
Soundtrack System - Loudspeaker Paradigm - Free user manual and instructions
Find the device manual for free Soundtrack System Paradigm in PDF.
| Product Type | Soundbar with wireless subwoofer |
| Brand | Paradigm |
| Model | Soundtrack System |
| Category | Speaker (soundbar system) |
| Soundbar dimensions (H x W x D) | 13.5 x 92.3 x 7.3 cm (including feet) |
| Soundbar weight (unboxed) | 3.34 kg |
| Subwoofer dimensions (H x W x D) | 36.0 x 46.4 x 16.0 cm (stand adds 1.9 cm height) |
| Subwoofer weight (unboxed, without stand) | 5.08 kg |
| Soundbar amplifier power | 2 x 50 Watts RMS |
| Subwoofer amplifier power | 120 Watts RMS (240 W peak) |
| Total frequency response | 40 Hz – 20 kHz |
| Wireless connection | 2.4 GHz, range up to 15 m (50 ft) |
| Inputs | Digital optical, RCA (Line-Level) |
| Main functions | Remote control, IR learning, volume control, mute, input selection, wireless pairing |
| Care and cleaning | Wipe gently with a soft damp cloth. Do not use abrasive cleaners. |
| Safety | Do not expose to rain or moisture. Do not open. Serviceable parts only by qualified technician. |
| Warranty | 1 year limited (parts and labor) |
| Finish | Matte black |
Frequently Asked Questions - Soundtrack System Paradigm
User questions about Soundtrack System Paradigm
0 question about this device. Answer the ones you know or ask your own.
Ask a new question about this device
Download the instructions for your Loudspeaker in PDF format for free! Find your manual Soundtrack System - Paradigm and take your electronic device back in hand. On this page are published all the documents necessary for the use of your device. Soundtrack System by Paradigm.
USER MANUAL Soundtrack System Paradigm
The Official Sound of YOU™
soundtrack™
System

RECYCLING AND REUSE GUIDELINES FOR EUROPE
In accordance with the European Union WEEE (Waste Electrical and Electronic Equipment) directive effective August 13, 2005, we would like to notify you that this product may contain regulated materials which, upon disposal, according to the WEEE directive, require special reuse and recycling processing. For this reason Paradigm Electronics Inc. (manufacturers of Paradigm speakers and Anthem Electronics) has arranged with our distributors in European Union member nations to collect and recycle this product at no cost to you. To find your local distributor please contact the dealer from whom you purchased this product or go to our website at www.paradigm.com/shift. Please note that the product only falls under the WEEE directive. When disposing of packing and other shipping material we encourage you to recycle through the normal channels.
This device contains FCC ID: XCO-SUBWOOFER and FCC ID: XCO-SOUNDBAR. This device complies with Part 15 of the FCC Rules. Operation is subject to the following two conditions: (1) This device may not cause harmful interference, and (2) This device must accept any interference received, including information that may cause undesired operation. Changes or modifications not expressly approved by the party responsible for compliance could void the user's authority to operate the equipment.
WIRELESS TRANSMITTER COMPLIANCE INFORMATION
The term "IC" before the radio certification number only signifies that Industry Canada technical specifications were met. This equipment complies with FCC and IC radiation exposure limits set forth for an uncontrolled environment. This equipment should be installed and operated with minimum distance 20cm between the radiator and your body. This transmitter must not be co-located or operating in conjunction with any other antenna or transmitter. To reduce potential radio interference to other users, the antenna type and its gain should be so chosen that the equivalent isotropically radiated power (e.i.r.p.) is not more than that permitted for successful communication.

DOLBY DIGITAL
Dolby and the double-D symbol are registered trademarks of Dolby Laboratories.
TABLE OF CONTENTS
Safety Precautions 1
Important Safety Instructions 2
Serial Number 3
About Paradigm. 3
About Your Soundtrack System 3
Break-In. 4
Cleaning 4
Placement 4
Soundbar: On a credenza or shelf. 4
Soundbar: On a wall 4
Subwoofer: Positioned Vertically 4
Subwoofer: Positioned Horizontally. 4
Wall Mounting. 5
Control 6
Remote Control. 6
Onboard Interface 6
IR Learning Codes 7
Connection 7
Setting up the Soundbar 7
Setting up the Subwoofer 7
Wireless Subwoofer Operation....8
Wired Subwoofer Operation 8
Technical Specifications 9
Limited Warranty 10
SAFETY PRECAUTIONS
READ THIS SECTION CAREFULLY BEFORE PROCEEDING!

WARNING!
RISK OF ELECTRIC SHOCK DO NOT OPEN

WARNING: TO REDUCE THE RISK OF ELECTRIC SHOCK, DO NOT REMOVE COVER (OR BACK). NO USER-SERVICEABLE PARTS INSIDE. REFER SERVICING TO QUALIFIED SERVICE PERSONNEL.
WARNING: TO REDUCE THE RISK OF FIRE OR ELECTRIC SHOCK, DO NOT EXPOSE THIS APPARATUS TO RAIN OR MOISTURE, AND OBJECTS FILLED WITH LIQUIDS, SUCH AS VASES, SHOULD NOT BE PLACED ON THIS APPARATUS.
CAUTION: TO PREVENT ELECTRIC SHOCK, MATCH WIDE BLADE OF PLUG TO WIDE SLOT, FULLY INSERT.

The lightning flash with arrowhead symbol within an equilateral triangle, is intended to alert the user to the presence of uninsulated "Dangerous voltage" within the product's enclosure that may be of sufficient magnitude to constitute a risk of electric shock to persons.

The exclamation point within an equilateral triangle is intended to alert the user to the presence of important operating and maintenance (Servicing) instructions in the literature accompanying the product.
WARNING: UNIT MAY BECOME HOT. ALWAYS PROVIDE ADEQUATE VENTILATION TO ALLOW FOR COOLING. DO NOT PLACE NEAR A HEAT SOURCE, OR IN SPACES THAT CAN RESTRICT VENTILATION.
CAUTION: FOR CONTINUED PROTECTION AGAINST RISK OF FIRE, REPLACE THE FUSE ONLY WITH THE SAME AMPERAGE AND VOLTAGE TYPE. REFER REPLACEMENT TO QUALIFIED SERVICE PERSONNEL.
IMPORTANT SAFETY INSTRUCTIONS
- Read these instructions.
- Keep these instructions.
- Heed all warnings.
- Follow all instructions.
- Do not use this apparatus near water.
- Clean only with dry a cloth.
- Do not block any ventilation openings. Install in accordance with the manufacturer's instructions.
- Do not install near any heat sources such as radiators, heat registers, stoves, or other apparatus (including amplifiers) that produce heat.
- Do not defeat the safety purpose of the polarized or grounding type plug. A polarized plug has two blades with one wider than the other. A grounding type plug has two blades and a third grounding prong. The wide blade or the third prong are provided for your safety. If the provided plug does not fit into your outlet, consult an electrician for replacement of the obsolete outlet.
-
Protect the power cord from being walked on or pinched, particularly at plugs, convenience receptacles and the point where they exit from the apparatus.
-
Only use attachments/accessories specified by the manufacturer.
-
Use only with the cart, stand, tripod, bracket, or table

Use only with the cart, stand, tripod, bracket, or table
the manufacturer or sold with the /hen a cart is used, use caution when cart/ apparatus combination, to avoid
injury from tip-over.
-
Unplug this apparatus during lightning storms or when unused for long periods of time.
-
Refer all servicing to qualified service personnel. Servicing is required when the apparatus has been damaged in any way, such as power-supply cord or plug is damaged, liquid has been spilled or objects have fallen into the apparatus, the apparatus has been exposed to rain or moisture, does not operate normally, or has been dropped.
-
Use the mains plug to disconnect the apparatus from the mains or "TO COMPLETELY DISCONNECT THIS APPARATUS FROM THE AC MAINS, DISCONNECT THE POWER SUPPLY CORD PLUG FROM THE AC RECEPTACLE.
-
"WARNING – TO REDUCE THE RISK OF FIRE OR ELECTRIC – SHOCK, DO NOT EXPOSE THIS APPARATUS TO RAIN OR MOISTURE"
-
"DO NOT EXPOSE THIS EQUIPMENT TO DRIPPING OR SPLASHING AND ENSURE THAT NO OBJECTS FILLED WITH LIQUIDS, SUCH AS VASES, ARE PLACED ON THE EQUIPMENT."
-
"THE MAINS PLUG OF THE POWER SUPPLY CORD SHALL REMAIN READILY OPERABLE."
SERIAL NUMBER
The product's serial number is located on the rear panel of both soundbar and subwoofer. In the event that you need to contact Paradigm about your system, please have the following information recorded:
Serial Number: ____
Retail Outlet or Website where Product was Purchased:
Retail Outlet Phone Number: ____
Purchase Date: ____
ABOUT PARADIGM
In the early 1980s Paradigm was just an idea in the minds of a couple of twenty somethings who loved music. Unlike today, there was no 225,000 square-foot factory, no 36,000-cu.-ft. on-site anechoic measurement chamber, just a desire to make really good sounding speakers and sell them at a down to earth price. Today our speakers are sold on six continents. We've been voted #1 speaker brand 22 times* and fans scour the web to buy used versions of our original speakers. That should tell you something about Paradigm quality. In our SHIFT™ Series, we've taken everything we've learned about sound and adapted it for today's more casual listening formats. For more info visit us: www.paradigm.com.
*Rated #1 Best Price/Value. Inside Track Dealer Survey. An annual independent nationwide survey of consumer electronics specialist retailers and custom installers.
ABOUT YOUR SOUNDTRACK SYSTEM
Your Soundtrack System is a high-performance design loaded with Paradigm technology. In other words, it's got loads of very cool stuff you won't find in any other soundbar subwoofer system. For those who salivate over technical details, we've also included a Tech Specs section in the back of the manual to give you the skinny on why your Soundtrack system sounds so good!
The difference the Soundtrack system will make to your television, music and movies can't be put into words, but you'll hear it and you'll feel it. It's an experience that takes you beyond a high performance system to a place where you're absolutely lost in the experience. It's the Paradigm Difference. We guarantee you won't be able to keep that difference a secret and we hope you don't. Spread the word. Talk about your Paradigm system. BRAG about it. Play it and let others listen.
We're all different and our sound should reflect that. Some of us like music, others love movies, others are gaming enthusiasts and others enjoy all of it. No matter who you are or where you live, what you like or what you do, we want to be The Official Sound of YOU ^1 .
Read this manual and follow all instructions. If you still have questions visit the Q&A page on our website at www.paradigm.com/shift.
BREAK-IN
Although your system will sound great 'out of the carton' it will sound even better when broken in. Allow it to operate for several hours before you listen critically.
CLEANING
Do not use strong or abrasive cleaners on your Soundtrack System. Gently wipe the cabinets with a damp soft cloth.
PLACEMENT
Soundbar: On a credenza or shelf (Fig. 1)
The Soundtrack soundbar must sit on a flat surface directly below your video display. Supplied stability feet must be attached. See the enclosed Setup Guide for how to attach the feet.

natural_image
Line drawing of a flat-screen monitor mounted on a stand, labeled Fig. 1 (no text or symbols on the device itself)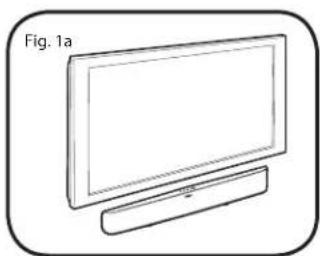
natural_image
Line drawing of a flat-screen TV with a stand (no text or symbols)Soundbar: On a wall (Fig. 1a)
For more information refer to the 'Wall Mounting' section.
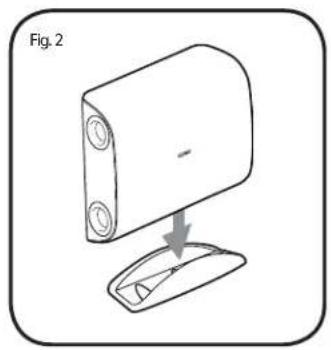
Subwoofer
The Soundtrack subwoofer can be positioned horizontally or vertically.
Vertical: If using the subwoofer in the vertical position, it must sit in the supplied cradle (Fig. 2).
Horizontal: If using the subwoofer in the horizontal position, the supplied feet must be attached to allow for adequate heat dissipation (Fig. 2a). Refer to the Startup Guide for how to attach feet.
natural_image
Diagram of a computer monitor with an arrow indicating the process, labeled 'Fig. 2' (no text or symbols on the diagram itself)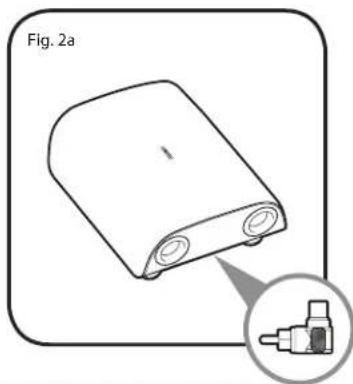
natural_image
Diagram of a device labeled Fig. 2a showing a rectangular component with two ports and an inset close-up of a plug (no text or symbols present)IMPORTANT! WIRED SUBWOOFER CONNECTION ONLY
When positioning the subwoofer horizontally in a wired connection, use the supplied 90° RCA adapter (see inset) to allow easier cable hookup. The adaptor is not necessary in a wireless configuration.
WALL MOUNTING

Paradigm does not supply screws and anchor bolts to mount your soundbar to a wall. Although we do provide limited instructions for wall mounting, you must contact a Paradigm Dealer for more information. The subwoofer is not designed to be wall mounted.

The instructions that follow assume the mounting surface is standard wood studs. Should you wish to mount to another type of surface you must consult a certified contractor.
What's Included
2 x Wall-Mounting Brackets
1 x Wall-Mounting Template
Recommended Tools (not included)
1 x Stud Finder
1 x Level
1 x Electric drill and appropriate drill bits
1 x Phillips Screwdriver
Recommended Hardware (not included)
4 x Screws to suit mounting surface and weight of soundbar.
4 x Wall anchors to suit mounting surface and weight of soundbar.
(NOTE: Soundbar weighs 7.35 lb / 3.34 kg)
Mounting Steps
Step 1
Establish desired mounting location.
Step 2
Lightly tape the supplied Installation Template to the wall in the correct position, using a level for accuracy. Mark the locations of the two screws on the wall. (Fig. 3)


natural_image
Illustration of a hand placing a small object into a wooden panel, labeled Fig. 4 (no text or symbols on the diagram itself)Step 3
Using a stud finder, determine if there is a wall stud directly behind the chosen location. (Fig. 4)
Step 4
a) If a wall stud is found, drill a pilot hole into the stud at each mark, then move to Step 5. OR
b) If no stud is found, install wall anchors at each mark following the instructions for the type of wall anchor you are using. CAUTION: We strongly recommend contacting a professional contractor for this type of installation. Every effort has been made to provide accurate and error-free installation instructions. Paradigm Electronics Inc. disclaims liability for difficulties that may arise from the misinterpretation of information contained in these instructions.
Step 5
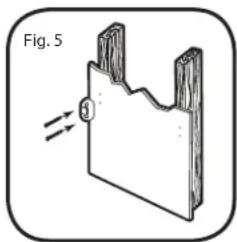
Using the screws, attach the first wall bracket to the wall. DO NOT completely tighten screws (Fig. 5).
Step 6
Repeat all steps for the second bracket. Use a level to make sure the brackets are completely straight before tightening screws.
IMPORTANT: Attach audio cables BEFORE mounting soundbar to wall brackets. See Set-Up Guide for how to attach cables.
Step 7
Move soundbar into place directly over brackets and gently push it to the wall making direct contact with brackets. You will hear a CLICK as each bracket makes contact with the soundbar. DO NOT release soundbar from your grasp until you hear those two clicks.
CONTROL
Remote Control
The supplied remote requires one lithium battery (included). The remote turns the power on and off, switches between inputs and controls volume.
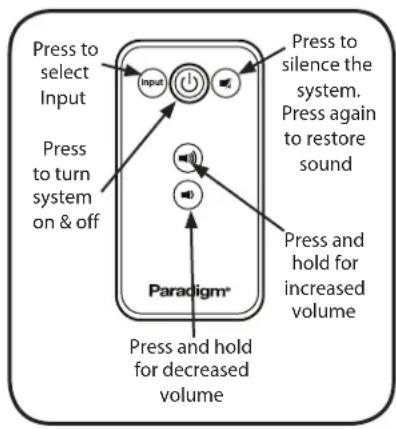
Onboard Interface

Press to turn
system
on and off

Press to select Input

Press to synch soundbar and subwoofer
Battery Installation
Follow the diagram on the back of the Remote for correct insertion. + to + and - to -.
IMPORTANT:
If you lose the remote contact Paradigm at 1-905-696-2868 to purchase a new one. Loss of remote is not covered under Paradigm warranty.

Press and release to decrease volume
Press and release to increase volume
IR Learning Codes
Your Soundtrack System is capable of learning certain codes from remote controls you already own, such as the volume code from your TV's remote. Each code must be programmed in separately. To program, follow the steps below.
Step 1
Press and hold for 3 seconds the button on the soundbar's Onboard Interface for the desired function to be programmed (eg. volume, source, mute, on/off).
Step 2
The Soundtrack's LED will start to flash indicating that the system is now in 'IR learning' mode.
Step 3
Aim the source's remote control at the front of the soundbar and press the corresponding function button on the source's remote.
Step 4
Repeat from Step 1 to program each additional function.
NOTE: To learn a MUTE command from a remote control you already own, press the Sync button on top of the soundbar for 3 seconds then move to Step 2 above.
Your existing cable/satellite box remote control or TV remote control may use a code that the Soundtrack System cannot learn. In these instances you will have to use the remote control that came with your system or use a universal or learning remote control.
CONNECTION
For quick setup of soundbar and subwoofer, refer to the instructions in the Set-Up Guide.
SETTING UP THE SOUNDBAR
See Set-Up Guide.
SETTING UP THE SUBWOOFER

(Shown) Back panel of Subwoofer. See pg. 8 for description of numbered functions.
1 Status LED. Indicates connection status between the subwoofer and soundbar (e.g. Not Paired, Searching for Connection, Paired). For additional information refer to the Set-Up Guide.
2 Line-Level Input (for use in a wired subwoofer connection only) Allows connection from the wired Sub Out of the soundbar or Sub/LFE Out of an external A/V receiver, processor or other suitable low-level source. IMPORTANT: Do not connect a cable to the Line-Level Input if you have already set-up a wireless subwoofer connection.
3 Pair. This feature initiates wireless pairing between the subwoofer and the soundbar's transmitter inside the soundbar.
4 Subwoofer Level. Balances the subwoofer's output level to that of the soundbar. See Set-Up Guide for more information.
WIRELESS OPERATION
Transmitter Range
In a typical listening room the built-in wireless transmitter in your soundbar has a maximum range of 50' (15 m). Obstructions such as walls, large pieces of furniture, room dividers, etc., may reduce that range. Do not place the soundbar and subwoofer farther apart than the recommended range.
The soundbar's wireless transmitter features a 2.4 GHz uncompressed digital self-sensing design that will automatically adjust for the best wireless connection while monitoring the integrity of the data stream.
See Set-Up Guide for synching instructions.
WIRED OPERATION

TECHNICAL SPECIFICATIONS
Soundbar
| Design | 2 isolated, identical channels for Left and Right. Left Channel: 2-driver, 2-way plus single passive radiator. Right Channel: 2-driver, 2-way plus single passive radiator. Molded ABS enclosure with matte finish. |
| Crossover 3rd-order electro-acoustic at 2.4 kHz. | |
| High-Frequency Driver (per channel) | 1 x 25-mm (1 in) S-PALTM satin-anodized pure-aluminum dome tweeter. |
| Bass / Midrange Driver (per channel) | 1 x 102-mm (4") composite cone, 37-mm (1-1/2") voice coil. |
| Passive Radiator (per channel) | 1 x 102-mm (4") composite. |
| Low-Frequency Extension* 90 Hz (DIN) | |
| Frequency Response On-Axis ±2 dB 140 Hz - 20 kHz30° Off-Axis ±2 dB 140 Hz - 20 kHz | |
| Total System Frequency Response 40 Hz - 20 kHz | |
| Sensitivity - Room / Anechoic | 88 dB / 85 dB |
| Total Amplifier Power | 2 x 50 Watts |
| Inputs | Optical digital; RCA to RCA |
| H x W x D (including feet) | 5-5/16 in x 36-3/8 in x 2-15/16 in / 13.5 cm x 92.3 cm x 7.3 cm |
| Weight (unpacked) | 7.35 lb / 3.34 kg |
| Finish | Black |
| Accessories (included) | Stability feet and screws |
TECHNICAL SPECIFICATIONS (cont'd ...)
Subwoofer
| Subwoofer Design | Single driver, bass-reflex design, dual low-turbulence tuned ports,built-in amplifier. Molded ABS enclosure with matte finish |
| Amplifier Design: High-current, Discrete Output | Ultra-Class-D ^TM amplifier: 120 watts RMS Sustained / 240 watts Peak Power |
| Amplifier Features Auto-On / Standby, soft clipping | |
| Bass Driver38-mm (1-1/2 in) voice-coil | 210-mm (8 in) reinforced polymer-composite cone, |
| Low-Frequency Extension* 33 Hz (DIN) | |
| Subwoofer Cut-Off Frequency 150 Hz fixed | |
| H x W x D (cradle adds 3/4 in / 1.90 cm to height)** | 14-3/16 in x 18-5/16 in x 6-5/16 in / 36.0 cm x 46.4 cm x 16.0 cm |
| Weight (unpacked, stand adds 0.70 lb / .32kg) | 11.2 lb / 5.08 kg |
| Finish Black |
*DIN 45 500. Indicates -3 dB in a typical listening room. **Feet add 1 in / 2.5 cm to height in horizontal position.
LIMITED WARRANTY
Paradigm warrants this product against defects in materials and workmanship under normal use and operation for a period of one (1) year from the date of retail purchase by the original end-user purchaser. For warranty purposes you must retain your sales receipt and this Owners Manual for warranty to be valid. For additional product support, call Paradigm at 905-696-2868 or email service@paradigm.com.
Paradigm ^MD
natural_image
Line drawing of a flat-screen TV mounted on a stand, labeled Fig. 1 (no text or symbols on the device itself)
natural_image
Line drawing of a flat-screen monitor with a stand (no text or symbols)natural_image
Diagram of a computer monitor with a base, showing an arrow pointing to the screen (no text or symbols present)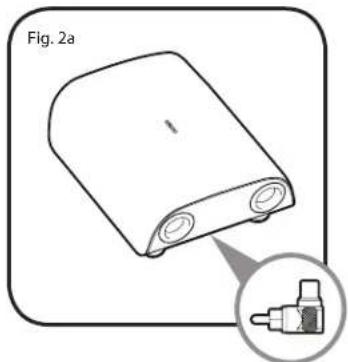
natural_image
Diagram of a battery pack labeled Fig. 2a, showing two cylindrical components with an inset close-up of the plug (no text or symbols on the diagram itself)RACCORDEMENT CÂBLÉ DU CAISSON DE SOUS-GRAVES UNIQUEMENT
natural_image
Illustration of a hand placing a small object into a wooden block, labeled Fig. 4 (no text or symbols on the diagram itself)Étape 3
Control remoto....32
Interfaz integrada .....32
natural_image
Line drawing of a monitor on a stand, labeled Fig. 1 (no text or symbols on the device itself)
natural_image
Line drawing of a flat-screen monitor with a stand, labeled Fig. 1a (no text or symbols on the device itself)natural_image
Diagram of a device with a screen and a base, showing an arrow pointing to it (no text or symbols present)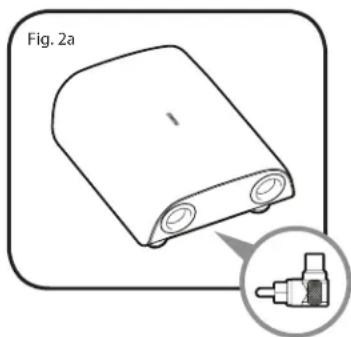
natural_image
Diagram of a device labeled Fig. 2a showing a rectangular block with two circular ports and an inset close-up of a plug (no text or symbols present)natural_image
Illustration of a hand placing a small object into a rectangular block, with no visible text or symbols.Paso 3
natural_image
Diagram of a folded paper or sheet with a circular arrow indicating direction, labeled 'Fig. 5' (no text or symbols on the diagram itself)Paso 5
Paradigm, Soundtrack™ System and all associated proprietary and patented designs and technologies are registered trademarks of Paradigm Electronics Inc. Copyright © Paradigm Electronics Inc. All rights reserved. All other trademarks are the property of their respective owner(s). Paradigm Electronics reserves the right to change specifications and/or features without notice as design improvements are incorporated.
Paradigm Electronics Inc.
205 Annagem Blvd., Mississauga, ON Canada L5T 2V1
REV. 101212


For more information visit www.paradigm.com


- RECYCLING AND REUSE GUIDELINES FOR EUROPE
- WIRELESS TRANSMITTER COMPLIANCE INFORMATION
- DOLBY DIGITAL
- TABLE OF CONTENTS
- SAFETY PRECAUTIONS
- READ THIS SECTION CAREFULLY BEFORE PROCEEDING!
- WARNING!
- RISK OF ELECTRIC SHOCK DO NOT OPEN
- IMPORTANT SAFETY INSTRUCTIONS
- SERIAL NUMBER
- ABOUT PARADIGM
- ABOUT YOUR SOUNDTRACK SYSTEM
- BREAK-IN
- CLEANING
- PLACEMENT
- Soundbar: On a credenza or shelf (Fig. 1)
- Subwoofer
- IMPORTANT! WIRED SUBWOOFER CONNECTION ONLY
- WALL MOUNTING
- What's Included
- Recommended Tools (not included)
- Mounting Steps
- Step 1
- Step 2
- Step 3
- Step 4
- Step 5
- Step 6
- IMPORTANT: Attach audio cables BEFORE mounting soundbar to wall brackets. See Set-Up Guide for how to attach cables.
- Step 7
- CONTROL
- Remote Control
- Onboard Interface
- Battery Installation
- IMPORTANT:
- IR Learning Codes
- CONNECTION
- SETTING UP THE SOUNDBAR
- SETTING UP THE SUBWOOFER
- WIRELESS OPERATION
- Transmitter Range
- TECHNICAL SPECIFICATIONS
- TECHNICAL SPECIFICATIONS (cont'd ...)
- LIMITED WARRANTY
- Paradigm MD
- RACCORDEMENT CÂBLÉ DU CAISSON DE SOUS-GRAVES UNIQUEMENT
- Étape 3
- Paso 3
- Paso 5
Brand : Paradigm
Model : Soundtrack System
Category : Loudspeaker