
SFC12-SW - Loudspeaker Paradigm - Free user manual and instructions
Find the device manual for free SFC12-SW Paradigm in PDF.

| Product Type | In-wall subwoofer |
| Model | SFC12-SW |
| Brand | Paradigm |
| Category | Speaker |
| Impedance | 8 ohms |
| Amplifier Compatibility | Paradigm Subwoofer Amplifier (use with other brands voids warranty) |
| Mounting Type | In-wall |
| Finish | Neutral white, paintable |
| Grille | Metal grille, magnetically attached |
| Paintability | Yes – paint before installation; do not paint behind grille or rear surface |
| Break-In Period | Several hours of operation before critical listening |
| Cleaning | Soft damp cloth; avoid strong/abrasive cleaners |
| Warranty | 3 years from original retail purchase (manufacturing defects) |
| Warranty Void Conditions | Abuse, unsuitable equipment, unauthorized service, removed serial number, commercial use |
| Recommended Amplifier Impedance | Compatible with 8 ohm amplifier outputs |
| Placement Recommendation | In-wall near a corner at front or rear of room |
| Two Subwoofers Benefit | Uniform bass distribution, lower distortion |
| Cavity Damping Requirement | Minimum R12 insulation (40” pieces folded) above and below cutout |
| Additional Bracing Recommendation | 2x4” cross-bracing within cavity |
| Installation Tool | Power drill on low setting recommended |
| Impédance Matching Switch | Must be positioned correctly for amplifier |
| WEEE Compliance | European Union – free recycling through distributor |
| Included Accessories | Subwoofer, grille, mounting template |
Frequently Asked Questions - SFC12-SW Paradigm
User questions about SFC12-SW Paradigm
0 question about this device. Answer the ones you know or ask your own.
Ask a new question about this device
Download the instructions for your Loudspeaker in PDF format for free! Find your manual SFC12-SW - Paradigm and take your electronic device back in hand. On this page are published all the documents necessary for the use of your device. SFC12-SW by Paradigm.
USER MANUAL SFC12-SW Paradigm
natural_image
Technical line drawing of a mechanical component with internal channels and mounting holes (no text or symbols)
RECYCLING AND REUSE GUIDELINES FOR EUROPE
In accordance with the European Union WEEE (Waste Electrical and Electronic Equipment) directive effective August 13, 2005, we would like to notify you that this product may contain regulated materials which, upon disposal, according to the WEEE directive, require special reuse and recycling processing. For this reason Paradigm Electronics Inc. (manufacturers of Paradigm ^® speakers and Anthem ^® Electronics) has arranged with its distributors in European Union member nations to collect and recycle this product at no cost to you. To find your local distributor please contact the dealer from whom you purchased this product or go to our website at www.paradigm.com.
Please note that only the product falls under the WEEE directive. When disposing of packaging and other shipping material we encourage you to recycle through the normal channels.
TABLE OF CONTENTS
Important Operating Instructions: Read Before Operating Subwoofer. . 2
Subwoofer Assembly Parts List .... 2
Your New Subwoofer .... 3
The Listening Room .... 3
Guidelines for Deciding on Subwoofer Placement .... 3
Subwoofer Placement .... 4
Color-Match Painting....5
Damping In-Wall Cavity
Preparation 6
Wiring Connections ..... 7
Subwoofer Installation....7
Limited Warranty 9
IMPORTANT OPERATING INSTRUCTIONS: READ BEFORE OPERATING SUBWOOFER
TO PREVENT DAMAGE TO AMPLIFIER OR SUBWOOFER, FOLLOW THE INSTRUCTIONS THAT RELATE TO YOUR SETUP BELOW. FAILURE TO FOLLOW THESE INSTRUCTIONS WILL RESULT IN PERMANENT DAMAGE TO AMPLIFIER AND SUBWOOFER. SUCH DAMAGE IS NOT COVERED UNDER THE PARADIGM WARRANTY.
POSITIONING THE IMPEDANCE MATCHING SWITCH:

TO PREVENT DAMAGE TO AMPLIFIER OR SUBWOOFER, THE IMPEDANCE MATCHING SWITCH ON YOUR SUBWOOFER'S BAFFLE MUST BE POSITIONED FOR USE WITH THE DESIGNATED AMPLIFIER.
SUBWOOFER ASSEMBLY PARTS LIST (Each Subwoofer)
- 1 subwoofer
• 1 subwoofer grille
• 1 mounting template
YOUR NEW SUBWOOFER
Break-In
Allow your Paradigm® Reference subwoofer system to operate for several hours before you listen critically.
Cleaning
Clean subwoofer housing with a soft, damp cloth. Do not use a strong or abrasive cleaner or get any part of the subwoofer wet.
If you wish to paint your subwoofer you must do so before installing it. See the section on "Color Match Painting" later in this manual for full details.
THE LISTENING ROOM
Paradigm® Reference in-wall subwoofers are suitable for use in a wide variety of listening environments. Note however, that room construction, dimensions and furnishings all play a part in the quality of sound you ultimately achieve. Try to follow these guidelines:
a. Strong, rigid walls are preferred for best bass balance. For even better results we recommend adding additional bracing and acoustic damping material to the cavity prior to installation. See section on Installation later in this manual for more details.
b. It is important to note that just as the amount of soft furnishings has a decided impact on mid and high frequencies, those frequencies below 150 Hz are dramatically affected by the room itself — its size, shape, as well as the physical boundaries of the room.
The extra care you take in correctly positioning your subwoofers will result in greater listening enjoyment. Follow the guidelines for placement below to achieve optimal sound in your room.
GUIDELINES FOR DECIDING ON SUBWOOFER PLACEMENT
When considering subwoofer placement directly into a wall, keep the following in mind:
- DO NOT install subwoofer in lath or plaster — over time, the bass vibrations will cause material to crack;
• DO NOT install subwoofer in cavities that contain ductwork; - DO NOT locate subwoofer close to wall-mounted fixtures that may vibrate (remember to check the other side of the wall too!);
- DO NOT install subwoofer in a cavity that already contains an in-wall speaker;
- If installing subwoofer in a wall with metal studs, make sure the studs are securely fastened so that they do not vibrate or rattle;
- Some acoustic bleed-through in the adjacent room is unavoidable. See section on Installation later in this manual for suggestions to reduce bleed-through.
Guidelines and suggestions for the actual installation process can be found later in this manual.
SUBWOOFER PLACEMENT
Bass is less and less directional as it goes down in frequency. For best sonic integration, placing your subwoofer in the wall at the front or rear of the room and close to a corner usually provides the best bass performance and sonic integration. If this location is not possible, keeping in mind the guidelines provided earlier, you may place your subwoofer anywhere in the wall without affecting the stereo image of your front speakers or the soundstage of your multi-channel speaker system.
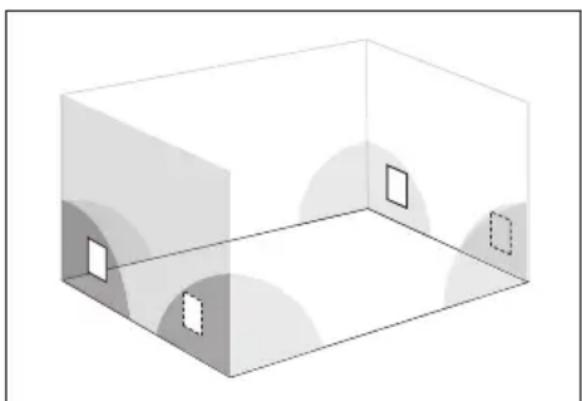
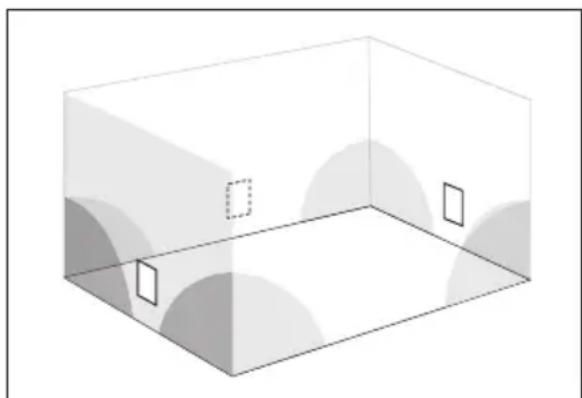
Figs. 1a and 1b below highlight how bass output is generally affected by in-wall placement. When seated in the typical listening area of your room, placing the subwoofers in the various positions will typically result in bass performance as follows: Guidelines and suggestions for the actual installation process can be found later in this manual.
Fig. 1a: Corner placement close to the floor provides the best balance of output and accuracy.
Fig. 1b: Placement anywhere along the wall close to the floor but outside the “shaded” area will provide slightly reduced output, though still acceptable accuracy.
The Advantages of Using Two Subwoofers
We highly recommend using two Paradigm® Reference in-wall subwoofers in your music and home theater system. Using two subwoofers allows you to randomize the standing waves within your listening room so that bass is distributed in a more uniform manner. Using two subwoofers can also ensure even lower distortion, especially at high output levels.
If desired, for further optimized bass performance and even greater output, you can install an additional pair of Paradigm® Reference in-wall subwoofers. Figure 2 provides recommended placement for four subwoofers.
Broken lines in figures below represent alternate placement for two subwoofers.
natural_image
Isometric diagram of a 3D rectangular room with internal geometric shapes and no text or symbolsFig. 1a Two subwoofers close to floor in corners of room
natural_image
3D wireframe diagram of a rectangular box with internal circular cutouts and two square cutouts (no text or symbols)Fig. 1b Two subwoofers close to floor in middle of walls

natural_image
Simple line drawing of a sofa with hands placed on top, no text or symbols presentFig. 2 Recommended placement for four subwoofers in a wall
COLOR MATCH PAINTING (Optional)
Your new subwoofer has a textured finish in neutral white to blend into any area. It may also be painted to match any décor. If you plan to paint your subwoofer, to avoid "painting it to the wall", we recommend that you paint it before installation.
Please note:
• Do not paint the surface behind the grille.
• Do not heat-cure your newly painted subwoofer.
- Avoid painting the subwoofer's rear surface.
To Paint, Follow These Steps:
- Remove the metal grille;
- In a well-ventilated area, apply several light coats of paint, letting the grille dry completely between coats. Follow the paint manufacturer's directions;
- When painting grille, be careful not to plug holes with paint and re-attach after paint has dried. It is easier to spray the grille than to use a brush. Remove grille before painting.
DAMPING IN-WALL CAVITY PREPARATION
DAMPING
Damping Material and Other Acoustic Treatments TIP! Additional soundproofing treatments (i.e. Dynamat®) can be used against the back wall of the cavity as well as on the inside front of the wall (see Dealer for more information).
Damping the Cavity: For optimum performance, loosely place a minimum of ...
- Two pieces of R12 insulation, both 40" folded in 3 to be a bit over 12" in length.
- Above the woofer place the first piece roughly 12" above the top of the cut out.
• Below the woofer place the second piece roughly 10" below the cut out.
STIFFENING AND STRENGTHENING THE CAVITY
Although Paradigm® in-wall mounting systems are the most rigid on the market, when installing your subwoofer directly into a wall, to minimize acoustic bleed-through, we recommend the following:
Additional Bracing
Additional cross-bracing will further stiffen the cavity. We suggest placing two to three pieces of 2" x 4" (more if application allows) within the cavity, evenly spaced above and below the cutout. Additional bracing can also be sandwiched to the studs on either side of the subwoofer.
New Construction
New construction offers an excellent opportunity to strengthen and stiffen the cavity with additional bracing or construction-grade stiffening adhesives applied directly to the drywall. (See Dealer for more information.)
1) Place the mounting template onto the wall. Use a level to make sure it's straight (Fig 3a).
2) Trace along the mounting template cut-out (Fig. 3b).

natural_image
Line drawing of a person holding a transparent box with a door, next to an open door (no text or symbols)
natural_image
Line drawing of a hand holding a blank sheet with a pen, no text or symbols presentFig. 3a Fig. 3b
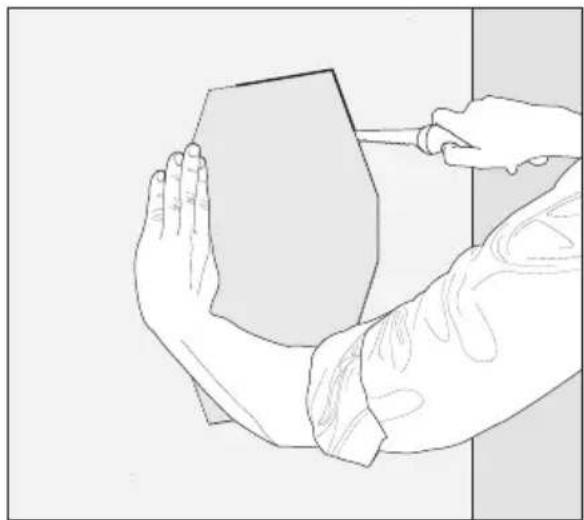
3) Cut a hole as indicated (Fig. 3c).
natural_image
Line drawing of a hand holding a geometric object with a tool, no text or symbols presentFig. 3c
WIRING CONNECTIONS
The SFC12-SW presents a load that is compatible with 8 ohms. Please refer to your amplifiers Owner's Manual for it's specific capabilities and wiring instructions.
SUBWOOFER INSTALLATION
IMPORTANT! While it is possible to use a manual screwdriver for installation, we strongly suggest using a power drill. To avoid damaging or breaking the clamps, set your drill to a LOW setting. A high power setting is NOT necessary and may cause clamps to crack or break from the added force. Such damage is NOT covered under warranty.
1) Set your Power Drill to the Low setting.
2) Gently position the assembly into the wall cavity (Fig. 3d).
3) Supporting the assembly with one hand, tighten each screw (Fig. 3e). Stop tightening when you sense resistance.

natural_image
Person installing or adjusting a rectangular electronic device with a scroll wheel (no text or symbols visible)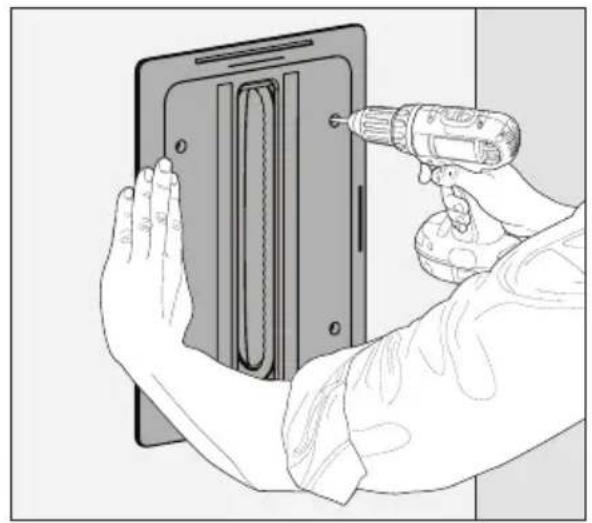
natural_image
Illustration of a hand using a power tool to install a wall-mounted panel (no text or symbols visible)Fig. 3d Fig. 3e
4) Gently press the grille onto the front face of the speaker (Fig. 3f). The magnets will ensure correct attachment.

natural_image
Illustration of hands installing or adjusting a tablet device on a stand (no text or symbols visible)
natural_image
Simple line drawing of a rectangular frame with rounded corners, no text or symbols present.Fig. 3f Fig. 3g
LIMITED WARRANTY
IMPORTANT: Subwoofers covered by this manual are designed for use with a Paradigm® Subwoofer Amplifier only. Use with any other brand of amplifier can cause permanent damage and will void the Paradigm warranty.
Paradigm® subwoofers covered by this manual are warranted to be and remain free of manufacturing and/or material defects for a period of three (3) years from the date of the original retail purchase.
Within the time period specified repair, replacement or adjustment of parts for manufacturing and/or material defects will be free of charge to the original owner.
Thermal or mechanical abuse/misuse is not covered under warranty.
Limitations:
- Warranty begins on date of original retail purchase from an Authorized Paradigm® Dealer only. It is not transferable;
- Warranty applies to product in normal home use only. If the product is subjected to any of the conditions outlined in the next section, warranty is void;
- Warranty does not apply if the product is used in professional or commercial applications.
Warranty is Void if:
• The product has been abused (intentionally or accidentally);
• The product has been used in conjunction with unsuitable or faulty equipment;
- The product has been subjected to damaging signals, derangement in transport, mechanical damage or any abnormal conditions;
• The product has been tampered with or damaged by an unauthorized service facility;
• The serial number has been removed or defaced.
Owner Responsibilities:
- Provide normal/reasonable operating care and maintenance;
- Provide or pay for transportation charges for product to service facility;
- Provide proof of purchase (your sales receipt given at time of purchase from your Authorized Paradigm® Dealer).
Should servicing be required, contact your nearest Authorized Paradigm® Dealer, Paradigm® Electronics Inc., or Import Distributor (outside the U.S. and Canada) to arrange, bring in or ship prepaid any defective unit.
Visit our website at www.paradigm.com for more information.
Paradigm Electronics Inc. reserves the right to improve the design of any product without assuming any obligation to modify any product previously manufactured.
This warranty is in lieu of all other warranties expressed or implied, of merchantability, fitness for any particular purpose and may not be extended or enlarged by anyone. In no event shall Paradigm Electronics Inc., their agents, or representatives be responsible for any incidental or consequential damages. Some jurisdictions do not allow limitation of incidental or consequential damages, so this exclusion may not apply to you.
Retain this manual and your sales receipt for proof of warranty term and proof of purchase.
NOTES

natural_image
Blank white image with no visible content, text, or symbols.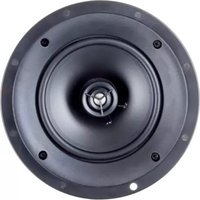

- RECYCLING AND REUSE GUIDELINES FOR EUROPE
- TABLE OF CONTENTS
- IMPORTANT OPERATING INSTRUCTIONS: READ BEFORE OPERATING SUBWOOFER
- SUBWOOFER ASSEMBLY PARTS LIST (Each Subwoofer)
- YOUR NEW SUBWOOFER
- Break-In
- Cleaning
- THE LISTENING ROOM
- GUIDELINES FOR DECIDING ON SUBWOOFER PLACEMENT
- SUBWOOFER PLACEMENT
- The Advantages of Using Two Subwoofers
- COLOR MATCH PAINTING (Optional)
- Please note:
- To Paint, Follow These Steps:
- DAMPING IN-WALL CAVITY PREPARATION
- DAMPING
- STIFFENING AND STRENGTHENING THE CAVITY
- Additional Bracing
- New Construction
- WIRING CONNECTIONS
- SUBWOOFER INSTALLATION
- LIMITED WARRANTY
- Limitations:
- Warranty is Void if:
- Owner Responsibilities:
- NOTES
Brand : Paradigm
Model : SFC12-SW
Category : Loudspeaker