Power 20001D - Car radio JENSEN - Free user manual and instructions
Find the device manual for free Power 20001D JENSEN in PDF.


| Product Type | Mono subwoofer amplifier |
| Brand | Jensen |
| Model | Power 20001D (Power 2000.1D) |
| Category | Car audio (amplifier) |
| Amplification class | Class D |
| RMS output power (1% THD+N, 14.4 VDC) | 425 W x 1 channel at 4 Ω, 675 W x 1 channel at 2 Ω, 900 W x 1 channel at 1 Ω |
| Minimum load impedance | 1 ohm |
| Signal-to-noise ratio | >100 dB (reference 1 W, 4 Ω) |
| Total harmonic distortion (THD+N) | 0.02% at 1 W, 125 Hz |
| Frequency response | 10 Hz to 300 Hz (-3 dB) |
| Low-pass filter | 40-300 Hz, 12 dB/octave |
| Subsonic filter | 16-40 Hz, 12 dB/octave |
| Variable bass equalizer | 0-12 dB at 45 Hz |
| Variable input level | 400 mV to 4 V |
| Phase inverter | 0°-180° |
| Remote input level control | Yes, with 5 m 3.5 mm cable |
| Supply voltage | 12 V DC, negative ground |
| Maximum current | 105 A |
| Recommended wire gauge | #4 AWG for power |
| Replaceable fuses | 3 x 35 A, type ATO |
| Built-in protections | Short circuit, DC offset, thermal overload |
| LED indicators | Green: power, Red: standby/fault |
| Warranty | 12 months (parts and labor) |
Frequently Asked Questions - Power 20001D JENSEN
User questions about Power 20001D JENSEN
0 question about this device. Answer the ones you know or ask your own.
Ask a new question about this device
Download the instructions for your Car radio in PDF format for free! Find your manual Power 20001D - JENSEN and take your electronic device back in hand. On this page are published all the documents necessary for the use of your device. Power 20001D by JENSEN.
USER MANUAL Power 20001D JENSEN
Introduction. 1
Features and Specifications 2
Installation 3
Power Wiring. 4
Speaker Wiring 6
Input Wiring 7
Indicators and Controls 8
Testing 9
Remote Input Level Control. 9
Troubleshooting 10
CEA Power Output 11
Contenido
The Jensen Power series of amplifiers were designed to meet or exceed the CEA-2010 test standards. These new standards give all participating manufacturers (and many don't participate) a baseline when comparing amplifiers of similar power output. The CEA Power rating protects you, the customer. "Power is power - it doesn't matter who makes it," is not always true. What does matter is whether the power can be produced in the first place. The RMS rating is the true power you are getting. At Jensen, to be fair to you and to the competition, we rate our amps in the two most popular ratings, including the CEA RMS rating. So feel confident that your Jensen purchase decision was a sound one, and remember "If it's Too Loud, You're Too Old."
Before You Begin
We need to get the legal stuff out of the way, so please keep reading. Afterwards, you'll be armed with the knowledge to install your new hard-hitting, speaker-pumping Jensen amplifier.
Exposure to loud sounds or music can permanently damage your hearing. Unfortunately, in many cases, the damage is not noticeable until years later. In addition, loud music may hinder your ability to hear traffic, police, and fire or emergency vehicles. Please be responsible and have respect for other people by listening at moderate volumes!
Warranty Service
If your Jensen amplifier should ever require service, you will need the original dated receipt. If you must return the unit for any reason, always include the receipt with the product.
POWER Amplifiers

Features and Specifications
Your new Jensen Power mobile mono power amplifier is the amplifier of choice for the high demands of auto sound reproduction. With its deep-bass reproduction and plenty of reserve power, low harmonic distortion and neutral reproduction, the Power series of amplifiers takes Mobile Hi-Fi to new heights. Like all Jensen products, when it comes to accurate sound reproduction the Power series takes a back seat to no one. Jensen will bring your Hi-Fi experience to new heights with the following features:
MOSFET Output and Power Supply
- Optimized Class D Design Minimizes Distortion and Reduces Idle Current
- Easily Drives 1-Ohm Loads
Pass-Thru RCA's
Variable Bass EQ0-12dB @ 45 Hz
- 12dB / Octave Low Pass and High Pass filters
Variable Input Level 400mV-4V
- Short Circuit, DC-offset and Thermal Overload Protection Circuitry
Diagnostic LED's -Green:Power,Red:Standby/Fault
Mono Subwoofer Amp
Low Pass Filter 40 - 300 Hz, 12dB / octave
Subsonic Filter 16-40 Hz, 12dB / octave
- Remote Input Level Control (Remote Bass Control) with 5 Meter Interface Cable
Phase Switch 0 - 180 degrees
- Signal to Noise @ 120 Hz: >100dB (Rated Power)
- Channel Separation Not Applicable
-THD+N @ 1 Watt: 0.02% 125 Hz, 14.4VDC
Power Output
RMS Power Output @ 2% THD+N, 1kHz, 14.4VDC
- 450 x 1 Watts, 4-Ohm
- 725 x 1 Watts, 2-Ohm
- 1000 x 1 Watts, 1-Ohm
Specifications subject to change without notice.

POWER Amplifiers
Installation
Before you begin the installation of your Power series amp remember, there are two ways to do things - right and twice! Use the proper installation techniques, tools and accessories to ensure that your Jensen Power series amp will put out all the power it was designed to. If necessary, seek a professional installer to have the amplifier installed correctly. Most mobile amp installations do not have the proper gauge wire for power and ground - do not let your amp be a victim of this common installation oversight!
NOTE: This device is a high-power audio amplifier intended for Installation in vehicles with a 12-Volt negative ground electrical system. Attempting to connect or operate the amplifier with another type of electrical system may cause damage to the amplifier or the electrical system.
Installation Assistance
For installation assistance, call 1-800-323-4815 during normal business hours, or visit www.jensen.com at any time.
Supplies and Tools Needed
To install the amplifier, you will need tools, supplies and adapters. It is best to make sure you have everything you need before you start.
Supplies
- Black electrical tape
- Amplifier Installation Kit
Tools
- Cordless drill with assortment of bits
- Flat-head and Philips screwdrivers
Wire cutters/strippers - Crimping tool
12-volt test light or digital multimeter - Wire brush, sandpaper or scraping tool (ground connection to vehicle should be a clean, unpainted metal surface)
Disconnect Battery
Disconnect the negative (-) battery cable before starting the installation. Check the battery ground (there should be two (2) ground wires coming from the battery - one going to the starter mounting bolt or engine block and another going to the vehicle chassis) and make sure the battery is grounded to the chassis with at least a #4 gauge wire. Also check the alternator connections, making sure they are tight and free from corrosion, rust or dirt.
Location and Mounting
The amplifier's compact design allows great flexibility in mounting. Common mounting locations include under the front passenger seat or in the trunk area.
When selecting a location, remember that amplifiers generate heat. Select a location on a flat surface away from heat and moisture where air can circulate around the amplifier.
Place the amplifier in the mounting location and mark the positions of the holes with a marker, pen or pencil. Carefully drill the mounting holes in the marked positions, then use the supplied mounting screws to securely fasten the amplifier to the mounting surface.
WARNING: Do not cover the amplifier with carpets or enclose it behind interior trim panels, and do not mount the amplifier in an inverted or upside down configuration. Be sure the mounting location and the drilling of pilot holes will not damage any wires, control cables, fuel lines, fuel tanks, hydraulic lines or other vehicle systems or components.
Routing Wires
Proper wiring connections are illustrated on the following pages. If wiring connections are made incorrectly, the unit will not operate properly and could become permanently damaged. Follow the installation instructions carefully, or have the amplifier installed by an experienced technician.
POWER Amplifiers

Power Wiring
Charging System
In some cases, the installation of just one (1) amplifier could be enough to overload your factory electrical system (i.e., alternator). Depending on the state of your electrical system and overall condition of your vehicle, you may need to upgrade your alternator and battery. After the vehicle is started, the alternator provides the power to your electrical system, not the battery. When the engine is running, the alternator is your main source of power. Upgrading the alternator should be your first consideration if you should experience a voltage drop in the system when operating your audio system. Adding capacitors and/or batteries without upgrading the alternator will only make the problem worse because these devices put an extra load on the alternator. After upgrading the alternator, capacitors and/or batteries can be installed if desired. Use the following recommended wire gauge as a guide when installing your amplifier(s):
| MODEL NUMBER | MAX CURRENT DRAW | MIN WIRE GAUGE |
| 2000.1D | 105A | #4 |
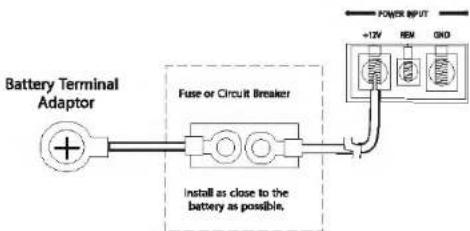
Power Terminal (+12V / B + )
Connect the main power wire to the battery, within 18 inches from the positive (+) battery post, using an adequate size fuse or circuit breaker capable of handling the current of the selected power wire. A fuse or circuit breaker must be installed to prevent a possible electrical fire should the main power wire short to ground.
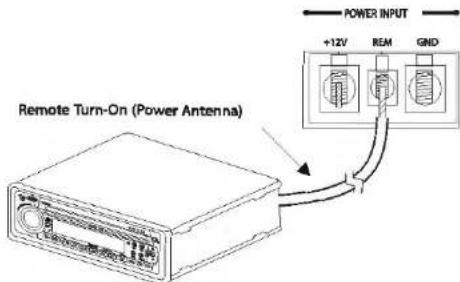
Remote Terminal (REM)
Connect the power antenna or amplifier turn-on lead from the receiver to the amplifier remote terminal.

POWER Amplifiers
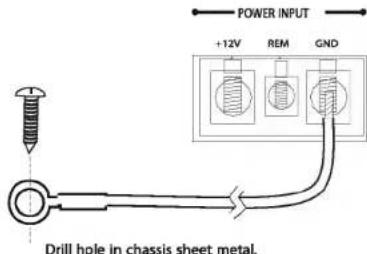
Ground Terminal (GND)
Make the ground lead as short as possible, leaving enough length to complete the installation and to allow for any service that may be needed at a later date. To ensure a good ground, scrape away any paint or undercoating to expose bare metal. Use a "ring" terminal of the proper gauge and an "outside star washer" (between the chassis and ring terminal) when making your ground connection. Although you've scraped away the paint to expose bare metal, the outside star washer will help to "bite into" the chassis for a tight, secure ground.
Replacement Fuse Requirements (FUSE)
| Model | Quantity | Amps | Type |
| 2000.1D | 3 | 35 | ATO |
POWER Amplifiers

Speaker Wiring
The Speaker Wiring diagrams illustrate options for connecting one or two speakers. Observe the proper speaker polarity.
NOTE: Power amplifiers can drive speakers with a nominal impedance range of 1~4-ohms. For maximum power, configure your speakers for a nominal 1-ohm load.
NOTE: Do not overlook the use of the proper gauge speaker wire. The Power series of amplifiers require a minimum of 12-gauge wire.
Power 2000.1D
Two Subwoofer
One Subwoofer
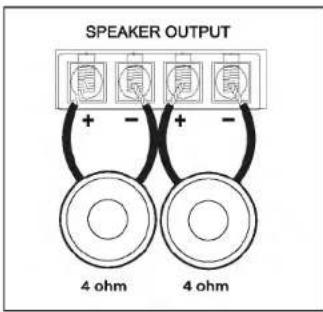
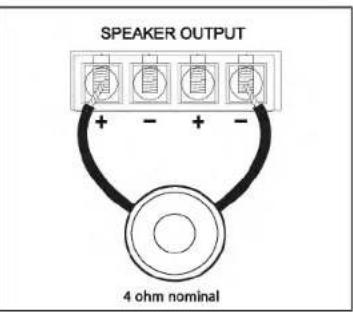
POWER Amplifiers

Input Wiring
Most trunk/hatchback installations will require a 15-20 foot RCA cable, while pickup trucks and under-seat mounting will require a 6-12 foot RCA cable. Connect an RCA cable from your receiver to the RCA input on your amplifier.
Power 2000.1D
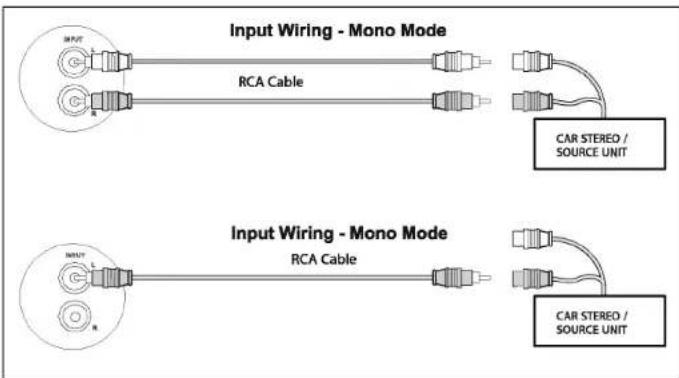
NOTE: The use of good quality RCA cables is just as important as power and speaker wire. Choose a high quality low capacitance cable for the best results.
Connecting Additional Amplifiers
Pass-Thru RCA connectors are provided to connect additional amplifiers without the need to purchase "Y" adapters.
Indicators and Controls
Power Indicator (POWER)
The power indicator provides a visual indication that the amplifier is turned on.
Input Level Control (LEVEL)
The input LEVEL control matches the output of your radio to the input of the amplifier. After the installation is complete, make sure the input level control on the amplifier is turned down all the way (counter-clockwise or all the way to the left). Play a tape or CD (make sure bass and treble settings or Bass EQ are flat) and turn the volume up slowly until you just start to hear distortion. Back the volume down just a bit. On the amplifier, slowly turn up the input level control (clockwise or to the right) until you just start to hear distortion, then back it down a bit. Now your radio and amplifier levels are matched.
BASS EQ
The Bass EQ is continuously adjustable from 0 to +12dB @ 45Hz. Adjusting the Bass Boost level allows different subwoofer/enclosure combinations to be equalized. Use this control to increase the level of low bass available from your subwoofer/enclosure combination. Ported and Band Pass enclosures should be limited to about +6dB to +9dB of boost. Sealed enclosures should be able to accept the full +12dB of boost, if necessary. The full +12dB of boost should be reserved for special applications since improper use of the Bass Boost could damage your subwooers at high volumes.
Low Pass Filter (LPF)
The Low Pass Filter controls adjust the crossover point. Typical crossover is between 60Hz and 80Hz for ported and sealed enclosures. Bandpass boxes will typically use a higher crossover setting between 125Hz and 150Hz . Since musical tastes vary, you should play music that you would normally listen to in your vehicle, with the above settings as a starting point. If necessary, set the crossover by ear.
High Pass Filter (HPF)
The high pass filter will limit the low frequencies being transmitted to your speakers. This can be useful in number of situations. For example, if you selected the high pass filter and set the crossover to 40Hz then you would have an infra-sonic (sub-sonic) filter at 40Hz , which would be useful with certain enclosure/subwoofer combinations that were tuned between 45Hz and 50Hz . Other uses might include limiting the low frequencies to smaller
speakers (6 1/2", 6 X 9", etc.) by adjusting the crossover to a higher setting (80-100Hz).
Phase Switch
The Phase Switch is selectable to 0 degrees (normal polarity) and 180 degrees (inverted polarity). Depending on the size and location of your subwoofer and main speakers, you may need to adjust the Phase Switch to provide the best blend in the midbass (60 - 150Hz). To determine the appropriate phase setting, select either regular (0^) or inverted (180^) and perform a sound test. Listen carefully to the sound quality while playing a CD with male voices and/or low bass such as percussion or bass lines, then select the position that produces the fullest and most dynamic bass. You may need to adjust the Input Level Control and the Low Pass Filter control after setting the Phase Switch.

POWER Amplifiers
Testing
Before finishing the installation, perform the following tests to make sure the wiring is correct and everything is operating properly.
Reconnect Battery
When wiring is complete, reconnect the battery negative terminal.
Test Power Wiring
Turn on the receiver, but do not turn up the volume. The amplifier power light should come on. If not, check the REM and +12V ( + ) wires. Turn up the receiver volume slightly. All speakers should operate. If not, check wiring connections at amplifier and speakers.
Test Speaker Connections
These tests make sure the speakers are connected properly. If speakers don't play at all, one (or both) speaker wires may be disconnected.
Remote Input Level Control
The Power 2000.1D comes equipped with a Remote Input Level Control. The Remote Input Level Control allows the input level to be adjusted from an alternate location. It can be mounted under-dash or in-dash. When the amplifier is used to drive subwoofer and the low pass crossover is activated, the Remote Input Level Control can be used as a "remote bass level control". This enables you to control the bass level independent from the rest of the system. This is convenient for system tuning and/or when playing many different types of music.
The Remote Input Level Control uses a 3.5mm modular cable for connectivity. Simply plug the 3.5mm modular cable into the amplifier and then into the Remote Input Level Control to activate the circuit.
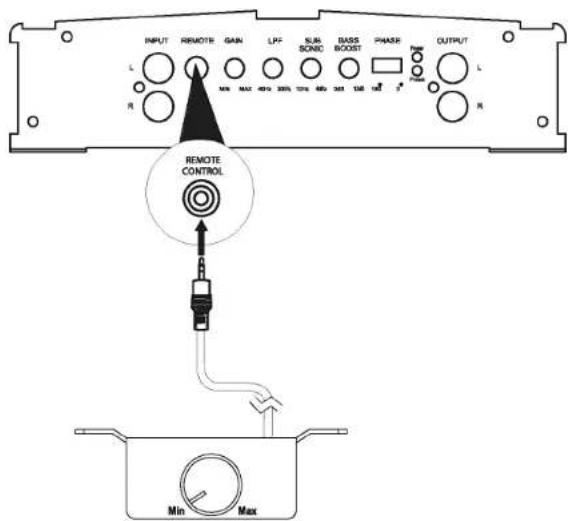
Troubleshooting
| Problem | Possible Cause | Corrective Action |
| Amplifier does not turn on | No power to +12V terminal | Check fuse(s) |
| No power to REM terminal | Check head unit fuse(s) and wiring | |
| Blown main fuse at battery | Replace fuse and identify cause of failure | |
| Blown fuse at amplifier | Replace fuse and identify cause of failure | |
| Faulty ground | Re-ground main power ground to bare metal chassis | |
| Volume control too sensitive | Input level control adjusted too high | Re-adjust the input level (refer to page 8) |
| Distorted sound | Input level control adjusted too high | Re-adjust the input level (refer to page 8) |
| Blows fuse(s) at amp | Power wires connected backwards | Reconnect power wires properly |
| Internal problem with amp | Take unit for service | |
| Engine noise / Alternator whine | Ground loop(s) | Use good quality shielded RCA cables |
| Faulty ground at amp | Re-ground amp to clean bare metal chassis | |
| Faulty ground at head unit | Re-ground head unit to clean bare metal chassis | |
| Inductive coupling | Re-route RCA and/or speaker wires away from factory harnesses | |
| Input level on amp set too high | Re-adjust input level (refer to page 8) | |
| Thermal protection activated | Amplifier driving 1 ohm load for long durations | If the amplifier "thermals" frequently while driving subwoofer, install fan to keep amp cool. |
| Short circuit protection activated | Blown speakers | Check all speakers |
| Speaker wire(s) shorting to ground | Check for faulty wiring | |
| Defective crossover | Faulty passive crossover | |
| Low impedance protection activated | Amp connected to improper load | Check speaker connections |
| Amp will not drive less than a 1 ohm load | Verify that speakers are connected properly | |
| Speakers defective/blown | Check speakers | |
| Faulty passive crossovers | Check crossovers | |
| Poor bass response | Speakers out of phase | Check speaker polarity; reverse the connection to one speaker only if two subwoofer are connected to the amplifier. |
NOTE: If the protection light is activated with no speakers connected to the amplifier, and all the power connections are correct, this would indicate an internal problem with the amplifier.

POWER Amplifiers
CEA Power Output

RMS Power Output @ 1% THD+N, 14.4VDC
Power 2000.1D
Power Output: 425 watts RMS X 1 channels into 4-ohms @ < 1% THD+N Signal to Noise Ratio: 100dBA below reference (Reference: 1 watt, 4-ohm)
Additional Power Output: 675 watts RMS X 1 channels into 2-ohms @ < 1% THD+N, 900 watts RMS X 1 channel into 1-ohms @ < 1% THD+N Frequency Response: 10Hz to 300Hz, -3dB (Reference: 1 watt) Dimensions: L 11.3" x H 2.0" x W 8.1" Weight: 6.3 lbs
Limited Warranty
DO NOT RETURN THIS PRODUCT TO THE STORE
Audiovox Electronics Corporation ("the Company") is committed to quality and customer service, and are pleased to offer you this Warranty. Please read it thoroughly and contact the Company at 1-800-323-4815 with any questions.
Who is covered?
The Company extends this warranty to the original retail purchaser of products purchased through an authorized Audiovox retailer in the U.S.A., Puerto Rico or Canada. This warranty is not transferable or assignable. Proof of purchase is required in the form of an original sales receipt.
What is covered?
The Company warrants that should this product or any part thereof, under normal use, be proven defective in material or workmanship within 12 months from the date of original purchase, such defect(s) will be repaired or replaced with a new or reconditioned product (at the Company's option) without charge for parts and repair labor.
What is not covered?
This Warranty does not cover the following:
- Damage incurred during shipping or transporting the product to the Company or a service center
Elimination of car static or motor noise
Defects in cosmetic, decorative or non-operative structural parts
Correction of antenna problems
Costs incurred for installation, removal or reinstallation of the product
- Consequential damage to compact discs, USB devices, digital media cards, accessories or vehicle electrical systems
- Damage caused by improper installation, mishandling, misuse, neglect, accident, blown fuse, battery leakage, theft or improper storage
- Products whose factory serial number/bar code label(s) or markings have been removed or defaced
- Damage resulting from moisture, humidity, excessive temperature, extreme environmental conditions or external natural causes
Please review the "Care and Maintenance" section of your Installation and Operation Manual for additional information regarding the proper use of your product.
Limitations
THE EXTENT OF THE COMPANY'S LIABILITY UNDER THIS WARRANTY IS LIMITED TO THE REPAIR OR REPLACEMENT PROVIDED ABOVE AND, IN NO EVENT, SHALL THE COMPANY'S LIABILITY EXCEED THE PURCHASE PRICE PAID BY PURCHASER FOR THE PRODUCT.
This Warranty is in lieu of all other express warranties or liabilities. ANY IMPLIED WARRANTY, INCLUDING ANY IMPLIED WARRANTY OF MERCHANTIBILITY, SHALL BE LIMITED TO THE DURATION OF THIS WRITTEN WARRANTY. ANY ACTION FOR BREACH OF ANY WARRANTY HEREUNDER INCLUDING ANY IMPLIED WARRANTY OF MERCHANTIBILITY MUST BE BROUGHT WITHIN A PERIOD OF 24 MONTHS FROM DATE OF ORIGINAL PURCHASE. IN NO CASE SHALL THE COMPANY BE LIABLE FOR ANY CONSEQUENTIAL OR INCIDENTAL DAMAGES FOR BREACH OF THIS OR ANY OTHER WARRANTY, EXPRESS OR IMPLIED, WHATSOEVER. No person or representative is authorized to assume for the Company any liability other than expressed herein in connection with the sale of this product.
Some states do not allow limitations on how long an implied warranty lasts or the exclusion or limitation of incidental or consequential damage so the above limitations or exclusions may not apply to you. This Warranty gives you specific legal rights and you may also have other rights which vary from state to state.
Obtaining Warranty Service
- To obtain repair or replacement within the terms of this Warranty, call 1-800-323-4815 for the location of a warranty station serving your area.
- You must prepay the initial shipping charges to the Company. The Company will pay the return shipping charges for all warranted products returned to an address within the U.S.A., Puerto Rico or Canada.
- Please package the product securely to avoid shipping damage. We recommend using a carrier that provides tracking service to prevent lost packages. Lost or damaged packages are not covered by this warranty.
- Provide a detailed description of the problem(s) for which you require service.
POWER Amplifiers


Sortie de puissance RMS @ 2%, THD+N, 1kHz, 14.4VDC
- 450 × 1 watts, 4ohm
- 725 x 1 watts; 2ohm
1000x1 watts; 1ohm,
Dimensions:L.11,3po×H.2,0po×I.8,1po
Poids:6,3 lb
Garantie Limitée
NE RENVOYEZ PAS CE PRODUIT AU MAGASIN
Audiovox Electronics Corporation
Hauppauge, NY 11788
1-800-323-4815
www.jensen.com
© 2010 Audiovox
v.111811

- Contenido
- Before You Begin
- Warranty Service
- POWER Amplifiers
- Features and Specifications
- Power Output
- Installation
- Installation Assistance
- Supplies and Tools Needed
- Supplies
- Tools
- Disconnect Battery
- Location and Mounting
- Routing Wires
- Power Wiring
- Charging System
- Power Terminal (+12V / B + )
- Remote Terminal (REM)
- Ground Terminal (GND)
- Speaker Wiring
- Input Wiring
- Connecting Additional Amplifiers
- Indicators and Controls
- Power Indicator (POWER)
- Input Level Control (LEVEL)
- BASS EQ
- Low Pass Filter (LPF)
- High Pass Filter (HPF)
- Phase Switch
- Testing
- Reconnect Battery
- Test Power Wiring
- Test Speaker Connections
- Remote Input Level Control
- CEA Power Output
- RMS Power Output @ 1% THD+N, 14.4VDC
- Limited Warranty
- DO NOT RETURN THIS PRODUCT TO THE STORE
- Who is covered?
- What is covered?
- What is not covered?
- Limitations
- Obtaining Warranty Service
- Garantie Limitée
- NE RENVOYEZ PAS CE PRODUIT AU MAGASIN
Brand : JENSEN
Model : Power 20001D
Category : Car radio