
BCD 250 - Radio Soundmaster - Free user manual and instructions
Find the device manual for free BCD 250 Soundmaster in PDF.
User questions about BCD 250 Soundmaster
0 question about this device. Answer the ones you know or ask your own.
Ask a new question about this device
Download the instructions for your Radio in PDF format for free! Find your manual BCD 250 - Soundmaster and take your electronic device back in hand. On this page are published all the documents necessary for the use of your device. BCD 250 by Soundmaster.
USER MANUAL BCD 250 Soundmaster
CLASS 1 LASER PRODUCT
KLASSE 1 LASER PRODUKT
LUOKAN 1 LASER LAITE
KCLASS 1 LASER APPARAT
PRODUCTO LASER CLASE 1
The Lightning flash with arrowhead symbol, with an equilateral triangle is intended to alert the user of the presence of uninsulated dangerous voltage within the product's enclosure that may be of sufficient magnitude to constitute a risk of electric shock to persons.

CAUTION: TO REDUCE THE RISK OF ELECTRIC SHOCK, DO NOT REMOVE COVER (OR BACK). NO USER SERVICEABLE PARTS INSIDE. REFER SERVICING TO QUALIFIED SERVICE PERSONNEL.

The exclamation point within an equilateral triangle is intended to alert the user of the presence of important operating and maintenance (servicing) instructions in the literature accompanying the appliance.
LASER SAFETY
THIS SET EMPLOYS AN OPTICAL LASER BEAM SYSTEM IN THE CD MECHANISM DESIGNED WITH BUILT-IN SAFEGUARDS. DO NOT ATTEMPT TO DISASSEMBLE. ECPOSURE TO THIS INVISIBLE LASER LIGHT BEAM MAY BE HARMFUL TO THE HUMAN EYES. THIS IS A CLASS-1 LASER PRODUCT. USE OF CONTROLS, ADJUSTMENTS OR PROCEDURES OTHER THAN THOSE SPECIFIED HEREIN. MAY RESULT IN HAZARDOUS LASER LIGHT BEAM EXPOSURE. THIS COMPACT DISC PLAYER SHOULD NOT BE ADJUSTED OR REPAIRED BY ANYONE EXCEPT QUALIFIED SERVICE PERSONNEL. THE LASER MECHANISM IN THE SET CORRESPONDS TO THE STYUS (NEEDLE) OF ARECORD PLAYER. ALTHOUGH THIS PRODUCT USES A LASER PICK-UP LENS, IT IS COMPLETELY SAFE WHEN OPERATED ACCORDING TO DIRECTIONS.
Specifications
FM Frequency 87,5-108 MHz
Power Consumption 14 Watt
Power Supply
AC/DC Adaptor
PRI: 230V 50Hz100mA
SEC: 9V 650mA
Batteries: 9V 6x UM-3 / AA size 1.5V

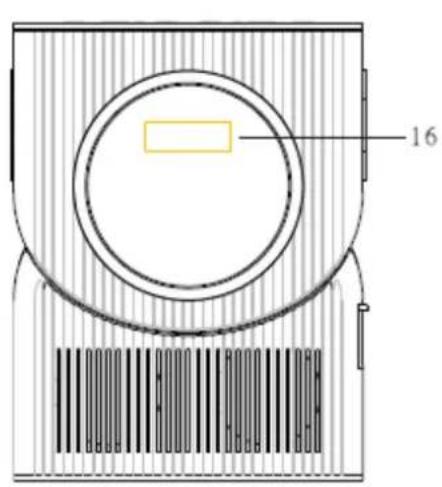
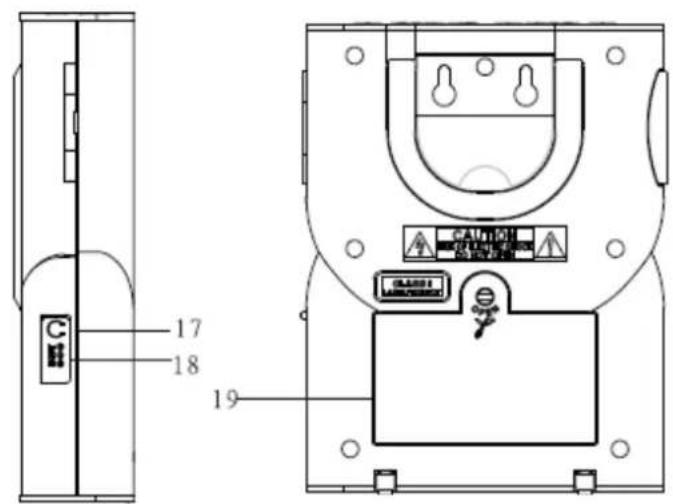
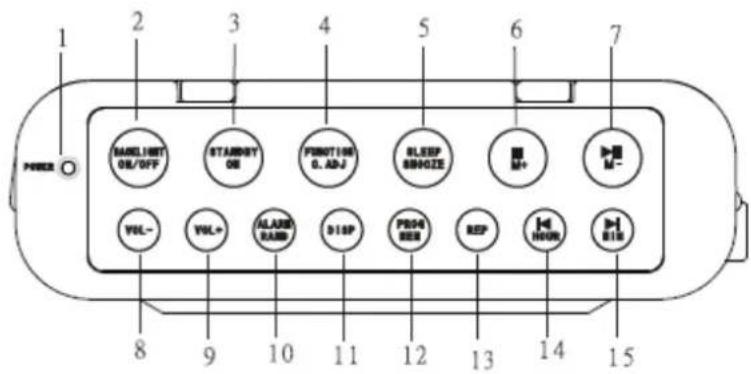
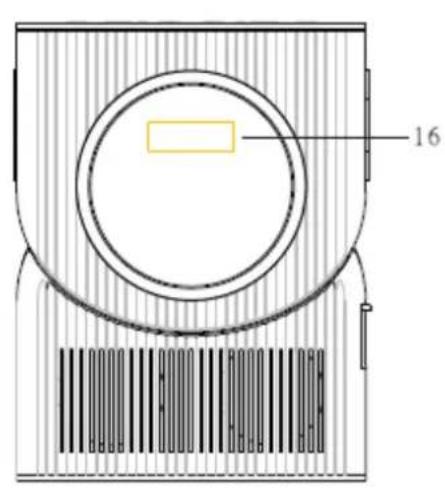
LOCATION OF CONTROLS
- Power indicator
- Backlight On / Off Button
- Standby Button
- Function / C.ADJ Button
- Sleep / Snooze Button
- Stop / M+ Button
- Play/Pause/M-Button
- Vol-Button
- Vol+ Button
-
Alarm/Rand Button
-
Disp Button
- Prog / Mem Button
- Rep Button
- Backward / Hour
- Forward / Min
- LCD display
- Phone Jack
- DC Jack
- Battery compartment
UNIT POWER SUPPLY
This unit is designed to operate on wither DC 9V adaptor.
Insert the small plug of adaptor into the DC Jack.
Insert the AC/DC adaptor into any convenient having AC230V ~ 50Hz household outlet in vertical or horizontal direction.
Operated by BATTERIES: (Not included): Open the BATTERY DOOR at the base of the unit and install 6pcs "AA" batteries as the polarity mark on the unit.
Press the backlight on/off button to switch back light on
TO SET THE CLOCK TIME
- In stand by Off mode. Press the FUNCTION/C.ADJ Button,
- Press Button to set the DESIRED HOUR.
- Press Button to set DESIRED MINUTE.
- After the desired time has set, display time will flash for 7-8 seconds, and then normal time is set.
TO SET ALARM FUNCTION
- In stand by Off mode. Press the FUNCTION/C.ADJ Button twice, the time will blink and there will be an alarm signal "AL" display on the LCD.
- Press Button to set the DESIRED HOUR.
- Press Button to set DESIRED MINUTE.
- After setting the alarm time as desired, press FUNCTION/C.ADJ Button to confirm.
WAKE UP TO ALARM BUZZER:
a. Press the ALARM/RAND BUTTON twice.
b. Alarm sign "AL" & " 品 " will show on the LCD Display.
c. The buzzer will sound at the set alarm time.
WAKE UP TO RADIO:
a. Press the STAND BY button to switch power on.
b. Press the FUNCTION/C.ADJ Button to the RADIO function.
c. Tune the radio to a broadcasting station and adjust the volume as desired.
d. Press STAND BY Button to switch power off.
e. Press the ALARM Button until ' & "AL" sign show on the LCD Display.
f. The radio will sound at the set alarm time.
WAKE UP TO CD:
a. Press the STAND BY button to switch power on.
b. Press the FUNCTION/C.ADJ Button to the CD function.
c. Press STAND BY Button to switch power off.
d. Press the ALARM Button until ' sign show on the LCD Display.
e. The CD will sound at the set alarm time.
TURN OFF THE ALARM
To cancel alarm press ALARM/RAND button until "O" or 'f' sign disappear on the LCD Display.
ADJUST VOLUME
Press VOL. + button to increase the volume.
Press VOL. - button to decrease the volume.
RADIO OPERATION
- Press the STAND BY Button to switch Power on.
- Press the FUNCTION/C.ADJ Button to the RADIO Function.
- How to use the buttons for radio
i. Manual Tuning
Press the or to search for desired frequency. Higher frequency can be selected by pressing the button while Lower frequency can be selected by pressing the button
ii. Automatic Tuning
i) Press and hold the▶ or | button until the display frequency starts run.
ii) When a station of sufficient strength has been found Tuning will stop or you can stop the automatic tuning by pressing or button.
To switch off the radio, Press the STAND BY BUTTON.
PRESET TUNING
- Select your desired station according to the normal tuning procedure.
- Press the PROG/MEM button, "P-01" will appear and flash in the LCD, Then use M+ or M- BUTTON to change the number where the station will be stored. (P01 to P10)
- Store the current frequency by pressing PROG/MEM again when you get the desired number.
- Repeat the same procedure to set other desired frequencies into Memory No.1 to NO.10
The unit can be preset up to 10 stations.
MEMORY RECALL
Recall the stored frequencies by pressing M+ or M- BUTTON select 1 to 10 stations as desired
NOTE: As stored frequencies can only be stored for long time with the power supplying. The station you stored will be lost and can not be recalled in case that you cut off the power.
PLAYING A COMPACT DISC (CD)
NOTE: Never touch the laser lens inside of the CD compartment. Clean the laser lens with a CD cleaner disc if it becomes dirty.
- Press the STAND BY Button to turn on the unit.
- Press the Function/C.ADJ Button to CD function.
- Open the CD door and insert a CD into the tray with printed label side facing up.
- Close the CD DOOR and the disc will rotate for a few seconds and then stop.
- Press the PLAY/PAUSE/M-B BUTTON to start play
- Press the PLAY/PAUSE/M-B BUTTON again to PAUSE play.
- Press the PLAY/PAUSE/M- BUTTON to resume play again.
- Press the STOP/M+ BUTTON to STOP play.
RANDOM PLAY
In CD stop mode, Press the ALARM/RAND BUTTON once, "RAND" will appear on LCD Display. Press PLAY/PAUSE/M- BUTTON, this will enable random tracks play.
To stop RANDOM play, press ALARM/RAND Button twice, and the "RAND" will disappear on the LCD Display.
REVERSE/FORWARD
i. The / MIN or / HOUR BUTTON can be used to jump to a different track number or to scan disc tracks at high speed.
ii. Press the | / HOUR once to hear the beginning of the current track. Press it two or more times to hear previous tracks on the disc.
iii. Press the / MIN to hear the next track on the disc.
iv. Press and hold the | / HOUR Button, the current track will be scanned and move backwards to the previous track(s); When the desired track section is found, release the button and normal play will resume.
v. Press and hold the / MIN BUTTON, the current track will be scanned and move forward to the next track(s); When the desired track section is found, release the selected button and normal play will resume.
REPEAT FUNCTION
The CD REPEAT Button may be used to repeat a single track or repeat all tracks on a compact disc.
- Press the REP BUTTON once during playback, the icon will show on LCD Display and flash. The same track will be repeated over and over.
- Press the REP BUTTON a second time to repeat all tracks. The icon will show on the LCD display, but will not flash this time.
- To cancel REPEAT PLAY, Press the REP BUTTON repeatedly until the icon disappeared.
PROGRAM FUNCTION
The Program feature can be used to program up to 20 tracks to play in a selected order.
- While in the stop mode only (CD is not playing), press the PROG/MEM Button, LCD Display will show the wording "PROG 01" and "PROG 01" starts to flash.
- Press the / MIN BUTTON or / HOUR BUTTON to allocate the desired track.
- Press the PROG / MEM Button to select and store the track into memory.
- Repeat step 2 to 3 to select up to 20 tracks.
- To play the selected tracks (in the program mode); press the PLAY/PAUSE/M-B BUTTON. The track number and the "PROG" appear on LCD Display.
- Press the | / HOUR BUTTON to hear the previous or press the / MIN BUTTON to hear next program track.
Note: After all of the programmed tracks have played, the CD player will return to the stop mode.
- To clear the programmed tracks from memory, press STOP two times.
SLEEP FUNCTION
- Press the FUNCTION / C.ADJ BUTTON to the desired source.
- Tune in the desired radio station or CD play and adjust the volume control.
- Press the SLEEP BUTTON. The "90" will appear on the clock display.
- Repeatedly press the SLEEP BUTTON for desired sleep time between 10-90 minutes.
- The unit will automatically switch off when the SLEEP time expires.
SNOOZE FUNCTION
If you want to snooze a few more minutes press the SNOOZE BUTTON will deactivate the sound for approximately 9 minutes.

RISQUE D'LECTROCUTION NE PAS OUVRIR
ATTENTION: AFIN DE RÉDUIRE
LES RISQUES
D'ÉLECTROCUTION, NE PAS
RETIRER LE COUVERCLE (OU L'ARRÊRE). AUCUNE PIECE
INTERNE NE POT ÉTRE
RéPARÉE PAR L'UTILISATEUR.
VEUILLEZ FAIRE EFFECTUER
L'ENTRETIEN PAR UN
PERSONNEL DE SERVICE
QUALIFIÉ.

Frequence FM 87,5-108 MHz
Consummation energetique 14 Watt
Alimentation
Adaptateur
AC/DC
PRI: 230V 50Hz100mA
SEC: 9V 650mA
9V 6x UM-3 / taille AA 1,5V

EMPLACEMENT DES COMMANDES
PENTRU A SETA FUNC TIA ALARMÄ
- Press the STAND BY Button to switch Power on.
- Press the FUNCTION/C.ADJ Button to the RADIO Function.
- How to use the buttons for radio
i. Manual Tuning
