XVDV88 - Home theater audio system PIONEER - Free user manual and instructions
Find the device manual for free XVDV88 PIONEER in PDF.

| Product type | 5.1 home cinema audio system |
| Brand | PIONEER |
| Model | XVDV88 |
| Dimensions (main unit) | 220 x 317 x 65 mm (W x D x H) |
| Weight (main unit) | 2.5 kg |
| Dimensions (display) | 206 x 50 x 65 mm |
| Weight (display) | 0.2 kg |
| Dimensions (subwoofer S-DV88SW) | 190 x 420 x 420 mm |
| Weight (subwoofer) | 14.2 kg |
| Dimensions (front/rear satellite speaker S-DV88ST) | 110 x 78 x 154 mm |
| Weight (satellite speaker) | 0.81 kg |
| Dimensions (center speaker) | 210 x 78 x 110 mm |
| Weight (center speaker) | 0.92 kg |
| Power supply | 230 V AC, 50/60 Hz |
| Power consumption | 166 W (standby 0.9 W) |
| Output power (front/center/rear) | 30 W per channel into 8 Ω (1 kHz, 1% THD) |
| Output power (subwoofer) | 50 W into 4 Ω (100 Hz, 1% THD) |
| Frequency response (subwoofer) | 31 Hz – 300 Hz |
| Frequency response (satellites) | 100 Hz – 20 kHz |
| Supported audio formats | Dolby Digital, DTS, PCM 96 kHz/24 bit, MP3 |
| Disc formats | DVD-Video, Audio CD, Video CD, MP3 CD-R/RW |
| Tuner | FM/AM with RDS (European model) |
| Digital audio inputs | 1 optical, 1 coaxial |
| Auxiliary video inputs | 3 (V1, V2, V3) |
| Video outputs | Composite, S-Video |
| Special features | Timer, parental lock, surround and DSP modes, demonstration display |
| Safety | Class 1 laser, surge protection, ventilated |
| Included accessories | Remote control, AM/FM antennas, video/audio/speaker cables, anti-slip pads, manuals |
Frequently Asked Questions - XVDV88 PIONEER
User questions about XVDV88 PIONEER
0 question about this device. Answer the ones you know or ask your own.
Ask a new question about this device
Download the instructions for your Home theater audio system in PDF format for free! Find your manual XVDV88 - PIONEER and take your electronic device back in hand. On this page are published all the documents necessary for the use of your device. XVDV88 by PIONEER.
USER MANUAL XVDV88 PIONEER
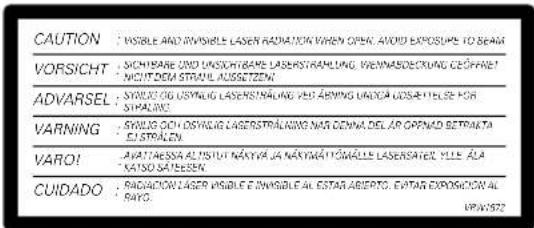
These labels can be found on the DVD/CD tuner rear panel (US model)/bottom panel (European model), and on the powered subwoofer rear panel.


CAUTION
RISK OF ELECTRIC SHOCK DO NOT OPEN
IMPORTANT

The lightning flash with arrowhead symbol, within an equilateral triangle, is intended to alert the user to the presence of uninsulated "dangerous voltage" within the product's enclosure that may be of sufficient magnitude to constitute a risk of electric shock to persons.
CAUTION
RISK OF ELECTRIC SHOCK DO NOT OPEN
CAUTION:
TO PREVENT THE RISK OF ELECTRIC SHOCK, DO NOT REMOVE COVER (OR BACK). NO USER-SERVICEABLE PARTS INSIDE. REFER SERVICING TO QUALIFIED SERVICE PERSONNEL.

The exclamation point within an equilateral triangle is intended to alert the user to the presence of important operating and maintenance (servicing) instructions in the literature accompanying the appliance. H002_En
IMPORTANT
FOR USE IN THE UNITED KINGDOM
The wires in this mains lead are coloured in accordance with the following code :
Blue
: Neutral
Brown
:Live
If the plug provided is unsuitable for your socket outlets, the plug must be cut off and a suitable plug fitted.
The cut-off plug should be disposed of and must not be inserted into any 13 amp socket as this can result in electric shock. The plug or adaptor or the distribution panel should be provided with 5 A fuse. As the colours of the wires in the mains lead of this appliance may not correspond with coloured markings identifying the terminals in your plug, proceed as follows:
The wire which is coloured blue must be connected to the terminal which is marked with the letter N or coloured black.
The wire which is coloured brown must be connected to the terminal which is marked with the letter L or coloured red.
Do not connect either wire to the earth terminal of a three pin plug.
NOTE
After replacing or changing a fuse, the fuse cover in the plug must be replaced with a fuse cover which corresponds to the colour of the insert in the base of the plug or the word that is embossed on the base of the plug, and the appliance must not be used without a fuse cover. If lost replacement fuse covers can be obtained from your dealer.
Only 5 A fuses approved by B.S.I. or A.S.T.A to B.S. H0058En
WARNING: THE APPARATUS IS NOT WATERPROOFS, TO PREVENT FIRE OR SHOCK HAZARD, DO NOT EXPOSE THIS APPLIANCE TO RAIN OR MOISTURE AND DO NOT PUT ANY WATER SOURCE NEAR THIS APPARATUS, SUCH AS VASE, FLOWERPOT,COSMETICS CONTAINERAND MEDICINE BOTTLE ETC. H001AEn
[For European model]
This product complies with the Low Voltage Directive (73/23/ EEC, amended by 93/68/EEC), EMC Directives (89/336/EEC, amended by 92/31/EEC and 93/68/EEC). H015AEn
CAUTION:
THE STANDBY/ON BUTTON IS SECONDARY CONNECTED AND THEREFORE DOES NOT SEPARATE THE UNIT FROM MAINS POWER IN STANDBY POSITION. THEREFORE INSTALL THE UNIT SUITABLE PLACES EASY TO DISCONNECT THE MAINS PLUG IN CASE OF THE ACCIDENT. THE MAINS PLUG OF UNIT SHOULD BE UNPLUGGED FROM THE WALL SOCKET WHEN LEFT UNUSED FOR A LONG PERIOD OF TIME. H017BEn
WARNING: BEFORE PLugging IN THE UNIT FOR THE FIRST TIME, READ THE FOLLOWING SECTION CAREFULLY. THE VOLTAGE OF THE AVAILABLE POWER SUPPLY DIFFERS ACCORDING TO COUNTRY OR REGION, BE SURE THAT THE POWER SUPPLY VOLTAGE OF THE AREA WHERE THIS UNIT WILL BE USED MEETS THE REQUIRED VOLTAGE (E.G., 230V OR 120V) WRITTEN ON THE REAR PANEL. H041 En
WARNING: NO NAKED FLAME SOURCES, SUCH AS LIGHTED CANDLE, SHOULD BE PLACED ON THE APPARATUS. IF NAKED FLAME SOURCES ACCIDENTALLY FALL DOWN, FIRE SPREAD OVER THE APPARATUS THEN MAY CAUSE FIRE.
H044 En
Thank you for buying this PIONEER product.
Please read through these operating instructions so you will know how to operate your model properly. After you have finished reading the instructions, put them away in a safe place for future reference.
When using this product, follow the instructions written on the underside of the unit, which concern the XV-DV77/XV-DV88.
[For European model]
CAUTION
This product contains a laser diode of higher class than 1. To ensure continued safety, do not remove any covers or attempt to gain access to the inside of the product.
Refer all servicing to qualified personnel.
The following caution label appear on your player.
Location: On the bottom panel of XV-DV77/DV88
CLASS 1 LASER PRODUCT
Inside the bonnet of XV-DV77/DV88
[For European model]
CAUTION: These speaker terminals can be under HAZARDOUS VOLTAGE. When you connect or disconnect the speaker cables, to prevent the risk of electric shock, do not touch uninsulated parts before disconnecting the power cord. H047 En
Operating Environment H045 En
Operating environment temperature and humidity: +5^ - + 35^(+41^ - + 95^) less than 85% RH (cooling vents not blocked) Do not install in the following locations
- Location exposed to direct sunlight or strong artificial light
- Location exposed to high humidity, or poorly ventilated location
[For U.S. model]
IMPORTANT SAFETY INSTRUCTIONS
H003 En
READ INSTRUCTIONS All the safety and operating instructions should be read before the product is operated.
RETAIN INSTRUCTIONS - The safety and operating instructions should be retained for future reference.
HEED WARNINGS All warnings on the product and in the operating instructions should be adhered to.
FOLLOW INSTRUCTIONS - All operating and use instructions should be followed.
CLEANING Unplug this product from the wall outlet before cleaning. The product should be cleaned only with a polishing cloth or a soft dry cloth. Never clean with furniture wax, benzine, insecticides or other volatile liquids since they may corrode the cabinet.
ATTACHMENTS Do not use attachments not recommended by the product manufacturer as they may cause hazards.
WATER AND MOISTURE - Do not use this product near water - for example, near a bathtub, wash bowl, kitchen sink, or laundry tub; in a wet basement, or near a swimming pool; and the like.
ACCESSORIES Do not place this product on an unstable cart, stand, tripod, bracket, or table. The product may fall, causing serious injury to a child or adult, and serious damage to the product. Use only with a cart, stand, tripod, bracket, or table recommended by the manufacturer, or sold with the product. Any mounting of the product should follow the manufacturer's instructions, and should use a mounting accessory recommended by the manufacturer.
CART A product and cart combination should be moved with care. Quick stops, excessive force, and uneven surfaces may cause the product and cart combination to overturn.

VENTILATION-Slots and openings in the cabinet are provided for ventilation and to ensure reliable operation of the product and to protect it from overheating, and these openings must not be blocked or covered. The openings should never be blocked by placing the product on a bed, sofa, rug, or other similar surface. This product should not be placed in a built-in installation such as a bookcase or rack unless proper ventilation is provided or the manufacturer's instructions have been adhered to.
POWER SOURCES - This product should be operated only from the type of power source indicated on the marking label. If you are not sure of the type of power supply to your home, consult your product dealer or local power company.
LOCATION - The appliance should be installed in a stable location.
NONUSE PERIODS - The power cord of the appliance should be unplugged from the outlet when left un-used for a long period of time.
GROUNDING OR POLARIZATION
If this product is equipped with a polarized alternating current line plug (a plug having one blade wider than the other), it will fit into the outlet only one way. This is a safety feature. If you are unable to insert the plug fully into the outlet, try reversing the plug. If the plug should still fail to fit, contact your electrician to replace your obsolete outlet. Do not defeat the safety purpose of the polarized plug.
- If this product is equipped with a three-wire grounding type plug, a plug having a third (grounding) pin, it will only fit into a grounding type power outlet. This is a safety feature. If you are unable to insert the plug into the outlet, contact your electrician to replace your obsolete outlet. Do not defeat the safety purpose of the grounding type plug.
POWER-CORD PROTECTION - Power-supply cords should be routed so that they are not likely to be walked on or pinched by items placed upon or against them, paying particular attention to cords at plugs, convenience receptacles, and the point where they exit from the product.
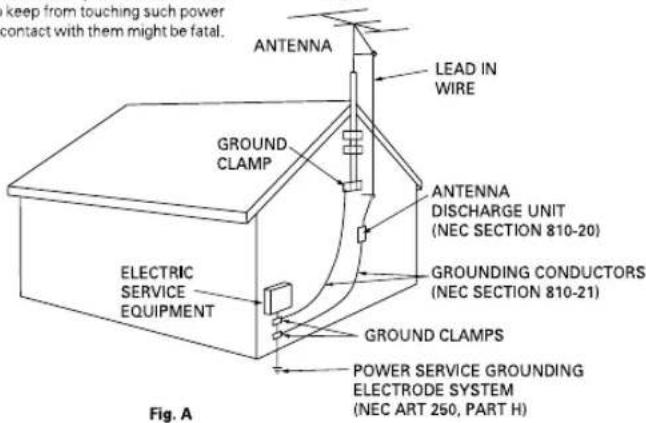
OUTDOOR ANTENNA GROUNDING - If an outside antenna or cable system is connected to the product, be sure the antenna or cable system is grounded so as to provide some protection against voltage surges and built-up static charges. Article 810 of the National Electrical Code, ANSI/NFPA 70, provides information with regard to proper grounding of the mast and supporting structure, grounding of the lead-in wire to an antenna discharge unit, size of grounding conductors, location of antenna-discharge unit, connection to grounding electrodes, and requirements for the grounding electrode. See Figure
LIGHTNING - For added protection for this product during a lightning storm, or when it is left unattended and unused for long periods of time, unplug it from the wall outlet and disconnect the antenna or cable system. This will prevent damage to the product due to lightning and power-line surges.
POWER LINES An outside antenna system should not be located in the vicinity of overhead power lines or other electric light or power circuits, or where it can fall into such power lines or circuits. When installing an outside antenna system, extreme care should be taken to keep from touching such power lines or circuits as contact with them might be fatal.
OVERLOADING - Do not overload wall outlets, extension cords, or integral convenience receptacles as this can result in a risk of fire or electric shock.
OBJECT AND LIQUID ENTRY—Never push objects of any kind into this product through openings as they may touch dangerous voltage points or short-out parts that could result in a fire or electric shock. Never spill liquid of any kind on the product.
SERVICING - Do not attempt to service this product yourself as opening or removing covers may expose you to dangerous voltage or other hazards. Refer all servicing to qualified service personnel.
DAMAGREQUIRING SERVICEUnplug this product from the wall outlet and refer servicing to qualified service personnel under the following conditions: When the power-supply cord or plug is damaged.
If liquid has been spilled, or objects have fallen into the product.
If the product has been exposed to rain or water. If the product does not operate normally by following the operating instructions. Adjust only those controls that are covered by the operating instructions as an improper adjustment of other controls may result in damage and will often require extensive work by a qualified technician to restore the product to its normal operation.
If the product has been dropped or damaged in any way.
- When the product exhibits a distinct change in performance — this indicates a need for service.
REPLACEMENT PARTS - When replacement parts are required, be sure the service technician has used replacement parts specified by the manufacturer or have the same characteristics as the original part. Unauthorized substitutions may result in fire, electric shock, or other hazards.
SAFETY CHECK—Upon completion of any service or repairs to this product, ask the service technician to perform safety checks to determine that the product is in proper operating condition.
WALL OR CEILING MOUNTING - The product should not be mounted to a wall or ceiling.
HEAT The product should be situated away from heat sources such as radiators, heat registers, stoves, or other products (including amplifiers) that produce heat.
NEC-NATIONAL ELECTRICAL CODE
[For U.S. model]
IMPORTANT NOTICE H006Aen
The serial number for this equipment is located in the bottom plate. Please write this serial number on your enclosed warranty card and keep it in a secure area. This is for your security.
CAUTION:
This product satisfies FCC regulations when shielded cables and connectors are used to connect the unit to other equipment. To prevent electromagnetic interference with electric appliances such as radios and televisions, use shielded cables and connectors for connections.
NOTE: This equipment has been tested and found to comply with the limits for a Class B digital device, pursuant to Part 15 of the FCC Rules. These limits are designed to provide reasonable protection against harmful interference in a residential installation. This equipment generates, uses, and can radiate radio frequency energy and, if not installed and used in accordance with the instructions, may cause harmful interference to radio communications. However, there is no guarantee that interference will not occur in a particular installation. If this equipment does cause harmful interference to radio or television reception, which can be determined by turning the equipment off and on, the user is encouraged to try to correct the interference by one or more of the following measures:
-Reorient or relocate the receiving antenna.
-Increase the separation between the equipment and receiver.
- Connect the equipment into an outlet on a circuit different from that to which the receiver is connected.
- Consult the dealer or an experienced radio/TV technician for help.
H010En
Information to User
H011En
Alteration or modifications carried out without appropriate authorization may invalidate the user's right to operate the equipment.
CAUTION : USE OF CONTROLS OR ADJUSTMENTS OR PERFORMANCE OF PROCEDURES OTHER THAN THOSE SPECIFIED HEREIN MAY RESULT IN HAZARDOUS RADIATION EXPOSURE.
CAUTION : THE USE OF OPTICAL INSTRUMENTS WITH THIS PRODUCT WILL INCREASE EYE HAZARD.
H013 En
[For Canadian model]
CAUTION: TO PREVENT ELECTRIC SHOCK, DO NOT USE THIS (POLARIZED) PLUG WITH AN EXTENSION CORD, RECEPTACLE OR OTHER OUTLET UNLESS THE BLADES CAN BE FULLY INSERTED TO PREVENT BLADE EXPOSURE.
[For U.S. model]
![PIONEER XVDV88 - [For U.S. model] - 1](/content/2026/02/373823/images/eee548221a0e4f1fc150bb103ba97a16cddebfc1aa7d6bd017e994053b9e1212.jpg)
As an ENERGY STAR® Partner, Pioneer Corporation has determined that this product meets the ENERGY STAR® guidelines for energy efficiency. K001 En
[For Canadian model]
This Class B digital apparatus complies with Canadian ICES-003.
H0092L
![PIONEER XVDV88 - [For Canadian model] - 1](/content/2026/02/373823/images/e389582b3e091ed295f959fcd44853599074ea6611b96715d17be0aee424fdea.jpg)
Dear Customer:
Selecting fine audio equipment such as the unit you've just purchased is only the start of your musical enjoyment. Now it's time to consider how you can maximize the fun and excitement your equipment offers. This manufacturer and the Electronic Industries Association's Consumer Electronics Group want you to get the most out of your equipment by playing it at a safe level. One that lets the sound come through loud and clear without annoying blaring or distortion-and, most importantly, without affecting your sensitive hearing.
Sound can be deceiving. Over time your hearing "comfort level" adapts to higher volumes of sound. So what sounds "normal" can actually be loud and harmful to your hearing. Guard against this by setting your equipment at a safe level BEFORE your hearing adapts.
To establish a safe level:
- Start your volume control at a low setting.
- Slowly increase the sound until you can hear it comfortably and clearly, and without distortion.
Once you have established a comfortable sound level:
- Set the dial and leave it there.
Taking a minute to do this now will help to prevent hearing damage or loss in the future. After all, we want you listening for a lifetime.
We Want You Listening For A Lifetime
Used wisely, your new sound equipment will provide a lifetime of fun and enjoyment. Since hearing damage from loud noise is often undetectable until it is too late, this manufacturer and the Electronic Industries Association's Consumer Electronics Group recommend you avoid prolonged exposure to excessive noise. This list of sound levels is included for your protection.
Decibel
Level Example
30 Quiet library, soft whispers
40 Living room, refrigerator, bedroom away from traffic
50 Light traffic, normal conversation, quiet office
60 Air conditioner at 20 feet, sewing machine
70 Vacuum cleaner, hair dryer, noisy restaurant
80 Average city traffic, garbage disposals, alarm clock at two feet.
THE FOLLOWING NOISES CAN BE DANGEROUS UNDER CONSTANT EXPOSURE
90 Subway, motorcycle, truck traffic, lawn mower
100 Garbage truck, chain saw, pneumatic drill
120 Rock band concert in front of speakers, thunderclap
140 Gunshot blast, jet plane
180 Rocket launching pad
Information courtesy of the Deafness Research Foundation.


WataVic LISTENING
IMPORTANT

CLASS 1 LASER PRODUCT
Installation Precautions
- Install components so that there are no obstructions above or either side of them, or by ventilation holes. Also install 5 cm away from the wall as shown in the figures. Components feature ventilation holes on the bottom so do not install on thick pile carpets or other surfaces that may block them.
- Use a vacuum cleaner periodically to clean the port of the subwoofer to keep it free of dust.
WARNING: Slot and openings in the cabinet are provided for ventilation and to ensure reliable operation of the product and to protect it from overheating, to prevent fire hazard, the openings should never be blocked and covered with items, such as newspapers, table-cloths, curtains, etc. Also do not put the apparatus on the thick carpet, bed, sofa, or fabric having a thick pile. H040 En
Handle the power cord by the plug. Do not pull out the plug by tugging the cord and never touch the power cord when your hands are wet as this could cause a short circuit or electric shock. Do not place the unit, a piece of furniture, etc., on the power cord, or pinch the cord. Never make a knot in the cord or tie it with other cords. The power cords should be routed such that they are not likely to be stepped on. A damaged power cord can cause a fire or give you an electrical shock. Check the power cord once in a while. When you find it damaged, ask your nearest PIONEER authorized service center or your dealer for a replacement.
NOTE IMPORTANTE SUR LE CABLE D'ALIMENTATION
Hints on installation 11
Avoiding problems with condensation 11
Moving the system. 11
Discs compatible with this system 12
DVD Video regions 12
2 Controls and Displays
Front panel 13
Display 13
Remote control 15
3 Setting Up
Introduction 17
Switching on and setting the clock 17
Changing the clock display format. 18
Setting up for surround sound 19
Setting the speaker distances 19
Balancing the surround sound. 21
Setting the TV System 22
Using the setup navigator 23
Setting up the remote to control your TV 25
Using this remote with your TV 26
4 Getting Started
Playing DVDs, CDs and Video CDs 28
Basic playback controls 29
Navigating DVD disc menus 30
Navigating Video CD PBC menus 31
Listening to the radio 32
Improving FM stereo sound 33
Saving station presets 33
Listening to station presets 34
Naming station presets 35
Tuner system displays 36
Playing other connected components 36
Reducing the auxiliary input level 37
5 Using Sound modes and Effects
Using the Sound menu 38
Using sound modes 39
Playing Dolby/DTS sources 39
Playing other stereo sources with DSP effects ....41
6 Playing Discs
Introduction 42
Finding what you want on a disc 42
Switching camera angles 43
Switching subtiles 43
Switching audio language 43
Switching audio channels 44
Making a program list 44
Using random play 46
Using repeat play 47
Table de matieres
1 Préparatifs
Bookmarking a place in a disc 48
Memorizing disc settings 48
Displaying disc information 49
Displays when playing 50
Displays when stopped 52
DVD and CD system displays 52
Displays when playing 52
Displays when stopped 52
7 Using RDS
Using RDS 53
RDS Program types 54
Displaying RDS information 55
Searching for a program type 56
8 Playing MP3s
Playing MP3s 57
Searching for folders and tracks 58
Using random play 58
Using repeat play 59
Displaying MP3 information 59
Using the MP3 Navigator 60
Making a program list of MP3 tracks 61
MP3 compatibility information 62
9 Using the Timer
Using the wake up timer 63
Activating/deactivating the wake up timer 64
Checking the timer settings 65
Using the sleep timer 65
10 Advanced Sound Setup
Dynamic Range Control 67
LFE Attenuator 67
Dual-mono setting 68
Adjusting channel volume levels 69
11 DVD Setup Menu
Using the DVD Setup menu. 70
Audio settings 71
Dolby Digital Out 71
96kHz PCM Out 71
Video settings 72
TV Screen 72
S-Video Out 72
Screen Saver 73
Background. 73
Video Adjust 73
Still Picture 76
On Screen Display 76
Angle Indicator 77
Language settings 77
OSD language 77
Audio Language 77
Subtitle Language 78
Auto Language 79
DVD Language 80
Subtitle Display 81
Subtitle Off 81
General settings 82
Setup Menu Mode 82
Parental Lock 82
Registering a new password 83
Changing your password 83
Setting/changing the Parental Lock level 84
Setting/changting the Country Code 84
Country code list. 85
12 Connecting Up
For instructions on connecting up the speakers and the powered subwoofer, see the separate instruction sheet, Setting Up the System.
Connecting the optional MD deck 86
Connecting the optional CD recorder.. 86
Connecting other components 87
Connecting external antennas 89
External AM antenna 89
External FM antenna 89
13 Additional Information
Child lock 90
Beep mode 90
Tuner frequency step 90
Dimming the display 91
Taking care of your system 91
Disc lens cleaner 91
Taking care of your discs. 91
Storing discs 92
Discs to avoid 92
Glossary. 93
Language code list 94
Screen sizes and disc formats 95
Troubleshooting 96
Amplifier fault finding 96
Optional component fault finding. 96
DVD fault finding 96
Troubleshooting tips 97
Resetting the system 98
Specifications 101
Demo display 104
Superlative audio performance with Dolby Digital* and DTS** software
The XV-DV77/DV88 delivers breathtaking sound quality with Dolby Digital and DTS discs, and is also compatible with 96kHz/24-bit PCM sources.
Super Fine Focus Digital Filter technology
This high-quality digital video filter gives you great picture quality with DVD discs. The filter is effective all the way up the video frequency range, and also reduces noise outside the video frequency range.
- This product incorporates copyright protection technology that is protected by method claims of certain U. S. patents and other intellectual property rights owned by Macrovision Corporation and other rights owners. Use of this copyright protection technology must be authorized by Macrovision Corporation, and is intended for home and other limited viewing uses only unless otherwise authorized by Macrovision Corporation. Reverse engineering or disassembly is prohibited.
- Manufactured under license from Dolby Laboratories. "Dolby", "Pro Logic" and the double-D symbol are trademarks of Dolby Laboratories. Confidential unpublished works. © 1992-1997 Dolby Laboratories. All rights reserved.
** "DTS" and "DTS Digital Surround" are trademarks of Digital Theater Systems, Inc. Manufactured under license from Digital Theater Systems, Inc.
Using this manual
This manual is for the XV-DV77/DV88 DVD Surround System (XV-DV88 DVD Surround System in Europe only). It is divided into several sections: information for before you start using the system (chapters 1-2); getting started using the system (chapters 3-4); more advanced features (chapters 5-10); system settings and preferences (chapter 11); connecting up the system and using this system with external components (chapter 12). Chapter 13 provides additional information, including a glossary of terms used in this manual, and a troubleshooting section.
Caracteristiques
Hints on installation
We want you to enjoy using this unit for years to come, so please bear in mind the following points when choosing a suitable location for it:
Do...
Use in a well-ventilated room.
Place on a solid, flat, level surface, such as a table, shelf or stereo rack.
Don't...
XUse in a place exposed to high temperatures or humidity, including near radiators and other heat-generating appliances.
±bx Place on a window sill or other place where the system will be exposed to direct sunlight.
X Use in an excessively dusty or damp environment.
±bx Place directly on top of an amplifier, or other component in your stereo system that becomes hot in use.
XUse near a television or monitor as you may experience interference—especially if the television uses an indoor antenna.
XUse in a kitchen or other room where the system may be exposed to smoke or steam.
XUse on a thick rug or carpet, or cover with cloth—this may prevent proper cooling of the unit.
±bx Place on an unstable surface, or one that is not large enough to support all four of the unit's feet.
Avoiding problems with condensation
Condensation may form inside the system if it is brought into a warm room from outside, or if the temperature of the room rises quickly. Although the condensation won't damage the system, it may temporarily impair its performance. For this reason you should leave it to adjust to the warmer temperature for about an hour before switching on and using.
■ Moving the system
If you need to move the system, first switch it off and unplug from the wall outlet. Never lift or move the unit during playback—discs rotate at a high speed and may be damaged.
Discs compatible with this system
Any disc that displays one of the following logos should play in this system. Other formats, including DVD-RAM, DVD-ROM, DVD-Audio, SACD Photo CD and CD-ROM (except those containing MP3 files) will not play.
DVD Video compatibility:
- Logo: DVD
- Single-sided or double-sided discs
- Single layer or dual layer discs
- Dolby Digital, DTS, MPEG or Linear PCM digital audio
MPEG-2 digital video
DVD discs are generally divided into one or more titles. Titles may be further subdivided into chapters.
Audio CD and MP3 compatibility:
- Logos:

12cm or 8cm (5" or 3") discs
- Linear PCM digital audio or MP3 (MPEG-1 Audio Layer 3)
- CD, CD-R and CD-RW formats
CDs are divided into tracks.
- This system can play CD-R and CD-RW discs recorded with audio. However, depending on the condition of the player and the disc, you may find that not all discs will play successfully. (For example, if the disc is scratched or dirty, or if the player's pickup lens is dirty.) Note that this unit cannot record onto recordable discs.
Video CD compatibility:
- Logo:


12cm or 8cm (5" or 3") discs
MPEG-1 digital audio
MPEG-1 digital video
Video CDs are divided into tracks.
DVD Video regions

All DVD Video discs carry a region mark on the case somewhere that indicates which region(s) of the world the disc is compatible with. Your DVD system also has a region mark, which you can find on the rear panel. Discs from incompatible regions will not play in this system. Discs marked ALL will play in any player.
1 Tiner - pages 63-66
2 Wake up timer page 63
3 Character display
4 -DSP--page41
5 >Lights when a disc is playing
6 Multi-angle scene - page 43
7 Sleep timer -page 66
8 Lights when playing a DVD with DTS sound
9 COND. Condition memory - page 49
10 LAST Last memory - page 48
11 96kHz Lights when playing a disc with 96kHz audio
12Active channel indicators
13 PRO Logic Lights when playing a Dolby Pro Logic source
14 Y Indicates strength of broadcast signal
15 Auto stereo/mono mode - page 33
16 RDS (European model only) - pages 53-56
17 RPT, RPT-1 Repeat play mode - pages 47, 59
18 PGM Program play - pages 44, 61
19 RDM Random play - pages 46, 58
20 DOLBY DIGITAL Lights when playing a Dolby Digital source
Panneau avant
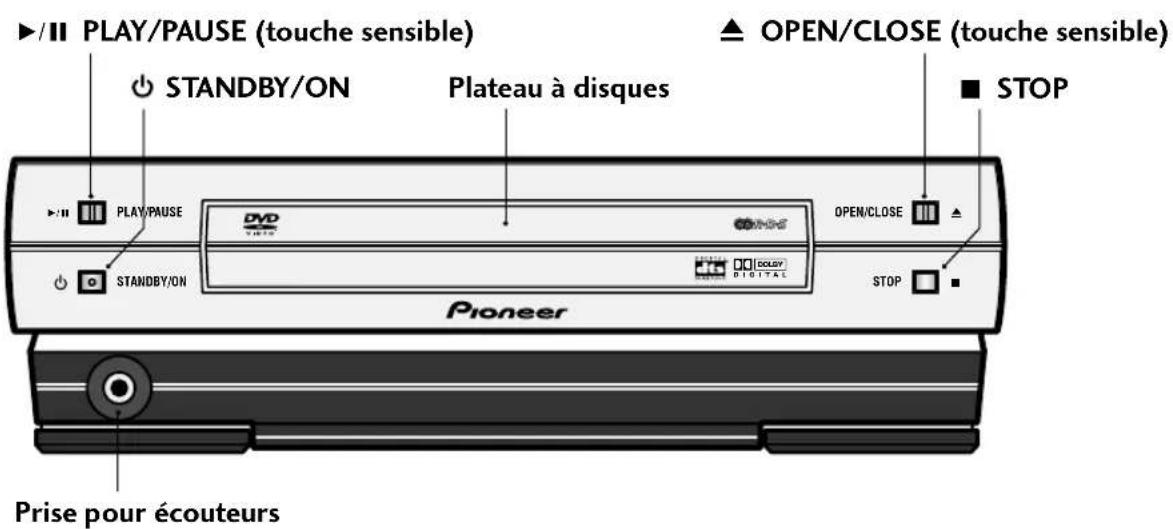
(L'illustration montre le modele europeen)
■ Afficheur

Before starting, make sure that your system is installed and set up according to the Setting up the system guide, and plugged into a power outlet.
This chapter covers switching on and setting the clock, using the Setup Navigator to set some basic preferences, using all the basic controls for playing discs, using the tuner and playing external sources.
Switching on and setting the clock
This system has a built in clock, which needs to be set to be able to use the timer features.
1 Press STANDBY/ON to switch on.
2 Press CLOCK/TIMER then use the or buttons to select CLOCK ADJUST.
CLOCK ADJUST
3 Press ENTER.
You should see a time displayed, with the hour part blinking.
9:00 am
Introduction
The display blinks for 2 seconds to indicate that the time has been set.

Tip
Press SYSTEM DISP anytime to see the clock when the system is on or in standby.
Changing the clock display format
You can choose to display the clock and timer settings in 12-hour (default setting) or 24-hour format.
1 If the system is on, press STANDBY/ON to put it into standby.
2 Press SYSTEM MENU and select HOUR FORMAT.
- Use the and buttons to change the currently displayed option. Press ENTER to select.
3 Select 12-HOUR or 24-HOUR format.
- Use the and buttons to change the currently displayed option. Press ENTER to select.
The system returns to standby after pressing ENTER.
Setting up for surround sound
You can use this system right out of the box for surround sound with just the default settings. However, for really great surround sound, we recommend that you spend a few minutes making some settings that match this system to your listening room. These include setting the distances from your listening position to your speakers, and balancing the speaker volumes. Unless you change the layout of your speakers or main listening position, you only need to make these settings once.
Setting the speaker distances
1 Press SYSTEM SETUP.
- To access this function, hold down SHIFT, then press SYSTEM SETUP.
2 Press or until you see FRONT in the display.
FRONT SP 3.0m
3 Use the and buttons to set the distance from your main listening position to the front left/right speakers.
Ideally, your listening position should be equidistant from the two front speakers.
The default setting is 3m . You can adjust the range from 0.3m to 9.0m in steps of 0.3m .
■ Configuration du son surround
4 Press to move on to the CENTER speaker setting.
CENTER SP 3.0m
5 Use the and buttons to set the distance from your main listening position to the center speaker.
The default setting is 3m . You can adjust the range from 0.3m to 9.0m in steps of 0.3m .
6 Press to move on to the SURROUND speakers setting.
SURR. SP 3.0m
7 Use the and buttons to set the distance from your main listening position to the surround speakers.
Ideally, your listening position should be equidistant from the surround speakers.
The default setting is 3m . You can adjust the range from 0.3m to 9.0m in steps of 0.3m .
8 Press ENTER to make the last setting and exit.
- The setting mode is automatically exited if no operation is performed within 20 seconds.

Note
- There are several other settings that you can make from the System Setup menu to further enhance the surround sound. See chapter 10 for more on this.
- The speaker distance settings have no effect when the surround mode is set to VIRTUAL SURR.1 or VIRTUAL SURR.2. See chapter 5 for more on surround modes.
Balancing the surround sound
You can further improve surround sound performance by balancing the levels from the subwoofer, center and surround speakers relative to the front left/right speakers. To help you judge the sound level of each speaker a test tone is played through each speaker in turn (make sure that there are no headphones connected). Adjust the levels until they all sound equal. The levels you set here will apply to all surround modes. However, you can set levels independently for each DSP mode (see page 69 for more on this).

Note
It may not be possible to accurately adjust the subwoofer level using this method. You may prefer to leave it on its default setting and adjust it to your liking later when playing surround-sound sources.
1 Press SURROUND.
STANDARD
The surround mode can be set to anything except SURROUND OFF or AUTO (No test tone is output if the surround mode is set to either of these settings.)
2 Set the volume to a moderate level.
3 Press TEST TONE (SHIFT and CLR) to start the test tone then adjust the master volume to a suitable level.
The test tone plays through each speaker in turn:
- Front left
Center - Front right
- Surround right
- Surround left
- Subwoofer
4 Use the and buttons to adjust the level of a speaker as the test tone plays.

For best results, sit in your main listening position when doing this. You can adjust each speaker in the range of +/-10dB.
5 When you're done, press TEST TONE to turn off the test tone.
Setting the TV System (Except US model)
The default setting of this player is AUTO, and unless you notice that the picture is distorted when playing some discs, you should leave it set to AUTO.
If you experience picture distortion with some discs, set the TV system to match your country or region.

Note
When set to NTSC, PAL encoded DVD discs are output as is.
1 Make sure that the system is in standby.
2 Press SYSTEM MENU.
3 Press or repeatedly until you see VIDEO SELECT appear in the display.
4 Press ENTER.
5 Use or to select the video system. Switch between AUTO, PAL and NTSC.
6 Press ENTER.
Before playing any discs, we strongly recommend using the Setup Navigator. This makes some basic DVD system settings for you.
1 Press STANDBY/ON to switch on.
Also turn on your TV and make sure that it is set to the correct video input.
- If a disc already loaded starts playing, press to stop it.
2 Press DVD SETUP.
The Setup Navigator on-screen display (OSD) appears:
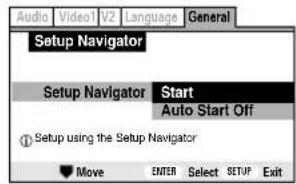
Navigate all of the following OSDs using these controls:
, -cursorup/down
ENTER - select the highlighted menu option
- go back to the previous question
The control possibilities for the current OSD are shown at the bottom of each screen.
-
Press ENTER to select the highlighted option.
-
If you decide you don't want to use the Setup Navigator, select Auto Start Off here instead.
4 Choose an OSD menu language.
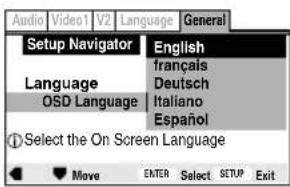

Note
- The language options shown in the on-screen display illustrations on the following pages may not correspond to those available in your country or region.
5 Select the type of TV you have.
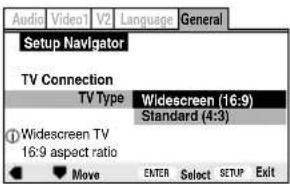
- See Aspect ratio in the glossary on page 93 if you're unsure of the difference between widenscreen and standard TVs.
6 Confirm all the settings.
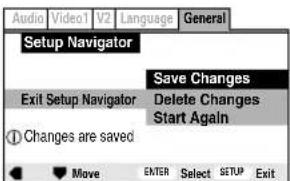
Congratulations, you've set up your system!
If you want to use the Setup Navigator again at any time, it is available from the General menu. Also, each individual setting can be changed using the appropriate menu option—chapter 10 explains all menu options in detail.
Setting up the remote to control your TV
You can set up the supplied remote to control your TV.
1 Switch on your TV.
2 Find the name of the manufacturer of your TV in the table on the following pages.
European model: See the code list on the following page.
US model: See the code list on page 27.
Next to each manufacturer is one or more three-digit codes. These tell the remote what kind of TV you have.
- If the name of the manufacturer of your TV does not appear in the table, you won't be able to set up this remote to control your TV.
3 Point the remote at your TV, hold down the CLR button, then enter the three digit code for your TV.
The remote transmits an on/off signal to the TV. If you've entered the correct code, your TV should switch off.
If your TV doesn't turn off, repeat the procedure using the next code in the list until your TV switches off.
Using this remote with your TV
The table below shows the TV controls available from this remote for Europe.
| Button | What it does |
| POWER | Press to switch your TV on or into standby |
| CH +/- | Press to change the TV channel |
| VOL +/- | Press to turn up the TV volume |
| INPUT | Press to switch the TV's input between the built in TV tuner and an external video source. |
(European code list)
| Manufacturer Code(s) | ||||||||
| Fabricant Code(s) | ||||||||
| AIWA 138 142 143 | ||||||||
| AKAI 504 505 515 548 550 562 563 | ||||||||
| ALBA 512 515 568 569 | ||||||||
| AMSTRAD 561 567 568 569 570 571 | ||||||||
| BAUR 562 563 | ||||||||
| BLAUPUNKT | 548 | 550 | 556 | |||||
| BRANDT | 544 | 545 | 564 | 565 | ||||
| BUSH | 508 | 512 | 513 | 514 | 515 | 559 | 568 | 569 |
| CONTINENTAL EDISO | 545 | 564 | 565 | |||||
| DAEWOO | 515 | 558 | 106 | 135 | 196 | |||
| DUAL | 559 | |||||||
| EMERSON | 561 | 562 | 563 | |||||
| FERGUSON | 515 | |||||||
| FINLUX | 515 | 535 | 536 | 537 | 538 | 539 | 542 | 543 |
| FISHER | 507 | 504 | 505 | 111 | ||||
| FUJITSU | 139 | 156 | 157 | 160 | ||||
| FUNAI | 508 | 141 | 136 | 137 | 140 | 146 | 147 | 155 |
| GOLDSTAR | 515 | 104 | ||||||
| GOODMANS | 515 | 542 | 543 | 558 | 569 | |||
| GRAETZ | 560 | 562 | 563 | 566 | ||||
| GRUNDIG | 548 | 550 | ||||||
| HITACHI | 507 | 100 | 530 | 544 | 545 | 566 | 104 | 113 |
| 183 | ||||||||
| ICE | 141 | 569 | ||||||
| INNO HIT | 515 | |||||||
| ITT | 562 | 563 | 566 | 104 | 113 | 183 | ||
| ITT-NOKIA | 504 | 505 | 512 | 566 | ||||
| JVC | 527 | 114 | 158 | 159 | 167 | 184 | ||
| KENDO | 536 | |||||||
| LOEWE | 519 | 520 | 556 | |||||
| LOEWE OPTA | 556 | |||||||
| LUXOR | 507 | 562 | 563 | 566 | ||||
| MARANTZ | 117 | |||||||
| MATSUI | 503 | 504 | 505 | 508 | 512 | 513 | 514 | 542 |
| 543 | 515 | 561 | 566 | 567 | ||||
| MITSUBISHI | 519 | 520 | 525 | 526 | 548 | 550 | 567 | 104 |
| 105 | 117 | 172 | 198 | 124 | ||||
Manufacturer Code(s) Fabricant Code(s)
ADMIRAL 112 124 126
AIWA 138 142 143
AKAI 104
AOC 105
BELL&HOWEL 124 126 178
BROKSONIC 104 105 180
CENTURION 105
CIS HOTEL 199
CORONAD 164
CRAIG 109 110 108
CROSLEY 115
CURTIS MAT 104 107 110
DAEWOO 106 104 135 196
EMERSON 109 108 110 104 120 133 134 180
FISHER 111
FUJITSU 139 156 157 160
FUNAI 136 137 140 141 155 146 147
GE 112 101 104 132
GOLDSTAR 104 105 165
HITACHI 113 104 183
INTEQ 126 127
JC PENNY 104 112
JVC 114 158 159 167 184
KTV 104 110 166
LXI 112 104 115 111 107 105
MAGNASONIC 178
MAGNAVOX 115 105 104 116 129 168
MARANTZ 117
MEMOREX 178
MGA104 105
Manufacturer Code(s) Fabricant Code(s)
MITSUBISHI 117 104 105 124 172
MTC 101 103
NATIONAL 100 101 102 151
NEC 104 105
ORION 128
PANASGMIC 100 101 102 151 193
PHILCO 115 104
PHILIPS 115
PIONEER 118 101 107
PORTLAND 104
PRISM 101
PROSCAN 112 104 121 119 122 185
QUASAR 101 103
RADIOSHACK 112 105 117 110
RCA 112 104 121 119 122 130 131 161
162 163 132 169 186
Playing DVDs, CDs and Video CDs
The basic controls for playing discs are covered here. Further functions are detailed in the next chapter.
1 Press STANDBY/ON (remote or front panel) to turn on the system.
2 Press DVD/CD.
3 Touch the OPEN/CLOSE sensor (front panel only) to open the disc tray.
4 Load a disc.
Load a disc with the label side facing up, using the disc tray guide to align the disc (if you're loading a double-sided DVD disc, load it with the side you want to play face down).
5 Press /II to start playback of the disc just loaded.
On the front panel, touch the / touch-sensor to start playback.
- If you're playing a DVD or Video CD, a menu may appear. See pages 30-31 for how to navigate these.
Basic playback controls
Button What it does
/IIS starts playback or pauses a disc that's playing (press again to restart playback). DVD and Video CD only: Resumes playback of a stopped disc.
■ Stops playback. DVD and Video CD only: Display shows RESUME (press /II to start playback again from the last place stopped).
1. Press & hold for fast reverse scanning. Release to resume normal playback. 2. Press once to start reverse scanning. Press again to increase the scan speed. (CD and Video CD have two scan speeds; DVD has three.) Press /II to resume normal playback.
▶▶1. Press & hold for fast forward scanning. Release to resume normal playback. 2. Press once to start forward scanning. Press again to increase the scan speed. (CD and Video CD have two scan speeds; DVD has three.) Press▶/II to resume normal playback.
14 Skips to the start of the current track or chapter, then to previous tracks/chapters.
Skips to the next track or chapter.
Numbers If the disc is stopped, playback starts from the selected track or title number. If the disc is playing, playback jumps to the start of the selected track or chapter number.
10 Selects tracks/titles/chapters 11 and over. (For example, for 24, press >10 , 2, 4.)
DVD and Video CD only:
II (SHIFT 1. Press to start slow-motion forward scanning. Press again to change the scanning speed (^1 / 16^1 / 8^1 / 4^1 / 2) . 2. When playing, press once to pause; advance a single frame with each subsequent press.
DVD only:
- Press to start slow-motion reverse scanning. Press again to switch between SLOW 1 and SLOW 2 scanning speed. 2. When playing, press once to pause; reverse a single frame with each subsequent press.

Important
While using the DVD playback controls, you may see the or mark displayed on-screen.
means that the operation is not allowed by the system.
means that the operation is not allowed by the disc.
Navigating DVD disc menus
Many DVD discs contain menus. Sometimes these are displayed automatically when you start playback; others only appear when you press MENU or TOP MENU.
Button What it does
TOP MENU Displays the 'top menu' of a DVD disc—this varies with the disc.
MENUDisplaysaDVD disc menu—this varies with the disc and may be the same as the 'top menu'.
RETURN Returns to the previously displayed menu screen.
Moves the cursor around the screen
ENTER Selects the current menu option
Numbers Selects a numbered menu option (some discs only)
Some Video CDs have menus from which you can choose what you want to watch. These are called PBC (Playback control) menus.
You can play a PBC Video CD without having to navigate the PBC menu by starting playback using a number button to select a track, rather than the / button.
Button What it does
RETURN displays the PBC menu.
Numbers Selects a numbered menu option.
1 Displays the previous menu page (if there is one).
- Displays the next menu page (if there is one).
Press to select an item from a PBC menu.
Station naming buttons
Listening to the radio
The following steps show you how to tune in to FM and AM radio broadcasts using the automatic, manual and high-speed tuning functions. Once you are tuned to a station you can memorize the frequency for recall later—see Saving station presets on the following page for how to do this.
1 Press TUNER FM/AM to select the tuner.
Press repeatedly to switch between FM and AM bands.
| FM | 87.50MHz |
| AM | 531kHz |
2 Tune to a station.
There are three ways to do this:
Automatic tuning
To search for stations in the currently selected band, press and hold either the or button for about a second. The system will start searching for the next station, stopping when it has found one. Repeat this step to search for other stations.
- Manual tuning
To change the frequency one step at a time, press the or buttons.
High-speed tuning
Press and hold the or button for high speed tuning, releasing the button once you reach the frequency you want.
- It's also possible to use the and buttons for tuning.
| FM | 87.50MHz |
| AM | 531kHz |
Improving FM stereo sound
If you're listening to a stereo FM broadcast, but find that there is a lot of noise because of a weak signal, try switching to mono.
1 Press SYSTEM MENU and select TUNER MENU.
TUNER MENU
- Change menu options using the and buttons. Press ENTER to select the currently displayed option.
2 Select FM AUTO/MONO from the tuner menu.
FM AUTO/MONO
- Change menu options using the and buttons. Press ENTER to select the currently displayed option.
3 Select FM AUTO or FM MONO.
- Change menu options using the and buttons. Press ENTER to select the currently displayed option. When listening in mono, the indicator lights in the display.
Saving station presets
If you often listen to a particular radio station, it's convenient to have the receiver store the frequency for easy recall whenever you want to listen to that station. This saves the effort of manually tuning in each time. This system can save up to 30 station presets. When saving FM frequencies, the receiver also saves the mono setting (see above).
1 Tune to a station you want to memorize.
See Listening to the radio on the previous page for more on how to do this.
4 Press or to select a station preset number.
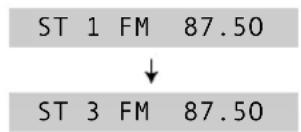
5 Press ENTER to save the station preset.
Repeat these steps to save up to 30 station presets.
■ Listening to station presets
Having saved up to 30 station presets (see above), you can be listening to a station with a couple of button presses.
1 Press TUNER FM/AM to switch to the tuner.
2 Use the | / | or the / buttons to select the station preset you want to listen to.
Alternatively, use the number buttons (use the >10 button for numbers over 10).
- If the system is left disconnected from the AC power outlet for a lengthy period, the station presets will be lost and will have to be reprogrammed.
Naming station presets
For easier identification, you can name your station presets.
1 Recall the station preset you want to name.
See Listening to station presets on the previous page for how to do this.
2 Press SYSTEM MENU and select TUNER MENU.
TUNER MENU
- Change menu options using the and buttons. Press ENTER to select the currently displayed option.
3 Select STATION NAME from the tuner menu.
STATION NAME
- Change menu options using the and buttons. Press ENTER to select the currently displayed option.
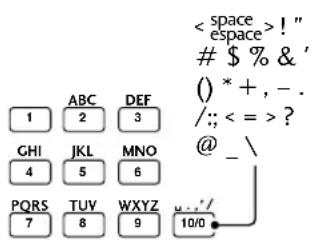
4 Press DISP/CHARACTER to change the character set.
You can switch between alphabet (upper case), alphabet (lower case), numbers and symbols.
5 Use the and buttons to change the displayed character; press ENTER to select it.
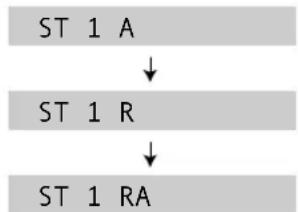
- Press CLR to clear a character.
- Use the and buttons to move the cursor in the display.
- You can also use the number buttons to select characters. See the diagram on page 32 for which buttons correspond to which characters.
6 Enter the rest of the station name in the same way.
7 When you're done, press SYSTEM MENU to exit.
- Press SYSTEM DISP to change the information shown in the display.
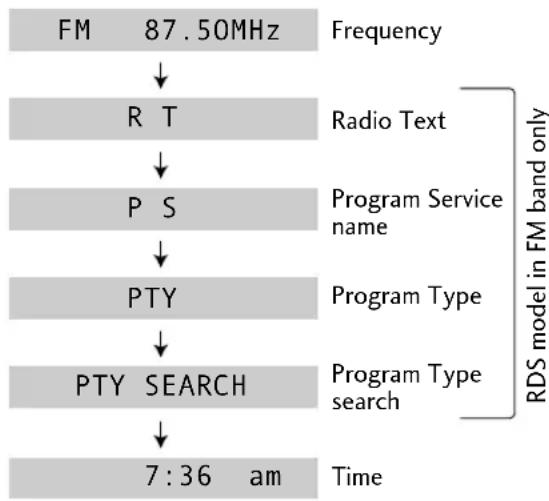
(RDS displays are available on European model only)
Playing other connected components
You may have connected various other components to your system using the analog or digital auxiliary inputs.
1 Press VIDEO V1/V2/V3 to select an auxiliary input.
2 For inputs V1 and V2^* only: Press SYSTEM MENU and select INPUT SEL.
-
Change menu options using the and buttons. Press ENTER to select the currently displayed option.
-
European model only
3 Use the or button to select an auxiliary input.
AUX ANALOG
AUX DIGITAL
4 Press ENTER.
- AUX ANALOG
AUX DIGITAL
- For detailed instructions on using the optional MD or tape deck, see the included operating instructions.
- For more on controlling your TV using this remote control, see page 26.
Reducing the auxiliary input level
If a component you connected to an analog input causes the sound to distort, the input level is probably too high. You can reduce it by turning on the video input attenuator.
1 Switch the system into standby.
2 Press SYSTEM MENU and select VIDEO ATT.
- Change menu options using the and buttons. Press ENTER to select the currently displayed option.
3 Use the or button to select VIDEO 1, 2 or 3 ATT, then press ENTER.
4 Select ATT ON or ATT OFF as required.
- Change menu options using the and buttons. Press ENTER to select the currently displayed option.

Remarque
This menu gives you access to various amplifier sound settings:

Note
The bass and treble settings have no effect when using the DSP modes, or when the Surround mode is set to anything other than STANDARD or SURROUND OFF.
1 Press SOUND.
2 Use the or buttons to select an option from the Sound menu.
BASS 0
Adjusts the level of bass.
TREBLE 0
Adjusts the amount of treble.
EFFECT 70
Adjusts the amount of Advanced Theater or DSP effect (not available on all effects).
P.BASS ON
Switches extra bass boost on or off.
MIDNIGHT ON
Switches the low-level listening mode on or off.
3 Use the and buttons to adjust the currently selected option.
You can see the current setting in the display.
4 Press ENTER to set the level and exit the Sound menu.
- If you don't press ENTER, the Sound menu is exited anyway after about 5 seconds.
This system offers several ways to enjoy surround sound and stereo sources. When playing Dolby Digital, Dolby Surround, Dolby Pro-Logic or DTS sources, we recommend using the surround mode to ensure proper surround sound. From the surround mode you can choose one of the Advanced Theater effects to add room-type effects to the source.
If you want to add room-type effects to stereo sources, we recommend using the DSP effects. Like the Advanced Theater effects, these add ambience to the source to simulate different spaces, such as a concert hall or a club.
Playing Dolby/DTS sources
Switch on the surround mode when you play a Dolby Surround, Dolby Digital or DTS source. Use the Advanced Theater effects to add room effects to the surround sound.

Note
The surround mode cannot be used with 96kHz / 24 -bit sources, or in combination with DSP effects.
1 Press SURROUND repeatedly to select a surround mode.
The display shows the current surround mode.
AUTO
For digital sources, decoding is automatically selected according to the source: Dolby Digital, DTS, Dolby Pro Logic, 2-channel stereo, etc. No extra effects are added to the source. Analog sources are played in the same way as the Surround Off setting.
Lecture de sources Dolby/DTS
As AUTO, except that 2-channel (analog or digital) sources are processed using Dolby Pro Logic for surround-sound effects.
MUSICAL
Concert hall sound.
DRAMA
Classic, mid-size movie theater sound.
ACTION
Large, modern movie theater sound.
VIRTUAL SURR.1
Virtual surround sound from just the main front stereo speakers and the subwoofer. Use this mode if you can't use the surround speakers.
VIRTUAL SURR.2
Virtual surround sound if you have connected the surround speakers, but are using them in front of your listening position.
REAR WIDE
Widens the rear channel soundstage.
SURROUND OFF
All sources are played through only the front left and right speakers, and the subwoofer. No effects are added.
2 If necessary, adjust the effect level.
- Select EFFECT from the Sound menu and adjust using the and buttons. Press ENTER to set the level.
EFFECT 70
You can adjust the effect level in the range of 10 to 90 in steps of 10.
STANDARD
Playing other stereo sources with DSP effects
You can add room effects to audio CDs and other stereo sources using the DSP modes. Different effects work better with different kinds of music, so don't be afraid to experiment a little.

Note
- The DSP effects cannot be used with 96kHz / 24 -bit sources, or in combination with a surround mode.
- When playing stereo sources with DSP effects switched off, there is no sound from the surround and center speakers.
1 Press DSP repeatedly to select a sound mode.
The display shows the current DSP mode.
HALL1
Large, wood-paned concert hall sound.
HALL2
Large, stone-walled concert hall sound.
JAZZ
Live jazz club sound.
DANCE
Nightclub sound.
THEATER1
Classic, mid-size movie theater sound.
THEATER2
Large, modern movie theater sound.
- SIMUL.STEREO
Virtual stereo for mono sources.
2 If necessary, adjust the effect level.
- Select EFFECT from the Sound menu and adjust using the and buttons. Press ENTER to set the level.
EFFECT 70
You can adjust the effect level in the range of 10 to 90 in steps of 10.
- Most of the functions covered in this chapter apply to DVD discs, Video CDs and CDs, although the exact operation of some varies slightly with the kind of disc loaded.
- When playing DVD discs, if the 8 or 9 con
appears on-screen when you try and use a particular function, either the player or the disc doesn't allow the use of that function.
- When playing Video CDs, some of the functions are not available in PBC mode. If you want to use them, start the disc playing using a number button to select a track.
Finding what you want on a disc
DVD Video CD MP3
You can directly access any point on a disc using one of the search modes. Use these search modes while a disc is playing, or when it's stopped—playback immediately starts from the point specified.
1 Press SEARCH to choose between:
- Title search (DVD only)
Chapter/Track search - Time search (DVD and Video CD only)
- Folder search (MP3 only)
- Off
2 Enter the title/chapter/track number or time (minutes & seconds).
For example, for title 4, press 4.
For chapter/track 12, press 1, 2.
For 45 minutes into the disc,
press 4,5,0,0.
3 Press /II to start/restart playback.
Introduction
Switching camera angles DVD
Some DVD discs feature scenes shot from two or more angles—check the disc box for details: it should be marked with a icon if it contains multi-angle scenes.
-
To switch the camera angle, press ANGLE. If the disc was paused, playback starts again with the new angle.
-
To hide the TV angle indicator, choose Angle Indicator > Off from the Video 2 menu (see page 77).
Switching subtitles DVD
Many DVD discs have subtitles in one or more languages—the disc box will usually tell you which subtitle languages are available. You can switch subtitle language anytime during playback.
- To display/switch the subtitle language, press SUBTITLE repeatedly.
-
To switch off subtitles, press SUBTITLE then CLR.
-
To set subtitle preferences, see page 78.
Switching audio language DVD
When playing a DVD disc recorded with dialog in two or more languages, you can switch audio language anytime during playback.
- To display/switch the audio language, press AUDIO repeatedly.
To set audio language preferences, see page 77.
Switching audio channels
Video CD CD MP3
For karaoke or similar format CDs and Video CDs, it's possible to select stereo, left channel only, or right channel only.
To change the playback channel, press AUDIO.
Press repeatedly to switch between:
LCH-Left channel only
- RCH - Right channel only
STEREO
Making a program list
DVD
Vide
CD
Making a program list means telling the player which titles/chapters/tracks you want played, and the order to play them in. You make a program list via an on-screen display, using the cursor buttons to navigate and the number buttons to enter titles/chapters/tracks.
DVD
1 Press PROGRAM.
2 Use the or button to select 'Program Chapter' or 'Program Title'.
3 Move the cursor down () to the program list window.
If you selected Program Chapter, move the cursor up () and enter a title number (all the programmed chapters will come from this title).
4 Enter the title/chapter numbers for your program list.
For titles/chapters 1-10, use the corresponding number buttons. For 11 and over, use the >10 button (>10, 2, 4 for 24, etc.)
- A program list can contain up to 24 steps.
5 If you want to save the program list, move the cursor down () to 'Program Memory' and set it to 'On'.
If you do this, the program list is automatically recalled when you next load the disc.
- You can save program lists for up to 24 discs.
6 Press ENTER or /II to start playback immediately, or PROGRAM to exit if you want to start playback later.

Note
During program play, you may occasionally see the start of a chapter that was not programmed when the chapter number changes. This is not a malfunction.
Video CD CD
For Video CDs that feature PBC, make sure that the disc is stopped before you start.
1 Press PROGRAM.
2 Enter the track numbers for your program list.
For tracks 1-10, use the corresponding number buttons. For 11 and over, use the >10 button (>10, 2, 4 for 24, etc.)
- A program list can contain up to 24 steps.