
MCR1310 - Browser Marquant - Free user manual and instructions
Find the device manual for free MCR1310 Marquant in PDF.
| Product type | GPS car stereo with DVD player, touch screen, Bluetooth and navigation |
| Power supply | 12 V DC (requires car battery) |
| Speaker impedance | 4 Ω |
| Radio frequency range | FM: 87.5 - 108.0 MHz, AM: 522 - 1620 kHz |
| Supported disc formats | DVD, VCD, SVCD, CD |
| Connectivity | Bluetooth (hands-free and A2DP streaming), USB, SD card, AV input, video outputs |
| Main functions | RDS radio, GPS navigation, multimedia playback, Bluetooth phone, touch screen, remote control |
| Screen | TFT screen with digital panel, touch calibration possible |
| Maintenance | Clean with a soft dry cloth; do not use abrasive products |
| Safety | 15 A fuse; professional installation recommended; handbrake required for certain video functions |
| Spare parts and repairability | Remote control with CR2025 battery, detachable faceplate, ISO cables; reset via RESET button |
Frequently Asked Questions - MCR1310 Marquant
User questions about MCR1310 Marquant
0 question about this device. Answer the ones you know or ask your own.
Ask a new question about this device
Download the instructions for your Browser in PDF format for free! Find your manual MCR1310 - Marquant and take your electronic device back in hand. On this page are published all the documents necessary for the use of your device. MCR1310 by Marquant.
USER MANUAL MCR1310 Marquant
- Power (TFT ON/OFF)
- Mute Button
- Mode Button
- Volume +/- Button
- Band Button
- Next Track Button
- Previous Track Button
- Title Button
22.Number Keys
7/AF(FOR RDS)
8/TA(FOR RDS)
9/PTY(FOR RDS)
- Playing Time Setting
- Setup Button
- ◀ / ▶ / ▲ / ▼
26.Enter Button
27.Track Switch (Audio) Button
28.Menu Button
29.Display Button
30.Fast Reverse Button - Fast Forward Button
32.Play/Pause Button - Stop Button
34.Sub-Title Button
35.Angle Button
36.Zoom Button - LOC Distance Reception Button
- Slow Movie Button
- Paragraph Repeat (A-B) Button
- Repeat Play Back Button
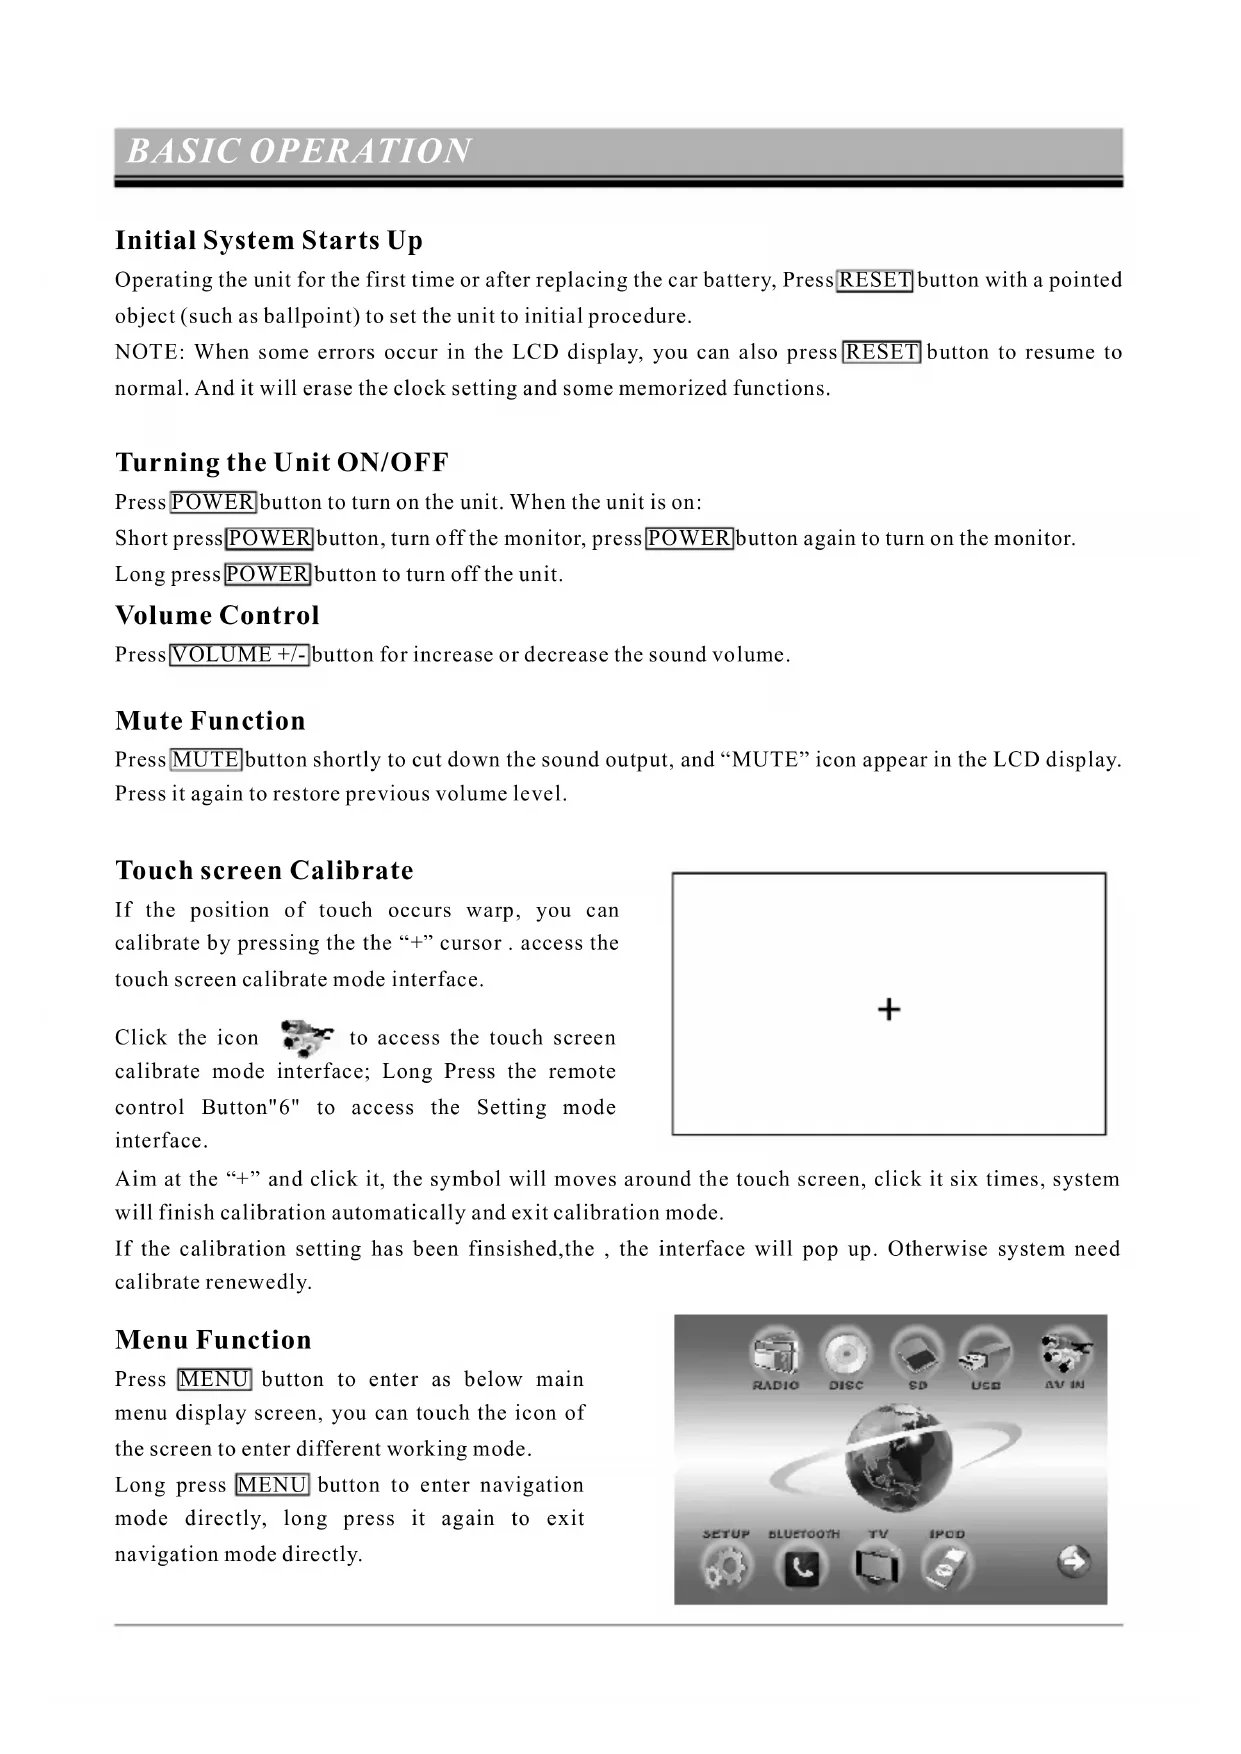
Initial System Starts Up
Operating the unit for the first time or after replacing the car battery, Press RESET button with a pointed object (such as ballpoint) to set the unit to initial procedure.
NOTE: When some errors occur in the LCD display, you can also press RESET button to resume to normal. And it will erase the clock setting and some memorized functions.
Turning the Unit ON/OFF
Press POWER button to turn on the unit. When the unit is on:
Short pressPOWERbutton, turn off the monitor, pressPOWERbutton again to turn on the monitor.
Long press POWER button to turn off the unit.
Volume Control
Press VOLUME +/- button for increase or decrease the sound volume.
Mute Function
Press MUTE button shortly to cut down the sound output, and “MUTE” icon appear in the LCD display. Press it again to restore previous volume level.
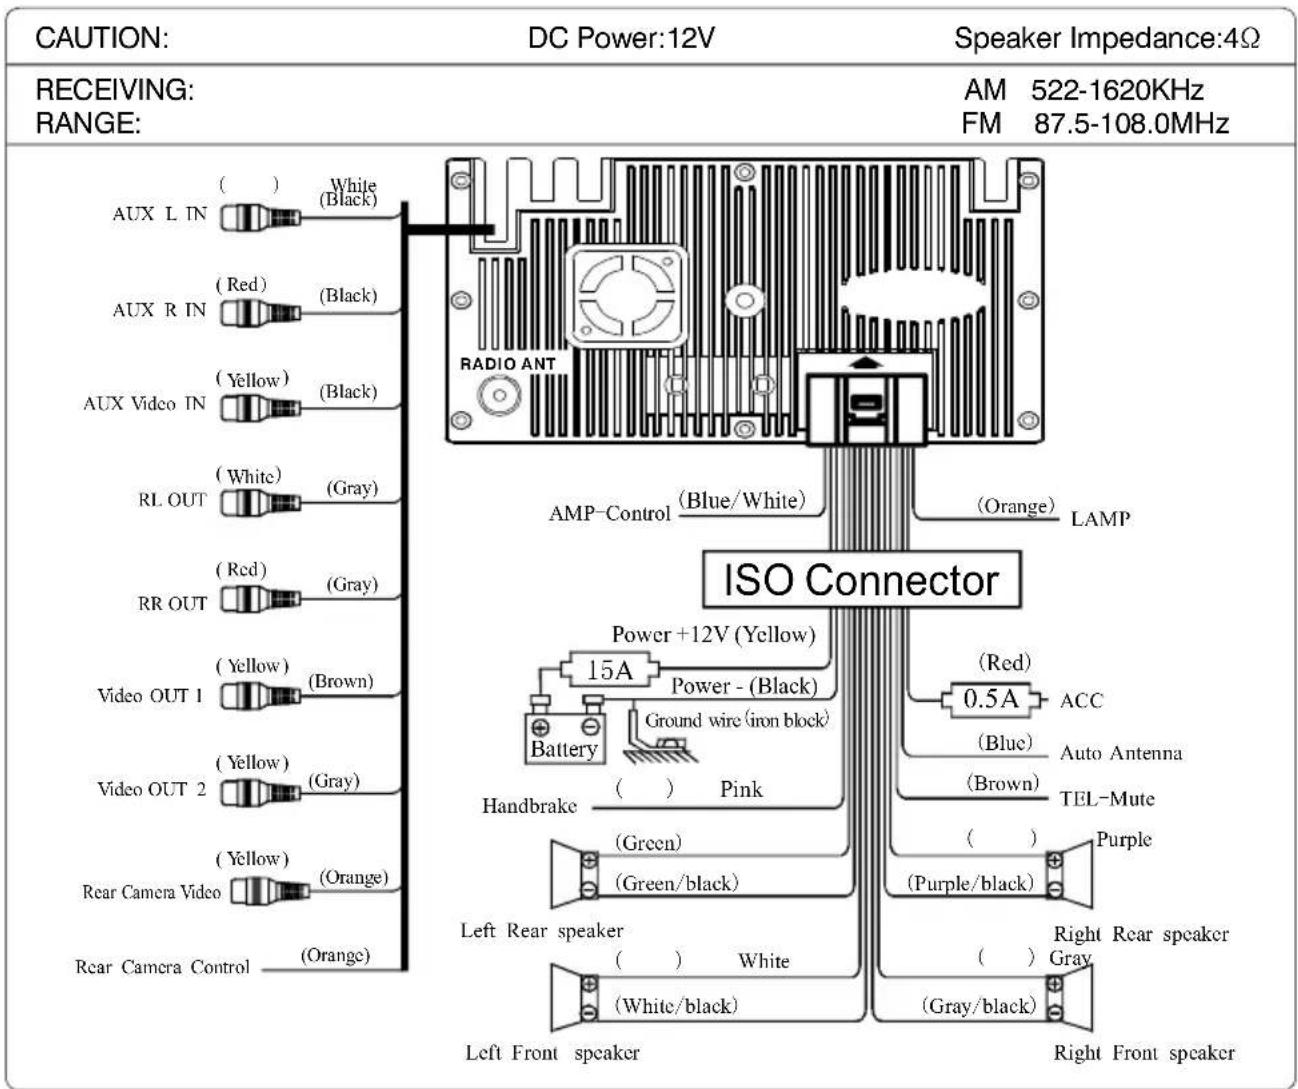
Touch screen Calibrate
If the position of touch occurs warp, you can calibrate by pressing the the “+” cursor. access the touch screen calibrate mode interface.
Click the icon 📁 to access the touch screen calibrate mode interface; Long Press the remote control Button"6" to access the Setting mode interface.
Aim at the “+” and click it, the symbol will moves around the touch screen, click it six times, system will finish calibration automatically and exit calibration mode.
If the calibration setting has been finished, the , the interface will pop up. Otherwise system need calibrate renewedly.
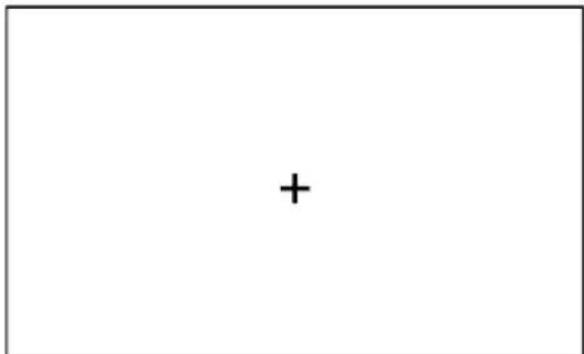
Menu Function
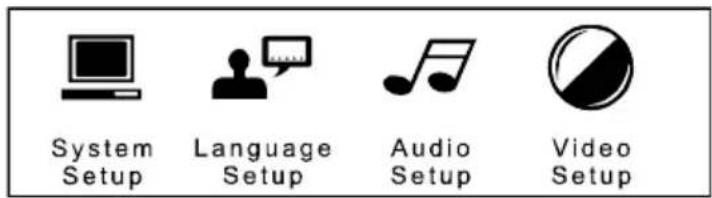
Press MENU button to enter as below main menu display screen, you can touch the icon of the screen to enter different working mode.
Long press MENU button to enter navigation mode directly, long press it again to exit navigation mode directly.
Setting the general & display & audio setup
Touch 📄 icon in the screen to enter setting mode, as below picture. You can touch the screen to set up the audio, display, time parameters etc.

General Setup
This item is for Selecting a General.
- The time required for 12 hours, 24 hours; Hour system or choice
- ON/OFF Beep.

Display Setup
This item is for Selecting a Display.
You can adjust each item by pressing the
icon ◀ or ▶ in the touch screen.
-Brightness: 00\~50
-Color:00\~50
-Saturation:00\~50
Click the icon "Bright Soft Stand Custom"
to access the System Default setup.


Audio Setup
This item is for Selecting a Audio.
You can adjust each item by pressing the
icon ◀ or ▶ in the touch screen.
-BASS: -7 / +7
-TREBLE:-7/+7
-LOUD: ON/OFF
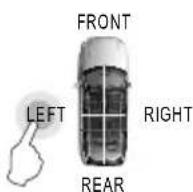
-Click the "Left/Right" to access the Balance Setup.
-Click the "Front/Rear" to access the Fader Setup.
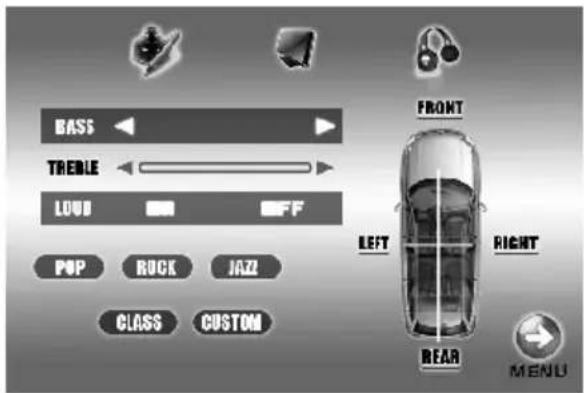
Click the icon "POP ROCK JAZZ CLASS CUSTOM" to access the EQ setup.
After finishing setting, click the icon → to exit the menu setup interface.
IR Sensor
Receiver for wireless IR remote control.
- Touch the radio icon in the main menu display screen to select radio mode, the LCD will displays as following:
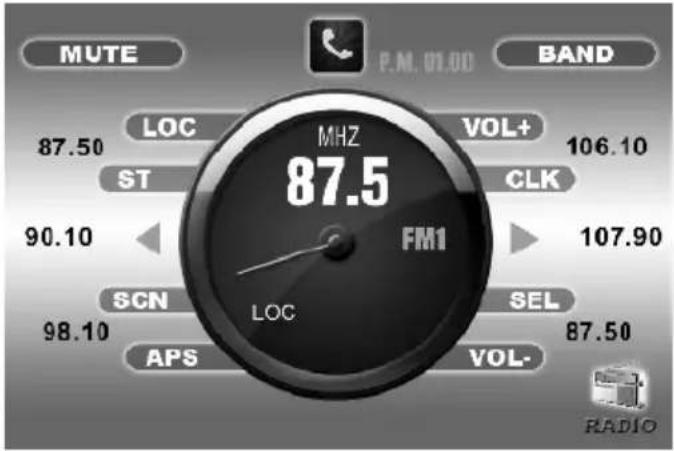
- Touch the icon "BAND" repeatedly to select bands in the following:
flowchart
graph LR
    A["→FM1"] --> B["→FM2"] --> C["→FM3"]
    D["AM2"] <--_E["→AM1"] <--_F["→AM2"]
-
Touch the icon "APS" or press APS key in IR handset shortly to activate automatically memory storing function.
-
Press SEEKING + or SEEKING - or icon ◀ / ▶ shortly to manual seek the radio station
-
Long press SEEKING + or SEEKING - or icon ◀ / ▶ to automatically seek the radio station
-
Touch the frequency bar in the display screen to select preset memory station.
-
Long press icon "APS" to scan each preset memory station for 10S.
-
Touch the icon "ST" or Press ST key in IR handset to set stereo or mono receiving mode.
-
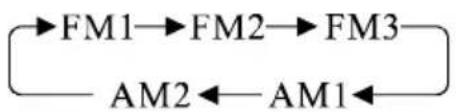
During radio mode, repeat press SEL button to select the desired mode in the following order:

flowchart
graph LR
    A["VOL"] --> B["BAS"]
    B --> C["TRE"]
    C --> D["BAL"]
    D --> E["FAD"]
    E --> F["BRI"]
    F --> G["CON"]
    G --> H["COL"]
After finishing setting, click the icon

to exit the menu setup interface.
AV-IN Operation
- Press the icon to enter main menu display screen.
- You can touch icon "AV-IN" to switch to your desired av in mode.
RDS operation
- Touch TFT displays "SEL" icon to access the RDS Setup interface.
- Long Press Click Using The Remote control "7" Button/Touch TFT displays "AF" icon, if showing AF in the LCD display, it is RDS mode, if no show AF, it is normal FM frequency.
-
Long Press Click Using The Remote control "8" Button/Touch TFT displays "TA" icon, enter traffic information frequency. When broadcast traffic information can switch to RDS mode automotive.
-
Long Press Click Using The Remote control "9" Button/Touch TFT displays "PTY" icon, You can select the title of RDS, press VOL+/- button to select as below program type:
| POP.M |
| NEWS |
| ROCK.M |
| AFFAIRS |
| EASY.M |
| INFO |
| LIGHT.M |
| SPORT |
| CLASSICS |
| EDUCATE |
| OTHER.M |
| DRAMA |
| JAZZ |
| CLUTURE |
| COUNTRY |
| SCIENCE |
| NATION.M |
| VARIED |
| OLDES |
| FINANCE |
| FOCK.M |
| CHILDREN |
| SOCIAL |
| RELIGION |
| PHONE N |
| TRAVEL |
| LEISURE |
| DOCUMENT |
Bluetooth Telephone Function
-
Pair the mobile phone with Bluetooth and the unit.
-
Turn on the Bluetooth function of your mobile phone
- Use your mobile phone to search the Bluetooth device
• Find out the Bluetooth device named "CAR KIT" - Connect the device by your mobile phone, please input "0000" while asking PIN code.
-
If displaying the successful message in your mobile phone, then finish the pairing operation.
-
Answer a calling
-
When coming call, the display will show the information of the calling phone number.
- Touch the icon 📋, you can hear the caller voice, press VOL+/- button to adjust volume.
- Speak to the microphone in the front panel, then you can talk with caller.
- Press the icon 📋 to hang off the calling.

• 3. Dial a phone number by IR remote handset
- Touch the icon 📊 to enter the Bluetooth mode in main menu screen.
- Touch the icon 0\~9, *, # to enter the phone number, touch the icon DEL to delete the previous number.
- Touch the icon 📞 to confirm and dial out the phone number.
- Press the icon 📋 to hang off the calling.
- Listen the Bluetooth Stereo Music (A2DP)
• Set your mobile phone Bluetooth to stereo music transmission
• Play music through multimedia play application of your mobile phone.
• Enter the Bluetooth mode.
• Then you can hear the music which the Bluetooth transfer.
• Press PLAY/PAUSE button to play or pause the music.
- Touch the icon I<< or >>I to skip the next or previous chapter.
NOTE: This function require your mobile phone supports the Bluetooth A2DP protocol.
Playing USB storage device and SD Card
To enjoy the music and video in SD card and USB storage device, only need to insert USB and SD card into the slot, so the unit starts to play automatically. After leave this mode, you can press MENU button and touch the media icon or to switch to Play USB storage or SD card.
Playing DVD/VCD/SVCD/CD Disc
1. Insert the multimedia disc
To enjoy the music and video in DVD/VCD/SVCD/CD disc, only need to insert a disc with labeled side up into the disc slot, so the unit starts to play automatically. After leave this mode, you can press MENU button and touch the icon 📷 to switch to Play the multimedia disc again. After leave this mode, you can touch the icon ➕ to go back main menu.
2. Eject the disc
Press EJECT button to eject the disc.
Pause the playing
Touch the icon ▶/□ to pause the playing, touch it again to restore playing.
Playing the next /previous chapter
Touch the icon 1 or >>1 shortly to skip the next or previous chapter.
Fast forward or remind playing
Long touch the icon I<< or >>I to fast forward or remind the disc.
Repeat playing
Touch the icon "RPT" to play one track repeatedly, Press RPT key in IR handset to play the track repeatedly.
Random Playing
Touch the icon "RDM" or Press [RDM] key in IR handset to play any track randomly.
On Screen Display
Press OSD key in IR handset, the screen will display Track/Chapter nbr, current playing time etc.
Program Playing
Press PROG key in IR handset to enter programming page, press arrow key and number key in IR handset to program the tracks to be played.
Audio selector
Repeatedly press AUDIO key in IR handset to change the different audio track mode.
Subtitle selector
Press SUB-T key in IR handset to select language.
Setting Disc playback time
Press GOTO key in IR handset to set the specific time to play, use arrow keys and number keys to set track/chapter on time, and press ENTER key to play.
Stop the playback
Press STOP key in IR handset to suspend the playback, press it again to stop the playback.
Multi-angle selector
Press ANGLE key in IR handset to watch the DVD content from different angle if the disc support.
Go to Title
Press TITLE key in IR handset to show all track's title on screen. Then press nbr keys or arrow keys to choose your desired track nbr and press ENTER key or PLAY/PAUSE key to start.
Enter setup model
- Press SETUP key in IR handset in the stop mode when playing multimedia.
- The main page of setup menu is displayed.
- Select the preferred item by using the arrow keys
- Press ENTER key to confirm setting.
Multimedia Playing Setup (system setup menu)
System Setup
The setup page include all the items of TV system, screen saver, TV type, password, rating & default features
TV system setup menu
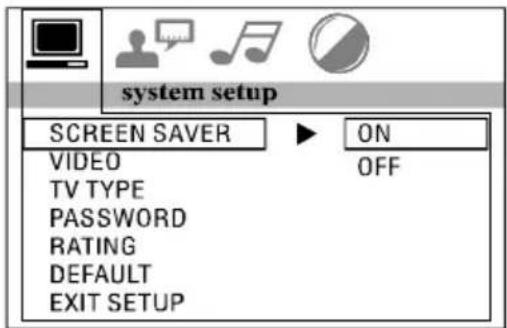
This player can play discs recorded in either PAL or NTSC format. Select NTSC format when you connected to NTSC TV. Select PAL format when you connected to PAL TV. If you select AUTO, the unit will auto select the format (PAL/NTSC) according to your disc content.
Video Setup Menu
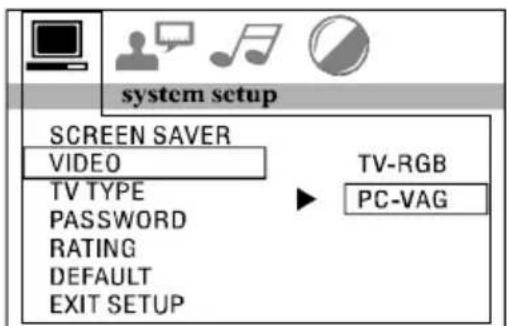
TV Type Setup Menu
1. 4:3 PS
Playback in the PAN & SCAN style. (If connected to wide-screen TV, the left and right edges are cut off)
2. 4:3LB
Playback in LEFTERR BOX style. (If connected to wide-screen TV, black bands appear at top and bottom of the screen).
3. 16:9
Select when a wide-screen TV set is connected.
Password Setup Menu
Enter the password and press ENTER button. Type the old password (The initial factory code is 0000) and key in 4 characters password now you want to use, and type again to confirm
Rating setup menu

Select suitable guidance rating by the cursor button and confirmed by pressing ENTER key.
Rating 1: [KIDSAFE]
Select this when the program are safe to all kid view.
Rating 2: [G]
Select this that allows admission to person of all ages.
Rating 3: [PG]
Select following when children under 13 are forbidden to view
Rating 4: [PG13]
Select following when children under 13 are forbidden to view.
Rating 5: [PG-R]
Select this when the PG-R was printed on the DVD disc.
Rating 6: [R]
Select this when children under 17 are forbidden to view.
Rating 7: [NC 17]
Select this when children under 17 are forbidden to view.
Rating 8: [ADULT]
Select this when only allows admission to all adults.
Default setup menu

Select restore to become factory initial setting.
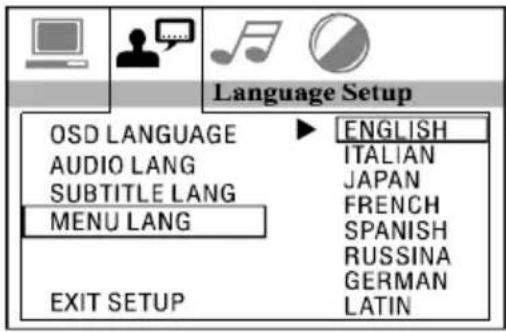
Language Setup
This setup page includes all the items of OSD language, Audio language, Subtitle Language and Menu Language features.
OSD Language Setup

Audio Language Setup
Subtitle Language Setup
Menu Language Setup
AUDIO SETUP
This setup page includes all the items for AUDIO.
Audio Out Setup
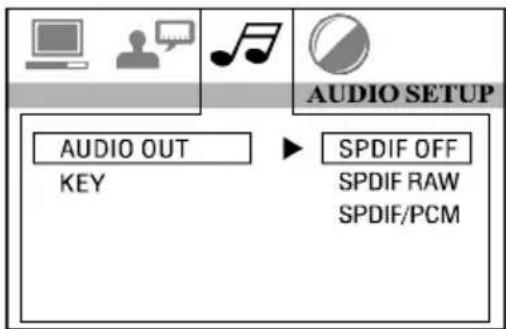
This is to activate the audio output from SPDIF OFF mode to SPDIF RAW mode or SPDIF PCM mode.
SPDIFOFF:
Analog or optical output port has no output signal at all.
SPDIFRAW:
When the player is connected with the power amplifier by the analog or optical port, please select this item when the playing disc which is recorded in Dolby Digital, DTS or MPEG. The analog or optical output signal of the unit will be the same as the digital signal (RAW format) of the playing disc. At the same time, the power amplifier you connected must have decode function of Dolby Digital, DTS or MPEG.
SPDIFPCM:
When the player is connected with the 2 channels, digital stereo amplifier, please select this item. When the playing disc which is recorded in Dolby Digital or MPEG. The analog or optical output will be modulated to 2 channels output by PCM.
Key Setup Menu

This is to select Treble or Bass according to your needs.
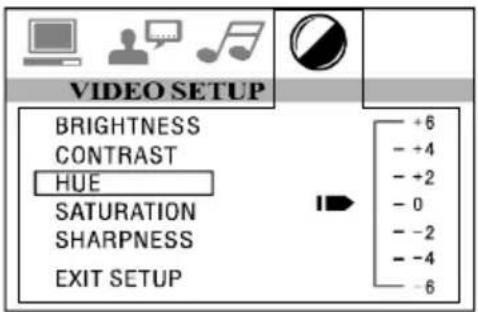
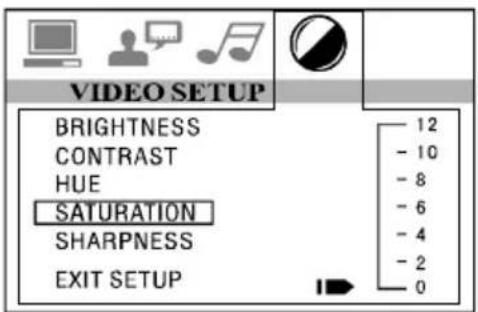
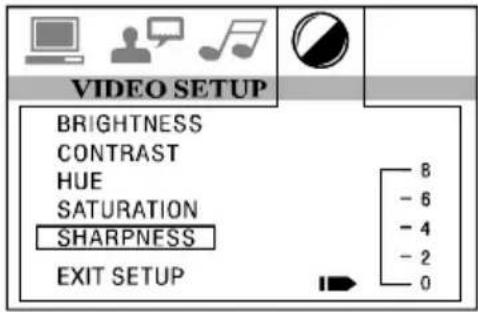
This is for the user to set Brightness, Contrast, Hue and Saturation of the picture by pressing the arrow left/right button.
Press ENTER key to confirm the change.
NOTE: Only on TV/AV mode, the Video setup is available.
VIDEO SETUP
This setup page includes all the items for VIDEO.
Brightness Setup Menu
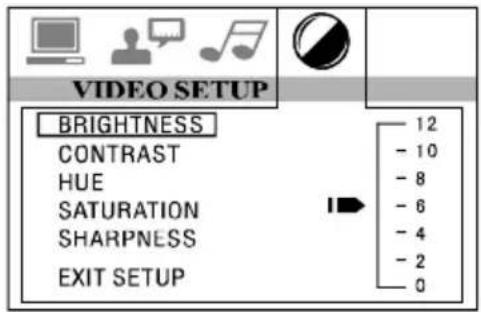
Contrast Setup Menu
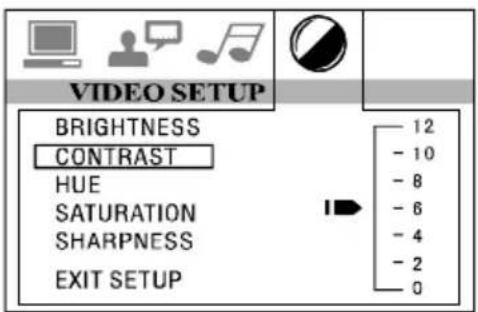
HUE Setup Menu
Saturation Setup Menu
Sharpness Setup Menu
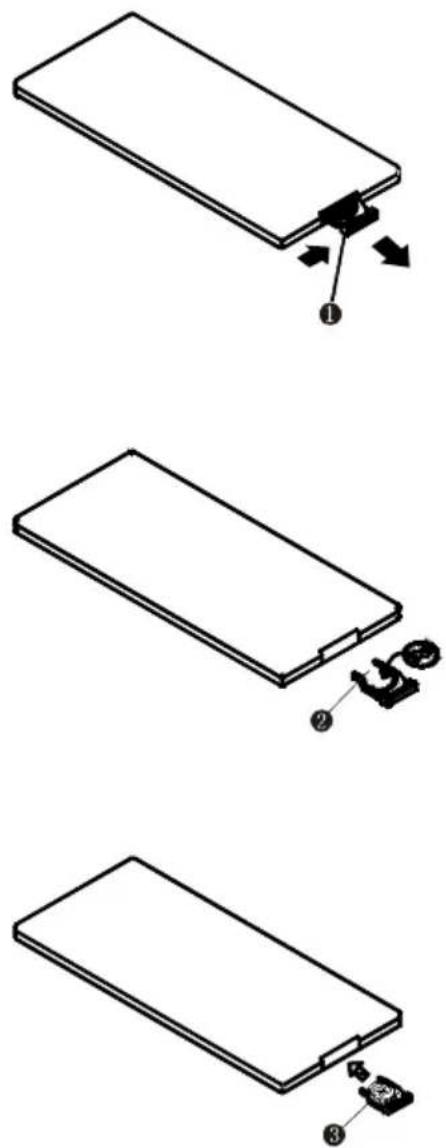
Replace the Battery
When the operational range of the remote control becomes short or non-functions while operating. Replace a new CR2025 battery. Make sure the battery polarity before replacement.
-
Pull out the battery holder while pressing the stopper 1.
-
Pull the button type battery (+) mark upward into the battery holder.
-
Insert the battery holder into the remote controller.
Notes:
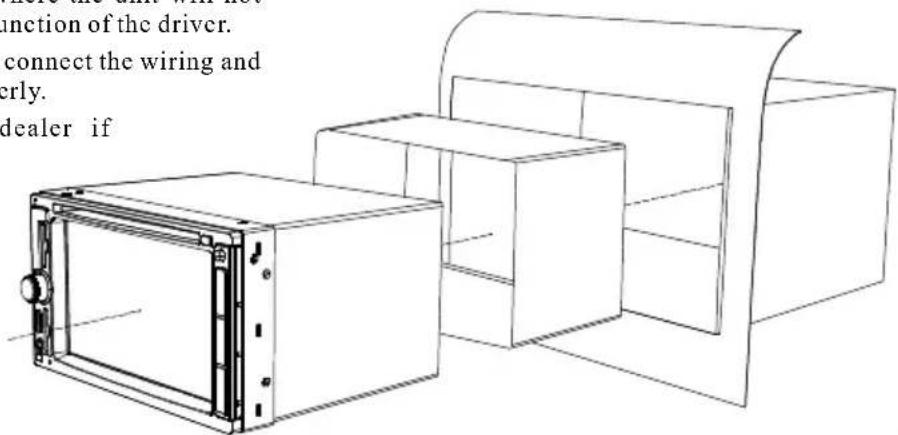
- Choose the mounting location where the unit will not interfere with the normal driving function of the driver.
- Before finally installing the unit, connect the wiring and make sure that the unit works properly.
- Consult with your nearest dealer if installation requires the drilling of holes or other modifications of the vehicle.
- Install the unit where it does not get in the driver's way and cannot injure the passenger if there is a sudden stop, like an emergency stop.
Remove the front panel
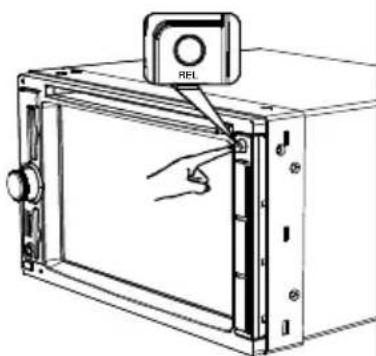
Press "REL" button, This part plastic will be detached. Please refer to the left of the test images.
NOTE:
With the panel removed, the system will stop all work, inorder to operate this system re-install the parcel.
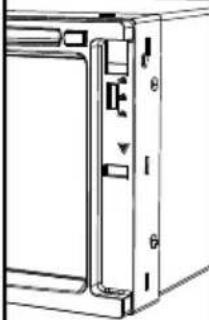
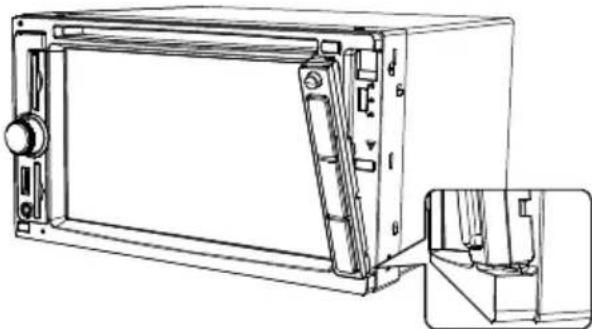
Uninstall Panel
natural_image
Technical line drawing of a door frame with mounting holes and a vertical guide (no text or symbols)Install the front panel
natural_image
Technical line drawing of a rectangular electronic device with internal components and a close-up inset showing a detail (no text or symbols)The Detached part install back into the unit the installation direction should be from down to up.
Please refer to the left of the test images.
NOTE:
The play with continue from the point it stopped in the media last time.
natural_image
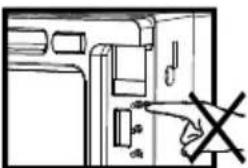
Diagram of a door handle with a hand pointing to a door panel, no text or symbols presentNOTE:
Please don't on the control panel with your finger, if may cause the connector contact failure installation direction should be from down to up, if connectors dirty application of clean soft cloth to wipe clean.
Bedienungsanleitung
TV Standard: PAL / NTSC.
Video Setup Menü

Rating / Bewertung
natural_image
Simple line drawing of a rectangular object with arrows indicating direction, no text or symbols presentnatural_image
Isometric line drawing of a rectangular electronic component with a small attached component (no text or symbols)natural_image
Isometric line drawing of a rectangular electronic device with a labeled component (no text or symbols)Installation
natural_image
Technical line drawing of a door frame with mounting holes and a handle (no text or symbols)natural_image
Technical line drawing of a rectangular electronic device with internal components and a close-up inset showing a detail (no text or symbols)Rating 1 : [KID SAFE]
natural_image
Simple line drawing of a rectangular object with arrows indicating direction, no text or symbols present![Marquant MCR1310 - Rating 1 : [KID SAFE] - 1](/content/2026/02/372522/images/10c0b546b9a46a5e83f66aeebada70612492810a929e2bc0a5c8aa5d9441de55.jpg)
natural_image
Technical line drawing of a rectangular electronic component with a small mechanical assembly attached (no text or symbols)![Marquant MCR1310 - Rating 1 : [KID SAFE] - 2](/content/2026/02/372522/images/66fb1fe9c842d9ef19b09e2aba0738184bbf55cdcea410f9264f4e95c1aec25c.jpg)
natural_image
Isometric line drawing of a rectangular electronic component with a small labeled component (no text or symbols)natural_image
Technical line drawing of a door panel with mounting holes and a handle (no text or symbols)natural_image
Technical line drawing of a mechanical device with internal components and an inset view showing a detail (no text or symbols)natural_image
Simple line drawing of a door with a hand pointing to the interior (no text or symbols)REMARQUE :
Rating 1: [KID SAFE]
natural_image
Simple line drawing of a rectangular object with arrows indicating direction, no text or symbols present![Marquant MCR1310 - Rating 1: [KID SAFE] - 1](/content/2026/02/372522/images/49ba8d966cd6a32269f9a951205e1f50462a075016ca42a1d5258190f276e19a.jpg)
natural_image
Isometric line drawing of a rectangular electronic component with a small mechanical component attached (no text or symbols)![Marquant MCR1310 - Rating 1: [KID SAFE] - 2](/content/2026/02/372522/images/74a2e5ef253a5d661ebb24e4d84feead8e557fe8be2c08099c9319ed4a6b5ed5.jpg)
natural_image
Isometric line drawing of a rectangular electronic component with a small labeled component (no text or symbols)natural_image
Technical line drawing of a rectangular electronic device with internal components and a close-up inset showing a detail (no text or symbols)natural_image
Simple line drawing of a door with a hand pointing to a door handle (no text or symbols)OPMERKING::

- Initial System Starts Up
- Turning the Unit ON/OFF
- Volume Control
- Mute Function
- Touch screen Calibrate
- Menu Function
- Setting the general & display & audio setup
- General Setup
- Display Setup
- Audio Setup
- IR Sensor
- AV-IN Operation
- RDS operation
- Bluetooth Telephone Function
- Playing USB storage device and SD Card
- Playing DVD/VCD/SVCD/CD Disc
- Insert the multimedia disc
- Eject the disc
- Pause the playing
- Playing the next /previous chapter
- Fast forward or remind playing
- Repeat playing
- Random Playing
- Program Playing
- Audio selector
- Subtitle selector
- Setting Disc playback time
- Stop the playback
- Multi-angle selector
- Go to Title
- Enter setup model
- Multimedia Playing Setup (system setup menu)
- System Setup
- 4:3 PS
- 4:3LB
- 16:9
- Rating setup menu
- Rating 1: [KIDSAFE]
- Rating 2: [G]
- Rating 3: [PG]
- Rating 4: [PG13]
- Rating 5: [PG-R]
- Rating 6: [R]
- Rating 7: [NC 17]
- Rating 8: [ADULT]
- Default setup menu
- Language Setup
- OSD Language Setup
- Audio Language Setup
- Subtitle Language Setup
- Menu Language Setup
- Audio Out Setup
- SPDIFOFF:
- SPDIFRAW:
- SPDIFPCM:
- Key Setup Menu
- VIDEO SETUP
- Replace the Battery
- Notes:
- Remove the front panel
- NOTE:
- Install the front panel
- Bedienungsanleitung
- Rating / Bewertung
- Installation
- Rating 1 : [KID SAFE]
- REMARQUE :
- Rating 1: [KID SAFE]
- OPMERKING::
Brand : Marquant
Model : MCR1310
Category : Browser