Innovis 780D - Sewing machine BROTHER - Free user manual and instructions
Find the device manual for free Innovis 780D BROTHER in PDF.
User questions about Innovis 780D BROTHER
0 question about this device. Answer the ones you know or ask your own.
Ask a new question about this device
Download the instructions for your Sewing machine in PDF format for free! Find your manual Innovis 780D - BROTHER and take your electronic device back in hand. On this page are published all the documents necessary for the use of your device. Innovis 780D by BROTHER.
USER MANUAL Innovis 780D BROTHER
-
Transferring embroidery patterns to the machine
-
Easily upgrading your machine
Bedienungsanleitung
USB-Funktion
This manual provides descriptions for transferring embroidery patterns from USB media to the machine. For details on other machine functions and operations, refer to the Operation Manual.
Using the Memory Function
Embroidery data precautions
Observe the following precautions when using embroidery data other than that created and saved in this machine.

CAUTION
- When using embroidery data other than our original patterns, the thread or needle may break when sewing with a stitch density that is too fine or when sewing three or more overlapping stitches. In that case, use one of our original data design systems to edit the embroidery data.
Types of Embroidery Data That Can Be Used
- Only .pes and .dst embroidery data files can be used with this machine. Using data other than that saved using our data design systems or sewing machines may cause the embroidery machine to malfunction.
Types of USB Media That Can Be Used
Embroidery data can be recalled from a USB flash drive (USB flash memory) of any size.

Note
- Only a USB flash drive (USB flash memory) can be connected to the USB port on this machine.
Some USB media may not be compatible with this machine. Visit our website for more details. - When using USB media equipped with an access indicator, the access indicator will begin flashing after the media is inserted into your computer or machine, and may take about 5 to 6 seconds before the media is recognized. (The length of time differs depending on the USB media.)
- For additional information, refer to the instruction manual included with the USB media that you have purchased.

Memo
- Letters and numerals can be used in file names. In addition, if the file name contains no more than eight characters, the entire file name will appear on the screen. If the file name is more than eight characters long, only the first six characters followed by "~" and a number appear as the file name. This applies to .dst embroidery data files only.
- Only the names of .dst files are displayed.
Precautions on Using the Computer To Create and Save Data
- If the file name of embroidery data cannot be identified, for example, because the name contains special characters, the file will not be displayed. If this occurs, change the name of the file. We recommend using the 26 letters of the alphabet (uppercase and lowercase), the numbers 0 through 9, " - ", and " _".
- All designs must be within the 18cm (H)× 13 cm (W) (Approx. 7 inches (H)× 5 inches (W)) design field size.
- If the selected pattern does not fit within the 18cm (H)× 13 cm (W) (Approx. 7 inches (H)× 5 inches (W)) design field size unless it is rotated 90 degrees, a message appears, asking if you wish to rotate the pattern 90 degrees.
- .pes files saved with the number of stitches, the number of colors and the number of combined patterns exceeding the specified limits cannot be displayed. Use one of our original data design systems to edit the embroidery pattern so that it meets the required specifications.
- Even if the embroidery unit is not attached, the machine will recognize embroidery data.
- Save the patterns in the root directory of the USB media. If embroidery data is saved in a folder on USB media, that embroidery data cannot be retrieved by the machine.
Tajima (.dst) Embroidery Data
- When a .dst file is imported, the only way that you can view the design is by selecting the pattern (file name).
Then press display the design on the screen.
Transferring embroidery patterns from the computer to machine

Note
- Only a USB flash drive (USB flash memory) can be connected to the USB port on this machine.
An embroidery pattern can be transferred to the machine from USB media containing data for no more than 200 embroidery patterns. - Embroidery patterns cannot be transferred to the machine if the USB media contains data for more than 200 embroidery patterns. In this case, reduce the number of designs saved on the USB media.
- In addition, if the embroidery designs contain too many colors (this number may vary within the designs themselves), it may not be possible to transfer an embroidery pattern to the machine, even if there are less than 200 embroidery patterns that have been saved on the USB media. In this case also, reduce the number of designs saved on the USB media.
- Save the patterns in the root directory of the USB media. If embroidery data is saved in a folder on USB media, that embroidery data cannot be retrieved by the machine.

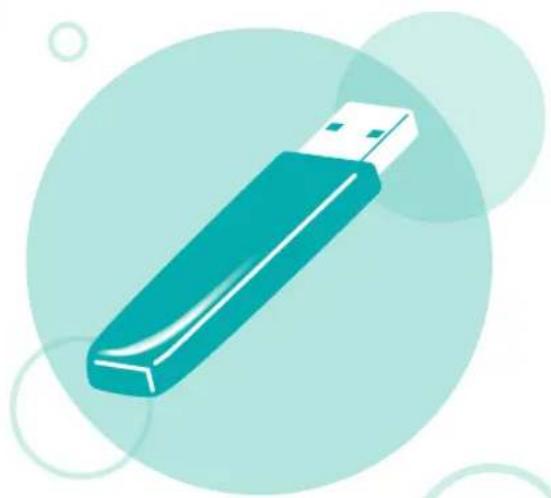
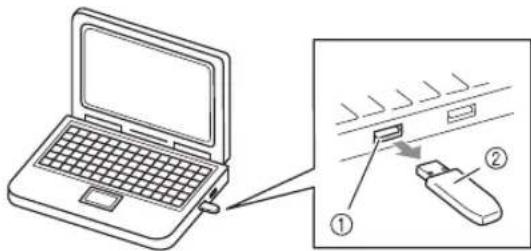
Insert the USB media into the USB port on the computer.
① USB port on the computer
② USB media

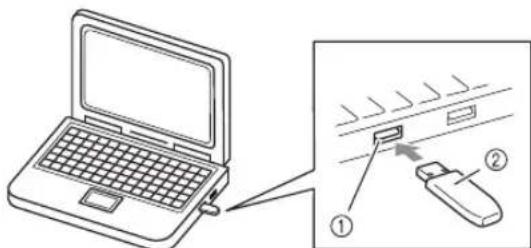
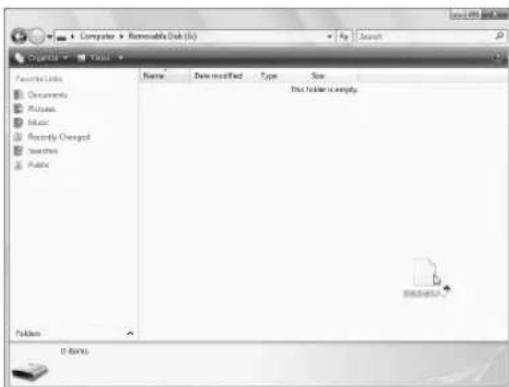
The "Removable Disk" icon appears in Computer (My computer) on the computer.

Copy the pattern data to "Removable Disk".

Safely remove the USB media from the USB port on the computer.
① USB port on the computer
② USB media

CAUTION
- Before disconnecting the USB media, click the "Unplug or Eject Hardware" icon in the taskbar of Windows® 2000 or the "Safely Remove Hardware" icon in the taskbar of Windows® XP/Windows Vista®.
Then, when the removable disk can safely be removed, disconnect the USB media from the computer.
Windows® XP

Windows Vista®


Insert the USB media into the USB port on the machine.
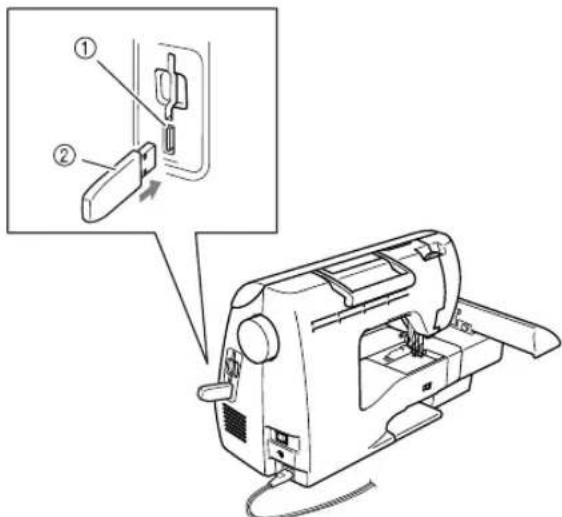
① USB port (for a USB flash drive (USB flash memory))
② USB media

Press
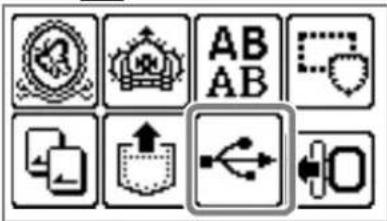

The saved patterns are displayed.

Note
- If the message "Reduce the number of patterns." appears, the USB media may contain either more than 200 embroidery patterns or the embroidery designs may contain too many colors (although there may be no more than 200 patterns).
In this case, unplug the USB media from the machine, plug it back into the computer, and then delete a few designs at a time from the USB media.
Close the error message on the machine, and then repeat procedures starting from step 5.

Memo
The pattern file names appear in alphabetical order.
- Only the names of .dst files are displayed.

Select the pattern you wish to retrieve.
Switch screens using (Previous page key) and (Next page key).
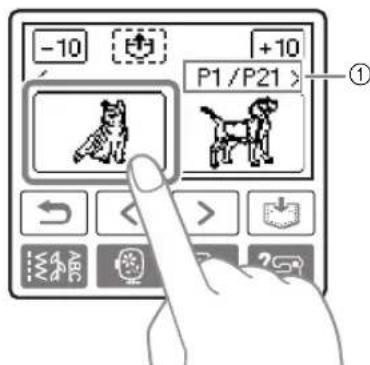
Number of the currently displayed page from the total number of pages
- When -10 is presented, the display of patterns moves forward or backward in increments of 10 designs.
The selected pattern is shown in reverse highlighting.

Press

The saved pattern is retrieved.
The embroidery screen appears, and you can embroider the retrieved pattern.

Adjust the pattern as desired, and then begin.
embroidering.
Error messages

Memo
This manual describes the error messages concerning the USB connection. For details on other error messages, refer to the Operation Manual.
| Error Message Probable Cause | |
| ① Do not change the USB media while it is being read. | You attempted to select a pattern after the USB media containing the pattern has been disconnected, then reconnected. |
| ① Load USB media. | You recalled a pattern while no USB media is connected. |
| ① Reduce the number of patterns. | A pattern was being retrieved from a USB flash drive (USB flash memory) containing more than 200 embroidery patterns. In addition, this message will appear if embroidery patterns containing many colors have been saved on the USB media, even if it contains data for no more than 200 patterns. |
| Retrieving the pattern. Wait a moment. | Retrieving the pattern |
Upgrading Your Machine's Software Using USB Media
You can use USB media and a computer to download software upgrades for your sewing machine. When an upgrade program is available on our website at "http://solutions.brother.com", please download the file(s) following the instructions on the website and steps listed below.


Note
- When using USB media to upgrade the software, check that no data other than the upgrade file is saved on the USB media being used before starting to upgrade.
- Upgrade file can be recalled from a USB flash drive (USB flash memory) of any size.

Memo
- When the machine's software is upgraded, saved combinations of character and decorative stitches are erased. However, saved embroidery patterns are not erased.
Press and hold the (Settings key) while turning on the machine.
The following screen appears.
Connect the USB media containing the upgrade file.
LOAD
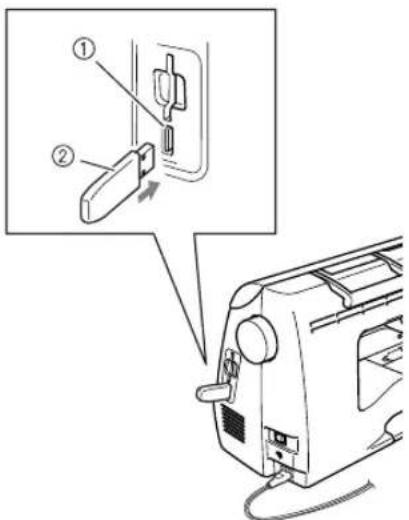
Insert the USB media into the USB port on the machine. The media device should only contain the upgrade file.

① USB port for media
② USB media

Note
- When using USB media equipped with an access indicator, the access indicator will begin flashing after the media is inserted into your computer or machine, and may take about 5 to 6 seconds before the media is recognized. (The length of time differs depending on the USB media.)

Press LOAD
The following screen appears.
Saving the
upgrade file.
Do not turn
main power to OFF.

Note
If an error occurred, a text error message will appear. At this time, turn the machine off, and then start the procedure again from step 1.

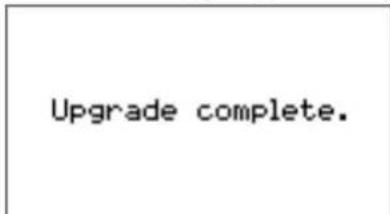
When the following screen appears, upgrading is completed.
Upgrade complete.

Remove the USB media, and turn the machine off and on again.
Einführung
Connect the USB media containing the upgrade file.
LOAD

BcTaBbTe USB-HocnteB USB-nopt MaunHbl. HocnteBdoJxehcoepXaTb TOIbKO paIn O6HOBHeHH.
① USB-nopt dЯ nódkloueHn HocnteJn daHHbIX
② USB-Hocntenb

Ppimechne
Ecnnncnoj3yeTc USB-HocnteIb c HNDKATOPOM COCTOHN, NOCNE NOKNIOUeyHNAHOCHTeJI K KOMNBIOTepy INN BblINBAJbHO MaUNHe INDkaTOP COCTOHN HAHTe MIRaTB; pacNO3HaBaHne HOCNTeJI KOMNBOTEpOM INN MaUNHO MOKeT 3aHrTb npIMepHO 5-6 CEkyH. (Heo6xOJnMOe BpeM paCNO3HaBaHn pa3NIuAeTcB 3aBNCmOcTn OT USB-HocnteJI.

HaxMnTe KhONky LOAD □IoBNTcraCneDyUOuN3Kp
Saving the
upgrade file.
Do not turn
main power to OFF.

Ppimechane
PnB03HKnHOBeHHmOuN6KnOTo6pa3ntc8 COOTBECTBYIOUe Coo6ueHHe O6 OUN6Ke. B 3TOM cIyae BbIKNoHTe MaunHy n HauHInTe onepaunio 3aHOBO c NyHKta 1

Korda 6OBHeHne 3aBepWntcra, NOBtca CneDyUoee coo6eHne:

OTcoeHNHTe USB-HocnteIb,3aTeM BbIKIOUHTe N CHOBA BKIOUHTe MaunHy.