
Aeres 25 XC8I - Air Conditioning Ariston Thermo - Free user manual and instructions
Find the device manual for free Aeres 25 XC8I Ariston Thermo in PDF.

| Product Type | Split air conditioner |
| Brand | Ariston Thermo |
| Model | Aeres 25 XC8I |
| Cooling/Heating power | 2.5 kW (estimated) |
| Power supply | 220-240 V ~ 50 Hz |
| Remote control | Yes, infrared, range 8 meters |
| Remote control batteries | 2 x AAA 1.5 V (LR03) |
| Operating modes | Auto, Cooling, Dehumidification, Heating, Ventilation |
| Fan speed | Auto, Low (LOW), Medium (MED), High (HIGH) - 12 levels |
| Louver adjustment | Vertical (SWING) and horizontal (SWING) |
| Timer | 24 h, programmable (combined TIMER ON/OFF) |
| Special functions | Sleep, Turbo, Self Clean, Silence, Follow Me, Intelligent Eye, Memory, Lock, LED |
| Temperature range | 17 °C to 30 °C |
| Automatic cleaning | Yes (Self Clean) |
| Safety instructions | Do not use aggressive products, comply with WEEE regulations |
Frequently Asked Questions - Aeres 25 XC8I Ariston Thermo
User questions about Aeres 25 XC8I Ariston Thermo
0 question about this device. Answer the ones you know or ask your own.
Ask a new question about this device
Download the instructions for your Air Conditioning in PDF format for free! Find your manual Aeres 25 XC8I - Ariston Thermo and take your electronic device back in hand. On this page are published all the documents necessary for the use of your device. Aeres 25 XC8I by Ariston Thermo.
USER MANUAL Aeres 25 XC8I Ariston Thermo
m = 311 ;
UTILIZZO DEL TELECOMANDO
Safety regulations 18
Using the remote control 19
Replacing the batteries 19
Function buttons 20
Display 22
Methods of using the buttons 23
Advice on energy savings 30
SAFETY REGULATIONS
READ THIS MANUAL THOROUGHLY AND KEEP IT IN A SAFE PLACE, AS IT CONTAINS IMPORTANT INFORMATION FOR THE SAFE INSTALLATION, USE AND MAINTENANCE OF YOUR NEW APPLIANCE.
Do not use insecticides, solvents or aggressive detergents to clean the device. Damage to plastic or painted parts.
Do not use the device for any purpose other than normal household operation. Damage to the device caused by operation overload. Damage to objects caused by improper use.
Do not allow children or inexperienced persons to operate the device. Damage to the device caused by improper use.
The device is not intended for use by persons (including children) with reduced physical, sensory or mental abilities, or that lack the necessary experience and knowledge, unless they are supervised or have been adequately trained in device operation by a person responsible for their safety.
Children must be supervised at all times to ensure that they do not play with the device.
THIS PRODUCT CONFORMS TO EU DIRECTIVE 2002/96/EC
The barred dustbin symbol appearing on the device indicates that the product must be disposed of separately from household waste once it reaches the end of its lifespan, and transferred to a waste disposal site for electric and electronic equipment, or returned to the dealer when purchasing a new device of the same kind.
The user is responsible for delivering the decommissioned device to a suitable waste disposal site.
Proper separated collection of the decommissioned device and its subsequent eco-compatible recycling, treatment and disposal helps to prevent negative effects on the environment and health, besides encouraging the reuse of the materials comprising the product.
For further details on the available waste collection systems, contact your local waste disposal office, or the dealer from which the product was purchased.
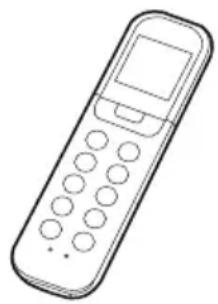
USING THE REMOTE CONTROL
Use the remote control within a distance of 8 meters in front of the appliance, pointing it at the receiver.
A beep confirms the correct reception of the signal.
Do not move the remote control away from the area from which the emitted signal may reach the receiver of the unit.
WARNING:
- The air conditioning unit will not operate in the presence of curtains, doors or other objects which obstruct the transmission of the signal from the remote control to the internal unit.
- Avoid any liquid coming into contact with the remote control.
- Do not expose the remote control to sunlight or heat sources.
- If the receiver of the infrared signal is exposed to sunlight, the air conditioning unit may not operate correctly. Use a curtain to stop the receiver being hit by sunlight.
- If other electric appliances react to the remote control, try solving this problem by moving them. If this does not work, contact the service centre.
REPLACING THE BATTERIES
The remote control is powered by two type AAA (1.5V LR03) alkaline batteries, housed in the rear compartment closed with a cover.
Replace the batteries as follows:
- Remove the cover by pressing it and sliding it off.
- Remove the dead batteries and insert new batteries taking care to the respect the polarity (+) and (-) .
- Reclose the compartment by sliding it into place.
NOTE: Removing the batteries causes all the programming of the remote control to be deleted.
Once the new batteries are inserted, the remote control must be reprogrammed.
WARNING:
- Do not mix dead and new batteries or batteries of different brands.
- Do not leave the batteries inside the remote control if you do not intend to use it for a period of 2-3 months.
- Do not dispose of the batteries as domestic waste.
The batteries must be disposed of at a recycling centre to be treated in a special manner.
FUNCTION BUTTONS
1. ON/OFF button
Press it to turn the air conditioning unit on and off.
2. MODE button
Selects the operating mode, according to the following sequence:
AUTO COOL DRY HEAT FAN
AUTO [AUTOMATIC]
COOL
DRY (DEHUMIDIFICATION)
HEAT
FAN
3. SWING button
It is used to adjust the direction of the fl ap. By keeping it pressed for more than two seconds, the automatic swing function is started or stopped.
4. SWING button (in the models fitted with this function)
It is used to adjust the direction of the horizontal deflectors. By keeping it pressed for more than two seconds, the automatic swing function is started or stopped.
5. SLEEP/EYE button
It activates and deactivates the SLEEP function. By keeping it pressed for more than 2 seconds, the "INTELLIGENT EYE" function is activated (in the models fitted with this function); to deactivate it just keep the button pressed for more than 2 seconds again.
NOTE: Once activated, the SLEEP function mode is cancelled.
6. TURBO/SELF CLEAN button
It activates and deactivates the TURBO function. By keeping it pressed for more than 2 seconds, the automatic cleaning is activated; to deactivate it just keep the button pressed for at least 2 seconds again.
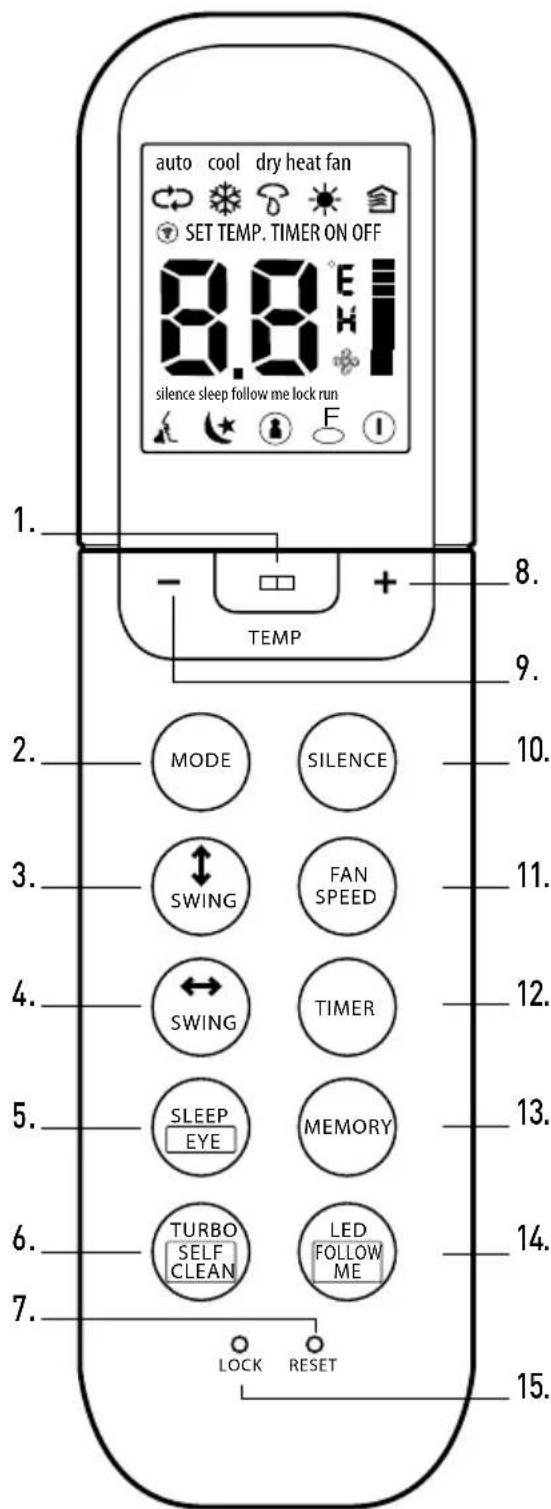
7. RESET button
By pressing the recessed RESET button, all the current settings are cancelled and replaced by the initial settings.
8. + button
Press this button to raise the set temperature or to increase the time value during the timer programming.
9. - button
Press this button to lower the set temperature or to decrease the time value during the timer programming.
10. Silence
It activates and deactivates the silence function.
11. FAN SPEED button
Use this button to select the fan speed in the four options available in sequence: AUTO LOW MED HIGH
12. TIMER button
It is used to set the automatic start up/shut down delay via the timer. Each time the +/- button is pressed, the delay setting increases/decreases by 30 minutes. When the set delay reaches the value of 10:00, as indicated on the display, each time the +/- button is pressed, the automatic shut down delay setting increases/decreases by 60 minutes. To cancel the programming via the timer, just set the delay to 0:00.
13. MEMORY button
It is used to save the current settings or restore the previous settings.
14. LED/FOLLOW ME button
It deactivates and activates the LED function. By keeping it pressed for more than 2 seconds, the FOLLOW ME function is activated. To deactivate it, just keep the button pressed for more than 2 seconds again.
15. LOCK button
By pressing the recessed LOCK button, all the current settings are locked and the remote control system no longer responds to any command, except the LOCK button being pressed. Press it again to cancel the LOCK mode.
NOTE:
All the function described above are carried out by the internal unit. If the latter does not have a certain feature, by pressing the respective button on the remote control system no operation is activated.
DISPLAY

Transmission indicator
The transmission indicator lights up when the remote control system transmits the signal to the internal unit.
Mode display
Display area where the current operating mode is indicated:
auto [ ] cool dry[]heat[]fan]and auto again().

Temperature/Timer Display
Display area where the temperature setting (17^ - 30^) is indicated: By setting the operating mode to FAN, no temperature setting is displayed. If the unit is in the TIMER mode, the TIMER start up and shut down settings are displayed.
Fan speed display
Display area where the set fan speed is shown: AUTO (no display) or one of the three speeds of the fan: [ ] LOW, [ ] MED and [ ] HIGH. The fan speed is set to AUTO when the operating mode is AUTO or DRY.

Start up/shutdown icon
It is displayed by pressing the ON/OFF button.
By pressing the ON/OFF button again the icon disappears.

Lock icon
It is displayed when the LOCK mode is activated.

FOLLOW ME icon
It appears when the FOLLOW ME function is activated.

Sleep Icon
It is displayed when the sleep function has been activated.
By pressing the SLEEP button again the icon disappears.

Silence Icon
It is displayed when the silence function has been activated!
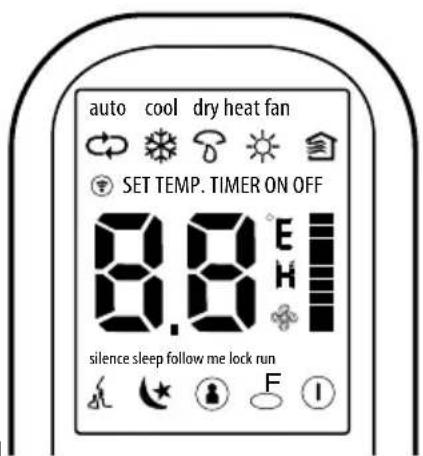
Note:
To aid explanation, all the indicators are shown
in the figure below. Nevertheless while using the appliance, the displays shows only the icons and the display areas relating to the functions that are actually active.
METHODS OF USING THE BUTTONS
Automatic operation
Make sure that the unit is connected to a regularly functioning electrical socket.
- Press the MODE button to select AUTO.
- Press the + / - button to set the desired temperature. The temperature may be set between 17^ and 30^ , with 1^ increases.
- Press the ON/OFF button to switch the air conditioning unit on.
NOTE
- In Auto mode, the air conditioning unit may alternate automatically between the cooling, fan and heating modes, recording the difference between the actual room temperature and the temperature set in the remote control system.
- In Auto mode, it is not possible to select the fan speed, which is automatically adjusted.
- If the Auto mode does not provide the right comfort, it is possible to manually select the desired mode.
Cooling/heating/fan function
Make sure that the unit is connected to a regularly functioning electrical socket.
- Press the MODE button to select the COOL, HEAT or FAN mode.
- Press the +/- buttons to set the desired temperature. The temperature may be set between 17^ and 30^ , with 1^ increases.
- Press the FAN button to select in sequence the four speed options available: AUTO (automatic), [ ] LOW, [ ] MED and [ ] HIGH.
- Press the ON/OFF button to switch the air conditioning unit on.
NOTE
In FAN mode, the set temperature is not displayed in the remote control system and it is not possible to adjust the room temperature.
Dehumidifi cation function
Make sure that the unit is connected to a regularly functioning electrical socket.
- Press the MODE button to select the DRY mode.
- Press the + / - buttons to set the desired temperature. The temperature may be set between 17^ and 30^ , with 1^ increases.
- Press the ON/OFF button to switch the air conditioning unit on.
NOTE
In dehumidifi cation mode, it is not possible to select the fan speed, which is automatically adjusted.
How to adjust the air flow
Press the FAN SPEED button to place the speed of the fan on AUTO, [ ] LOW, [ ] MED and [ ] HIGH.
For each of the 3 speeds which can be set (HIGH, MED, LOW), the air conditioning unit has three speed sublevels (HIGH, HIGH+, HIGH-, MED, MED+, MED-, LOW, LOW+, LOW-) which are set automatically.
NOTE: the 9 different speeds described above, in addition to those of the dehumidifi cation, turbo and silence functions, mean that the air conditioning unit has a total of 12 air flow speeds.
| SET SPEED ΔT* | |||
| HIGH | 4.5 | HIGH + | |
| 3.0 | HIGH | ||
| 1.5 | HIGH - | ||
| MED | 4.5 | MED + | |
| 3.0 | MED | ||
| 1.5 | MED - | ||
| LOW | 4.5 | LOW + | |
| 3.0 | LOW | ||
| 1.5 | LOW - | ||
(*) difference between room temperature and set temperature
Use the SWING button to direct the air flow in the vertical direction desired.
- Each time the flap button is pressed the angle is changed by 6^
- By keeping the fl ap button pressed, the fl ap automatically starts to swing upwards and downwards
Use the SWING button to direct the air flow in the horizontal direction desired.
- Each time the button is pressed the angle of the horizontal deflectors changes by 6^
- By keeping the button pressed the horizontal defl ectors automatically start to swing to the right and left
NOTE: When the swing or movement take the flap to a position which interferes with the cooling or heating effect of the air conditioning unit, the direction of the swing or movement is automatically changed.
Operation with timer
Press the TIMER button to set the automatic start up or shut down delay of the unit.
the automatic start up delay (TIMER ON).
- Press the TIMER button once. In the special display area of the LCD screen, TIMER ON is displayed with the last setting for automatic start up and the symbol "H".
- Press the + / - buttons to set the desired start up delay. Each time the button is pressed, the delay increases by 30 minutes between 0 and 10 hours, while the increase is of one hour between 10 and 24 hours.
- Once the TIMER ON function is set, a delay takes place one second before the control system transmits the signal to the air conditioning unit. Thus, after about another 2 seconds have elapsed, the "H" symbol disappears and the set temperature appears again in the special area of the LCD screen.
- To cancel the programming via the timer, just set the delay to 0:00.
Setting the automatic shut down delay (TIMER OFF).
- Press the TIMER button twice. In the special display area of the LCD screen, TIMER OFF is displayed with the last setting for automatic shut down and the symbol "H".
- Press the + / - buttons to set the desired shut down delay.
Each time the button is pressed, the delay increases by 30 minutes between 0 and 10 hours, while the increase is of one hour between 10 and 24 hours.
- After setting the TIMER OFF function, a delay takes place one second before the control system transmits the signal to the air conditioning unit. Thus, after about another 2 seconds have elapsed, the "H" symbol disappears and the set temperature appears again in the special area of the LCD screen.
PRECAUTIONS
- When the operation with timer is selected, the remote control automatically transmits the signal of the timer at the time specified to the internal unit. Therefore we recommend placing the remote control where it can correctly transmit the signal to the internal unit.
- The activation delay that may be set via the timer function of the remote control is limited to the following values expressed in hours: 0.5, 1.0, 1.5, 2.0, 2.5, 3.0, 3.5, 4.0, 4.5, 5.0, 5.5, 6.0, 6.5, 7.0, 7.5, 8.0, 8.5, 9.0, 9.5, 10, 11, 12, 13, 14, 15, 16, 17, 18, 19, 20, 21, 22, 23 and 24.
TIMER SETTING EXAMPLE
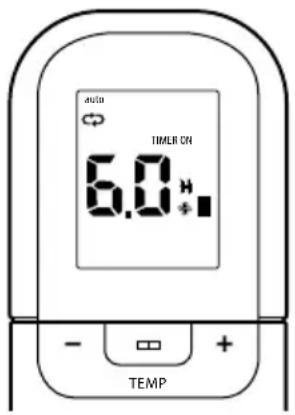
TIMER ON
[operation with automatic start up]
The TIMER ON function is useful, for example, when you want the unit to start up automatically before you come home. The air conditioning unit will automatically start working at the set time.
Example:
Start up of the air conditioning unit after 6 hours.
- Press the TIMER button once. In the special display area the operation start up delay and the symbol "H" will appear.
- Press the + / - buttons to set and display "6:0 H" in the TIMER ON area of the display of the remote control.
- After a second, in the same area of the digital display, the temperature will be shown again.
The "TIMER ON" indicator stays lit to confirm that the function was activated.
TIMER OFF
[operation with automatic shut down]
The TIMER OFF function is useful, for example, when you want the unit to shut down automatically after you go to bed. The air conditioning unit will automatically stop operating at the set time.
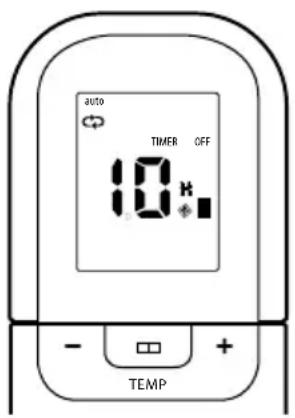
Example:
Shut down of the air conditioning unit after 10 hours.
- Press the TIMER button twice. In the special display area the operation shut down delay and the symbol "H" will appear.
- Press the + / - buttons to show "10H" in the TIMER OFF area of the display of the remote control.
- After a second, in the same area of the digital display, the temperature will be shown again.
The "TIMER OFF" indicator stays lit to confirm that the function was activated.
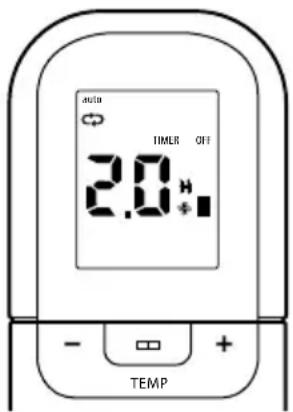
COMBINED TIMER
(Simultaneous setting of the start up and shut down timers)
TIMER OFF TIMER ON
(0n Stop Start operation)
This function may be useful, for example, when you want to shut down the air conditioning unit after going to bed, to then start it up again when you wake up or come home.
Example:
Programmed stop of the air conditioning unit after 2 hours and programmed restart after 10 hours.
- Press the TIMER button to display TIMER OFF.
- Press the + / - buttons to show 2.0H in the TIMER OFF area of the display.
- Press the TIMER button to display TIMER ON.
- Press the + / - buttons to show 10H in the TIMER ON area of the display.
- After three seconds, in the same area of the digital display, the temperature will be shown again. The "TIMER ON OFF" indicator stays lit to confirm that the function was activated.
TIMER ON TIMER OFF
(Off Start up Stop operation)
This function is useful, for example, when you want to start up the air conditioning unit in the morning before getting up and turn it off when leaving the house.
Example:
Programmed start up of the air conditioning unit after 2 hours and stop after 5 hours.
- Press the TIMER button to display TIMER ON.
- Press the + / - buttons to show OH in the TIMER ON area of the display.
- Press the TIMER button to display TIMER OFF.
- Press the +/- buttons to show 0H in the TIMER OFF area of the display.
- After three seconds, in the same area of the digital display, the temperature will be shown again. The "TIMER ON OFF" indicator stays lit to confirm that the function was activated.
NOTE: The first function of the timer (TIMER ON or TIMER OFF) to operate is the first in sequence after the setting time.
SLEEP/INTELLIGENT EYE function
Keep this button pressed for at least 2 seconds to activate the SLEEP function. By keeping it pressed for more than 2 seconds, the INTELLIGENT EYE function is activated.
- The Sleep function allows the unit to automatically increase (cooling) or decrease (heating) the temperature by 1^ an hour for the first two hours, to then remain constant for the next 5 hours and finally shut down. In this way it is possible to maintain an optimal temperature in terms of both comfort and energy saving.
NOTE: The SLEEP function is only available in cooling, heating and AUTO mode.
- The Intelligent Eye function allows the air conditioning unit to enter the stand-by mode if it does not detect any activity for more than 30 minutes. The unit reactivates automatically with the previous settings as soon as the presence of people is identified.
The air conditioning unit deactivates this function each time it is turned off or the SLEEP, SELF CLEAN or TIMER button is pressed.
LED/FOLLOWME function
Keep this button pressed for at least 2 seconds to activate the LED function which turns off the display of the internal unit.
By keeping it pressed for more than 2 seconds, the FOLLOW ME function is activated.
- By activating the Follow Me function, the remote control system detects the actual temperature in the room where it is located and sends this signal to the air conditioning unit every 3 minutes, until the FOLLOW ME button is not pressed again.
- The Follow Me function is not available in DRY and FAN mode.
- By switching to a different operating mode or turning off the unit, the Follow Me function is automatically deactivated.
TURBO/SELF CLEAN function
Keep this button pressed for at least 2 seconds to activate the TURBO function. By keeping it pressed for more than 2 seconds, the self clean function is activated.
- The Turbo function allows the unit to reach the preset temperature in the shortest time possible. When the unit is in cooling or heating mode, bypassing this button a strong air flow is activated with the fan at maximum speed.
- In SELF CLEAN mode, the air conditioning unit automatically cleans and dries the evaporator, keeping it in optimal conditions for subsequent operation. (through a fan, heating, low speed fan cycle). The Self Clean function is only activated in cooling or dry mode.
SILENCE function
Press this button to activate/deactivate the SILENCE function which allows the air conditioning unit to set an ultra minimum fan speed of the internal unit, making the room extremely quiet.
MEMORY function
It is used to save the current settings or restore the previous settings.
- The first time the unit is connected to the power supply, the AUTO 24^ operating mode is activated by pressing the MEMORY button, with the Auto fan speed.
- If you press this button when the remote control system is on, the system automatically restores the previous settings, i.e. the operating mode, the temperature setting, the fan speed and the sleep function (if activated) and transmits the signals to the unit.
- Whereas if you press this button when the remote control system is off, the system restores the previous settings, but does not transmit the signals to the unit. Furthermore, the sleep function is deactivated.
- By keeping the button pressed for more than 2 seconds, the system automatically saves the current operating settings, i.e. the operating mode, the temperature setting, the fan speed and the sleep function (if activated).
ADVICE ON ENERGY SAVINGS
- Do not programme too high a temperature (in heating mode) or too low a temperature (in cooling mode).
- Avoid installing the internal/external units in places directly exposed to sunlight (this could prevent the appliance from operating at its best).
- Avoid opening and closing doors and windows too frequently, as the ongoing heat exchange with the outside hinders the operation of the air conditioning unit.
- Use the "TIMER" for the timed starting of the appliance to prevent the appliance from operating unnecessarily while you are out.
- Use the "SLEEP" function at night.
NOTES:
- In cooling mode, you may detect a slight mist coming out of the Internal Unit for a few seconds: this is completely normal and due to the difference in temperature between the air exiting the appliance and the air inside the room.
- During operation, you may hear a noise similar to the fl owing of water: this is completely normal, owing to the liquid refrigerant fl owing through the piping.
- When the air conditioning unit starts or stops, especially in heating mode, you may hear a little creaking: this is due to the thermal expansion of the parts making up the appliance.
SOMMAIRE
Funcao TURBO/SELF CLEAN
Manter pressionada esta tecla por menos de 2 segundos para ativar a funcao TURBO. Manter pressionada esta tecla por mais de 2 segundos, ativa-se a funcao de limpeza automatica.
ARISTON THERMO GROUP
Ariston Thermo S.p.A.
Viale Aristide Merloni 45
60044 Fabriano (AN)
T: [+39] 07326011
Fax: (+39) 0732 602331
www.ariston.com


- UTILIZZO DEL TELECOMANDO
- SAFETY REGULATIONS
- THIS PRODUCT CONFORMS TO EU DIRECTIVE 2002/96/EC
- USING THE REMOTE CONTROL
- WARNING:
- REPLACING THE BATTERIES
- FUNCTION BUTTONS
- ON/OFF button
- MODE button
- SWING button
- SWING button ↔ (in the models fitted with this function)
- SLEEP/EYE button
- TURBO/SELF CLEAN button
- RESET button
- + button
- - button
- Silence
- FAN SPEED button
- TIMER button
- MEMORY button
- LED/FOLLOW ME button
- LOCK button
- NOTE:
- DISPLAY
- Transmission indicator
- Mode display
- Temperature/Timer Display
- Fan speed display
- Start up/shutdown icon
- Lock icon
- FOLLOW ME icon
- Sleep Icon
- Silence Icon
- METHODS OF USING THE BUTTONS
- Automatic operation
- NOTE
- Cooling/heating/fan function
- Dehumidifi cation function
- How to adjust the air flow
- Operation with timer
- the automatic start up delay (TIMER ON).
- Setting the automatic shut down delay (TIMER OFF).
- PRECAUTIONS
- TIMER SETTING EXAMPLE
- TIMER ON
- TIMER OFF
- Example:
- COMBINED TIMER
- TIMER OFF → TIMER ON
- TIMER ON → TIMER OFF
- SLEEP/INTELLIGENT EYE function
- LED/FOLLOWME function
- TURBO/SELF CLEAN function
- SILENCE function
- MEMORY function
- ADVICE ON ENERGY SAVINGS
- NOTES:
- SOMMAIRE
- Funcao TURBO/SELF CLEAN
Brand : Ariston Thermo
Model : Aeres 25 XC8I
Category : Air Conditioning