
FUS63E - Air purifier SHARP - Free user manual and instructions
Find the device manual for free FUS63E SHARP in PDF.
| Product Type | Air Purifier |
| Brand | Sharp |
| Model | FUS63E |
| Dimensions (W x H x D) | 430 x 620 x 256 mm |
| Weight | 9.6 kg |
| Power Supply | 220-240 V, 50/60 Hz |
| Power Consumption | Max: 70 W, Medium: 10 W, Silent: 3.9 W |
| Airflow Rate | Max: 378 m³/h, Medium: 156 m³/h, Silent: 36 m³/h |
| Noise Level | Max: 52 dBA, Medium: 31 dBA, Silent: 14 dBA |
| Humidification (Mist) | Max: 250 ml/h, Medium: 130 ml/h, Silent: 40 ml/h |
| Recommended Coverage Area | Up to 48 m² |
| Sensors | Dust, Odor, Temperature, Humidity |
| Filters | Pre-filter, HEPA filter (white), Washable activated carbon filter (black) |
| Purification Technology | Plasmacluster (Ion Shower, Cleaning mode, Auto mode) |
| Operating Modes | Auto, Pollen, Max, Medium, Silent, Ion Shower |
| Mist Function | Yes (with water tank) |
| Remote Control | Yes, with AAA batteries (included) |
| Power Cord Length | 2.0 m |
| Maintenance | Clean filters and mist unit (see manual) |
| Included Accessories | Remote control, batteries, user manual |
Frequently Asked Questions - FUS63E SHARP
User questions about FUS63E SHARP
0 question about this device. Answer the ones you know or ask your own.
Ask a new question about this device
Download the instructions for your Air purifier in PDF format for free! Find your manual FUS63E - SHARP and take your electronic device back in hand. On this page are published all the documents necessary for the use of your device. FUS63E by SHARP.
USER MANUAL FUS63E SHARP
*Plasmacluster is a trademark of Sharp Corporation.
FU-S63E
Please read before operating your new Air Purifier
The air purifier draws in room air from its air intake, lets the air pass through a Active Carbon Filter (deodorization filter) and a HEPA Filter (dust collection filter) inside of the unit, then discharges the air from its air outlet. The air purifier unit repeats this process by moving its internal fan.
As air passes through, a new HEPA Filter can remove 99.97% of dust particles, of as small as 0.3 microns. The Active Carbon Filter gradually absorbs odour elements as they repeatedly pass through the filter. (Odour elements are absorbed by HEPA Filter as well.)
Some odour ingredients absorbed by the filters may become separated and may be discharged through the air outlet and result in additional odour. Depending on the usage environment, especially when the product is used in a condition significantly more severe than household use, this odour may become strong in a shorter period than expected.
If the odour persists, then the filters are fully expended and it is necessary to purchase the optional replacement filter.
NOTE
- The air purifier is designed to remove air-suspended dust and odour, but not harmful gases (for example, carbon monoxide contained in cigarette smoke). If the odour sources still exist, it cannot completely remove the odour. (for example, odours from construction materials and pet odours).
It is suggested to open the window a bit when you are smoking in order to facilitate ventilation.
FEATURES
ION SHOWER
New ION SHOWER Operation Mode releases the concentrated Plasmacluster ions, and effectively removes the pollen and mold, and also controls the activity of airborne virus, mold, and allergen.
Plasmacluster Ion Control
Your new air purifier will control the ratio of negative ions and positive ions depending on the condition of the room.
Clean Mode
Approximately the same numbers of positive and negative ions are discharged.
- AUTO Plasmacluster Ion Mode
The unit detects the dust, mold or airborne microbes using its sensors, and controls the generating amount of positive and negative ions automatically.
When room air is impure, approximately same numbers of positive and negative ions will be released.
When room air is clean, negative ions will be released in an increased rate and controls the ion balance.
- Filters
1) Washable Active Carbon Filter
Absorbs odour elements.
Washable to maintain optimum deodorization performance.
2) HEPA (High Efficiency Particulate Air) Filter with Microbial control.
High-efficiency particle collection including pollen and dust.
- Mist Operation Mode
New Ion Mist coats each ion with a water mist that helps to further reduce odours both in the air and tactile surfaces.
CONTENTS
IMPORTANT SAFETY INSTRUCTIONS .... E-2
WARNING E-2
- CAUTIONS CONCERNING OPERATION.... E-3
- REMOTE CONTROL LIMITATIONS ...... E-3
- INSTALLATION GUIDELINES E-3
- FILTER GUIDELINES E-3
PART NAMES. E-4
- MAIN UNIT DISPLAY. E-4
- INCLUDED. E-4
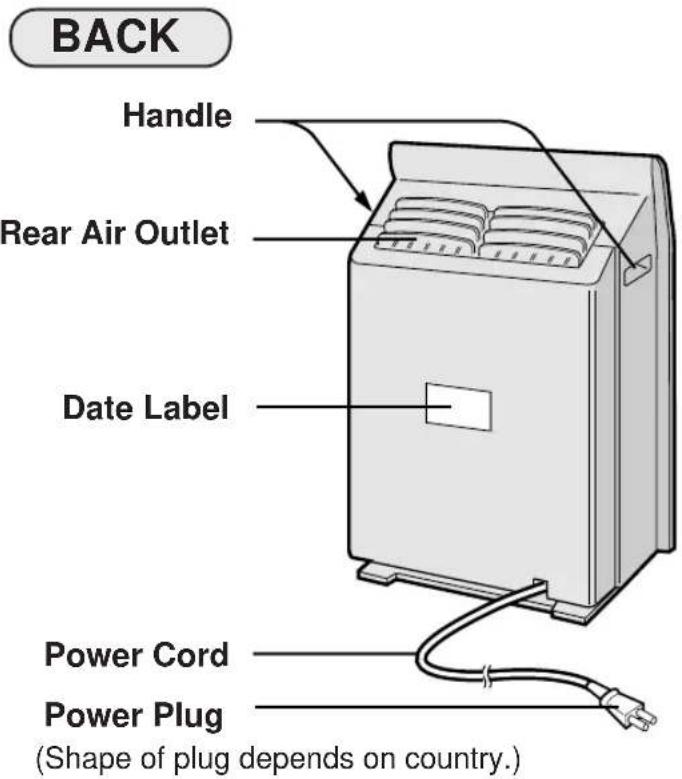
- BACK E-5
PREPARATION. E-6
- FILTER INSTALLATION E-6
POUR WATER INTO THE TANK E-8 - INSERTING BATTERIES IN THE REMOTE CONTROL
- REMOTE CONTROL USE E-9
OPERATION E-10
MAIN UNIT OPERATION E-10
- REMOTE CONTROL OPERATION ....E-11
MAIN UNIT INDICATOR E-12
CARE AND MAINTENANCE. E-14
MIST UNIT E-14
TANK E-16
WASHABLE ACTIVE CARBON FILTER CARE. E-16
- MAIN UNIT. E-17
PRE-FILTER E-17
·SENSORS E-17
- FILTER REPLACEMENT
GUIDELINES E-18
TROUBLE SHOOTING. E-19
SPECIFICATIONS E-20
INFORMATION ON PROPER DISPOSAL ....E-21
Thank you for purchasing the SHARP Air Purifier. Please read this manual carefully for the correct usage information. Before using this product, be sure to read the section: "Important Safety Instructions."
After reading this manual, retain it in a convenient location for future reference.
IMPORTANT SAFETY INSTRUCTIONS
When using electrical appliances, basic safety precautions should be followed, including the following:
WARNING - To reduce the risk of electrical shock, fire or injury to persons:
- Read all instructions before using the air purifier.
- Use only a 220-240 volt outlet.
- Do not use the air purifier if the power cord or plug is damaged or the connection to the wall outlet is loosened.
Periodically remove dust from the power plug. - Do not insert fingers or foreign objects into the intake or air outlet.
- When removing the power plug, always hold the plug and never pull the cord.
Electrical shock and/or fire from short circuit may occur as a result.
- Do not remove the power plug when your hands are wet.
- Do not use this air purifier near gas appliances or fireplaces.
- Remove the power plug from the wall outlet before cleaning the unit and when not using the unit.
Electrical shock from bad insulation and/or fire from short circuit may occur as a result.
- If the power cord is damaged, it must be replaced by the manufacturer, its service agent, Sharp authorized Service Centre or similarly qualified person in order to avoid a hazard.
- Do not operate when using aerosol insecticides or in rooms where there is oily residue, incense, sparks from lit cigarettes, chemical fumes in the air or in very high humidity condition, such as a bathroom.
- Be cautious when cleaning the air purifier. Strong corrosive cleansers may damage the exterior.
- Only Sharp Authorized Service Centre should service this air purifier. Contact the nearest Service Centre for any problems, adjustments, or repairs.
- The batteries must be removed from the remote control before disposal, and the batteries must be disposed of safely.
- When carrying the Main Unit, please remove the Tank and MIST Tray and hold the Handles on both sides.
- Do not drink in jest the water in the MIST Tray or Tank. It may cause illness.
- Change the Tank water every day with fresh tap water. Keep inside the Tank clean. (See Tank maintenance E-16) Leaving water in the Tank will result in mold, bacteria, and bad odours. In rare cases, this bacteria cause harmful physical effects.
- When not in use, dispose the water in the Tank and MIST Tray. Leaving water in the Tank and MIST Tray will cause mold and bacteria.
NOTE - Radio or TV Intference
If this air purifier should cause interference to radio or television reception, try to correct the interference by one or more of the following measures:
- Reorient or relocate the receiving antenna.
- Increase the separation distance between the air purifier and radio/TV receiver.
- Connect the equipment into an outlet on a circuit different from that to which the receiver is connected.
- Consult the dealer or an experienced radio/TV technician for help.
CAUTIONS CONCERNING OPERATION
- Do not block the intake and air outlet.
- Do not use the unit near or on hot objects, such as stoves or heaters or where it may come into contact with steam.
- Do not lay the unit down when using.
- Always hold the handle on the back of the unit when moving it.
Holding the front panel when carrying may cause it to detach, thus dropping the unit and resulting in bodily injury.
- Do not operate the unit without the filter.
- Do not wash and reuse HEPA filter.
It not only it does not improve filter performance, it may cause electric shock or malfunction.
- Clean the exterior with a soft cloth only.
The unit surface may be damaged or cracked.
In addition, the sensors may malfunction as a result.
REMOTE CONTROL LIMITATIONS
DO NOT USE THE REMOTE CONTROL IN THE FOLLOWING LOCATIONS:
- Any location where there is inverter lighting equipment or electronic spontaneous lighting equipment
- The remote control may become inoperative. In this case, move away from such lighting equipment or change direction.
- Location exposed to direct sunlight or fluorescent.
The unit may not receive signals from the remote control.
INSTALLATION GUIDELINES
- During the operation of the product, please place the unit at least 2m away from equipments which involve electric wave such as televisions, radios or wave clocks, in case electrical interference occurs to such equipments.
- A void a location where the sensor is exposed to direct wind.
The unit may not operate properly.
- A void locations where curtains, etc., come into contact with the intake or air outlet.
Curtains, etc., may become dirty or a malfunction may occur.
- Avoid locations where the unit is exposed to condensation, due to drastic temperature changes.
(Use under appropriate conditions between 5 and 35^ in the room.) - Place on a stable surface with sufficient air circulation.
When placing the unit on a heavily carpeted area, it may cause the unit to vibrate slightly.
When placing the unit on an uneven surface, the water may leak from the Tank.
- Do not install when there is generation of lampblack, such as in a kitchen, etc.
The unit surface may crack or the sensor may malfunction as a result. - Leave about 60cm of space from the ceiling and wall.
The wall behind the air outlet may become dirty as time passes. When using the unit for extended period of time in the same location, use a vinyl sheet, etc., to prevent the wall from becoming dirty. In addition, periodically clean the wall.
FILTER GUIDELINES
- Follow the instructions in this manual for correct care and maintenance of the filters.
PART NAMES

MAIN UNIT DISPLAY


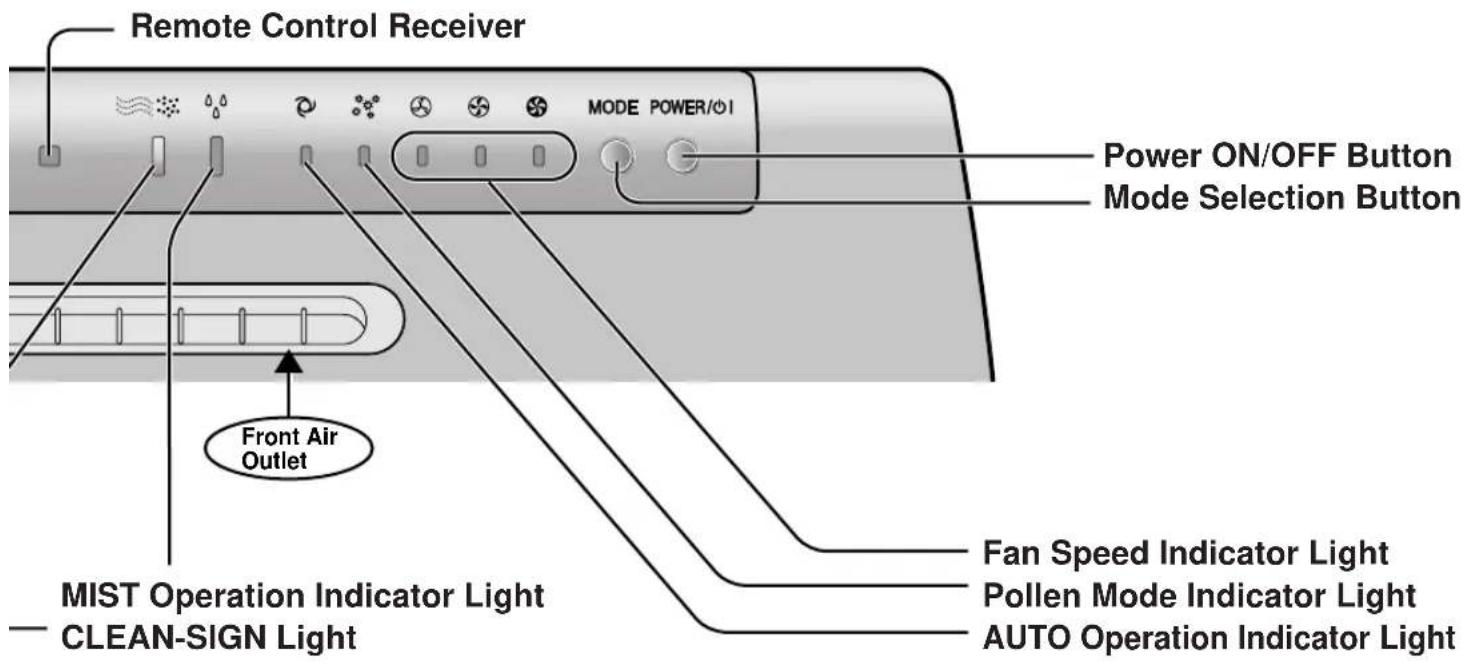
Odour Sensor Temperature / Humidity Sensor
Tank Tank Cap
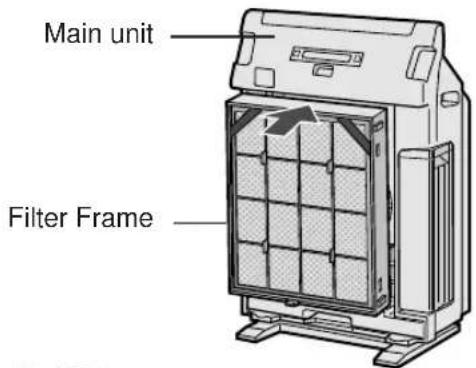
Filter Frame
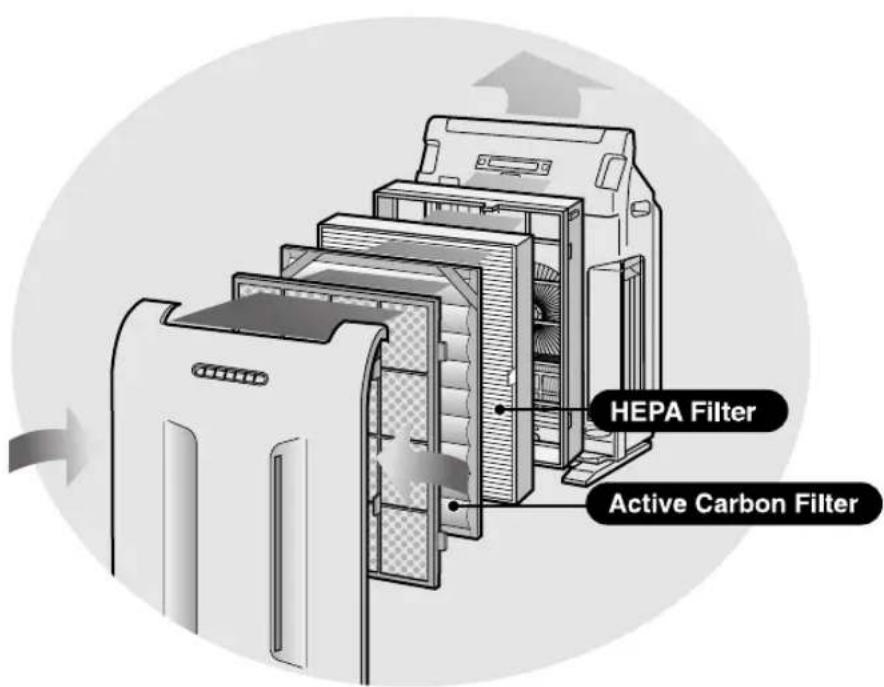
HEPA Filter (white)
Active Carbon Filter (black)
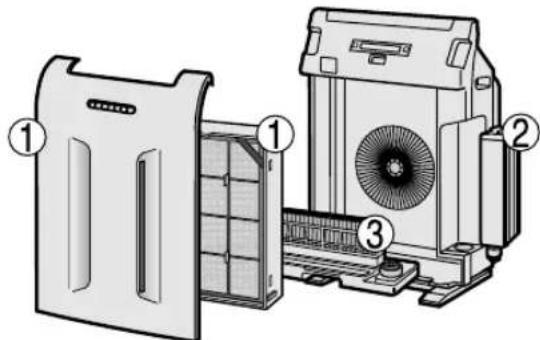
Pre-Filter MIST Unit MIST Filter Set MIST Filter MIST Filter Frame MIST Tray Cap Float MIST Tray MIST Tray Top
E-5
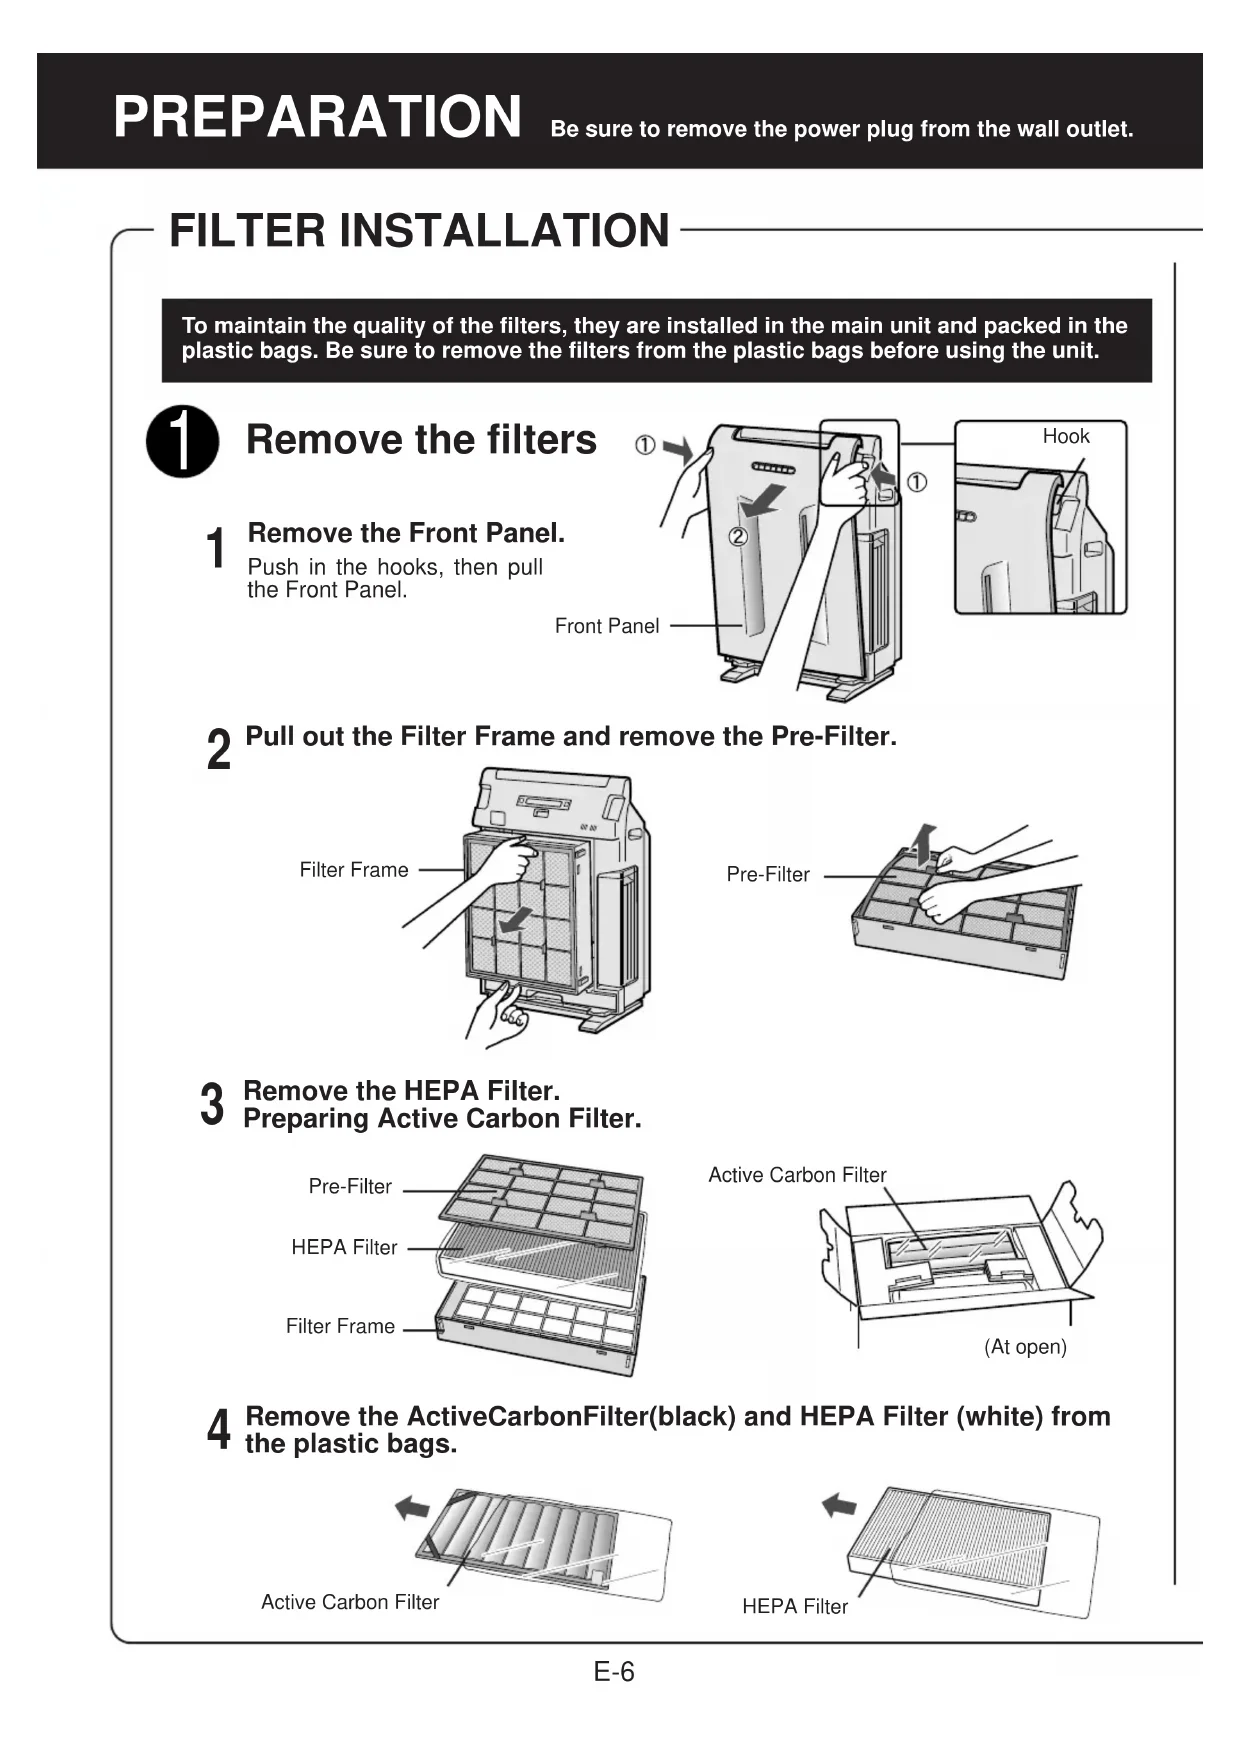
FILTER INSTALLATION
To maintain the quality of the filters, they are installed in the main unit and packed in the plastic bags. Be sure to remove the filters from the plastic bags before using the unit.

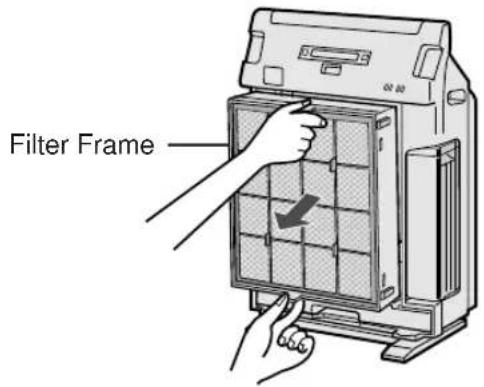
Remove the filters
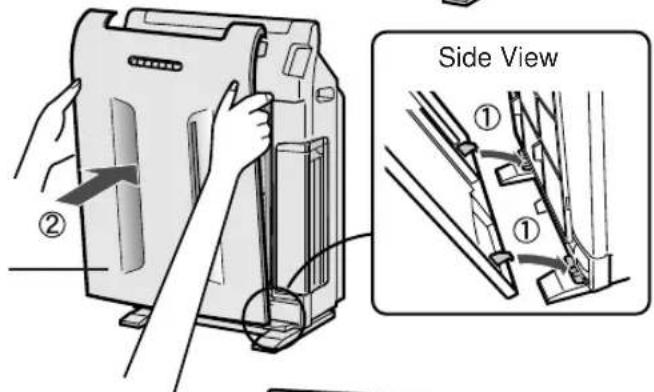
1 Remove the Front Panel. Push in the hooks, then pull the Front Panel.
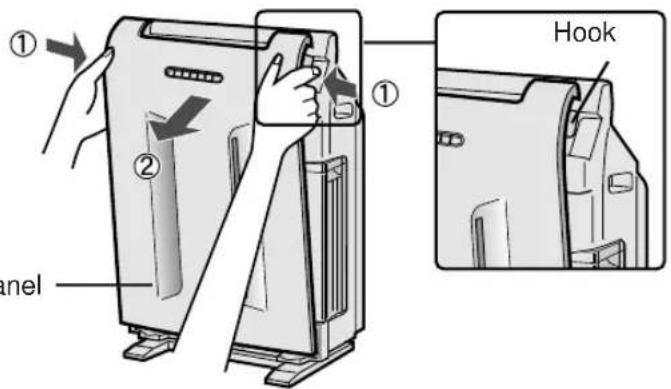
2 Pull out the Filter Frame and remove the Pre-Filter.
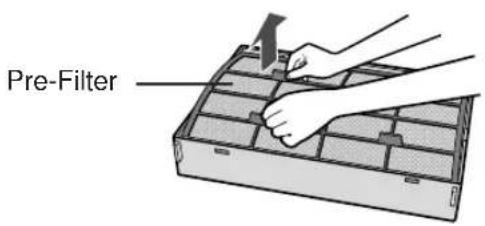
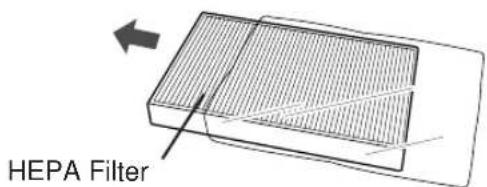
3 Remove the HEPA Filter. Preparing Active Carbon Filter.
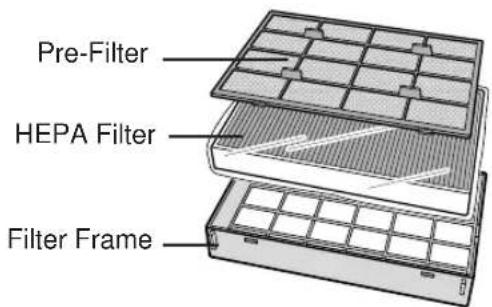
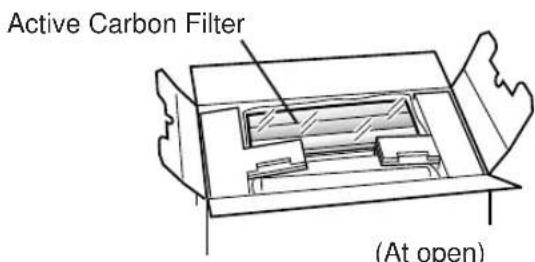
4 Remove the ActiveCarbonFilter(black) and HEPA Filter (white) from the plastic bags.


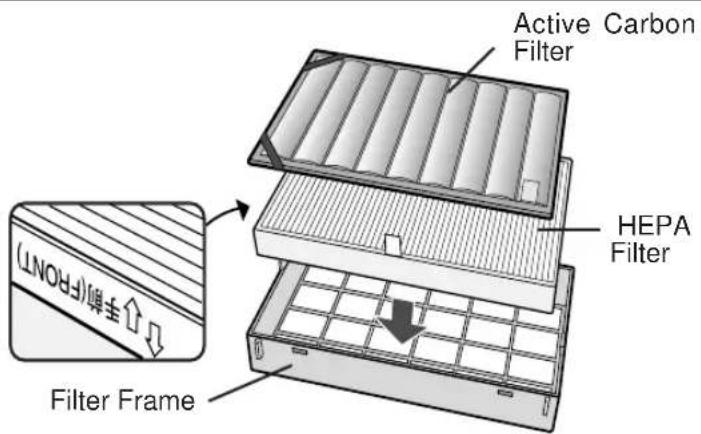
Install the filters
1 Place the HEPA Filter within the Filter Frame.
Please make sure that the HEPA Filter is placed in proper orientation.
Do not install the filter backwards or the unit will not operate properly.
Place the Active Carbon Filter on top of the HEPA Filter with the bands (2 places) facing up.
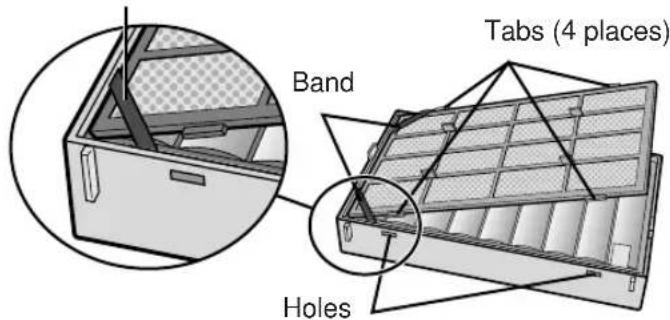
2 Place the Pre-filter through the bands (2 places) located at the corners of the Active Carbon Filter.
Insert the tabs of the pre-filter into the associated holes of the Filter Frame.
3 Mount the Filter Frame to the main unit.
4 Replace the Front Panel back onto the main unit.
5 Fill in the usage start date on the Date Label.
Use the date as a guide for the Filter Replacement schedule.
Front Panel
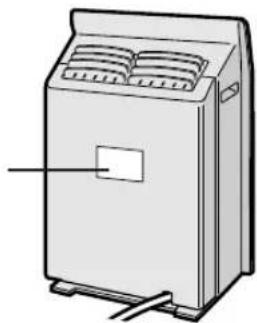
Date Label
Pour water into the Tank
This product can be used as an air purifier without putting water in the tank.
1 Hold the tank handle and remove the tank.
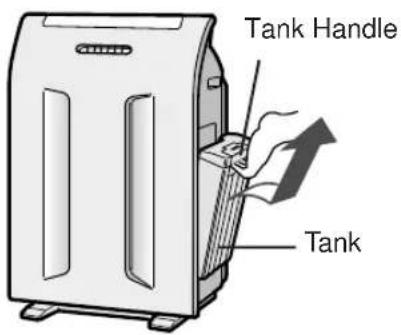
Remove the tank cap and pour water.
- Use drinkable tap water. (Generally speaking, tap water is sterilized with chlorine to suppress propagation of bacteria.)
- Change the tank water every day with fresh tap water.
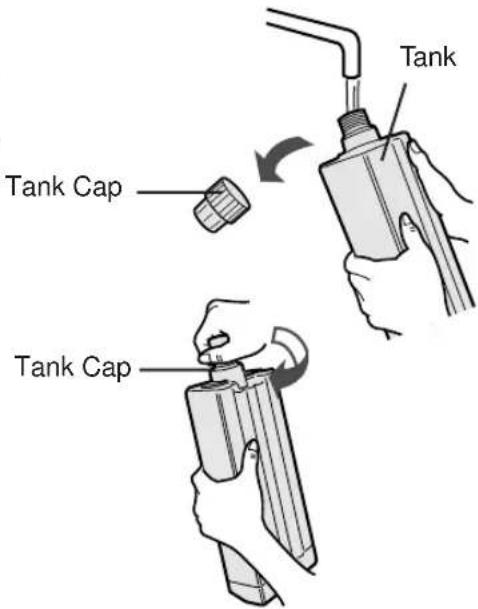
After supplying water, securely tighten the tank cap.
- Check to see that there is no water leak.
- Be sure to wipe off any excess water around the tank.
- When carrying the tank, hold it with both hands so that the tank opening is facing up.
4 Mount the tank to the main unit. Insert the tank cap into the dented part o
- Insert the tank cap into the dented part of the unit.
Make sure the tank is firmly attached by pushing it in until you hear a click.
CAUTION
- Do not expose the unit to water. Short circuit and/or electrical shock may occur as a result.
- Do not use hot water (of 40^ or higher), chemical agents, aromatic substances, dirty water, etc. Deformation and/or malfunction may occur as a result.
- Do not use mineral water, ionized alkaline water, well water, purified water, etc. Propagation of mold fungus and bacteria may occur as a result.
- Securely tighten the tank cap. If the tank cap is difficult to tighten, loosen the cap one full turn to properly set the cap to the tank.
INSERTING BATTERIES IN THE REMOTE CONTROL
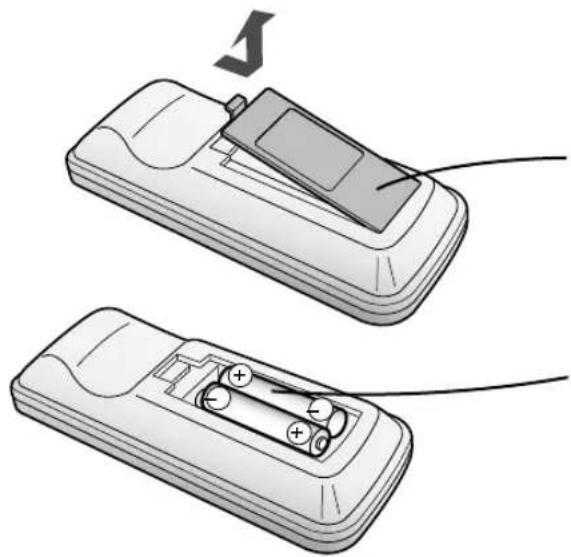
1 Remove the back cover Press and slide the back cover to remove.
2 Insert batteries Insert batteries with and as shown below.
3 Close the back cover
Battery Information
The battery life is about 1 year.
- The batteries for this remote control are for initial use only. Change the batteries when necessary.
- Incorrect usage of the batteries may cause battery fluid leakage and/or damage. Take care of the following when handling:
- When replacing the batteries, replace both batteries with new ones of the same type. (Use 2 AAA manganese batteries.)
- When not using the unit or remote control for an extended period, remove the batteries.
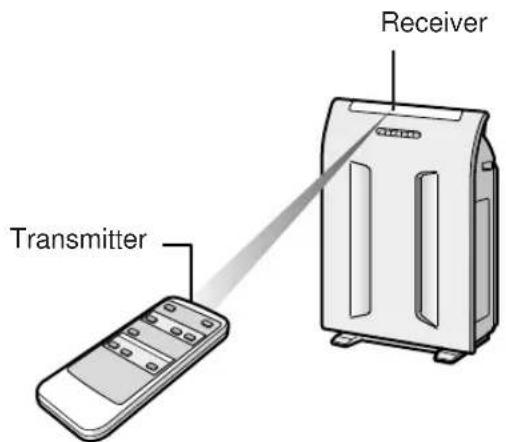
REMOTE CONTROL USE
- Operate with the remote control facing the main unit receiver.
The signal range is about 7m.
Make sure there are no objects blocking the path of the signal. - A beep sound will be heard from the main unit when a signal is received.
NOTE
- A void dropping or damaging the remote control, using in a high humidity condition, in direct sunlight or near a heat source.
Main Unit Controls
- AUTO
POLLEN
SILENT
MEDIUM
MAX
MAIN UNIT OPERATION
Mode Selection Button
Power ON/OFF Button
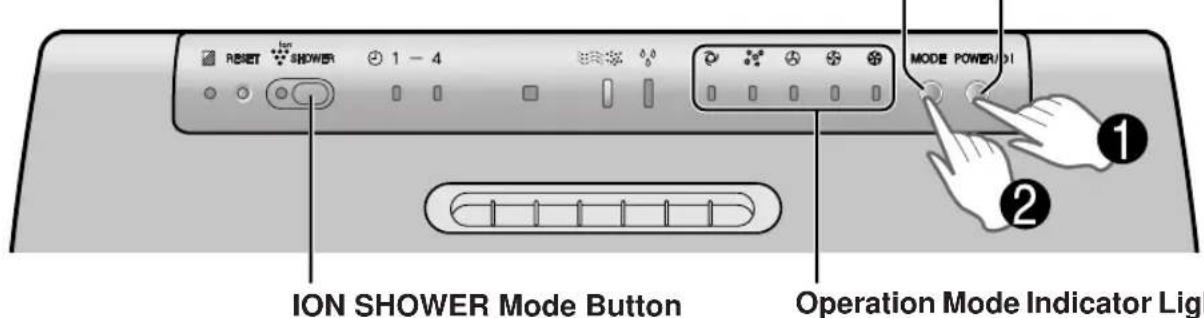
Power ON/OFF Button
Used to start operation (short beep) and stop operation (long beep)
- Plasmacluster Indicator Light and Fan Speed Indicator Light turn on/off.
- Unless unplug the power cord, the operation starts in the previous mode the unit was operated in.
- When stop operation during ION SHOWER Operation, the unit will back to the prior operation of ION SHOWER Operation.
MODE Selection Button
- The operation mode can be switched, and the Indicator Light will turn on.
AUTO operation
The fan speed is automatically switched (HIGH*, MEDIUM, SILENT) depending on the amount of impurities in the air. The sensors detect the impurities for efficient air purification.
MAX operation

The unit will operate at a fan speed of MAX.
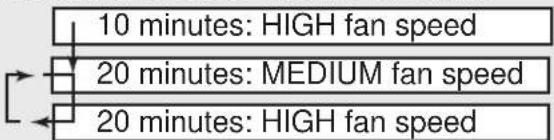
POLLEN mode operation
The unit will operate at HIGH fan speed for 10 minutes, then will alternate between MEDIUM and HIGH for 20 minutes.
MEDIUM operation

The unit will operate at a fan speed of MEDIUM.
SILENT operation

The unit will operate quietly using minimal air intake.
- HIGH fan speed is an intermediate speed between MEDIUM and MAX.
Ion
SHOWER
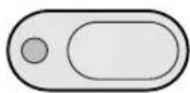
ION SHOWER Mode Button
When pushing the ION SHOWER Mode button, the ION SHOWER operation will be activated. (Direct start is available even when the unit is not turned on.) The concentrated Plasmacluster Ions (ION SHOWER) will be generated in the room like a shower for 15 minutes, repeating the airflow cycles between strong and gentle. (The Plasmacluster Indicator Light repeats its colour cycles between blue and green.), and effectively controls the airborne dust, pollen, mold, and allergen.
- When the operation finishes, the unit will return to the prior operation.
- When pushing the ION SHOWER button while the ION SHOWER operation mode is working, the unit will return to the prior operation.
Operations available with the Remote Control
·AUTO
- MANUAL
POLLEN
OFF TIMER
- Lights ON/OFF
POWER ON/OFF Button
- When you press the POWER ON/OFF Button, a short beep will sound and operation will start in AUTO Mode.
- Unless unplug the power cord, the operation starts in the previous mode the unit was operated in.
To stop, press the POWER ON/OFF Button again. A long beep will sound and operation will stop.
Auto (Fan Speed) Button
The fan speed switches automatically depending on the amount of impurities in the air.
Off Timer Button
The set time switches every time the button is pressed as shown below.
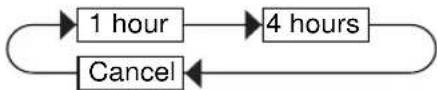
The indicator light shows the remaining time.
The unit will stop operation when the timer is up.
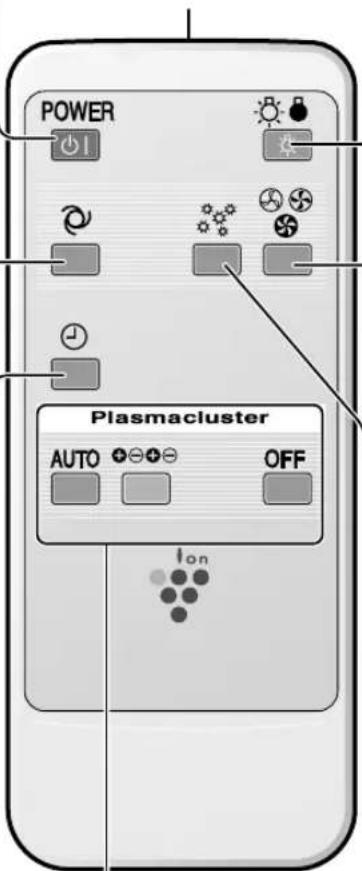
Transmitter
Plasmacluster ion mode selections
- AUTO
CLEAN
OFF
LIGHTS ON/OFF Button
Switches the Plasmacluster Indicator Light, CLEAN-SIGN Light and MIST Operation Indicator light either ON or OFF.
Manual (Fan Speed) Button
The fan speed can be switched among Silent, MEDIUM and MAX settings.
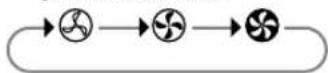
SILENT MED MAX
Pollen Mode Operation Button
See Page E-10
Plasmacluster Ion Mode Selections
| Mode | Colour of Plasmacluster Indicator Light | Operation |
| AUTO | Green The room air is clean. Blue The room air is impure. First 10 minutes since AUTO mode is selected. (regardless of air condition) The air environment is favourable for activation of mold, virus, and allergen. | The unit detects the dust, mold or airborne microbes using its sensors, and controls the generating amount of positive and negative ions automatically. When room air is impure, approximately same numbers of positive and negative ions will be released. When room air is clean, negative ions will be released in an increased rate and controls the ion balance. |
| CLEAN | Blue | The same numbers of positive and negative ions are discharged. |
| OFF | Off | The generation of ions will stop. |
MAIN UNIT INDICATOR
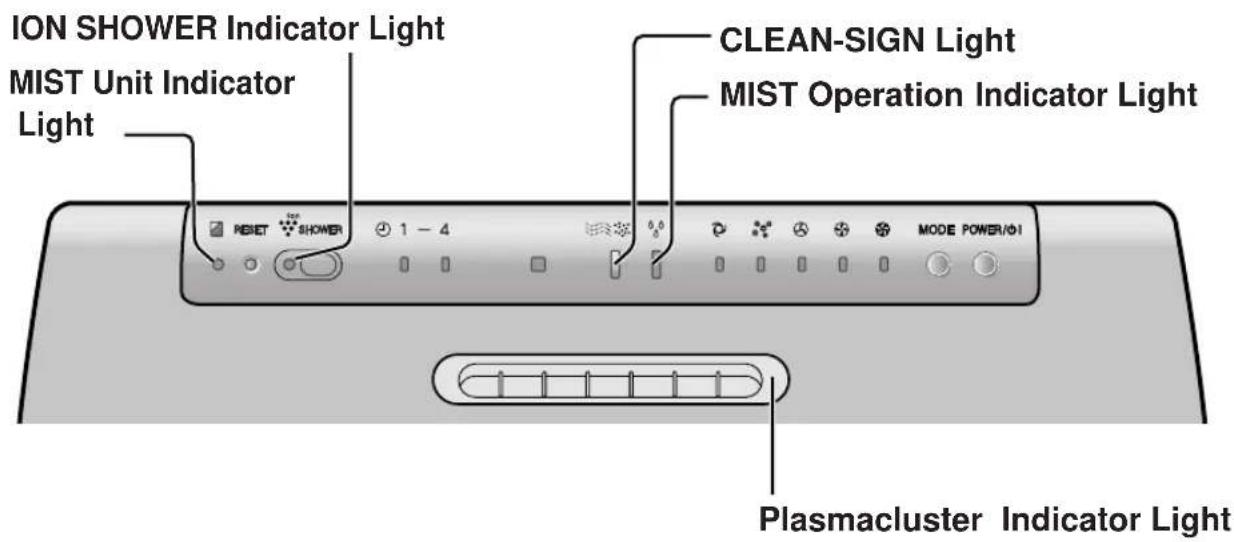

MIST Unit INDICATOR LIGHT

Clean the MIST Filter when the MIST Filter Indicator Light activates. (The indicator light will be activated in about 1 month, when using the unit with mist operation 24 hours day, every day.) (See Page E-14)

The ION SHOWER Operation is working when the ION SHOWER Indicator Light activates.

PLASMACLUSTER INDICATOR LIGHT
Plasmacluster ion operation is selected using the remote control.
Blue light
When the Plasmacluster ion operation is in Clean Mode, or in AUTO Mode and the air in the room is impure, the Plasmacluster Ions will be released continuously.
Green light
When the Plasmacluster ion operation is in the AUTO Mode and the air in the room is clean, this light will be activated and the unit will release the negative ions in the increased rate and controls the ion balance.
Cycles of blue and green.
When the Plasmacluster ion operation is in the ION SHOWER Mode, Plasmacluster indicator Light will repeat its colour cycles between blue and green.
Light off
There are no Plasmacluster ions being generated.
- The light can be turned off by using the 'Lights ON/OFF Button' on the Remote Control. In this case, Plasmacluster ions are generated. (Please turn off the light when not required.) (See Page E-11)

CLEAN-SIGN LIGHT

The colour changes according to the air condition.

ABOUT THE CLEAN-SIGN
- The condition of the CLEAN-SIGN depends on the room air condition detected by the Dust and Odour Sensors when the plug is inserted into the wall outlet.
- It is possible to have a green CLEAN-SIGN with impurities in the air at the time that the air purifier was just introduced to the room environment. After a while, however, the base impurity rate will be adjusted to detect room air condition correctly.
- Use the Lights ON/OFF Button on the remote control to turn off the Indicator lights.
DETERMINING THE BASE IMPURITY RATE
For the first 30 seconds after the power plug is inserted into the wall outlet, the unit will check the conditions of the air. If operation is set to ON during this time, the CLEAN-SIGN LIGHT will alternately flash in green, orange and red.

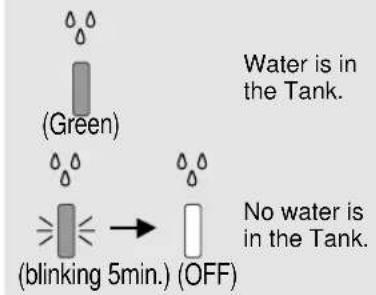
MIST Operation Indicator Light
Operating this product with water in its MIST Tray will prompt the MIST Operation Indicator Light (green) to turn on, and vaporized mist will come out automatically. To stop the vaporized mist from being released, discard water from the tank and MIST Tray.
- The MIST Operation Indicator Light will blink for 5 minutes when the tank water is gone, and eventually it will turn off.
- The MIST Operation Indicator Light may not correctly display if the main unit is not sitting up straight.
When the sensors detect polluted air, air flow is increased to release more vaporized mist and raise its air-purifying function; a healthy environment with the appropriate humidity will be achieved.
- The amount of released vaporized mist also changes, depending on humidity and temperature-related conditions.
The light changes according to the Tank condition.
CARE AND MAINTENANCE
To maintain optimum performance of this air purifier, please clean the unit including the sensor and filters periodically.
When cleaning the unit, be sure to unplug the power cord, and never handle the plug with wet hands. Electrical shock and/or bodily injury may occur as a result.
MIST UNIT
Care Cycle
2 weeks
The MIST Filter Indicator Light up.
The frequency of maintenance (descaling) will depend on the hardness of the water that you use; the harder the water the more often descaling will be necessary.
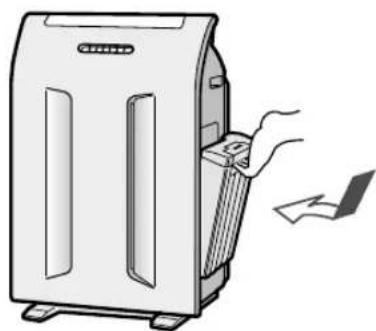
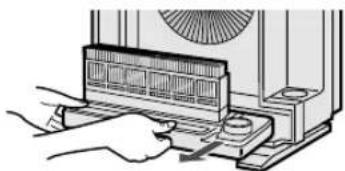
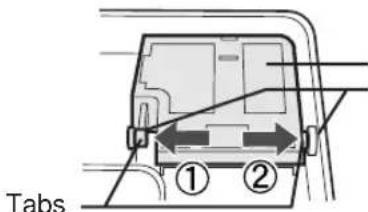
1 Remove THE MIST Unit.
① Remove the front panel and the filter frame. (See Page E-6)
② Remove the tank.
- Be careful of the water drops that may fall.
- Remove all the water drops that are on the tank cap before you pull out the tank.
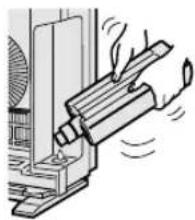
③ Take the MIST Unit from the Main Unit.
- Use both hands to pull out the MIST Unit to avoid spilling of water.
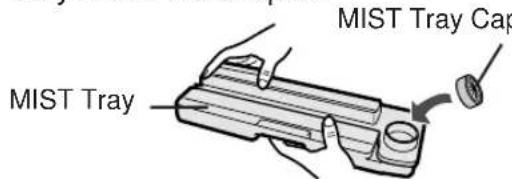
Take apart the MIST Unit.
① Remove the MIST Tray Cap and drain the water by tilting the MIST Unit slowly.
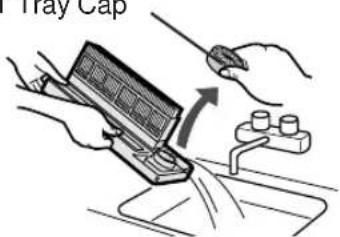
MIST Tray Cap
② Remove the MIST Filter Set from the MIST Tray.
- Be careful of the water drops that may fall.
- Do not take the MIST Filter out of a MIST Filter frame, to maintain its shape.
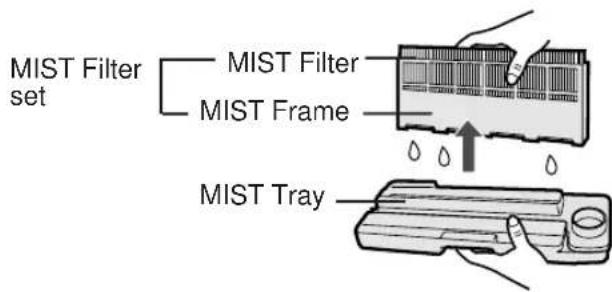
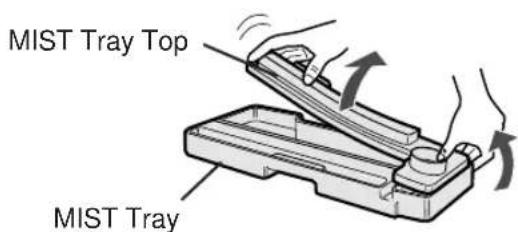
③ Remove the MIST Tray Top.
Carefully remove the MIST Tray Top. If excessive force is applied all at once it may get damaged.
3 Preparing the descending solution.
Citric acid, available at some drugstores, or 100% bottled lemon juice are used for.
descaling.Choose either one to use, and
prepare the descaling solution.
Dissolve 3 teaspoons of citric acid and 600ml of lukewarm water in a suitable container, and stir well.
Use only bottled 100% lemon juice with no pulp (please check before using and strain through a fine strainer there seems to be some pulp). Pour 50~ml of lemon juice and 600~ml of luke-warm water in a suitable container, and stir well.
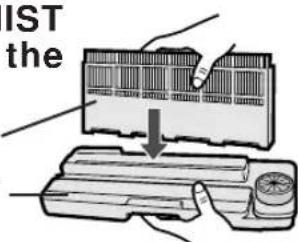
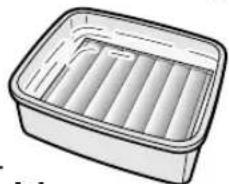
4 Presoak the mist filter set in the solution prior to cleaning.
When using lemon juice, it is recommended to presoak longer than citric acid.
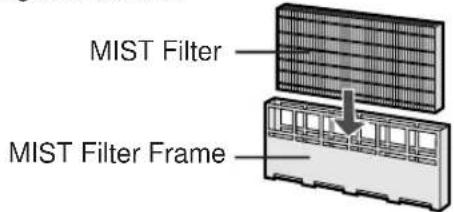
MIST Filter Set
Do not take the MIST Filter out of the MIST Filter Frame. If the MIST Filter is taken out of the Frame by mistake, put it back in the frame, as shown in the diagram below.
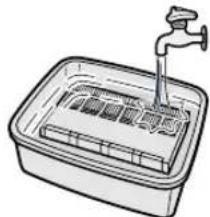
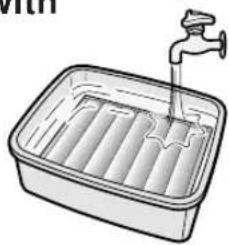
5 Rinse the MIST Filter set with water.
- Change the water and repeat this procedure 2-3 times.
- Use clean water each time.
- I inadequate rinsing may cause citric acid odour or changes in the shape/colour of the main unit.
Replacement Filter See Page E-18
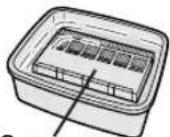
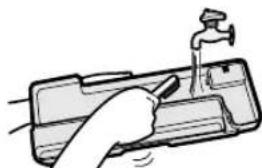
6 Wash inside the tray with water to remove impurities.
- Do not remove the float (Styrofoam).
Clean difficult-to-reach parts with a cotton-tipped swab or tooth brush.
7 Put the MIST Tray Cap back on to close it.
Make sure that the cap is closed by pushing the whole circumference of the cap. Failure in closing the cap completely may result water spills.
8 Attach the MIST Filter set to the MIST Tray.
MIST Filter Set
MIST Tray
9 Put back the MIST Filter Set and MIST Tray in the main unit.
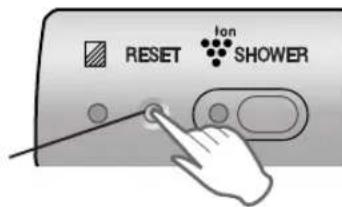
10 Plug in the product and press the MIST Unit Reset Button on the main unit.
MIST Unit Reset Button
When Float comes off, please insert the tabs of the Float into the holes of Mist Tray as shown in the diagram below.
Float
Hole in MIST Tray
CARE AND MAINTENANCE
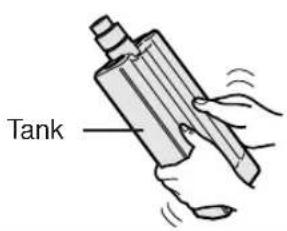
TANK
Care Cycle Every day
With a small amount of water inside and the tank cap closed, wash the tank set by shaking it.
When using a kitchen detergent, dilute the detergent with water and rinse it thoroughly.
WASHABLE ACTIVE CARBON FILTER CARE
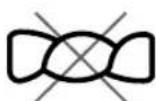
HAND WASH ONLY!
DO NOT TUME BLDRY!
Care Cycle 2 months
1 Fill a large container with warm water, add a mild kitchen detergent and stir.
Dilute as indicated on the detergent container.
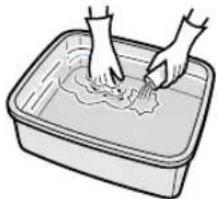
2 Allow the filter to soak approximately 30 minutes before washing.
If the filter surface is very dirty, scrub with an old toothbrush.
3 Rinse thoroughly with clean water.
CAUTION
If rinsing in a container, be sure to rinse 3 to 4 times so that the odour is rinsed thoroughly from the filter.
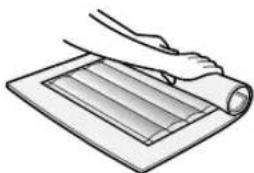
4 Remove excess water.
The filter will be saturated with water after rinsing. To decrease drying time, wrap the filter in an old thick towel so that excess water can be removed.
CAUTION
Some carbon may adhere to the towel, but it is harmless.
It is not allowed to wring out the filter.
5 Dry the filter outdoors if possible in a well ventilated area.
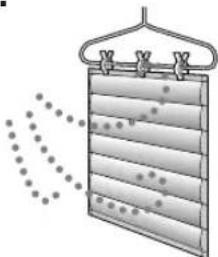
CAUTION
- The wet filter is heavy. Fix it securely for drying to make sure it does not fall down.
- The filter takes longer to dry in winter, on rainy days. Wash it on a day when the weather is good and dry it in the sun.
Move it indoors at night to prevent freezing.
- Dry the filter outdoors in a well ventilated area. If dried indoors, the water dripping off the filter may soil your floor.
- Make sure that the activated carbon has not shifted to one side inside the filter. If it has, distribute it evenly with your fingers.
- Let the filter dry thoroughly. If used while the filter is still moist, then the air that is exhausted from the main unit will have an odour. It may take 1 or 2 days to dry.
6 Reinstalling the Filters.
Reinstall the filters as shown on Page E-6,7
MAIN UNIT
Care Cycle
1 month
To prevent dirt or stains on the main unit, clean as often as necessary. If stains are allowed to remain, they may become hard to clean.
Wipe with a dry, soft cloth
For stubborn stains or dirt, use a soft cloth dampened with warm water.
Do not use volatile fluids
Benzene, paint thinner, polishing powder, etc., may damage the surface.
Do not use detergents
Detergent ingredients may damage the unit.
Keep the unit away from water
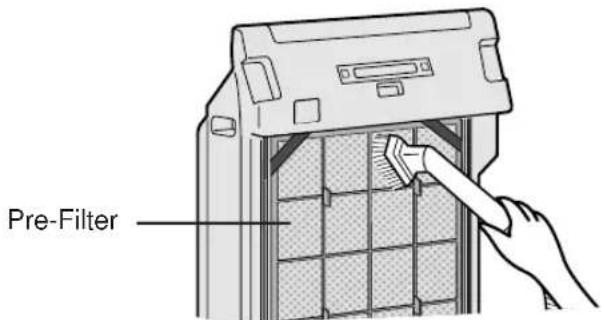
PRE-FILTER
Care Cycle
2 months
As shown in a figure, clean the top surface of the Pre-Filter lightly with a vacuum cleaner.
When Pre-Filter is very dirty, wash it in water with mild kitchen detergent and dry Pre-Filter well in the shade.
SENSORS
(DUST SENSOR, ODOUR SENSOR, TEMPERATURE/HUMIDITY SENSOR)
Care Cycle
2 months
Remove dust from the surface of the hole of the sensors using a vacuum cleaner.
SENSOR FILTER CARE (The sensor Filter is in the sensor cover.)
Detach the sensor filter and tap it lightly with your hand to remove the dust. If it is very dirty, wash it with water and then allow it to dry thoroughly.
Hole of Temperature/Humidity Sensor
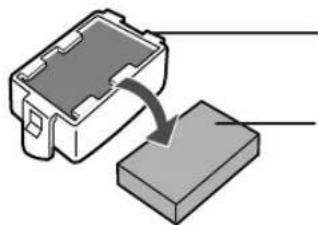
Sensor Cover
Sensor Filter
It does not have a front and a back.
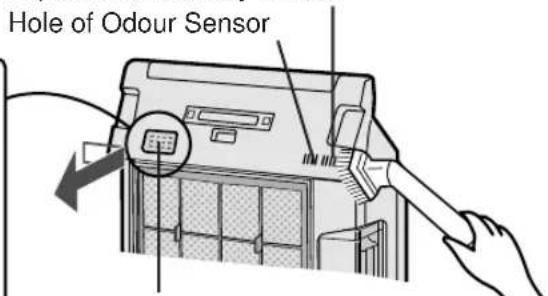
Hole of Dust Sensor
(When the sensor cover is removed, it will be seen.)
FILTER REPLACEMENT GUIDELINES
The replacement period differs depending on the room environment, the usage hours and location of Air Purifier.
If dust or odours persist, replace the filters.
(Refer to "Please read before operating your new Air Purifier")
HEPA Filter / Washable Active Carbon Filter
Up to 5 years after opening
Guide for filter replacement timing
- Filter life can be greatly reduced in poor environments. The presence of cigarette smoke, pet dander and other concentrations of airborne particles will cause filters to become clogged in less time. Please check filters regularly and replace as needed.
Replacement Filters
Model: FZ-P63SEF
HEPA Filter : 1 unit
- Washable Active Carbon Filter : 1 unit
REPLACING THE FILTERS
-
See page E-6,7 for directions on how to install the filters when replacing.
-
Fill in the usage start date of the filters on the Date Label.
Disposal of Filters
Please dispose of replaced filters according to the local disposal laws and regulations.
HEPA Filter materials:
- Filter: Polypropylene • Frame: Polyester
Active Carbon Filter Materials: - Deodorizer: Activated charcoal - Net: Polypropylene 60% , Polyester 40%
MIST Filter
Up to 1 years after opening
Guide for filter replacement timing.
- The Mist Filter life can be greatly reduced in poor environments. Please exchange the Mist Filter, even if within 1 year after opening, if the following conditions appear:
- Mineral deposits (white, black, or red masses) do not come off after cleaning or the Mist Filter is still dirty.
Severe damage or change of shape has resulted.
Replacement Filters
Model: FZ-S63MF
- MIST Filter : 1 unit
REPLACING THE FILTERS
1.See page E-14,15 for directions on how to install the filters when replacing.
2. Fill in the usage start date of the filters on the Date Label.
Disposal of Filters
Please dispose of replaced filters according to the local disposal laws and regulations.
MIST Filter materials:
Rayon, Polyester
TROUBLESHOOTING
Before calling for repair, please review the list below, since the problem may not be a unit malfunction.
| SYMPTOM | REMEDY (not a malfunction) |
| The Remote Control does not work. | ·Have the batteries been depleted? ·Are the batteries inserted correctly? ·Is a fluorescent lighting in the room flickering due to service life? |
| Odours and smoke are not removed. | ·Clean or replace the filters if they appear to be heavily soiled. (Refer to E-16,E-18) |
| The CLEAN-SIGN Light lights green even when the air is impure. | ·The air could be impure at the time the unit was plugged in. (Refer to E-12) Pull out the plug from the electrical outlet, and insert the plug one minute later. |
| The CLEAN-SIGN Light lights orange or red even when the air is clean. | ·The sensitivity of the sensors become unstable when the opening of the odour sensor or dust sensor is dirty or is clogged. Clean the dust around the sensor opening using a vacuum cleaner. (Refer to E-17) |
| The Plasmacluster Indicator Light remains blue and does not change. | ·When in Clean Mode, the Plasmacluster Indicator Light colour will not change. |
| A clicking or ticking sound is heard from the unit. | ·Clicking sound or ticking sound is emitted when the unit is generating ions. |
| The discharged air has an aroma or odour. | ·Check to see if the filters are heavily soiled. Replace the filters. ·Plasmacluster Air Purifiers emit small traces of ozone which may produce an odour. These ozone emissions are well below safety levels. |
| The unit does not operate when cigarette smoke is in the air. | ·Is the unit installed in a location that is difficult for the sensor to detect cigarette smoke? ·Are the dust or odour sensor openings blocked or clogged? (In this case, clean the openings.) (Refer to E-17) (Care Cycle : MIST Filter : 1 month) |
| The MIST Unit Indicator Light remains activated even after replacing filter. | ·After replacing filters, connect the power cord to an outlet and press the Mist Unit Reset Button. (Refer to E-15) |
| The Plasmacluster Indicator Light or the CLEAN-SIGN Light will not activate. | ·Check to see if the Lights OFF Mode on the Remote Control is selected. If so, then press the Lights ON/OFF Button on the Remote Control to activate the indicator lights. (Refer to E-11) |
| Plasmacluster Indicator Light repeat colour cycles between blue and green. | ·The ION SHOWER operation is working. |
| Mist Unit Indicator Light does not turn on even water is in. | ·Please check if the impurities adhered to the surface of the Float. Clean the Mist Tray. Check to see check if the Main Unit is put on a inclined surface. |
| When the water of the tank does not decrease or the decrease of the water is slow. | ·Check to see if the Mist Unit and Tank are installed correctly. ·Check the Mist Filter. Replace the filter when it is heavily soiled. (Refer to E-14,18) |
| The CLEAN-SIGN LIGHT switches frequently. | ·The CLEAN-SIGN Light will automatically switches the colours when detected by dust and odour sensors. |
TROUBLESHOOTING
| SYMPTOM | REMEDY (not a malfunction) |
| Though Clean Sign Indicator turns on Green, Plasmacluster indicator Light terns on blue. | "SENTINEL" function is working. When the Plasmacluster ion mode is AUTO or CLEAN mode and the unit detects the air environment is favourable for activation of mold, virus, and allergen, using its 4 sensors for dust, odour, temperature and humidity, the Plasmacluster lons will be automatically increased and controls the activity of airborne microbes. |
| Molds and mildews: refer to "Kenko Jutaku no Chishiki(Knowledge of Healthy Homes)" by NPO Kenko Jutaku Suishin Kyoigaki. Viruses: refer to "The Influence of Environment on the Survival of Air borne Virus Particles in LaboratoryAh by G. J. Harper. Allergens (House Dust): refer to Koichi Ikeda's "Shitsunai Osen no Gen'in to Taisaku (Indoor Pollution: Causes and Measures)" | Air environment that allows fungus and virus activities. Temperature(℃) Virus 0 50 Humidity(%) Air environment that allows allergens (house dust) to float around. 40 0 50 Humidity(%) Allergens 0 0 0 100 0 0 0 100 0 0 0 100 0 0 0 100 0 0 0 100 0 0 0 100 0 0 0 100 0 0 0 100 0 0 0 100 0 0 0 100 0 0 0 10 |
ERROR DISPLAY
| LAMP INDICATION REMEDY | |
| The “Silent” Fan Speed Indicator Light blinks. | Fan motor disconnected or abnormal. Operation stops. • Pressing the POWER ON/OFF button will reset the error display, but if error occurs again, contact the Sharp Service Centre. |
SPECIFICATIONS
| Model | FU-S63E | |||
| Power supply | 220-240V 50/60Hz | |||
| Fan Speed Operation | Fan Speed Adjustment | MAX | MED | SILENT |
| Rated Power | 70 W | 10 W | 3.9W | |
| Air Flow Volume | 378m3/ hour | 156m3/ hour | 36 m3/ hour | |
| Noise Level | 52 dBA | 31 dBA | 14 dBA | |
| Humidification*1 | 250 ml/ hour | 130 ml/ hour | 40 ml/ hour | |
| Applicable Floor Surface | ~48m2*2 | |||
| Sensors | Dust/Odour/Temperature & Humidity | |||
| Filter type | Dust collection | Pre-filter & HEPA with Microbial control | ||
| Deodorization | Washable Active Carbon | |||
| Cord Length | 2.0m | |||
| Dimensions | 430mm(W)x256mm(D)x620mm(H) | |||
| Weight | 9.6kg | |||
1 Room temperature : 20°C ; humidity : 30%
2 •The applicable floor surface area is appropriate for operating the unit at maximum fan speed.
Applicable floor surface area indicates the space where a certain amount of dust particles can be removed in 30 minutes.
Standby Power
In order to operate the electrical circuits while the power plug is inserted in the wall outlet, this product consumes about 0.8W of standby power.
For energy conservation, unplug the power cord when the unit is not in use.
Attention: Your product is marked with this symbol. It means that used electrical and electronic products should not be mixed with general household waste. There is a separate collection system for these products.
A. Information on Disposal for Users (private households)
1. In the European Union
Attention: If you want to dispose of this equipment, please do not use the ordinary dust bin!
Used electrical and electronic equipment must be treated separately and in accordance with legislation that requires proper treatment, recovery and recycling of used electrical and electronic equipment.
Following the implementation by member states, private households within the EU states may return their used electrical and electronic equipment to designated collection facilities free of charge. In some countries your local retailer may also take back your old product free of charge if you purchase a similar new one.
*) Please contact your local authority for further details.
If your used electrical or electronic equipment has batteries or accumulators, please dispose of these separately beforehand according to local requirements.
By disposing of this product correctly you will help ensure that the waste undergoes the necessary treatment, recovery and recycling and thus prevent potential negative effects on the environment and human health which could otherwise arise due to inappropriate waste handling.
2. In other Countries outside the EU
If you wish to discard this product, please contact your local authorities and ask for the correct method of disposal.
For Switzerland: Used electrical or electronic equipment can be returned free of charge to the dealer, even if you don't purchase a new product. Further collection facilities are listed on the homepage of www.swico.ch or www.sens.ch.
B. Information on Disposal for Business Users.
1. In the European Union
If the product is used for business purposes and you want to discard it:
Please contact your SHARP dealer who will inform you about the take-back of the product. You might be charged for the costs arising from take-back and recycling. Small products (and small amounts) might be taken back by your local collection facilities.
For Spain: Please contact the established collection system or your local authority for take-back of your used products.
2. In other Countries outside the EU
If you wish to discard of this product, please contact your local authorities and ask for the correct method of disposal.
Ion-shower indicator
6 Monteer de filters weeR.
2) HEPA-Filter (HEPA = High
SHARP machines are proprietary articles which are produced with precision and care according to most modern production methods.
In case of proper handling and with considering of the instruction book, this machine will serve you well for a long time.
Of course, a defect cannot be ruled out.
If your appliance has a warrantyable defect in the period of warranty, please contact your dealer, where you bought the appliance. This dealer is your only contact person for any claim of warranty.
As proof for repairs during Warranty period, you need the invoice of the machine.
Please bring your defect appliances also to your dealer (where you bought the appliance) when the warranty period is over.
SHARP ELECTRONICS (EUROPE) GMBH
Parts & Technical Service
SERVICE VORGEHENSWEISE - GILT NUR FÜR DEUTSCHLAND
Lieber SHARP-Kunde
Parts & Technical Service
Plasmacluster Ion Mode Selections
REEMPLACEMENT DES FILTRES
REEMPLACEMENT DES FILtres
INDICATIONS LUMINEUSES

- Please read before operating your new Air Purifier
- NOTE
- FEATURES
- ION SHOWER
- Plasmacluster Ion Control
- Clean Mode
- - AUTO Plasmacluster Ion Mode
- - Filters
- 1) Washable Active Carbon Filter
- 2) HEPA (High Efficiency Particulate Air) Filter with Microbial control.
- - Mist Operation Mode
- CONTENTS
- IMPORTANT SAFETY INSTRUCTIONS .... E-2
- PART NAMES. E-4
- PREPARATION. E-6
- OPERATION E-10
- CARE AND MAINTENANCE. E-14
- TROUBLE SHOOTING. E-19
- SPECIFICATIONS E-20
- INFORMATION ON PROPER DISPOSAL ....E-21
- IMPORTANT SAFETY INSTRUCTIONS
- NOTE - Radio or TV Intference
- CAUTIONS CONCERNING OPERATION
- REMOTE CONTROL LIMITATIONS
- DO NOT USE THE REMOTE CONTROL IN THE FOLLOWING LOCATIONS:
- INSTALLATION GUIDELINES
- FILTER GUIDELINES
- PART NAMES
- FILTER INSTALLATION
- Remove the filters
- Install the filters
- Pour water into the Tank
- CAUTION
- INSERTING BATTERIES IN THE REMOTE CONTROL
- Battery Information
- REMOTE CONTROL USE
- Main Unit Controls
- MAIN UNIT OPERATION
- Power ON/OFF Button
- MODE Selection Button
- AUTO operation
- MAX operation
- POLLEN mode operation
- MEDIUM operation
- SILENT operation
- SHOWER
- ION SHOWER Mode Button
- Operations available with the Remote Control
- Auto (Fan Speed) Button
- Off Timer Button
- Plasmacluster ion mode selections
- LIGHTS ON/OFF Button
- Manual (Fan Speed) Button
- Pollen Mode Operation Button
- MAIN UNIT INDICATOR
- MIST Unit INDICATOR LIGHT
- PLASMACLUSTER INDICATOR LIGHT
- Blue light
- Green light
- Cycles of blue and green.
- Light off
- CLEAN-SIGN LIGHT
- ABOUT THE CLEAN-SIGN
- DETERMINING THE BASE IMPURITY RATE
- MIST Operation Indicator Light
- The light changes according to the Tank condition.
- CARE AND MAINTENANCE
- MIST UNIT
- Care Cycle
- weeks
- The MIST Filter Indicator Light up.
- Remove THE MIST Unit.
- Take apart the MIST Unit.
- Preparing the descending solution.
- Presoak the mist filter set in the solution prior to cleaning.
- Rinse the MIST Filter set with water.
- Wash inside the tray with water to remove impurities.
- Put the MIST Tray Cap back on to close it.
- Attach the MIST Filter set to the MIST Tray.
- Put back the MIST Filter Set and MIST Tray in the main unit.
- Plug in the product and press the MIST Unit Reset Button on the main unit.
- TANK
- Care Cycle Every day
- WASHABLE ACTIVE CARBON FILTER CARE
- HAND WASH ONLY!
- DO NOT TUME BLDRY!
- Care Cycle 2 months
- Fill a large container with warm water, add a mild kitchen detergent and stir.
- Allow the filter to soak approximately 30 minutes before washing.
- Rinse thoroughly with clean water.
- Remove excess water.
- Dry the filter outdoors if possible in a well ventilated area.
- Reinstalling the Filters.
- MAIN UNIT
- month
- Wipe with a dry, soft cloth
- Do not use volatile fluids
- Do not use detergents
- Keep the unit away from water
- PRE-FILTER
- months
- SENSORS
- SENSOR FILTER CARE (The sensor Filter is in the sensor cover.)
- FILTER REPLACEMENT GUIDELINES
- HEPA Filter / Washable Active Carbon Filter
- Guide for filter replacement timing
- Replacement Filters
- REPLACING THE FILTERS
- Disposal of Filters
- MIST Filter
- Guide for filter replacement timing.
- TROUBLESHOOTING
- ERROR DISPLAY
- SPECIFICATIONS
- Standby Power
- Information on Disposal for Users (private households)
- In the European Union
- In other Countries outside the EU
- Information on Disposal for Business Users.
- Ion-shower indicator
- Monteer de filters weeR.
- 2) HEPA-Filter (HEPA = High
- SHARP ELECTRONICS (EUROPE) GMBH
- SERVICE VORGEHENSWEISE - GILT NUR FÜR DEUTSCHLAND
- REEMPLACEMENT DES FILTRES
- INDICATIONS LUMINEUSES
Brand : SHARP
Model : FUS63E
Category : Air purifier