
HBP702 - Heating DELONGHI - Free user manual and instructions
Find the device manual for free HBP702 DELONGHI in PDF.
| Product type | Radiant fan heater |
| Brand | DeLonghi |
| Model | HBP702 |
| Power supply | Mains electricity (voltage to check on the device) |
| Maximum power | 2000 W (estimated) |
| Dimensions (W x D x H) | Approximately 30 x 25 x 60 cm |
| Weight | Approximately 4 kg |
| Heating functions | Reduced power (1 switch) and maximum power (2 switches) |
| Summer ventilation | Yes, without heating |
| Adjustable thermostat | Allows maintaining the desired temperature |
| Anti-freeze function | Maintains the room at about 5°C |
| 24-hour timer | On some models, programming in 15-minute intervals |
| Swivel base | Manual or motorized depending on model, 30° angle |
| Foot switch | Present on models with swivel base |
| Installation | On horizontal surface or wall-mounted (3 screws) |
| Minimum distance from obstacles | 50 cm |
| Minimum room surface area | 4 m² |
| Overheat protection | Safety device with automatic cut-off |
| Maintenance and cleaning | Clean air intake and outlet grilles regularly, do not use abrasives |
| Spare parts | Power cord replaceable by a professional |
Frequently Asked Questions - HBP702 DELONGHI
User questions about HBP702 DELONGHI
0 question about this device. Answer the ones you know or ask your own.
Ask a new question about this device
Download the instructions for your Heating in PDF format for free! Find your manual HBP702 - DELONGHI and take your electronic device back in hand. On this page are published all the documents necessary for the use of your device. HBP702 by DELONGHI.
USER MANUAL HBP702 DELONGHI
FAN HEATER INSTRUCTION MANUAL

RADIATEUR SOUFFLANT MODE D'EMPLOI

AEPOOEPMO OHHTESXPHEHS

VARMLUFTSBASER BRUGSVEJLEDNING

VärMEFLÄKT
BRUKSANVISNING

VIFTE OVN
BRUKS ANVISING

TUULETINLÄMMITIN
KAYTTÖOHJEET

TERMOWENTYLATOR INSTRUKCJA OBSLUGI

HOVENTILATOR KEZELESI UTASITAS

TEPELNY VENTILATOR
NAVOD K POUZITI

TEPMOBEHTNJARTOP INHCTPYKUNI NO 3KCNJYATAUIN

| Voltage Wattage | See rating label | Spending effect | se typepladen |
| Tension puissance | voir plaquette données | Spänning effect | se markplat |
| Spannung Leistung | siehe Typenschild | Spenning se etikett | |
| Tensione potenza | vedi targa caratteristiche | Jännite watt kts. arvokilpi ominaisuudet | |
| Spanning Effekt | zie plaatje | Napiëcie mocy | Zob. tabliczke znamionowq |
| Tension Potencia | védase placà de caracteristicas | Feszültseg teljesitmény | Iásd adatlemez |
| Voltagem Potencia | ver placà de espécificações | Napétí Vykon | viz štlek charakteristik |
| Táton Toxics | žléne minaxíba με χαρακτηριστικ | Hannpajęnéme nityanma | смогри Табликухарakтериспк |
ELECTRICAL CONNECTION (U.K. ONLY)
A) If your appliance comes fitted with a plug, it will incorporate a 13 Amp fuse. If it does not fit your socket, the plug should be cut off from the mains lead, and an appropriate plug fitted, as below.
WARNING: Very carefully dispose of the cut off plug after removing the fuse: do not insert in a 13 Amp socket elsewhere in the house as this could cause a shock hazard.
With alternative plugs not incorporating a fuse, the circuit must be re-fitted when changing the fuse using a 13 Amp Ast approved fuse to BS 1362. In the event of losing the fuse cover, the plug must NOT be used until a replacement fuse cover can be obtained from your nearest electrical dealer. The colour of the correct replacement fuse cover is that as marked on the base of the plug.
B) If your appliance is not fitted with a plug, please follow the instructions provided below:
IMPORTANT
The wires in the mains lead are coloured in accordance with the followin code:
Blue: Neutral
Brown: Live
As the colours of the wires in the mains lead of this appliance may not correspond with the coloured markings identifying the terminals in your plug, proceed as follows:
The wire which is coloured blue must be connected to the terminal which is marked with the letter N or coloured black. The wire which is coloured brown must be connected to the terminal which is marked with the letter L or coloured red.
GB
ELECTRICAL CONNECTION
- Before using the appliance check that your supply voltage is the same of that shown on the rating label of the unit.
- T HIS APPLIANCE CONFORMS TO DIRECTIVE 89/336/CEE GOVERNING RADIO INTERFERENCE.
INSTALLATION
The appliance can be used on any horizontal support surface.
The models without adjustable base can be wall-mounted, using 3 screws and 3 wall plugs.
To mount the appliance on the wall, proceed as follows:
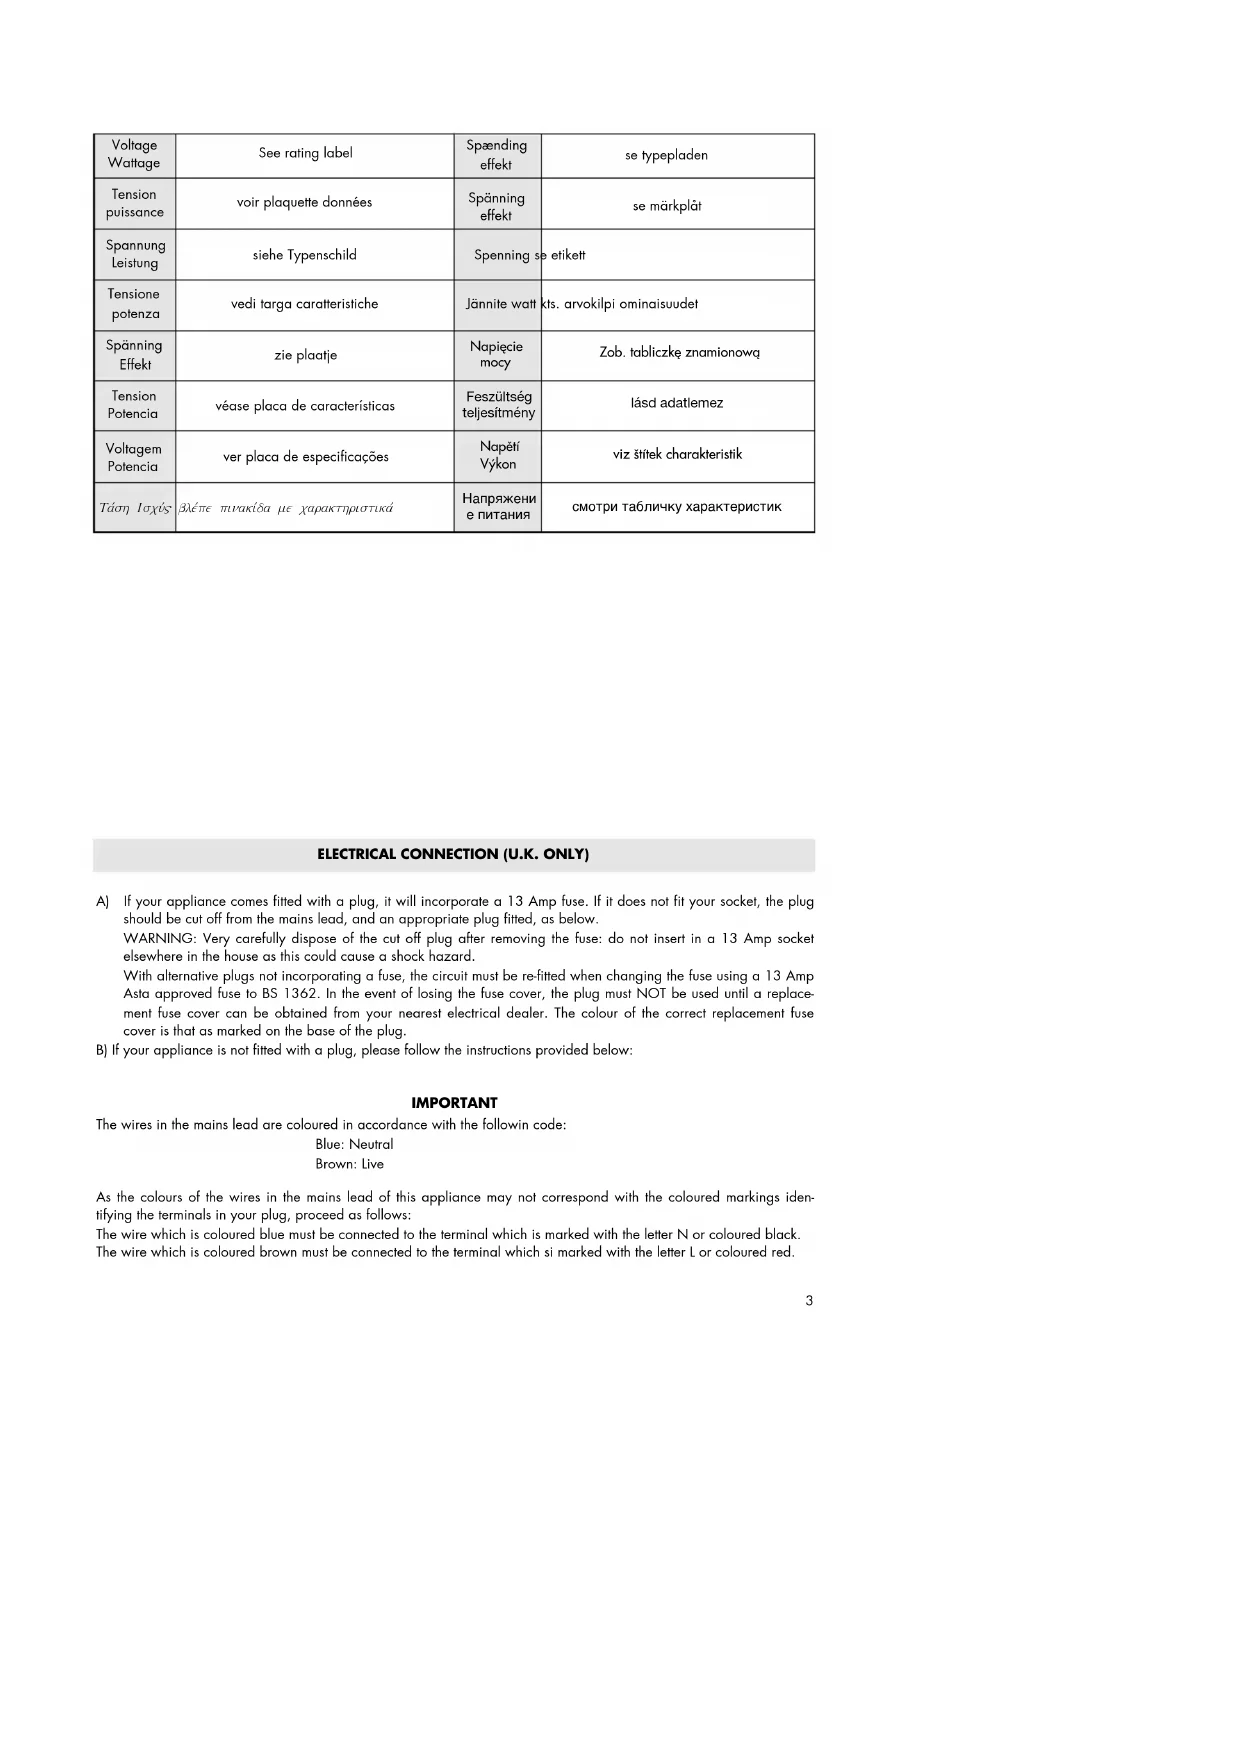
- drill the first hole in the wall, heeding the minimum distances indicated in Fig. 1;
- hang the appliance on the wall and mark the place where the other 2 holes are to be drilled in the wall, in order to fasten the appliance safely;
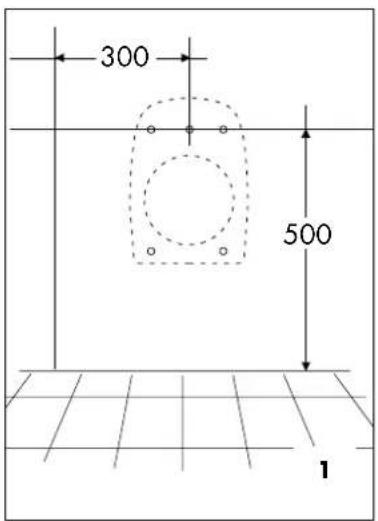
- installations in bathrooms must be performed by qualified persons, in compliance with the standards in force;
The appliance must be installed outside of the prescribed protective volume (Fig. 2) and in any case away from bathtubs, showers, washbasins, taps, etc.
The appliance must not be positioned directly underneath a fixed power point.
OPERATION
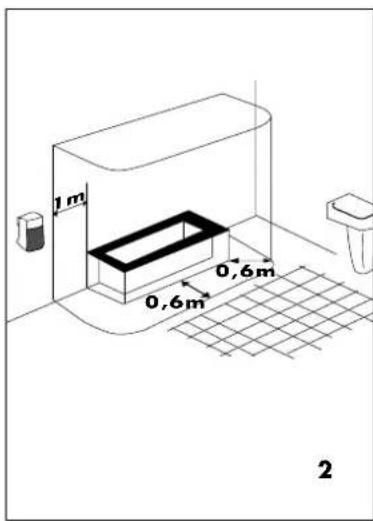
- Summer use: (ventilation only): turn the thermostat dial fully clockwise to the maximum position
- Reduced power operation (only on some models): turn the thermostat dial to the maximum position and press the "o" switch (the pilot light will turn on).
Full power operation (only on some models): turn the thermostat dial to the maximum position and press the "o" and "oo" switches (the pilot lights will turn on).
- Setting the thermostat:
When the room has reached the desired temperature, turn the thermostat knob slowly in an anti-clockwise direction until you get to the setting — and not beyond it — where you hear a click (or, for models with warning lights, until those lights turn off). The thermostat will then adjust that set temperature automatically and keep it constant.
If your appliance is the type with 2 switches, you could utilize only one of them during mild seasons and on days not particularly cold. You will thus use but little electrical power and obtain even greater savings in energy consumption.
Anti-freeze function
With the thermostat in the position and the switches pressed, the appliance will keep the room at a temperature of approximately 5^ , thereby preventing freezing, at a minimum consumption of energy.
- Switching the appliance off: turn off the switches and turn the thermostat dial anticlockwise to the minimum position .
MODELS WITH 24 HOUR TIMER
To set the heating periods proceed in the following manner:
- Check the time by your watch. Supposing it is 10.00 a.m. turn the numbered dial of the time-clock in a clockwise direction until the number 10 coincides with the reference mark on the time-clock. Set the time period during which you wish the appliance to work by pushing the black notches towards the centre. Each notch corresponds to a period of 15 minutes. At this point red sections will be visible corresponding to the working periods. Set in this way the radiator will function automatically every day during the set period. (Important: the plug must always remain connected to power supply).
-
To change the programmed time period, just bring back the black notches to their original position and set the new working periods required.
-
If you wish the appliance to function without programmed working periods push all the notches towards the centre. In this case, to turn the appliance off totally the plug must be pulled out apart from switching off, so as to avoid unnecessary working of the timer.
- Antifreeze function: turn the thermostat dial to the minimum position and press the switches. The appliance will maintain a minimum room temperature of approximately 5^ thus preventing freezing with a minimum energy consumption.
- Summer use: (ventilation only): turn the thermostat dial fully clockwise to the maximum position (with the teeth of the timer facing inwards).
MODELS WITH ADJUSTABLE BASE (pedal switch)
Some models feature an adjustable base and pedal switch.
The appliance can be manually pointed up to around 30^ to the right and left, so as to aim the flow of air in the preferred direction.
To turn the appliance on, after having set the thermostat dial and switches (and, if necessary, the timer) as described above, press the pedal switch to activate the main switch which turns on the appliance (for models with timer, the pilot light on the base will turn on). To turn the appliance off, simply press the pedal again (the pilot light on the base will turn off).
Important: the appliance can only be turned on using the pedal.
MODELS WITH MOTORISED ROTATING BASE
Some models are fitted with a motorised rotating base.
To turn the appliance on, use the dial, switches and, if necessary, the timer, as described above.
To distribute the air flow over a larger area, press the pedal. When activated in this way, the appliance will oscillate both to the right and left over an angle of around 30^ . To stop the appliance in the desired position, simply press the pedal again.
MAINTENANCE
- Always pull the plug out of the power point before cleaning the heater.
- Periodically clean the air intake and outlet grilles during the period in which the heater is in use.
- Do not use abrasive cleaning products or solvents.
CAUTION
- Never use the heater near a bath, shower, basin or swimming pool.
- Always use the heater in an upright position.
- Do not use the heater to dry your laundry. Never obstruct the intake and outlet grilles (danger of overheating).
- The heater must positioned at least 50~cm from furniture or other objects.
- When the appliance is used as a portable heater, do not place it close to walls, furniture, curtains etc.
- The appliance must be installed so that the switches and other controls cannot be reached from a person standing in a bathtub or a shower.
- The electrical feed cord must be replaced only by officially authorised personnel.
- Do not cover the appliance when in operation as this could cause a fire risk.
- Do not use the appliance in rooms less than 4m^2 in area.
The heater is fitted with a safety device which will switch off the heater in case of accidental overheating (eg. obstruction of air intake and outlet grilles, motor turning slowly or not at all). To reset, disconnect the plug from the power for a few minutes, remove the cause of overheating then plug the appliance in again.
F
RACCORDEMENT AU RESEAU
- Regulering of termostaten
MEPbI IPEDOCTOPOXHOCTN
He noJIb3yITeCb annapaT B6IIN BaHH, dywa, paKOBn Hnn 6accenHOB.
- IcnoJb3yIte np6Op JIuB ToJIbKO B BepTnKaJbHOM NOJOxKeHH.
He nCnoB3yIe np6op IJn cyuKn 6JIb, He 3aropaxnBaTe BxOdHbIe N BbIXoHbIe peWetKn Bo3dyxa (cUeCTByET onachocTb neperpeBa).
Ha paccToHn 50 cm npeep npnbopom He doJXhbl haoDntbcra MebeIb nn npytne npedMeTbl.
Korda np6op nCnOsb3yETcB nepeHOCHom pexmme, He BKIOuHaTe erO B6NI3n CTeH, Me6en, 3aHaBeCOK n T.d.
Heo6xOJIMMO yCTaHOBt npI6Op taKIM O6pa3OM, YTO6bI BbIKIOHaTeIN INpyrne OprAHy npabJIeHn 6bIJN BHe DoCraEMOCTn YEIOBEKa, NOJIb3YIOUeROc BAHHOn ININ dyuEM.
- 3aMeHy uHypa nHTaHn yOJKeH BbINOJHrTb TOnbKO nepcoHa, yNoHOMOeHHbI n3ROTOBtTeIeM.
- Hn B Koem cnyuae He HaKpbIbai Te npu6op BO BpEma pa60tbl, TaK KaK cyuectByet onaHocTb noXapa.
He nCnoJb3yIte 3TOT np6Op B NOMeUeHnX, NIOuaJaKoTOpBix MeHbSe 4 M².
PpeoXpAHnTeBHOe yCTPOcTBO OCTaHaBnBaET paOby TepMOBeHTNlTOpa B Cnyuae cnUyauHoro neperpeBa (HanpImep, npu 3acopeHN BxOndbIX N BbIXoNDbIX peWetOK BO3dyxa, npi npu octaHOBKe nni MeDJIeHNOM BpaueHN DBNrAteJRA. IInra BoCCTaHOBHeHn erO paObI Heo6xoDMo BbHyTB BNky INo3oTKN, DoKJaTcR HeCKOJIbKm MNHyT, YcTpaHnTbnPnUHHy neperpeBa npu6opa IN CHOBA BCTaBnTB BNky Bpo3eTKy.
5714003500/04.02