
Vento V550920T - Heating DELONGHI - Free user manual and instructions
Find the device manual for free Vento V550920T DELONGHI in PDF.


| Product type | Fan heater |
| Brand | DeLonghi |
| Model | Vento V550920T |
| Category | Heating |
| Dimensions (H x W x D) | 420 x 250 x 150 mm |
| Weight | 2.5 kg |
| Power supply | 220-240 V, 50-60 Hz |
| Maximum power | 2000 W |
| Power levels | 2 (1000 W / 2000 W) |
| Thermostat | Adjustable |
| Fan only | Yes |
| Frost protection | Yes |
| Safety | Automatic shut-off in case of overheating |
| Maintenance | Clean with a damp cloth; do not immerse |
| Spare parts | Contact DeLonghi after-sales service |
| Repairability | Repairability index not provided |
Frequently Asked Questions - Vento V550920T DELONGHI
User questions about Vento V550920T DELONGHI
0 question about this device. Answer the ones you know or ask your own.
Ask a new question about this device
Download the instructions for your Heating in PDF format for free! Find your manual Vento V550920T - DELONGHI and take your electronic device back in hand. On this page are published all the documents necessary for the use of your device. Vento V550920T by DELONGHI.
USER MANUAL Vento V550920T DELONGHI
OIL FILLED RADIATORS
RADIATEURS À BAIN D'HUILE
ÖL-RADIATOR
RADIATORI AD OLIO
OLIEGEVULDE RADIATOREN
RADIADOR DE ACEITE
RADIADORES A ÓLEO
ΚΑΛΟΡΙΦΕΡ ΛΑΔΙΟΥ
MODELS WITH "EASY WHEEL" SYSTEM
Turn the radiator upside down and rest it on a piece of cloth or other soft surface to avoid damaging the paint. Open the wheels completely by rotating them outwards (fig. 1).
Turn the radiator upright.

natural_image
Diagram of a mechanical setup with two monitors and a rotating arrow, no text or symbols presentfig. 1
IMPORTANT
When in use, the radiator should always be kept vertical (wheels at the bottom, controls at the top). Any other position could be dangerous!
DESCRIPTION

1. WHERE TO LOCATE THE APPLIANCE
Position the radiator under the coldest window in the room or wherever else you want.
The radiator will reduce the effects of cold draughts to a minimum.
The appliance must not be positioned directly underneath a fixed power point.
Do not use the appliance in rooms with a surface area of less than 4 m^2 .
2. CONNECTION
The radiator must be connected to a perfectly functioning 230-240 V AC socket with correct poles. Avoid contact between clothing, household linen, furniture, inflammable material and the socket providing power to the radiator.
3. TURNING ON
Plug into the mains, turn the thermostat pointer as far as it will go to maximum and turn the radiator on using the power selector as described below:
- Turn the power selector to 1 (minimum power) (the light comes on).
- Turn the power selector to 2 (medium power) (the light comes on).
- Turn the power selector to 3 (maximum power) (the light comes on).
NB:
For economic operation, once the appliance has reached working temperature, you can use minimum or medium power (1 or 2).
4. ADJUSTING THE THERMOSTAT
When the room has reached the required temperature, turn the thermostat slowly clockwise until a "click" is heard and no further.
The thermostat will automatically regulate the temperature set and keep it constant.
If your model has three power levels, in the spring or autumn or on mild days, you can further save energy by using minimum power.
Frost protection function
With the thermostat dial in the * position and one of the power levels selected, the appliance maintains room temperature at about 5^ , preventing freezing with minimal energy consumption.
NB:
To turn the appliance off completely, turn the power selector to "0".
5. APPLIANCE WITH TIMER
Setting the clock
As with all clocks, the timer must be set to the exact time.
For example, if it is 9.30 in the morning, turn the dial of the timer clockwise (in the direction of the arrow) until 9.30 is lined up with the pointer.
IMPORTANT: DO NOT TURN THE DIAL OF THE TIMER ANTICLOCKWISE.
The timer is an electric clock and works only if plugged into a socket.
If disconnected, the timer stops and must be reset.
THE TIMER
See figure below:

IMPORTANT: the timer consists of 96 teeth, each representing a 15-minute period. The appliance can be programmed to come on and go off at set times. With the timer, the appliance is programmed to within 15 minute intervals and you can programme up to 48 cycles (each cycle consists of a coming on and a going off time) during a 24 hour period). The teeth can be pushed or pulled with your fingers. When a tooth is pushed towards the centre of the dial, the radiator remains in operation for those 15 minutes.
If the tooth is pulled out, the radiator is off during that period.
Using the timer
A) Plug into the mains socket.
B) Turn the dial clockwise to set the current time (see SETTING THE CLOCK).
C) Push the teeth corresponding to the period you do not want the radiator to operate towards the outside. For example, the radiator in the figure will be on from 2.00 to 5.00.
D) Turn the power selector to the required position (1, 2 or 3).
E) Once the teeth have been set for the desired periods of heating, the radiator will come on and go off as set.
F) While the radiator remains plugged into the socket, the timer retains the correct time.
CUTTING OUT THE TIMER (models with selector only)
To cut out the timer, place the selector in the I position (see figure).
To go back to programmed operation, place the selector in the ⏻ position.
NB: when the selector is in the 0 position, the appliance is off. In the 1 and 0 positions, the timer is still set to the current time.
Safety device
A safety device shuts the radiator down in the case of overheating. To start the radiator up again, call the nearest service centre.
6. MAINTENANCE AND SERVICE
Before performing any operations on the appliance, always unplug from the mains socket and leave to cool.
Dust the radiator with a soft damp cloth without using detergents or abrasives.
If the radiator is not used for a long period of time, wrap the cable around the cable tidy and store the appliance in a dry place.
This appliance has been made to last many years without problems.
In the event of malfunction or doubt, do not try and repair on your own. There would be the danger of fire or electric shock.
Call the nearest service centre (see list of service centres).
7. IMPORTANT SAFEGUARDS

IMPORTANT: To avoid overheating, never under any circumstances cover the appliance during operation as this would lead to a dangerous rise in temperature.
If this recommendation is not respected, a safety device will turn the radiator off. To reset, contact the technical assistance service.
CAUTION: In order to avoid a hazard due to inadvertent resetting of the thermal cutout, this appliance must not be supplied through an external switching device, such as a timer, or connected to a circuit that is regularly switched on and off by the utility.
- Do not use the radiator near bath tubs, showers, sinks or swimming pools. The appliance is not intended for use by persons (including children) with reduced physical, sensory or mental capabilities, or lack of experience and knowledge, unless they have been given supervision or instruction concerning use of the appliance by a person responsible for their safety. Children should be supervised to ensure that they do not play with the appliance.
- Do not use the radiator to dry washing, do not rest the power cable on hot elements.
- Always use the radiator in the vertical position.
- If the power cable is damaged, it must be replaced by the manufacturer, an authorised service centre or a qualified electrician in order to eliminate all risk.
- When you turn the appliance on for the first time, operate it at maximum for at least two hours. During this time, you should ventilate the room to eliminate the "new" smell given off.
- It is normal for the appliance to make "squeaking" noises when first turned on.
- The appliance must not be placed immediately under a fixed power socket.
- This appliance is filled with a precise quantity of oil and repairs requiring it to be opened must be carried out by the manufacturer or an authorised technical assistance centre only. In the event of oil leaks, contact the manufacturer or an authorised technical assistance centre.
- When disposing of this appliance, respect legislation on disposal of oil.
- Do not use this appliance in rooms measuring less than 4m^2 .
Important information for correct disposal of the product in accordance with EC Directive 2002/96/EC.
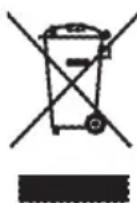
At the end of its working life, the product must not be disposed of as urban waste. It must be taken to a special local authority differentiated waste collection centre or to a dealer providing this service. Disposing of a household appliance separately avoids possible negative consequences for the environment and health deriving from inappropriate disposal and enables the constituent materials to be recovered to obtain significant savings in energy and resources. As a reminder of the need to dispose of household appliances separately, the product is marked with a crossed-out wheeled dustbin.
FONCTIONNEMENT ET UTILISATION DU RADIATEUR
MODÈLES DOTÉS DU SYSTÈME "EASY WHEEL"
natural_image
Simple line drawing of a desk with three chairs and a computer monitor, no text or symbols presentfig. 1
ATTENTION
natural_image
Diagram of a mechanical setup with two monitors and a central table, no text or symbols presentAbb. 1
ACHTUNG
natural_image
Diagram of a desk with three chairs and a table, showing a curved arrow indicating rotation or movement (no text or symbols present)fig. 1
ATTENZIONE
natural_image
Diagram of a mechanical or ergonomic setup with three identical devices and a curved arrow indicating motion (no text or symbols)fig. 1
ATTENTIE
BESCHRIJVING VAN HET APPARAAT

1. PLAATSING VAN HET APPARAAT
natural_image
Diagram of a mechanical setup with two monitors and a paper holder, no text or symbols presentfig. 1
ATENCIÓN:
natural_image
Diagram of a mechanical setup with two heads and a table, showing motion or movement (no text or symbols)fig. 1
ATENÇÃO
natural_image
Diagram of a mechanical or electrical setup with three monitors and a central table, no visible text or symbolsεικ. 1
ΠΡΟΣΟΧΗ
natural_image
Diagram of a mechanical setup with two monitors and a curved arrow indicating motion (no text or symbols)рис. 1
ВНИМАНИЕ
natural_image
Diagram of a mechanical setup with two heads and a central table, showing motion arrows (no text or symbols)- ábra
FIGYELEM!
natural_image
Diagram of a mechanical setup with two monitors and a central table, no text or symbols presentObr. 1
POZOR
natural_image
Diagram of a mechanical setup with two heads and a table, showing motion or movement (no text or symbols)rys. 1
UWAGA
natural_image
Diagram of a mechanical setup with two heads and a table, showing motion or movement around a table (no text or symbols)fig. 1
VÆR OPPMERKSOM:
5. APPARAT MED TIDSINNSTILLING
6. VEDLIKEHOLD OG ASSISTANSE
natural_image
Diagram of a mechanical setup with two heads and a central table, showing motion arrows (no text or symbols)fig. 1
OBS:
natural_image
Diagram of a mechanical setup with two heads and a central table, showing motion or movement (no text or symbols)fig. 1
GIV AGT
natural_image
Diagram of a mechanical assembly with rotating components and an arrow indicating motion (no text or symbols)kuva 1
HUOMIO
6. HUOLTO JA HUOLTOPALVELU
RAD I UPORABA RADIJATORA
MODELI SA SUSTAVOM «EASY WHEEL»
Radijator okrenite naopako i stavite ga na krpu ili drugu meku površinu da se ne ošteti.
Potpuno otvorite kotače tako da ih okrenete prema van (Sl. 1).
natural_image
Diagram of a mechanical setup with two monitors and a central table, showing motion or assembly (no text or symbols)sl. 1
VAŽNO
RAD I UPORABA TAJMERA
Vidi sliku dolje:

VAŽNO: Tajmer se sastoji od 96 zubaca, svaki zubac predstavlja vremensko razdoblje od 15 minuta. Uređaj se može programirati tako da se uključi i isključi u podešena vremena. S tajmerom je programiranje približno određeno unutar 15 minuta i može se programirati do 48 ciklusa (svaki ciklus es sastoji od jednog uključivanja i jednog isključivanja) u krugu od 24 sata. Zupce možete pritisnuti ili izvući prstima. Kad se zubac pritisne prema središtu, radijator će biti uključen tih 15 minuta. Ako zubac izvučete prema van, radijator će u tom razdoblju biti isključen.
Rad s tajmerom
natural_image
Diagram of a mechanical setup with two monitors and a central table, showing motion or assembly (no text or symbols)obr. 1
UPOZORNENIE
natural_image
Simple line drawing of a desk with chairs and a monitor, no text or symbols presentSlika 1
OPOZORILO
natural_image
Diagram of a desk with three monitors and a curved arrow indicating rotation or movement (no text or symbols)фиг. 1
ВНИМАНИЕ
natural_image
Diagram of a mechanical setup with two heads and a central table, showing motion or movement (no text or symbols)fig. 1
ATENTIUNE
natural_image
Diagram of a desk with three monitors and a paper airplane, showing a curved arrow indicating rotation (no text or symbols)res. 1
DIKKAT
- MODELS WITH "EASY WHEEL" SYSTEM
- IMPORTANT
- WHERE TO LOCATE THE APPLIANCE
- CONNECTION
- TURNING ON
- NB:
- ADJUSTING THE THERMOSTAT
- Frost protection function
- APPLIANCE WITH TIMER
- Setting the clock
- THE TIMER
- Using the timer
- CUTTING OUT THE TIMER (models with selector only)
- Safety device
- MAINTENANCE AND SERVICE
- IMPORTANT SAFEGUARDS
- FONCTIONNEMENT ET UTILISATION DU RADIATEUR
- MODÈLES DOTÉS DU SYSTÈME "EASY WHEEL"
- ATTENTION
- ACHTUNG
- ATTENZIONE
- ATTENTIE
- PLAATSING VAN HET APPARAAT
- ATENCIÓN:
- ATENÇÃO
- ΠΡΟΣΟΧΗ
- ВНИМАНИЕ
- FIGYELEM!
- POZOR
- UWAGA
- VÆR OPPMERKSOM:
- APPARAT MED TIDSINNSTILLING
- VEDLIKEHOLD OG ASSISTANSE
- OBS:
- GIV AGT
- HUOMIO
- HUOLTO JA HUOLTOPALVELU
- RAD I UPORABA RADIJATORA
- MODELI SA SUSTAVOM «EASY WHEEL»
- VAŽNO
- RAD I UPORABA TAJMERA
- Rad s tajmerom
- UPOZORNENIE
- OPOZORILO
- ATENTIUNE
- DIKKAT
Brand : DELONGHI
Model : Vento V550920T
Category : Heating