DO7046S - Iron DOMO - Free user manual and instructions
Find the device manual for free DO7046S DOMO in PDF.


User questions about DO7046S DOMO
0 question about this device. Answer the ones you know or ask your own.
Ask a new question about this device
Download the instructions for your Iron in PDF format for free! Find your manual DO7046S - DOMO and take your electronic device back in hand. On this page are published all the documents necessary for the use of your device. DO7046S by DOMO.
USER MANUAL DO7046S DOMO
PRODUCT OF LINEA 200
GARANTIEVOORWAARDEN
CONDITIONS DE GARANTIE
This appliance has a two year warranty period. During this period the manufacturer is responsible for any failures which are the direct result of construction failure. When these failures occur the appliance will be repaired or replaced if necessary. The warranty will not be valid when the damage to the appliance is caused by wrong use, not following the instructions or repairs executed by a third party. The warranty will only be valid if the warranty application has been completed by the dealer at the time of purchase. All parts, such as brushes and batteries, which are subject to wear, are excluded from the warranty.
Type nr. Apparaat
N^ de modulo de l'appareil DO-7046S
Type nr des Gerätes
Type nr. of appliance
Naam
Nom
Name
Name
Adres
Adresse
Adresse
Address
Aankoopdatum
Date d'achat
Kaufdatum
Date of purchase
RECYCLAGEINFORMATIE
RECYCLING INFORMATIONEN
RECYCLING INFORMATION
The symbol 三 on the product or on its packaging indicates that this product may not be treated as household waste. Instead it shall be handedover to the applicable collection point for recycling of electrical and electronic equipment. By ensuring this product is disposed of correctly, you will help prevent potential negative consequences for the environment and human health, which could otherwise be caused by inappropriate waste handling of this product. For more detailed information about recycling of this product, please contact your local city office, your household waste disposal service or the shop where you purchased the product.
BELANGRIJK
SYSTEME ANTICALCAIRE INCORPORÉ
For safety purpose you should read these instructions carefully before using the iron for the first time. Save these instructions.
The iron is made for domestic purposes only.
The appliance produces steam with a very high temperature. Be careful and warn other users for the possible dangers.
DO'S
Check the mains voltage stated on the iron.
Unwind and straighten the power cord before use.
The appliance has to be placed on a firm base.
Please ensure that the power cord does not touch the sole plate of your iron.
If the power cord is damaged, it must be replaced by the manufacturer or its service agent or similarly qualified person in order to avoid a hazard.
Depress and hold the control button for 2 sec to turn off the appliance when it is not in use, even for a short period of time.
Switch off the steam function by moving the steam control knob to the off-position when it is not in use, even for a short period of time.
Disconnect the iron from mains supply outlet when filling or emptying water.
Remove the water which remains in the watertank after use.
DO NOT'S
Do not allow children to touch the iron or the power cord when ironing.
Do not leave the iron unattended when it is connected to a mains supply outlet.
Do not use an extension power cord set unless competent authority has approved it.
Do not add vinegar or other chemical liquids into the watertank, they can damage the iron seriously.
Do not immerse the iron in water or any other liquid.
Do not use the iron when it is damaged or when it works improperly.
Do not touch the surface on which the iron has been placed during or after the ironing.
This is hot !!!
Do not roll the power cord around the iron for storage until it has cooled down completely.
Do not attempt to open the cabinets or dismantle any parts from the iron, there is no serviceable part inside.
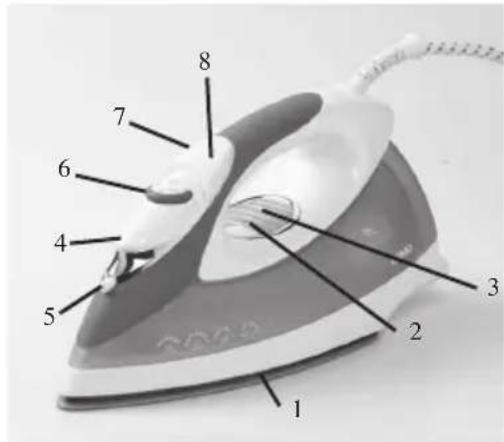
GET TO KNOW YOUR IRON
- Sole plate
- Control button
- Pilot light
- Water inlet cover
- Spray nozzle
- Steam control/self-cleaning knob
- Spray button
- Burst of steam button
HINTS FOR IRONING
- Sort out the articles to be ironed according to the type of fabric. This will minimize the frequency of temperature adjustment for different garments.
- Test ironing a small area on the backside or inside the garment if you are unsure about the type of fabric. Start with a low temperature and increase gradually.
- Wait for about 3 minutes before ironing heat sensitive fabrics. Temperature adjustments need a certain time to reach the required level nomatter if it is higher or lower.
- Delicate fabrics such as silk, wool, velour, etc. are best ironed with an ironing cloth to prevent shine marks.
READ THE GARMENT LABELS AND FOLLOW THE MANUFACTURER'S IRONING INSTRUCTIONS THAT ARE OFTEN SHOWN BY SYMBOLS SIMILAR TO THE FOLLOWING:
HOW TO FILL WITH WATER
- Disconnect the iron from mains supply outlet.
- Move the steam control/self-cleaning knob to the off-position
- Fill water through the water inlet hole.
- Fill up to the "Max" level marked on the side of the watertank.
Note: For the best result, it is advisable to use distilled water. Do not use chemically descaled water or any other liquids.
FIRST TIME IRONING
- Remove any protective films or stickers from the sole plate and the cabinet.
- Unwind and straighten the power cord.
- Fill the watertank with water.
- Connect the iron to a suitable mains supply outlet.
- Select the temperature by simply depressing the control button according to the recommendation on the garment label.
- The indication light will flash as long as the temperature is too high or too low.
- When the required temperature is reached the indication light will stop flashing and
DO-7046S
you will hear a "beep" sound. The iron is now ready for use.
- Move the steam control/self-cleaning knob to the steam position: steam starts to come out of the holes in the sole plate.
- First begin to iron with an old towel.
- When the watertank is empty and there is no more steam produced is the iron ready for proper use.
SPRAYING
- This function can be used at any time and does not affect any setting.
- Fill the watertank as described in "How to fill with water".
- Aim the nozzle to the garment.
- Press the spray button.
Note: it may be necessary to press the spray button a few times to start this function.
DRY IRONING
- Connect the iron to a suitable mains supply outlet, the pilot light will glow.
- The appliance will automatically go to the "standby" mode.
- Select the temperature by simply depressing the control button according to the recommendation on the garment label.
- The indicator light will flash as long as the temperature is too high or too low.
- When the required temperature is reached the indicator light will stop flashing and you will hear a "beep" sound. The iron is now ready for use.
- To switch off the appliance, disconnect the iron from the mains supply outlet.
- When the iron has cooled down completely, you can store it vertically in a safe place.
STEAM IRONING
- Fill the iron as described in "How to fill with water".
- Connect the iron to a suitable mains supply outlet, the pilot light will glow.
- Select the temperature by simply depressing the control button. (For optimum steam quality, do not use 1 dot or 2 dots setting for steam ironing).
- The indicator light will flash as long as the temperature is too high or too low.
- When the required temperature is reached the indicator light will stop flashing and you will hear a beep" sound. The iron is now ready for use.
- Move the steam control/self-cleaning knob to give the desired amount of steam.
- To turn off the appliance, depress and hold the control button for 2 sec.
- Disconnect the iron from the mains supply outlet.
- When the iron has cooled down completely, you can store it vertically in a safe place.
Note: Move the steam control knob to the off-position after use.
BURST OF STEAM
This function provides extra amount of steam to remove stubborn wrinkles.
- Fill the iron as described in the section "How to fill with water".
- Select the temperature: 3 dots, by pressing the control knob.
- The indicator light will flash as long as the temperature is too high or too low.
- When the required temperature is reached the indicator light will stop flashing and you will hear a "beep" sound. The iron is now ready for use.
- Press the burst of steam button once.
- The steam will penetrate into the fabric and remove the wrinkles.
- For stubborn wrinkles, wait a few seconds before pressing the burst of steam button again. Most wrinkles can be removed within three presses.
Note: it may be necessary to press the burst of steam button a few times to start this function.
BURST OF STEAM IN VERTICAL POSITION
Warning: do not apply steam on any clothes or fabrics worn by human beings or pets. The temperature of the steam is very high.
This function provides an extra amount of steam to remove wrinkles of delicate garments in hanging position, curtains, or other hanging fabrics.
- Fill the iron as described in "How to fill with water".
- Select the temperature: 3 dots, by pressing the control knob.
- The indicator light will flash as long as the temperature is too high or too low.
- When the required temperature is reached the indicator light will stop flashing and you will hear a "beep" sound. The iron is now ready for use.
- Hold the iron between 15 and 30 centimeters away from the garment.
- Press the burst of steam button once.
- Steam will penetrate into the garment and remove the wrinkles.
- For stubborn wrinkles, wait a few seconds before pressing the burst of steam button again. Most wrinkles can be removed within three presses.
Note: it may be necessary to press the burst of steam button a few times to start this function.
BUILD-IN ANTI-SCALE SYSTEM
The build-in anti-scale system is designed to reduce the build-up of limescale which occurs during steam ironing. This will prolong the life of your iron. Note: the antiscale system will not completely stop the natural process of limescale build-up.
SELF-CLEANING
This function removes the scales and minerals built up in the steam chamber. The iron will remain in the best condition if this function is performed at least once a month or more regularly, depending on the hardness of the water used.
- Fill the iron as described in "How to fill with water". Fill the watertank up to half.
- Place the iron on a surface in upright standing position.
- Connect to a mains supply outlet.
- Select the "Max" temperature setting.
- The indicator light will flash as long as the temperature is too high or too low.
- When the required temperature is reached the indicator light will stop flashing and you will hear a "beep" sound. The iron is now ready for use.
- Disconnect the iron from mains supply outlet.
- Hold the iron horizontally over a sink.
- Pull and hold the steam control/self-cleaning knob completely to the right and hold it there.
- Steam and boiling water will drain from the holes on the soleplate washing away the scales and minerals that have built up inside the steam chamber.
- Gently move the iron back and forth until the watertank is empty.
- When the self-cleaning has been completed, release the steam control/self-cleaning knob.
- Rest your steam iron back on its heel rest and allow it to fully cool down.
- Wipe the soleplate with a cold damp cloth.
Caution: keep skin/body away from the hot water.
ANTI-DRIP
- Your iron has an anti-drip system, which is designed to prevent that water escapes from the soleplate when the iron is too cold.
- During use, the anti-drip system may emit a loud clicking sound, particularly during heat-up or whilst cooling down. This is perfectly normal and indicates that the system is functioning correctly.
AUTO SHUT-OFF
The auto shut-off feature will operate after 3 minutes when the iron is not moving. By simply moving the iron, the auto shut-off will reset (auto shut-off indicator goes off).
Note: after auto shut-off is reset, the iron will take about 60 seconds to reach its previous soleplate temperature set by the temperature dial.
DRAINING THE WATER
- Move the steam control/self-cleaning knob to the off position.
- Disconnect the iron from the mains supply outlet.
- Press the burst of steam button to release any trapped water when the soleplate is still hot.
- Press the spray button to release any trapped water.
- Hold the iron upside down and gently shake it to remove the remaining water.
CLEANING THE IRON
- Disconnect the iron from the mains supply outlet.
- Use a damped cloth or non-scratching cleaner to remove any deposits on the soleplate or the cabinets.
Note: Never use sharp or rough objects to remove the deposits on the soleplate. Never use vinegar or descending agents to clean the iron.