A2010E - Vacuum Cleaner BESTRON - Free user manual and instructions
Find the device manual for free A2010E BESTRON in PDF.


User questions about A2010E BESTRON
0 question about this device. Answer the ones you know or ask your own.
Ask a new question about this device
Download the instructions for your Vacuum Cleaner in PDF format for free! Find your manual A2010E - BESTRON and take your electronic device back in hand. On this page are published all the documents necessary for the use of your device. A2010E by BESTRON.
USER MANUAL A2010E BESTRON
Instruction manual vacuum cleaner
1
1
Congratulations with the purchase of your powerful 2200W vacuum cleaner, which you can use to thoroughly clean your home.
Safety instructions
General
- Please read these instructions carefully and retain them for reference.
- Use this appliance solely in accordance with these instructions.
- Use solely accessories recommended by the supplier. The use of other accessories may result in damage to the appliance, thereby creating hazards for the user.
This appliance is not intended for use by persons (including children) with reduced physical, sensory or mental capabilities, or lack of experience and knowledge, unless they have been given supervision or instruction concerning use of the appliance by a person responsible for their safety.
Children should be supervised to ensure that they do not play with the appliance. - Have any repairs carried out solely by a qualified electrician. Never try to repair the appliance yourself.
Electricity and heat
- Verify that the mains voltage is the same as that indicated on the type plate on the appliance before use.
Always remove the plug from the wall socket when the appliance is not in use. - Always remove the plug from the wall socket by pulling on the plug, not the power cord.
- Check the appliance's power cord regularly to make sure it is not damaged. Do not use the appliance if the power cord is damaged. Have a damaged power cord replaced by a qualified service department.
- Avoid stumbling over the extension lead or power cord.
Make sure the air vents are not covered or blocked. - Make sure that the appliance, the cord and the plug do not come in contact with sources of heat, such as a hot hob or naked flame.
- Make sure that the appliance, the power cord and plug do not come in contact with water.
During use
- Never use the appliance outdoors.
- Never use the appliance in a humid room.
- Make sure that your hands are dry before touching the appliance, power cord or plug.
- The power cord has a yellow and a red mark. Pull out the power cord to the yellow mark. Never pull out the power cord beyond the red mark.
- Guide the power cord whilst it rewinds onto the reel, since otherwise the cord could become tangled or the plug could strike the back of the appliance. Take hold of the power cord near the mark, and allow it to gently slide through your fingers back into the appliance.
- When fitting the dust bag make sure that it does not become pinched between the cover and the motor unit. This could damage the appliance and/or the dust bag.
- Do not use the appliance to suck up the following objects:
- glowing or burning objects
glass splinters or other sharp objects - residues of plaster, cement, stone, soot, and similar
liquids, or moist dirt.
These objects could cause serious damage to the appliance and the filter system, and make it unsafe to use.
- Do not use the vacuum cleaner on wet rugs and carpets.
- Never insert objects in the air-exhaust vents.
- Make sure that the suction and exhaust openings are open, and that the filters are not blocked. Blockages will cause the appliance to overheat. Switch off the vacuum cleaner immediately! Once you have remedied the problem, wait 20 to 30 minutes to allow the vacuum cleaner to cool down completely. The vacuum cleaner will then be ready for use again.
- Keep the nozzle and the tubes away from the body while the vacuum cleaner is running. This could cause serious injury, for example to the eyes or ears.
- Never roll the appliance over the cord.
- Switch off the appliance and remove the plug from the wall socket in the event of a malfunction during use, and before filling or emptying the appliance, cleaning the appliance, fitting or removing an accessory, or storing the appliance after use.
-
Never immerse the appliance, the plug or the power cord in water or other liquids. After washing the filters make sure they are thoroughly dry before returning them to the appliance.
-
Do not pick up the appliance if it falls into water. Remove the plug from the wall socket immediately.
- Do not use the appliance any more.
Operation
The appliance is intended only for domestic use, not for professional use.
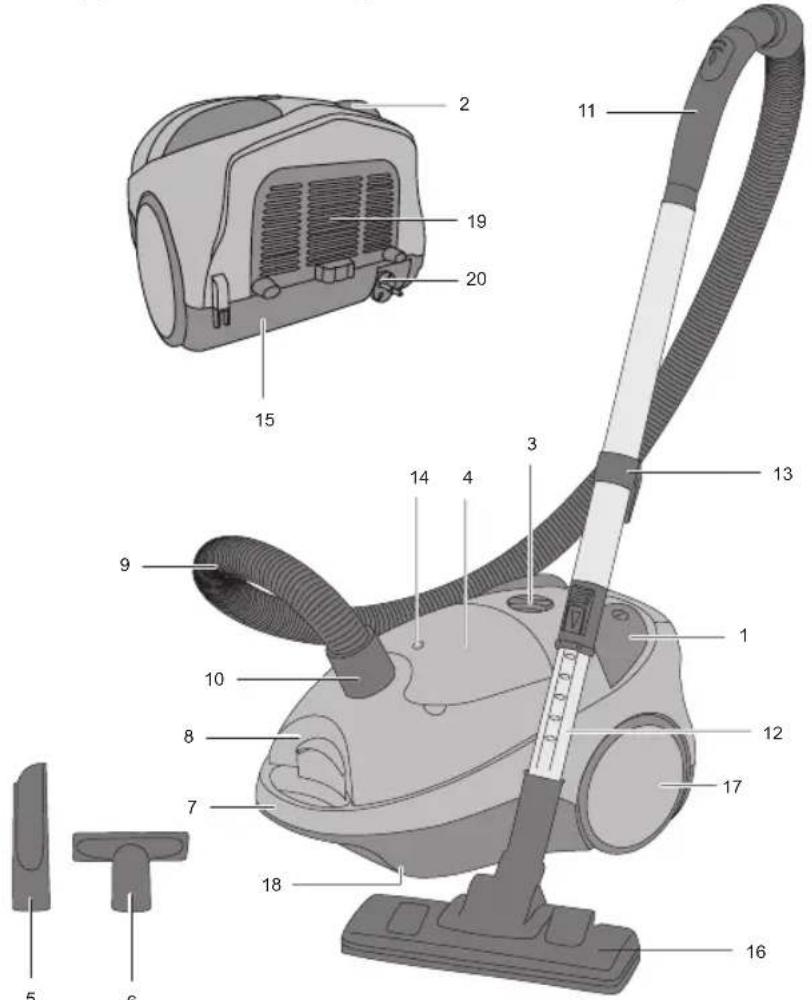
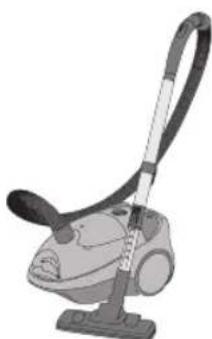
Figure 1
- On/Off switch
- Cord-rewind button
- Vacuum suction control
- Accessory compartment
- Crevice tool
- Upholstery tool
- Vacuum-cleaner handle
- Cover release button (dust bag)
- Hose
-
Hose connector
-
Grip with adjustable air opening
- Brushed stainless steel telescopic tube
- Fixing bracket
- Indicator, "dust bag full"
- Motor unit
- Combi nozzle
- Rear wheels
- Swivelling front wheel
- Exhaust filter
- Power cord and plug
Before use for the first time
- Remove the vacuum cleaner from the packaging, and remove all packaging materials.
- Verify that a dust bag is fitted. Fit a dust bag, if necessary. See "Cleaning and maintenance".
Use
- Fit the hose connector in the opening on the motor housing, see Figure 2. To remove the hose, press on the two release buttons on the side of the connector and pull the connector from the opening.
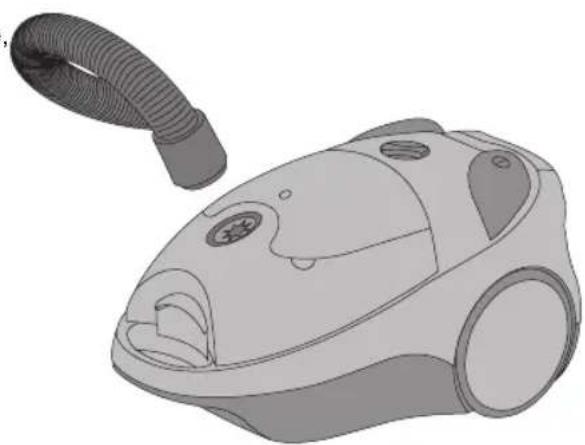
Figure 2 Fitting the hose to the vacuum cleaner
- Fit the telescopic tube into the hose grip. (see Figure 3a)
- Fit the combi nozzle or one of the other accessories to the end of the telescopic tube. You can also fit the combi nozzle or one of the other accessories directly to the hose grip. (see Figure 3b)
- You can adjust the length of the telescopic tube as follows (see Figure 3c):
a. push the slide button on the telescopic tube downwards (in the direction of the arrow on the button).
b. Keep the slide button pressed downwards, and slide the upper section of the tube into or out of the upper section.
c. Release the slide button.
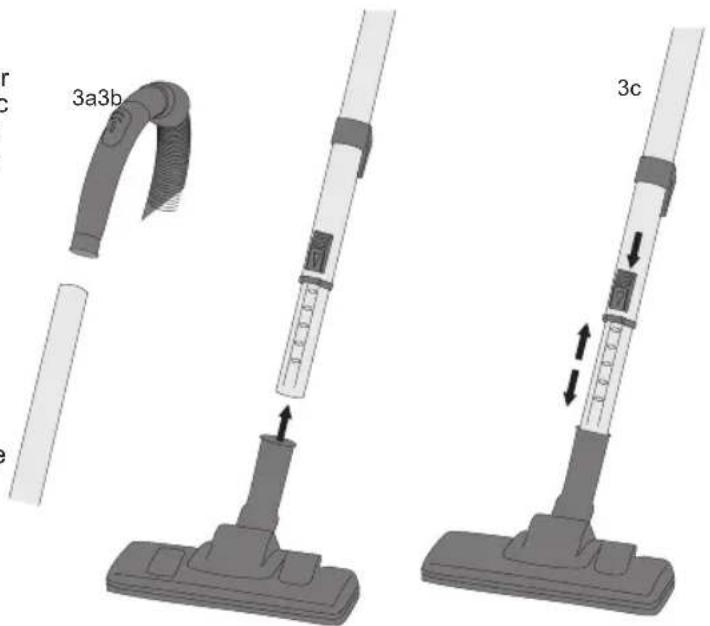
Figure 3 Fitting the parts together
- Press the foot button on the nozzle to set the combi nozzle for use on hard or soft surfaces, see Figure 4. For use on hard surfaces, press the rear of the foot button on the combi nozzle to extend the brushes. Press the front of the foot button for use on soft surfaces.
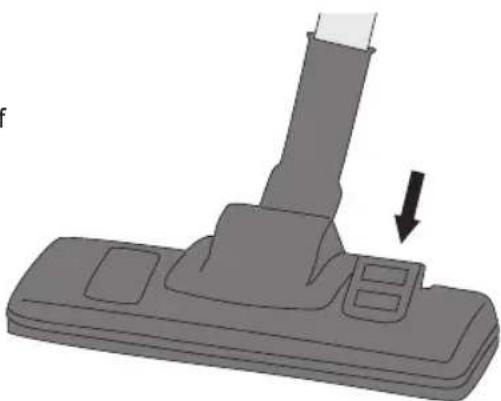
Figure 4 Soft or hard surfaces
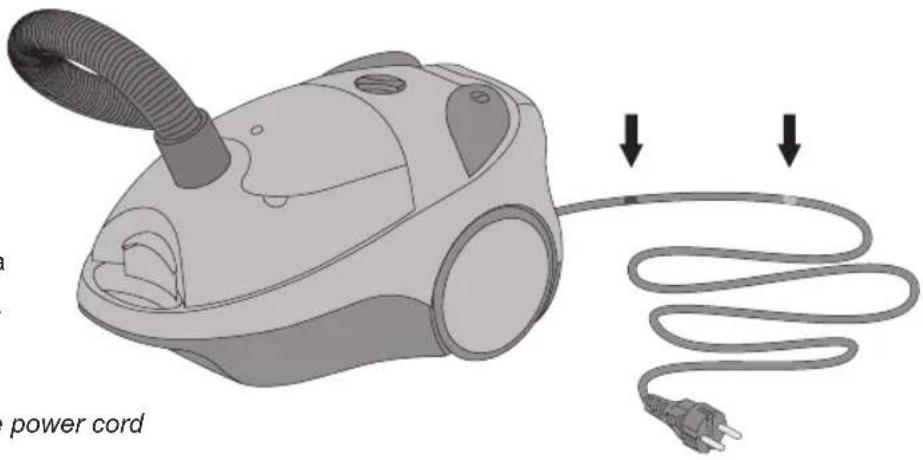
Figure 5 Markings on the power cord
- Put the plug in the wall socket, and press the On/Off switch. To switch off the appliance, press the On/Off switch again, see Figure 6.
- The appliance is now ready for use. You can move the vacuum cleaner while you are cleaning by pulling on the hose grip. You can lift the appliance with the vacuum cleaner's handle.
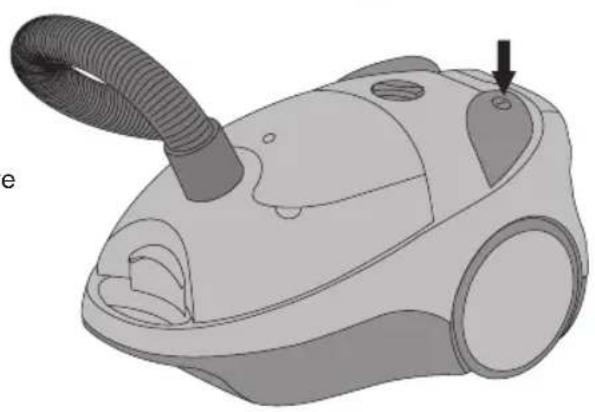
Figure 6 On/Off pushbutton
- You can adjust the vacuum suction with the vacuum suction control, see Figure 7. It is advisable to reduce the vacuum suction when cleaning upholstered furniture and curtains. This will prevent the fabric from being sucked into the nozzle.
Note If so required, you can also reduce the suction quickly by moving the slide on the hose grip.

Figure 7 Vacuum suction control
Accessories
This vacuum cleaner is supplied with two accessories:
- a crevice tool, which you can use to clean radiators, window frames, crevices, small openings, and similar;
- a upholstery tool, which you can use to clean soft surfaces such as upholstered furniture and curtains.
You can store these accessories in the accessory compartment, see Figure 8.
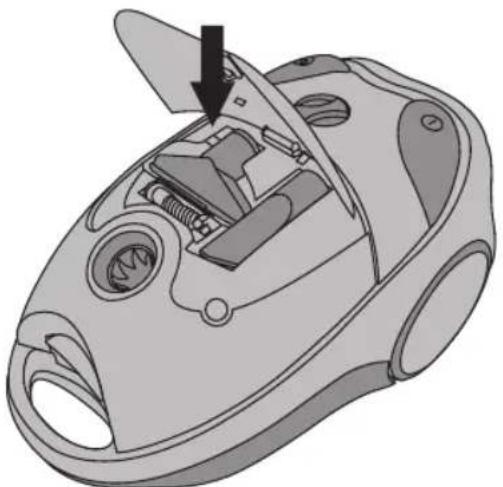
Figure 8 Storing the accessories
- Remove the plug from the wall socket.
- Press the rewind button and keep it pressed in; the power cord will automatically rewind onto the reel.

PLEASE NOTE
Guide the power cord whilst it rewinds onto the reel, since otherwise the cord could become tangled or the plug could strike the back of the appliance. Take hold of the power cord near the mark, and allow it to gently slide through your fingers back into the appliance, see Figure 9.
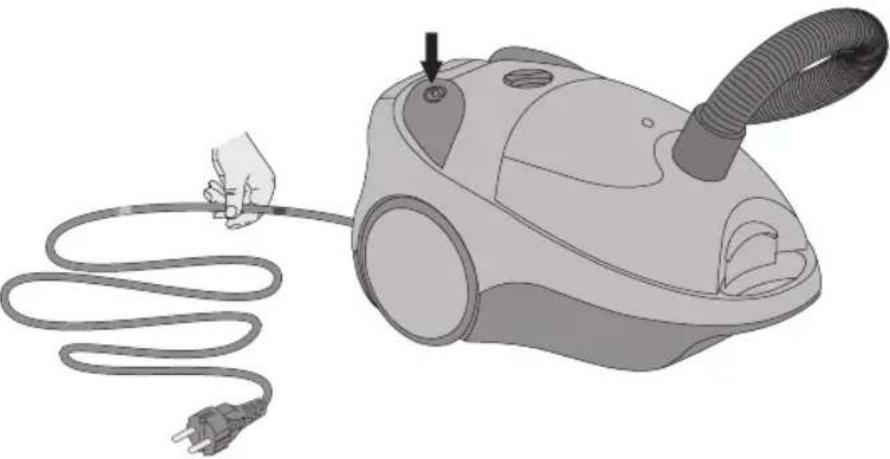
Figure 9 Rewinding the power cable
- Stand the vacuum cleaner upright. An attachment slot for the fixing bracket is fitted to the back of the vacuum cleaner next to the front castor see Figure 10. Slide the bottom of the fixing bracket into the slot. This avoids the need to dismantle the vacuum cleaner after use; you can store the assembled appliance and retrieve it again quickly when you need it.
Cleaning and maintenance
Cleaning
- Clean the outer surface of all parts with a damp cloth and a cleaner suitable for plastics. Make sure no moisture gets into the appliance.
- Over the course of time dust and dirt can accumulate around the wheel axles, thereby preventing the wheels from turning easily. Consequently they should be kept clean.

PLEASE NOTE
- Never immerse the appliance, plug or power cord in water.
- Never use corrosive or scouring cleaning agents or sharp objects (such as knives or hard brushes) to clean the appliance.
Changing the dust bag
Change the dust bag immediately once the 'dust bag full' indicator turns red, see Figure 11.

PLEASE NOTE
It is possible that the indicator turns red whilst the dust bag is not yet full. If so, then the nozzle, hose or tubes may be blocked. These will then need to be unblocked.
- Open the cover by pulling the cover release (dust bag) upwards. Remove the dust bag holder from the vacuum cleaner. Remove the dust bag from the holder, and dispose of it in a dustbin.
- Fit a new dust bag in the holder with the arrow pointing downwards, and press into position. Place the dust bag holder back.
- Press the cover until it clicks into place.

PLEASE NOTE
Make sure that the dust bag does not become pinched by the cover. This could damage the appliance and/or the dust bag.
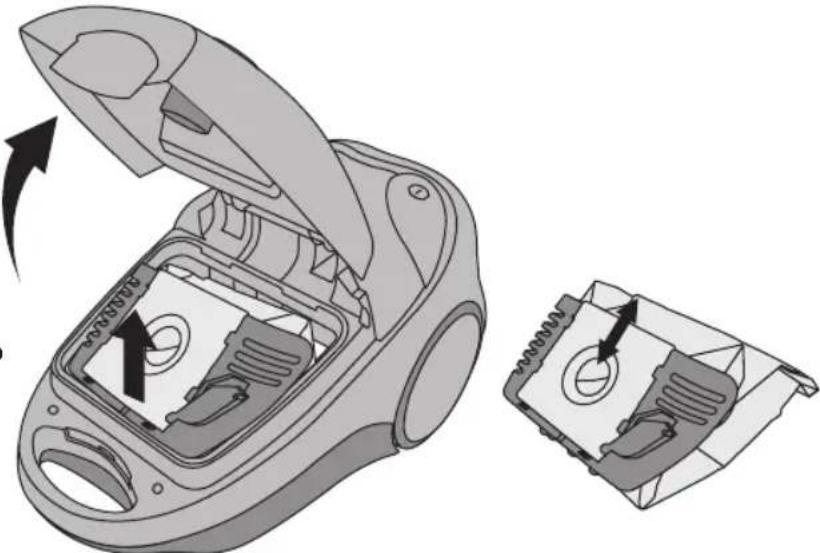
Figure 11 Changing the dust bag
Note Dust bags for this vacuum cleaner are available from every major hardware store, with a statement of the type number Bestron D00013/D0013S.
Cleaning or replacing the motor safety filter
Clean or replace the motor safety filter at least twice a year, and more frequently if the filter is visibly blocked.
- Remove the plug from the wall socket.
- Remove the hose from the vacuum cleaner.
- Open the cover by pulling the cover release (dust bag) upwards.
- Remove the dust bag, see Figure 11.
- Remove the motor safety filter from the vacuum cleaner, see Figure 12.
- Dispose of the filter, or wash it in lukewarm water. Allow it to dry thoroughly.
- Return the cleaned or new filter to its holder, and return the holder to the vacuum cleaner.
- Fit the dust receptacle back into the holder. Press the cover until it clicks into place.
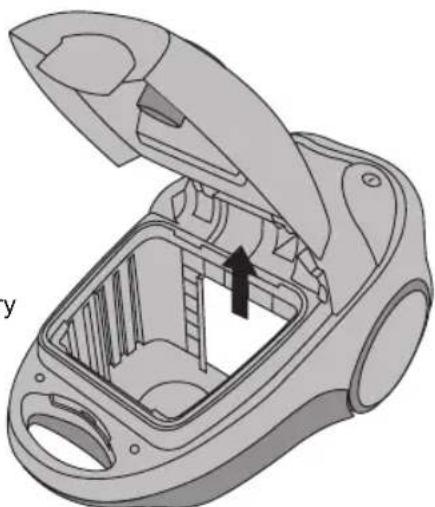
Figure 12 Removing the motor safety filter

PLEASE NOTE
Water could penetrate into the appliance if the filter is not thoroughly dry. This could result in (electrical) damage.
- Make sure that the dust bag does not become pinched by the cover. This could damage the appliance and/or the dust bag.
Cleaning or replacing the exhaust filter
Cleaning or replace the exhaust filter at least twice a year, and more frequently if the filter is visibly blocked.
- Remove the plug from the wall socket.
- Open the exhaust-filter cover by pulling on the cover in the direction of the arrow, see Figure 13.
- Dispose of the filter, or wash it in lukewarm water. Allow it to dry thoroughly.
- Return the cleaned or new filter to its holder, and return the holder to the vacuum cleaner.
- Return the cover of the exhaust filter to the vacuum cleaner, and press it until it clicks into place.
Technical details
Type: A2010E
Power consumption: 2200W
Power supply: 230V 50Hz

The Environment
- Dispose of packaging material, such as plastic and boxes, in the appropriate waste containers.
- When this product reaches the end of its useful life do not dispose of it by putting it in a dustbin; hand it in at a collection point for the reuse of electrical and electronic equipment. Please refer to the symbols on the product, the user's instructions or the packaging.
- The materials can be re-used as indicated. Your help in the re-use, recycling or other means of making use of old electrical equipment will make an important contribution to the protection of the environment.
- Contact your municipality for the address of the appropriate collection point in your neighbourhood.
Guarantee terms
The importer guarantees the appliance against defects caused by manufacturing and/or material faults for 60 months from the date of purchase, subject to the following conditions.
- No charges will be made for labour costs or materials during the warranty period. Any repairs carried out during the warranty period do not extend the warranty period.
- The importer automatically becomes the owner of any faulty parts that he replaces or a faulty appliance (in the event of replacement of the appliance).
- All claims submitted under warranty must be accompanied by the original bill of sale.
- Claims under warranty must be submitted to the dealer where the appliance was purchased or to the importer.
- The warranty is issued solely to the first purchaser and cannot be transferred.
- The warranty does not cover damage caused by:
a. Accidents, incorrect use, wear and/or neglect.
b. Faulty installation and/or use in a manner contravening the prevailing legal, technical or safety regulations.
c. Connection to a mains voltage other than the voltage specified on the type plate.
d. Unauthorized modifications
e. Repairs carried out by third parties.
f. Careless transport, i.e. without suitable packaging materials or protection.
- No claims may be made under this warranty for:
a. Losses incurred during transport.
b. The removal or changing of the appliance's serial number. - The guarantee does not cover power cords, lamps or glass parts.
- No claims can be submitted under this warranty for damage other than the repair or replacement of faulty parts. The importer can never be held responsible for any consequential loss or damage or any other consequences, resulting either directly or indirectly from the appliance supplied by the importer.
- In case of claims under guarantee you can contact your dealer where the appliance is purchased. Bestron offers you also the possibility to send the appliance directly to our Service Department. Do not send your appliance without consulting us. The package may be refused and any any costs will be for your account. Please contact the Service Department and they will tell you how to pack and
send the appliance.
- This appliance is not suitable for professional use.
Service
If a fault should occur please contact the BESTRON service department:
THE NETHERLANDS:
BESTRON NEDERLAND BV
Bestron Service
Moeskampweg 20
5222 AW 's-Hertogenbosch
Tel: +31 (0) 73 - 623 11 21
Fax: +31 (0) 73-621 23 96
Email: info@bestron.com
Internet: www.bestron.com
CE Declaration of Conformity
This product conforms to the essential requirements of the following EU safety directives:
EMC Directive 2004/108/EC
Low Voltage Directive 2006/95/EC

R. Neyman
Quality control
1
1
一
一
DESTRON
A2010E
v 170214-07