Pure & Clean AMC2000B - Vacuum Cleaner BESTRON - Free user manual and instructions
Find the device manual for free Pure & Clean AMC2000B BESTRON in PDF.
| Brand | Bestron |
| Model | Pure & Clean AMC2000B |
| Product type | Canister vacuum cleaner |
| Power supply | 220-240 V, 50-60 Hz |
| Power | 700 W |
| Dimensions (L x H x D) | 40,8 x 26,6 x 35,7 cm |
| Cord length | 6 m |
| Dust container capacity | Approx. 1.5 L (estimate) |
| Filtration type | Dust separation system, washable filter |
| Exhaust filter | Washable, to be replaced every 6 months |
| Power adjustment | Electronic and manual (button on the device) |
| Cord rewinder | Automatic, with yellow and red markings |
| Included accessories | Hard floor brush, furniture brush, small brush, crevice tool, telescopic tube, flexible hose |
| Special parquet brush | Included, for wooden floors |
| Usage | Domestic, on hard floors and carpets |
| Maintenance | Regular filter cleaning, emptying the container |
| Protection class | II (double insulation) |
| Safety | Do not vacuum incandescent objects, liquids, glass, etc. |
| Weight | Not specified (estimate 4-5 kg) |
Frequently Asked Questions - Pure & Clean AMC2000B BESTRON
User questions about Pure & Clean AMC2000B BESTRON
0 question about this device. Answer the ones you know or ask your own.
Ask a new question about this device
Download the instructions for your Vacuum Cleaner in PDF format for free! Find your manual Pure & Clean AMC2000B - BESTRON and take your electronic device back in hand. On this page are published all the documents necessary for the use of your device. Pure & Clean AMC2000B by BESTRON.
USER MANUAL Pure & Clean AMC2000B BESTRON
natural_image
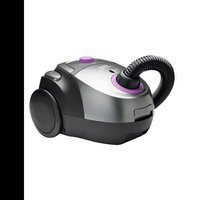
Black power vacuum cleaner with attached hose and control panel (no visible text or symbols)MULTI CYCLONE VACUUM CLEANER
AMC2000
INSTRUCTION MANUAL
DE
HRN
EN S
OES


natural_image
Exploded view of a mechanical vacuum cleaner with cutaway view (no text or symbols)
text_image
Labeled diagram of a device with numbered parts for identification
text_image
Labeled diagram of a vacuum cleaner with numbered parts for identification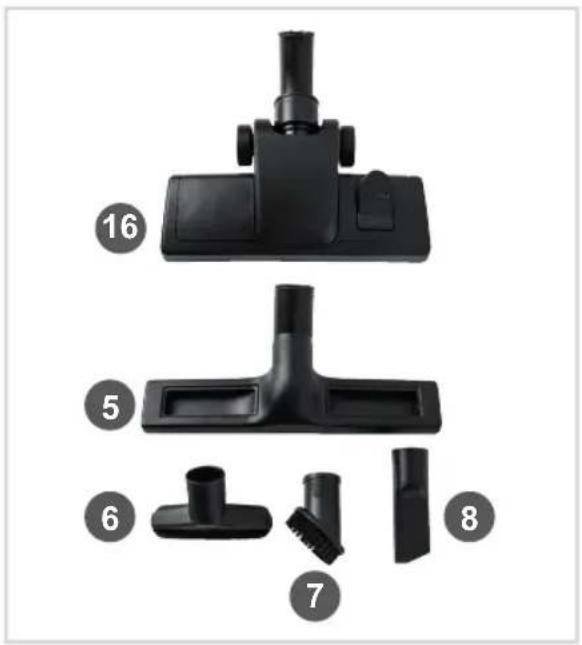
text_image
Labeled diagram of a black vacuum cleaner with numbered parts for identification.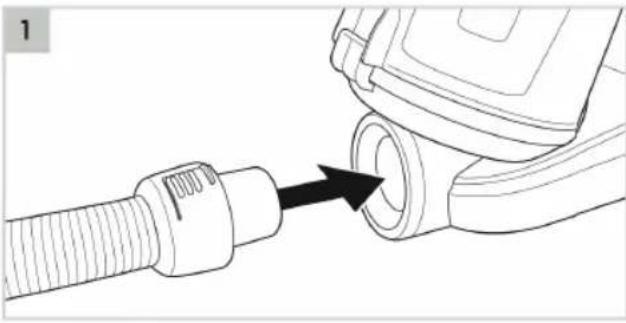
natural_image
Diagram showing a connector being inserted into a pump fitting (no text or symbols present)
text_image
3 A B C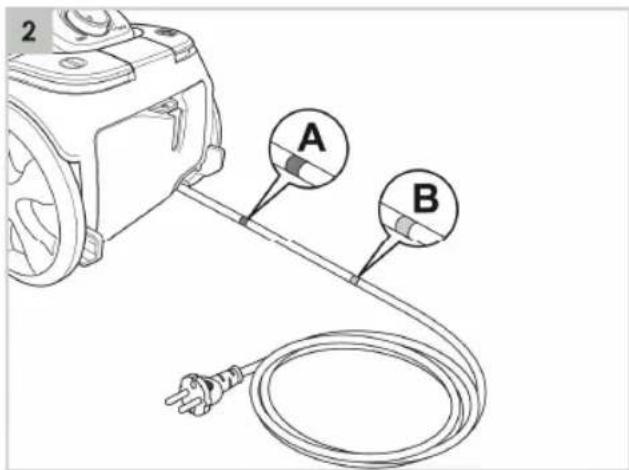
text_image
2 A B
natural_image
Line drawing of a mechanical device with a black arrow pointing to a component (no text or symbols present)
text_image
5 A MAX B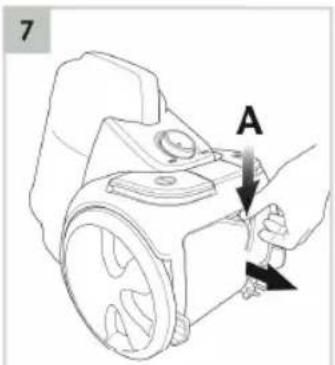
text_image
7 A
text_image
6 A B C D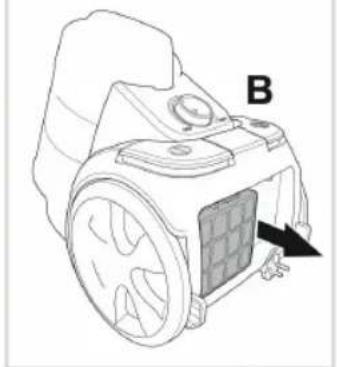
natural_image
Technical line drawing of a mechanical device with labeled component B (no text or symbols beyond label)SICHERHEITSHINWEISE
- This appliance is not intended for professional use, but is intended for domestic and similar use, such as in staff kitchens, in shops, offices and other working environments, by guests in hotels, motels and other residential environments, in Bed & Breakfast type environments and farms.
• Always place the device on a stable and level surface.
- Check whether the mains voltage corresponds to the mains voltage indicated on the rating plate of the appliance before connecting it to an earthed socket.
- Certain parts of the device may become hot. Do not touch it to avoid getting burned.
- The device must be able to dissipate heat and must therefore not be covered. Keep it sufficiently free.
- Never immerse the appliance, the cord or the plug in water or any other liquid and do not hold it under running water.
- Do not pick up the device if it has fallen into water. Immediately pull the plug from the socket. Don't use it anymore.
• Make sure your hands are dry when you touch the device.
- Make sure that the appliance, the cord and the plug do not come into contact with heat sources such as a hob or open fire.
- Remove the plug from the socket when you are not using the device. Pull the plug, not the cord.
- Check regularly whether the cord is still intact. If the device is damaged, do not use it anymore, but take it to the manufacturer or a technical service center for repair.
- The appliance must not be operated by means of an external timer or by a remote control system.
- Switch off the device before moving it.
- Do not use the device if the filter is damaged or incorrectly installed. This could damage the device.
- Do not use the device to vacuum the following objects:
- glowing or burning objects
- glass splinters or other sharp objects
- remains of plaster, cement, stone, soot and the like
- liquids or damp dirt.
- Do not use the vacuum cleaner on wet rugs and carpets.
- Never insert objects into the exhaust openings.
- Make sure that the suction and discharge openings are open and the filter is not clogged. Blockages cause overheating.
- Keep suction nozzles and tubes away from the body. You can cause serious injuries, for example to eyes or ears.
- Switch off the appliance and remove the plug from the socket if you experience any malfunctions during use, empty the appliance, clean the appliance, install or remove an accessory, or have finished using it.
- This appliance can be used by children aged from 8 years and above and persons with reduced physical, sensory or mental capabilities or lack of experience and knowledge if they have been given supervision or instruction concerning use of the appliance in a safe way and understand the dangers.
• Children are not allowed to clean or maintain the appliance unless they are over 8 years old and supervised. - Keep the appliance and the cord out of the reach of children under the age of 8.
• Children must be supervised to ensure that they do not play with the appliance.
ENVIRONMENT
Dispose of packaging material such as plastic and cardboard boxes in the designated containers.
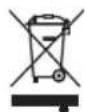
Do not dispose of this product as normal domestic waste at the end of its life, but hand it in at a collection point for the reuse of electric and electronic equipment. Look for the symbol on the product, the user instructions or the packaging showing the type of waste.
- The materials can be used as indicated. By helping us reuse and process the materials or otherwise recycle the old equipment, you will be making an important contribution towards the protection of the environment.
- Your municipality can tell you where to find the designated waste collection point in your neighbourhood.
SERVICE
In the unlikely event of a malfunction, please contact Bestron customer service: www.bestron.com/service
| Technical Specifications | |
| Model AMC2000 | |
| Mains (V) 220-240V | |
| Frequency (Hz) 50-60 | |
| Safety Class II | |
| Power (Watt) 700 | |
| Noise (dB(A)) - | |
| Max. Capacity | - |
| Maximum continuous operating time (KB) | - |
| Dimensions (L x W x H) (cm) | 40,8x26,6x35,7 |
| Cable length (cm) | 600 |
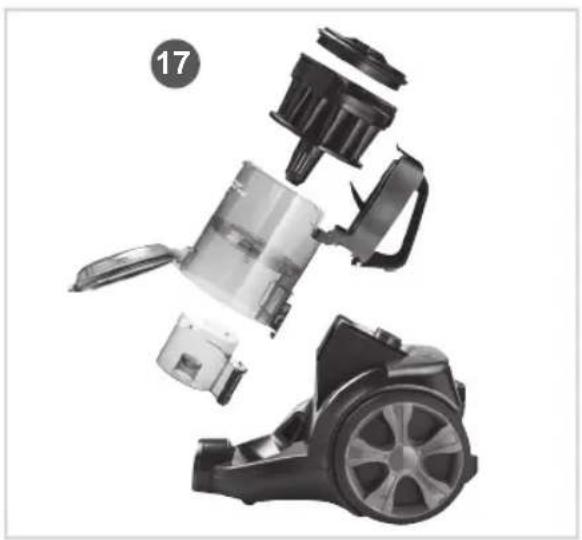
OPERATION - General information
The below description goes with the image on page 2.
| 1. Hose connection | 10.Hose |
| 2. Cable reel-in button | 11. Grip with adjustable air opening |
| 3. Vacuum-cleaner handle | 12.Telescopictube |
| 4. On/off switch with | 13. Dust container release button |
| 5. Parquet brush tool | 14. Exhaust filter |
| 6. Furniture nozzle | 15.Rearwheels |
| 7. Dusting brush | 16.Combinozzle |
| 8. Crevice tool | 17. Dust separation system |
| 9. Dust receptacle | 18. Electronic suction power regulator |
See page 3 for the images referenced in the description.
OPERATION
- Push the hose into the hose connection on the motor unit (see figure 1). To remove the hose, push the two buttons and pull it out of the hose connection.
- The power cord has a yellow (B) and red (A) mark (see figure 2). Pull out the cord to the yellow mark.
- Slide the hose handle into the telescopic tube (see figure 3A).
- Press the button on the telescopic tube and keep it pressed in; you can then extend or retract the tube to the required length (see figure 3B).
- Press the foot button on the nozzle to set the combi nozzle for use on hard or soft surfaces, (see figure 3C). For use on hard surfaces, press the foot button on the combi nozzle to extend the brushes. Lift the button for use on soft surfaces.
- Put the plug in the wall socket, and press the On/Off switch. To switch off the appliance, press the On/Off switch again (4).
- The appliance is now ready for use. You can move the vacuum cleaner while you are cleaning by pulling on the hose grip. You can lift the appliance with the vacuum cleaner's handle (3).
- You can adjust the vacuum suction with the vacuum suction control (see figure (5). It is advisable to reduce the vacuum suction when cleaning upholstered furniture and curtains. This will prevent the fabric from being sucked into the nozzle.
- In addition, you can use the electronic suction power regulator (18) to determine how much suction power you want to use.
WARNING:
• Never pull out the power cord beyond the red mark (A). This could damage the power cord.
- For wooden flors we recommend you to use the special hard floor brush
- Remove the plug from the wall socket.
- Press the rewind button and keep it pressed in; the power cord will automatically rewind onto the reel.
- An attachment slot for the combi nozzle is fitted to the back of the vacuum cleaner. This avoids the need to dismantle the vacuum cleaner after use; you can store the assembled appliance and retrieve it again quickly when you need it.
WARNING:
- Guide the power cord whilst it rewinds onto the reel, since otherwise the cord could become tangled or the plug could strike the back of the appliance. Take hold of the power cord near the mark, and allow it to gently slide through your fingers back into the appliance (see figure 5).
CLEANING AND MAINTENANCE - Cleaning the housing
- Remove the plug from the wall socket.
- Clean the outer surface of all parts with a damp cloth and a cleaner suitable for plastics.
- Over the course of time dust and dirt can accumulate around the wheel axles, thereby preventing the wheels from turning easily. Consequently they should be kept clean.
WARNING:
- Never immerse the appliance, plug or power cord in water.
- Never use corrosive or scouring cleaning agents or sharp objects (such as knives or hard brushes) to clean the appliance.
CLEANING AND MAINTENANCE - Removing waste from the dust receptacle
- Remove the plug from the wall socket.
- Remove the hose.
- Remove the dust bin by pressing the dust bin release button (see figure 5A) and take out the dust bin and hold it over a waste bag.
- Let the bottom cover fall open by pulling the handle towards you (see figure 5B). Then take out the inner container with a twisting motion and also beat it empty.
- If so required, use your hand to remove any waste sticking to the receptacle.
- Close the bottom cover and close the lever until it clicks into place.
- Fit the dust receptacle onto the appliance, and click it into position.
CLEANING AND MAINTENANCE - Cleaning or replacing the filter
For best results clean or replace the filter after every second or third use of the vacuum cleaner, or more frequently if the filter is visibly blocked.
- Remove the waste from the dust receptacle (see "Removing waste from the dust receptacle").
- Take the filter from the vacuum cleaner (see figure 6B).
- Rinse the filter thoroughly in lukewarm water.
- Allow the filter to dry thoroughly.
- Take the dust seperation system from the dust container by turning it (see figure 6C).
- Open the filter lid.
- Remove the filter from the dust separation system (see figure 6D).
- Rinse the filter and dust separation system thoroughly in lukewarm water.
- Let the filter dry thoroughly.
- Reassemble the holders and filter in reverse order.
WARNING:
- Clean the filter regularly to avoid that the filter becomes clogged and the engine overheated.
- Water could penetrate into the appliance if the filter is not thoroughly dry. This could result in (electrical) damage.
- Do not clean the filter in a washing machine.
- Do not dry the filter with a hairdryer.
CLEANING AND MAINTENANCE - Cleaning or replacing the exhaust filter
Replace the exhaust filter at least twice a year, and more frequently if the filter is visibly blocked.
- Remove the plug from the wall socket.
- Open the cover of the exhaust filter by pulling the cover down and forwards. Remove the exhaust filter from the appliance (see figure 7).
- Rinse the filter in lukewarm water. Allow it to dry thoroughly.
- Return the cleaned filter to the appliance. Close the cover, and turn right until it clicks into place.
WARNING:
- Water could penetrate into the appliance if the filters are not thoroughly dry. This could result in (electrical) damage.
ALL YOU WANT TO KNOW ABOUT YOUR UNIQUE 5 YEAR WARRANTY
ALLES, WAS SIE ÜBER IHRE EINZIGARTIGE 5-JAHRES-GARANTIE WISSEN MÖCHTEN TOUT CE QUE VOUS VOULEZ SAVOIR SUR VOTRE GARANTIE UNIQUE DE 5 ANS ALLES WAT U WILT WETEN OVER UW UNIEKE GARANTIE VAN 5 JAAR TUTTO QUE LLO CHE VUOI SAPERE SULLA TUA GARANZIA UNICA DI 5 ANNI TODO LO QUE QUIERES SABER SOBRE TU ÚNICA GARANTÍA DE 5 AÑOS
BESTRON.COM/GUARANTEE

text_image
QR code image containing encoded data, no visible human-readable textNEED HELP?
CHECK OUT OUR SERVICE PAGE
BRAUCHEN SIE HILFE? SCHAUEN SIE SICH UNSERE SERVICESEITE AN BESOIN D'AIDE? DISCUTE AVEC NOUS! CONSULTEZ NOTRE PAGE DE SERVICE HULP NODIG? CHAT MET ONS! BEKIIJK ONZE SERVICEPAGINA HO BISOGNO DI AIUTO? CHATTA CON NOI! GUARDA LA NOSTRA PAGINA SERVIZI ¿NECESITAS AYUDA? CONSULTE NUESTRA PÁGINA DE SERVICIO
BESTRON.COM/SERVICE

natural_image
Generic user profile icon with headset and uniform (no text or symbols)EASTERN EUROPE
CUSTOMER SERVICE
POLSKA bestron.service.pl@sertronics.de HRVATSKA bestron.service.hr@sertronics.de CZECHIA bestron.service.cz@sertronics.de SLOVENSKO bestron.service.sk@sertronics.de ROMÂNIA bestron.service.ro@sertronics.de BULGARIA bestron.service.bg@sertronics.de
SERVICE HOTLINE: 00800 954 39 543


240724-02
| Hersteller / Fournisseur/ Výrobce / Proizvođač / Produčator / Výrobca / ПроизводителBestron Nederland BV, Moeskampweg 20, 5222 AW, 's-HertogenboschNiederlande, Pays-Bas, Nizozemí, Hollandia, Holandia, Olandia, Holandsko, Холандия | |||||||
| DCZHRPLRO/MIDSKBG | |||||||
| Ursprungs-landChina | Pays d'origineChine Čína | Země původuChina Chiny | Zemlja podrijetlaChina Čína Kitář | Wyprodu kowano w | Tara de origine | Krajina pôvodu | Страна на производ |