M28280 - Aspirateur DIRT DEVIL - Free user manual and instructions
Find the device manual for free M28280 DIRT DEVIL in PDF.
Download the instructions for your Aspirateur in PDF format for free! Find your manual M28280 - DIRT DEVIL and take your electronic device back in hand. On this page are published all the documents necessary for the use of your device. M28280 by DIRT DEVIL.
USER MANUAL M28280 DIRT DEVIL
ance-Kundenservice (ZSeite 48, „International Service“). Problem mögliche Ursache / Lösung Centec.book Seite 9 Donnerstag, 21. April 2011 6:06 1810
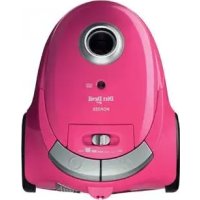
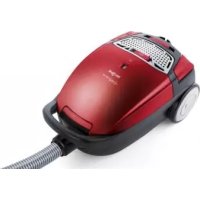
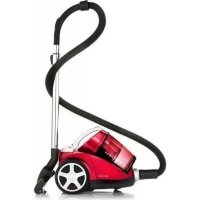
1 Overview of your Centec 1 Overview of your Centec Thank you!
Thank you for purchasing the Centec and your confidence in us.
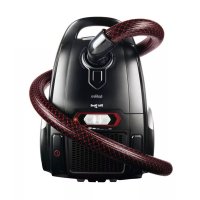
Overview of the scope of delivery (Fig. 1)
1 Suction hose release buttons
3 Floor nozzle (Fig. as an example)
5 "Carpet/hard floor" selector
7 Telescopic tube stop catch
12 Accessory bracket
14 Fitting mark on the dust container
15 Fitting mark on the dust container cover
16 Motor protection filter
17 Release button for the dust container
18 Dust container cover
20*Filter fleece (optional*)
22 MAX marking on the dust container
23 Dust compartment bottom plate
27 Suction power control
32 Exhaust filter cover release buttons
33 Exhaust filter cover
* depending on model and scope of delivery
1 Overview of your Centec 10
Conditions of warranty 10
In case of a warranty claim 10
2 Safety notices 11
2.1 Re: Operating Manual 11
2.2 Re: Certain groups of persons 11
2.3 Re: Power supply 11
2.4 Re: Appropriate Use 11
2.5 If the appliance is defective 11
3.2 Selecting the proper nozzle 12
4.1 Operational safety 13
4.2 Vacuum cleaning 13
4.3 Switching off 13
4.4 Transport and storage 13
5.1 Emptying and cleaning the dust container 14
5.2 Cleaning central lamellae filter and motor protection filter 14
5.3 Cleaning the exhaust filter 15
5.4 Spare parts and accessories 15
5.5 Before you send in the appliance 15
Technical and design specifications may be changed in the course of
continuous product improvement. © Royal Appliance International GmbH Conditions of warranty
We grant the legally prescribed warranty of 24 months from the date
of purchase for the appliance distributed by us.
Within this period we will either repair or replace the appliance or accessory
(damages to accessories do not automatically cause a replacement of the
complete appliance) all defects due to manufacturing or materials at no
Damages due to inappropriate use (operation on wrong voltage or type of
current, connecting to unsuitable power supplies, breakage, etc.) are
exempt from warranty, as are normal wear and minor defects that only
negligibly influence the appliance's serviceability.
Intrusions by unauthorised parties and the use of spare parts not supplied
Appliance invalidate the warranty. Consumable parts are not
included in the warranty and are therefore at the customer's expense!
The warranty is only valid if the date of purchase has been acknowledged
by the dealer's stamp and signature on the warranty card or if a copy of the
invoice or sales slip is included with the sent-in appliance. Warranty work
does not extend the warranty period nor does it constitute a claim for a new
In case of a warranty claim
Send us the appliance with its dust container empty and a short description
of the defect in printed letters.
Head your accompanying letter with the notice "warranty claim". Send it to
the following address, including the warranty card or a copy of the invoice
ZPage 48, „International Service“
Type of appliance :bagless cylinder vacuum cleaner
Model number :M2828 (-0/-1.../-8/-9)
Power :1800 W nom. – 2500 W max.
Max. available dust bag capacity :approx. 1.5 litres
Power cord length :approx. 5 m
Weight :approx. 5.3 kg
Centec.book Seite 10 Donnerstag, 21. April 2011 6:06 1811
2 Safety notices 2 Safety notices 2.1 Re: Operating Manual Read this operating manual completely before working with theappliance. Keep the operating manual for reference. Include the operatingmanual if you pass the appliance on to someone else.Violations of the operating instructions can lead to severe injuries aswell as damages to the appliance. We take no responsibility for damages due to violations of these operatinginstructions. By all means always observe the notices marked as follows to avoidaccidents and damages to the appliance.
2.2 Re: Certain groups of persons This appliance is not intended to be used by persons (including children)with impaired physical, sensorial or mental abilities and/or insufficientexperience or knowledge, unless they are supervised by a personresponsible for their safety or have been instructed in the proper use of theappliance by this person. Keep the appliance out of reach of people of thesegroups. Children should be supervised in order to make sure that they don’t playwith the appliance. Children must not be allowed to stand or sit on theappliance. Packing material must not be used to play with. There is danger ofsuffocation. 2.3 Re: Power supply The appliance runs on electricity -- that means there is a general risk ofelectric shock. So please especially observe the following: Never immerse the appliance in water or other liquids. Keep it awayfrom rain and moisture. Always pull directly at the plug if you want to disconnect the appliancefrom the mains. Never pull on the cable as this could damage it. Never carry the appliance by its power cord. It could be damaged. Take care that the power cord is not bent, pinched, rolled over or getsin contact with heat sources. Also take care that it does not become astumbling-hazard. Never touch the plug with wet hands. Before connecting to the power supply, make sure that the voltagestated on the type plate matches the voltage of your plug socket. Only usesockets with a ground/safety contact. If possible, avoid using extension cords. If you must use an extensioncord, use only safety-certified, water-protected single extension cords (no-multi-socket distributors) designed for the power consumption of theappliance. Always check the power cord for possible damages before using theappliance. 2.4 Re: Appropriate Use The cylinder vacuum cleaner is intended for home use only. It is notsuitable for commercial use.Use the cylinder vacuum cleaner only for cleaning dry, normally soiledfloors. With the furniture brush attached, you may also use the appliancefor vacuuming furniture surfaces. With the bypass vent (Fig. 1/9) complete-ly open and the necessary caution, you may even use the appliance to vac-uum-clean drapes. Our (optional) turbo brush serves solely to vacuum non-sensitive carpets, runners, doormats, and the like. Do not clean any objects with the turbobrush that you would not clean without a second thought with a convention-al brush. Therefore, do not clean furniture, or materials with a delicate tex-ture, nor any other high-quality or polished substrates with the turbo brush.Otherwise material damage might occur. If in doubt, refrain from using theturbo brush. In every instance observe the instructions for care and clean-ing of the respective manufacturer.Any other use is considered inappropriate and is prohibited. It is especially forbidden: To vacuum-clean:- persons, animals, plants, especially hair, fingers and other parts ofthe body as well as pieces of clothing worn on the body. They couldbe sucked in and cause injuries.- water and other fluids, especially damp carpet cleaning agents.Moisture inside the appliance can cause a short-circuit.- toner dust (for laser printers, copying machines, etc.). There isdanger of fire or explosion.- hot ash, burning cigarettes or matches. This could cause a fire.- pointed objects, such as glass shards, nails, etc. They can damagethe appliance.- rubble, plaster, cement, fine drilling-dust, makeup, etc. These mightdamage the appliance. To use the appliance near explosive or easily flammable substances.There is danger of fire or explosion. To use the appliance outdoors. There is danger of rain and dirtdestroying the appliance. To stick objects into the appliance's openings. It could overheat. To modify or repair the appliance on your own. 2.5 If the appliance is defective If the power cord of this appliance is damaged it must be replaced by themanufacturers, their authorised service representative or a similarlyqualified person to avoid danger.Never use a defective appliance or operate an appliance with a defectivepower cord. Bring or send a defective appliance to a specialist dealer or to Royal Appliance Customer Services for repair. Address ZPage 48, „International Service“. 2.6 Re: Disposal Dispose of the appliance in compliance with the environmentalprotection laws of your country. Electrical waste may not bedisposed of together with domestic waste. Use local old-appliancecollection points instead. The filters used are made from environment-friendly materials. You maydispose of them in your household waste. WARNING: Warning concerning health hazards describing possible risks of injury. ATTENTION: Warning concerning possible dangers to the appliance or other objects. NOTE: Highlights tips and information for you. Centec.book Seite 11 Donnerstag, 21. April 2011 6:06 1812
3 Before use 3 Before use 3.1 Unpacking 1. Unpack the appliance and all its accessories. 2. Check that the contents are intact. 3.2 Selecting the proper nozzle
1. Select the nozzle according to the surface to be cleaned: The crevice nozzle and the furniture brush are included as accessories in the scope of delivery besides the floor nozzle (Fig. 2/1).
- Crevice nozzle (Fig. 2/4): Use this to vacuum dust from hard to reach places. - Furniture brush (Fig. 2/5): Use this to vacuum dust off objects that have sensitive surfaces. *Optionally available (i.e. included in the scope of delivery depending on model and features) are also:- Parquet brush (Fig. 2/2*)Its long bristles make it especially suitable for cleaning delicatesurfaces (e.g. parquet and laminate floors). - Turbo brush (Fig. 2/3*)This has a rotating brush head and is most suitable for thoroughlydeep cleaning of carpets. The brushing also raises the carpet pile.- Long flexible crevice nozzle (Fig. 2/6*)Use this to vacuum dust from distant, hard-to-reach places.2. Push the accessory bracket onto the telescopic tube as shown, or ontothe handle (Fig. 3/A).3. Push nozzles not in use onto the stubs of the accessory bracket (Fig. 3/ B).
1. Attach the selected nozzle to the bottom end of the telescopic tube(Fig. 4/A1) or of the handle (Fig. 4/B1). 2. Insert the end of the suction hose into the intake opening (Fig. 5/A) of the vacuum cleaner until you hear and feel it locking into place. If using the telescopic tube: 3. Insert the handle into the upper end of the telescopic tube (Fig. 5/B). 4. Adjust the length of the telescopic tube (Fig. 5/C). Press down therelease latch on the tube to do this. Then extend the telescopic tube tothe desired length. Let go of the release catch while pulling until it locksin place. You will hear a distinct click.ATTENTION:Always transport or ship the appliance in its original packaging to avoiddamage. Keep the packaging for such an event. However, dispose of nolonger needed packaging material properly.NOTE:Immediately contact your dealer if you have found damage resultingfrom transport. 2*
3 NOTE:When you use the long, flexible crevice nozzle, under certain circum-stances the pressure inside the vacuum cleaner might drop too far thustriggering the safety valve. The signal for this is e.g. a whistling noise(depending on the vacuum cleaner model) and greatly reduced suctionperformance. In this case, depending on the vacuum cleaner model andequipment, you have to reduce the suction power or open the bypassvent until the valve no longer triggers.
5 WARNING:Danger of injury! Only attach the nozzles if the appliance is notconnected to the power supply. The cylinder vacuum cleaner could beswitched on by accident.ATTENTION:Before vacuuming, make sure that the fitted nozzle suits the surface tobe cleaned. Also observe the flooring manufacturer's recommendations. Centec.book Seite 12 Donnerstag, 21. April 2011 6:06 1813
4 Operation 4 Operation 4.1 Operational safety 4.2 Vacuum cleaning
1. Pull out the cord by the plug up to the yellow mark (Fig. 6/1). 2. Insert the mains plug into a socket with ground/safety contact.3. Switch on the cylinder vacuum cleaner with the on/off switch (Fig. 6/4). 4. Adjust the suction power with the suction power control (Fig. 6/5). 5. If using the floor nozzle, set the "carpet/hard floor" selector accordingto the type of floor to be cleaned (Fig. 7/1):Fig. 7/A: for deep- and short-pile carpets, runnersFig. 7/B: for hard floors such as laminate, tiles, PVC etc.4.3 Switching off 1. Switch off the cylinder vacuum cleaner with the on/off switch (Fig. 6/4) and pull the plug from the mains socket.2. Keep the plug in your hand.3. To retract the power cord, push the cord retracting button (Fig. 6/3).4.4 Transport and storage Only carry the vacuum cleaner by its carrying-handle (Fig. 8/1). For storage you can park the telescopic tube on the vacuum cleaner byinserting the parking-hook of the floor nozzle into the parking-bracket(Fig. 8). If you want to store the appliance for a longer period of time, empty the dust container. Zchapter 5.1, „Emptying and cleaning the dust container“. Store the appliance in a cool, dry place, out of reach of children.WARNING:Danger of injury! Check appliance and power cord before each use. Adamaged appliance must never be used.WARNING:Danger of injury! Especially when vacuum-cleaning stairs make surethat you always stand on a higher level than the appliance.ATTENTION:Only use the cylinder vacuum cleaner with all filters intact, in drycondition and correctly fitted. Make sure that no objects obstruct thetelescopic tube, the suction hose or other openings.NOTE:Your cylinder vacuum cleaner is equipped with a safety switch to preventoverheating. It will switch off automatically if overheated (e.g. due toclogged suction channels). If this happens: Switch off the vacuum cleaner. Pull the plug from the power socket. Remove the cause of the overheating. Wait for about 45 minutes. After it has cooled off, you may switch on the vacuum cleaner again. 6
7 WARNING:Danger of electric shock! If the red marking (Fig. 6/2) shows, press thecord retracting button (Fig. 6/3) to pull in the cord up to the yellow mark(Fig. 6/1) again. Otherwise, the power cord may be damaged.NOTE:With the bypass vent (Fig. 6/6) you can quickly reduce the suction powerif less power is needed, e.g. to release curtains accidentally sucked in.WARNING:Danger of injury! When leaving your working-area, switch off the appliance and mind the notices at Zchapter 4.3, „Switching off“. This will help avoid accidents.WARNING:Danger of injury! During uncontrolled retraction the power cord can whiparound, become an obstacle or overthrow objects. Therefore keep theplug in your hand and guide it when retracting the power cord. 1
8 ATTENTION:Never store the appliance next to heat sources (e.g. stoves or radiators).Avoid exposing it to direct sunlight. Heat can damage the appliance. Centec.book Seite 13 Donnerstag, 21. April 2011 6:06 1814
5 Maintenance 5 Maintenance5.1 Emptying and cleaning the dust container It is best to empty the dust container after each vacuuming session. However, empty the dust container at the latest when the ‘MAX’ mark(Fig. 9/B1) has been reached, if storing it for a long period, or when sending it.
1. Switch off the appliance, Zchapter 4.3, „Switching off“. 2. Push the release button for the dust container (Fig. 9/A).3. Remove the dust container by pulling it upwards out of its receptacle. 4. Empty the dust container by holding it low over a dustbin and only thenpress the release button (Fig. 9/B).5. Twist off baffle by turning anticlockwise (Fig. 9/C) to empty and cleanthe dust container better.6. Remove any residual dust from the dust container using a dry cloth ora soft brush, e.g. the supplied furniture brush.7. Twist baffle back on by turning clockwise until you feel and hear it clickinto place.8. Close the dust compartment bottom plate.5.2 Cleaning central lamellae filter and motor protection filter It is best to clean the central lamellae filter and the motor protection filtereach time you empty the dust container. Though clean both filters at the latest when the cleaning indicator(Fig. 1/25) lights up. 1. Switch off the appliance and empty the dust container, Zchapter 5.1, „Emptying and cleaning the dust container“. 2. Remove the motor protection filter from its holder (Fig. 10/A).
3. Unlock the cover by twisting it in the ‘UNLOCK’ direction (Fig. 10/B). 4. Hold the cover with the filter elements attached low over a dustbin. 5. Pull the filter fleece (optional) off the central lamellae filter (Fig. 11/A). 6. Remove the central lamellae filter from the cover by twisting it in the‘UNLOCK’ direction (Fig. 11/B).7. Remove larger agglomerations of dirt by hand and brush the centrallamellae filter clean with the supplied furniture brush (Fig. 12/A).8. If the filter elements are still dirty after this procedure, thoroughly rinsethem by hand in running water (Fig. 12/B) until all dirt is gone.9. If a filter element is damaged or too dirty, replace it with a new one (ordering information Zchapter 5.4, „Spare parts and accessories“). 10. Put the new / cleaned and completely dry motor protection filter backinto its receptacle (Fig. 10/A).11. Refit the central lamellae filter to the dust compartment cover bytwisting it in the ‘Lock’ direction until it is securely fastened (Fig. 11/B).You will feel and hear the filter snap into place.12. Put the filter fleece (optional) back onto the central lamellae filter so thatit exactly encloses the lamellae of the filter (Fig. 11/A). 13. Fit the cover in such a way that the fitting mark on the cover (T) exactly corresponds to the arrow on the dust compartment. 14. Fix the cover by twisting it in the "LOCK" direction (Fig. 10/B). 15. Put the dust container back into its receptacle. You will feel and hear itsnap into place.ATTENTION:Switch off the appliance before emptying the dust container. This willprevent dust from damaging the appliance.NOTE:You can dispose of the contents of the dust container with your regulardomestic waste as long as it does not contain any substances notpermitted in domestic waste. A
9 NOTE:The dust container cannot be cleaned with the central lamellae filter fitted. So clean the central lamellae filter on this occasion, Zchapter 5.2, „Cleaning central lamellae filter and motor protection filter“. A B LOCKUNLOCK 10
12 ATTENTION:The filter elements are washable, but may not be cleaned indishwashers or washing-machines. Also, do not use detergents orbrushes with hard bristles to clean them. Let the filters dry for approx.24 hours at room temperature after cleaning. Only put them back intothe appliance when they are completely dry. Centec.book Seite 14 Donnerstag, 21. April 2011 6:06 1815
5.3 Cleaning the exhaust filter It is best to clean the exhaust filter every third time that the centrallamellae filter is cleaned. However, clean the exhaust filter at least every six months. 1. Switch off the appliance, Zchapter 4.3, „Switching off“. 2. Push the release catches of the exhaust filter cover down (Fig. 13/A)and fold down the exhaust filter cover. 3. Remove the filter holder (Fig. 13/B). 4. Hold the filter holder deeply into a dustbin. 5. Only now separate the exhaust filter from the filter holder (Fig. 14/A). 6. Thoroughly tap the dirt from both elements.7. Remove residual dust with a soft brush, e.g. the supplied furniturebrush.8. If the exhaust filter is damaged, deformed or too soiled, replace it (ordering information Zchapter 5.4, „Spare parts and accessories“). 9. Put the cleaned or new exhaust filter back into the filter holder.10. Now put the filter holder with the freshly fitted filter back into itsreceptacle (Fig. 13/B). 11. Fit the exhaust filter cover on the bottom side first (Fig. 14/B) and then fold it in upwards. 5.4 Spare parts and accessories
Ordering address: ZPage 48, „International Service“
Further information: Z www.dirtdevil.de The following accessories and spare parts can be reordered: 5.5 Before you send in the appliance Before contacting your authorised Royal dealer, Royal service partner orappliance market or sending in the appliance, first follow the procedure inthe following table to check if you can solve the problem yourself. A B
14 ATTENTION:The exhaust filter is not washable.ATTENTION:Only use original spare parts from the scope of delivery or those that youhave acquired by reordering.Item number Description2828001 Filter set 5 pcs, consisting of 1 central lamellae filter, 1 motor protection filter, 1 exhaust filter and 2 filter fleecesM203 1 parquet brushM209 1 turbo brushM232 1 long flexible crevice nozzleWARNING:Danger of injury! Never use a defective appliance! Always switch off theappliance and disconnect it from the mains before starting troubleshoot-ing Zchapter 4.3, „Switching off“.Problem Possible cause / solutionThe appli-ance will not start.The socket does not carry current.Test the vacuum cleaner at another socket which you are sure carries current.Power cord is damaged. Have the power cord replaced by Royal Appliance Customer Service, address, ZPage 48, „International Service“.The vacuum cleaner stops sud-denly.The overheating protection has tripped (possibly due to blocked suction channels, filters, or similar).Switch the appliance off and pull the plug out of the socket. Remove the cause of overheating (e.g. by disassembling telescopic tube and suction hose and removing the obsta-cle and/or cleaning filters). Wait for about 45 minutes. After the appliance has cooled off, you may switch it on again.Cleaning in-dicator (Fig. 1/25) lights up.The central lamellae filter is dirty. Clean the central lamellae filter, Zchapter 5.2, „Cleaning central lamellae filter and motor protection filter“.The dust container is full. Empty / clean the dust container, Zchapter 5.1, „Emptying and cleaning the dust container“.The cleaning results are unsatisfacto-ry in spite of the appli-ance work-ing correctly.The bypass vent (Fig. 1/9) is open.Close the bypass vent .The attached nozzle is unsuitable. Change the nozzle, Zchapter 3.2, „Selecting the proper nozzle“.The suction power you set is unsuitable.Adjust the suction power control to suit the flooring, Zchapter 4.2, „Vacuum cleaning“, step 4. The position of the "carpet/hard floor" selector (Fig. 1/5) is unsuitable. Set the "carpet/hard floor" selector to the correct position for the type of floor, Zchapter 4.2, „Vacuum cleaning“, step 5.The dust container is full. Empty / clean the dust container Zchapter 5.1, „Emptying and cleaning the dust container“.The filter is dirty. Clean the respective filter Zchapter 5.2, „Cleaning central