
HB590 - Solar bench PHILIPS - Free user manual and instructions
Find the device manual for free HB590 PHILIPS in PDF.
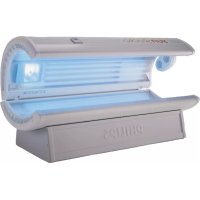



| Product type | Sunbed with integrated facial lamp |
| Brand | Philips |
| Model | HB590 |
| Use | Home tanning |
| Power supply | 400 V three-phase, 16 A |
| Facial lamp | Integrated, adjustable (75% and 100% power) |
| Timer | 30 minutes maximum, automatic shut-off |
| Fan | Adjustable (on/off, two speeds) |
| Acrylic panels | Protection of UV tubes (bed and canopy) |
| Capacity | 1 person |
| Recommended session duration | 6 to 25 minutes depending on skin type |
| Maximum hours per year | 17 hours (1020 minutes) |
| Protection | Automatic shut-off after 30 min, 16 A fuses |
| Included accessories | Protective goggles (2 pairs), key, screwdriver, protection panels |
| Cleaning | Damp cloth without harsh liquid products |
| Repairability | Replacement of UV tubes and starters possible by user (except HPA facial lamp) |
| Installation | Requires two people, free space: 50 cm sides, 30 cm rear |
| Safety | Wear provided goggles, avoid overexposure, consult a doctor if sensitive skin |
| Environment | Appliance and lamps recyclable at designated points |
Frequently Asked Questions - HB590 PHILIPS
User questions about HB590 PHILIPS
0 question about this device. Answer the ones you know or ask your own.
Ask a new question about this device
Download the instructions for your Solar bench in PDF format for free! Find your manual HB590 - PHILIPS and take your electronic device back in hand. On this page are published all the documents necessary for the use of your device. HB590 by PHILIPS.
USER MANUAL HB590 PHILIPS
HB591, HB590 Sunstudio

ENGLISH 4
DEUTSCH 8
FRANÇAIS 12
NEDERLANDS 16
ESPAÑOL 20
РУССКИЙ 24
Introduction
Full-body tanner with integrated facial tanning unit
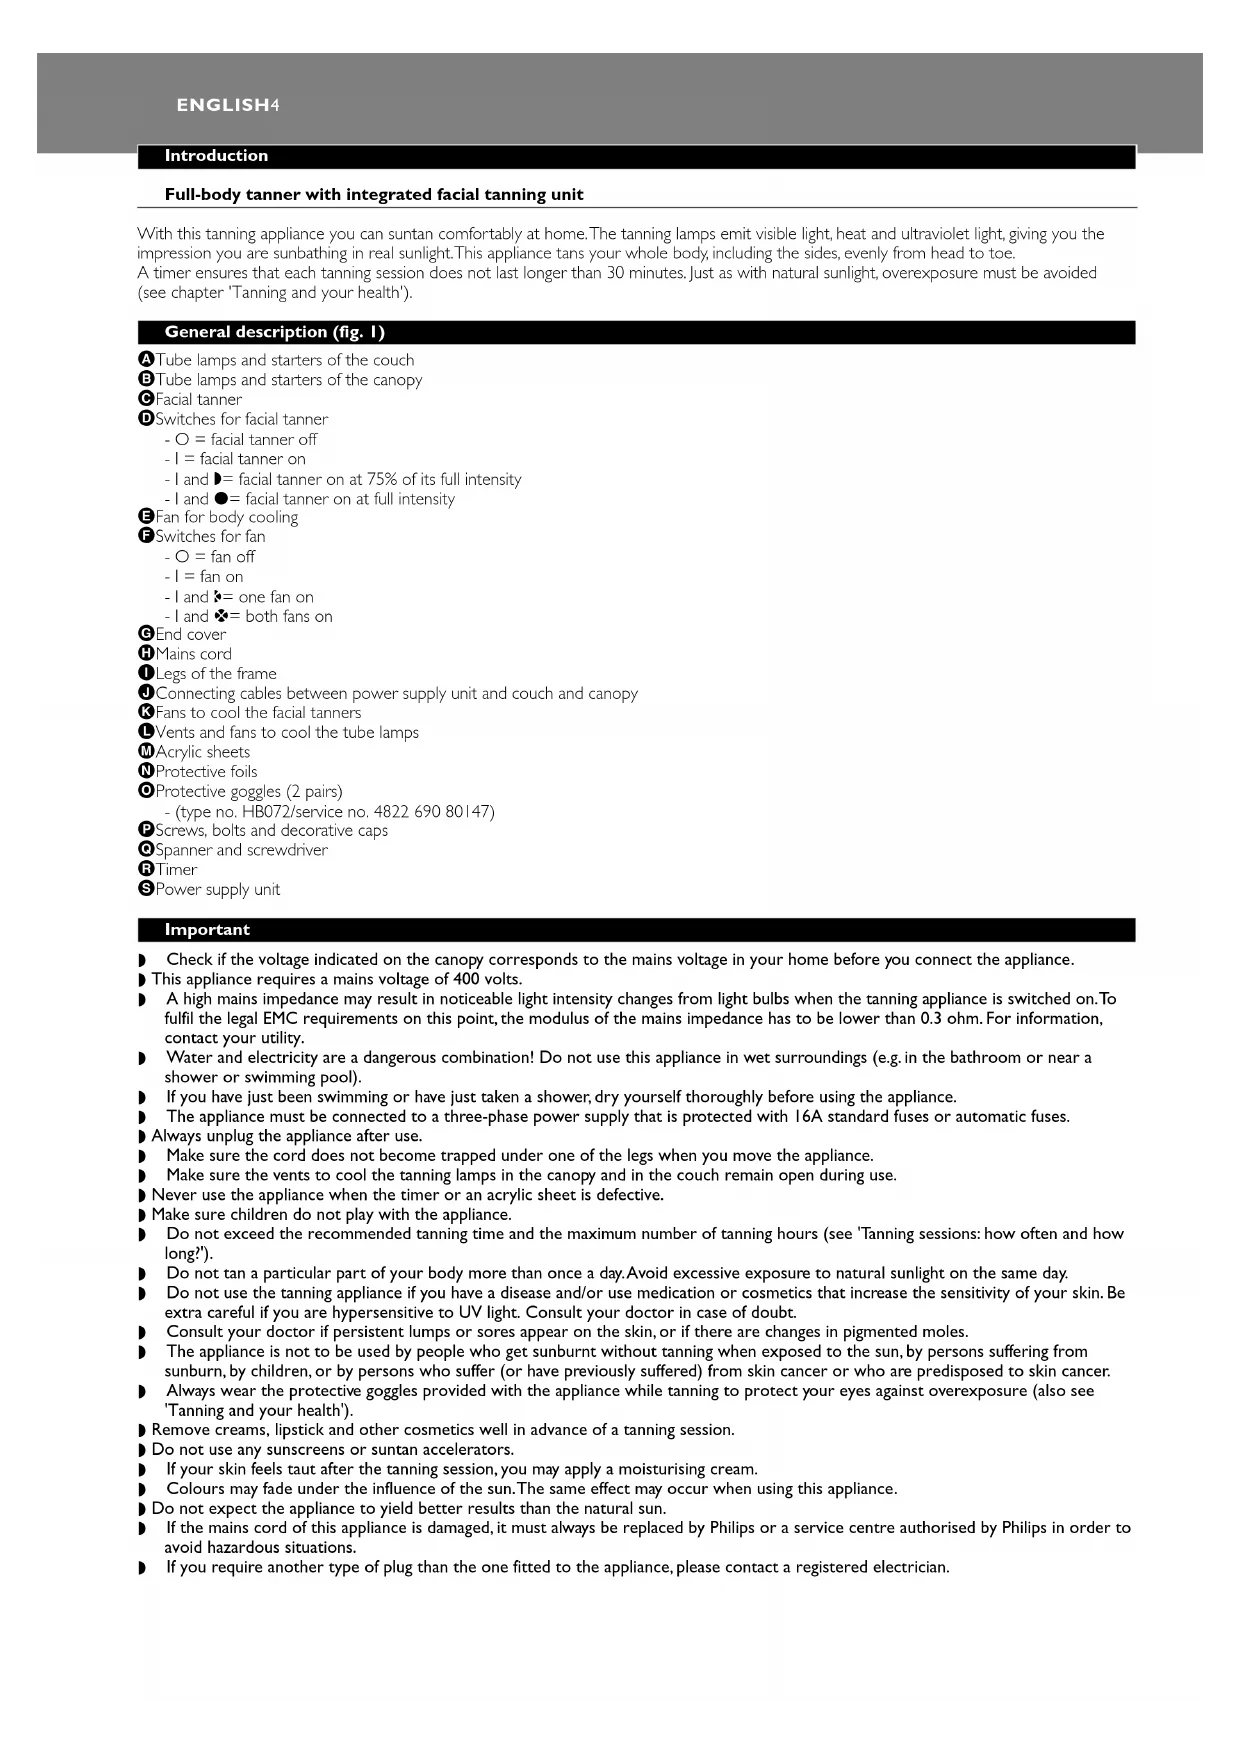
With this tanning appliance you can suntan comfortably at home. The tanning lamps emit visible light, heat and ultraviolet light, giving you the impression you are sunbathing in real sunlight. This appliance tans your whole body, including the sides, evenly from head to toe.
A timer ensures that each tanning session does not last longer than 30 minutes. Just as with natural sunlight, overexposure must be avoided (see chapter 'Tanning and your health').
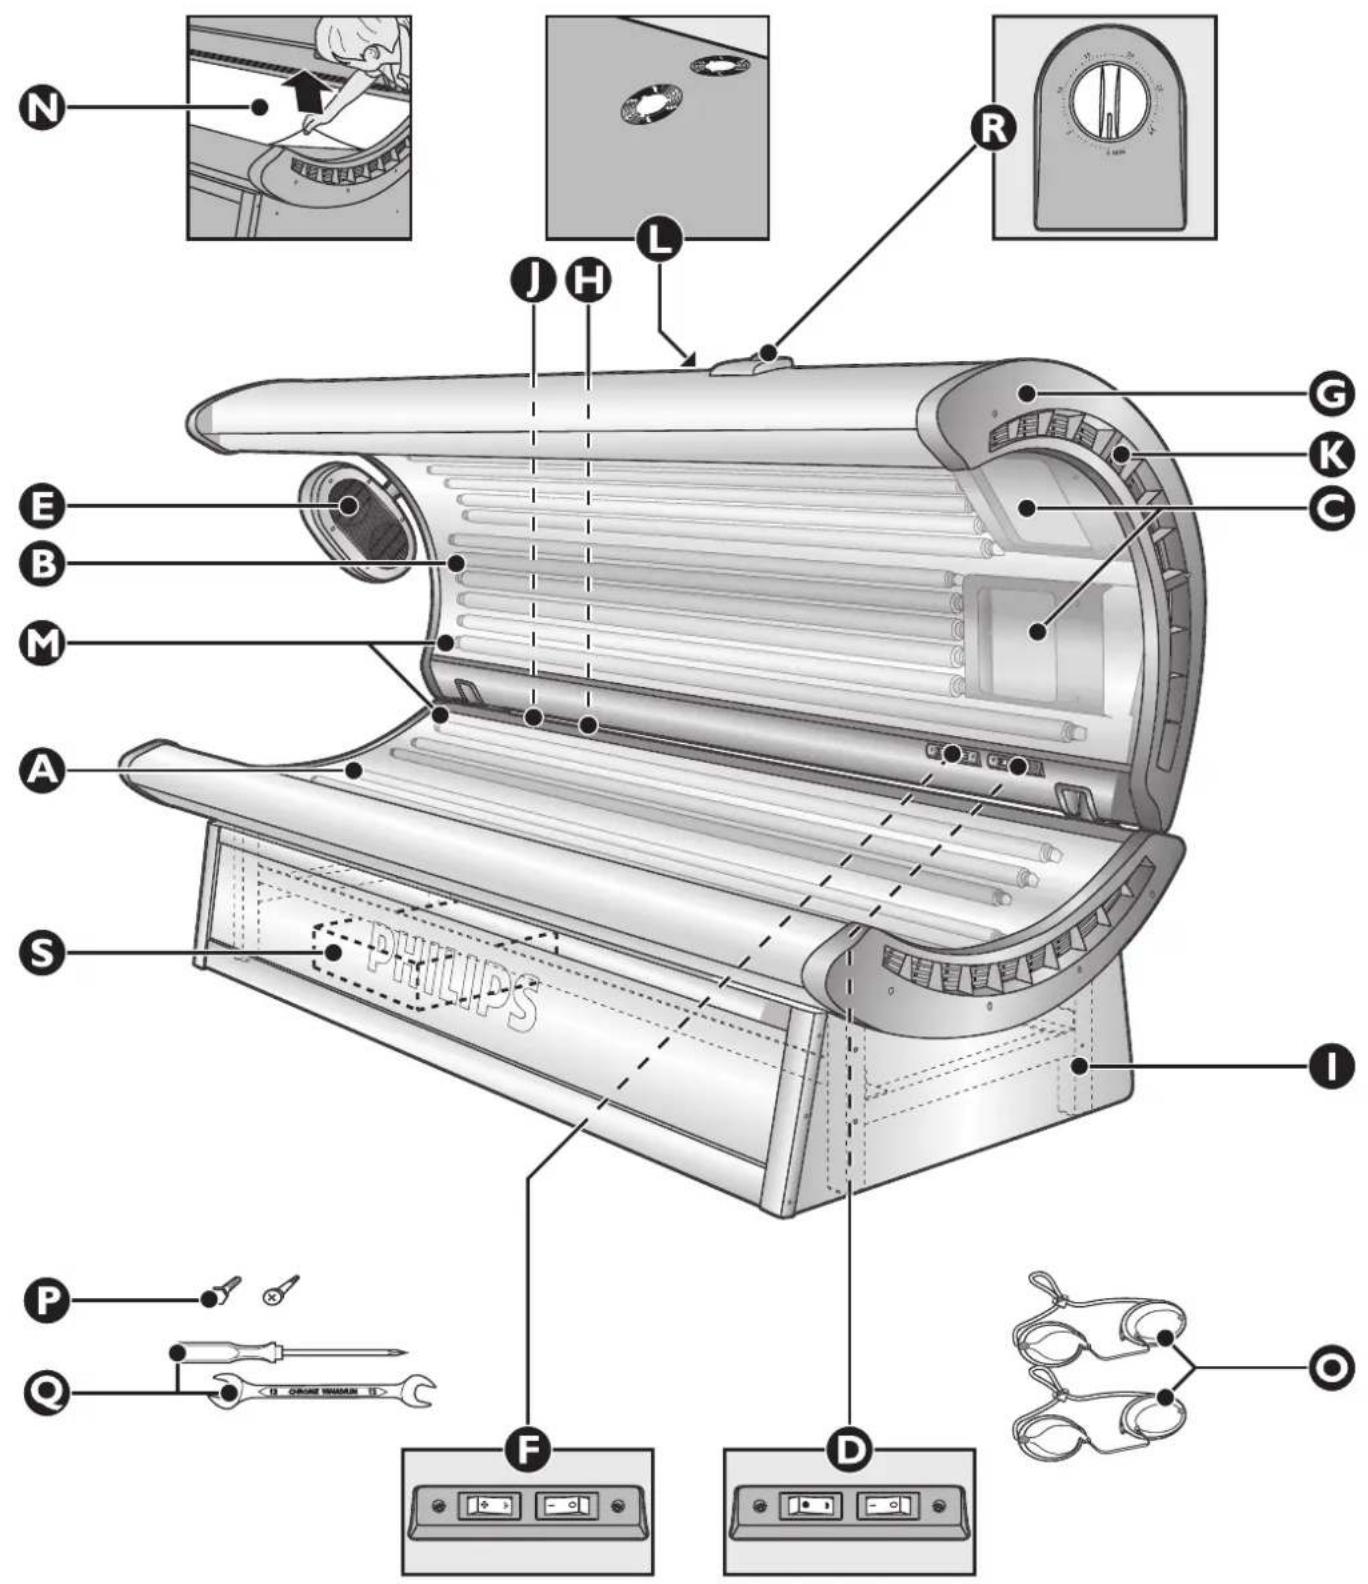
General description (fig. 1)
A Tube lamps and starters of the couch Tube lamps and starters of the canopy Facial tanner Switches for facial tanner
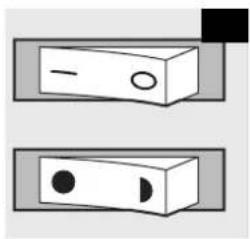
- O = facial tanner off -1 = facial tanner on -1 and = facial tanner on at 75% of its full intensity
-1 and ● = facial tanner on at full intensity
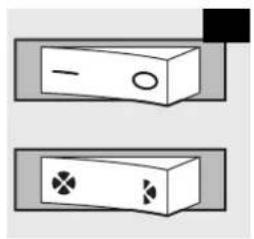
Fan for body cooling Switches for fan
- O = fan off -1 = fan on -1 and ♣ = one fan on
-1 and ♣ = both fans on
End cover Mains cord Legs of the frame • Connecting cables between power supply unit and couch and canopy ♣ Fans to cool the facial tanners Vents and fans to cool the tube lamps Acrylic sheets Protective foils Protective goggles (2 pairs)
(type no. HB072/service no. 482269080147)
Screws, bolts and decorative caps • Spanner and screwdriver R Timer S Power supply unit
Important
Check if the voltage indicated on the canopy corresponds to the mains voltage in your home before you connect the appliance. This appliance requires a mains voltage of 400 volts. A high mains impedance may result in noticeable light intensity changes from light bulbs when the tanning appliance is switched on. To fulfil the legal EMC requirements on this point, the modulus of the mains impedance has to be lower than 0.3 ohm. For information, contact your utility. Water and electricity are a dangerous combination! Do not use this appliance in wet surroundings (e.g. in the bathroom or near a shower or swimming pool). If you have just been swimming or have just taken a shower, dry yourself thoroughly before using the appliance. The appliance must be connected to a three-phase power supply that is protected with 16A standard fuses or automatic fuses. Always unplug the appliance after use. Make sure the cord does not become trapped under one of the legs when you move the appliance. Make sure the vents to cool the tanning lamps in the canopy and in the couch remain open during use. Never use the appliance when the timer or an acrylic sheet is defective. Make sure children do not play with the appliance. Do not exceed the recommended tanning time and the maximum number of tanning hours (see 'Tanning sessions: how often and how long?'). Do not tan a particular part of your body more than once a day. Avoid excessive exposure to natural sunlight on the same day. Do not use the tanning appliance if you have a disease and/or use medication or cosmetics that increase the sensitivity of your skin. Be extra careful if you are hypersensitive to UV light. Consult your doctor in case of doubt. Consult your doctor if persistent lumps or sores appear on the skin, or if there are changes in pigmented moles. The appliance is not to be used by people who get sunburnt without tanning when exposed to the sun, by persons suffering from sunburn, by children, or by persons who suffer (or have previously suffered) from skin cancer or who are predisposed to skin cancer. Always wear the protective goggles provided with the appliance while tanning to protect your eyes against overexposure (also see 'Tanning and your health'). - Remove creams, lipstick and other cosmetics well in advance of a tanning session. Do not use any sunscreens or suntan accelerators. If your skin feels taut after the tanning session, you may apply a moisturising cream. - Colours may fade under the influence of the sun. The same effect may occur when using this appliance. Do not expect the appliance to yield better results than the natural sun. If the mains cord of this appliance is damaged, it must always be replaced by Philips or a service centre authorised by Philips in order to avoid hazardous situations. If you require another type of plug than the one fitted to the appliance, please contact a registered electrician.
Tanning and your health
The sun, UV and tanning
The sun
The sun supplies various types of energy. Visible light enables us to see, ultraviolet (UV) light gives us a tan and the infrared (IR) light in sunrays provides the heat in which we like to bask.
UV and your health
Just as with natural sunlight, the tanning process will take some time. The first effect will only become visible after a few sessions (see 'Tanning sessions: how often and how long').
Overexposure to ultraviolet light (natural sunlight or artificial light from your tanning appliance) can cause sunburn.
Besides many other factors, such as overexposure to natural sunlight, incorrect and excessive use of a tanning appliance may increase the risk of skin and eye problems. The degree to which these effects occur is determined by the nature, intensity and duration of the exposure on the one hand and the sensitivity of the person involved on the other hand.
The more the skin and the eyes are exposed to UV light, the higher the risk of keratitis, conjunctivitis, damage to the retina, cataracts, premature skin ageing and the development of skin tumours will be. Some medications and cosmetics increase the sensitivity of the skin.
Therefore it is highly important:
that you follow the instructions given in 'Important' and 'Tanning sessions: how often and how long?'; that you do not exceed the maximum number of tanning hours per year (see 'Tanning sessions: how often and how long?'); - that you always wear the goggles provided while tanning.
Tanning sessions: how often and how long?
Take one tanning session a day for five to ten days. Wait at least 48 hours after the first session before taking the second session. After this 5 to 10-day course, we advise you to give your skin a rest for a while. Approximately one month after a course, your skin will have lost much of its tan. You can then start a new course. If you want to keep your tan, do not stop tanning after the course, but continue taking one or two tanning sessions a week.
Whether you choose to stop tanning for a while or whether you continue tanning on a lower frequency, always keep in mind that you must not exceed the maximum number of tanning hours. For this appliance the maximum is 17 hours (= 1020 minutes) a year.
Example
Suppose you are taking a 10-day course, consisting of a 6-minute tanning session on the first day and a 20-minute tanning session on the following nine days.
The entire course will then last (1 × 6 minutes) + (9 × 20 minutes) = 186 minutes. This means you can take 5 of these courses a year, as 5 × 186 minutes = 930 minutes.
Table
As is shown in the table, the first session of a tanning course should always last 6 minutes, irrespective of the sensitivity of the skin.
If you think that the sessions are too long for you (e.g. if the skin gets taut and tender after the session), we advise you to reduce the sessions by e.g. 5 minutes.
| Duration of the tanning session in minutes | for persons with very sensitive skin | for persons with normal sensitive skin | for persons with less sensitive skin |
| 1st session | 6 | 6 | 6 |
| rest of at least 48 hours | |||
| 2nd session | 10 | 15-20 | 25 |
| 3rd session | 10 | 15-20 | 25 |
| 4th session | 10 | 15-20 | 25 |
| 5th session | 10 | 15-20 | 25 |
| 6th session | 10 | 15-20 | 25 |
| 7th session | 10 | 15-20 | 25 |
| 8th session | 10 | 15-20 | 25 |
| 9th session | 10 | 15-20 | 25 |
| 10th session | 10 | 15-20 | 25 |
Preparing for use
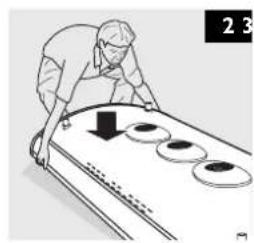
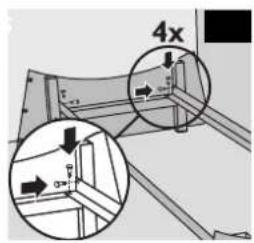
It requires two people to assemble and move the tanning appliance. During assembly the appliance becomes heavier and more difficult to move. We therefore advise you to assemble the appliance at the place where it will be used. Make sure there is enough free space beside (at least 50 cm) and behind (at least 30 cm) the appliance. If the couch and/or canopy have to be placed on the floor, put them on the floor with the tube lamps facing downwards to avoid internal damage. Make sure you place them on a soft surface (e.g. a carpet or rug) to prevent damage to the housing (fig. 2). 1 First assemble the legs of the frame by fastening the angle sections with the bolts and then fit the side panels, if applicable (fig. 3). NB: the holes in the side panels must be on the front side.
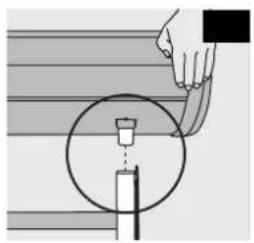
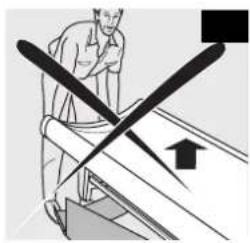
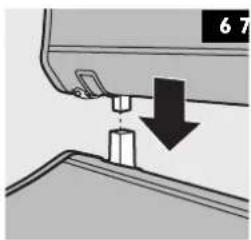
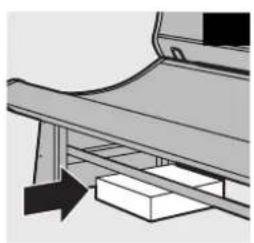
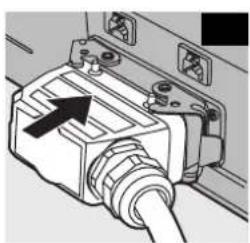
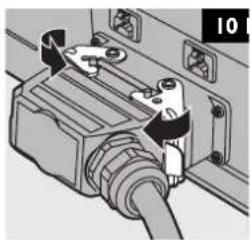
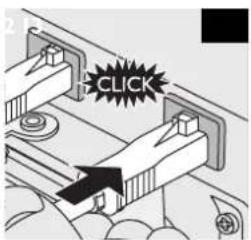
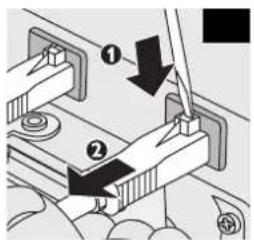
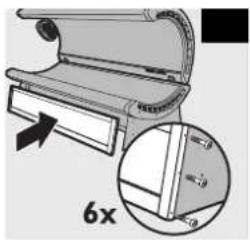
2 Place the couch on the legs carefully. Make sure the legs slide steadily into the appropriate openings in the couch (fig. 4). NB: the openings for assembling the canopy must be located at the back of the couch. 3 If necessary, you can move the couch slightly by sliding its legs across the floor or by carefully lifting it slightly off the floor together with another person. Make sure there is enough free space beside (at least 50 cm) and behind (at least 30 cm) the appliance. Never try to move the appliance in the manner shown in the picture. This could cause the frame to become detached from the couch (fig. 5). 4 Lift the canopy together with another person and position its connecting tubes over the connecting holes. Slide the tubes steadily into the connecting holes of the couch (fig. 6). Be careful not to get your fingers stuck between the couch and the canopy. Make sure the cord does not get stuck between the couch and the canopy. 5 Remove the protective foil from the acrylic sheets of the canopy and couch (fig. 7). 6 Push the power supply unit under the couch from the front (fig. 8). NB: the plugs should be located at the back of the power supply unit. Make sure the mains cord does not get caught under the wheels. 7 Insert the large plug into the socket of the power supply unit. This will take some effort (fig. 9). Lock the plug in position by means of the metal handles (fig. 10). 8 Put the plugs of the couch and the canopy in the socket of the power supply (fig. 11). The small plugs are identical and interchangeable. If you want to remove the small plugs, follow the instructions shown in the picture (fig. 12). 9 Place the front panel and fasten it with the screws (fig. 13). The only purpose of the panel is to enhance the appearance of the appliance. 10 Insert the mains plug of the power supply unit into the wall socket.
Using the appliance
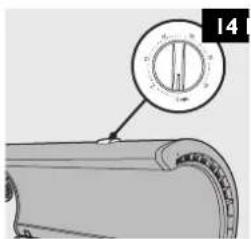
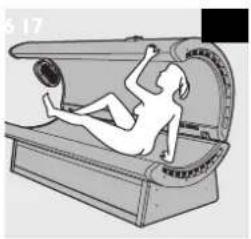
Switch the appliance on by setting the required tanning time on the timer (fig. 14). For the correct tanning times, see 'Tanning sessions: how often and how long?' 2 Push the canopy backwards so that you can lie down on the couch. When you are lying on the couch, pull the canopy back into horizontal position (fig. 15). NB: when the appliance has not been used for some time, the hinges of the canopy may squeak when you open or close the canopy for the first time. 3 Switch the body cooler on by means of the switch (fig. 16). Select the desired airflow: or (fig. 16). 4 If you like, you can also switch on the facial tanner (fig. 17). Select for 75% of the full intensity or for full intensity (fig. 17). 5 Don't forget to put on the protective goggles provided. During the last minute of the session you will hear a beeping sound.
Cleaning
Always remove the mains plug from the wall socket and let the tanning appliance cool down before you start cleaning it.
Never use liquids such as alcohol, methylated spirits, petrol or acetone to clean the acrylic sheets as this may cause irreparable damage.
Clean the outside of the appliance with a damp cloth. Do not let any water run into the appliance.
Replacement
The light emitted by the tanning lamps will become less bright in time (i.e. after a few years in case of normal use). When this happens, you will notice a decrease in the tanning capacity of the appliance. You can solve this problem by setting a slightly longer tanning time or by having the tanning lamps replaced.
Have the tanning lamps and/or starters replaced by a service centre authorised by Philips. They have the knowledge and skills required for this job and the original spare parts for your tanning appliance.
If you really insist on replacing the tube lamps and/or starters yourself, you should proceed as follows:
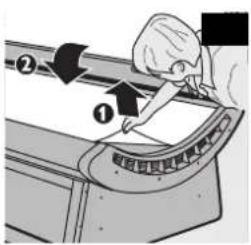
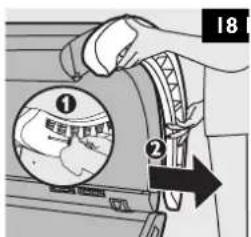
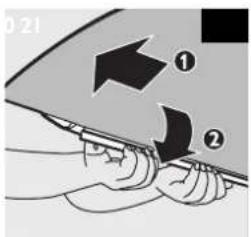
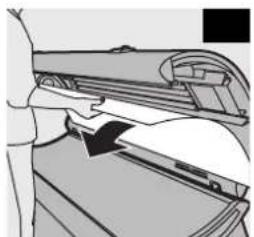
1 Remove the mains plug from the wall socket. 2 Remove the end cover at the head of the canopy by undoing the screws (fig. 18). 3 First pull the acrylic sheet approx. 10 cm out of the appliance (1). Then undo the snap strip on the rear side of the canopy (2) (fig. 19). 4 Do the same with the snap strip on the front side of the canopy. 5 Remove the acrylic sheet (fig. 20). Now you can remove the tube lamps and the starters. NB: you can now also clean the acrylic sheet, if you wish.
6 The lamps and/or starters of the couch and the canopy can in principle be replaced in the same way. The starters are located at one of the lamp ends, except for three starters in the canopy which are located in a different place and which can only be replaced by removing the three lamps. 7 To remove the lamps, turn them to the left or to the right so that you can lift them out of their holders. 8 The starters can be removed by turning them to the left. Insert new lamps and/or starters and follow the instructions above in reverse direction and order to reassemble the appliance. 10 Do not forget to fasten the end cover with the screws again.
NB: the HPA lamps of the facial tanner may only be replaced by a service centre authorised by Philips.
Coin box or remote control unit
This appliance can also be connected to a coin box or a remote control unit. These devices may only be connected by a registered electrician. The connection instructions can be found on a sticker on the power supply unit.
Environment
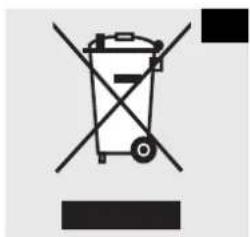
Do not throw the appliance away with the normal household waste at the end of its life, but hand it in at an official collection point for recycling. By doing this you will help to preserve the environment (fig. 21).
The lamps of this appliance contain substances that may pollute the environment. Always remove them and take them to an official collection point before you hand the appliance in for recycling.
Guarantee & service
If you need service or information or if you have a problem, please visit the Philips Web site at www.philips.com or contact the Philips Customer Care Centre in your country (you will find its phone number in the worldwide guarantee leaflet). If there is no Customer Care Centre in your country, turn to your local Philips dealer or contact the Service Department of Philips Domestic Appliances and Personal Care BV.
Guarantee restrictions
The following parts are not covered by the terms of the international guarantee.
- tanning lamps
- acrylic sheets and the costs of cleaning acrylic sheets
Troubleshooting
If the appliance has not been installed or is not used in accordance with the instructions, it may fail to work properly. In that case you will be able to solve the problem yourself by following the troubleshooting tips below. If the problem is not mentioned in the list, the appliance may not work properly because it has a defect. In that case we advise you to contact your dealer or a Philips service centre.
| Problem | Possible causes |
| The appliance does not start. | The mains plug has not been properly inserted into the wall socket. |
| The timer has not been set. | |
| Connecting cables (I) have not been plugged in (correctly). | |
| One or more fuses of the three-phase power supply system cut off the power when you switch the appliance on or when it is in use. | Check the fuses.The correct fuse type is a 16A standard fuse or an automatic fuse. |
| Poor tanning result. | You are using an extension cord that is too long or does not have the correct current rating.Consult your dealer. Our general advice is not to use an extension cord. |
| You are not following the tanning schedule suitable for your skin type. Check the table in 'Tanning sessions: how often and how long?' | |
| When the lamps have been used for a long time, the UV light emitted will decrease. This effect only becomes noticeable after several years.You can solve this problem by selecting a slightly longer tanning time or by replacing the lamps. |
Introduction
Before connecting the appliance to the electrical supply, make sure that the voltage indicated on the rating plate corresponds to the mains voltage in your home. This appliance requires a mains voltage of 400 V. Low mains resistance may lead to a noticeable change in the intensity of the light from the tanning lamps when the appliance is switched on. To comply with EMC requirements, the mains resistance must be lower than 0.3 ohms. Contact your local utility company for advice. Water and electricity are a dangerous combination. Do not use the appliance in areas with high humidity (e.g., bathroom, shower, near a swimming pool). After bathing or showering, wait until you are completely dry before using the appliance. The appliance must be connected to a three-phase wall socket with a standard plug or an automatic 16 A circuit breaker. Always disconnect the appliance from the electrical supply after use. When moving the appliance, make sure that the power cord is not under its base. Ensure that the ventilation openings on the emitting unit and the canopy are not blocked during use. Do not use the appliance if the timer or the acrylic sheet is damaged. Do not allow children to play with the appliance. Do not exceed the recommended duration of sessions or the maximum allowable number of tanning hours (see section "Tanning sessions: how often and how long?"). Tanning sessions for individual body parts should not be performed more than once a day. During tanning sessions, avoid prolonged exposure to natural sunlight. You should not use the tanning appliance if you are ill or if you are undergoing a course of treatment or using cosmetics that increase the sensitivity of your skin. Be especially careful if your skin is sensitive to UV radiation. Consult a doctor if you have any doubts. If skin redness, swelling, or inflammation occurs, or if there are changes in pigmentation, consult a physician. Do not use the appliance on skin that has been subjected to rapid sunburn, has sunburn, on children, or on people who suffer (or have suffered) from skin cancer or are predisposed to skin cancer. When using the appliance, always wear the protective goggles supplied with the appliance to prevent excessive exposure to radiation (see also section "Tanning and your health"). Remove creams, lotions, and other cosmetics from the skin before the tanning session. Do not use any tanning accelerators or tanning creams. If you feel some dryness of the skin after a tanning session, apply a moisturizing cream. Under the influence of the sun, colors may fade. This can also happen when using this appliance.
This appliance emits intense UV radiation, which is more powerful than natural sunlight. In case of damage to the power cord, it must be replaced only at a retail outlet or at an authorized service center of the company to ensure safe operation of the device. If you need a different plug instead of the plug included in the delivery set, contact a professional electrician.
Tanning and your health
Sun, UV and tanning
Sun
The sun emits various types of radiation. Visible light allows us to see, ultraviolet (UV) radiation makes us tan, and infrared (IR) radiation, which is part of the sun's spectrum, gives us warmth.
UV and your health
Just like with natural sunlight, excessive exposure to UV radiation can be harmful. The first effect is only noticeable after several sessions (see "Tanning sessions: how often and how long?").
After prolonged exposure to UV radiation (both from the sun and from this appliance), the skin may become burnt.
With excessive and prolonged exposure to the sun or this appliance, the risk of skin and eye diseases increases. The nature, intensity, and duration of exposure on one hand, and the sensitivity of the individual on the other, determine the degree of potential harm.
The more UV radiation affects the eyes and skin, the higher the risk of diseases such as inflammation of the cornea, conjunctivitis, damage to the retina, cataracts, premature aging of the skin, and skin tumors. Some medications and cosmetics increase the sensitivity of the skin to UV radiation.
Therefore, it is important:
- To follow the instructions in the sections "Attention" and "Tanning sessions: how often and how long?" Do not exceed the maximum allowable number of tanning hours per year (see section "Tanning sessions: how often and how long?"). Always wear protective goggles during tanning sessions.
Tanning sessions: how often and how long?
Take one session per day for 5 to 10 days. Between the first and second session, at least 48 hours must pass. After a 5 to 10 day course, we recommend giving your skin a little rest. About a month after the course, your tan will have faded. After that, you can start a new course if you want to maintain your tan. Do not stop tanning sessions after the course; continue with one or two sessions per week.
Regardless of whether you decide to take a break from tanning sessions or continue with fewer sessions, remember that you must not exceed the maximum allowable number of tanning hours. For this appliance, the maximum allowable number is 17 hours (=1020 minutes) per year.
For example, you can take a 10-day course of hardening, consisting of a 6-minute session on the first day and 20-minute sessions on the following nine days.
The total duration of the entire course in this case will be (1x6 minutes) + (9x20 minutes) = 186 minutes. This means that within a year you can conduct five such courses, since 5 x 186 minutes = 930 minutes.
Table
As indicated in the table, the duration of the first session of the course should always be 6 minutes, regardless of the sensitivity of the skin.
If you think that the duration of the session is too long for you (for example, after the session the skin becomes tight and its sensitivity increases), we recommend reducing the session time, for example, by 5 minutes.
Preparing the device for operation
Before lifting, the contents of the device should be removed. After lifting, the device will become heavier and more difficult to carry. Therefore, we recommend assembling the device at the location where it will be used. There should be enough free space on the sides of the device (at least 50 cm), and also enough free space behind the device (at least 30 cm). If you need to install the couch and/or canopy on the floor, turn the drain pipes downward to prevent leakage into the internal mechanism. Place them on a soft surface (e.g., on a carpet, nearby) to prevent damage to the housing (Fig. 2). 1 First, install the legs on the frame, secure the corner sections with bolts, and then install, if necessary, the side panels (Fig. 3). NOTE: The holes for the side panels must be on the front side. 2 Carefully place the couch onto the legs. Check that the legs fit tightly into the corresponding holes in the couch (Fig. 4). NOTE: The holes for installing the canopy must be located on the rear side of the couch. 3 If necessary, you can slightly slide the couch that is on the legs, or slightly lift it with the help of an assistant. Check that there is enough free space on the sides of the device (at least 50 cm), and also that there is enough free space behind the device (at least 30 cm). It is forbidden to drag the couch in the manner shown in the figure. This method may lead to the separation of the frame from the couch (Fig. 5). 4 Together with an assistant, lift the canopy and position the connecting pipes over the connecting holes. Insert the pipes tightly into the holes (Fig. 6). Follow safety precautions to avoid getting fingers caught between the couch and the canopy. Follow safety precautions to avoid getting the family member caught between the couch and the canopy. 5 Remove the protective film from the acrylic sheets of the canopy and the couch (Fig. 7). 6 Insert the power supply unit under the couch from its front side (Fig. 8). NOTE: The connectors must be located on the rear side of the power supply unit. Make sure that the power cord does not get under the wheels. 7 Insert the large connector into the socket of the power supply unit. This requires some effort (Fig. 9). Secure the connector in its position with the metal clips (Fig. 10). 8 Insert the connectors of the couch and the canopy into the sockets of the power supply unit (Fig. 11). The connectors are not interchangeable. If the connectors are different, follow the instructions given in the figure (Fig. 12). 9 Install the front panel and secure it with screws (Fig. 13). The sole purpose of the panel is to improve the appearance of the device. 10 Insert the power plug of the power supply unit into the power outlet.
How to use the device
1 Turn on the device and set the timer to the desired time (fig. 14). For the correct choice of session time, refer to the section "Session duration: how often and how long?". 2 Open the air duct in the opposite direction so that you can see the UV lamp. After you have looked at the lamp, close the air duct by placing it in a horizontal position (fig. 15). NOTE: if the air duct has not been used for some time, its UV lamp may need to be cleaned when first opening and closing the duct. 3 Turn on the body cooling fan using the switch (fig. 16). Set the desired air flow intensity mode (fig. 16). 4 If you wish, you can also turn on the aroma lamp (fig. 17). Set 75% power or full power (fig. 17). 5 Do not forget to put on the protective glasses included in the delivery set. During the last minutes of the session, you should remove the glasses.
Cleaning
Before cleaning, always unplug the power cord from the wall outlet and wait until the device cools down.
It is forbidden to use abrasive sheets or liquids such as alcohol, methylated spirits, gasoline, or acetone, as this may cause irreparable damage.
The external surface of the device can be wiped with a damp cloth. Make sure that water does not get inside the device.
Replacement
Over time (after several years of normal use), the UV lamps' emission capacity gradually decreases, which leads to a reduction in the effectiveness of the device. To compensate for the aging of the lamps, you can slightly increase the duration of the sessions or replace the UV lamps.
Replacement of tubular lamps and/or starters should be carried out by an authorized service center of the company. The specialists of this center have sufficient experience and qualifications necessary for such work, as well as the appropriate spare parts for your device.
If you do not intend to replace the tubular lamps and/or starters yourself, you should proceed as follows: 1 Unplug the power cord from the wall outlet. 2 Remove the top cover of the head part of the air duct by unscrewing the screws (fig. 18). 3 First, pull the acrylic sheet out of the device by about 10 cm (1). Then loosen the belt on the back side of the air duct (2) (fig. 19). 4 Do the same for the belt on the front side of the air duct. 5 Remove the acrylic sheet (fig. 20).
Now you can remove the tubular lamps and starters.
NOTE: Depending on the type of lamp, you may be able to remove the lamp without removing the lamp cover. The lamp cover is located at the ends of the lamp, with the exception of three starters located in another part of the channel, which can only be removed after removing the three lamps. 7 To remove the lamp, turn it left or right so that it can be pulled out of the holder. 8 The starters can be removed by turning them. 9 Insert the new lamp and/or starter and follow the instructions given above in reverse order. 10 Do not forget to reattach the screws, cover. I NOTE: Lamp replacement may only be performed by an authorized service center of the company (KNC).
Coin slot or remote control receiver
This device can also be equipped with a coin slot or a remote control receiver. These devices can only be connected by a professional electrician. Instructions for installation can be found on the label on the power supply block.
Lamps for ignition - acrylic sheets and cost of cleaning acrylic sheets
Possible malfunctions and methods of their elimination
The device detects signs of malfunction if, during installation and operation, the instructions were not followed. In this case, you can eliminate the malfunction yourself, following the recommendations below. If the malfunction is not listed, then, possibly, the device does not work due to a malfunction. In this case, we recommend contacting the local representative or service center of the company "DIIIS".
| HéncnPabHoctb | Bo3MOxHbIe HencPpABHocTn |
| CoIaRn He BkAChyAcTc. | CetEBAH BnAka PINOXO BCTAbAeHa B pO3eTKy. |
| He yctahOBaH TaIeMep. | |
| CoeAInHtCtBHeK cIbCAt (J) He 6bIM (npabNtHo) NOACoAChHbI. | |
| При ВКIOЧEN coIaRn IaM BO BPEM erO ekCPlayatauZI crabTaBaTe OAnH Nm 60MbIe EKAnYeCTBO CetEBbIX IIpeOxpaHITeAe TReXΦaHOn CETn. | ПropeВeTe PpeOxpaHITeM. ПрavBbHbI TIN - cTaNdApTHbI nMaBkI PpeOxpaHITeBA Ha 16 A Nm ABToMATUeCKI PpeOxpaHITeB. |
| CoIaRn pa6OtaET He3ΦΦeKTTHB. | CoIaRn IIOAkoH eHepez CanlukOM AmHHbI Nm He paccHTaHbI Ha Tpe6yEmy BeAMHy ToKa YdAmHtEaBbI ShHyp. O6paHITeB B ToproByO oprAHnaZAuIO. He peKoMeHdyEM Bam IIOAkoHbT coIaRn Hepez YdAmHtEaBbI ShHyp. |
| Bb6paHbI pexHM ceAHcoB 3aRopaHMy He COOTBeTCTByET BaIeMy TIny KoKs. PropeBte pexHM IIO TabMue B pa3deLe "CeAHbI 3aRopaHMy Kac hacto N kak DoATo". | |
| IocAE DAInTEbHO 3KcPlyaTaUZIM PrIbOpa N3MuaOuZaRcIcO6bHcTb Aamn ChnkaeTc. 3TO T ΕΦeKT CTaHOBITcR ZAMeTHbIM TObKO No IcTceHEni HecKOaBHX Aet 3KcPlyaTaUZIM. ΔAor KOMPeHcaUZI CTapeHNAaMn Bbl MoKeTe HeCKoAko YBeAMHITb PpoOaxHtEaBHOCTb ceAHCOB 3aRopaHMy Nc60 ZAMeHITb AamNbl. |
- HB591, HB590 SUNSTUDIO
- INTRODUCTION
- FULL-BODY TANNER WITH INTEGRATED FACIAL TANNING UNIT
- GENERAL DESCRIPTION (FIG. 1)
- IMPORTANT
- TANNING AND YOUR HEALTH
- THE SUN, UV AND TANNING
- THE SUN
- UV AND YOUR HEALTH
- THEREFORE IT IS HIGHLY IMPORTANT
- TANNING SESSIONS: HOW OFTEN AND HOW LONG
- EXAMPLE
- TABLE
- PREPARING FOR USE
- USING THE APPLIANCE
- CLEANING
- REPLACEMENT
- COIN BOX OR REMOTE CONTROL UNIT
- ENVIRONMENT
- GUARANTEE & SERVICE
- GUARANTEE RESTRICTIONS
- TROUBLESHOOTING
- SUN, UV AND TANNING
- SUN
- THEREFORE, IT IS IMPORTANT
- PREPARING THE DEVICE FOR OPERATION
- HOW TO USE THE DEVICE
- COIN SLOT OR REMOTE CONTROL RECEIVER
- POSSIBLE MALFUNCTIONS AND METHODS OF THEIR ELIMINATION
Brand : PHILIPS
Model : HB590
Category : Solar bench