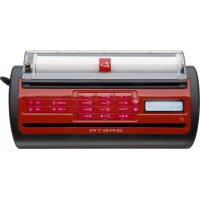
Greta - Fax machines Possio - Free user manual and instructions
Find the device manual for free Greta Possio in PDF.


User questions about Greta Possio
0 question about this device. Answer the ones you know or ask your own.
Ask a new question about this device
Download the instructions for your Fax machines in PDF format for free! Find your manual Greta - Possio and take your electronic device back in hand. On this page are published all the documents necessary for the use of your device. Greta by Possio.
USER MANUAL Greta Possio
Congratulations on your purchase of the Possio GRETA GSM Fax & Printer. We hope that you will have great use of GRETA and that she will be a useful and a efficient addition to your business.
We advice you to carefully read the Important Information, Important Safety Precautions, the Limited User License, the Limited Warranty and Manual packed with GRETA before using your device. You should also keep this booklet for future reference.
This guide is also available on our homepage www.possio.com together with additional information for using and maintaining your GRETA GSM Fax & Printer.
Improvements and changes to this guide necessitated by typographical errors, inaccuracies of current information, or improvements and changes of programs and/or equipment may be made by Possio at any time and without any prior notice. Such improvements and changes will however, be incorporated into new editions of this booklet available for download at www.possio.com.
Be sure to register your product online at www.possio.com/register to receive product updates and news from Possio.
2. Copyright
© Possio AB. This booklet contains or refers to proprietary information that is protected by copyright. All rights are reserved. Possio is a registered trademark of Possio AB, Sweden. This manual may not be copied, photocopied, reproduced, translated, or converted to any electronic or machine-readable form in whole or in part without prior written approval from Possio.
Possio AB
P.O.Box 1236
SE-164 28 Kista
Sweden
Third edition, November 2008
QRPM 00210/01
3. Read first

- In order to avoid accidental usage of the device during transport GRETA is by factory default set to Vehicle mode. In Vehicle mode GRETA will not start unless a charger is connected. Please read under 8.2 Power modes on how to deactivate this feature.
- GRETA has an in-built battery that might be empty upon arrival. Therefore, before using GRETA GSM Fax & Printer please allow for a minimum of 16 hours charging.
- Risk for explosion if battery is replaced by an incorrect type. Always use original Possio battery!
- When inserting your SIM card, make sure GRETA is powered off, and that the SIM card is correctly inserted and snaps into the SIM card slot. In order to receive faxes a special GSM fax number is needed. Please contact your local mobile operator for more details.
- Your warranty is invalidated if you tamper with the device or if the warranty seal is broken or damaged.

Explosive Atmospheres
When in any area with a potentially explosive atmosphere or where flammable materials exist, GRETA should be turned off and the user should obey all signs and instructions. Sparks in such areas could cause an explosion or fire resulting in bodily injury or even death. Users are advised not to use the equipment at refuelling points such as service or gas stations. Users are reminded of the need to observe restrictions on the use of radio equipment in fuel depots, chemical plants or where blasting operations are in progress. Areas with a potentially explosive atmosphere are often, but not always, clearly marked. These include fuelling areas, below deck on boats, fuel or chemical transfer or storage facilities, and areas where the air contains chemicals or particles, such as grain, dust, or metal powders.
4. Important Safety Precautions

When using GRETA, the safety precautions below must be taken to offset possible legal liabilities and damages.
Electrical safety
This product is intended for use with the supplied charger only. Usage of other chargers may be dangerous and cause damage to the device. Any usage of non-original Possio accessories will also invalidate any approval given to the product and warranties.
Safety in aircrafts
Due to the possible interference caused by this device to an aircraft's navigation system and its communication network, using this device on board an airplane (when not in flight mode) is against the law in most countries.
Environment Restrictions
Do not use this device at gas or refuelling stations. The use of this product is also prohibited in fuel storehouses, chemical plants, and locations containing explosives.
Safety for Environments
Do not use this product in gas stations, fuel depots, chemical plants or where blasting operations are in progress, or in potentially explosive atmospheres such as fuelling areas, below deck on boats, fuel or chemical transfer or storage facilities, and areas where the air contains chemicals or particles, such as grain, dust or metal powders. Please be aware that sparks in such areas could cause an explosion or fire resulting in bodily injury or even death.
Road Safety
Vehicle drivers in motion are not permitted to use telephony or fax services with handheld devices, except in the case of emergency. In some countries, using hand-free devices as an alternative is allowed.
Interference with Medical Equipment Functions
This device may cause medical equipment to malfunction. The use of this device is forbidden in most hospitals and medical clinics.
Non-ionising Radiation
This product should be operated in the suggested normal condition only to ensure the radiative performance and safety of the interference. As with other mobile radio transmitting equipment, users are advised that for satisfactory operation of the equipment and for the safety of personnel, it is recommended that no part of the human body be allowed to come too close to the antenna during operation of the equipment.
#
1.Dear Customer 3
2. Copyright 4
3. Read first 5
4. Important Safety Precations 6
5. Overview & Quick Guide 8
5.1 Know your GRETA
5.2 Greta contents list
5.3 Antenna connection 9
5.4 Inserting the SIM card 9
5.5Charging GRETA 10
5.6 Switching GRETA on and off 10
5.7 Making a call 10
5.8 Receiving a call 10
5.9 Sending a fax 10
5.10 Receiving a fax 10
5.11 Receiving SMS 10
5.12 Paper change 11
| 6. Operation | 12 |
| 6.1 Menu overview | 12 |
| 6.2 Navigation | 12 |
| 6.3. Phonebook | 13 |
| 6.3.1 Contacts | 13 |
| 6.3.2 Add Contact | 13 |
| 6.3.3 Edit Contact | 13 |
6.3.4 Print list of all contacts 13
6.3.5 Memory status 13
6.4 Messages 14
6.4.1 Inbox 14
6.4.2 Delete All Messages 14
6.4.3 Print all SMS 14
6.4.4SIMMemory 14
6.5 Functions 15
6.5.1 Copy 15
6.5.2 Forward feed scanner 15
6.5.3 Print settings 15
6.5.4 Print settings
6.5.4 Print activity report 15
- Setup 16
7.1 Resolution 16
7.2 Date & Time 16
7.3Volume 16
7.4 Fax header 16
7.5 Print out modes 16
7.5.1 Number presentation 16
7.5.2 Call duration 1
7.5.3 SMS 17
7.5.4 Activate all 17
7.5.5 Deactivate all 17
7.6 Language settings 17
7.7 Density Control 17
7.7.1 Scan density 17
7.7.2 Print density 17
3 Font size 17
- Advanced Setup 18
8.1 Power-down time 18
8.2 Power modes 18
8.2.1 Deactivates all 18
8.2.2 Vehicle mode 18
8.2.3 Flight mode 18
8.3 Security 19
8.3.1 Key lock 19
8.3.2 PIN request 19
8.4 Call dividends 19
8.4.1 Cancel all dividends 19
8.4.2 Divert voice calls 19
8.4.3 Divert fax calls 19
8.4.4 Divert data calls 19
8.4.5 Print all divert settings 19
8.5 Network settings 20
8.5.1 Show networks 20
8.5.2 Select network 20
6 Error codes 20
- GRETA Manager and Drivers 21
9.1 GRETA Driver installation 21
9.2 GRETA Manager installation 22
- Starting GRETA Manager 23
10.1 Using GRETA Manager 23
10.2 Printing with GRETA Manager 23
11.DoC/SAR/FCC 24
11.1 Declaration of Conformity 24
11.2 FCC Statement 24
11.3 WEEE Disposal Instructions 24
12.Troubleshooting
13. Technical specification 26
5. Overview & Quick Guide
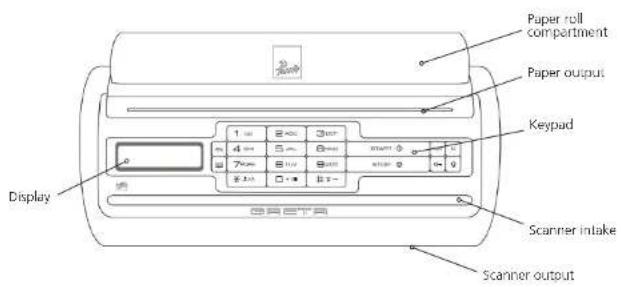
5.1 Know your GRETA
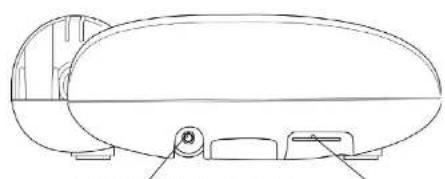
Earpiece connector SIM Card holder
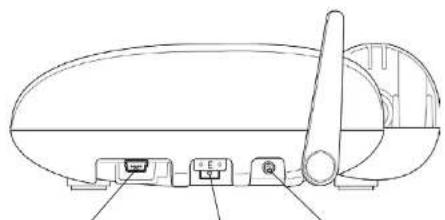
USB connector Power inletFuse
5.2 Greta contents list
- GRETA GSM Fax & Printer
Antenna
USB cable - 110-240V AC power adapter
- Earpiece
CD - User manual
Licence & Warranty booklet - Registration card
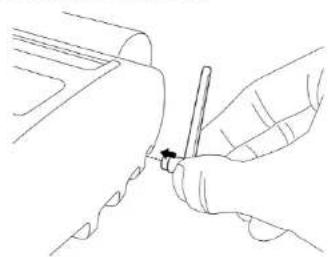
5.3 Antenna connection
Connect the supplied antenna to GRETA as shown. If you are using an antenna adapter please make sure you also connect an external antenna to this.
NOTE: GRETA does not have a built-in antenna and therefore requires you to connect the supplied antenna or an external antenna using the external antenna adapter (accessory).
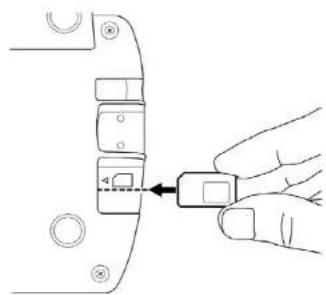
5.4 Inserting the SIM card
Make sure that GRETA is switched off before you insert the SIM card. It is necessary to have subscribed to a fax and data service from your mobile operator in order to receive taxes. With the fax/data service you receive a separate fax number that needs to be used to receive taxes. Contact your mobile operator for more information.
- If your SIM card is PIN code enabled the display will show "Enter PIN?" Please type your PIN code and confirm by pressing START
GRETAWill now connect to the network and you will be ready to use GRETAA.
5.5 Charging GRETA
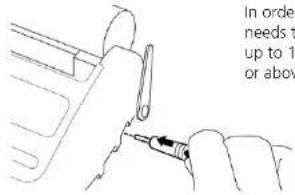
In order to use GRETA without a charger the device needs to be fully charged. The initial charge may take up to 16 hours. Once the battery level reaches 93% or above the LCD will show "Battery charged".
5.6 Switching GRETA on and off
To turn on GRETA press and hold down START
To turn off GRETA press and hold down STOP
5.7 Making a call
To make a phone call, make sure that you have connected the earpiece. Dial the number using the keypad and press START

If a document is stored in the memory the outgoing call made will be a fax.
5.8 Receiving a call
To answer incoming calls, preSTANT use the earpiece to listen and talk.
5.9 Sending a fax
To send a fax, first scan in the pages you want to send. After you have scanned in the pages dial the receivers fax number and press BACK mission fails GRETA will automatically redial 3 times. The redialing event is shown on the display and can be cancelled by pressing STOP . Follow instructions on the display.
5.10 Receiving a fax
All incoming taxes are automatically printed out.
5.11 Receiving SMS
GRETA automatically prints out all incoming SMS.

NOTE: To learn more about the functions of GRETA please read the instructions Chapter 6:Operation.
5.12 Paper change
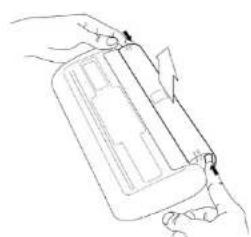
1. Remove the lid. 2. Move the plastic wheels
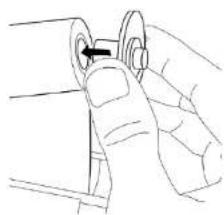
to the new paper roll.
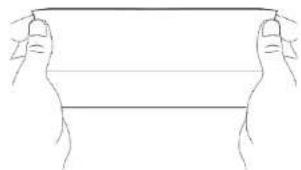
3. Ensure a straight cut edge.
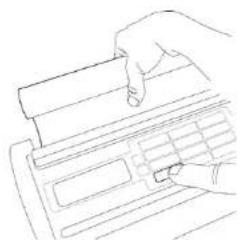
4. Insert paper in the paper slot and keep pressed to feed paper.
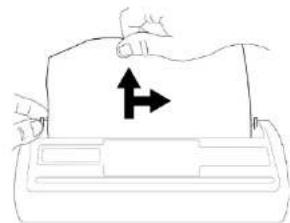
5. Lift metal clips to adjust and straighten paper. Pull the paper up and replace lid.
6. Operation
6.1 Menu overview
Phonebook Messages Functions
Contacts Inbox Copy
Add Contact Delete All Messages Forward feed scanner
Edit Contact Print all SMS Print settings
Print list of all contacts SIM Memory Print activity report
Memory status Print Menu tree
Setup Advanced Setup
Resolution Power-down time
Date & Time Power modes
Volume Security
Fax header Call diverts
Print out modes Network settings
Language settings
Density control
Font size
6.2 Navigation
| Button | Description | Button | Description |
| MENU | Menu, Print menu tree | STOP | Stop, Cancel, No |
| Phonebook | COPY | Copy, Print | |
| - | 0-9 or letters | C | Delete, Erase letters, One menu up |
| Paper feed forward, Scroll menu, Capitalise letters | O | Keylock on/off | |
| #T- | Paper feed backwards, space bar | Q | Backlight on, 15 seconds |
| START | Start, Enter, Yes |
6.3. Phonebook
All your contacts are listed in the phonebook. You can use the phonebook to search, edit, delete or print contact information and even check available space on your SIM card.
6.3.1 Contacts
Contacts are listed according to SIM position. The displays shows intermittent contact name, phone number and SIM/Quick dial number. If you wish to print the displayed contact information press copy. Should you wish to delete the displayed contact press and follow the on-screen instructions.

NOTE: Should you wish to assign (key 1) to your voice mail number, please first delete position 1 contact and then add your voice mail number. See 6.3.2 Add contact.
6.3.2 Add Contact
To add a new contact enter the Add contact menu. Type the name of your new contact first and confirm by pressing START. Then type the new number and confirm your entry by pressing START. Your new contact is now saved to the SIM.
6.3.3 Edit Contact
To edit a contact just enter the Edit contact menu. Scroll to the contact you want to edit and press START Use to delete characters and type letters by pressing the corresponding letter buttons. Press START to confirm changes. Now you can edit the phone - or fax number. Save all changes by pressing START
6.3.4 Print list of all contacts
To print out a list of all your contacts enter the Print all contacts menu. The contacts list contains SIM position, the contact name and the phone or fax number.

Tip: The SIM position number can also be used for speed dialing. Just type the SIM position number followed by START and the corresponding contact/number is dialed.
6.3.5 Memory status
GRETA can show how many contact spaces are used in total. Most of the SIM cards today can hold 200 contacts. This number, however, depends on the type of SIM card you were provided by your mobile operator. Please contact your MO for further information on the capacity of your SIM card.
6.4 Messages
6.4.1 Inbox
All incoming SMS are stored in the Inbox. SMS are listed chronologically with unread messages shown first. To read a SMS just scroll using and the message and press message will be shown in the screen. Print the message by pressing or delete the message by pressing
6.4.2 Delete All Messages
This function will delete all received messages and empty the inbox. You will be asked to confirm this action by pressing 1047 1 will can 1057 1
6.4.3 Print all SMS
To print a list of all SMS enter the Print all SMS menu and press: STAMP All SMS are printed in chronological order together with the senders numbers.
6.4.4 SIM Memory
GRETA can show how much space is used in total. Most of the SIM cards today can hold 25 SMS. This number, however, depends on the type of SIM card you were provided by your mobile operator. Please contact your MO for further information on the capacity of your SIM card.
6.5 Functions
6.5.1 Copy
If you have a scanned document in the memory pressing command generate a copy of the document/s. This button is also used to print contact details or SMS messages when in the respective submenu.

NOTE: After copying a document the document remains in the GRETA memory. You have to delete the document in order to be able to make voice calls or receive calls/faxes.
6.5.2 Forward feed scanner
In cases where a scanned paper is stuck in the scanner this button can be used to scroll the scanner roll forward.

NOTE: This function requires the fax to have power and will not work if the battery is empty and GRETA is not connected to the mains.
6.5.3 Print settings
A list of all current GRETA settings is printed.
6.5.4 Print activity report
The print activity report provides a list of the last 10 transmissions/receipes and includes a date/time stamp, the number called or caller number (if available), the transmission status, number of pages faxed/received (if applicable) and the duration of the call.
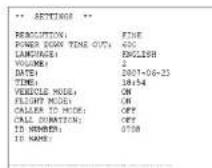
6.5.5 Print Menu tree
Prints out the menu tree with a list of all available functions. Including menu numbers for easy and quick access.

TIP 1: For quick access to a function Press Menu, the Function number and Start. For Example: to add a contact type H81 135 2-START
TIP 2: Keep assessed for 3 seconds and the menu tree will be printed.
7. Setup
7.1 Resolution
Sets the scanner resolution.
- LOW
High (Factory default)
7.2 Date & Time
Sets the date and time to be shown in the display and on printed information. The date has to be entered in full and is shown in DD/MM/YYYY format. The time is shown in 24h format.
7.3 Volume
Sets the volume of the beeper.
- Off
Low
Medium
High (Factory default)
7.4 Fax header
Sets the name and number to be shown on the top of the fax page. First type the user name that is to be shown on the fax header and then enter the number to be shown.

NOTE: If you enter a name and number it will always be shown on the top of the fax page sent.
7.5 Print out modes
GRETA can be set to only display information (except fax which is always automatically printed) on screen.
7.5.1 Number presentation
Sets whether to have incoming call numbers printed or only shown on screen. Factory default is off and number is only shown on the display.
- Off (Factory default)
- On

DTE: Missed calls will even be printed when number presentation is switched off.
7.5.2 Call duration
Sets whether to have the call duration printed or only shown on screen. Factory default is off and call duration is only shown on the display.
- Off (Factory default)
- On
7.5.3 SMS
Sets whether to automatically print SMS or only shown on screen. Factory default is on and all incoming SMS are printed out automatically.
-Off
- On (Factory default)
7.5.4 Activate all
Sets print out mode to active. Number presentation, call duration and SMS are printed.
7.5.5 Deactivate all
Sets print out mode to deactive. Number presentation, call duration and SMS are not printed and ONLY shown on LCD display.
7.6 Language settings
Sets the language version of GRETA from the list below.
- English (Factory default)
German
French
Spanish
7.7 Density control
7.7.1 Scan density
Sets the amount of illumination GRETA uses when a document is scanned. If the paper is thin, like freight documents, use dark density to obtain better contrasts.
Light
Normal (Factory default)
Dark
7.7.2 Print density
Depending on the content and quality of the document being printed use Print density to obtain better print contrasts. If the document is light use dark.
Normal (Factory default)
Dark
7.8 Font size
Sets the font size for print outs. Choose small to save paper.
Large (Factory default)
Small
8. Advanced Setup
8.1 Power-down time
Sets the power-down time after the last action, 600 minutes is the factory default and maximum is 999 minutes. In connection with Vehicle mode GRETA will switch off after the specified time once the vehicle is turned off.

NOTE: This function is disabled if a power charger is connected to the unit. Please observe that if the power down time is set to max it might cause your vehicle battery to be drained.
8.2 Power modes
Power modes is used to power on/off GRETA with special criteria's. Sets the power mode to be used by GRETA.
8.2.1 Deactivates all
Deactivates all power modes and GRETA can be powered on and powered down


8.2.2 Vehicle mode
GRETA can only be power up when a charger is attached. This function is the factory default in order to prevent accidental power on during transport. This function can be used in vehicles where the charger is connected to the vehicle system. GRETA will automatically power up when the ignition is turned on.
- On (Factory default)
- Off
8.2.3 Flight mode
GRETA's GSM module can be turned off in environments that prohibit use of radio frequency devices. All functions that are not GSM related can still be used.
- On
-Off

Emergency calls will not work when GRETA is set to flight mode as the GSM module is turned off!
GSM related functions will not work in flight mode.
- Flight mode needs to be set before entering areas prohibiting use of radio frequency devices.
8.3 Security
8.3.1 Key lock
To prevent accidental usage of the key functions GRETA can be set to lock all keys. Press and follow the on-screen instructions. To unlock the keys just press again and follow the instructions on the LCD.
On automatic key lock after 15 seconds
- Off (Factory default)
8.3.2 PIN request
Most SIM cards are delivered with PIN code request turned on. If you would like to turn off the PIN request every time GRETA is started you can select to switch it off.
- On (Factory default)
-Off
8.4 Call diverts
Sets the divert option for voice, fax and data calls to a user defined number.
8.4.1 Cancel all diverts
All diverts are deactivated. This is the factory default.
8.4.2 Divert voice calls
Incoming voice calls will be diverted to a user set defined number.
Divert all calls: All voice calls are diverted to a user defined phone number.
Divert if busy: Voice calls will be diverted to a user defined phone number when busy.
Divert if not answered: Voice calls will be diverted to a user defined phone number when not answered.
Divert delay: Voice calls will be diverted to a user defined phone number when not answered after x seconds.
Divert delay will only work if divert no answer is activated.
8.4.3 Divert fax calls
All incoming fax calls are diverted to a user defined fax number.
8.4.4 Divert data calls
All incoming data calls are diverted to a user defined data call.
8.4.5 Print all divert settings
Prints all current divert settings.
8.5 Network settings
8.5.1 Show networks
Displays a numeric list of all available networks.
8.5.2 Select network
When roaming you can choose an operator from the numeric list printed out in Show networks. The digit 0 activates automatic roaming (GRETA chooses the operator). The factory default is automatic roaming.
8.6 Error codes
| 1 | Error |
| 2 | Hangup |
| 3 | Busy |
| 4 | No answer |
| 5 | No carrier |
| 6 | Unexpected hangup |
| 7 | Unexpected response |
| 8 | No response |
| 9 | No dialtone |
| 10 | Document error |
| 11 | Action cancelled by user |
9. GRETA Manager and Drivers
GRETA can be used as a printer and scanner when connected to a laptop running Windows 2000 or XP with the supplied USB cable. In order to be able to use GRETA as a printer & scanner the GRETA Manager software and drivers on the supplied CD-Rom need to be installed.
Power up GRETA and connect the USB cable to your laptop and GRETA. Windows will automatically detect the new hardware. Insert the enclosed Possio GRETA installation CD and follow the on-screen instructions.
For a more detailed guide with screendumps please refer to the PDF on the CD named GRETA Manager Guide.
9.1 GRETA Driver installation
- Once GRETA is connected to your laptop Windows will automatically find the new hardware. Follow the on-screen instructions to install the USB drivers.
- Insert the GRETA Installation CD into your CD-ROM or DVD drive. When the Found New Hardware Wizard appears, select Install the software automatically (Recommended) and click [Next >].
- The Windows XP logo testing screen will appear and warn you that the driver has not passed Windows XP certification. Ignore this warning and Click [Continue Anyway].
- Once the installation is complete, click [Finish] to complete the first phase of installation.
- Windows will once again find a new hardware.
- Repeat steps 3 and 4 above
- Your new hardware is now installed and ready to use.
9.2 GRETA Manager installation
- In order to use GRETA as printer & scanner the GRETA Manager will have to be installed.
- Insert the GRETA installation CD and the setup should start automatically. If it does not go to D:( (where D: is your CD/DVD drive) and double click D:)(\text{SETUP})(\backslash)GRETA)(\backslash) setup.exe and follow the on screen instructions.
- Select a language from the list and click [Next >] to start installation.
- The installation preparation has been completed. Click the [Next >] button to start installation.
- Read the End-User License Agreement (EULA) and click [YES>] to accept it.
- Click [Finish] to complete the process. GRETA is now ready to be used for printing and scanning.
10. Starting GRETA Manager
A shortcut to GRETA Manager has been placed on your computer desktop. With GRETA Manager you can save scanned documents in GRETA to the PC and print PC files to GRETA.
10.1 Using GRETA Manager
- Click GET SCAN FILES to retrieve scanned documents from GRETA.
- Click [File] and [Save] to save scanned documents as jpg files to your PC.
- Click [Edit] and [Delete] to delete saved documents from your PC.
- Click [View] and [View PC File] to check the files status. If print is incomplete, the status is NEW. The print is completed, if status is OLD.
10.2 Printing with GRETA Manager
- Open the file to be printed.
- Click Print and choose GRETA printer from the printer list.

NOTE: GRETA Manager has to be running in order to print.
11.DoC/SAR/FCC
11.1 Declaration of Conformity
We, Possio AB of
Isafjordsgatan 35,8tr
SE-162 40 Kista, Sweden
Declare under our sole responsibility that our product GRETA GSM Fax & Printer and in combination with our accessories, to which this declaration relates is in conformity with the appropriate standards EN55022, EN55024, EN301489-1, EN301489-7, EN301511 and EN 60950, following the provisions of, Radio Equipment and Telecommunication Terminal Equipment directive 99/5/EC with requirements covering EMC directive 89/336/EEC, and Low Voltage directive 73/23/EEC.
Kista, October 2007
Ralf Wittig
Product Manager
11.2 FCC Statement
This device (GRETA US-version only) complies with Part 22 and 24 of the FCC rules. Operation is subject to the following conditions:
1) This device may not cause harmful interference, and
2) This device must accept any interference received, including interference that may cause undesired operation.
11.3 WEEE Disposal Instructions Instructions
Do not dispose of this device or its battery with unsorted household waste. Improper disposal may be harmful to the environment and human health. Please refer to your local waste authority for information on return and collection systems in your area.
POSSIO GRETA USER MANUAL
12. Troubleshooting
I cannot receive any fax pages?
Make sure that your SIM is properly inserted.
Make sure that you have a valid fax subscription from your mobile operator.
I can receive most faxes, but from some numbers GRETA just rings?
The transmitting fax might be connected to a type of digital switchboard which is not compatible to GSM faxing.
- The transmitting fax has its Baud-rate (transmission speed) set too high for GSM faxing. Adjust the Baud-rate to 9.6 kbps for better compatibility.
I cannot send faxes?
- The recipient fax might be connected to a type of digital switchboard, which is not compatible with GSM fax.
GRETA shows no signal?
Make sure your SIM card is properly inserted.
- Check that the antenna is correctly inserted.
Make sure that the antenna connector is not damaged. There should
be a small pin sticking out of antenna connector on GRETA. Inside a vehicle the GSM signal reception can be reduced due to insulation. Use an external antenna adapter (accessory) to connect a roof antenna mounted on the vehicle to improve signal level.
- Move GRETA to a place you know has good coverage and check again. You can check signal strength with another device e.g. mobile phone.
GRETA is not responding to any buttons pressed?
- Make sure that the key pad is not locked. To unlock the key pad press confirm with START
If GRETA is still not responding, reset GRETA by pressing simultaneously. - Connect GRETA to the mains. Your GRETA battery could be empty.
Paper is stuck?
- Should you experience paper congestion in the printer never use a sharp device to try and cut the paper. This could damage the printer head and result in poor print qualities. Contact your nearest service center.
- Should you experience paper congestion in the scanner press
- keep START pressed to forward scanner roll. If the battery is empty try pulling the paper out. Never use a sharp object to try and cut the paper. This could damage the scanner head and result in poor scan qualities.

Under no circumstances should you open GRETA as the warranty might be void. Contact your nearest service center, reseller or Possio to find out more. You can also find more information @ww.possio.com under Support.
GRETA USER MANUALPOSSIO
GRETA MANUEL DE L'UTILISATEUR
13. Technical specification
Features
Phone: Making and receiving phone calls using earpiece with microphone
Fax: Sending and receiving paper-based faxes. Fax standard organisation - ITU-T; Fax standard - T30; Fax Class II. Fax coding - Modified Huffman (MH). Transmission speed - 9600 bps
SMS printer: Automatic print out of short text messages (SMS)
Printer: Thermal printer, 15-meter paper roll capacity (approx. 50 A4 pages). Onboard emulation, Windows 2000 and XP compatible. 200 dpi x 100 dpi resolution
Scanner: Manual feed, multiple pages. On-board protocol, Windows 2000 and XP compatible. 200 dpi x 100 dpi resolution
Copier
Technical Details
Thermal data (Degrees Celsius)
During usage: -10°C to +45°C
Recommended: 0^ to +40^
Storage: -25°C to +70°C
Battery capacity: Internal NIMH-battery 1300mA
GRETA: 10 - 15 h in Standby mode, 120 h power down mode [off]
GSM interface: Siemens MC55 module [900/1800/1900 Mhz] EU/CHINA, MC56
module [850/1800/1900 Mhz] US
Electrical data
Scanning: 0.5-0.6A
Printing: 0.5-2 A (depending on the black content)
Charging: 0.85 A
Self-discharge of battery: 1.5% -2.5%
Paper
Paper thickness in scanner: Scanner takes paper up to 200g
Memory
Memory (4 MBit): 19/9 pages (Standard/Fine resolution) NB: (Image Memory is 2MBit)
Dimensions
(W)280mm, (D)150mm, (H)50mm
Weight
1087g
AC Adapter Manufacturer: DVE (DEE VAN ENTERPRIZE CO., LTD.), Model no.: DSA-0421S-12 2 42, Spec. : +12V, 3.5A
POSSIO
1. Cher client
7.5 Modes impression
11.1 Declaration of Conformity
We, Possio AB of
Isafjordsgatan 35,8tr
SE-162 40 Kista, Sweden
Declare under our sole responsibility that our product GRETA GSM Fax & Printer and in combination with our accessories, to which this declaration relates is in conformity with the appropriate standards EN55022, EN55024, EN301489-1, EN301489-7, EN301511 and EN 60950, following the provisions of, Radio Equipment and Telecommunication Terminal Equipment directive 99/5/EC with requirements covering EMC directive 89/336/EEC, and Low Voltage directive 73/23/EEC.
Kista, octobre 2007
Ralf Wittig
Product Manager
11.2 FCC Statement
This device (GRETA US-version only) complies with Part 22 and 24 of the FCC rules.
Operation is subject to the following conditions:
1) This device may not cause harmful interference, and
2) This device must accept any interference received, including interference that may cause undesired operation.
11.1 Declaration of Conformity
We, Possio AB of
Isafjordsqatan 35,8tr
SE-162 40 Kista, Sweden
Declare under our sole responsibility that our product GRETA GSM Fax & Printer and in combination with our accessories, to which this declaration relates is in conformity with the appropriate standards EN55022, EN55024, EN301489-1, EN301489-7, EN301511 and EN 60950, following the provisions of, Radio Equipment and Telecommunication Terminal Equipment directive 99/5/EC with requirements covering EMC directive 89/336/EEC, and Low Voltage directive 73/23/EEC.
Kista, Oktober 2007
Ralf Wittig
Product Manager
11.2 FCC Statement
This device (GRETA US-version only) complies with Part 22 and 24 of the FCC rules. Operation is subject to the following conditions:
1) This device may not cause harmful interference, and
2) This device must accept any interference received, including interference that may cause undesired operation.
(B) 280mm, (T) 150mm, (H) 50mm
Gewicht
1087g
AC Adapter Manufacturer: DVE (DEE VAN ENTERPRIZE CO., LTD.), Model no.: DSA-0421S-12 2 42, Spec. : +12V, 3.5A
POSSIO GRETA MANUAL DEL USUARIO
1. Estimado cliente
5.4 Inserting the SIM card

START
6.3.3 Editor contact
11.1 Declaration of Conformity
We, Possio AB of
Isafjordsgatan 35,8tr
SE-162 40 Kista, Sweden
Declare under our sole responsibility that our product GRETA GSM Fax & Printer and in combination with our accessories, to which this declaration relates is in conformity with the appropriate standards EN55022, EN55024, EN301489-1, EN301489-7, EN301511 and EN 60950, following the provisions of, Radio Equipment and Telecommunication Terminal Equipment directive 99/5/EC with requirements covering EMC directive 89/336/EEC, and Low Voltage directive 73/23/EEC.
Kista, octubre 2007
Ralf Wittig
Product Manager
11.2 FCC Statement
This device (GRETA US-version only) complies with Part 22 and 24 of the FCC rules.
Operation is subject to the following conditions:
1) This device may not cause harmful interference, and
2) This device must accept any interference received, including interference that may cause undesired operation.
Resolution: 200 x 100 ppp
Copiadora
Información técnica
(Anch.) 280 mm, (Fondo) 150 mm, (Alt.) 50 mm
Peso
1.087g
AC Adapter Manufacturer: DVE (DEE VAN ENTERPRIZE CO., LTD.), Model no.: DSA-
0421S-12 2 42, Spec.: +12V, 3.5A