3600N - Oven Vitrokitchen - Free user manual and instructions
Find the device manual for free 3600N Vitrokitchen in PDF.
| Brand | Vitrokitchen |
| Model | 3600N |
| Product type | Electric oven |
| External dimensions (W x D x H) | 520 x 440 x 360 mm |
| Internal dimensions (W x D x H) | 397 x 385 x 240 mm |
| Internal volume | 36 L |
| Power supply | 220-240 V, 50-60 Hz, 16 A |
| Total power | 2600 W (heating elements) |
| Thermostat | 50 - 250 °C |
| Timer | 0 - 90 minutes, automatic shut-off |
| Upper heating element | 650 W |
| Lower heating element | 650 W |
| Grill heating element | 1300 W |
| Turbo fan | Yes (13-15 W) |
| Rotisserie spit | Optional (4 W) |
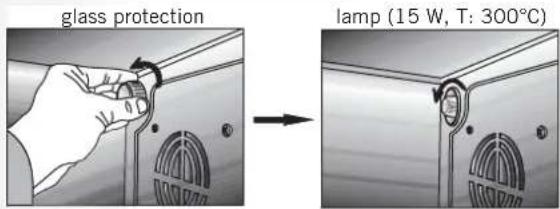
| Interior light | 15 W (T: 300 °C) |
| Hot plates | Optional: ∅80 mm (450 W), ∅145 mm (1000 W), ∅180 mm (1500 W) |
| Cooking functions | Using upper, lower, combined heating elements, with turbo, grill, rotisserie |
| Maintenance | Unplug, clean interior with soft cloth and soapy water, do not use abrasives or steam cleaner |
| Safety | Automatic shut-off by timer, hot surface, do not use damaged cable |
Frequently Asked Questions - 3600N Vitrokitchen
User questions about 3600N Vitrokitchen
0 question about this device. Answer the ones you know or ask your own.
Ask a new question about this device
Download the instructions for your Oven in PDF format for free! Find your manual 3600N - Vitrokitchen and take your electronic device back in hand. On this page are published all the documents necessary for the use of your device. 3600N by Vitrokitchen.
USER MANUAL 3600N Vitrokitchen
natural_image
3D rendering of a circular metallic object with a vertical line and a marked point labeled '10' (no text or symbols on the object itself)
natural_image
3D diagram of a square plate with labeled dimension '11' (no text or symbols beyond label)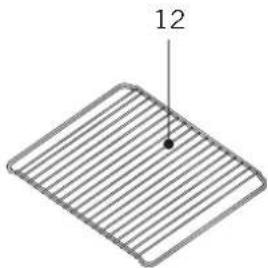
natural_image
Isometric view of a rectangular grid with a labeled point '12' (no text or symbols beyond the number)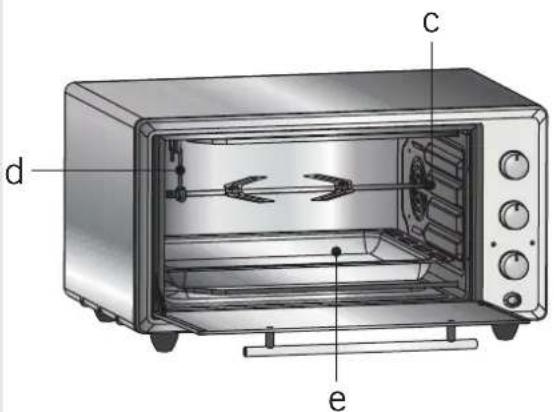
natural_image
Diagram of a person using a tool to interact with an object, labeled with points a and b (no text or symbols beyond labels)GB
WARNINGS
Pay attention to minimum health and safety requirements.
This appliance is not intended for use by persons (including children) with reduced physical, sensory or mental capabilities, or lack of experience and knowledge, unless they have been given supervision or instructions concerning use of the appliance by a person responsible for their safety.
The appliance is not intended to be operated by means of an external timer or separate remote-control system.
Keep the electrical cable of your oven away from the hot areas; do not let them touch the appliance. Keep them away from sharp sides and heated surfaces.
Usage of your appliance creates moisture and heath in the room it is placed, make sure that your kitchen is ventilated well. Maintain the natural ventilation ducts properly.
Do not touch hot parts with bare hands and keep children well supervised.
When the oven is hot never touch the oven glass by hand.
Before starting to use your appliance, keep curtain, tulle, paper or inflammable things away from your appliance. Do not keep combustible or inflammable things in or on the appliance.
- Use your oven production for cooking purpose. Please do not use except for purpose.
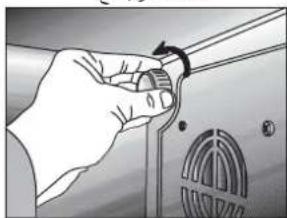
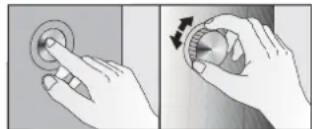
The pop-up knobs absolutely must be run push-off mode as following pictures for which models have pop-up knob.
natural_image
Two-step illustration showing hands using a rotary knob to press or adjust the dial (no text or symbols present)√ Please check the plug of power supply cord has a well connection with wall socket or not.
√ Please check the electric network.
√ Please check the fuse.
√ Please check power supply cord for any damage problems.
If you can not solve the problem, please apply manufacturer supplier services agent.
ELECTRICAL CONNECTION & SECURITY
Your oven is adjusted in compliance with 230-240 Volt AC, 50 Hz (for SA will be 220-240 Hz), electrical supply, and requires a 16 Amp (for England 13 Amp) fuse. If the mains are different from this specified value, contact an electrician or your authorised service.
Isolation switches for the oven must be accessible to the end user with the oven in place.
- Should you need to replace the 16 Amp plug top (for England 13 Amp), please ensure you rewire the plug as follows; - Brown live to the terminal
- Blue Neutral the terminal
- Yellow & Green Earth
Electrical connection of the oven should only be made using sockets with Earth system installed (for England B.S. Approved sockets with Earth system), and in compliance with Regulations. If there is no proper socket with Earth in place, immediately contact a qualified electrician. The Manufacturer will not be responsible for damage or injuries that can arise because of inappropriate supply outlets with no earth system.
If your electric supply cable gets defective, it should definitely be replaced by the authorized service or qualified electricians in order to avoid from the dangers.
Electrical cable should not touch the hot parts of the appliance.
The oven should be using a well ventilation place and should be install on flat ground.
Please operate your oven in dry atmosphere.
DESCRIPTION OF OVEN AND COMMAND PANEL (page 4)
1- Oven body
2- Hotplate (36 lt. option)
3- Command panel
4- Cavity
5- Glass lid of oven
6- Handle
7- Heating elements
8- Command knobs
9- Oven legs
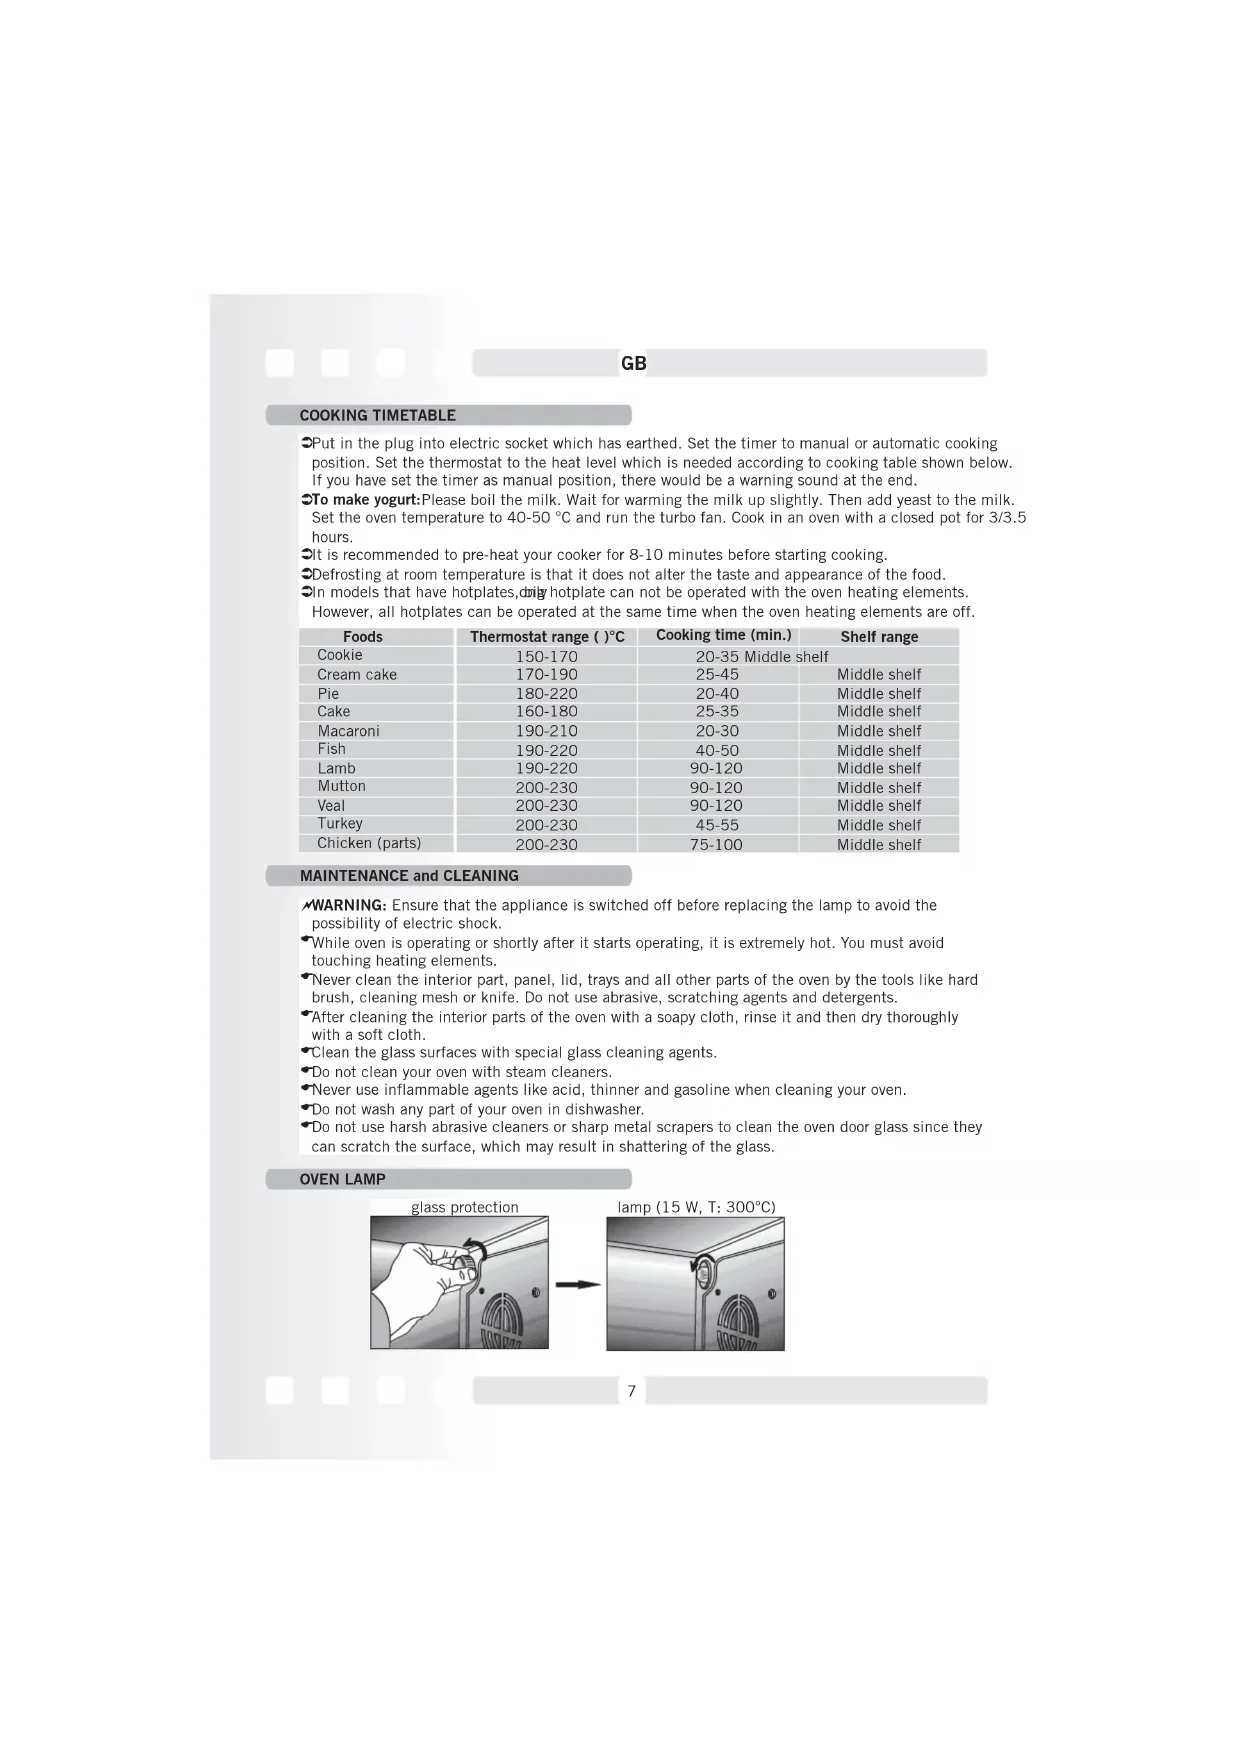
10- Circular tray
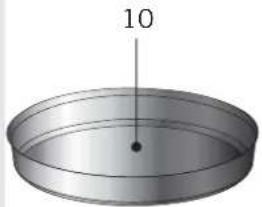
11- Oven tray
12- Wire grid
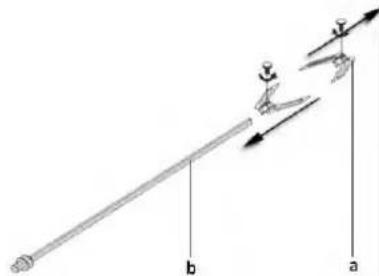
a- Swords
b-Spit
c- Motor slot
d- Hook
e- Place the oven tray onto the bottom heating element.
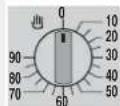

timer knob
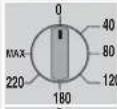

thermostat knob
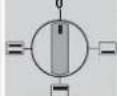

oven control knob
top heating element
bottom heating element
top and bottom heating element
bottom heating element with fan

top & bottom heating element with fan

grill heating element
turnspit (*)
hotplate(*)
TIMER KNOB: Turn the timer knob to right direction to set for requested level. At the end of the time period which has been set, there will be a warning sound. The electric would cut off automatically and also the cooker would turn off automatically. In order to turn off the cooker set the timer knob to zero point or set the oven knob to zero point. It helps setting the period of cooking time as requested. THERMOSTAT KNOB It can supply oven center temperature between 5022 0 °C
TECHNICAL FEATURES
| Specifications | M32 Series | M36 Series | M42 Series |
| Outer width | 480 mm | 520 mm | 590 mm |
| Outer depth | 358 mm | 440 mm | 470 mm |
| Outer height | 332 mm | 360 mm | 330 mm |
| Inner width | 364 mm | 397 mm | 440 mm |
| Inner depth | 315 mm | 385 mm | 420 mm |
| Inner height | 240 mm | 240 mm | 240 mm |
| Thermostat | 50 - 250°C (MAX) | 50 - 250°C (MAX) | 50 - 250°C (MAX) |
| Timer (*) | 0 - 90 d k. | 0 - 90 d k. | 0 - 90 d k. |
| Bottom heating element | 650 W | 650 W | 800 W |
| Top heating element | 650 W | 650 W | 600 W |
| Gril heating element (*) | 1300 W | 1300 W | 1200 W |
| Supply voltage | 220-240 V, 50-60 Hz. | 220-240 V, 50-60 Hz. | 220-240 V, 50-60 Hz. |
| Turbo fan (*) | 13 - 15 W | 13 - 15 W | 13 - 15 W |
| Turnspit (*) | 4 W | 4 W | 4 W |
| Oven lamp | ---- | 15 W | 15 W |
| Hotplate ∅80 mm (*) | ---- | 450 W | ---- |
| Hotplate ∅145 mm (*) | ---- | 1000 W | ---- |
| Hotplate ∅180 mm (*) | ---- | 1500 W | ---- |
(*): Only exist some models.
GB
COOKING TIMETABLE
- Put in the plug into electric socket which has earthed. Set the timer to manual or automatic cooking position. Set the thermostat to the heat level which is needed according to cooking table shown below. If you have set the timer as manual position, there would be a warning sound at the end.
To make yogurt: Please boil the milk. Wait for warming the milk up slightly. Then add yeast to the milk. Set the oven temperature to 40-50 °C and run the turbo fan. Cook in an oven with a closed pot for 3/3.5 hours.
It is recommended to pre-heat your cooker for 8-10 minutes before starting cooking.
Defrosting at room temperature is that it does not alter the taste and appearance of the food.
In models that have hotplates, daily hotplate can not be operated with the oven heating elements. However, all hotplates can be operated at the same time when the oven heating elements are off.
| Foods | Thermostat range ( )°C | Cooking time (min.) | Shelf range |
| Cookie | 150-170 | 20-35 Middle shelf | |
| Cream cake | 170-190 | 25-45 | Middle shelf |
| Pie | 180-220 | 20-40 | Middle shelf |
| Cake | 160-180 | 25-35 | Middle shelf |
| Macaroni | 190-210 | 20-30 | Middle shelf |
| Fish | 190-220 | 40-50 | Middle shelf |
| Lamb | 190-220 | 90-120 | Middle shelf |
| Mutton | 200-230 | 90-120 | Middle shelf |
| Veal | 200-230 | 90-120 | Middle shelf |
| Turkey | 200-230 | 45-55 | Middle shelf |
| Chicken (parts) | 200-230 | 75-100 | Middle shelf |
MAINTENANCE and CLEANING
WARNING: Ensure that the appliance is switched off before replacing the lamp to avoid the possibility of electric shock.
While oven is operating or shortly after it starts operating, it is extremely hot. You must avoid touching heating elements.
Never clean the interior part, panel, lid, trays and all other parts of the oven by the tools like hard brush, cleaning mesh or knife. Do not use abrasive, scratching agents and detergents.
After cleaning the interior parts of the oven with a soapy cloth, rinse it and then dry thoroughly with a soft cloth.
Clean the glass surfaces with special glass cleaning agents.
Do not clean your oven with steam cleaners.
- Never use inflammable agents like acid, thinner and gasoline when cleaning your oven.
Do not wash any part of your oven in dishwasher.
- Do not use harsh abrasive cleaners or sharp metal scrapers to clean the oven door glass since they can scratch the surface, which may result in shattering of the glass.
OVEN LAMP
USE OF DIGITAL TIMER(\*)
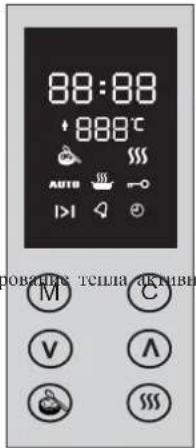
Screen symbols :

Symbol of yoghurt fermentation
Flashing: The yoghurt fermentation process is active
Flashing and Fade-Out: The yoghurt fermentation finished

Warm keeping symbol:
Flashing: The warm keeping is active
Flashing and Fade-Out: Temperature setting mode is active

Мигаст индикация :
«
Flashing: Automatic cooking function is active
Flashing and Fade-Out: Automatic cooking finished

Oven mode symbol :
Flashing : Oven is active
Not Flashing : Oven is off
Flashing and Fade-Out: WARNING! The oven is not getting hot, the mode switch is probably off

Child-Safety Lock symbol:
Flashing: The child-safety lock is active

Automatic cooking time setting symbol:
Flashing and Fade-Out: The cooking time setting is active, you can adjust it by using the buttons ∧ ∨
Flashing: The time remaining on the screen is in terms of hour-minute

The clock setting symbol:
Flashing and Fade-Out: The clock setting mode, by using the buttons A and V
you can make the adjustment.
Flashing: On the clock screen the current actual time is shown.

Remind timer (Minute counter) symbol is
Alerting: Alarm is active.
Flashing : The adjustment can be made by and V buttons or the alerting time is up.
Flashing and Fade-Out: The oven heaters are in use to raise the adjusted heat. After reaching the adjusted heat, it works as termostatic control indicator alerts while the resistances are inversion, fades away while they are not in use.
WHEN ELECTRICTY COMES :
When the electricity first came, the oven is deactive, the clock on the screen is 00:00 and AUTO
Is flashing. The heat screen is off. In that case, the clock can be set up by using ⑦ and ⑨
buttons and pushing Ⓜ button makes the oven active. If the Ⓜ button is pushed before setting
up the right time, the time on the screen will be shown up as the right time.
Please read 'CLOCK TIMING' section to set up the clock later on.
PS.: Please see the 'YOGHOURT FERMENTATION' section if the electricity goes off while
making yogn
MENU BUTTON :

It is possible to move between adjusting menus by pushing and leaving the menu button.
Alignment is cooking time,minute counter alert time and the real time clock menu. The symbols
(▶ 4 ○ ) belong to adjustment menu will be flashing, the adjustment of them will be possible by the possible by the buttons.
PS.: Pushing the button for a long time means going out from the position of the time adjusted Cooking (automatic). (Please see the revelant phagraph below).
TIME ADJUSTMENT:
You can step in the time adjustment menu by pushing Ⓜ button 3 times. ⏻ starts blinking and the clock is setting up by the Ⓥ button, pushing these buttons for a long time makes the clock set up quickly. The clock adjustment mode will end after around 5 seconds by Itself.
YOGHURT FERMENTATION FUNCTION:

Yoghourt fermentation function, if there is no cooking function in use, is getting started by Button and , symbol alerts and by the same button it ends.
As a default factory adjustment the fermentation has been set as 5 hours. The remaining time For the fermentation is shown on the time screen. Unless 📐 button is cancelled ( 🔊 is on the screen), user can adjust the remaining time.
In order to change the duration of the fermentation:
Press the button it will start flashing.
Adjust the duration by pressing the Ⓥ button on the screen (the duration cannot be set under 5 hours or over 10 hours)
When the fermentation process is finished, the alarm will sound and the 📄icon will start flashing on the screen. By pressing the Ⓜ button you can terminate the process or change the duration.
EXCEPTIONS:
If the oven temperature is over 60 C the fermentation process will not start. You will hear a warning tone and the phrase "hot" will be visible on the screen.
When power is cut off during fermentation, 3 beeps will sound and the remaining time (before the electricity was cut off) will appear flashing.
As mentioned above, the ⏻ button can be used to terminate the fermentation or to change the remaining duration.
KEEPING WARM FUNCTION

The keeping warm function will be activated when pressing the ⏻ button. You will see the icon on the screen. With this function, the oven temperature will be 80 C and will be kept constant, however the temperature will not be indicated on the screen. Changing the temperature is not possible (the Ⓐ button is non-functional) By pressing the ⏻ button again, this function will be canceled.
SETTING THE COOKING HEAT:

Besides the yogurt and keeping warm function you can use it for cooking as well. When pressing © The button, the 📁 icon will start flashing next to the temperature.
By pressing A and V you can set the temperature between 50 C and 230 C (if you don't have a set temperature, the preset factory temperature of 190 C will appear)
In order to switch off the temperature indication on the screen or to disable it, press and hold the Ⓒ button. The temperature will disappear and the oven heaters will turn off.
PERSONOLIZING THE FACTORY HEAT SETTINGS:
In order to change the preset factory temperature of 190 C, press Ⓒ and Ⓜ at the same time until you hear a short beep.
ATTENTION
The icon 🎨 means that the oven is in funtion. In other words, if the function OFF is not seen on the screen, it means that it is always turned on.
The icon flashing on the screen means that the oven isn't getting hot although there is a adjusted temperature on the screen or the fermentation process or warm keeping function is activated. At the beginning of this alert 3 times beep tones are heard for only 1 time.
Please make sure that the function switch is in OFF position, after having set the switch to the preferred cooking mode the oven begins to heat and after a while the symbol becomes fixed.
Manual cooking
When the switch is set to the preferred position and the temperature is fixed according to the description above the cooking process begins and continues until the user finishes it.
AUTOMATIC COOKING (TIME ADJUSTED)
By entering the cooking time you can programme you oven so that it will be off automatically.
Press the button Ⓜ one time. The >I icon starts to flash.By using the buttons Ⓧ and ⛆ Please set the cooking time ( Max. 10 Hours) AUTO icon will appear on the screen.
In any moment of the program you can finish the cooking by pressing the Ⓜ button for 3 seconds. The icon will disappear on the screen. In this case the cooking will take so long until the oven is switched off by the user. (Manual cooking mode)
After finishing of the cooking time automatically the icon AUTO will appear on the screen with a acoustic alarm. (The acoustic alarm will be heard for 7 minutes as long as any button is not pressed)
The AUTO icon will flash until the M button is pressed and the oven will be deactivated. By pushing the button the oven will come to the manual mode, the AUTO icon will disappear. Attention: do not forget to set the switch to the OFF position.
REMINDER TIMER SETTING
With this function at the end of the adjusted time the oven clock alarm starts to sound and lets know that the time is over. At the end of this time the oven is not switched off.. The M button is pressed 2 times, the icon starts to flash, by using the A and V buttons the preferred time is set. The maximum setting alarm time is 23 hours and 59 minutes. After 5 seconds the icon Becomes fixed on the screen and the time beging to run. After the time setting is over the alarm begins to sound. The icon begins to flash on the display. By pushing any button the alarm sound can be switched off and the symbol disappears on the display. If the alarm isn't stopped, it will automatically finish after 7 minutes.
GB
CHILD PROOF FUNCTION
[Non-Text]
This function prevents any attempts to change your timer settings by key lock. While child proof function is ON, none of the keys will be functioning unless you keep push By the cancellation of the key lock, keys will become able to use back. To activate the Child Proof, push key (app. 3 seconds) until you see icon on the screen. To deactivate the Child Proof push
same key until icon disappears from the screen.
Attention: If the alarm rings while Child Proof is active, it can be put to silence by pushing any key. Safety Lock function will continue.
FAILURE MESSAGES
Flashing ; It means your oven is not warming. Be sure that Function Switch is not at 0 position and check your oven door closed. If problem continues please call Technical Service.
Err1 Heat Sensor open-circuit failure; Push Ⓜ key. If the failure message does not disappear from screen please call Technical Service
Err2 Heat Sensor short-circuit failure; Push Ⓜ key. If the failure message does not disappear from screen please call Technical Service
Err3 Oven heat exceeds maximum limits electronic circuit failure; Push Ⓜ key. If the failure message does not disappear from screen please call Technical Service
Attention: At the first moments of a failure message appears on the screen, a fleeting audible warning will sound
DE
WARNHINWEISE
natural_image
Illustration of hands using a rotary dial tool to interact (no text or symbols present)FALLS IHR BACKOFEN NICHT FUNKTIONIERT,
natural_image
Illustration of hands using a rotary knob to interact with a dial (no text or symbols present)natural_image
Illustration of two hands interacting with a circular button, one pointing at the button and the other holding a curved object (no text or symbols present)SI VOTRE FOUR NE FONCTIONNE PAS
natural_image
Illustration of hands using a rotary knob to interact with a dial (no text or symbols present)ALS UW OVEN NIET FUNCTIONEERT
natural_image
Illustration of two hands holding a circular device with a pointer, showing the change in the interior (no text or symbols present)natural_image
Illustration of a hand holding a circular device with a knob, showing the mechanism of rotation and adjustment (no text or symbols present)
natural_image
Interior view of a double door with decorative window and circular vent (no text or symbols)محافظة الزجاج