BO243EAE - Oven BOMPANI - Free user manual and instructions
Find the device manual for free BO243EAE BOMPANI in PDF.
User questions about BO243EAE BOMPANI
0 question about this device. Answer the ones you know or ask your own.
Ask a new question about this device
Download the instructions for your Oven in PDF format for free! Find your manual BO243EAE - BOMPANI and take your electronic device back in hand. On this page are published all the documents necessary for the use of your device. BO243EAE by BOMPANI.
USER MANUAL BO243EAE BOMPANI
8.2.Fase 2-Power Board
2. USER INTERFACE WITH TOUCH KEYS AND DISPLAY 5
2.1.Key functions 5
2.2. "Time" key cyclical functions 5
4 CARE AND CLEANING 1
4.1 Cleaning 1
4.2 Maintenance 12
5. REGULATIONS, GENERAL SAFETY AND ENVIRONMETAL PROTECTION 13
5.1. REGULATIONS 13
5.1.1 Disposal: Packaging and decommissioned appliance 13
5.1.2. Materials in contact with foods, information for users 13
5.2.GENERAL SAFETY 13
6. FOR THE INSTALLATION ENGINEER 14
6.1. Technical data 14
6.2.Pre-installation procedures 14
6.3. Building in the oven 14
6.4. Connecting to the electrical mains.. 15
7. GENERAL PRECAUTIONS 15
7.1.Oven accessories 15
7.2.“Pull-out oven runners"ki1 15
8. ASSISTANCE - DIAGNOSTIC MODE 15
8.1. Phase 1 - Display Board 15
8.2. Phase 2 - Power Board. 15
9.MALFUNCTION SIGNALS. 16
9.1.Detecting malfunctions 16
9.2. Over-heating 16
Figures. 1/
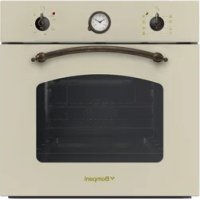
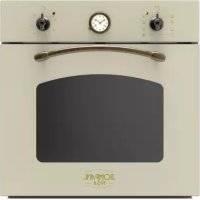
Congratulations on your purchase of an oven from the BOMPANI iTALIA collection. This new product, designed and produced with quality materials, combining innovation and technology, is intended to assist you in putting your recipes into practice. We therefore ask that you read and follow the easy instructions which will enable you to achieve excellent results right from the very first times: they contain important information concerning the safety, use and maintenance of the appliance. This instruction manual covers the various versions of the product. Kindly ignore the sections relating to accessories or instruments not featured on the appliance you have purchased
BOMPANI IALIA . accepts no responsibility for injury or damage deriving from poor installation or incorrect use of the appliance.
When contacting your dealer for spare parts, it is essential to state the model number and the serial number, on the nameplate visible when the oven door is opened.
Appliance producers are required to comply with a variety of regulations, and with this in mind, when possible, in the production of its appliances BOMPANI ITALIA includes innovative features intended to further improve safety and environmental protection.
All BOMPANI ITALIA products therefore comply with:
Directive 2006/95/EC applying to electrical products operating on low voltage.
- The directive requires electrical and electronic materials intended for use at voltages between 50-1000 VAC and 75-1500 VDC to be constructed to proper standards concerning safety both in the home and in industrial contexts. The Directive applies to electrical appliances in general, and its main aim is to prevent all risks relating to the use of electricity.
- EUROPEAN REGULATION 1935/2004, covering materials and objects intended for contact with foods.
- Directive 2002/95/EC, which aims to limit or prohibit the use of specific hazardous substances, in the awareness that the value of a product also depends on the social worth which it generates;
- Directive 2002/40/EC, the reference standard which applies the old Directive 92/75/EEC with regard to the labelling of domestic electric ovens in relation to energy consumption;
- Directive 2004/108/EEC which relates to electromagnetic compatibly requirements. This directive aims to regulate the signals which appliances emit during normal operation, and to protect the public telecommunications networks from damage of all kinds;
- Directive 2012/19/EEC (WEEE), concerning waste from electrical and electronic equipment, in the awareness that appropriate separate disposal ready for recycling of decommissioned appliances, and environment-friendlyly processing and disposal of waste, help to prevent possible harmful impacts on the environment and health and encourage the recycling of the materials of which the product consists.
BEFORE USING THE APPLIANCE, READ THE INSTRUCTIONS CAREFULLY AND KEEP THEM IN A SAFE PLACE FOR FUTURE REFERENCE
FOR YOUR SAFETY
Each user is responsible for using the appliance purchased correctly and keeping it in good condition
The appliance must not be used if damaged (see After-Sales Service).
- All repairs must be carried out by one of the manufacturer's authorised service centres, using original spare parts. Failure to comply with these rules may reduce the appliance's safety.
- The appliance may only be connected to the electrical mains by authorised personnel in accordance with all relevant regulations concerning electricity supplies, and the legislation containing building regulations in force in the various countries.
- Disconnect the appliance from the electrical mains before carrying out any cleaning or servicing operations
- Do not disconnect the plug from the power socket by pulling on the power supply cable; disconnect it gently to avoid breaking the electrical wires inside.
- Take care not to place the power supply cables in contact with parts which heat up during use or which might cause crushing.
- Never keep inflammable, explosive or non heat-proof items such as paper, rags or detergents inside the oven; they may catch fire when the oven is used.
- Although our product complies with the regulations concerning surface temperatures ("cold door"), children should be kept away from the oven's control panel and door when it is in operation.
- Always wear oven gloves when placing pans in or removing them from the oven.
- Always keep an eye on foods when cooking, since the oils and fats used are easily inflammable. Remove fat deposits and other food residues before using the oven again.
- Do not place heavy items on the open oven door; this may damage the hinges.
- Damage caused by failure to comply with these instructions is not covered by the warranty entitlement
FIRST START-UP
- Disconnect the appliance from the electrical mains as for any cleaning or servicing operation.
- Remove the accessories from the oven.
- Removal all packaging residues, e.g. any polystyrene fragments, from the oven.
Then proceed as follows:
- Remove the shelves from the oven
- Clean the oven and accessories with a hot commercial cleaning solution.
- Wipe the exterior with a damp cloth.
- Put the shelves back in place.
- Heat the oven for the first time empty with the thermostat at the highest setting and the door closed for at least 30 minutes. Then switch off the oven, open the door and ventilate the kitchen. The smell noticed is due to the evaporation of the substances used to keep the oven in good condition.
Use commercial solutions which are not harmful for the environment or health; do not use products with excessively aggressive chemical ingredients.
For subsequent cleaning procedures, refer to the instructions in section 4.
Before starting up the appliance, inspect it carefully for damage. If the damage is due to transport of the product, notify your nearest after-sales service centre without delay.
WARNING : Repairs under warranty in the event of damage to the product's appearance are only possible during delivery and commissioning of the appliance; the purchaser is therefore responsible for checking that it is in good condition. In the event of malfunctions, contact the after-sales service without delay, following the manufacturer's recommended procedures described in the After-Sales Service section.
1. GENERALITIES
WARNING : Installation must be carried out by qualified individuals, who must follow the instructions indicated in this booklet and those provided for by law (Law n.46, dated 03/05/1990 - System Safety Standards).
2. USER INTERFACE WITH TOUCH KEYS AND DISPLAY

2.1 Key functions
| FUNCTION KEY (description from right to left) |
| 1 0/I Turns on the oven and activates the -/+ key for cooking method selection |
| 1 + 0-n Child safety: press the 0/I for 4 seconds |
| 2 + Increases the time and selects the cooking method |
| 3 - Decreases the time and selects the cooking method |
| 4 Time: selects the time functions in sequence( see following table) |
| 5 Boost: Fast pre-heat option |
| 6 + Increases the temperature |
| / - Decreases the temperature |
Automatic repeat combined with the “-” and “+” keys if kept pressed: one increment every 500 ms during the first second, one increment every 200 ms to follow.
2.2. "Time" key cyclical functions
If repeatedly pressed, the following sequence will be displayed:
| Pulse | Displayed after pressing | Action | Display shows after 2 seconds | Azione Utente tramite "+" o "-" |
| 1 | (bell) | None | fl ashes as default value, other wise current value Alarm signal time adjustment | Set alarm signal time |
| 2 | (dur) | None | fl ashes as default value, other wise current value Alarm signal time adjustment | Set cooking length time adjustment |
| 3 | (End) | None | the result between current time/hour and length (default or current) in fl ashing mode | Set cooking end time |
| 4 | (hour 9) | None | Flashing clock | Set actual time (clock) |
When the control is first turned on, the display shows the clock set at 12:00, which can be increased by one unit every minute. The oven is off and the possible operations for unblocking it are: the "Clock setting" procedure or, in alternative, directly turning it on. The detailed operations for setting the clock, the timer, duration, and end of cooking process are indicated in the relevant paragraphs that follow. Through a single setting key, the oven cyclically enters into the display and modification mode (shown on the flashing display), in which the "+" and "-" keys are activated to correct the value indicated on the display. This value is, however, accepted after 4 seconds from the last time the key is pressed (the display stops flashing).
3.1. CLOCK SETTING
Scroll through the menu with the Timer Mode key until "hour" is displayed, and set it using the "+" and "-" keys. The clock can only be set with the oven in stand-by
3.2.TURNING OVEN ON/OFF
Press and release the "O/I" key. "ON" will appear on the central display, the symbol lights up, as well as the light inside the oven. It after a minute a cooking mode was not selected, the oven and the symbol turn off, and "OFF" will appear on the display. To turn the oven off during cooking, press and release the 0/I key. With the key activated, it must be released at least 1" after being pressed.
3.3.TIMER
This function does not interact with loads, and it is always available regardless of the state the oven is in. Press the "Time" key, the bell symbol lights up, and the display shows what is explained in paragraph 2.2. Set the desired value in minutes using the "+" and "-" keys, up to a maximum of 180 minutes. After 4 seconds without increasing or decreasing, the information is accepted, and the bell remains lit. Once the time set has lapsed, an acoustic signal is heard, and the bell symbol flashes. To stop both the acoustic signal and the flashing symbol, just press any key; its associated function is normally not carried out (it is only needed to stop the signal).
3.4. SEMI-AUTOMATIC COOKING TIME FUNCTION
Turn the oven on, as indicated in paragraph 3.2. Pres and release the "Time" key, until "dur" appears. Set the time required for cooking using the "+" and "-" keys, up to a maximum of 180 minutes. Select a cooking function among those available, as indicated in paragraph 3.9: the oven will suggest a predetermined temperature. The temperature can be changed. After 4 seconds from the last time the key was pressed, the oven turns on for the time set. After the time defined has ended, the oven enters the Cooking Ended mode.
3.5. SEMI-AUTOMATIC COOKING END FUNCTION
Turn on the oven as indicated in paragraph 3.2. Press the "Time" key until "End" appears. Use the "+" and "-" to set the cooking end time, which must occur within the next 23h59m . To enter the time, the same steps should be followed as those for the clock setting (current time). After 4 seconds from the last time the key was pressed, the oven turns on for the time set. A cooking function among those available can always be selected. The oven suggests a predetermined temperature. The temperature can be changed. Once the time specified has bee reached, the oven enters into the Cooking End mode
3.6.AUTOMATICFUNCTION
Turn the oven on as indicated in paragraph 3.2. Press and release the "Time" key until "dur" appears. Set the cooking time required using the "+" and "-" keys, until a maximum of 180 minutes. Press the "Time" key again until "End" appears. Use the "+" and "-" keys to set the cooking end time, which must occur within the next 23h59m. After 4 seconds from the last time the key was pressed, the oven enters the delayed start mode: it will then automatically turn on for the length of time specified and will stop at the stop time specified, entering the Cooking end mode. Even during the delayed start phase, the temperature and the function are both displayed, and both can be changed. All the oven loads are deactivated once the oven must start. The symbol will show the element selected, but will maintain the light off symbol and the stopped fan symbol. The tangential fan runs according to the indications specified in paragraph 0, while the oven light is separately illustrated in paragraph 3.13
3.7. COOKING END MODE
Once the timed cooking process has terminated, the oven turns off all the loads, and a triple intermittent acoustic signal of average intensity is heard. The display temperature and functions turn off. The clock display shows the time, and the two "pot" and "auto" symbols flash. I do unblock the oven, just press any key among those positioned under the display: the acoustic signal stops, and the oven is ready to receive new commands. It is possible to immediately select a new cooking function, or completely turn off the oven by pressing the "O/I".
3.8. CLOCK DISPLAY SYMBOLS
3.8.1. Pot
If lit, it indicates that the cooking function is active, even in manual mode. The "Light" and "Defrost" functions are not considered cooking functions, therefore, it remains off. If this symbol is flashing, it indicates the end of the timed cooking phase. During the delayed start mode, it remains off, and then lights up when cooking starts.
3.8.2.Auto
This is normally off. If lit, it indicates that a cooking time has been selected (the oven is not in manual mode), therefore, it is completed with the PoI symbol. If fl ashing, it indicates the end of the timed cooking phase
3.8.3.Bell
Normally off. If lit, it indicates that the timer is active. If fl ashing, it indicates that the timer has enc
3.9. COOKING MODES SELECTION
By pressing the "+" or "-" key, what is indicated in column 1 appears on the central display of the clock for 3 seconds ever 10 (alternating with the clock), on the symbol, what is indicated in column 2 appears on the symbol, and the default value appears on the temperature display.
| Functions electric oven | Grill | Top heating el | Bottom heat- ing | Oven far | Oven light | Rotisserie. | Cooling fan radale | T. min.(℃) | T. default (℃) | T. max (℃) | Tangential far | Tangential tan | ||
| On | Light | X | --- | --- | --- | 16C | 110 | |||||||
| Pr 01 | Oven Static | X | X | X | 5C | 20C | 25C | 200 | 110 | |||||
| Pr 02 | Top heating element | X | X | 5C | 20C | 25C | 16C | 110 | ||||||
| Pr 03 | Bottom heating ele- men! | X | X | 5C | 20C | 25C | 200 | 110 | ||||||
| Pr 04 | Grill | X | X | X | L' | L2 | L5 | 16C | 110 | |||||
| Pr 05 | Grill strengthened | X | X | X | X | L' | L4 | L5 | 16C | 110 | ||||
| Pr 06 | Grill strengthened fan | X | X | X | X | 5C | 18C | 20C | 16C | 110 | ||||
| Pr 07 | Oven Static + fan | X | X | X | X | 5C | 175 | 25C | 200 | 110 | ||||
| Pr 08 | Oven fan circular | X | X | X | 5C | 175 | 25C | 200 | 110 | |||||
| Pr 09 | Pizza (Bottom + fan) | X | X | X | 5C | 20C | 25C | 200 | 110 | |||||
| Pr 10 | Defrost | X | 0 | dEF | 0 | --- | 110 | |||||||
| FPH | -- | Circular + Bottom + far | X | X | X | --- | --- | --- | 16C | 110 |
Safety device
In order to prevent the appliance from overheating, the oven is fitted with a safety device tripped in the event of a main thermostat failure. This cuts off the electricity supply: do not attempt to repair the fault yourself; call your nearest Service Centre
The oven should be left to heat up for at least 10 minutes before food for cooking is placed inside it.
When cooking in fan mode, two shelves can be filled at the same time. However, if the amount or type of foods is changed, cooking times also change.
Using the cooking functions
Defrosting
Turn the selector knob to the symbo and leave the thermostat on zero. The fan in the bottom of the oven circulates the air around the food at room temperature. It is ideal for detroasting any type of food, but especially for delicate foods where no heat is required, such as: frozen cakes, custard or cream cakes and fruit desserts.
Conventional Cooking
Turn the selector knob to the symbol and set the thermostat on the temperature required. Heat is delivered from above and below, and the food is cooked evenly.
Fan Cooking
Turn the selector knob to the symbol and set the thermostat on the temperature required. In this cooking mode, the heat inside the oven is circulated through it by a fan. This provides more uniform heat distribution, and thus gentler cooking. This function is also useful for cooking several dishes at once, on different shelves. In this case the top runners and the third runners from the bottom should be used. When cooking just one dish, place the shelf on the lowest runners for the best results. This function is ideal for cooking souffies, which need delicate, even cooking
Cooking meat and fi sI
Meat can be placed in oven-dishes or pans, or straight on the shelf. If using only the shelf, ALWAYS pour a little water into the dripping pan and fit it onto the runners underneath the shelf. The dripping pan will collect the fats which melt during cooking, and the water will prevent the fats from burning and generating unpleasant smells or smoke. White meat, poultry and fish generally require cooking at a medium temperature (between 150 and 250 degrees); to cook red meat "rare", use temperatures between 200 and 220 degrees for short times.
Cooking pizza
To cook pizza, use the function: this programme uses the bottom heating elements and the fan. This combination heats the oven quickly, with most of the heat delivered from underneath. If more than one shelf is used at a time, their positions must be swapped halfway through the cooking process. The recommended temperature is 220^ for an average cooking time of about 15-20 minutes.
Cooking confectionery
Cakes need a medium temperature, from 160^ to 200^ C. Before starting cooking, the oven should be left to warm up for about 15 minutes: try not to open the oven door once cooking has started.
| Food for cooking Weight | (kg) | Cooking shelf position from the bottom | Temperature (°C) | Preheating time (minutes) | Cooking time (minutes) |
| Pasta: Lasagne | 2.5 | 2 | 210 | 10 | 60-75 |
| Cannelloni | 2 | 200 | 10 | 40-50 | |
| Paste au gratin | 3 | 200 | 10 | 40-50 | |
| Meat: Veal | 1.7 | 2 | 220-250 | 10 | 120-160 |
| Chicken | 2 | 200-220 | 10 | 45-60 | |
| Duck | 2 | 200-220 | 10 | 100-110 | |
| Rabbit | 2 | 200-220 | 10 | 70-80 | |
| Lamb | 2 | 200-220 | 10 | 90-95 | |
| Fish: Mackerel | 1.1 | 2 | 160-220 | 10 | 45-70 |
| Dentex | 2 | 160-220 | 10 | 45-70 | |
| Trout baked on paper | 2 | 160-220 | 10 | 45-70 | |
| Pizza: Neapolitan style 1.0 1-3 | 200-230 15 | 10-20 | |||
| Cake: Biscuits | 0.5 | 2-3 | 160-180 | 15 | 30-50 |
| Fruit tarts | 2-3 | 160-180 | 15 | 30-50 | |
| Quiches | 2-3 | 160-180 | 15 | 30-50 | |
| Ckes with yeast | 2-3 | 165 | 15 | 30-50 | |
| Grilling: Spit-roast veal | 1 | 2 | - | 5 | 15-20 |
| Spit-roast chicken | 2 | - | 5 | 20 | |
| Hamburger | 2 | - | 5 | 7 | |
| Mackerel | 2 | - | 5 | 15-20 | |
| Toasted sandwiches | n° 4 | - | 5 | 5 |
NB: Cooking times are guideline and may be varied to suit personal taste.
3.9.1. Special Booster Fast Pre-Heat Program
The special Booster program allows for fast pre-heating of the oven through a particular combination of loads that are active during pre-heating.
Specific cities of the Booster mode
- Can only be selected if a timed cooking mode is not programmed
- Cannot be activated in during the following functions:
a) Grill
b) Double Gril
c) Defrost/Chafing are:
To activate the Booster:
- press the BOOST key
- on the clock display, "BOOST" appears flashing
When the Booster is active - the symbol continues to display the function normally select, but the Power board is actually informed to carry out a different combination of loads.
- The temperature indicated is free and can be further modified
- I he function that will be carried out at the end of the Booster cycle cannot be changed
When pre-heating has terminated, "BOOST" disappears, and the Power board carries out the function that is actually represented by the symbol.
I do deactivate the Booster after it was activated:
- Press "BOOST". The Booster mode is deactivated, and the actual function is reset.
3.9.2. Special Booster Super-Fast Pre-Heat Program
Program that is an alternative to the traditional Fast Pre-Heat program. The loads selected are recurrent
- Circulation + Fan for 15 seconds
- Grill + Top + Fan for 15 seconds (Top = upper resistance)
- Bottom + Top + Fan for 15 seconds (Bottom = lower resistance
3.10. COOKING TIME SELECTION
Using the "+" and "-" keys, the temperature varies between the minimum and the maximum expected for each cooking mode with increments of +/- 1 degree that are shown on the temperature display
3.11. OVEN OFF MODE AND RESIDUAL HEAT INDICATOR
When powered-up, and when there is no function selected, the temperature display and programs are normally off, while the timer display shows the time.
If the oven is still hot when turned off, the temperature display indicates the residual heat
The 4 level bar indicated the actual oven temperature:
i. If t probe >200^ 1st, 2nd, 3rd on; 4th fl ashes
ii. Se 200 > t_- probe >150^ 1st, 2nd on; 3rd fl ashes ; 4th off
iii. If 150 > t_ probe > 100^ : 1st on, 2nd fl ashes a; 3rd, 4th off
iv. If 100 > t_ probe > 50^ : 1st fl ashes; 2nd, 3rd, 4th off
v. If 50 > t_- probe: 1st, 2nd, 3rd, 4th off
3.12. «CHILD CARE » CONTROL LOCK FUNCTION
Keeping the "ON/OFF" key pressed for at least 6 seconds, the oven enters in the child safety mode. The display shows "n--O" followed by "On", and the time reappears. On the temperature display, the lock symbol will remain lit until the "Child Care" is active. If this block is activated after any type of cooking setting (manual, semi-automatic, automatic), the settings programmed can be displayed but modifi cations cannot be made an "n--O" on the central display will be a reminder that the function is active.
Manually or automatically turning the oven off will not deactivate the control lock mode. To deactivate, the "ON/OFF" key must be pressed for at least 6 seconds. The display shows "n--O", followed by "OFF", then the time reappears.
When the oven is blocked, it cannot be turned on by pressing the "O/I" key.
3.13.OVEN LIGHT CONTROL
Once the desired function has been chosen, until the end of the pre-heating cycle, the oven light remains lit. After 3 minutes, the oven light turns off. While waiting for the delayed start mode, the oven light remains off.
The oven light turns on automatically once any key is pressed (and its associated theoretic function is not carried out), then it turns off after 1 minute
3.14. PRE-HEATING BAR
This bar furnishes pre-heating indications, and signals the heating phase when cooking is in process. During the pre-heating phase, the 4 level bar visually indicates what remains to reach the requested set-point:
i. If k > 75% : 1st, 2nd, 3rd on; 4th fl ashes
ii. If 75% > k > 50% : 1st, 2nd on; 3rd fl ashes; 4th of
iii. If 50% > k > 25% : 1st on, 2nd fl ashes; 3rd, 4th of
iv. If 25% > k : fll ashes; 2nd, 3rd, 4th off
At the end of the pre-heating phase, and during the cooking phase, the bar always remains lit: 1st,2nd,3rd,4th on
3.15. TANGENTIAL FAN CONTROL
3.15.1. Select a cooking cycle
The tangential turns on, regardless of the central oven temperature, after 15 minutes from selection or, however, even before, if the temperature detected on the probe is higher than the "power threshold" value. During the "DEFROST" function, the tangential fan is immediately activated.
3.15.2. Cooking cycle stop (Off, stand-by)
When a cooking cycle ends, an observation phase begins, which lasts 20 minutes, during which the tangential is turned off if the temperature is lower than the "power threshold" value.
After these 20 minutes, the tangential remains off, regardless of the temperature.
3.15.3. Power board sensor automatic function
A temperature sensor is installed on the Power board. When it detects a value >80^ , the tangential is forcedly activated, regardless of the previous logistics.
3.16.ANNULLING COOKING END AND LENGTH SETTINGS
The cooking length and cooking end can be annulled by pressing the Funz + key during the cooking length setting phase: the oven remains on and is automatically set to the indefinite time manual function mode, as described in the paragraph ...
Otherwise, the oven can be turned off completely by pressing the ON/OFF key
3.17.ANNULLING TIMER SETTINGS
During the timer setting phase, the current value can be annulled by pressing the Funz - key.
4. CARE AND CLEANING
Kindly ignore the sections relating to accessories or instruments not featured on the appliance you have purchased.
4.1. Cleaning
Oven Cleaning Advice
The first rule is to clean the oven often. For natural cleaning, use only hot water with bicarbonate of soda and/or lemon juice and/or white wine vinegar dissolved in it.
- Do not use steam-cleaners.
- Detergents should not be sprayed straight onto the controls area; use a sponge.
- Never clean glass when still hot as the temperature difference may cause it to shatter. Always wait for glass to cool down to lukewarm.
- Never use those cleaning products which contain caustic soda, solvents or many other harmful substances, since there is a risk that they might not be completely removed after use, and the residues left in small cavities within the oven might be released onto the foods cooked later.
To clean an oven which is not very dirty, wipe half a lemon over the surface, leave to dry and then wipe with a damp sponge to remove the residues of dirt and lemon juice.
- If the oven is very greasy, put a pan containing two litres of hot water containing a spoonful of ammonium inside and leave it overnight. Wipe the grease off with a sponge next morning.
If you are going to cook particularly greasy foods, deposits can be prevented by protecting the bottom of the oven with a sheet of aluminium foil, which can easily be removed with the grease residues at the end of the process.
- When using detergents, keep the environment in mind and follow the producer's instructions. The market now offers a variety of concentrated solid or liquid detergents with lower environmental impact.
- The oven should be rinsed with plenty of water and dried after cleaning.
Except for the runners, the oven accessories can be washed in the normal way, even in the dishwasher
- For superficial scratches, apply a special cleaner/polish for stainless steel, using a soft cloth
- Do not use silver-cleaning products
Cleaning Stainless Steel
Care and cleaning of the oven you have purchased are important to keep the steel bright and uniform over time. The stainless steel used for the manufacture of our ovens is Silver Ice, finished with a special anti-fingerprint treatment that keeps it shiny even after use. We advise you never to use abrasive sponges, scouring pads, wire wool, acids or products which might scratch the surface. Clean it with soft cloths and ordinary, absolutely non-abrasive washing-up liquid; creams are not recommended because they contain tiny abrasive particles which might leave marks on the steel.
Cleaning Enamel and Glass
Enamel is a vitreous finish with excellent resistance to heat and acids. Like glass, it may be damaged by prolonged contact with acids, sc spills of tomato sauce, lemon and vinegar should be wiped off immediately. Use bicarbonate of soda or non-abrasive cream cleaner for the most stubborn stains. Never use descaler products: they might cause irreparable damage to the enamel. Oven interiors are also enamelled and must be cleaned using specific products, easily available from retailers. It is best to clean the oven after each use, while still warm. We advise you not to allow dirt to build up over time since it is more difficult to remove layers of dirt and there is a risk of leaving permanent marks on the enamel
Cleaning the Door Glass
All ovens are fitted with glass doors with innovative, extremely convenient characteristics. The full-glass on the inside can be removed easily without the aid of any tools: the screw-free visible fixing system guarantees that the door provides the easy cleaning only glass can ensure. Proceed as follows to remove the glass in the oven door correctly.
- Fully open the door.
- apply gentle leverage with a coin or a flat-head screwdriver in the two recesses in the bottom of the inside of the door simultaneously;
- released from its seat, the glass can be extracted from the recess into which it is fitted.
- After cleaning, repeat the same procedure in reverse order.
WARNING: Take care to reassemble the pieces of glass in the correct order; the inside glass has a special heat-refl ecting fi nisi Do not clean the glass door of the oven with rough, abrasive materials or sharp metal scrapers, since they may scratch the surface and cause the glass to shatter
4.2. Maintenance
- Disconnect the appliance from the electrical mains by disarming the fuses before carrying out any cleaning or servicing operations.
- In the event of failure, please first of all check the fuses of the household electricity supply system
- If the problems are not caused by the power supply, kindly contact your Authorised Service Centre, stating the model of the appliance and the serial number stated on the nameplate
To ensure that the appliance's safety characteristics are not impaired, all maintenance work must be carried out by authorised personnel. - Improper maintenance work will result in forfeiture of warranty rights
Changing the oven light bulb
To replace the oven light bulb, follow the instructions provided below
- Switch the oven off and disconnect it from the power supply. The bulb is in the top right-hand corner of back wall of the oven.
2.Make sure that the oven is cold and unscrew the glass cover; - Unscrew the light bulb and replace it with another of the same type;
4.Screw the glass cover firmly back into place
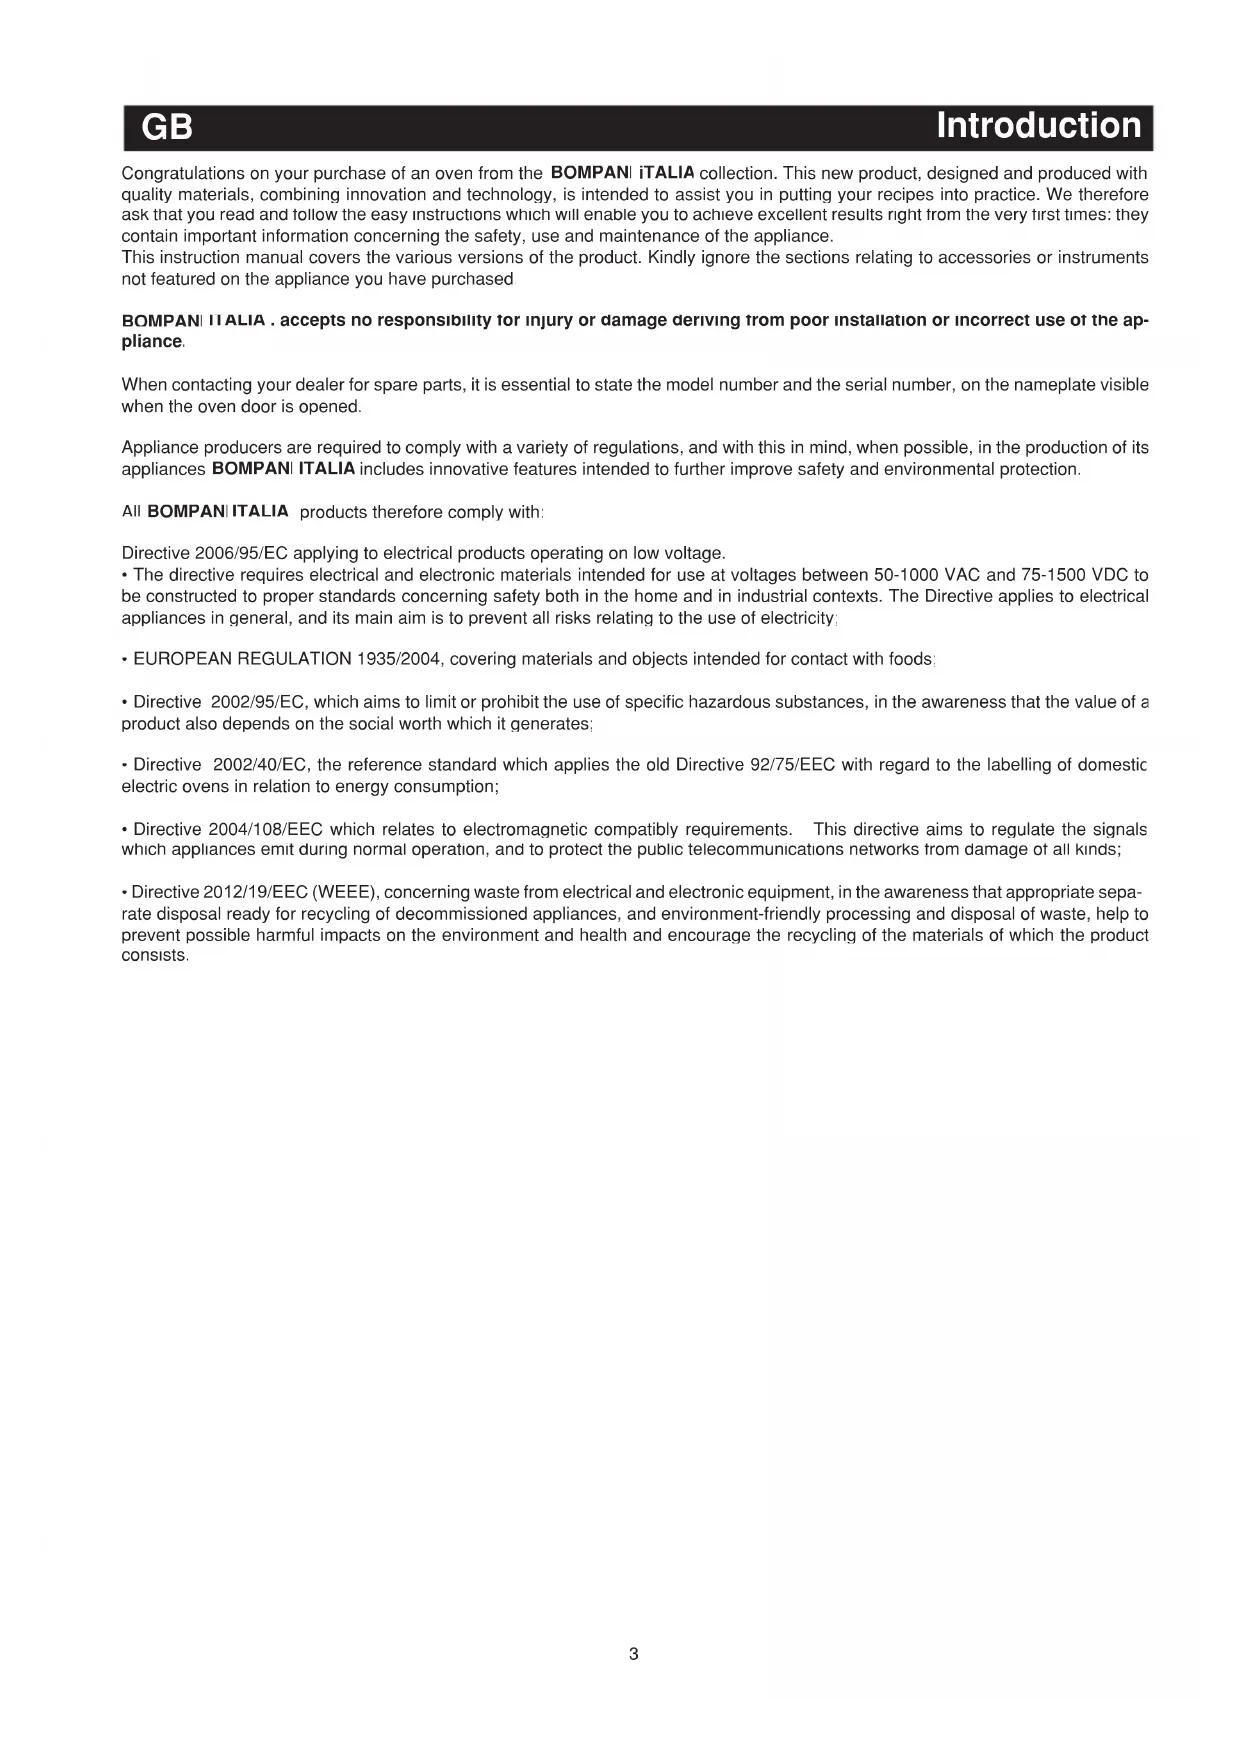
Removing the oven door
The door can be removed to clean the oven in an easier way following this instructions:
1) Open the door completely.
2) Turn the two levers "B" bringing them from position 1 to position 2.
3) Close the door slowly to a stop, grab it with both hands from side to side, close it further and pull it by lifting it upwards.
4) To replace the door you must follow the procedure in reverse order, insert the two hinges in their seats and open the door completely.
5) Turn the two levers "B" bringing them back in position 1.
6) Close the door normally.
Changing the Oven Door Gasket
Always inspect the oven door gasket and order a replacement from the after-sales service without delay if worn.
5. REGULATIONS, GENERAL SAFETY AND ENVIRONMENTAL PROTECTION
5.1. REGULATIONS
- Directive LVD (low voltage) 2006/95/EEC and following edits
- GAD Directive (gas) 2009/142/EEC and following edits
- Directive EMC (electromagnetic compatibility) 2004/108/EC
- Directive RoHS 2011/65/EU
- Directive WEEE 2012/19/EEC
- Directive EUP (standby) 2005/32/CE
- European Regulation 65/2014 (energy labels ovens)
- European Regulation 66/2014 (ecodesign)
- European Regulation 1935/2004 (materials and food contact)
5.1.1 DISPOSAL: PACKAGING AND DECOMMISSIONED APPLIANCE
The user is responsible for consigning the obsolete appliance to his disposal facility; otherwise, he will be liable to prosecution under the relevant waste disposal legislation.
- Appropriate separate disposal ready for recycling of decommissioned appliances, and environment-friendlyly processing and disposal of waste, help to prevent possible harmful impacts on the environment and health and encourage the recycling of the materials of which the product consists.
- For more detailed information on the waste disposal systems available, contact your lo cal waste disposal service, or the shop from which the appliance was purchased.
DIRECTIVE 2012/19/EEC (WEEE): INFORMATION FOR USERS
This is information intended only for the owners of appliances which carry the symbol shown in Fig. A on the adhesive technical data label fitted to the product (serial number label).
This symbol indicates that the product is classified, under the relevant regulations as electrical or electronic equipment and is compliant with EU Directive 2012/19/EEC (WEEE). Therefore, at the end of its useful life, it must be handled separately from household waste; it can be consigned free of charge to a recycling centre for electrical and electronic equipment or returned to the dealer on purchase of an equivalent new appliance.
Italian Decree Law 151/05, which implements the EU guidelines, extends the principle of Producers' responsibility to the electrical and electronic products sector. Producers are responsible for implementing and operating a system for disposing of the waste generated by the electrical and electronic equipment they offer for sale. Producers are therefore responsible for collecting WEEE from the collection points (public and private), transporting them to suitable treatment centres, and the subsequent recycling and reuse of the materials.
Fig.A
5.1.2 MATERIALS IN CONTACT WITH FOODS. INFORMATION FOR USERS.
EUROPEAN REGULATION No 1935/2004: INFORMATION FOR USERS.
The symbol shown here, which appears on the packaging, indicates that the materials in this product which may come into contact with food are compliant with the requirements of European Regulation No 1935/2004. This regulation is based on the principle that materials or objects intended for direct or indirect contact with foods must be sufficiently inert to rule out the risk of transfer of substances to the foods in quantities such as to put human health at risk or cause an unacceptable change in the foods' composition or a deterioration of their organoleptic characteristics.

Fig. B
- Foods might come into contact:
- Inside the oven chamber, with oven shelves, dripping pans, confectionary trays, oven door glazing, rubber gaskets, and the sides of the oven itself.
- On the hob, with pan stands, burners and the hob skin.
3.In the food-warmer drawer, with the sides of the compartment.
5.2 GENERAL SAFETY
- This appliance is intended solely for domestic use. The oven must only be used for preparing food.
GB
Instructions
- The electricity supply must always be disconnected before any procedures inside the oven or where there is the risk of accessing live parts.
- Never touch the oven door hinges without due care as injury may result
-
The appliance must not be used by children or the differently able without supervision.
-
Parents must avoid children to play with the appliance.
The appliance becomes very hot during use. Care should be taken not to touch the heating elements inside the oven. - Warning: accessible parts may become very hot during use, children should be kept at a safe distance.
- If the power supply cable is damaged it must be replaced by the producer, the after-sales service or a skilled person to avoid hazards.
- The appliance becomes hot during use.
- Removal all packaging residues, e.g. any polystyrene fragments, from the oven.
- No responsibility is accepted for injury or damage deriving from poor installation or incorrect use of the appliance.
- Improper repairs are a source of danger; repairs must only be performed by technical staff who have been suitably trained by the manufacturer.
- In the event of malfunctions, contact the after-sales service without delay.
WARNING: Do not touch the oven heating element.
WARNING: Make sure that the appliance is switched off before changing the light bulb to avoid electric shock.
5.3 ENVIRONMENTAL PROTECTION AND SAVING
- Using the oven between late afternoon and early morning helps to reduce demand peaks.
- Keeping the oven door gaskets clean and in good condition, so that they adhere to the door firmly, reduces heat loss.
6.FOR THE INSTALLATION ENGINEER
The appliance must be installed by a qualified person, who must follow the instructions provided in this manual and in the regulations:Law n. 46 of 05.03.1990 - Regulations on the Safety of Systems
6.1. Technical Data
Heating Element Power
Bottom heating element 1100 W
Top - bottom heating element 1100-1500 W
Fan heating element 2000 W
Oven light 40 W
Cooling fan (where installed) 22-26 W
Oven fan 25 W
Power supply voltage (50-60Hz) 230 V
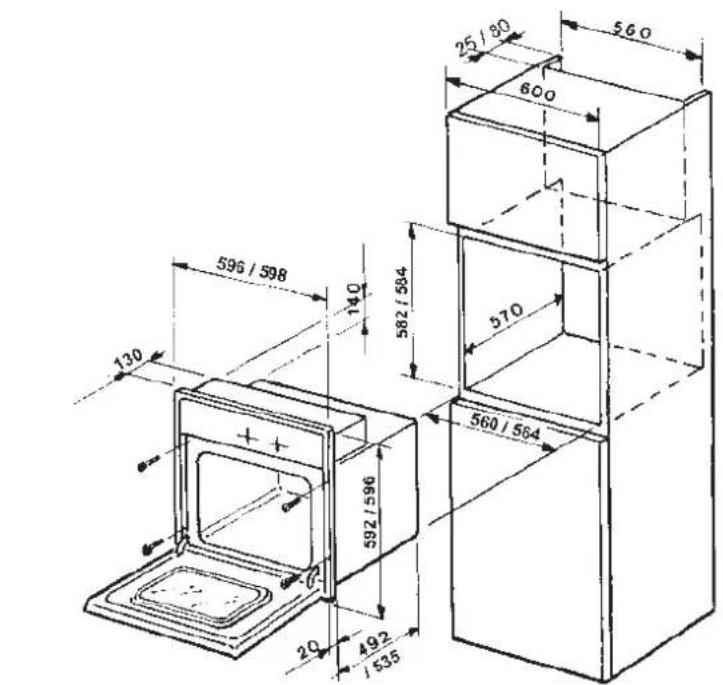
Oven usable dimensions
Width mm. 411
Depth mm. 391
Height mm. 330
Volume I. 58
Usable dimensions of cavity in building-in cabinet
Height mm. 584
Width mm. 564
Depth mm. 550
6.2 Pre-Installation Procedures
- Unpack the appliance and recycle the packaging material in accordance with the relevant regulations.
After unpacking, check the appliance for damage. If in doubt, do not use the appliance and contact a qualified professional. (See After-Sales Service). - The packaging materials (plastic bags, expanded polystyrene, nails, etc.) must not be left within reach of children since they are potentially hazardous.
- Check that the accessories are in the bottom of the packaging.
- Do not make improper use of the oven door handle during transport and installation.
6.3 Building-In the Oven
- In order to allow the product to be built in correctly, the cabinet must have the following characteristics:
- the panels next to the oven must be in heat-resistant material;
- if the cabinet is in veneered wood, the adhesive used must withstand a temperature of 100^ ;
- when building-in the oven, whether the installation is under-counter or in a tall unit, the cabinet must have the dimensions stated in Fig. 1 - page 17
GB
Instructions
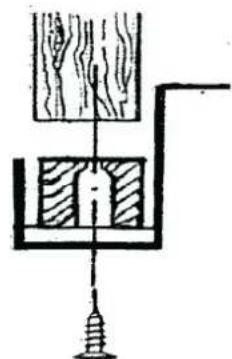
- Place the oven in the cabinet and screw the 4 screws fully down, using the holes provided in the facia, visible when the oven door is opened. Make sure that the screws are inserted towards the centre of the wood in the cabinet: (see Fig.1-3-page 17). Before fixing the screws, also ensure that the oven is correctly aligned with the floor with the aid of a spirit level.
An opening in the top of the tall unit, or a 10mm gap above the oven surround, should be provided to ensure adequate ventilation. (see Fig. 1 - page 17). - If the oven is to be installed close to another appliance, check that there is no interference between the two devices when in operation.
- Once the appliance has been built in, no contact with electrical parts must be possible.
6.4 Connecting to the electrical mains
For direct connection to the mains, a mains cut-off device with a contact breaking gap that ensures complete disconnection in category III overvoltage conditions must be provided, in accordance with the installation rules.
WARNING: The plug must be reachable when the appliance is installed.
Useful information for the installation engineer:
- the green-yellow coloured wire must be used to make the earth connection;
the blue wire for the neutral; - the brown wire for the live connection;
- the cable must not touch hot surfaces with a temperature over 75^ ;
-
if the cable is replaced, the new one must be of H05RR-F or H05V2V2-F type of suitable gauge (see Fig. 2 - page 17);
-
if the appliance is supplied without a cable, use a type H05RR-F or H05V2V2-F cable of suitable gauge (see Fig. 2 - page 17);
The installer is responsible for making the electrical connection correctly and for compliance with safety regulations. The electrical connection diagrams are provided in Fig. 2 - page 17.
IMPORTANT WARNING:
The manufacturer cannot be held responsible for any damage caused by failure to comply with the instructions provided and the relevant regulations and standards.
7. GENERAL PRECAUTIONS
7.1. Oven Accessories
The accessories provided in the oven are:
- The shelf, which supports the pans for cooking confectionery or roasts, or on which meat for grilling is placed directly.
- The drip pan under the grill is used to collect juices, which drip from the food that is cooked directly on the grill. The drip pan can also be used for cooking.
7.2. "Pull-Out Oven Runners" Kit
Some versions of the appliance are fitted with telescopic runners.
They are extremely convenient when cooking, since they allow shelves to be pulled right out, and stopped in the fully extracted position.
This convenient aid allows foods to be checked with no risk of burns, and ensures more thorough cleaning.
The oven can be fitted with a "Pull-Out Runner" kit on request.
This optional can be ordered from your dealer.
8. ASSISTANCE - DIAGNOSTIC MODE
When the oven is in the Power-up state (flashing clock), the test mode can be activated by simultaneously pressing the TEMPER+ and the EDITION+ keys for 5 seconds.
8.1. Phase 1 - Display Board
All the display segments are all turned on. If a key is pressed, the code associated to this key is temporarily displayed, to then return to display all the segments. The automatic repetition is activated for keys equipped with this function.
If a key is not pressed for approx. 10 seconds, the oven passes to the next phase.
8.2. Phase 2 - Power Board
The clock display shows "8888" with the symbols flashing, while the display shows the temperature read by the oven probe. The symbol is off. By pressing a key, the associated code is shown on the clock display.
The Double Cut relay is kept closed, and all the other relays are cyclically activated, one at a time. Once the last relay is reached, the cycle starts over.
If a key is not pressed for approx. 10 seconds, the diagnostic phase is terminated and the oven returns to the Power-up phase.
9. MALFUNCTION SIGNALS
9.1. Detecting malfunctions
When a malfunction occurs, the control system begins to monitor this signal and considers it plausible only if it persists for more than 1 minute. If during this minute another malfunction presents itself, the system considers it plausible if it persists for more than 4 seconds.
When the malfunction is plausible, the system passes to the Malfunction display mode: the oven is off, all the loads are deactivated, and the "Err" message appears, alternating with the type of malfunction detected:
"Shor": oven probe in short circuit
"OPEN": oven probe in open circuit and not connected
"ntc1": thermal probe on Power board
During this phase, the malfunction signal can be "annulled" by pressing any key: if the malfunction is still present, everything returns to the display mode after 1 minute.
If the malfunction is not autonomously resolved, the control continues to indicate "Err", without any additional explanation.
If a probe malfunction occurs, the system reacts as if a temperature higher than 500^ has been reached.
9.2. Over-heating
When the thermal probe on the Power board detects a room temperature of >100^ , all the thermal elements of the oven automatically turn off. If this persists for more than 1 minute, the clock display shows "STOP", and every command on the key board is ignored until the temperature goes below this limit.

①
CONNECTION DIAGRAM
230V TWO-PHASE
Wire gauge
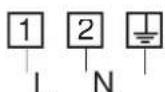
3.5kW 3x2.5mm
2.2-3.5kW 3x1.5mm
0-2.2 kW
3x1 mm


BOMPANI ITALIA Spa. - Via Emilia Est, 1465
41100 Modena - Italy
Tel + 39 059 282278 - Fox +39 059 281774
8.1. Phase 1 - Display Board. 15
8.2. Phase 2 - Power Board 15
- SIGNALIMENT D'ANOMALIES. 16
3.2. ALLUMAGE/MISE HORS TENSION DU FOUR
8.1 Phase 1 - Display Board
8.2 Phase 2 - Power Board
A B T O M A T N U E C K N I N O B T O P I I I K H O N O K + I + : I3MeHHe H a O D I N H W a R K a X d b e N O N C e K y H d b i B T e H e N e N e p B O B c K y H d b i Y d e p X N B a H N, 3aT E M I3MeHHe H a O D I N H W a r K a X d b e 200 M C.
2.2.Функцu npu nocledoameьньх habamux knaeuw“Time"
PnIOBTOpHbIX HAKATINX npOcXoDIT CneDyUOaI NOcNEObaTeNbHOCTb:
v. Ecnn 50 > t probe:
1-,2-,3-4n4-nnoocnMnraHOT
1-,2-,3-NOLOCKMURAHOT,4-HECBETTC
1-,2-NOLOCKMNraoT,3-,4-HECBETTcR
1-Я NOLOCKa MURAET,2-Я,3-Я 4-Я He CBETTcR
1-8,2-8,3-8n4-nOIOCKHeCBETTcR
3.12.Функцяблokupoьku om demeue
Ecnn KnaBnuy ON/OFF> DepKaTb HauKato He MeHee 6 ckyH, DyXOBka NepExoNT B pexm 3aunTb ot DeTei. Ha 3kpahe OTObpaKaeta CnBOM 3AMKa, noka cyHKua 6boknpOBKn OT deTei He 6ydet BbIKNoHeHa. Ecnn 6bOKpOBKy BKIOuHTb Nocne HAcToPkn peXIMa RotOBKn (pyHoN, NOnyABTomATuecKn, ABTomATuecKn), npaMeTpblpeXIMa MoKHO 6ydet NOKa3aTb, HO 6yDet HeBO3MOxHO N3MeHntb, Ha 3kpahe dIra HAnOMHaHnO TOM, YTO peXIMAKTNBEH, 6yDet OTObpaKaTaCn "n-O".
PyHoe nIaBtOMaTnueckoe BbIKIOUeHne DyXOBKn HE OTMeHReT peKm 6JOKnPOBKn. Ira BbIKIOUeHnpeKIma 6JOKnPOBKn HxKHO yIepKNaBaTb KONKy «ON/OFF» He MeHee 6 ckyHd. Ha 3KpaHe 6ydet Noka3aHo «n—O», 3aTeM «OFF», 3aTeM TEKyuLee Bpemr.
Korda dYxOBka 3a6NoKInpObaHa, ee HeJIb3a BKNIOHTb HaxaTNMeH KHOKN «O/I».
3.13. YnpaBJIeHue ocEeuEHeuem dyXoBku
Iocne toro, kak Hxkna yHKn Bb6pHa, n do KOHca zKna pa3orpeBa, noCBeTka dYxOBKn ocTaetcBknueHHo. Uepe3 3 MmHytbl NOCBETKa dYxOBKn BbIKIOuyeTcR. B TeueHne BpemeHn OXnDaHn npn OTloKeHHom 3anycke NODCBETKa dYxOBKn OCTaetc BbIKIOUeHa.
IOnCBeTka DyXOBKn ABToMaTHueCeKn BkJIOUaTeCn Pn HaxKaTN JIO6oK KHOKN (CbraHHa C KHOKNO FyHKnA He BbINOJIHReTc), Nocne 3TOrO OHa BbIKNoHTcyepe3 1 MHyTy.
3.14. ПонOCKа п dedapumelbhozo Haapeea
3Ta noLONCKa CnyKNT DnI INHnkaCnnpEeBapnteHbHoro HArpeBa, OHa TaKxte CnRHaN3npyeT O a3e HArpeBa BO Bpemr roTOBKn. B TeueHne cAsbl npEeBapnteHbHoro HarpeBa, 4 nlaHKn INHnKaTopa Noka3bBAOT, CKOJIbKO OCTaIOCb Do DoCTNKeHnra 3daAHHO TEmpepaTypbl:
i. Ecnk > 75%
1-8,2-8,3-8n4-NOIOCKMNIGAHT
ii. Ecn75% > k > 50%
1-,2-,3- noJockMnraIOT,4-He CBeNTTC
iii. Ecnn 50% > k > 25% :
1-,2-NOJOCKMNIRAHOT,3-,4-HECBETATC
iv. Ecn 25% > k:
1- noJocka Mraet,2-3-4 He CBeTcR
B KOHcE 4a3bI npeDbapntelbHorO HArpeBa N BO Bpemr 4a3bI rOtOBKn BCE noJIOCKn INDnKAtopa CBETTcR: ropr1- 1- 2-3-3-4-4.
3.15. YnpaJIeHue maHzeHcuaJIbHbIM beHmUJmOpOM
3.15.1. BbI6op zukna roTOBKn
TahreHuaNbHbI BeHTnIaTOp BKIOUaEcTc He3aBNCMo OT Tempeatypb I D yXOBKe, uee3 15 MHyT nOcne BbIbopa pexima nn daKe paHbSe, ecIn n3MepeHHa TEmpeatypa Bblse 3NaueHEn "PpeJeI cpa6aTaIBaHnra". Ppi fHKuPi Pa3MopaxKbAHnra (DEFROST), TaHReHuaNbHbI BeHTnIaTOp BKIOUaEcTc cpa3y.
3.15.2.OctaHOBka uKna roTOBKn (BbIKIOueHne, OxNdaHne)
B KOHcE zKNa rOToBKn HaunHaetcra 3aHa6nKeHn, KOTopA dIHTcra 20 MNHyT, H a3oT pa3e TaHReHuaNBbHbBEHTnTAP BbIKNoaTeC, cNn TeMnePaTaJaET Hxke «PpeJena Cpa6aTaBaHnra.
Pocne 20 MnHyT TaHreHuaNbHbB BeHTnIaTOP OCTaETcBAIKIOUeHHbIM He3aBNCmO OT TempepaTypbl.
3.15.3.ABtOMaTHueckaФyHKnJa DaTUnKa CInoBOI nPaTbI
TtHcK TEmnepaTypbY cTaHOBHeH Ha CInOBoN pNaTe. Ecn OH 6hApyXnBaET TemnepaType BbIe >80^, TaHReHuaNbHbI BEHTINJATOp PnHyDNTeBHO BKIOHaETc, He3aBNCmO OT BbIbpaHHoro peKIMa.
3.16. C6poc hacmpoek 3aepweHua u dIumelbHocmu zomoeku
Bpemr roTOBn H Bpemr KOHcra rOToBKn MOxHO c6pocntb HaKaTHmE KlaBnUI + BO BpeM pa3bl HacTPOkN BpeMeHN rOToBKn: DyXOBka OCTaeTcBKNIOeHHo n ABtOMaTHueCKn YCTaHaBnIBaeTcH Ha HeORpaHcHHeHO BpeMpyHOI peKIM, KaONiCaHO B naparpaΦe (...) B dpyrom cnlyae DyXOBky MOxHO NlHOCbIO BbIKIOHTb HaKaTHmE KnaBnOn ON/OFF.
3.17. C6poc Hacmpoek maumepa
B xode hactpoKn TaHmepa, TeKyuee 3NaueHne MoXHO c6pocntb HaxKaTne KnaBUn -
4. Yxod n ounstka
Iponrhopnyte pa3deNb, OTHocayneK akceccyapam HnHCTpyMeHTam, He BXoJaUM B KOHMnKeT NOCTaBKn Baawero obopydOBAHna.
4.1.Ouucmka
PekomeHdaunn no ouncTke dyxOBKn
- I'naBHOe npaBnIO - qacto YmCTnTb DyXOBky. IJN eCTeCTBEHHO OYNCTKM CNOJIb3OBA Tb RopAUYO BDOy C 6bnkap60HaTOM HATPnI N/INI JIMMOHbI COK N/INI PpO3paHb BNHHb yKCyc
He nCnoJb3OBAtB npoBBle OCHNTeJI. - MoIuIe cpeCTBa HEnb3ra pa36pb3rHbA Tb npraMo Ha 3JeMeHTb ynpaBHeHn, nCNoIb3yTe r6Ky.
- HnKorda He ouHuaTb CTekIIO, ecnn OHO BCE eue ropayee, pa3Hua TempeaTyp MoKe TnpBecTN K ero TpeckaHbIO. IdoxkaTb, noka CTekIO OCTbIHET Do cnerKa TeNloro.
- He nCnONb3OBaTb YnCTaYnne CpeDCTBa, CoepXaUne KAYCTNueckyO cOdy, PAcTBOpNTeIN NIn DpyrIe BpeHbIe BeuEcTBA, TAK KAK OHN MOrYT 6bITb He NOnHocTbIO y6paHbI NocNE NcNoB3OBaHnR, a INx OCTaTKn B He6oNbUnx NOIOCTAX MOrYT BBICBO6OxJaTbCRA BO BpEma rTOOBKn I Nonactb B eNy.
-Дя OчNTKHe OЧeHгрзн ДухOBKN,поTepeТь NOВepxHOCtь NOLOBnHOJ NIMOHa,ДaTb BBICOXHyTb,3aTEM npTepeTb BnaXHoRу6kO,чTOБы ydaNtB OCTaTKn rpr3Nи NIMOHHO COKa. - Ecnn DxyOBka OChb rpa3Ha, NOCTaBnTB BHyTp b NOdoH C DByMa JInTPaMn BOdbI N IOXKO aMMnaka N OCTaBnTB Ha HoCb. Ctepeb Knp ry6kOHa cnEduoOee yTpo.
- Ecnn Bbl co6npaetcB rotOBnB OC60o KnPHyIO NmU, OCTaTKOB KnPa MOXHO N36EkaTb, NOOKNB Ha DHO dYxOBKn aIOMHHeByIO fOJIbry, B KOHcE rTOBKn ee MOXHO 6yDet NERKO CHrTb BmecTe C XnPOM.
- Пи ИСПОЛБЗОВАнИМ MOHUIX CpeICTB, NOMHITe 66 OKpykaIooJIe CpeIe I CNEdyIte INHCTpyKUIMM npON3BOJNTeJI. CeIuHac Ha pbIHKe cyIeCTByET 60JIbIooE KOJIuYeCTBO KOJIeHTpnpOBAHHbIX TBePdbIX I JxIDKNX MOHUIX CpeICTCB HN3KOJ 3KOKIOnIyueCKOJ TOKcHHOCTbIO.
- Nocne YnCTKnyxOBky HxHNO pOmbITb 6oJbWIM KOnIueCTBOM BObl N BbICyuNTb.
Kpome peek, BCE akceccyapbl MOXHO MBtB o6bHbIM cnocobom, daxe B NocydomoeHoi MaunHe.
B cnyae herny60x 4apanHHaHecTN M8KoR y6koCneuaJIbHoe CpeCTBO DnA NCTKN/NOINPOBKN HepKaBeOeI CTAn.
-He nCnoNb3ObaTb yIcTЯuIne npOduKyTbI dIa cepe6pa.
OuNTka HepXaBeoJe CTaJIi
IITTO, UObI cTJIbHbIe NOBepXHOCTN OCTaBAJINCB IRPKIMN IMeIIN paBHomepeHyIO TeKCTpy, 3a dYxOBKO HyKeH yXoI peryIpaHna YnCTKa. HepKaeBOUa CTAJIb, ICNoIb3OBAHHa DnI npOn3BOcTBa dYxOBKn IMeET CBet Silver Ice, OHa cNeuaJIbHO o6pa6ToHa DnI npEIoTbPAuEHN OTeuATKOB NaIbueB, BlaROpApa KOTOpOMy NOBepXHOCTb OCTaETc 6Iec7aJe DaKe Nocne IcNOb3OBAHnM Bi peKomeHdyem Bam HIKOrda He NCNoIb3OBAt b abpa3NBhie ry6Kn, HaxdauHyIO bMyar, nPoBOLOuHbIe UeTKN, KICNoTbI INI npOdyKTbI, KOtOpBe MOrTy NOUapanaTb NOBepXHOCTb. OUnuATb Pn Ni NMOUIMrKo TpAInKn I ObuHoi He abpa3NBHO XnIDKOCTN DnI npOMbIBKN; KpeMbHe peKomeHdyOTc, TAK KAK OHN CoDEPkaT MeNKne abpa3NBbIe YactuCbI, KOtOpBe MOrTy OCTABJIaTb CNEbl Ha CTaJI.
OuHCTKa 3MaJIH n cTeKna
3MaJIb - 3TO CTeKJIOIO6HOe NOKpbITHe C 3aMeayateJIbHOYCTOuHBOCTBIO K TENNy H KNCOTAM. KaC cTeKIO, OHa MOKeT 6bITb NOBpeXeHa npn DInIteJIbHOM KOHTAKTe C KNCLOToI, No3TOMy pa3NtBu TOMaTHbI COYC, JIMMOHHBI COK n yKcyc HyKHO HeMeJeHNO BbItepeTB. Iyra ydaJIeHnO Oco6o BbeBWeJcRrpa3N MoKHO NcONb3OBaTB 6Nkap6oHa HATpna INI Hea6pa3INBHyI ChTaeUH KPEM. Hn B Koem cnyuae He NCNoB3OBaTB pOdyKtB dJa YdaJIeHnA HAKIN: OH MOrYT HaHeCTn HEnOpPabMbIe NOBpeXeHnE 3MaII. BHyTpEHnE NOBepxHocTn DxyOBKn TAKKE NOKpbITb 3MaJIbHO nDOnIKbI OUnIaTBcRn Pn NOMOI COOTBETCTBYUHX CpeCDTB, KOTOpBE MOKHO CBO6OHO KyNTB TTOROB CETN. Lyuwe BCero UcHtB dyXOBky Nocne kaxdoro NcNoJIb3OBAHn, NOKA OHa eue Tenla. Mbl peKOMeHdyEM He DonyCKaTB HAKONJIeHn rpr3n, TAK KAC CIOI rpr3n TpydHee ydaJIbT, N ectb ONaCHOCTB TORO, YTO HA 3MaII NOCTAHyTCRe HeycTpaHmMbIe OTMeTKN.
Ouictka cTeKla Ha DBepe
Bce nyxOBKn 06OpYIOBaHbI CTeKJIaHHbIMn DBePcAmN C HHOBAQIOHHbIMn Ype3BbUaH O yO6hblm XapakTepncTnKaMn. BHyTppeHHIO CTKJAAHHyIO pAACTHy MOXHO NERKO CHrTB 6e3 IcNoIb3OBAHn KaKnx-NN60 IHCTpyMeHTOB: BNIMMa CNCTema KpENIIeHn 6e3 BoNTOB No3BOJraT JeIKo BbINOHNrTb OuHCTKy, TTO BO3MOXHO TOJbKO y CTeKNa. Dn npabInbHorO ChrTHna CTeKNa C DBepCbI, CdeNaTb CneDyUoJe.
-NonHOCTbIO OTKpbITb DBepey;
- OndOBpeMeHNO cIeKa IODTeb MOHeTKaMn INN OTBepTKaMn C PNOCKIM XaIOM Dba yrry6JIeHn B HnKHe Nactn DBepCu;
- Ocbo6oxdHoeOT KpeJIeHn, CTeKIO MOXHO N3BNeUb N3 yIy6JeHnA, B KOTOPOM OHO HaxOHTCA:
- Oocne ouhctkn, noBtOpntb Ty Jke npoueDpyy B o6paTHOM nopraKe.
BhImaHne: BybTe BnMaTeNbHbI, cKeJIaHbIe qactn HxKHO cO6paTb B npaBnJbHom nopAke; BHyTpehHee cTeKnIOMeET cNeuaJIbHoE OtpaxaHooee TEnNo NOKpbITne! He YncNTb CKeJIaHHyU DBepu yDxyOBKn rpy6blIM a6pa3uBbIMM MaepuanaMn nn OCTpbIM MetaanueckmN ppeMeTaMn, Ta kak OH N MOryt nozaapanat NobepxHOCTb n pa3bntb cTeKnIO.
4.2.06cnyxueHue
- OTKIIOHTb 6OpyDobAHne OT 3JIeKTPoNITAHnry NyTeM n3BNeueHnra IpeDOxpaHNTeNe IpePe BblNOJHeHnem JIO6bIX DeIcTBNI NO OCHTE KINIO6CnykBAHIO.
B cnyuae noonomkn, B nepbyo oupeeb npobepbte npedoxpaHnten doMaunHe 3Jektpuecko cetn. - Ecπ npo5nema He cBra3a H C ΝIeKtpOnNTaHMe, NOxKaIyIcTa, OpaTntecb A bTOpN3ObaHHb I cepBnchb I ceHTp, yka3ab MoDJIb o6OpYIOBaHn I cepNHIb HOMep Ha IJeHTnФkaUHOHOr I nactnKe.
- 4To6bl rapaHTnpoBaTb xapaKTepnCTnKn 6e3OnacHOCTn, BCE pa60tbl no 06cnyXnBaHIO DoJXHbI BInONHrTBcABTOPIN3OBAHHbIM nepcoHaJOM.
- HenpaBnIbHoe o6cnyxNBAHne npBODNT K yTpate npaHa rapaHTnHoe o6cnyxNBaHne.
3aMeHa JAmnoQKn DyXOBKn
OxnaKdaIOUeIN BENTnIaTOp (ecIn yCTaHOBJeH): 22-26 Bt
BentnIaTOp dYxOBKn:25BT
Hapraxhenne nHTaHn (50-60 T): 230 B
Pone3Hbpepa3MepbIyXOBKn
UinHnHa:411MM
Tny6nHa:391MM
BbICota: 330 MM
06bem.58n
Pone3hbe pa3MepbI BCTpoEHNOJIOCTN
BbICota:584 MM
UnpHa:564MM
TJy6nHa:550MM
a a a a a a a a a a a a a a a a
a a a a a a a a a a a a a a a a a a a a a
a
11 11111111111111111111111111111
y 1
Jaaa aag aag aag aag
n j 10
1 1
a
Jn
y
a 1
jai jia
j j j j j j j j j j j j j j j j j j j j j j j j j j j j j j j j j j j j j j j j
:
-1
20 1
-3
lg( 1 + x) - 1 < x < lg( 1 + x)
(30)
a
a 1
a 4
J 1
J 1
-1
(1990/5/3 46)
aal g aal 2
()
:1-2
ylll lllllllllllllllllllllllllllllllllllllllllllll
jzjjz jzjjz
a a a a a a a a a a a a a a a a a a a a a
y
1g
joll
cayiyiajbio/nyaiyaiy
:jjj
jueill 1ie jie biai
Jaaal jsslaie "jaj" jaoa aeall jae aalee
A
a 1
1
jaiy jaiy jaiy jaiy jaiy jaiy jaiy jaiy jaiy jaiy jaiy jaiy jaiy jaiy jaiy jaiy jaiy jaiy jaiy jaiy jaiy jaiy jaiy jaiy jaiy jaiy jaiy jaiy jaiy jaiy jaiy jaiy jaiy jaiy jali y
jaaai jaaai
gdpaa a aalll gall jai jajall alal .
jiall jll jill jil:2-9-3
sio j 1
15 2 -g+
(x)=5
()15
10-3
i 1
aaii 11-3
4 1 1 1 1 1 1 1 1 1 1 1 1 1 1 1 1 1 1 1
4 200 >a
14, 150>200.
100> 150
450>100. iv
4 50 c1s.
aIiI I 12-3
"1 6000000000000000000000000000000000000000000000000000000000000000
j13-3
a 1
1J 1
14-3
a a a a a a a a a a a a a a a a a a a a a a a a a a a a a a a a a a a a a a a
75 >
150 >75
25 > >%50
25 iv
L 1
15-3
1-15-3
15 11 11 11 11 11 11 11 11 11 11 11 11 11
12-15-3
20 20
3.5jlll j 100
3-15-3
180 180
jyblcbabg yblg 16-3
a 1
"Jie/2e" 100000000000000000000000000000000000000000000000
17-3
iie 10000000000000000000000000000000
4
Lalb, jyrs yjg sly g jlllall aygill
a a a a a a a a a a a a a a a a a a a a a a a a a a a a a a a a a a a a a a a a a a a a a a a
J 1 J 1 J 1 J 1 J 1 J 1 J 1 J 1 J 1 J 1 J 1 J 1 J 1 J 1 J 1 J 1 J 1 J 1 J 1 J 1 J 1 J 1 J 1 J 1 J 1 J 1 J 1 J 1 J 1 J 1 J 1 J 1 J 1 J 1 J
JSLB
Jrnnnne nnnnne nnne nnnnne nnnnne nnnnne nnnnne nnnnne nnnnne nnnnne nnnnne nnnnne nnnnne nnnnne nnnnne nnnnne nnnnne nnnnne nnnnne nnnnne nnnnne nnnnne nnnnne nnnnne nnnnne nnnnne nnnnne nnnnne nnnnee
Lagaii jay jay jay jay jay jay jay jay jay jay jay jay jay jay jay jay jay jay jay jay jay jay jay jay jay jay jay jay jay jay jay jay jay jay jay jay jay jay jay jay jay jay jay jay jay jay jay jay jay
a 2
aalalalalalalalalalalalalal
1-5
4EEC/2006/95·()LVD
EEEC/2009/142 (jGAD
(EMC) 2004/108 / EC EMC -
/2011/65
WEEE 2012/19 / EEC
EC/2005/32()EUP-
()65/2014a
(ecodesign) 66/2014 a
(aaee aaeaaal alg) 1935/2004 aagw
Jusuuii jiuuii jiuilai iiaii 1-1-5
n 1
all 1
e 1
a
nssnnssll cloglae (g) .g/196002
(J)
y 96/2002
aill/syall yjg aably jds
aalall 2-5
aal 1 jlll lai y jiall g aal lss
y 1
aee
j 1
aaiy aaiy aaiy aaiy aaiy aaiy aaiy aaiy aaiy aaiy aaiy
aalal alalal alalal alalal alalal alalal alalal alalal alalal
Juauiyjie jiu
j 15 j 1 j 1 j 1 j 1 j 1 j 1 j
J 1
Jn nn nnnnnnnnnnnnnnnnnnnnnnnnnnnnnnnnnnnnnnnnnnnnnnnnnnnnnnnnnnnnnnnnnnnnnnnnnnnnnnnnnnnnnnnnnnnnnnnnnnnnnnnnnnnnnnnnn
.
y
yj.
ydi 1
13-5
aill 8 j 15e 20 11 11 11 11 11 11 11 11
a 1
6- 5
46 45
1990/03/5)
4.111 1-6
jusuiyueia
1,1100
jieyiey jiuie
1500-1100
jbj1- clj1 class jaiie
2000
aall clal jiaic
40
jollol
26-22
()
25
jill 2
230(60-50)
Jusu
jia 41
j391
gaoell
j330
1.58
jai jil lusg jia jia jia jia jia jia jia jia jia jia jia jia jia jia jia jia jia jia jia jia jia jia jia jia jia jia jia jia jia jia jia jia jia jia jia jia jia jia
y
75 1000
-205. 1 -j.05
.(172
2 000000000000000000000000000000000000000000
.(17)
1 1
.17 2
:
Ae 1
- aale aie,
1-7
i jill s jall
1 1
- all actual 15,20,21
2
i j 1
"2-7
y
1 1
Aaa Jaiitil jaiill jaiy jay jayll a
aLwglg-aaalil 8
aal + yjll, cyl aiey jil jil jil jil jil jil jil jil jil jil jil jil jil jil jil jil jil jil jil jil jil jil jil jil jil jil jil jil jil jil jil jil jil jil jil jil jil jil jil jil jil jil jil jil jil jil jil
.5
j-1
1-8
a 1