BO243CAE - Oven BOMPANI - Free user manual and instructions
Find the device manual for free BO243CAE BOMPANI in PDF.
User questions about BO243CAE BOMPANI
0 question about this device. Answer the ones you know or ask your own.
Ask a new question about this device
Download the instructions for your Oven in PDF format for free! Find your manual BO243CAE - BOMPANI and take your electronic device back in hand. On this page are published all the documents necessary for the use of your device. BO243CAE by BOMPANI.
USER MANUAL BO243CAE BOMPANI
Operating Instructions BUILT IN OVEN
Contents
Warnings 6
Technical data and specifications 27
Installation 28
Electrical connection. 28
For the user 28-33
Using the static electric oven 28
Using the static electric oven 4. 28
Using the static electric oven " 4 New ".....28
Using the electric fan oven 4 28
Using the multifunction electric 4 positions.28
Using the multifunction electric oven with 6 cooking programs. 29
Using the multi-function electric oven 29
Using electric grill with oven electric 29
Using the rotisserie 29
Using the minute minder 29
Using the electronic timer 29
Using the electronic timer 3 29
Using end cooking timer(without clock) ....30
Using the electronic timer with push knob ..30
Cleaning and maintenance 31
Cleaning the oven 31
Using the self-cleaning oven 31
Changing the oven light bulb 31
Removing the oven door 31
Cleaning the door glass 31
Use of the "TOUCH TIMER 3 keys.32
Using push-pull knobs 33
"Pull-out oven runners" kit 33
Oven accessories 33
Advice and precautions 33
The European Directive 2012/19/EEC (WEEE) 33
European Regulation 1935/2004 33
Figures. 81 - 83

pycckn
YCTAHOBKA
NTbl
CopepkaHne
BHIMAHNE 7
TexHHueckHe daHHbIe H xapaKTePncTHKn...34
YCTaHOBka 35
IIOKJIIOUeHHe K 35
Дяnotpeбnte. 35-41
HcnoJb3ObaHne 3JIeKTPnuecko CTaTHueCKo DyXOBKn 35
35
3JIeKTPnueckoIyXOBKn“4New" 35
3JIeKTPnueCKA DyXOBKA CCHCTEMOBEHTNJIaHH“4" 36
3JIeKTPnueCKAIOJINΦYHKUHOHAJIbHAR KOHBEKIIHOHHA DYXOBKA4 36
HcnoJb3OBAHne 3JIeKTPnueeCKoIyXOBKn C CnCTeMoB BeHTNJrau 36
HcnoJb3OBAHne 3JIeKTPnueeCKo KOM6HHPOBaHHOH dyXOBKn 36
HcnoJb3ObaHne 3JIeKTPnueeCKoMHOroΦ yHKUHOHaJIbHOJ dYXOBKn 36
KaK noJIb3OBAtbcrIpIJemN
perynilpyemblm rpnlem 36
KAKIOJIb3OBATbcBEPTEJOM 37
KAKIOJIb3OBATbCRA TAIIMEPOM 37 KAKIOJIb3OBATbcra 2JEKTPOHHbIM
IPOPAMMHPYIOHMM YCTPOICTBOM 37 TPEXKHONOQUHOE 3JIEKTPOHHOE
IPOΓΡΑΜΜΥΙΟΥEEE YCTΡΟΥCTBO 38
IΚΝΟΙβ3ΟΒΑΗΝΕ ΘΙJEΚΤΡΟΗΝΟ TΑΥΜΕΡΑ C
HAJKIMHOIpyKOI 38
UHCTKa DuyXOBKn 39
CHCTKA CAMOOUHIIAIOIIECRA DYXOBKN 39
3aMeHa JIaMIIb IyXOBKn 39
Kak cHrTb DBePKy DyXOBKn 39
DEmoHTax DBePbI DuxOBKn. 40
UcTka CTeKJa DBePcbl 40
3JIeKTPoHHbI DNICPNIE CCEHCOPHBIM
ynpabJIeHnEM. 40
UcnoB3ObaHne HaxMHbIX-OTXMMHBx pyueK 41
KoMnJIeKT《BbIbNkHbIe HappaJIIOUne DuyXOBKn》 41
IIPIHAAJIEXKHOCTN DYXOBKN 41
Директina 2012/19/EEC (WEEE) 42
EBPONEENCKI PEJIAMEHT Ne 42
PncyHKn 81-83
1935=2004

εληνικα
EΓΚΑΤΑΣΤΑΣH
ENTOIXIZOMENOY FOYPNOY
περιεχόμενα
PPOOXH 8
TexviKa oToIxEia kai xapaktnpiOTiKa 42
ERKATAZTAH 43
SYNDEESHTOHAEKPTIKOIKTYO 43
Kit "guiasornoextraibles" .56
- Always disconnect the power supply before any work inside the oven or where live parts may be accessed.
- Any overheating of the outside walls of the oven will trip the safety device, which will cut off the power supply. The power supply will be restored automatically once the outside temperature of the oven has dropped back within acceptable limits. However, remember that if this device is tripped repeatedly, there is a malfunction (e.g. breakage of the thermostat which regulates the temperature inside the oven). Call in your service engineer.
- Never touch the door hinges accidentally; this may cause injury.
-
When the oven and grill are switched on for the first time there may be a typical smell and smoke may come out of the oven. This is because of the treatment applied to the surfaces. Operate the oven empty before placing foods inside.
-
Some modes are fitted an automatic cooling motor.
- WARNING: The appliance and its accessible parts become hot during use. Care should be taken to avoid touching heating elements. Children less than 8 years of age shall be kept away unless continuously supervised.
- This appliance can be used by children aged from 8 years and above and persons with reduced physical, sensory or mental capabilities or lack of experience and knowledge if they have been given supervision or instruction concerning use of the appliance in a safe way and understand the hazards involved.
- Children shall not play with the appliance. Cleaning and user maintenance shall not be made by children without supervision.
- For direct connection to the mains, a mains cut-off device with a contact breaking gap that ensures complete disconnection in category III overvoltage conditions must be provided, in accordance with the installation rules.
- If the supply cord is damaged, it must be replaced by the manufacturer or its service agent or a similarly qualified person in order to avoid a hazard.
- During use the appliance becomes hot. Care should be taken to avoid touching heating elements inside the oven.
- Do not clean the glass doors of the oven with rough, abrasive materials or sharp metal scrapers, since they may scratch the surface and cause the glass to shatter.
- Warning: Ensure the appliance is switched off before replacing the lamp to avoid the possibility of electric shock.
- Do not use vapor jets to clean the appliance.
-WARNING: While the oven is working, don't place any tray, pan or pot directly on the oven bottom.

pycckn
BHUMAHNE:
JIIO6aOnepaunHa y3Jax,HAXOJxHXcnoi HaIpyeHHem,K KOTOpbIM HMeetcNOCTyN, MOeT 6bITb IIPOUN3BeHeHa C IpeBapHTeJIbHbIM OTKJIUoyEHm 3JIeKTPoNTaHH.
-BcIyueH3JIINIIHeRoIpeIpeBaCoCTOpOHbI HApylHbIX CTeHOK dyXOBKn cpa6Otae 3a
HTHOE yCTPOINCTBO, KOToPoE IpePBET NO Dauy 3JIeKTPnueCKOro TOka. Bo3o6HOBJeHne 3JIeKTPocHa6)EHnI 6yIeT caMOIpOn3BOJbHbIM NocJe TORO, KaK TeMnepaTypa BOIeT B DOnyCTHMblE PpeJIbI. Tem He MeHee HU)HO NOMHHTb, YTO BO3MO)HOE INKJIuYeCKOe DeNCTBHe 3aUnTHOrO yCTPOINCTBa MO)Et 6bITb Bbl3BaHO OTKIOHeHNMAH B pe)HMe paBoTb I dyXOBKn (HaPnHMeP, IOJLOMa TepMOcTaTa, KOTOpbl PeYJInpyeT TempeaTypByBHyTpN dYxOBKn). B TaKOM cIyuae Heo6xoDmO o6paHTbcr K TexHHueCKOMy cNeuaJIInCTy.
-He TpoRaTb No HeocToPo)HocTH IIIapHnPbI DBepuI dyXOBKN, -O6 HNX MOHO IOpaHHtbcra.
-ПрпперВьключEHнДухOBКИ ГрлЯ,ИЗ OTВерстя caMOЛ ДухOBКИ MO)eT HCXODNTb XapaKTePHyI 3aIax ыма, -3TO OБьсHЯETcra TeM,чTO NOBepxHOCTHДухOBКИ ИМeOT cIeцhaJIbHyIO obpa6OTky. PeKOMeHДуETcR BKЛQUHTb DyXOBKY B pa6OTy BXOJOCTyIO, Ipe)de Yem CTabNTb B Hee ПpoДуKTbl IJIЯ FOToBKN.
-HekoTopbIeMoIeNIO6OpyOBoaHbIBBnraTeJIem aBTOMaTnueCKKOrO OXJaXKeHnI.
- Pnp6op n ero doctynhble qactn cnIbHo HaraBcTcBO Bpempa60tbl. Cneyet npoBnTb octopoxHoctb. Henb3kacatbcn HaraBeTeJbHbIX 3JeMeHTOB. DeTN B Bo3pacte Do 8 JeTdoJXhbl HaxOaNTbcr Ha pacCTOAHIN, INN NOI pncmOTpOM B3Pocblx.
-Данhoe yctpoiCTBO MoKet 6bITb
ИСПОЛБ3OBaHO DeTbMn B BO3pacte OT 8 JET
И ПИцAMN C ORpaHnueHHbIMN ΦИЗЧECKIMN,
ИПИ YMCTBeHHbIMN CNOco6HOCtAМN ИПИ C
HEDOCTaTOUHbIM ONbITOM N 3HaHЯМN, рп
YCSIOBn, YTO OHI NaXODaTcI NOI pPcMOTpOM
ИПИ ПОЛУПИ N yKa3aHHe O TOM,ΚΑК пРавиьHo
И 6e3OJaCHO INCNoJIb3OBaTb PnIbOp, YTO6bl
ПОНMuMaTb PnCKN.
-Дети He DoJxHbI nIpaTb C npI6Opom. YIcTka N OBCnyKuBaHne He DoJxHbI OcyUeCTBJIaTbCra DeTbMn.6e3.IpIcMoTpa
-ДЯ.ВьПОЛHeHЯ.IIpAMO.ToIOKJIIOUeHЯ.K.cETN. Heo6XoIMo.IIOITOTOBHTb.YCTPOIcTB0,KOTOpoe. 6yJeT.O6ecIeYnBaTb.OTKIIIOUeHne.OT.cETn.. paCCToHNe.OTKpbITn. KOHTaKTOB.B.KOTOpOM. IOnJHO.I03BOJIaTb.IIOHoe.OTKJIIOUeHne.B. ycIOBnx.IpeHaIIpJaXeHne.KaTeRopn.III.n.B. COOTBeTCTBn.B.IPaBnIaMn.YCTaHOBKn.
-Даньприбор He npedha3haeHдЯ ИСПОЛБ3OBAHЯ ПОДьМС ORPANUeHHbIMN ФИЗЧЕСКIM NIIДВИТЕЛВHы M ИСПОБНСТЯМ (ВКПЮчАДTeи), ПИБО HEONBITHBIMN IIN HE3HaKOMbIMN C yCTPOIcTBO M, 3a ИСКПЮчEHнEM CNYuaEB пrimeHENЯ ррбop a
IOD Hau3OpOM NIN CJIeDy INHCTpyKcIyM JNua, OTBeTCTBHeHHOrO 3a 6e3OnacHOCTb.
- CneiNbTb, YTo6bl DeTn He irpaJIn c npnbopom.
- He nCnoIb3OBA Tb napOBbIe noInpOBuNKn dIЯ YnCTKN yCTpoiCTBa.
BHIMAHHE:BoBpempa60bI dyxOBKn He cTaBbTe Ha ee DHO npOTnBEHnJIn JIO6yOΦopMy dJRA BbINEcKn.
Φa6pɪka - n3rOToBHTeJIb He Hecet OTBeTcTBeHHOCTn 3a NOBpe]DeHnA, HEnCnpaBHOCTn HecuactThbIe CJIyauH, Bbl3BaHHbIe HECo6JIIODeHnEmPeKOMeHdaiHn IOn yCTaHOBKe H KcπJIyTaUHnIIJNTbl.
B cJyuae HeHcnpaBHocTn PJIHTb, 0bHApy)eHn yTeukn Ra3a HJN NOBpe]DeHn EJIeKTPoPpOBOdKn HemeJeHHO O6paTHTEcb B UeHTp Texo6-cLy]HbaHH N Bbl3OBHTe CneuaJIInCTa.

ελληνικα
ПОБOXH:
- Piv ano onoiabnnotε επεμβaon, oTo εωτερíkó Tou φoupvou n στa τμημata unó táon, npéπεi va δiaκóψετο ng ηλεκτρíkó ρεúma.
Mia evexoevn unepeepavon oTa EwTepiKa Toixwata Tou poypou 0a evpyoioaei Tn diatae aopaaleiac, n onoia 0a diakoyei Tnv Tpofooia Tou pEuMaTOc. H anevpyoioan TnC Tpofoooiaac 0a yiveauToMaT, moic n 0epuokpaia eEwTePikA Tou poypou enaveAe1 eOa Ota anobekta opia.AaBETe unOy npoc, otua evexoeynu kuklki n enpbaon Tc diataEn Cpokaetai Eaiaac avmaawv ouvKow Aetoupyia (n.x. btn Tou 0epooatn Tou puOmuizI TN 0epuokpaoia oTo eomegaTepiKtou foypou). EnoeVw civai anapaitnto va KaeoTE Evav TeviKO. - Mny akoumuatae xomega touc tnc
Lg g 3 aill Jolll jin
- 45
1
J 1
J 1
Jalalai
LgI Lollb odl a jiee cll b sso g i sl auiu uugj y
j 1
yjss Jaa Jai jai Jai Jai Jai Jai Jai
jgl jbi jbi jbi jbi jbi
. 1 j 1 1 1 1 1 1 1 1 1 1 1 1 1 1 1 1 1 1
IT
Introduzione
Dati tecnici
KIT "GUIDE FORNO ESTRAIBILI"
FUNCTIONNEMENT MANUEL
ANNULATION D'UN PROGRAMME
FONCTIONNEMENT MANUEL
ANNULATION DU PROGRAMME
REEMPLACEMENT DE L'AMPOULE DU FOUR
- Thank you for choosing one of our quality products, capable of giving you the very best service. To make full use of its performance features, read the parts of this manual which refer to your appliance carefully. The Manufacturer declines all responsibility for injury or damage caused by poor installation or improper use of the appliance.
- To ensure its appliances are always at the state of the art, and/or to allow constant improvement in quality, the manufacturer reserves the right to make modifications without notice, although without creating difficulties for users.
- When ordering spare parts, inform your dealer of the model number and serial number punched on your appliance's nameplate. The nameplate can be seen when the oven door is opened.
Appliance.complying.with.thefollowing.Directives:
-.LVD Directive (low voltage) 2006/95 / EEC and subsequent amendments
- GAD Directive (gas) 2009/142/EEC and subsequent amendments
- EMC Directive (electromagnetic compatibility) 2004/108/EC
- ROHS Directive 2011/65/EU
- WEEE Directive 2012/19/EEC
-EUP Directive (standby) 2005/32/CE
- European Regulation 65/2014 (energy labels ovens)
- European Regulation 66/2014 (ecodesign)
- European Regulation 1935/2004 (materials in contact with food)
FOREWORD
- Refer only to the headings and sections covering accessories actually installed on your appliance.
| Usable dimensions | Oven |
| Width | cm. 41,00 |
| Depth | cm. 39,40 |
| Height | cm. 31,00 |
| Volume | L. 50/52 |
HEATING ELEMENT POWERS
bottom element 1.5 kW
top element 0.7kW
oven circular element 2.0kW
grill 2.0kW
fan 25W
oven light 40W
cooling fan 22-26 W
Depending on the models, cooker may have:
- Self-cleaning enamelled liners
- Rotisserie
- Mechanical timer
- Analogue clock with minute-minder and automatic switch-off
- Electronic timer
Tangential cooling fan
For the ELECTRIC WIRING DIAGRAM see figure 2 at the back of this manual.
The electrical power is stated on the nameplate. The nameplate can be seen when the oven door is opened.
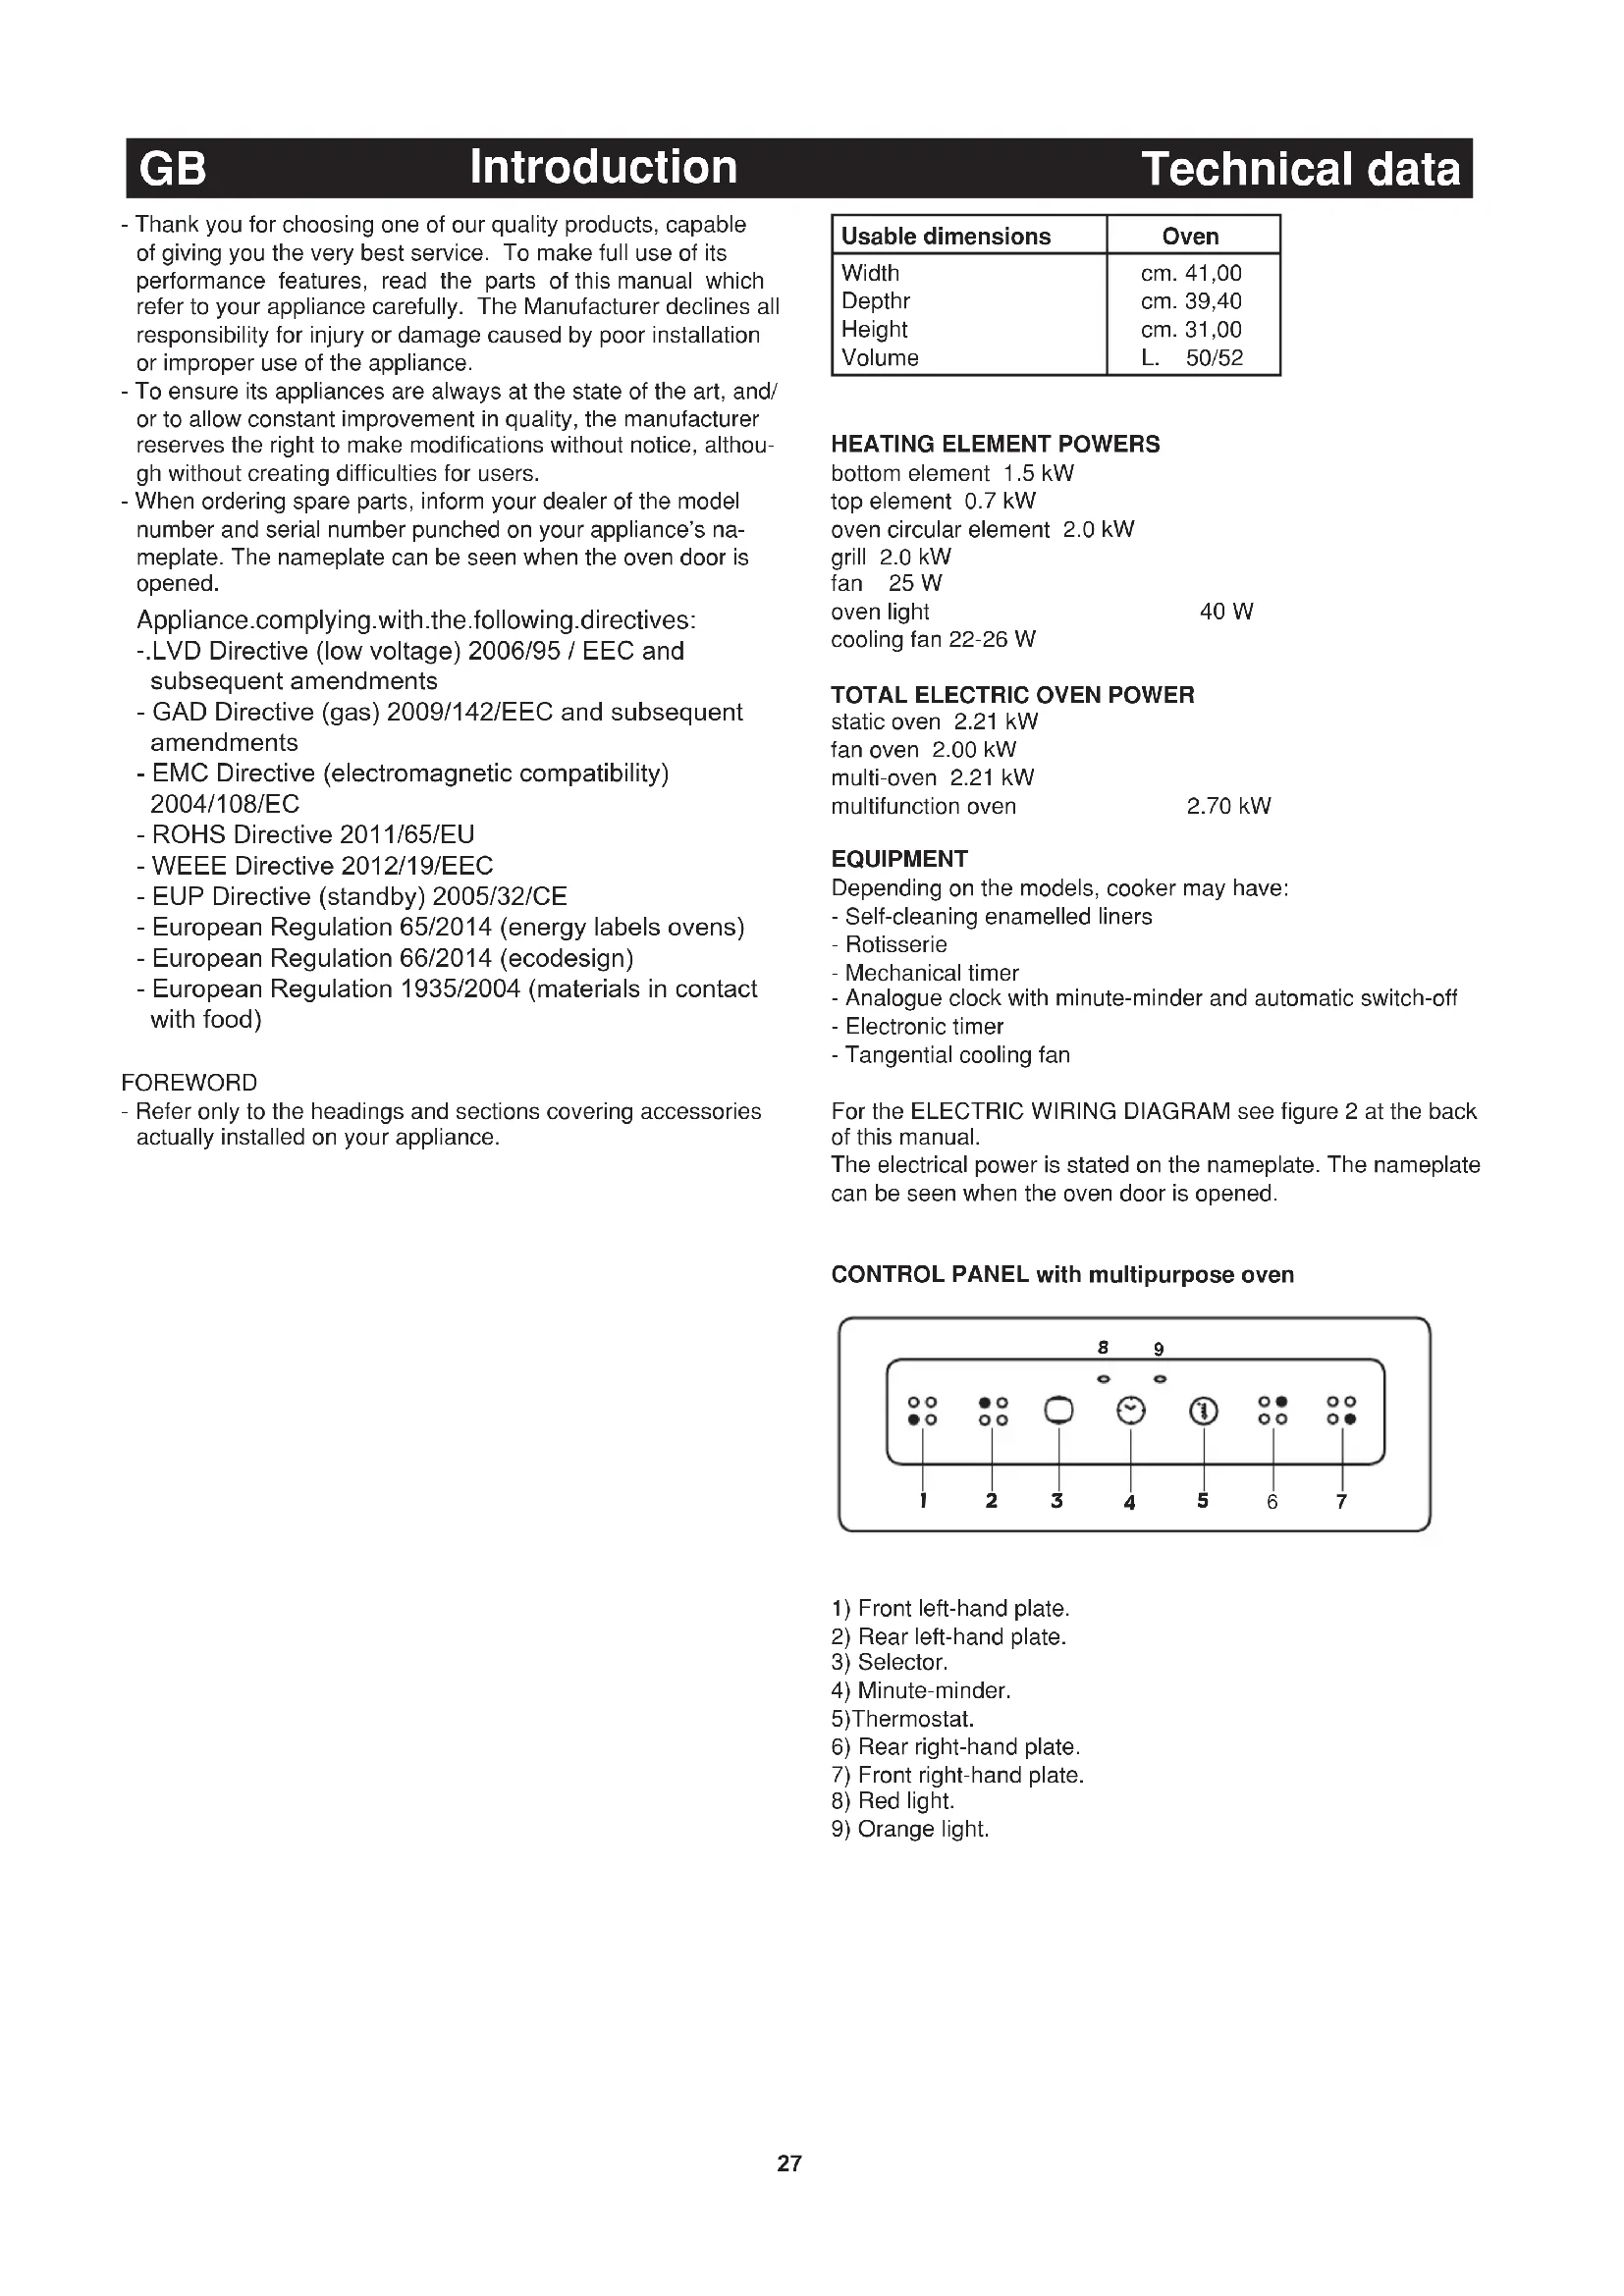
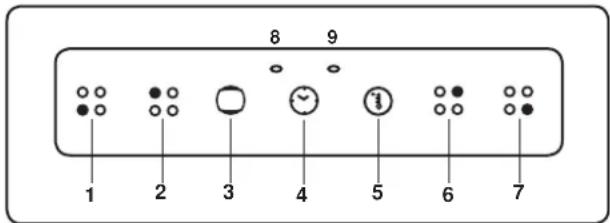
CONTROL PANEL with multipurpose oven
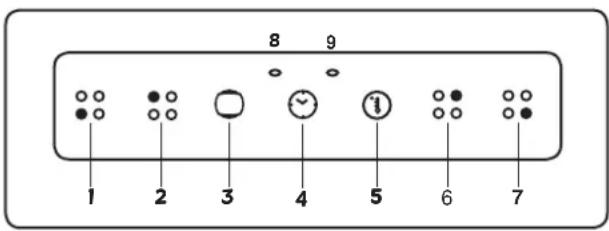
1) Front left-hand plate.
2) Rear left-hand plate.
3) Selector.
4) Minute-minder.
5)Thermostat.
6) Rear right-hand plate.
7) Front right-hand plate.
8) Red light.
9) Orange light.
INSTALLATION
The appliance must be installed by qualified staff working in accordance with the regulations in force.
The appliance is produced to EN 60 335-1, EN 60 335-2 and is of built-in type, meaning that it must be installed in accordance with the producer's instructions.
The oven must be installed in a unit having materials (varnishes, finishes, glues, etc.) resistant to a temperature of at least 100^ .
The dimensions of the compartment for built-in installation are shown in Fig. 1.
Prefit the 4 screws (see fig. 3) using the holes provided in the front panel visible with the oven door open, making sure that the tips of the screws go in the direction of the cabinet's wooden element.
Fit the oven into the unit and screw in the screws until completely tight.
If the oven is to be installed close to other household appliances, check that there will be no mutual interference during operation.
Their respective electrical connections must be separate.
Suitable ventilation should be assured by means of an opening in the top of the column unit, or an opening of 10mm above the oven surround. See fig. 1.
CONNECTING TO THE ELECTRICAL MAINS
Before making the connection, check that:
- the mains voltage is as indicated on the nameplate;
- the earth connection is in good working order.
If the appliance power lead is not fitted with a plug, use an approved standard type, remembering that:
- the green-yellow wire must be used for the earth connection;
- the blue wire is the neutral;
- the brown wire is live;
- the lead must never touch hot surfaces over about 75 degrees C;
- replacement leads must be of type H05VV-F of suitable size (see diagrams in fig. 2).
- if the appliance is supplied without lead, using type H05VV-F cable of suitable size (see diagrams in fig. 2).
N.B. The plug must be reachable when the appliance is installed
IMPORTANT: the manufacturer declines all liability for damage due to failure to comply with the regulations and standards in force. Check that the appliance is correctly connected to the earth (see diagrams in fig. 2 at the back of the manual).
HOW TO USE THE OVEN
STATIC ELECTRIC OVEN
There is a single control knob for the oven or grill.
Starting from the 0 (off) position, the knob can be turned clockwise to the following settings:
- symbol 满: oven lamp on (it will remain on even if the knob pointer is turned to the other settings).
- Setting from 50 to 250 degrees C: oven heat settings, with thermostat control.
symbol grill on (in roof of oven)
symbol - potisserie start with grill on.
Turn the knob anti-clockwise to return to the 0 (off) position.
N.B. - The yellow light switches on and off as the thermostat is tripped.
Before placing food inside, allow the oven to heat up for at least 10 minutes.
STATIC ELECTRIC OVEN 4
With different heating elements controlled using a selector switch and regulated by a thermostat, starting from the 0 (off) position, as the knob is turned clockwise the settings available are:
- symbol : the oven light is switched on (it will always remain on even when the knob pointer is turned to the other settings).
- symbol :grill(in top of oven) is switched on.
- symbol roaster switches on with grill on.
- symbol oven top and bottom elements switch on (conventional cooking function). To regulate the temperature, use the knob of the thermostat oven heat settings rising from 50^ to 250^ .
N.B. - The yellow light switches on and off as the thermostat is tripped.Before placing food for cooking inside, allow the oven to heat up for at least 10 minutes.
STATIC ELECTRIC OVEN " 4 New "
With different heating elements controlled using a selector switch and regulated by a thermostat, starting from the 0 (off) position, the knob can be turned clockwise to the following settings:
- symbol 滑:oven lamp on (it will remain on even if the knob pointer is turned to the other settings).
- symbol slow cooking using the bottom element; the oven temperature is regulated using the thermostat knob.
- symbol :conventional "static" oven cooking, the oven temperature is controlled using the thermostat knob.
symbol :grill on.
N.B. - The yellow light switches on and off as the thermostat is tripped.
Before placing food inside, allow the oven to heat up for at least 10 minutes
ELECTRIC FAN OVEN WITH 4 COOKING PROGRAMS
With different heating elements controlled using a selector switch and regulated by a thermostat, starting from the 0 (off) position, the knob can be turned clockwise to the following settings:
- symbol : oven lamp on (it will remain on even if the knob pointer is turned to the other settings).
symbol : operation of fan. - symbol cooking with fan oven, on one or two levels, the oven temperature is controlled using the thermostat knob.
symbol :grill on.
MULTIFUNCTIONS ELECTRIC OVEN 4 POSITIONS
With different heating elements controlled using a selector switch and regulated by a thermostat, starting from the 0 (off) position, the knob can be turned clockwise to the following settings:
- symbol : oven lamp on (it will remain on even if the knob pointer is turned to the other settings).
- symbol :conventional "static" oven cooking, the oven tem
perature is controlled using the thermostat knob.
- symbol x :cooking with fan oven, on one or two levels, the oven temperature is controlled using the thermostat knob.
symbol grill on.
NOTE: The yellow warning light comes on according to thermostat variations.
Before placing food inside, allow the oven to heat up for at least 10 minutes.
MULTIFUNCTION ELECTRIC OVEN WITH 6 COOKING PROGRAMS
With different heating elements controlled using a selector switch and regulated by a thermostat, starting from the 0 (off) position, the knob can be turned clockwise to the following settings:
- symbol 0 : oven light and red warning light on
- symbol * : oven light and red warning light on, operation of fan.
- symbol :conventional "static" oven cooking, the oven temperature is controlled using the thermostat knob.
- symbol + : cooking with fan oven, on one or two levels, the oven temperature is controlled using the thermostat knob.
- symbol :grill on (on oven top element), the thermostat knob must be set at maximum temperature.
- symbol :quick cooking using the fan oven, the oven temperature is controlled using the thermostat knob. In all positions except zero (0) the red warning light and the oven light are on.
NOTE: The yellow warning light comes on according to thermostat variations. Before putting food in to be cooked, the oven should be pre-heated for at least 10 minutes.
MULTI-FUNCTION ELECTRIC OVEN
With different heating elements controlled using a selector switch and regulated by a thermostat (from 50 to 250^ ), this oven offers various cooking methods. There are three principle sources of heat:
a) Forced heat diffusion (fan oven)
b) Spontaneous heat diffusion (static oven)
c)Infra-red rays (grill)
Starting from the position 0 (off) the selector knob can be turned clockwise to the following positions:
- symbol * : oven light and red warning light on, operation of fan.
- symbol □:conventional "static" oven cooking, the oven temperature is controlled using the thermostat knob.
- symbol :cooking with fan oven, on one or two levels, the oven temperature is controlled using the thermostat knob.
- symbol :traditional oven cooking with fan assistance for cooking on one or more levels; the oven temperature is regulated using the thermostat knob.
- symbol :grill on (on oven top element), the thermostat knob must be set at the maximum temperature.
- symbol : slow cooking using the bottom element; the oven temperature is regulated using the thermostat knob.
- symbol + : quick cooking using the fan oven, the oven temperature is controlled using the thermostat knob.
- symbol :slow cooking using fan oven, the oven temperature is controlled using the thermostat knob.
In all positions except zero (0) the red warning light and the oven light are on.
NOTE: The yellow warning light comes on according to thermostat variations. Before putting food in to be cooked, the oven should be pre-heated for at least 10 minutes.
HOW TO USE THE ELECTRIC GRILL WITH ELECTRIC OVEN
- open the oven door;
- place the food on the shelf;
- place the dripping pan underneath the shelf;
- place the dripping pan and shelf on the uppermost level in the oven
- close the door;
- switch on the grill element;
- after a few minutes, turn the food to expose the other side to the infrared radiation (the cooking time depends on the type of food and personal taste).
To see table "Food to be grilled"
IMPORTANT:accessible parts may be hot when the grill is in use. Keep children well away.
| Food to be grilled | Time minutes | |
| 1st side | 2nd side | |
| Thin pieces of meat | 6 | 4 |
| Fairly thick pieces of meat | 8 | 5 |
| Thin fish or fish without scale | 10 | 8 |
| Fairly thick fish | 15 | 12 |
| Sausages | 12 | 10 |
| Toasted sandwiches | 5 | 2 |
| Petits oiseaux | 20 | 15 |
IMPORTANT - For models with "Electric Oven" only two knobs separately (selector-thermostat), grilling is permitted with the door closed, without using the front side. Temperatures above 200^ must not be used when grilling with the door closed.
HOW TO USE THE ROTISSERIE (FiG. 4)
The rotisserie, which is combined with operation of the grill, is only available for static oven models. Operation:
- switch on the grill element;
- impale the meat for cooking on the spit and fix it in the centre of the two forks;
- place the small frame for the spit on the oven's ordinary shelf runners, or insert the larger spit support frame in the runners incorporated in the sides of the oven;
- insert the end of the spit into the motor drive socket;
- remove the handle from the spit;
- place the drip tray on the bottom runner of the oven;
- close the oven door;
- start the motor by turning the knob to the spit setting;
- baste the meat from time to time. When cooked, screw the handle onto the spit and remove from the motor drive socket. CAUTION: The spit forks may have sharp points. Handle with care.
HOW TO USE THE MINUTE-MINDER (FiG. 6)
The minute-minder can be set for times up to one hour max. The setting knob must be turned clockwise to the time required. At the end of the preset time, a buzzer sounds; it stops automatically. The minute-minder does not switch the oven off when the buzzer sounds.
USE OF THE ELECTRONIC TIMER (FiG. 7)
This allows the start time and cooking duration time to be programmed. If food does not need to be watched, this timer can be selected even when the user is absent. Soon after installation and at any electrical supply cut-outs the display flashes; the clock must then be synchronized again to allow programming. SETTING THE TIMER TO THE CURRENT TIME
- The current time is set by pressing the 2 buttons (COOKING TIME and STOP) and the "+" or "-" button at the same time. Any previous programmes are cancelled and the AUTO symb flashes.
NOTE: when the AUTO symbol is flashing the oven cannot be
used manually.
“+” AND “-” BUTTONS
-
Pressing the "+" or "-" buttons makes time go up or down at variable speed according to how long the button is pressed for.
MANUAL USE -
Press the MANUAL button: the AUTO symbol goes out (if flashing or permanently on) the SAUCEPAN symbol lights up and the oven can be used by adjusting the thermostat knob and the selector switch according to the instructions given in the manual.
AUTOMATIC OPERATION WITH END OF COOKING AND DURATION TIMERS
- Let's use an example: it is 9:25 am; you want the oven to switch on at 11 am and switch off at 12 pm (cooking time 1 hour).
- Press the COOKING DURATION button and within 5 seconds press "+" button until it shows 01.00, adjust using "-" button if necessary. The AUTO and PAN symbols come on permanently.
- Press the END OF COOKING button and within 5 seconds press "+" button until it shows 12.00. The PAN symbol goes out but the AUTO symbol remains permanently on.
- Move the oven thermostat knob to the desired temperature, and the selector switch to the required cooking method; the red warning light comes on the oven light comes on and the timer is ready to start: at 11am the oven will come on automatically and the PAN symbol will light up.
- When cooking is over (12 am) the AUTO symbol flashes, the PAN symbol goes out and a buzzer sounds; to turn off the buzzer press any button.
- Move the thermostat and selector knob to the OFF position. SEMI-AUTOMATIC OPERATION WITH COOKING DURATION SELECTION
- Let's take an example: it is 11:35 am and you want the oven to stay on for 25 minutes from now on.
- Press the COOKING DURATION button and within 5 seconds press the "+" button until it shows 00.25, adjusting the time with the "-" button if necessary. The AUTO and PAN symbols light up permanently.
- Turn the oven thermostat knob to the desired temperature and the selector switch to the required cooking method; the red warning light comes on, the oven light comes on and the oven starts to operate.
- After 25 minutes the oven and the PAN symbol go out. The AUTO symbol flashes and the buzzer tells you that cooking is over: to turn off the buzzer press any button.
- Then move the oven thermostat knob and the selector switch to the OFF position.
MINUTE MINDER
- Press the MINUTE MINDER button and choose the desired time using the "+" or "-" button.
- The BELL symbol lights up when the minute minder is in use.
- When the pre-set time is over, the buzzer sounds and the BELL symbol goes out.
BUZZER
- The buzzer sounds at the end of a programme and lasts for a maximum of 7 minutes.
- To turn it off, press any button.
- Pressing the " - " button without having previously selected a function the frequency of the signal changes. A selection from 3 possibilities can be made. The selected signal is audible as long as the " - " button is pressed.
STARTING AND CHECKING A PROGRAMME
- The programme starts after about 4 seconds of it being set.
- The set programme can be checked at any point by pushing the corresponding buttons.
PROGRAMMING ERRORS
- Example: at 12:15 pm a COOKING DURATION time of 30 minutes is set and a END OF COOKING is programmed in at 12:30 pm.
- The programme error can be rectified by changing the duration or the end of cooking time, or by pressing the MANUAL button
and programming again.
- If there is a programming error the oven will not come on.
ANNULLING A PROGRAMME - A programme can be cancelled by pressing the COOKING DURATION button and then the " - " button until the display shows 0.00.
IMPORTANT:
AT THE END OF EVERY PROGRAMMED COOKING OPERATION YOU ARE ADVISED TO PRESS THE BUTTON, OTHERWISE THE OVEN CANNOT BE OPERATED MANUALLY.
THREE -KEY ELECTRONIC TIMER (FiG. 8)
Allows programming of the duration of cooking in the oven. If the cooking procedure does not require monitoring, it can also take place in the user's absence.
AT POWER ON
When the appliance is powered up, the display flashes and the time starts from "00:00". The oven is switched off. The display flashes until the setting is made with "MODE".
SETTING THE TIME
On installation or after a power blackout, the display flashes. The current time now has to be set.
Press the "MODE" key.
Press the or keys to set the current time.
MANUAL OPERATION
After the correct time has been set, the oven can be used in manual mode with the aid of the oven thermostat knobs and the selector switch (pan symbol on).
SEMIAUTOMATIC OPERATION WITH COOKING DURATION In this operating mode, the user sets the cooking duration: at the end of the countdown the oven switches off and a buzzer sounds.
Example: it is 11:35 and you wish the oven to stay on for 25 minutes starting from now. Press the key until the display shows "25:00", adjusting the value if necessary with the key. The pan and "auto" symbols are on. Turn the oven thermostat knob to the temperature required and set the selector switch on the chosen cooking mode: the oven indicator lights and inside light illuminate and the oven comes into operation.
N.B.: To reset the cooking duration keep the key pressed until zero is reached.
After 25 minutes the oven and the pan and "auto" symbols turn off and the buzzer warns that the cooking procedure has ended. Press the "MODE" key to stop the buzzer and restore manual operation. Then turn the thermostat knobs and oven selector switch to the off position.
N.B.: The units of measurement used for the cooking duration change depending on the setting: initially the numbers on the display show the minutes and the seconds, and increases are in 10 seconds, until 99 minutes is reached.
DELETING PROGRAMS
Programmed cooking duration times can be deleted by pressing the and keys simultaneously and releasing the key first.
USE OF SINGLE-CONTROL END OF COOKING TIMER (WITHOUT CLOCK) (FIG. 9)
This allows the cooking time to be programmed. Operation:
- Move the knob to the desired cooking time (120 mins max.).
- Choose the temperature using the thermostat knob and move the selector knob to the required cooking method.
- When the programming knob is at the 0 position the oven will switch itself off. This is automatic.
- Move the thermostat knob back to symbol .
- Move the selector knob to symbol 0..
N.B. If the timer is not used, the oven programming knob is to be set to the manual position
USING THE ELECTRONIC TIMER WITH PUSH KNOB (FIG.10)
GENERAL OPERATION
This timer governs the time display (with analog hands) and the
operation of the oven (using push knob and indicator icons). Pushing on the the knob, you can: adjust the time, program the start time and end of cooking, set the alarm (Minute Minder). SETTING TIME
To adjust the clock press the knob briefly 4 times until you get the flashing of the "CLOCK" icon. Hence to increase or decrease the time, turn knob clockwise or counterclockwise. After 10 seconds of the last adjustment the electronic timer automatically exit time setting mode.
MANUAL COOKING
During default condition, timer allows manual firing of the oven using the general oven switch (external to the timer). PROGRAMMING END COOKING TIME
Cooking end programming allows you to start immediately and stop cooking in an automatic manner based on the time scheduled. To program the end of cooking time briefly press 2 times the knob until you get the flashing of "END TIME" icon. To increase or decrease the cooking time, turn knob clockwise or counterclockwise. The flashing of "END TIME" icon continues for some seconds after the last rotation. The program can be confirmed by pressing the knob (at least 2 minutes
of cooking time). Upon confirmation of the program, the cooking is started and the alarm is automatically activated.
Cooking stops when "Programmed End Time = Present Time". To view the program press and release the knob and the timer show the selected program. When cooking stops the "END TIME" icon flashes and the alarm beeps. After 1 minute beeps are disabled and the icon "END TIME" remains flashing until you press the knob.
To cancel the program before the end, press the knob for some seconds and the program will be canceled and the timer returns to manual cooking mode.
START AND END COOKING TIME PROGRAMMING
Cooking start programming allows to start end stop cooking automatically based on the time scheduled. To program the cooking start time, briefly press 1 time the knob until the flashing of the "START TIME" icon. Increase or decrease the cooking start time turning knob clockwise or counterclockwise. The flashing of "START TIME" icon continues for some seconds after the last rotation. If within this time you don't turn or press the knob the hands return automatically to display the time and the program is canceled. If you press the knob the cooking start time is stored ("START TIME" icon is turned on) and timer switches to cooking end programming (the "END TIME" icon from off becomes flashing). The cooking time end programming will follow the procedure in the preceding section. Cooking will begin when "Programmed Start Time = Present Time".
MINUTE MINDER PROGRAMMING
Minute Minder programming allows you to have a simple alarm after a scheduled time without activating the cooking (mode Minute Minder). To schedule an "alarm" (Minute Minder mode), press the knob 3 times until the flashing of "ALARM" icon. Minute Minder setting is identical to end of cooking time setting (see the corresponding paragraph). It's possible to use Minute Minder only when there is no current cooking program active. DISPLAYING THE PROGRAM SET
The timer allows the display of the program. To view the program set press and release the knob, at the same time the programmer will display the program set by moving the hands on the set times and highlighting the steps with the flashing of the icons.
The controller then returns automatically to display the current time and continues with the execution of the program.
CANCELLATION OF PROGRAM SET
The timer allows the cancellation of the program. To delete the program set to press knob for a few seconds until the icons shut off and emission of the second beep.
The programmer then automatically returns to the manual cooking.
BLACKOUT INDICATION
The timer signals every lack of power supply through the flashing
of the symbol "CLOCK". In this case, to disable it briefly press the knob.
CLEANING THE OVEN
- The oven should be cleaned after each use, when it is still lukewarm but not hot. This allows fats to be removed before they have time to dry.
- If stubborn stains remain place a cloth soaked in ammonia on the bottom of the oven, close the door and leave for a few hours. Then wash the oven with hot water and liquid detergent and dry completely.
- For the outside of the oven, use a soft cloth and soapy water.
NEVER USE POWDER DETERGENTS OR OTHER ABRASIVE PRODUCTS.
FOR COOKERS WITH SELF-CLEANING OVEN
The two side walls and the back are coated with a catalytic self-cleaning enamel (fig. 5). Every 10-15 times it is used, leave the oven empty at full heat. The time required for cleaning depends on the condition of the oven. Some splashes tend to set hard and may clog the pores of the special coating, preventing oxidation and eliminating its self-cleaning properties. In this case, as soon as the oven has completely cooled apply very hot water to soften the deposits and use a soft brush, without detergent, to remove them. Then switch the oven back on at maximum heat for a few minutes.
Important: never use metal brushes or abrasive substances).
To replace the catalytic liners, purchase item code 0003103/1
CHANGING THE OVEN LIGHT BULB
- Switch the oven off and disconnect it from the mains electrical supply;
- the light bulb is in the top right-hand corner of the back of the oven;
- make sure that the oven is cold and unscrew the glass lamp-holder;
- replace the light bulb with another of the same type and screw the lamp-holder back firmly into place.
REMOVING THE OVEN DOOR
The door can be removed to clean the oven in an easier way following this instructions:
1) Open the door completely.
2) Turn the two levers "B" bringing them from position 1 to position 2 (see fig.11).
3) Close the door slowly to a stop, grab it with both hands from side to side, close it further and pull it by lifting it upwards.
4) To replace the door you must follow the procedure in reverse order, insert the two hinges in their seats and open the door completely.
5) Turn the two levers "B" bringing them back in position 1.
6) Close the door normally.
CLEANING THE DOOR GLASS
All ovens are fitted with glass doors with innovative, extremely convenient characteristics. The full-glass on the inside can be removed easily without the aid of any tools: the screw-free visible fixing system guarantees that the door provides the easy cleaning only glass can ensure. Proceed as follows to remove the glass in the oven door correctly.
- Fully open the door;
- apply gentle leverage with a coin or a flat-head screwdriver in the two recesses in the bottom of the inside of the door simultaneously;
- released from its seat, the glass can be extracted from the recess into which it is fitted:
- After cleaning, repeat the same procedure in reverse order.
WARNING: Take care to reassemble the pieces of glass in the correct order; the inside glass has a special heat-reflecting finish!
USE OF THE TOUCH TIMER 3 KEYS (Fig. 13) The first start up
The numbers and the A letter on the display are blinking when the oven is switched on for the first time, or after a power cut:the appliance cannot be operated in this condition.To set the hour and/or to enable the appliance to operate press the M key for at least 2 seconds: the A letter turns off and the numbers now are steady on the display.The dot (3) starts blinking:press the-or ^+ key to set the hour.The hour is accepted by the programmer just few second after having released the key.
N.B. the appliance can be correctly used for cooking only when you will see on the display the symbol (2).
The symbols on the display
| 1 | A* | Automatic programme is working. (* in some models there is the writing " Auto instead of A) |
| 2 | The appliance is ready for manual use (not auto) | |
| 3 | • | When blinking, the programmer is in setting hour mode. |
| 4 | Timer set. | |
| 5 | - | Decreasing numbers when setting the timer. Also for choose your desired sound level (3 levels available) |
| 6 | M | "Mode" key to access the programming options of the pro-gramme. |
| 7 | + | Increasing numbers when setting the timer. |
Timer
The purpose of the timer is just of a sound signal, which can be set for a maximum time of 23h 59min. Once elapsed the set time, the (4) symbol turns off and a sound signal is heard; this sound set off automatically in 7min, or you can stop it by pressing any key of the programmer. To set the timer press the M key for 2 seconds, or anyway just to see the (4) symbol blinking. Set the timer by using the + or - keys. Release the + or - key when you have matched your desired time. In a few seconds the current time appears on the display together with the (4) symbol.
The countdown starts immediately from now on.
Semi-automatic cooking
Cooking time
Once having selected a cooking function and set the desired temperature, press the M key for a 2 seconds time to access the programming mode. The (4) symbol appears. Release and press again the M key.
On the display, the A symbol starts blinking and the "dur" writing appears on the display, then it changes to 0^*00 .
Set the cooking time with the -or + keys. (max available time: 10h). The selected time is automatically processed by the programmer in a few seconds, or you can also touch the M key many times just to see again the current time. The A and (2) symbols will be on the display.
Once the set cooking time is finished, a sound will be heard and the oven automatically switches off. Please see the following paragraphs about how to disable the sound alarm and restarting the oven.
End of cooking
Once having selected a cooking function and set the desired temperature, touch the M key to access the programming mode for at least 2 seconds. The (4) symbol switches on. Release and touch again the M key.
On the display the A symbol starts blinking and the writing "dur" appears. Touch again the M key. On the display the writing "End" appears. The last one changes few seconds after with the symbol 0^*00
Set the end of cooking time with the keys - or +. (maximum available time: 10h 00m). The selected time is automatically processed by the programmer in a few seconds, or you can also touch the
M key many time just to see again the current time. The cooking immediately starts, while on the programmer display the current time is shown again in a few seconds.
The A and (2) symbols will be on the display.
Once the set end of cooking time is finished, a sound will be heard and the oven automatically switches off. Please see the following paragraphs about how to disable the sound alarm and restarting the oven.
Automatic cooking
Set a cooking time following the instructions on the cooking time paragraph, then set the end of cooking time following the instructions on the previous paragraph.(maximum available end of cooking time 24h).
The oven automatically switches on at a determined time which is the difference between the end of cooking time and the cooking time.
During the waiting time before cooking, which goes from the oven start to the heating, on the display appears the A symbol to show that an automatic program is on and the current time. The oven on is marked by the (2) symbol.
Once the set end of cooking time is finished, a sound will be heard and the oven automatically switches off. Please see the following paragraphs about how to disable the sound alarm and restarting the oven.
How to disable the sound alarm
To disable the sound just touch one of the keys.
Operating again the oven
Once a semi-automatic or automatic cooking has expired, on the display appear the current time and the blinking A symbol. In this condition, the heating elements and the light bulb of the oven are disabled.
To enable again the oven, just touch and keep the M key up to see the symbol (2) on the display and the A symbol disappears.
THE OTHERS PROGRAMMER FUNCTIONS
How to delete a cooking time - Semi-automatic or Automatic To delete a semi-automatic or automatic cooking program, with the A symbol on, touch together the - and ^+ keys for a least 2 seconds or anyway up to see the (2) symbol and the disabling of A symbol.
How to delete the countdown timer
To delete the counting of the timer, which symbol is (4), touch the M key for at least 2 seconds or anyway up to see the (4) symbol blinking.
Touch together the - and + keys.
Checking the function settings
The set or remaining time of every cooking function of the programmer can be recalled to the display by entering in program mode with the M key. Touch and keep the M key for almost 2 seconds or anyway up to see the (4) symbol. The remaining time appears on the display, or a series of zero numbers if the timer is disabled. Touch again the M key. On the display appears the "dur" writing, then alternately the remaining time or a series of zero number (disable timer).
By touching again the M key, the end of cooking time appears together with the "End" writing.
How to change the current time or the sound level
With the programmer in standard mode, the (2) symbol is on touch together the - and + keys for at least 2 seconds or anyway up to see the dot (3) blinking.
To update the hour on the display: touch the - and + keys.
To change the sound level: touch the M key.
On the display appears the writing : to n... followed by a number. Select whit the - key your favourite sound level.
Note: number 1 is referred to the highest sound level. The available levels are 3.
Warning:
Power cut causes the loss of any program, even the clock. That means the programmer will have to be set again.
GENERAL PRECAUTIONS
A number of fundamental precautions must be complied with when using household electrical appliances. In particular:
- The ceramic-glass hob has good mechanical strength and thus withstands small accidental knocks. If the knob is broken or cracked by a knock, do not use the appliance, disconnect the power supply and contact your dealer.
Advice in case of malfunctions
Before contacting your After-Sales Service, check that:
-
the plug is fitted properly into the mains socket;
-
the master pilot is on.
If the problem persists, consult a qualified, authorised technician capable of repairing the fault.
If the oven light does not work, proceed as follows:
- Disconnect the power supply. Remove the protective glass on the back of the oven and replace the bulb.
No liability is accepted for injury or damage caused by poor installation or improper use of the cooker.
USING PUSH-PULL KNOBS
Some versions of the appliance are fitted with a push-pull knob. When not in use, the knob is flush with the control panel; to use it, press and it will pop out; now turn it to select the function required. When in the operating position, the knob is fitted with a safety device which prevents it from returning to the retracted position.
"PULL-OUT OVEN RUNNERS" KIT
Some versions of the appliance are fitted with telescopic runners. They are extremely convenient when cooking, since they allow shelves to be pulled right out, and stopped in the fully extracted position. This convenient aid allows foods to be checked with no risk of burns, and ensures more thorough cleaning.
The oven can be fitted with a "Pull-Out Runner" kit on request. This optional can be ordered from your dealer.
HOW TO USE OVEN ACCESSORIES
- The oven grill is designed to take normal oven dishes for cooking sweets or roasts, or is used without a pan for cooking foods under the grill.
The oven grill is equipped with two catches on the rear must be inserted in the oven until they touch the back of the oven.
- The drip pan under the grill is used to collect juices, which drip from the food that is cooked directly on the grill. The drip pan
can also be used for cooking.
- The oven is provided with a stop system to extract the racks and prevent them from coming out of the oven (1). As shown in the drawing, to extract them completely, simply lift the racks, holding them on the front part, and pull (2) see fig 12
EUROPEAN DIRECTIVE 2012/19/EEC (WEEE):INFORMATION FOR THE CONSUMER
Fig.A
This information is strictly addressed to those who have a product showing the symbol below (Fig.A). This symbol is indicated on the technical data sticker (rating label) placed on the product itself.
This symbol indicates that the appliance is considered as Waste Electrical and Electronic Equipment and complies with the European directive 2012/19/EEC (WEEE).
Therefore this product is not to be treated as household waste. Instead it shall be handed over to the applicable collection point for the recycling of electrical and electronic equipment or it can be handed back to the retailer when you want to purchase a new equivalent product.
The consumer is responsible for a correct disposal of the product towards an appropriate collection point.
Otherwise the consumer can be exposed to a penalty sanction by laws in force for waste disposal.
Appropriate separate waste collection followed by recycling the product, the treatment and compatible environmental disposal contributes to avoid negative effects towards the environment and health and helps to recycle material which the product is composed of.
For more detailed information regarding the available waste collection systems of this product please contact your local city office or contact the retailer where the product was purchased. The manufacturers and importers will obey to their responsibility for recycling, treatment and compatible environmental disposal by participating directly and through a joint cooperative system.
EUROPEAN REGULATION NO 1935/2004 - MATERIALS IN CONTACT WITH FOOD. NOTICE TO USERS.

The symbol shown here, which appears on the packaging, indicates that the materials in this product which may come into contact with food are compliant with the requirements of European Regulation No 1935/2004.
Inside the oven chamber, food might come into contact with oven shelves, dripping pans, pastry trays, oven door glazing, rubber gaskets, rotisserie spits, and the sides of the oven itself. On the hob, contact is possible with pan stands, burners and the hob skin.
In the food-warmer, contact may occur with the sides of the compartment.
HaIIaΦnMa 6IaRoIapHT Bac 3a To, YTO BbI OCTaHOBJIIN CBOI BbIbOp Ha ODNOM H3 BbIyCKaEMOM EIO KaueCTBeHHOM H3JeJIN, H TropAHO HaJeETcA, YTO 3TO ObOpyIOBaHHe 6yTeT BbIaBaTb HAJIyUHNE 3KcNlYatauHOHHBe NOKa3aTeJIN, CnpaBeJINBO 3aTpeBOaHHBe B MOMeHT npHOpeTeHH. C 3TOI CEJIbO Mbl PnHrJa7aem Bac BHIMATEJBHO pOuyHTb HNCPTpyKUHN, H3JOCHHBIC B DAHHOM IOOCHNI. PnH 3OTOM CJCdyCT HmETb B BVHy TOJbKO Te NapaPpaFbI, KOtOpBE ONHCbBAHOT npHbOpbl OOBpyIOBaHHe, OTHOCAHCEK INpHObPeTEHHOM BaMn aInapaTy. FApRka - H3ROTOBHTb He HecET OTBeTCTBEHHOCTb 3a IOBpeJDCHH, HcHcPiabHOCTH H HeCuaCTHbc ClyuH, BBi3BaHIbIe HecoBIOJedHHEM peKOMeHJaIIN NO yCTAHOBKe H 3KcNlYaTaUHH IIHTb.
CTpeMcb BcERda 6bITb Ha CaOMBbICOKOM TexHHueckOM yPOBHC, H IIpeIaIarTaB Bam H3dJIINr TOJbKO JyUHcero KaIEcTBA, HAIIa FHPMa OcTabJIeRr 3a Co0Bn PpABO BHOCHTB NMeHENr TaKle H6e3 CneuHaJIbHOro IpeDyNpe)DeHn, He CO3JaBaI pHi OTM KaKHX 6bI To HN 6bIIO HeyIo6CB NTpeBHTeJIaM.
- PnB03MoHOM 3aTpe6oBaHH 3aNaChbIX qacte, OpaHTTEcK BaIIeMy PO3HHUHOMy IPOdaBcy, COOIBHB HOpE MoJeHN HOpE TexHHueCKOrI NaCnOpTa aIInapata, yKa3aHHbIe Ha 3aBOJckOn TaJIuHKe. TaJIHky MOHO YBHeTb PnH OTK pbBAHH DBePbI dyXOBKn.
IIHTa COOTBETCTBYeT HOPMaTHBaM
-Директва LVD (Low Voltage) 2006/95 / EECипocнeуюиne
нор paВкn
-Директва GAD (ra3) 2009/142/EEC Ипослесушни
норравки
-ДиректнБА EMС (эл ektpomamHnTHaЯ COBmectHmocTB) 2004/108/EC
- INpeKTHBa ROHS 2011/65/EU
-Директва WEEE 2012/19/EEC
-ДиректuaEUP(standby)2005/32/CE
-EBpOeNckn PeryIpObaHne 65/2014 (Heprna 3TnKetKn Neu)
- Ebponeckn Perynpobanhe 66/2014 (EcoDesign)
- Ebponeckn PeryimpoBaHne 1935/2004 (KoHTaKTbIe MaTePnaJIbI npOyKTOB NHTAHN)
PNEINCIOBNE
-BaHHom Nocobn CneJeYnt H3yUHTb ToJbKO Te CTaTb H rJaBbl, KOTOpBc OTHOCATC K pHOBpTeHHOMy BaMn aannapaty.
DyXOBKa C cnCTeMoB BeHTHJIaHH 2.0 KBT
KOMHHPOBaHHaYxOBka 2,21 KBT
MHOROyHKINHOHaJIbHaIyXOBKa2.7KBT
OxnaaJauoui BHTnIaTOp 22-26 KBT
MOHOCTBaAMnB3eKTPnueckoIyXOBKn 40BT
OBOPYIOBAHNE
B 3aBnCHMOCTN OT MoJeH, KXYOHHbIe PJIHTbI MOrY IMeTbI.
CTEHKN DYXOBKH C 3MaJIeBbIM CaMOOuHIIaIIOHMcR IOKpbITHEMb
-BepTe/lb
-MexaHueckn TaMepb
- nporpammpyuoee yctpoHCTBO OKOHuaHHaBapKn CnHPOBbIMuacAMHB
- nporpaMMpyouee ycTPOIcTBO OKOHuaHHaBapKn C eINHbIM MExaHH3MOM YnpaBJEHHb
-3JIeKTPoHHOe nporpaMMpyuuee yCTPOHCTBO.
- Kac noJb3ObaTbcra “aHaIoroOBbIM" npOrpaMMpyUoUcM yCTpoiCTBOM OKOHuaHnRA TOBKN
3JIKTPHUECKA CXEMA CBA3N npHBedeHa Ha pnc. 2 B KOHIe IIOOC6HA. 3JIeKTPHuecka MOIHOCbY kA3aHa Ha 3aBOIDcKoT Ta6JHKe, KOTopyIO MOHO yBnTeB npn OTkpBaHH INBepuI dyXOBKN.
Cpok cny6bI daHHoro H3eJnH 10JeT.
FapaHTHHbHcpoK-1ro
Hata H3ROTOBJIeHHa Yka3bIbAEcHa 3TKeTKe C cepHHbIM HOMCPOM
H3JeJIIN H MoIeT 6bITb BbIOJIHeHa B IByXΦOpMaTaX:
1.AASSGNNNN-AA-yka3bIbaETnoCleHneDBeUΦpblrda, SS- npopakobH Homep HeJeLH G- DeHb HeJeHN,NNNN -uΦpblBnpaKe Bo3paCTaHH.
2.AAMMGG-AA-yka3bIbAeT nocJeHHe DBe uHΦpI rOa, MM- npraKOBbH HmOp mecua, GG-dcH IIpoH3BOJCTBA.
BCTPOEHHNAIHAHECb yHnBepcAIBHOJ dYXOBKO
1)IpeHnJneBaKoHΦopKa
2) 3aHnJneBaKoHΦopKa
3) CenekTop
4) TaHmep
5) TepmoperyraTop
6) 3aHn npaba KOnfopka
7)передя правая конфоркa
8) Kpacna JAmnoKa
9) OpaHkeBaJnAmnoUka
YCTAHOBKA
YcTaHOBKa DOJIHa 6bITb BbIIOJIHeHa KBAJIINHPOBaHHbIM TexHHKOM, C COBJIOJEHHEM DeICTBYIOIHX HOPMaTHBOB NO yCTaHOBKe. O6OpyIOBAHHe IPOHN3BeDEHO B COOTBeTCTBHN C HOPMaTHBaAMN EN 60 335-1, EN 60 335-2, IN DJOHO 6bITb "BCTaBJEHO BHYTpB Me6eJbHOro raphHTypa" YTO O63bIBaEt BblIOJIHHTb YcTaHOBky B COOTBCTBHN C yKa3aHHM NHIOTOBHTCLIA.
DyXOBKa DJIHa 6bIb yCTaHOBJIeHa B Me6eJIbHOM H3dJIHN C IIpMHcHcHcM MaTePHaJIOB (KpaCKH, OJIHcOBAKN, KJIcH H T.D.), KOtOpbIe DJIHa bIb 6bIb yCToONHBbl K TempePaTyPe He MeHee 100^
Pa3mepbI yctaHOBOUHOro npOema npBBeDeHbHa Pnc.1 IpeDbapnteHbHO yCTaHOBtne 4 BnHTa (CMOTpn pnc.3) B CNEuaJIbHbIe OTBepCTnJ LInceBOI CTOPHbI, KOTOpBIE BnHbI npOTKpbIToN DBePue dyXOBKn, y6eINBUnCb, YTO OCTpne BnHTOB HAnpaBHeO B CTOpOHy pa3dEInTeHbHO DepeBHHo npeperopdkn Me6enl.
BCTaBBTe DyXOBky B Me6eIb I 3aTAHnTE BuHtbl Do ynopa.
B clyuae, ecJn dYXOBKa 0oJHa 6bIb yCTaHOBJeHa B6JH3n pyrroTOOMaHIrero 3JIeKTPoPnPbOpa, CJEyET yOcTObEPbITbcra, UTObBO BpemF yHKUHNOHPoBAHn He 6blIO B3aHMhBix NOMex. TaKe H COOTBeTCTByUOHe 3JIeKTPHueckne CB3n D0JIHbI 6bITb pa3JeHeHbI.
PekomeHdyetye TaKe oEbcneuHTb COOTBETCTBYOuyo BEHTNIJIIO NOCpeIDCTBOM OTBepCTnB BepXHeN Yactn Me6eJIbHOI3JeINBA BnDE NeHaJa, HIn OTBepCTn 10 MM Ha paMOI dyXOBKn. CMOTpHTe pnc.1.
IOIKJIIOUEHNEK3JIIEKTPNUECKOHN CETH
IpeIe Yem npHcTyNaTb K NOKIIIOueHIO K 3JIeKTPuuecko CETN, HeoXoHMO BbINOJHHt CJeDyUOee:
- HanpaeHHe 3eKtpnuecko CeTH OJHO COOTBeCTBOBaTb BEJIuHHa, yKa3aHHbIM Ha 3aBODcKO TaBnUKe;
-3a3emJIeHHe IOJHO 6bITb 3000KTHBbIM
DOnKHO 6bIb YACHO, YTO pN OTKHIOeHNm np6Opa OT 3NeKtpueeCKo CETn C BUNK, OHa DOnKHA 6bITb NERKO DOCTyINHO NOcne yCTaHOBKn np6Opa COrraCHO IHCTpyKUJAM.
ECINB KOMIIeKT aIIIapata BXoINT Ka6eJIb 6e3 BHIKH,TO NOKJIHOyATb COJIaCHO pncyHKy 2. Pn Eton CJeNyET yHTbIBaTcJcEyIOUce:
-]EJTO-3eJIeHbI Ka6eJIb DOJIeH 6blTb HcNOJIb3OBAH B KauecTBe 3a3EMJIeHH;
CHHHKa6eJIbIJIaHEITpaJIN;
-KOpHHeBbKaeJIbIJIa3bI;
- KaBeJIb He DoJIleH 6bITb B KOHTaKTe C rOpAHH CTeHaMH, TeMnepaTypa KOTopBx INpeBbIIaET 75^
B CJyue 3aMeHb Ka6eJIb DoJIleH 6blb THIIa HO5VV-F COOTBeTCTByIOHH CeueHHem (CMOTPHTe CXEMbHa pnc.2);
B C Lyue, ECINB KOMIIeKTIOCTaBKN anIinaPATA Ka6JIb H BxOHT, CJeNyET HcNOJb3OBaTB Ka6JIb Tnna Y05PP-Φ HnH Y05B2B2-Φ C COOTBcTCTByUHMM CeueHHem (CMOTpHTE CXEMbHa pHc. 2);
BAHOE 3AMEUAHHE:ΦHMa H3ROTOBHTeJb OTKJOHOReT BCJkyOOTBETCTBCHHOCTb 3a yuepe, IPOHcXODAunIOT HECOBIODeHHN DeHCTBYIOHN X PpaBHn H HopMaTHBOB. COBetyem IPOKOHTPoJInpOBA Tb PpaBHnHoE COCTOARHe 3aEmJeHHn Annapata (CMOTPHTe CXEmbHa PHc.2 B KOHne NOCOBHn).
KAKHCIOb3OBATdyXOBky
3JEKTPPUECKA CTATNUECKA DXYOBKA
3a)HraHHe dyxOBKn HnI rPHJy BbINOJIHReTcN NOpeCDTBOM OHN eHNCTBeHHo pyKu.
HcxOJa n3 noIOJeHHo 0 (noraWeHo), H BpaJau pyKy no
YacBOB CTpeJIke, yCTaHaBJIHBAOTc CJeDyUWeH NoIOJeHHa:
-CHMBOJ -3a)HrAHHe JAMNbI dyXOBKN (KOTOPa86yDet NOCTOHHO rOpTe, TaKe Hn PnH yKa3aTeJIe pyuKn, yCTaHOBJIeHHOM Ha BCEX dpyRnx NIOJOeHHx).
-ПОЛоEнeOT 1do10(HJNOT50do250°C)-OBorpeBdIyXOBKN BCTOPOHy IOBbHHeHnC TePmocTaTHueckHM perYJIHpOBA HnEM.
-CMBOJ HJH 3aHraHHe rHJaOHe DYXOBKN).
-CHMBOJ -NyCK BXoJB BepTeJa npn 3a]EHHOM rPHJIe. UTO6bl BEPhTy yKa3aTeJIb pyKHN B noJO]EHNE O (NORaWEHO), HE06XOIMMO NOBEPHyTb pyKUpyOTHB YACOBONCTpeJKN. 3AMEAHHE: IJIITa HINHKATOPHAR JAMNOUKA 3a]HraetcB B 3aBHCIMOCTH OT BKJIOUEHN TepMOCTaTa.
PpeJe CteBbB DxyOBky npOyKtbl BapKN OHa doJIHa pa3oRpeTbcB TeHeHne IIO KpaIHeMpe10 MHyT.
3NEKTPNUECKA CTATNUECKA DYXOBKA C DBYMA OPGAHAMU YNPABJIEHNI
JaOaIpa pa3HnHbIM HaIpeBaIOUHM 3JIeMeHTaM, INHBODMbIM B DeHcTBHe NocpeCTBOM nepeKIOuAteJN peyJHyPyembl pIn NOMOHTepMOpEryJITOPa, HauHHa C HyJEBOrO NOJOleHn0 (BbIKIOueHo) N IOBopaUNBa pyky No YacOBon CTpeJeMoHO yCTaHOBHTbe E B cJeDyIOUne noJOleHn: NcxOJa n3 NOJoxEHnO (BbIKIOUeHo) N Bpaua PyKy NO YacOBoN CTpeJIke, yCTaHaBJIINBAIoTc cJeDyIOUne NOJoxEHn:
-cmb01 3axirhaHne lamMbI dyXOBKn (KOTOPa8bET NOCTOHHO rOpTeB, TaKxE IN npu yKa3aTeJIe pyHKU,ycTaHOBHeHHOM BO BcEx dpyrIX nNoJKeHnX).
-Cmbon:3axnraHne rpnna(Ha nlafohe dyxOBKn).
-CMBON,BKNIOHHe BepTeJa npn BKIOHcHHom rpune.
-CMBOJ BKNIOHHeCOnpOTNBJIeHnCBOda nCONpOTBJIeHnNoDaCTaTNUeCKaФyHKUIN.
PerynnpOBKa TempepaTpybO ocueeCTBnaTc npn nmooun TepmoperyIaTOPa 电:HarpE BdyxOBKn Bo3pactaet C 50^ do 250^
3AMEAHHE.JIITaHINHnKaTOPHaJAMNOKAc3aHraeTcB 3ABHCMOCTHOTBKJIOUCHN TCPMOCTaT.
Ipe)de Yem CTaBHTb B DYXOBKY PPOyKtbl IJIa BApKN OHa 1oJHa pa3orpeTBcB TeueHHe IO KpaHHe Mepe 10 MNHyT.
KAK NOJIb3OBATbcra 3NEKTPUeCKnIM TPNJEMB 3NEKTPUeCKO JYXOBKE
-OTKpbITbBepuyDyXOBKn;
- noJoxnTb 6nIO ha peWetKy;
- yCTaHOBHTb NOdOH NopeWTeKy;
- yCTaHOBNTe BCE 3TO Ha CAMOM BbICOKOM yPOBHe B dYXOBKe;
-3akpbblBbepuy;
-BKJIIOUHTb COIpOTNBHeHne IprJIA;
-Hepe3 HeckonbKO MNHyT NOBepHyTB 6NIOo, YTO6bl NOBeRHyTB BO3DeIcTBIO INHpPaKpaPacHOrO n3JyHeHH DpyrTO CTOpOHy; (BpEMBAIDepKKN 3aBNCNT OT Tnna npOyKTA NOT LMHORO Bkyca NOJIb3OBaTeJI).
BHIMAHVE: BO Bpemra paoBtI rpnIIOCTyHbIe qactn Moryr harpeTcR! He noDnyckaIte K dYxOBKe deten. Iio6a
TOTOBKa DOnJXHa BbInONHrTbC npn 3aKpbIToI DBepe.
-ПишьТолькоДЯМоDEЛЕн c"3NeKtpuYeCKOуxOBKO”,ynpaBnEmbIX DByMpa3DelenbHbIMpykam(ceNEKTop
- TepmoperyIaTOp), MoXHO rOToBnTb Ha rPnne npn 3aKpbIToN dBepe, He nonb3yRcB 3auNToN pyueK.
Pn roTOBKe Ha rPIne c 3aKpbIToN DBepueH HeJIb3r nCNoJIb3OBAbT TeMnepaTpybl, npEbIwaIOUne 200^
MoHO CTepeTb IIpoIpaMMy,HaJIaBbHIIy CPOK BAPKN, H3aTEM cpa3y KJIaBbHIIy “-” 3Ta KJIaBbHIIa DoJIHa 6bITb HaJaToH, IOKa Ha DnCIIlee He IOBHTcN OKa3aHHe 0.00.
BAIHOE 3AMEUAHNE
KAIbIN PA3IO OKOHAHNO BAPKNCIPOPTPAMMHBIM YIPABJIHEHEM PEKOMEHNYEICRAHATb KJABNUYB IPOTHBHOM CLYUAE DYXOBKA HE MOIEF YIKUNHOHPOBATB B PYHOM PEINME.
TPEXKHOIOHOO3JIKTOPHHOIPOPTPAMMIPYIOUCEE YCTPOINCTBO (pnc.8)
IIO3BOJIAET IporpaMMHPOBaTb IpoIOJIHKHTeJIbHOCTb rOToBKn B dyXOBKe.
EcHn roTObKa H Tepe6yET Bn3yaJIbHOrO KOHTpoI IIOJIb3OBaTeIa, TO OHa MoKeT BbIIIOJIHHrBcI DaKe B eRcOTcyTCTBHe.
IIOJKJIIOUOYEHNEK IITAHNIO
IpnIOKJIIOueHHN K IHTaHHIO DnCIIeH MHaer H acbI Noka3bBAHOT "00:00". Ioka DnCIIeH MHaer, dyXOBKa BbIKIOeHa. MHaHHe npOIOJKITcA DO BbIOJHEHHpeYJINPObKN KOHNKOI "MODE".
3AIAHNE TEKYIIIETO BPEMEHN
B MOMCHYTcTaHOBKN HIN NOCNC OTKJIOUChHH 3JCKTPOHTAHHH INCNIIeMHraet. BOTOM cIyae IeooxOHNMO 3aIATb TEkyIIEE BpeMn HaKMHTe KHOIIKY“MODE”.
HaKMHTe KHOINK ▲HIN▼ДЯЗАнг TeKyIeRO BpeMeHH. PPyHIOPEKHM PA6OTbI
IocJIe 3aHaHnBpeMeHH MoKHO HcIOJIb3OBaTb dyXOBky BpyHOM peKHMpe6OHTb, HcIOJIb3y pyKoRTKN peryJITOPa TEmIEpaTypbIB dYxOBKe II cJIeKTopa (CHMBOI 3aKKeHHOn KAcTpOII).
IIOJIYABTOMATNUECKINPEKIMPABOTBI C IPOJOJIKHTIELHOCTbIO FOTOBKN
3aJaetcI pOIOJIKHTeJIbHocTb rOTOBKN: HNCTeEHNN 6paTHOrO OTCHeTa BpCEMeHH IyXOBKa BbIKIIHOHTcH NIOaCT 3ByKOBoi CHHaI.
HaHPHMep:Bpem-11q.35M.BbXOTHTe,4TO6bl dyxOBKa BKJIOHJIacb Ha 25 MHHyT,HaHHa c dAHHO rOMcHtA.HaKMHTe KHOKNy △o OT6paKeHHn HfP“25.00”,IHN HeO6xoHMOCTN OTPeryJHPyTe 3HaCHHe IPN NMOHIN KHOKN▼。CmBOJIb KAcPTIOHn "auto" Ropr. YcTaHOBHTpe pyKoRTky peryTATopa TeIIepaTypbI B dyXOBKe HA HcO6xoHmYIO TEmPePaTypy,a ceckTOp-Ha BbIpaHHbTHIN ROTOBKn.CHHaJIbHbIe JAMNb H JAmIIa dyXOBKn 3aKryTcI,H dyXOBKa HaHcT pa6oTatb.
IIIPMEUAHHE: IyctaHOBKn IpoIOJIKHTeIbHOCTHIOTOBKn Ha HOJI HAKHMaHTe H He OTYNCKaHTe KHOHNKY 10 IONBAJIeHHaHyJ. IIO HCTeueHHN 25 MHHyt DxyOBKa H cHMBOJI KaCTpOJIIN "auto" BkIOHOTcA, a 3ByKOBo CHHaJI ONOBECTHT O KOHIE IOTOBKn.
HaKMHTe KHOIIky“MODE”IITIOKJIIOUeHn3ByKOBOrO cHrHaIa H BOCCTAHOBJIeHHpyuHOro peKHMpa60tI. IIOcJIe 3TOrO yCTAHOBHTe pyKOTKN peryJITopApTeMNEpAtpbI H ceJIeKToppa IyXOBKn B IOIOKeHHe“BbIKJIOHHeHO”.
IIPIMEAHHE: EHHHbI H3MepeHH INPOdoJHKTeJIbHOCTH MeHIOCTB 3aBHCHMOCTN OT HAcTPOIKH: CHaHaJIa IuΦpbl Ha JINCIIEIe NOKa3bBAOT MHNyTbI H cKcYIIbI, II YBeJIHnHBAIOr T NO 10 cKcYII, IO DOCTNHKeHH 99 MHHyT.
CTIPIAHHE IITPOPTPAMM
3aIporpaMMHPOBaHHyIO IPOJOJIIXHTeJIbHOCTb FOTOBKN MOKHO CTepcTB, HAKHMaj OJIOBpeMeHHIO KHOIKN ▲ N▼, H OTIIyckar CHaHaJa KHONKY ▲.
KAKIOJIb3OBATbCIIPOIPTPAMMHPYIOUHM YCTPOICTBOM OKOHUAHBAKINCEIDINHBIM MEXAHN3MOM YIPABJIEHNA (E3 YACOB) (pnc.9)
PpOpaMMHpyIOJIe ycTPOIcTBO IO3BOJAE TpOpaMMHpoBaTb cPOK BApKN BdyXOBKe.
Функшонюранe:
- yctahOBHTb peryJINPOBOUHyo pyky Ha |eJaembl cpoK BapKN, a ceJIeKTop HA BBIbpaHHB Bamn THII BapKN (MaKcHMyM 120 MnHyT);
BbipaTbeJaemyToempeaTypy NocpeCTBOM pyKTHepMOCTaTa, H yCTaHOBHTb pykCy CeJIeKTopa Ha 3aHaHHbI TINBapKN; - KAK TOKko pyka nporpaMMHpyIOIero yCTPOHCTBa OCTaHOBHTcHa CHMBOJe 0, To cPOK BapKN 3aKOIHHTcR. IpepbIBaHHe BapKN pONCXOJNT aBTOMaTHueckn;
- yCTaHOBHTb pyIKY TepMOcTaHa Ha CHMBOJ
- yctaHOBHTb pyky ceJIeKTopa Ha cHMBOJ 0. IPIMEUAHNE:
IyXOBKa 6e3 pIIMHeHn IpOrpaMMHyIOIero YcTPOINCTBa
fYHKUHOHHpyET ToIbKO,ecIHN pyKa InpOrpaMMHyIOIero
ycTpOINCTBa yCTaHOBJEHa B NIOIo)eHHe pyHORo peIma
NCHONb3OBAHNE 3JEK TPOHHO TAIIMEPA C HAXHMHOpyKOI (PNC.10)
OBUIN PUNHUNPABOTbI
3TOT TaIeMep OTo6paKaet BpeMra (npn NOMOu aHaIOrOBbIX CTpeNOK) uynpaBnAET pa60To n DyXOBKn (npn NOMOu HaxIMHO pyKu INHdkaTophBix 3NaYKO). TocpeDCTBOM HaxIMHO pyKu MoKHO: peYIpOBA Tb BpeM, 3aJaBa Tb BpeM HaHaJNA IN KOHua rOtOBKn, HAcTpaNBa Tb 3ByKOBoCnHaJI (TaIeMep MInHyT).
HACTPOIKA BPEMEHN
YTo6bI HAcTpaBbBpeMn, NOKa3bIbAeMOe CTePknAmu YacOB, 6bICTpo HaxMnte 4 pa3a pyKy, noka 3HaQoCLOCK" He NaHcHT MIRATb. Pocne 3TOrO dIyBEJIuHcHn IIN yMeHbWeHn IOKa3bIbAeMO r BpeMeHn C WArOM B 1 MNHyTy, NOBOPaUHBaIte pyKy no YacBOB CTpeNke IIN npOTNB He, IN CTePkn MInyT 6yET DBrAtbCra C WArOM B 1 MNHyTy NO YACBOB CTpeJIKe IIN npOTNB He. IIO nCTeueHN 10 cekyHd nocNe peryNipOBKn 3JNEKTPOHHbI TaIMep ABTomAtnueckn BbiJeT n3 peXIma HAcTPOKN BpeMeHn.
PuyHARIOTOBKA
Korda TaImepe63eNCTByeT, OH pa3pe7aET BbINOJIHrTb pyHyIO rOToBky, INoNb3yra INaBHBi BBIKIOHaTeJIb DxyOBKn (He3aBnCmbl OT yCTpoIcTba).
ПОТРAMMЛPOBAHINE BPEMEH N KOHLA TOTOBKN Порраммпованee Врemeи KOHca roTOBKN NO3BOJЯET HemeДлелно 3aIyCTNtB roTOBky n aBTOMaTnueeCKN 3aBepuNTb ee В 3aBUCMIOCTN OT 3aDaHNO BOpeMeH. ДяnporpaMMIpOBAHIN Врemeи KOHca roTOBKn 6bIcTpo HaxKMITE 2 pa3a pyKny, noka 3NaYOK "END TIME" He NaHcET MraTb. Дяу yBeNInuEHN ИиуМeHbIeHINь Врemeи roTOBKn C WaROM B 1 MInHyTu, ПОВОРАУВAIte pyKny NO YacOBON CTpeLKe Ил ПOTNB Hee,
n CTpeJIka MNHyT 6yDet DnBraTbC C WaROM B 1 MNHyTy YacobOJ CTpeIKe IINI NpoTnB HeE. MrrAHee 3HaUka "END TIME" npoDoJIkaeTcB TeueHne 10 cekyHn nocNe nocJeHero nobOpota. PporpamMy MoKHO NoDTBePdHTb HaxaTne pyKn
RU
ДяnotpebnteЯ
npu ycnoBn, cyo 6bIa 3anporpamMnpoBaHa roTOBka B TeueHne He MeHee 2 MNHy.T. Nocne noTbepXdeHn nporpaMMbl 3anyckaetc rOToBka n 3BykoBo CnHaI ABTomatueckn NOkNIOaETc. rOToBka 3aBePunTcK, KOrda ,3aDaHHOe BpeMa KOHca rOToBKn = TekyUee BpeMa".ДЯ OTo6paXeHn HAcTPOEHHO nporpAMMbI 6bICTpo HaxMITE u OTNyCTte pyKy, cTeJIkn n 3NaUKN POKaKyT 3aDaHHyO nporpAMMy. B KOHce rOToBKn 3HaQoK "END TIME" Miraet n NodaIoTc8 3ByKObIe CNHaJIbI. No nCTeueHN1 MNHyTb 3ByKOBoCnHaI ONKIOuaETcA a 3HaQoK "END TIME" npoDoJxKaET MIRAtb Do HaxKatna pyKn. DnAOTMeHbI nporpaMMbl Do ee KOHca HaxIMmaTe pyKv B TeueHne 3ceKyHd: nporpAMMa OTMeHtTC, IN TaMmEP BepHEcR B pexmMpyHOH rOToBKn.
ПОГРAMMЮВАНЕ BРЕМЕн HACHAJA N KOHLA TOTOBKIN
IporpammpoBaHne BpeHn HauJa I roTOBKn N03BOJraT ABtOMaTHueckn 3aNcTntb roTOBky N 3aBepuNTb ee B 3abncmocn OT 3adaHnO BpeHn. JIpy nporpammpoBaHn BpeHn HauJa rTOBKn 6bICTpo HaxMITE 1 pa3 pyK, noka 3haQok ,START TIME" He hauHET MIRATb. JIyBEJIuYeHn IIN yMeHbSeHnBpeHn HauJa rTOBKn C wAROM B 1 MNHyTy, NOBopauBaIte pyKy no YacOBoi CTpeKe IIN npOTNB Hee, nCTpeJIka MNHyT 6yTeD TBnA TcBcR C WArOM B 1 MNHyTy YacOBoi CTpeKe IIN npOTNB Hee. MIRaHne 3HaUka "START TIME" npOdoJIkaetcB TceHeNe 10 cekHyd nocLe nocJeHero NobopoTa. Ecn B TeueHne 3TORO INTEPBana pyKa He NobopauBaETcN H e HaxIMaeTc, TO CTpeJIKN ABtOMaTHueckn nepeiuyT Ha OTo6paXeHne BpeHn I pOrpamma OTMeHTCg. Ecn HaxIMaeTc pyKa, To BpeM aHaJa I rTOBKn BBODITCBA nAmrTb (3hauOK "START TIME" noCToHnHO ropIT), npYcNOBn, QTO 6blNa 3anPorpammpoBaHaN 3aDePkKa He MeHee, Yem B 1 MNHyTy, nocLe Yero HxKHO 3aDaTb BpeM KOHCa rTOB (he ropraun paHee 3aHuCK "END TIME" HauHET MIRaTb). DInI pOrpammpoBaHn BpeHn KOHCA rTOBKn BBINOHNTE npOceDpy, ONcaHHyIO B COOTBeTCTByIOUeM pa3deJe. rTOBKa HAHTcN, KOrda ,3aDaHHoe BpeM HauJa I rTOBKn = TEkyUee BpeM".
ПОТРAMMЮВАНИЕ TAIMЕРМИНHYT
PporpammpoobAHne TaMepa MNHyT NO3BOJnEe TbIaBaTb
IpoCTO 3ByKOBo CnHAn IIO NCTeueHHN 3anpOrpammpoBHO BpeMeHN, He BKIOUcA rTOBky (peKIM TaMepa MNHyT).
Ipykny, noka 3NaOH, ALARM" He NaHT MIRATb
Iocne 3TORo nobepHnte pykny, n HAcTPOKa TaMepa MNHyT
COBnaTe C HAcTPOKOBpeMeHN KOHa rTOBKn (CMOTpTe COOTBeTCTBvOuun pa3den). FyHKua Taimepa MNHyT pa6oTaet IINb ToIbKO Torda, KOrDa He BbINOJIHReTcHn OJa pOporpMaMA.
OTOBPAXEHNE 3ADAHHOI PPOrPAMMbI
Iporpammyemb taMep no3BONaTe OTobpa3nTB 3aDaHHyIO nporpammy.ДЯ OTObpaXeHna 3aDaHHoIN Iporpammbl6bICTPO hAKMTe n OTnyCTHTe pyKy: nporpammyemb TaMep NOKAKET 3aDaHHYIO nporpamMy, yCTaHaBnIBa CTepeIKN B COOTBeTCTBmC HAcTpoEHbIM BpeMeHm IN OKa3bIBaR pa3JIuHbIe 3TaIbMIraHHeM COOTBeTCTByUOxN 3HaKOB. Pocne 3TORO nporpammyemb TaMep ABTomAtnueckn nepeKIOuHTcRa Ha OTobpaXeHne TekyUero BpeMeHn, n IpoDoJHKIT BbINOHNHeHne 3aDaHHoIN nporpammbl. OTMEHA 3ADAHHOI IPOFRPAMMBI
PpOrpaMmpyEmb TaIepe P03BOJnEOTMeHHT 3aDaHHyIO nporpaMMy. DnA OTMeHb 3aHaHHo NpOpaMMb HaxMaTe pyKv B TeueHne HeCKoJIbKx CekHyB BnToB Do OKJIIOUeHn COOTBeTCTByUOx 3HaKOB N NOaun BTOPOr 3ByKOBo rCINHana. IocNe 3toro pOprpaMMpyEmb TaIepe ABToMaTuYeCKn nepeKluOHTCB PexHM pyHou roTOBKn. CNHAI OB OTKlHOeHn 3JEKTPO3HEPnN B clyuae OTKJIIOUeHn 3JeKTpo3HePnN TaIepe He OTMeHre TnpoRpaMMy. TaIepe ONOBeUaet O KaXdOM OTKlIOUeHn CeTEBOr 3JeKTponHTAHn MIRaHnEM CmMbOJa "CLOCK", YTo6bl
N03BOJNTb NOJIb3OBATeIIO npOBepntb, npaBnIbHO JIN HAcTpoEHO BpEMr. B 3TOM cnyae IIN OTKJIoueHn CnHaHa 6bICTpo HaxMMTe pyKy.
CHCTKA DYXOBKN
-PekomeHdyetc yHCTHTb DxyOBky NocJe Ka]Doro HcIOJIb3OBAHH, KOJa OHa eIe TcIIaJ. Ho He TropaJ. 3To NO3BOJNTyJaIITb |Hpbl, PpeJde Yem OH 3aTBepeJOT. -Ecln BCC-TaKn B DxyOBKe OCTaJIncb yCtOuHBic IYTHa, To Ha JHO eCJeDyET NoJOITb TpIPOUky. IpONHTaHIyO aMMHaKOM, 3aKpbITb DBCpy, H OCTaBHTb DxyOBky B TaKOM COCTOaHH Ha HeCKoJIbKO YacOB. IocJte 3TOr POmblb DxyOBKy TropueB BOIDn IHKHM MOIOIH M cpeCTBOM. 3aTeM HAcyXo BbIHCHTb DxyOBKY.
-ⅡIyHCTKN DYXOBKN CHAPy)N pIMHeHrTB MArKyIO TpRnOuyKy H MblbHyIO BOyI.
HN B KOEM CJIYUAE HE IIPMHERb MOIOUIE CPEICTBA B IPOOIKAX HIN DPYTNE ABPA3HBHbIE MATEPHAJIbI.
CHCTKA CAMOOUHIIAUIOEICRA DYXOBKN (pnc.5)
DBe 6OKOBbIe H OdHa TOpueBa CTeHK N OJIINIOBAHb CaMOOHNU 10uieCRA MAlBc CKaTaJIHTHcECKM 3ΦΦKETOM.
locke ka)1bIX 10-15 BapOK cIeDyET BKNIOHTB NycTyO DxyOBky Ha NOJHyO MOHOCtB. Bpem, B TeueHHe KOTOPOro DxyOBka DOJIHa paOToTb BNcyTO,3aBHcHT OT COCTOHHN CoXpaHHocTH CaOM DxyOBKn. Pb3rH N IHKoCTH, NOnaDaIOH He HA CTeHKN DxyOBKn, MOrYT 3aTBepDeBaT, H TOrDa O6JIIOBka NOpTePaeT CBOH OUYIIaIOHne KaueCTBa. DeJo B ToM, YTO 3TN 3aRpy3IeHHRAkyINOPHBaOT NOpbl CNeUHaJIbHOH 3MaJIH, BCJeDCTBHe Yero OKNCJHe HeJaETCRe HeBO3MOHbIM. B 3TOM Clyuae, KaK ToJbKO DxyOBKa cTaHET NOIHOCtBO XOJOIOHON,
cJeIyET pa3MraHTb 6pa3OBABHyIOcK KOpKy NocpeCTBOM OueHb Tropaen BObl H MRAKO IeTOUKN, 6e3 PnIMHeHHN MOIOETo CpeCTBa. 3aTeM CJIeIyET CHOBA 3a)eYb DxyOBKY KaK MaKCHYM Ha HeCKoJIbKO MNHYT.
BAHOE 3AMEUAHHE: HN B KOEM CNYaEc He IINPMHeHb a6pa 3NBbIe MaTePnAJIbI HMetaJIInueckNe uETKN.
PpM.ДЯЗAMeHbI KaTJIINTHueCKNX CTeHOK 3aKaXnTe KOD0003103/1
3AMEHA JAMIIbl dyXOBKN
IoracHTb dyXOBKY H OTKIOHTb eO OTJIEKTPOHHTAHNIA;
JaMaHaXoHITcBBePbHemPaBOMyJyHa3aHHeiCTeHKe dyxOBKn;
-yIOCTOBepHTbCBA TOM. yTO6bI IyXOBka 6blJa XOJIOHOH, NocJIe Yero OTBHTNTb CTekJIaHHbI JAmNOpeIATEJB;
-3aMEHHTbJaMnHy Ha HOByIO TORO]e TINpa, 3aTeM cHOBA KpeIKo 3aBnHTbJaMnOde]aTeJb.
DEMOHTAX DBEPLB DYXOBKN
DBepeMa MoKET CHIMAtbCnIg 6Oe e yOoBHO ONUCTKn DyXOBKn, BbINOJIHr CNeDuOuNne HCHpyKUIN:
1)ПОЛнOCью OTKpoIte DBepu.
2)ПовернITE Два рьчara "В",пенияnxи злложеня 1 Влложеня 2 (сm.pnc.11).
3)MeDneHNO 3akpoIe Dbepuy do ee octaHOBKn.Bo3bMNTe ee cnpaba n CnEBA o6EHmPykAm, 3akpoIe ee eoONHITe bHo n CHIMITE ee, NODHMAR Bepx.
4)ДЯ усановки Дерць Na MeCTO Heo6xOДIMо BbInONHnTb ПpoeIpydemyHTaKa B OбpaTHOH NOcJIeNoBAteNbHOCTN, BCTaBnTb DBe netTN B COOTBETCTByIOUne THe3DA N OINHOCTbIO OTKpbITb DBepu.
5) Nobephnte Dba pbiura "B", cHOba yCTaHaBnBaBnx B noJoxeHne 1.
6) 3aKpoIe TdEpeu obbIHybIM oBa3OM.
UcTka cTeKna DBepubl
BceDyXOBKnObOpYOBaHbI CTeKJrHHbIMn DBePcAmn C COBpeMeHHbIMn I OChEh PpaKTNUHbIMN XapaKTePncTnKaAMn. BHyTpHee CTeKNO MoXHO JERKO CHrTB 6e3 NcONb3OBAHn KaKx-Ni6o NHCPTpMeHTOB. BNoKIpOBoUHAR CnCTema 6e3 HApYKBHX BNHTOB ObecneuHaet IpocTyu NcCTKy DBePcbl, KOTopyIO MOKeT NO3BOJNTb TOnbKO CTeKNO.
BbInonHnIe cneDyUoune HNCTpyKcun, YTo6bl npabnlbHO CHrTB CTeKNO C
DBepuBdyXOBKn.
- NOHOCbIO OTKpoTe eDbepuY
- pni NOMOUI MOHeTbI ININ PNOCKO ITOBepTKN OJHOBpeMeHHO OCTOpOXH0
NoDiehBe B DByx yIy6JIeHnax, BbINOnHeHHbIX BHN3yB TblbHOCTopoHe DxyOBKn;
-TaKIM O6pa3OM,CTeKIO OCBO6OJNTcI N3 eRO THe3Ja,MOXKeT 6blb BbIHyTO
H3 HnH, Ie OHO HaxOHTc:
- 3aBepuINuYnCTky, BbInonHnTe 3TNKe OpepaunB o6paTHoN nocJeObaTeNbHOCTN.
PRIMeHAInle%O6paTnTe BHMaHne Ha npabuNbHoCTb NocJeIOBaTeNbHOCTn npyctaHOBKe CTekOI. BHytpEHHe CTEKIO nMeet cneuaNBHOe NOKpbITNe,OTpaxKaUoue TENNo!
3NEKTPOHbI INCJIe C CEHCOPHBIM YNPABJEHnEM

Pncyho
K3
1 Pa6oTaET ABTOMaTnuecka nporpaMMA (B HeKOTOpbIX MoJeIax BmecTo Cm-BOJa A OTo6paKaetcHaDnncb «Auto»).
2 Pexim pyHoro ynpaBneHna.
3 DaHHbI CNMBON MIRaeT BpeKIMe yCTaHOBKn TEkyUeero BpeMeHn.
4 CmB0J OTo6pKaTaTc npnakBaun TaMepa.
5 KhoNka yMeHbSeHn3HaueHn npu yCTaHOBKe TaMepa. TaKke nCNoIb3y-etc dna BbI6opAp yPOBn 3ByKOBOrO CnHana (IOCTyINHO TpN yPOBn).
6 KhoNka Bblbopa pexnma pa60TbI.
7 KhoNka yBeJIuHEnIaHaUeHnI npI yCTaHOBKe TaIMepa.
YCTAHOBKA TEKYLIEGOBPEMEHN
Pn npBOM BKNIOUeHnn I NOcNE ppe6oB B NOdaue 3JIeKToPO3HePmN Ha DnCnIe MIRaOT UINCPbI N CIMBOJ A - B TAKOM PEXKIMNE PNTA He 6yJeT OYHKUOHNPOBaTb.
1 Pocne BkHoueHnI PtntbHaXMMTe KHOKMyuYdepXNBaIte ee He MeHee 2 CekyH, noka CMBOJ A He Ncye3Het cDncPnJe. Ha DncPnnee NOBtCmraIOUcN CIMBOJ .
2 C NOMOJIbIO KHOJOK -N + yCTaHOBNTe TEKYUee BpEMr.
3Yepe3 HeckoIbKO cekyHn nocne nocJeHero HaxaTn KHOIOK BbIbpaHHOe Bpem6dyET COxpaHeHO ABTomAtueeKn.
- PABOTABPYHOMPEKIM
DyxoBoi 6kaΦ 6ydt paOtaB pyHOM pexime (6e3 yCTaHOBNEHHOR BpeMeHN OKOHuaHn IpuroTOBHeHn INI nnTEbHOCTn npuroTOBHeHn) TOJbKO pn OTO-6paKeHn Ha DCNnee CmB0Na .
TAMMEP
Taimep 3daet 3ByKOBoi CnHaJIO nCTeEHn 3aHaHHOro BpemHb63 OTKIIOue-HNnIITb.MakcImaJIbHbINHTepBaI, KOtOpBmOKeT 6bITb yCTaHOBJEn Ha TaI-Mpe -23 Yaca 59 MNHT. IIO nCTeEHn yCTaHOBJEHORO BpemHn H DaICnIeE Ncye3aET CnMBoJn 3ByuNT CnHaJn. 3ByKOBoi CnHaJn ABToMaTHueCKN OTKJIIOHTcYpe37 MInyT, INn JxE Bbl MoXteero npeBaTb, Haxab JIO6yIO KnaBnUy Ha DnC-nIee.
IytaHOBKa TaMepa BbIOJIHnTe CneDyHOuee:
1.HaekKhoNkyMnyepxnbaiTe ee He MeHee 2 cKHyH, nokaHaDnC-πIee He NoBntc Mraiou CmBOJ
- C NOMOJIbHO KHOJOK -H + 3aJaITe Heo6XoIMbI INHTepBaI BpeMeHN.
- Yepe3 HeckoIbKO CeKHyN IocNe IocNeIeHero HaxaTn KHOJOK TaMep COxpaHT 3HaueHHe N HaueHET O6paTHbI OTCuET BpemH.Na DCnPee 6ydt OT6paXaTbCnMBO
- NOJYABTOMATNUECKN PEXKIM C 3AADHEM DINTENbHOCTN INPNI FOTOBJEHNA
- YctahOBtE XeHaembI peXm pa6Obl DyXOBOro 1kaΦa N TemnepaTpy npiroTOBneHnA.
2..HaxekhONkyMnydepKnBaIte ee He MeHee 2 cekyH, NOKa HaDNC-PIee He NOBNTC MRAIOUcN CMBOJ - OTNyCTHTe HauKMITE KHOKNy M onrTb. Ha DnCnneeIPOBNTcMIRaHO-UNN CmBON A, a TAKKe HAdNcB《dur》,KOTOPaYuepe3 HeKOTOpoe Bpe-Mn3MeHNTcHa 0:00.
4.C NOMOJIbHO KHOJOK-N+YcTaHOBITe KeJaemyIOIINTEJIbHOCTb PnIRO-TOBJIeHnRA (MaKcImaJIbHODOYNCTMIOE 3NaueHnE-10 yacOB). - Yepe3 HeckoIbKO cekyHIOncIe NocJeIhero HaxaTnKHOIOK 3Haue-Hne COxpaHNTcN HAuHTcN O6paTHbIOTChET BpemHeN Ha DInCJIpe 6yDyT OTo6paKaTbcraCMBOJbA nDnToro, YTO6bl OTO6pa3ntb HaDInCJIpe TekyUee Bpem, HaxMITE HeckoIbKO pa3KHONKy M.
IIO OKOHaHn yCTaHOBHeHHORo BpeMeHN npO3ByuHT CnHaN, n DxyOB0 WkaΦ AB-TOMaTnueeCKn BbIKNHOHTcR. 3ByKO0B CnHAN ABTOMATnueeCKn OTKnHOHTcR yepe3 7 MmHyT, INN Xe BbMOKeTe erO npepBaTb, Haxab JIO6yIO KnaBnWy Ha dncnnee.
- NOJYABTOMATNUCHEKNI PEXIMC 3ADAHNEMBPEMEHN OKOHUAHNII PNIGOTOBJEHIN
1 YctahOBHTeKeIaEMbIpeKIMpa60TbIdyXOBOrO.kaΦaNTEMNEpatpy npiroTOBHeHn.
2 HaekHONky M ydepKnBaIe ee He MeHee 2 ckyH, noka Ha dnc-PIee He NORBNTcMraIOuN CMBOJ
3 OTnyctnte n haXmnte KhoNky M onTb. Ha dinCnnee noRbNTcra MrraO-uznn CmBOnA, a TaKke HaDnncb «dur»
4 Hαke KHOKNky Meepe pa3. Ha DCNnEE NOBNTcHnINCb «end», KO-TOpAa Ype3 HeKOTOpoe BpemrN3MeHHTcRa 0:00.
5.CNOMOJIbIO KHOJOK-N+ycTaHOBNTe XeIaEMOE Bpemr OKOHuaHn nprirotOBJIeHn.
6. Yepe3 HeckoIbKO cekyHn nocne nocJeHrero HaKaTna KHOJOK 3Haue-HnE COxpaHNTcN HAuHETcO oBpaTHbI OTCuET BpemHe.Ha DInCJIeE 6dyT OTobpaKaTbcR CmBOJbI A n. Dnra TOrO, YTObI OTobpa3ntb Ha DInCJIeE TeKyuIee Bpem, HaxMnte HeckoJIbKO pa3 KHOJky M.
No OKOHaHIn ycTaHOBNeHHOro BpeMeHN npO3ByuHT cnRHaH, n DxyBOi uKaΦ ab-TOMaTHueCKn BbIKIouHTa. 3ByKOBo CNrHaN abTOMaTHueCKn OTKnIOHTcra Hepe3 7 MmHT, ININ Ke Bbl MoKeTe erO npepBaTb, Haxab IIO6yU KnAbuSy Ha dncnnee.
BbInonHnIe cneDyUoNue nHcTpyKuIN, YTo6bl npabnIbHO CHrTB CTEKNO C DBepCuI DxyOBKn.
-NonHOCTbIO OTKpOIne eDBepu;
- INI NOMOUI MOHeTbI INIINOCKO ITBepTKN ODNHOPEMeHNO OCTOpOXHO
NoIeHbTe B DByx yIy6JIeHnX, BblIOJIHeHHbIX BHN3Y B TblbHOCTOpOHe IyXOBKn;
-TaKIMO6pa3OM,CTEKIOOCBO6oNTcN3eROTHe3da,N MOXETbIbBbHyTO
I3HNI,TDEOHOHAOXOHTCA:
-3aBepuINB YNCTKy, BbIOnHInTe 3TN JKe OePaunn B o6paTHoH
PRIM.HAnl.%ObpaTne BnMaHne Ha npabuNbHoCTb nocJeOBAteMbHOCTn npy yctaHOBe cTeKoN. BHyTppeHHee CTekNO IMeET CneuaNBHOe NOKpbITNe, OTPaioUoe TEnNo! nocJeOBAteMbHOCTn.
NcnoB3OBAHHe HaxmMhblx-OTXMMHbIpyeK
HekotopbIe BepcnnyxOBKn OobopyoBaHbI HaxmHOnn OTHKmHOn pykO. B noNoXeHN 6e3DeNCTBna OHa haoDntc Ha ypoBHe naHEn ynpaBNeHn. DnE ee nCnONb3OBAHn Heo6xoDnMo HaxaTb Ha Hee, nocne Yero pyka BbyIeT n3 CBOero THe3da, NOBepHyTb EE n Bbl6paTb Heo6xOdmyu FyHKUIO. B pa6oHem noNoXeHNn pyka nCnONb3yeT npedoxpahNTeNbHOe ycToPcTBO, KOTOpoe He n03BOJareT en BepHyTbc R IxCoDnHOe NoIOXeHne.
KoMnneKT «BbIbIbIXHbIe HApBaIyIouIe IyXOBKn»
HeKoTOPbIe BepCn DyXOBKn O6OpYIOBaHbI
TeNECKONNUeCKNIM HApPabJIHOUcIMN. OHJABJIOTcR
Upe3BbUaHNo yDIO6HbIMN BO BpeMraTOOBKN, TAK KAK OHNI
NO3BOJLAOT NOINOCtBu BOIBBURA tpeWETK N 6IoKIpOBA Tb
BbIDBIXKeHne B KOHc E XOA. 3To yDIO6CTBO NO3BOJRAET
O6paAutaBCr C PpOdyKTAMn, He ONacAraCb OBKeYbcr N
NO3BOJRAET yDIO6Hee BbINONHrTb YNCTKy. I0 3aKa3y MoxHo
O6OpYIOBaTb DyXOBky KOMIIeKtOM «BbIDBIXHbIX
HaNPabJIHOUxX>.
3aIpcoc Heo6xOdImo HApPabJIrTaB BaWEmy INCTprbIOtopy
Iolb3oBAtenb Hecet OTBeTCTBeHHocTh 3a cdauy npnbopa B KOHue erO 3Kcnnyataunn B nyHKtbl c6opa BTOpcbipbra, B npoTHBOM Clyuae K HeMy 6dyT npmHeHb CaHKUnn, npedcMOTpeHbIe 3aKOHOaTeNbCTBOM B Obnactn OTXoIOB.
DnΦepeHcnpoBaHHb c6op OTxODOB dIy IN NocJeHyOSei nepepa60TKN, 6pap60Ku yTININ3aCUN, COBMeCTMmbix C OKpykaIOeI cpeOn, nO3BOJRAET N36EkaTb OTPcaTeJIbHO BO3DeIECTBna HA pnpOdy I 3DOPOBBe, a TAKKe CNOCObCTByET NOBOTOPHOMY NCNOJB3OBAHIO MaTePNAIOB, IN3 KOTOpBX IN3ROTOBHeHa npOdyKzma. DnI NaONyHeHn 6Oone DeTaJIbHO IHΦopMaun O6 IMeHOUxCnCTEmax C6opa OTXODOB CneDeYET oPaAsbcra B MeCTHyIO Cnyk6y no nepepa60Tke OTXODOB, INI JIe B MArA3IN, B KOTOpOM 6bl KynIeH np6Op. PpOIN3BOIDTEIN INMNOptepbI Hecyt OTBETCTBEHHOCtB 3a nepepa60TKy, 6pap60TKu yTININ3aCUN, He 3arpr3HryIOune OKpykaIOUyO cpey, KaK HenOcpeIcTBEHHO, TaK IN YCACTByB KOLJIeKTNBHO CnCTeme.
EBPOENCKN PEJAMEHT Ng 1935/2004 - MaTePnaJIbI, npedHa3NaeHHBle dJa KOHTaKTA C NiueEBBIMn npodykTAM. HΦopMaun noJb3OBAteJIaM.
PnBBeHbHbHa pncyHke CmBOJ, KOTOpb HMeETc Ha yNaKOBKe, yKa3bIbAeT Ha To, YTO MaTePnAbI b 3TOrO N3dEInN, BO3MOxHO BCTyNAHOUINE B KOHTaKT C NIIuEeBIMN IpOdyKTAMN, COOTBeTCTByOT Tpe6oBaHNM EBpONEckORo perIamEnTa No.1935/2004.
BHytpn nonoctn dYxOBKn nIeBbI npOyKtBI MOrTy BCTynaT B KOHTAKT C:peWetkAm dyXOBKn, npOTNBHrMM, pINTAMn DnB bIneyKn KOHNTEpCKN x3dEJI, CTEKOM DBepcbl dYxOBKn, pe3INHOBBIM yNlOTHeHnM, BEpTeJOM, CTEHkAMn dYxOBKn. Ha nIInTe - c peWetkAm, KOHOpKamn mMetanJnuecko nOBepxHOCTBIO nIITbl.
Brauke paoarpeba nui-cero cteHKamn.
IPHHADIEKHOCTH DYXOBKN
- Ha peewtky duyxOBKn CTabTcN IpOTHBHn IJI npHrTOBJIeHHn cIaJKNX 6JIIO, |apKOrO H3 MraCa H T.I. Mrc MoHO paCNOLO)HTb PpMA Ho pewetke, - TaKoI cnOCoB Ha3bIBaEcTcR MaCO Ha rPHJe. PeWetkn neu O6OpYoBaHbI DByMCTOnopamn, pacNoJoxHeHbIMn B 3aDneuactn. PeWetky Heo6xOIMO BCTABnTb B ney do ynpa B rHe3do Ha 3aDne CTehKe.
-ПрOTиВeHb pa3meUaetcnopeWetKoN cIyKNT dIЯсбОа cTeKaIOuero COKA pIriroTAbINBaEMbIX npOdyKTOB ha peWetke.ПрOTиВeHb moxHo IcNoJIb3OBaTb NДЯ rOTOBKn 6IiOJ. - DyXOBO WkaΦ OchaueH CnCTeMO KnpeJIeHnpeIeTOK, YTO NO3BOJAE TnBLeYb IN, He N3BNEKAa INNHOCTbIO INDyXOBORo WkaΦa (1). YTo6bl NnHOCTbIO IN3BNeYpeIeTKN DOCTaTOUHO nPnIOHrTb IN NOTAHyTB peIeTKN BnepeД, KAK NOKa3aHo Ha pncyHke (2). CM. pnc. 12.
INPEKTNBA 2012/19/EC (WEEE): INHΦOPMAUЯ ДПЯ NOJIb3OBATEJIEN
pmc.A
DAnHbIe CBeHeHnnpEHa3NaueHb NmB TOnBko DnO bnaTeNe npmbopOB, IMeHOuxxCMBON (PNC. A) Ha CamOKneJece 3TKeTke cTexNueckmm DaHHbIM, HAKneEHNO HA n3dennn (nacnopTHa Ta6nuka). 3TOT CMBON 06o3NaHaet, YTO npOdyKuJN KlaCCNUpOBOHa No DeiCTByUOzMM HopMam B KaYeCTBE 3NEKTpuCeCKORO INN 3NEKTPOHORO 6OpOpDAHn, IN OHA COOTBETCTBYe DTpeKTNBE 2012/19/EC (WEEE).CLeDoBaTeNbHO, B KOHc CBOero cPoka 3KcPiNyatauIN OHa DonXHa nepepaTaibatcbc OTDeNbHO OT 6bITOBbIX OTxODOB, PyTEM 6ecnIaTHOH CdaUN B NYKT C5opa 3NEKTpuCeCKORO IN 3NEKTPOHORO 6OpOpDAHn, INN Xe CdaBaer ee DnCTPNb6bIoTopy B MOMENT NOKyIKN HOBOrO, 3KBIBaENTHORO 6OpOpDAHn.
GR
Eioaywyn
Texvika xapaktnpiOTiKa
-H etaipia a,c, euxapiotowvTac oac nou diaaleEate eva ano ta apiotana poiovta mac, thee va exete ano autn Tn ouakeun tvkauTEpnn ano00n, onwc o0ota anaiteite autn tv ayopacac. I' auto ac napakaai va diaabaetekai va akolouhnoetepnoeKTiakTc odnyiec tou npovtoc yxepidiou, laabavovtac unoyn movo Ekeivec tic npaypapouc nou apopov ta eosoupakai ta opyava nou utapxouv otn ouakeun oac. O kataokueaOTc dve pepei kaia euhvn ia zniiec nou thpokknboov oeavtkieeva n atoa ano lavebaouevn eykataoTaon n nootn xpon Tns ouakeuhs.
-Exovtacav oKoTo nV npaywyuokewv nou npooapocovta 0Ao kai nepiaotepo otic movtpvec TEXVIkEc, kai yia ma KaAUTEpn noIOTnTa Tou npoiovtoc, n Etaipia mac enmuAaoetai Tou dikaiwmuatoc va enipepe I ptonoioeic, akofa ka xwpic npoeidonoin, naVTWC xwiicva dnoupnyoei npoBAmata oTo Koivo.
- Tua tvxov avtaaaktika, n napayyεia npoc to kataoTma nωλnαnc πeπει va ouvodεuεtai anó tov ap. tou μovτelou kai tov ap. μntpwou nou εival turiwévoi naW Tnv niavakiδa avaywpiΩnc. H niavakiδa εival opatη avoiyovTac Tnv npTa δiaoxikες
- Oδηγia EMC (ηλεκτρομανγηπικόσμβατόπια) 2004/108/EC
- Oδηγία ROHS 2011/65/EU
- Odyia WEEE 2012/19/EEC
- Oδηγia EUP (αναμονή) 2005/32/CE
-EupwnaiKO Kavovio65/2014 (EvpeyiaKcE tIKETeS poUpvoi)
-Eupowtaikokavovio66/2014(Oikooyikocxεδiaoμoc)
-Eupwtaiko Kavovio 1935/2004 (uiaKa e Etnaepn e TpOipuaTow)
EISAGΩΓH
- Ano To napov Eyexipidio oac evdiapepouv movo Ta kepaala aou avapepovta ota unapxovta aEosouap.
KIT "GUIAS HORNO EXTRAIBLES"
J 150
J 150
J 150
J 150
J 150
J 150
J 150
J 150
J 150
J 150
J 150
J 150
J 150
J 150
J 150
J 150
J 150
J 1
4EEEC/2006/95 LVD
EEEC/2009/142 (jGAD
(EMC) 2004/108 / EC EMC -
/2011/65
WEEE 2012/19 / EEC
EC/2005/32 (J) EUP -
()65/2014 1
(ecodesign) 66/2014 a
(a) 1935/2004 a
:
:
OE AB
7 6 5 4 3 2 1
aolal s rall a -1
a#11 a#11 -2
j-3
glde 4.1io -4
-5
a+6-6
alol alldas -7
-8
9-
1
aalll g no nnoe no go no jglall
60 2-335 .j. y 60 1-335 .j. y! - j
i 1
e 1
100 100 100
1:J 1
aagllg 3 kll (4) aalwll
j j 1
.
1
Jzj 120000000000000000000000000000000000000000000
aaiin j bie aiai i 1
10 1
1.
aaiiiee
J:J 1
J1 1
1
.
.
. 75 124 124 124 124 124
05 05 05 05 05 05 05 05 05
(2:JK
05 05 00
(2:J)
jglg jg 100
$$ \left. \right.\left. \right.\left. \right.\left. \right.\left. \right.\left. \right.\left. \right.\left. \right.\left. \right.\left. \right.\left. \right.\left.\left.\left.\left.\left.\left.\left.\left.\left.\left.\left.\left.\left.\left.\left.\left.\left.\left.\left.\left.\left.\left.\left. \text {的} \right]\right]\right]\right]\right]\right]\right]\right]\right]\right]\right]\right]\right]\right]\right]\right]\right]\right]\right]\right]\right]\right]\right] $$
$$ . (s) \dot {2} ^ {2 1} \varepsilon L _ {2} g ^ {2 1} $$
$$ j \left{j \right} \left{j \right} \left{j \right} \left{j \right} \left{j \right} \left{j \right} \left{j \right} \left{j \right} $$
$$ . (c i l l w a g r i d) $$
$$ \cdot \text {i} _ {\text {i}} \text {i} _ {\text {i}} \text {i} _ {\text {i}} \text {i} _ {\text {i}} \text {i} _ {\text {i}} \text {i} _ {\text {i}} \text {i} _ {\text {i}} \text {i} _ {\text {i}} \text {i} _ {\text {i}} \text {i} _ {\text {i}} $$
$$ . \int_ {0} ^ {\infty} \int_ {0} ^ {\infty} \int_ {0} ^ {\infty} \int_ {0} ^ {\infty} \int_ {0} ^ {\infty} \int_ {0} ^ {\infty} \int_ {0} ^ {\infty} \int_ {0} ^ {\infty} \int_ {0} ^ {\infty} \int_ {0} ^ {\infty} $$
$$ \cdot \text {C l} \left(\frac {\mathrm {d} \mathrm {d}}{\mathrm {d} t}\right) \text {S W S} \left(\frac {\mathrm {d} \mathrm {d}}{\mathrm {d} t}\right) \text {S W S} \left(\frac {\mathrm {d} \mathrm {d}}{\mathrm {d} t}\right) \text {S W S} \left(\frac {\mathrm {d} \mathrm {d}}{\mathrm {d} t}\right) $$
$$ \text {d} \left(1 0\right) \text {d} \left(\frac {1}{2}\right) \text {d} \left(\frac {1}{2}\right) \text {d} \left(\frac {1}{2}\right) \text {d} \left(\frac {1}{2}\right) \text {d} \left(\frac {1}{2}\right) \text {d} \left(\frac {1}{2}\right) $$
(4)
1
aag aee eae eae eae eae eae eae eae eae eae eae eae eae eae eae eae eae eae eae eae eae eae eae eae eae eae eae eae eae eae eae eae eae eae eae eae eae eae eae
()
$$ . (s) \dot {s} ^ {2 1} \varepsilon l \dot {s} s ^ {2 1} $$
$$ \Delta \geqslant 0, \text {且} \Delta \geqslant 0; () \quad j _ {0} = 1 $$
$$ \left. \int_ {0} ^ {\infty} \frac {1}{x} \frac {1}{x ^ {2}} \frac {1}{x ^ {3}} \frac {1}{x ^ {4}} \frac {1}{x ^ {5}} \frac {1}{x ^ {6}} \frac {1}{x ^ {7}} \frac {1}{x ^ {8}} \frac {1}{x ^ {9}} \frac {1}{x ^ {1 0}} \right] $$
$$ \therefore \lim _ {x \to 0} \frac {\sin x}{x + 1} = \frac {2}{3} $$
$$ \left. \int_ {a} ^ {b} \frac {\sin x}{x} d x + \int_ {a} ^ {b} \frac {\sin y}{y} d y\right) = 0 $$
4 1
i 1
aI 10000000000000000000000000000000000000000000000
()
$$ . (s) \dot {2} 1 \varepsilon L \dot {2} 1 $$
$$ j j \left. \right.\left. \right.\left. \right.\left. \right.\left. \right.\left. \right.\left. \right.\left. \right.\left. \right.\left. \right.\left. \right.\left. \right.\left. \right.\left. \right.\left.\left.\left.\left.\left.\left.\left.\left.\left.\left.\left.\left.\left.\left.\left.\left.\left.\left.\left.\left. j j \right}\right}\right}\right}\right}\right}\right}\right}\right}\right}\right}\right}\right}\right}\right}\right}\right}\right}\right}\right} $$
$$ \therefore \lim _ {x \to 0} \frac {\sin^ {2} x}{\cos^ {2} x + 1} $$
$$ \left. \right.\left. \right.\left. \right.\left. \right.\left. \right.\left.\left.\left.\left.\left.\left.\left.\left.\left.\left.\left.\left.\left.\left.\left.\left.\left.\left.\left.\left.\left.\left.\left.\left.\left.\left.\left.\left.\left.\right.\right.\right.\right.\right.\right.\right.\right.\right.\right.\right.\right.\right.\right.\right.\right.\right.\right.\right.\right.\right.\right.\right.\right.\right.\right.\right.\right.\right\rangle_ {j} = 0 $$
$$ \therefore \mathrm {c l i s s o g a l l} j j _ {1} i _ {2} i _ {3} i _ {4} $$
$$ j _ {i} = \frac {1}{2} \sum_ {j = 1} ^ {n} a _ {i j} $$
aag aegy jaiill gaiall abya:
(10)
6 6
i 1
ylll l 11 11 11 11 11 11 11 11 11 11 11 11 11 11
()g 1 jn jnn n nn nnnn nnnn nnnn nnnn nnnn nnnn nnnn nnnn nnnn nnnn nnnn nnnn nnnn nnnn nnnn nnnn nnnn nnnn nnnn nnnn nnnn nnnn nnnn nnnn nnnn nnnn nnnn nnnn nnnn nnnn nnnn nnnn nnnn nnnn
()g 1
m = 311
j 1
.
j 1
ii
j j()
.
j 1 j 1 j 1 j 1 j 1 j 1 j 1 j 1 j 1 j 1 j 1 j 1 j 1 j 1 j 1 j 1 j 1 j 1 j 1 j 1 j 1 j 1 j 1 j 1 j 1 j 1 j 1 j 1 j 1 j 1 j 1 j 1 j 1 j 1 j
.
(0)g
(/)
JdIe Ie 10000000000000000000000000000000000000000
(10)
aillgll 1
50 50
250
:
$$ (a _ {i} \otimes a _ {j}) \otimes a _ {k} \otimes a _ {l} \otimes a _ {m} - 1 $$
$$ \left(\omega_ {1} \omega_ {2} \omega_ {3}\right) \omega_ {1} \omega_ {2} \omega_ {3} \omega_ {1} \omega_ {2} \omega_ {3} - \omega $$
$$ (\partial \cup \partial \cap) \cup \partial \cup \cup \cup \cup \cup \cup \cup \cup \cup \cup \cup \cup $$
$$ \left. \right.\left. \right.\left. \right.\left. \right.\left. \right.\left. \right.\left. \right.\left.\left.\left.\left.\left.\left.\left.\left.\left.\left.\left.\left.\left.\left.\left.\left.\left.\left.\left.\left.\left.\left.\left.\left.\left.\left.\left.\right.\right.\right.\right.\right.\right.\right.\right.\right.\right.\right.\right.\right.\right.\right.\right.\right.\right.\right.\right.\right.\right.\right.\right.\right.\right.\right\rangle_ {0} ^ {\prime} = 0: 1 0 $$
$$ \left. \int_ {0} ^ {1} \frac {\mathrm {d} x}{x - 1} \cdot \left(x + \frac {1}{2}\right) \right| _ {0} ^ {1} = \int_ {0} ^ {1} \frac {\mathrm {d} x}{x - 1} \cdot \left(x + \frac {1}{2}\right) \cdot \left(x + \frac {1}{2}\right) $$
$$ \therefore \Delta = 0, y = 1 $$
$$ j j j j j j j j j j j j j j j j j j j j j j j j j j j j j j j j j j j j j j j j j j j j j j j j j j j j j j j j j j j j j j j j j j j j j j j j j j j j j j j j j j j j j j j j j j j j j j j j j j j j j $$
$$ \therefore \lim _ {x \to 0} \frac {\sin^ {2} x}{\cos^ {2} x} $$
$$ \left. \int_ {0} ^ {\infty} \frac {1}{x} \frac {1}{x ^ {2}} \frac {1}{x ^ {3}} \frac {1}{x ^ {4}} \frac {1}{x ^ {5}} \frac {1}{x ^ {6}} \frac {1}{x ^ {7}} \frac {1}{x ^ {8}} \frac {1}{x ^ {9}} \frac {1}{x ^ {1 0}} \right] (x) d x $$
$$ \therefore \lim _ {x \to 0} \frac {\sin {x}}{x} = \frac {1}{2} $$
$$ \left. \frac {1}{2} \frac {1}{2} \frac {1}{2} \frac {1}{2} \frac {1}{2} \frac {1}{2} \frac {1}{2} \frac {1}{2} \frac {1}{2} \frac {1}{2} \frac {1}{2} \frac {1}{2} \frac {1}{2} \frac {1}{2} \frac {1}{2} \right] $$
$$ \therefore \text {l i} = \text {g a} \text {j j} \text {j} \text {j} \text {j} \text {j} \text {j} \text {j} \text {j} $$
$$ j \left. j _ {i} \right| _ {i} = \left. j _ {i} \right| _ {i} = \left. j _ {i} \right| _ {i} = \left. j _ {i} \right| _ {i} = \left. j _ {i} \right| _ {i} = \left. j _ {i} \right| _ {i} = \left. j _ {i} \right| _ {i} = \left. \dots \right| $$
$$ . \dot {0} j _ {j} \dot {a} _ {j} \dot {a} _ {j} \dot {a} _ {j} \dot {a} _ {j} \dot {a} _ {j} \dot {a} _ {j} $$
$$ j j \rho_ {i} d i s i w h y n o r d e r f a c t o r b _ {i} \rho_ {i} \rho_ {i} \rho_ {i} \rho_ {i} \rho_ {i} \rho_ {i} \rho_ {i} \rho_ {i} \rho_ {i} \rho_ {i} \rho_ {i} \rho_ {i} \rho_ {i} \rho_ {i} \rho_ {i} \rho_ {i} \rho_ {i} $$
$$ \therefore \lim _ {g \to 0} \frac {\frac {d}{d g}}{g ^ {2}} $$
$$ j _ {i} \left{ \begin{array}{l} j _ {i} \end{array} \right. $$
$$ \therefore \lim _ {x \to 0} \frac {\sin^ {2} x}{\cos^ {2} x} $$
$$ j j _ {i} \text {p l a s s i n g y} j j _ {i} \text {a l l o f} j _ {i} \text {b a s e} j _ {i} \text {p i} _ {i} \text {a l l o f} j _ {i} \text {p r o p e r a t i o n} j _ {i} \text {p l a s s i n g y} j _ {i} \text {e l l o f} j _ {i} \text {b a s e} j _ {i} \text {e l l o f} j _ {i} $$
$$ \therefore \lim _ {x \to 0} \frac {\sin^ {2} x}{\cos^ {2} x} $$
$$ \dot {z} \dot {z} \dot {z} \dot {z} \dot {z} \dot {z} \dot {z} \dot {z} \dot {z} \dot {z} \dot {z} \dot {z} \dot {z} \dot {z} \dot {z} \dot {z} \dot {z} \dot {z} \dot {z} \dot {z} \dot {z} (0) \dot {z} \dot {z} \dot {z} \dot {z} \dot {z} \dot {z} \dot {z} \dot {z} \dot {z} \dot {z} \dot {z} \dot {z} \dot {z} \dot {z} $$
$$ . (j _ {i} \text {i i i} / j _ {i} \text {i i i}) g \cdot g \cdot j _ {i} \text {i i i} $$
$$ \left. \int_ {0} ^ {1} \frac {\mathrm {d} x}{x - 1} \right| _ {0} ^ {1} = \int_ {0} ^ {1} \frac {\mathrm {d} x}{x - 1} = \int_ {0} ^ {1} \frac {\mathrm {d} x}{x - 1} = \int_ {0} ^ {1} \frac {\mathrm {d} x}{x - 1} = \int_ {0} ^ {1} \frac {\mathrm {d} x}{x - 1} = \int_ {0} ^ {1} \frac {\mathrm {d} x}{x - \sqrt {3}} = \int_ {0} ^ {1} \frac {\mathrm {d} x}{x - \sqrt {3}} = \int_ {0} ^ {1} \frac {\mathrm {d} x}{x - \sqrt {3}} = \int_ {0} ^ {1} \frac {\mathrm {d} x}{x - \sqrt {3}} = \int_ {0} ^ {1} \frac {\mathrm {d} z}{z - 1} = \int_ {0} ^ {1} \frac {\mathrm {d} z}{z - 1} = \int_ {0} ^ {1} \frac {\mathrm {d} z}{z - 1} = \int_ {0} ^ {1} \frac {\mathrm {d} z}{z - 1} = \int_ {0} ^ {1} \frac {\mathrm {d} z}{z - 1}. $$
$$ \therefore \text {d} _ {1} = \left(1 0\right) \text {d} _ {2} = \left(1 0\right) \text {d} _ {3} = \left(1 0\right) \text {d} _ {4} = \dots $$
y
jll j 1
e l pabll g
f j 1
j 1
j 1
i 1
i 1
i 1
i 1
i 1
i 1
i 1
i 1
i 1
"0gol yll pall
a 1
$$ \therefore \text {a b a l l} $$
"g"+--j
ae jai g ie 11 11 11 11 11 11 11 11 11 11 11
jllbcnallg jiey 1ccly
s
()
i 1
J 1
g 1
11eLwJn9:
.(1)eLwseBj)12cLwIg
(5)
j00 j00 111 111 111 111 111 111 111 111 111 111 111 111 111 111 111 111 1
gall jll 5 g yill jll g all g
J 1
. 25)
1 1
j 1
"Jg" 1
A1 = ( a1,b_1)
-
- " g " + " j j j j j j j j j j j j j j j j j j j j
J 1
J 1
. liobai
y
(7)
J 1e baiu
J 1
jLl l 10000000000000000000000000000000000000000000000000
Aie biwai ai "
eaiiie
.(4)
aal j 1 1
a
$$ ) \mathrm {i} \int_ {\mathcal {D}} \mathrm {d} \mathcal {S} \mathrm {d} \mathcal {L} \mathrm {d} \mathcal {R} \mathrm {d} \mathcal {S} \mathrm {d} \mathcal {T} \mathrm {d} \mathcal {U} \mathrm {d} \mathcal {V} \mathrm {d} \mathcal {W} \mathrm {d} \mathcal {Z} \mathrm {d} \mathcal {X} \mathrm {d} \mathcal {Y} $$
$$ 1 2: 3 0 \text {a c l} \text {a l l} \text {i c} \text {g e l l} \text {a l l} \text {a l l} \text {a l l} \text {a l l} \text {a l l} \text {a l l} $$
$$ \left. \right.\left. \right.\left. \right.\left. \right.\left.\left.\left.\left.\left.\left.\left.\left.\left.\left.\left.\left.\left.\left.\left.\left.\left.\left.\left.\left.\left.\left.\left.\left.\left.\left.\left.\left.\left.\left.\right.\right.\right.\right.\right.\right.\right.\right.\right.\right.\right.\right.\right.\right.\right.\right.\right.\right.\right.\right.\right.\right.\right.\right.\right.\right.\right.\right.\right.\right. $$
$$ \therefore \text {a l l} \text {a l l} \text {a l l} \text {a l l} \text {a l l} \text {a l l} \text {a l l} \text {a l l} \text {a l l} \text {a l l} \text {a l l} \text {a l l} \text {a l l} $$
$$ \cdot \text {J} _ {\mathrm {i}} \text {i} _ {\mathrm {j}} \text {i} _ {\mathrm {k}} \text {i} _ {\mathrm {l}} \text {i} _ {\mathrm {n}} \text {i} _ {\mathrm {o}} \text {i} _ {\mathrm {p}} \text {i} _ {\mathrm {q}} \text {i} _ {\mathrm {r}} \text {i} _ {\mathrm {s}} \text {i} _ {\mathrm {t}} \text {i} _ {\mathrm {u}} \text {i} _ {\mathrm {v}} \text {i} _ {\mathrm {w}} \text {i} _ {\mathrm {x}} \text {i} _ {\mathrm {y}} \text {i} _ {\mathrm {z}} \text {i} _ {\mathrm {t}} \text {i} _ {\mathrm {u}} \text {i} _ {\mathrm {v}} \text {i} _ {\mathrm {w}} \text {i} _ {\mathrm {x}} \text {i} _ {\mathrm {y}} \text {i} _ {\mathrm {z}} $$
:
.0.00 1
:
y 8 y
(8:J)
aaiiie 1
:
00.00"
"J 1
a
J 1
"Ji" 2111 1c bi
.
n nn nnnnnnnnnnnnnnnnnnnnnnnnnnnnnnnnnnnnnnnnnnnnnnnnnnnnnnnnnnnnnnnnnnnnnnnnnnnnnnnnnnnnnnnnnnnnnnnnnnnnnnnnnnnnnnnnn
()/
y
"g 10000000000000000000000000000000000000000000000000000000000000
a
J 1 1 1 1 1 1 1 1 1 1 1 1 1 1 1 1 1 1 1 1 1 1 1 1 1 1 1 1 1 1 1
J 1 J 1 J 1 J 1 J 1 J 1 J 1 J 1 J 1 J 1 J 1 J 1 J 1 J 1 J 1 J 1 J 1 J 1 J 1 J 1 J 1 J 1 J 1 J 1 J 1 J 1 J 1 J 1 J 1 J 1 J 1 J 1 J 1 J 1 J
.
JolSllb
J 1
J 1
a 1
-
- ( a + b) ( a^2 - ab + b^2) = a^3 + b^3 .
j j j j j j j j j j j j j j j j j j j j j j j j j j j j j j j j j j j j j j j j j j
.
j 3
jai jia jia jia
| الترجمة الحرفية (الترجمة Auto Auto Book Book Book Book Book Book Book Book Book Book Book Book Book Book Book Book Book Book Book Book Book Book Book Book Book Book Book Book Book Book Book Book Book Book Book Book Book Book Book Book Book Book Book Book Book Book Book Book Book Book Book Book Book Book Book Book Book Book Book Book Book Book Book Book Book Book Book Book Book Book Book Book Book Book Book Book Book Book Book Book Book Book Book Book Book Book Book Book Book Book Book Book Book Book Book Book Book Book Book Book Board Book Board Board Board Board Board Board Board Board Board Board Board Board Board Board Board Board Board Board Board Board Board Board Board Board Board Board Board Board Board Board Board Board Board Board Board Board Board Board Board Board Board Board Board Board Board Board Board Board Board Board Board Board Board Board Board Board Board Board Board Board Board Board Board Board Board Board Board Board Board Board Board Board Board Board Board Board Board Board Board Board Board Board Board Board Board Board Board Board Board Board Board Board Board Board Board Board Board Board Board Board Book Book Book Book Book Book Book Book Book Book Book Book Book Book Book Book Book Book Book Book Book Book Book Book Book Book Book Book Book Book Book Book Book Book Book Book Book Book Book Book Book Book Book Book Book Book Book Book Book Book Book Book Book Book Book Book Book Book Book Book Book Book Book Book Book Book Book Book Book Book Book Book Book Book Book Book Book Book Book Book Book Book Book Book Book Book Book Book Book Book Book Book Book Book Book Book Book Book Book Read | A* | 1 |
| الترجمة الحرفية (الترجمة Auto Auto Book Book Book Book Book Book Book Book Book Book Book Book Book Book Book Book Book Book Book Book Book Book Book Book Book Book Book Book Book Book Book Book Book Book Book Book Book Book Book Book Book Book Book Book Book Book Book Book Book Book Book Book Book Book Book Book Book Book Book Book Book Book Book Book Book Book Book Book Book Book Book Book Book Book Book Book Book Book Book Book Book Book Book Book Book Read | ↓ | 2 |
| الترجمة الح註冊 (الترجمة Auto Auto Book Book Book Book Book Book Book Book Book Book Book Book Book Book Book Book Book Read | ● | 3 |
| الترجمة الح註冊 (الTRLTTR TTR TTR TTR TTR TTR TTR TTR TTR TTR TTR TTR TTR TTR TTR TTR TTR TTR TTR TTR TTR TTR TTR TTR TTR TTR TTR TTR TTR TTR TTR TTR TTR TTR TTR TTR TTR TTR TTR TTR TTR TTR TTR TTR TTR TTR TTR TTR TTR TTR TTR | △ | 4 |
| (الترجمة 3) مسليم نهش مسليم نهش مسليم نهش مسليم نهش مسليم نهش مسليم نهش مسليم نهش مسليم نهش مسليم نهش مسLEM "Mode" ↓ | - | 5 |
| (الTRLTTR TTR TTR TTR TTR TTR TTR TTR TTR TTR TTR TTR TTR TTR TTR TTR TTR TTR TTR TTR TTR TTR TTR TTR TTR TTR TTR TTR TTR TTR TTR TTR TTR TTR TTR TTR TTR TTR TTR TTR TTR TTR TTR TTR TTR TTR TTR TTR | M | 6 |
| (الTRLTTR TTR TTR TTR TTR TTR TTR TTR TTR TTR TTR TTR TTR TTR TTR TTR TTR TTR TTR TTR TTR TTR TTR TTR TTR TTR TTR TTR TTR TTR TTR TTR TTR TTR TTR TTR TTR TTR TTR TTR TTR TTR TTR TTR TTR TTR T TR | + | 7 |
A a a a a a a a a a a a a a a a a a a a a a a a a a a a a a a a a a a a a
A 2 2
yolg bni 1jnnn lslc! g/ glll
J 1
j- jll 13 (3) a baii gui
(2) jai jai aai iie 1000
auiiui i
59 23 1000 1000 1000 1000 1000 1000 1000 1000 1000 1000 1000 1000 1000 1000 1000 1000 1000 1000 1000 1000 100
clinal
a_b = 1
jrrn 2 2 1 1 1 1
aal baaal aal baaal aaal baal sa
."dur" 3
(4)
0*00 1
10 10
.(2) jol AAAAA jol no 15 c. gill lgl lgl lgl
MMM j 1
:
J 2 2 2 2 2 2 2 2 2 2 2 2 2 2 2 2 2 2 2 2 2 2 2 2 2 2 2
Jrlll lllllllllllllllllll
".dur"
A AAA JMMM 1
(4)
.0*00 1
M M M M Jll lbc
10 10
MMM 1
(2) jraaaa jraa aas
Lai li jell 8g g g g g g g g g g g g g g g g g g
jall jaii aie! g yaiil 4aiil aai iaii ai jaiil
sab
J 1111111111111111111111111111
aJalll Jll 1100 gLo gGgBll 20
4
A AAA a
aill jai jil jll jil jil jil jil jil jil jil jil jil
Laii jn nn nnnn nn nnnnnnnnnnnnnnnnnnnnnnnnnnnnnnnnnnnnnnnnnnnnnnnnnnnnnnnnnnnnnnnnnnnnnnnnnnnnnnnnnnnnnnnnnnnnnnnnnnnnnnnnnnnnnnnnn
J 1
gai 1
J 1
J 1
.
AAAAJy jy yj yj yj yj yj yj yj yj yj yj yj yj yj yj yj yj yj yj yj yj yj yj yj yj yj yj yj yj yj yj yj yj yj yj yj yj yj yj yj yj yj yj yj yj yj yj yj yj yj yj y
aall 1
y 1
AAAA 2 2 2 2 2 2 2 2 2 2 2 2 2 2 2 2 2 2 2 2 2 2 2 2 2 2 2 2 2 2 2 2 2
auii iie
(4)jJ 2njjM jll bcia (4) jll nss Ld
aillgll
:glgullll clogla :().s.s!s!/19/2012 1
g b g 1
al gall aab 100 b d 100g 100g
L 1
中
1 1
alglll 12j 3 jilg b pill aobly
Ie boll 0xai jS
(1) 1
e jnnn nnnn nn nnnn nnnnnnnnnnnnnnnnnnnnnnnnnnnnnnnnnnnnnnnnnnnnnnnnnnnnnnnnnnnnnnnnnnnnnnnnnnnnnnnnnnnnnnnnnnnnnnnnnnnnnnnnnnnnnnnnn
2:J (2)
:llgssall caggs :(s).s!.s! /19/2012 4
1: