GFWS1705 - Machine à laver GE - Free user manual and instructions
Find the device manual for free GFWS1705 GE in PDF.
Download the instructions for your Machine à laver in PDF format for free! Find your manual GFWS1705 - GE and take your electronic device back in hand. On this page are published all the documents necessary for the use of your device. GFWS1705 by GE.
USER MANUAL GFWS1705 GE
49-90521-1 04-14 GE Washers
Safety Instructions 2, 3
Operating Instructions Controls 4-9 Features 10-11 Quick Start 5 Loading and Using the Washer ....12–13 Care and Cleaning 14–17
Installation Instructions Preparing to Install Your Washer 18 Location of Your Washer 19 Rough-In Dimensions 19 Unpacking Your Washer 20 Electrical Requirements 21 Grounding Requirements 21 Drain Requirements 22 Water Supply Requirements 22 Installing the Washer 23-24 Replacement Parts 24 Troubleshooting Tips 25-29
Consumer Support Warranty (U.S.) 30 Warranty (Canada) 31 Consumer Support Back Cover Owner’s Manual &
Installation Instructions Write the model and serial numbers here:Model # _________________Serial # __________________You can find them on a label on the side of the washer. As an ENERGY STAR
® partner, GE has determined that this product meets the ENERGY STAR
guidelines for energy efficiency. Laveuses
La sección en español empieza en la página 65 GFWS1705GFWS1700GFWS1605GFWS1600GFWH1200GFWN1100 Printed in ChinaThis is the safety alert symbol. This symbol alerts you to potential hazards that can kill you or hurt you and others. All safety
messages will follow the safety alert symbol and the word “DANGER”, “WARNING”, or “CAUTION”. These words are defined as:
Indicates a hazardous situation which, if not avoided, will result in death or serious injury.
Indicates a hazardous situation which, if not avoided, could result in death or serious injury.
Indicates a hazardous situation which, if not avoided, could result in minor or moderate injury.
DANGER WARNING CAUTION IMPORTANT SAFETY INFORMATION.
READ ALL INSTRUCTIONS BEFORE USING.
IMPORTANT SAFETY INSTRUCTIONS To reduce the risk of death, fire, explosion, electric shock, or injury to persons when using your appliance,
follow basic precautions, including the following:
Read all instructions before using the appliance.
DO NOT wash or dry articles that have been previously cleaned in, washed in, soaked in or spotted with gasoline,
dry-cleaning solvents, or other flammable or explosive substances, as they give off vapors that could ignite or explode.
DO NOT add gasoline, dry-cleaning solvents, or other flammable or explosive substances to the wash water. These
substances give off vapors that could ignite or explode.
Under certain conditions, hydrogen gas may be produced in a hot-water system that has not been used for 2 weeks
or more. HYDROGEN GAS IS EXPLOSIVE. If the hot water system has not been used for such a period, before using a
washing machine, turn on all hot-water faucets and let the water flow from each for several minutes. This will release
any accumulated hydrogen gas. As the gas is flammable, DO NOT smoke or use an open flame during this time.
DO NOT allow children to play on or in this appliance. Close supervision of children is necessary when this appliance is
used near children. Before the washer is removed from service or discarded, remove the door or lid. Failure to follow
these instructions may result in death or injury to persons.
DO NOT reach into the appliance if the tub or agitator is moving to prevent accidental entanglement.
DO NOT install or store this appliance where it will be exposed to the weather.
DO NOT tamper with controls, repair or replace any part of this appliance or attempt any servicing unless specifically
recommended in the user maintenance instructions or in published user repair instructions that you understand and
have the skills to carry out.
Keep the area around your appliance clean and dry to reduce the possibility of slipping.
DO NOT operate this appliance if it is damaged, malfunctioning, partially disassembled, or has missing or broken parts
including a damaged cord or plug.
Unplug the appliance or turn off the circuit breaker before servicing. Pressing the Power button DOES NOT disconnect power.
See “Electrical Requirements” located in the Installation Instructions for grounding instructions.
SAVE THESE INSTRUCTIONS WARNING
Turn off water faucets to minimize leakage if a break or
rupture should occur. Check the condition of the fill hoses;
GE recommends changing the hoses every 5 years.
Ensure that the hot water hose is connected to the “H”
(internal red screened) valve and the cold water hose is
connected to the “C” (internal blue screened) valve.
Install or store where it will not be exposed to
temperatures below freezing or exposed to the weather,
which could cause permanent damage and invalidate the
Properly ground washer to conform with all
governing codes and ordinances. Follow details
in Installation Instructions.
This washer does not include water supply hoses.
GE strongly recommends the use of factory specified
parts. A list of factory hoses available for purchase are
listed below. These hoses are manufactured and tested to
meet GE specifications.
GE strongly recommends the use of new water supply
hoses. Hoses degrade over time and need to be replaced
every 5 years to reduce the risk of hose failures and water
Parts and Accessories
Order on-line at GEApplianceparts.com today, 24 hours a
day or by phone at 800.626.2002 during normal business
hours. In Canada, call 800.661.1616.
Part Number Accessory
PM14X10002 4 ft Rubber Water Supply Hoses
PM14X10005 4 ft Braided Metal Water Supply Hoses
PM7X1 Washer Floor Tray
PROPER INSTALLATION This washer must be properly installed and located in accordance with the Installation Instructions before it is used.
If you did not receive an Installation Instructions, you can receive one by visiting GEAppliances.com or by calling
800.GE.CARES (800.432.2737). In Canada, visit www.geappliances.ca or call 800.561.3344.
is a registered trademark of Procter & Gamble
SAVE THESE INSTRUCTIONS
3About the washer control panel.
You can locate your model number on a label on the side of the washer or inside the washer door.
Throughout this manual, features and appearance may vary from your model.
115Control settings. GEAppliances.com
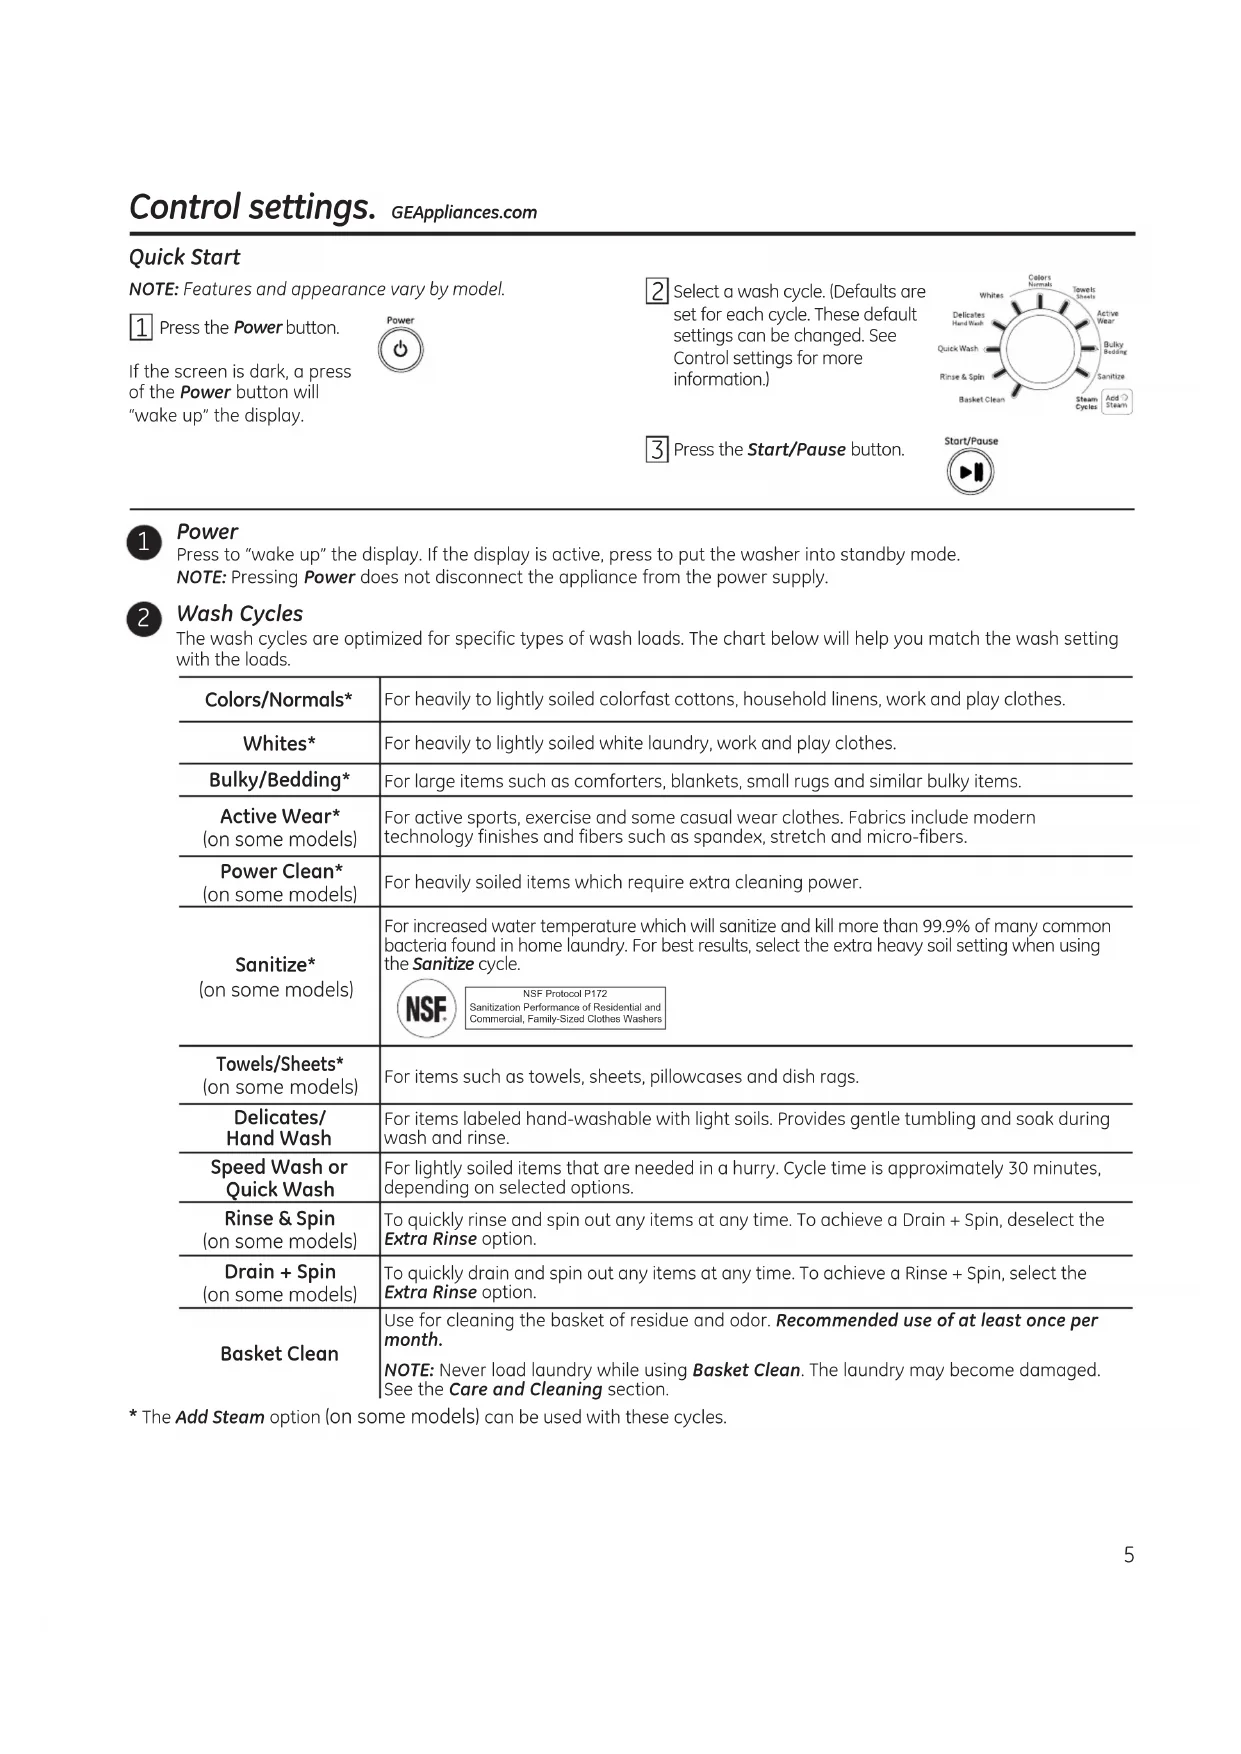
* The Add Steam option (on some models) can be used with these cycles.
Power Press to “wake up” the display. If the display is active, press to put the washer into standby mode. NOTE: Pressing Power does not disconnect the appliance from the power supply.
Colors/Normals* For heavily to lightly soiled colorfast cottons, household linens, work and play clothes. Whites* For heavily to lightly soiled white laundry, work and play clothes. Bulky/Bedding* For large items such as comforters, blankets, small rugs and similar bulky items. Active Wear*
(on some models) For active sports, exercise and some casual wear clothes. Fabrics include modern technology finishes and fibers such as spandex, stretch and micro-fibers. Power Clean*
(on some models) For heavily soiled items which require extra cleaning power. Sanitize*
(on some models) For increased water temperature which will sanitize and kill more than 99.9% of many common bacteria found in home laundry. For best results, select the extra heavy soil setting when using the Sanitize cycle.NSF Protocol P172Sanitization Performance of Residential and Commercial, Family-Sized Clothes Washers Towels/Sheets*
(on some models) For items such as towels, sheets, pillowcases and dish rags. Delicates/
Hand Wash For items labeled hand-washable with light soils. Provides gentle tumbling and soak during wash and rinse. Speed Wash or
Quick Wash For lightly soiled items that are needed in a hurry. Cycle time is approximately 30 minutes, depending on selected options. Rinse & Spin
(on some models) To quickly rinse and spin out any items at any time. To achieve a Drain + Spin, deselect the Extra Rinse option. Drain + Spin
(on some models) To quickly drain and spin out any items at any time. To achieve a Rinse + Spin, select the Extra Rinse option. Basket Clean Use for cleaning the basket of residue and odor. Recommended use of at least once per month. NOTE: Never load laundry while using Basket Clean. The laundry may become damaged. See the Care and Cleaning section. Wash Cycles The wash cycles are optimized for specific types of wash loads. The chart below will help you match the wash setting with the loads.NOTE: Features and appearance vary by model. Quick Start
Press the Power button.If the screen is dark, a press of the Power button will “wake up” the display. 2
Select a wash cycle. (Defaults are set for each cycle. These default settings can be changed. See Control settings for more information.) 3
Press the Start/Pause button.Control settings.
My Cycle (on some models)
To save a favorite cycle, set the desired
settings for wash cycle, soil level, spin speed
and wash temp settings and hold down the
My Cycle button for 3 seconds. A beep will
sound to indicate the cycle has been saved.
To use your custom cycle, press the
My Cycle button before washing a load.
To change the saved cycle, set the desired
settings and hold down the
My Cycle button for 3 seconds.
NOTE: When using My Cycle, wash
options cannot be modified after the
cycle has been started.
NOTE: If you change wash options with
My Cycle before starting the cycle, the
My Cycle light will turn off and you will
be returned to the base cycle.
Change the Soil level to increase or
decrease the wash time to remove
different amounts of soil.
To change the Soil level, press the Soil level
button until you have reached the desired
setting. You can choose between Extra
Light, Light, Normal, Heavy or Extra Heavy
Adjust to select the proper main water
temperature for the wash cycle. The
PreSoak and PreWash rinse water is
always cold to help reduce energy usage
and reduce setting of stains and wrinkles.
Follow the fabric manufacturer’s care label
when selecting the wash temperature.
To change the wash temperature, press
the wash Temp button until you have
reached the desired setting. You can
choose between Tap Cold, Cold, Warm,
Hot or Extra Hot (Extra Hot is available
on models equipped with a heater). By
design, to protect fabrics, not all wash
temperatures are available for certain
NOTE: The first 10 seconds of the wash
fill is always cold. This feature assists in
conditioning the fabric and preventing
stains from setting on garments.
Changing the Spin speed changes the final
spin speed of the cycles. Always follow the
garment manufacturer’s care label when
changing the Spin speed.
To change the Spin speed, press the Spin
speed button until you have reached the
desired setting. You can choose between
No Spin, Low, Medium, High or Max. Higher
spin speeds are not available on certain
cycles, such as Delicates.
Higher spin speeds remove more water
from the clothes and will help reduce dry
time, but may also increase the possibility
of setting wrinkles on some fabrics.
Add Steam (on some models)
Add Steam adds steam into the washer
to assist with loosening stains on the
Whites, Colors/Normal, Towels/Sheets,
Active Wear or Power Clean (depending
on model), Bulky Bedding or Sanitize
1. Turn power ON and select a wash
2. Select the Add Steam button to
3. Press the Start/Pause button. (appearance will vary)(appearance will vary)(appearance will vary) 6Extra Rinse
This option allows for an extra rinse
during a cycle to remove excess dirt
and detergent from soiled loads.
On models with Rinse & Spin cycle, a
drain and spin cycle can be achieved by
pressing the Extra Rinse button until the
light is no longer illuminated.
On models with Drain+Spin cycle, a
rinse and spin cycle can be achieved by
selecting Extra Rinse option.
PreWash (on some models)
Prewash is an extra wash before the
main wash. Use it for heavily soiled
clothes or for clothes with a care
label that recommends prewashing
before washing. Be sure to add liquid
or powder high-efficiency detergent,
or the proper wash additive to the
PreWash must be selected prior to
The PreWash feature will fill the washer
with cold water (adding the prewash
detergent), tumble the clothes, drain
and spin. Then the washer will run the
selected wash cycle.
NOTE: In some special cycles, the
prewash is selected automatically
as the default. You can modify this
selection at any time.
Time Saver (on some models)
Use this option to reduce the overall
wash cycle by at least 20% without
sacrificing wash performance. This
feature is available on all cycles except
Basket Clean, Sanitize, Rinse + Spin,
This option will modify the wash cycle,
slightly raising the wash temperature
and using more water to deliver equal
wash performance as the basic cycle. All
other features, such as Extra Rinse, Add
Steam, etc, can be used with Time Saver
but may adjust the total wash time.
1. Turn power on and select a wash
cycle which has Time Saver as an
2. Make any adjustments to Soil, Temp
and Spin as desired.
3. Press the Time Saver button to
reduce the overall wash time.
You can delay the start of a wash cycle
for up to 24 hours. Press the Delay
Wash button to choose the amount
of time you want to delay the start of
the wash cycle. Once the desired time
is reached, press the Start button. The
machine will count down and start
automatically at the correct time.
NOTE: If you forget to fully close the
door, a reminder signal will beep
reminding you to do so.
NOTE: If you open the door when the
delay is counting down, the machine
will enter the pause state. You must
close the door and press Start again in
order to restart the countdown.
(depending on model)Control settings.
The Stain Removal Guide is pre-
programmed with the ideal wash and
rinse settings to tackle five common
stains: grass, wine, blood, tomato and
dirt. To use this feature, select the
desired wash cycle and then press
the Stain Removal Guide button
until the stain you want to remove is
highlighted. Once selected, press the
Start button to start the cycle.
For some stains, a prewash will be
selected automatically. Be sure to
add liquid or powder high-efficiency
detergent, or the proper wash additive
to the prewash dispenser.
Add Steam cannot be selected when
the Stain Removal Guide is used.
This button has two functions: To change the loudness of the end of cycle signal, press the button as many
times as needed to reach the desired
volume. There are four sound levels
including OFF. To turn the button sounds ON/OFF, press and hold the button for 3
PreSoak (on some models)
For soaking your garments prior to
the PreWash (if selected) and/or wash
cycle. This option begins with a brief
tumble and then proceeds to soak the
clothes with cold water for a specified
period of time. Once complete, the
cycle will begin automatically.
PreSoak must be selected prior to
The PreSoak time is set in ½ hour
increments, with the maximum
presoak set option of 8 hours.
If desired, add high-efficiency detergent
or the proper wash additive to the
Extended Tumble (on some models) Ext Tumble Freshly tumbles your garments
periodically for up to 8 hours after the
wash cycle is complete to lessen the
setting of wrinkles and creases when
you are not able to move clothing to
the dryer right away.
At the end of the cycle, the display will
scroll “END” and after ten minutes the
Extended Tumble will begin. It can be
stopped at any time by pressing the
Note: The Extended Tumble option
cannot be added to the My Cycle
feature.GEAppliances.com
Displays the approximate time
remaining until the end of the cycle.
NOTE: The cycle time is affected by
the water pressure in your home and
the balance of the load in the washer.
You may see the time remaining on
the display increase to accommodate
a slower spin speed to handle
On some models, cycle status is also
displayed and certain features such
as Delay Wash or Steam are shown
indicating they have been selected.
Lock Controls or Lock
(depending on model)
You can lock the controls to prevent
any selections from being made. Or
you can lock or unlock the controls
after you have started a cycle.
Children cannot accidentally start the
washer by touching buttons with this
To lock the washer, press and hold the
Lock Controls or Lock button for 3
To unlock the washer controls, press
and hold the Lock Controls or Lock
button for 3 seconds.
A sound is made to indicate the lock/
The indicator light above the button
will illuminate when the controls are
NOTE: The Power button can still be
used when the machine is locked.
Start/Pause-Add A Garment
Press to start a wash cycle. If the
washer is running, pressing it once will
pause the washer and unlock the door.
It will take a few seconds for the door
to unlock after pressing Pause. Press
again to restart the wash cycle.
NOTE: If the washer is paused and
the cycle is not restarted within 15
minutes, the current wash cycle will be
NOTE: In some cycles the washer will
drain first, then unlock the door when it
NOTE: The washer performs automatic
system checks after pressing the Start
button. Water will flow in 45 seconds
or less. You may hear the door lock
and unlock before water flows; this is
Use the Signal pad to change
the volume of the end of cycle signal.
Press the pad until you reach
(depending on model)
(appearance will vary
and not all features
on all models)About the washer features.
The Dispenser Drawer
Slowly open the dispenser drawer by pulling
it out until it stops.
After adding laundry products, slowly close
the dispenser drawer. Closing the drawer too
quickly could result in early dispensing of the
bleach, fabric softener or detergent.
You may see water in the dispenser drawer
at the end of the cycle. This is a result of the
flushing/siphoning action and is part of the
normal operation of the washer.
The Detergent Compartment
High-efficiency detergent is required for this
washer. Use the detergent manufacturer’s
Add measured detergent to the front left
detergent compartment of the dispenser
Detergent is flushed from the dispenser
at the beginning of the wash cycle. Either
powdered or liquid detergent can be used.
Detergent usage may need to be adjusted for
water temperature, water hardness,
size and soil level of the load. Avoid using too
much detergent in your washer as it can lead
to oversudsing and detergent residue being
left on the clothes.
Using more detergent than the recommended
quantity can cause residue buildup on your
The Prewash Compartment (on some models)
Only use the Prewash Compartment if
you are selecting the Prewash or Presoak
cycle for heavily soiled clothes. Add
measured detergent or prewash additive
to the back left prewash compartment of
the dispenser drawer.
Detergent or prewash additive is flushed
from the dispenser in the prewash or
Presoak cycle (if selected).
NOTE: Liquid detergent will drain into the
washer drum as it is added.
Detergent usage may need to be adjusted
for water temperature, water hardness, size
and soil level of the load. Avoid using too
much detergent in your washer as it can
lead to over sudsing and detergent residue
being left on the clothes.
DETERGENT S O LIQUID 3X
1X remove for powder Normal
Remove for powder detergent
The detergent selection insert must be placed in
the detergent compartment in a specific position
according to what type of detergent you are
Powder Detergent – Remove the
detergent selection insert and place it in
a safe location outside of the washer.
Liquid Detergent – You will need to adjust
the insert according to the type of Liquid
Detergent you are using. The Icons on the
side of the detergent compartment must
line up on the center when the insert is in
NOTE: Not all models have the 2x and 3x
detergent settings. Some have only regular
HE detergent settings. You must reduce the
amount of detergent for 2x or 3x detergent
per bottle instructions.
Move the insert by pulling it up and replace
it by sliding it down between either the rear
or front detergent compartment molded rails,
as desired, for liquid detergent. Remove for
Liquid detergent may seep under the insert
prior to the start of the cycle. This is normal
and will not affect the wash performance.
On models with a selection insert
PR EWASHFor Liquid Detergent Remove For Powder
Remove for powder detergent
Powder Detergent – Remove the
liquid detergent cup and place it in a
safe location outside of the washer.
Follow the detergent manufacturer’s
instructions when measuring the
amount of powder to use.
Liquid Detergent – Locate the
concentration of your detergent on the
bottle. Do not fill above the Max Fill line
in the detergent cup for your detergent
On models with a removable detergent cupGEAppliances.com
The Liquid Bleach Compartment
IMPORTANT: The bleach compartment position
varies by model. Be sure to identify the correct
compartment for bleach before using.
If desired, measure out the recommended
amount of liquid bleach, not to exceed
1/3 cup (80 ml), and pour into the right
compartment labeled “LIQUID BLEACH”.
Do not exceed the maximum fill line. Overfilling
can cause early dispensing of the bleach which
could result in damaged clothes.
NOTE: Do not use powdered bleach in the
The Fabric Softener Compartment
IMPORTANT: The fabric softener compartment
position varies by model. Be sure to identify the
correct compartment for fabric softener before
If desired, pour the recommended amount
of liquid fabric softener into the compartment
labeled “FABRIC SOFTENER.”
Use only liquid fabric softener in the dispenser.
Dilute with water to the maximum fill line.
Do not exceed the maximum fill line. Overfilling can
cause early dispensing of the fabric softener which
could stain clothes.
NOTE: Do not pour fabric softener directly
On some models:Loading and using the washer. Always follow fabric manufacturer’s care label when laundering. 12
symbols Any bleach(when needed)Only non-chlorine bleach(when needed)Do not bleach BLEACH LABELS Below are fabric care label “symbols” that affect the clothing you will be laundering. DETERGENT LABELS Use only HE High-Efficiency detergent. Preparing Clothes
To avoid snags during washing:
• Close garment zippers, snaps, buttons and hooks.
• Mend seams, hems, tears.
• Empty all items from pockets.
• Remove nonwashable garment accessories such as ornaments and nonwashable trim materials.
To avoid tangling, tie strings, draw ties and belt-like materials. Brush away surface dirt and lint; treat spots and stains.
Promptly wash wet or stained garments to maximize results.
Mix garments using recommended maximum load sizes on page 13.
Use nylon mesh garment bags to wash small items.
Wash multiple garments at one time for best results. Follow these steps to maximize garment care.GEAppliances.com
Colors WhitesLights Darks Soil HeavyNormalLight Fabric DelicatesEasy CareSturdy Cottons Lint Lint ProducersLint Collectors Combine large and small items in a load. Load large items first. Large items should not be more than half the
Pillows and comforters should not be mixed with other items. This may cause an out-of-balance load.
Sort dark-colored clothes from light-colored clothes to prevent dye transfer. This is a high-efficiency washer,
so it uses less water, making dye transfer more common.
WARNING Never place items in the washer that are dampened with gasoline or other flammable liquids.
No washer can completely remove oil.
Do not dry anything that has ever had any type of oil on it (including cooking oils).
Doing so can result in death, explosion, or fire.
The wash drum may be fully loaded with loosely
added items. Do not wash garments containing
flammable materials (waxes, cleaning fluids, etc.).
To add items after the washer has started, press Start/
Pause and wait until the door is unlatched. The washer
may take up to 30 seconds to unlock the door after
pressing Start/Pause, depending on the machine
conditions. Do not try to force the door open when it is
locked. After the door unlocks, open gently. Add items,
close the door and press Start/Pause to restart.
Loading ExamplesCare and Cleaning.
To clean the interior of the washer, select
the Basket Clean feature on the control
panel. This Basket Clean cycle should be
performed, at a minimum, once per month.
This cycle will use more water, in addition to
bleach, to control the rate at which soils and
detergents may accumulate in your washer.
NOTE: Read the instructions below
completely before starting the Basket Clean
1. Remove any garments or objects from
the washer and ensure the washer
2. Open the washer door and pour
or other washing machine cleaner
3. Close the door and select the Basket
Clean cycle. Push the Start pad.
4. When the Basket Clean cycle is working,
the display will show the estimated cycle
time remaining. The cycle will complete
in about 90 minutes. Do not interrupt the
5. After the cycle is complete, leave
the door open slightly for better
If for any reason the cycle needs to
be interrupted, the door will not open
immediately. Forcing open the door at
this stage may cause water to flood.
The door will open after the water is
drained to a level where it would not
Basket Clean may be interrupted
by pressing the Start pad in between cycles.
A power outage in the house might also
interrupt the cycle. When the power supply
is back, the Basket Clean cycle resumes
where it had stopped. When interrupted, be
sure to run a complete Basket Clean cycle
before using the washer. If the Power pad is
pressed during BasketClean, the cycle will
Run Basket Clean with 1 Cup (250 ml) of
bleach once a month.
After the completion of a Basket Clean
cycle, the interior of your washer may
have a bleach smell.
It is recommended to run a light color
load after the Basket Clean cycle.
Immediately wipe off any spills. Wipe with
damp cloth. Do not hit surface with sharp
Open the washer door. Using both hands,
press down the door gasket. Remove any
foreign objects if found trapped inside the
gasket. Make sure there is nothing blocking
the holes behind the gasket.
While holding down the door gasket, inspect
the interior gasket by pulling it down with
your fingers. Remove any foreign objects if
found trapped inside this gasket. Make sure
there is nothing blocking the holes behind
When you are finished cleaning the door
gasket, remove your hands and the gasket
will return to the operating position.
Video Scan this code to watch a video on this topic. Video Scan this code to watch a video on this topic.GEAppliances.com
Cleaning the Pump Filter
Due to the nature of the front-load washer,
it is sometimes possible for small articles
to pass to the pump. The washer has a
filter to capture lost items so they are not
dumped to the drain. To retrieve lost items,
clean out the pump filter.
1. Using a small flathead screwdriver or
coin, open the access door.
2. Place a shallow pan or dish under
the pump access door and towels
on the floor in front of the washer to
protect the floor. It is normal to catch
about a quart of water when the filter
NOTE: If there is water in the basket
when the pump filter is cleaned, it will
drain out and a larger pan or dish may
3. Pull down the pour spout.
4. Turn the pump filter counterclockwise
and remove the filter slowly, controlling
the flow of the draining water.
5. Clean the debris from the filter.
6. Replace the filter and turn clockwise.
7. Flip up the pour spout.
8. Close the access door by hooking the
Video Scan this code to watch a video on this topic. Pump filterCare and Cleaning.
Dispenser Drawer Area
Detergent and fabric softener may build up in the dispenser drawer. Residue should be
removed once or twice a month.
Remove the drawer by first pulling it out until it stops. Then reach back into the
left or right rear corner (depending on model) of the drawer cavity and press down
firmly on the lock tab, pulling out the drawer.
Remove the inserts from the bleach and fabric softener compartments and the
detergent insert. Rinse the inserts and the drawer with very warm water to remove
traces of accumulated laundry products.
To clean the drawer opening, use a small brush to clean the recess.
Remove all residue from the upper and lower parts of the recess.
Return inserts to the proper compartments. Replace the dispenser drawer.
To reduce buildup in the Dispenser Drawer area:
Use only HE High-Efficiency
Lock tab is visible only after drawer
has been pulled open
Tab on back right or left depending
Be sure the water supply is shut off at the faucets. Drain all water from the hoses if the
weather will be below freezing.
Ask the service technician to remove water from drain pump and hoses. Do not store
the washer where it will be exposed to the weather. When moving the washer, the tub
should be kept stationary by reinstalling the shipping bolts removed during installation.
See Installation Instructions in this book. If these parts are not available, they can be
ordered by visiting our Website at GEAppliances.com or by calling 800.GE.CARES. In
Canada, call 800.561.3344.17
If you have any questions, call 800.GE.CARES (800.432.2737) or visit our Website at: GEAppliances.com In Canada, call 1.800.561.3344 or visit www.GEAppliances.ca
BEFORE YOU BEGIN Read these instructions completely and carefully. •
IMPORTANT – Save these instructions for local inspector’s use. • IMPORTANT – Observe all governing codes and ordinances.• Note to Installer – Be sure to leave these instructions with the Consumer.• Note to Consumer – Keep these instructions for future reference.• Skill level – Installation of this appliance requires basic mechanical and electrical skills.• Completion time – 1-3 hours• Proper installation is the responsibility of the installer. • Product failure due to improper installation is not covered under the Warranty.
This is the safety alert symbol. This symbol alerts you to potential hazards that can kill you or hurt you and others. All safety messages will follow the safety alert symbol and the word “DANGER”, “WARNING”, or “CAUTION”. These words are defined as: Indicates a hazardous situation which, if not avoided, will result in death or serious injury.
Indicates a hazardous situation which, if not avoided, could result in death or serious injury.
Indicates a hazardous situation which, if not avoided, could result in minor or moderate injury.
DANGER WARNING CAUTION TOOLS REQUIRED Adjustable wrench or 1/2” socket with ratchet Adjustable wrench or 9/16” open-end wrench Channel-lock adjustable pliers Carpenter’s level
Inlet Hose Screen Washers (2)PARTS SUPPLIED Cable Tie Hose Guide Water Hoses (2)PARTS REQUIRED (Obtain locally)STACK BRACKET KITOPTIONAL PEDESTAL ACCESSORYA stack bracket kit is available at additional cost. It can be ordered in the United States by visiting our Web site at GEAppliances.com or calling 800.GE.CARES. In Canada, call 800.661.1616 or visit your local GE Appliances dealer. Order kit # WE25X10018 or GEFLSTACK.A pedestal is available at additional cost. It can be ordered in the United States by visiting our Web site at GEAppliances.com or calling 800.GE.CARES. In Canada, visit your local GE Appliances dealer. This product should be used with the pedestal # SBSC137HXX, SBSD137HXX and SBSD227FXX. Follow the pedestal Installation Instructions.19
Installation Instructions
LOCATION OF YOUR WASHER Do Not Install the Washer:
1. In an area exposed to dripping water or outside
weather conditions. The ambient temperature should
never be below 60°F (15.6°C) for proper washer
2. In an area where it will come in contact with curtains
3. On carpet. The floor MUST be a hard level surface
with a maximum slope of 1/2” per foot (1.27 cm per
30 cm). To make sure the washer does not vibrate
or move, you may have to reinforce the floor.
NOTE: If the floor is in poor condition, use 3/4”
impregnated plywood sheet solidly attached to the
existing floor covering.
Minimum Installation Clearances
• When installed in alcove: Sides, Rear,
• When installed in closet: Sides, Rear,
Top = 0” (0 cm), Front = 1” (2.54 cm)
• Closet door ventilation openings required:
2 louvers each 60 square in. (387 cm), located 3”
(7.6 cm) from top and bottom of door
ROUGH-IN DIMENSIONS SIDE FRONT 27.0” (68.6 cm)NOTE: With pedestal, 52.6” Stacked, 84”39.8” (101.09 cm)39.8” (101.09 cm)1100/1200 series models: 32.1” (81.3 cm)1600/1700 series models: 33.6” (85.3 cm)Installation Instructions
UNPACKING THE WASHER WARNING: Recycle or destroy the carton
and plastic bags after the washer is unpacked. Make
materials inaccessible to children. Children might use them
for play. Cartons covered with rugs, bedspreads
or plastic sheets can become airtight chambers causing
1. Cut and remove the top and bottom packaging straps.
2. While it is in the carton, carefully lay the washer on its side.
DO NOT lay the washer on its front or back.
3. 7XUQGRZQWKHERWWRPIODSV³UHPRYHDOOEDVHSDFNDJLQJ
including the cardboard, styrofoam base and styrofoam tub
support (inserted in center of base).
NOTE: If you are installing a pedestal, proceed to
the installation instructions that come with the pedestal.
4. Carefully return the washer to an upright position and
5. Carefully move the washer to within 4 feet (122 cm)
of the final location.
6. Remove the following from the back side of the washer:
4 plastic spacers (including rubber grommets)
4 power cord retainers
NOTE: Failure to remove the shipping braces can cause
the washer to become severely unbalanced.
Save all bolts for future use.
NOTE: If you must transport the washer at a later date,
you must reinstall the shipping support hardware to prevent
shipping damage. Keep the hardware in the plastic bag
In case you misplace your shipping bolts, replacements
are available at additional cost. They can be ordered in the
United States by visiting our website at GEAppliances.com
or calling 800.GE.CARES. In Canada, call 800.661.1616. Order kit
#WH49X10039. VideoScan this code to watch a video on this topic.ELECTRICAL REQUIREMENTS
WARNING Plug into a grounded 3-prong outlet.DO NOT remove ground prong.DO NOT use an adapter.DO NOT use an extension cord.Failure to follow these instructions can result in death, fire or electrical shock.CIRCUIT – Individual, properly polarized and grounded 15 or 20 amp circuit breaker or time-delay fuse. POWER SUPPLY – 2 wire plus ground, 120 Volt, single phase, 60 Hz, alternating current.Outlet Receptacle – Properly grounded 3-prong receptacle to be located so the power cord is accessible when the washer is in an installed position. If a 2-prong receptacle is present, it is the owner’s responsibility to have a licensed electrician replace it with a properly grounded 3-prong grounding type receptacle.Washer must be electrically grounded in accordance with local codes and ordinances, or in the absence of local codes, in accordance with the NATIONAL ELECTRICAL CODE, ANSI/NFPA NO. 70 latest edition. Check with a licensed electrician if you are not sure that the washer is properly grounded.If required by local codes, an external 18 gauge or larger copper ground wire (not provided) may be added. Attach to washer cabinet with a #8-18 x ½” sheet metal screw (available at any hardware store) to rear of washer.Mobile Home Installation:Installation must conform to Standard for Mobile Homes, ANSI A119.1 and National Mobile Home Construction and Safety Standards Act of 1974 (PL93-383). Installation Instructions
GROUNDING INSTRUCTIONS This appliance must be grounded. In the event of malfunction or breakdown, grounding will reduce the risk of electric shock by providing a path of least resistance for electric current. This appliance is equipped with a cord having an equipment-grounding conductor and a grounding plug. The plug must be plugged into an appropriate outlet that is properly installed and grounded in accordance with all local codes and ordinances. WARNING Improper connection of the equipment-grounding conductor can result in a risk of electrical shock. Check with a qualified electrician, or service representative or personnel, if you are in doubt as to whether the appliance is properly grounded. DO NOT modify the plug on the power supply cord. If it will not fit the outlet, have a proper outlet installed by a qualified electrician. 21Installation Instructions
1. Drain capable of eliminating 17 gals (64.3 L)
2. A standpipe diameter of 1–1/4” (3.18 cm) minimum.
3. The standpipe height above the floor should be:
Minimum height: 24” (61 cm)
Maximum height: 96” (244 cm)
NOTE: The drain hose attached to the washer can reach
a 58” (147 cm) high standpipe. For a higher standpipe,
contact an authorized parts distributor.
WATER SUPPLY REQUIREMENTS Hot and cold water faucets MUST be installed within
42 inches (107 cm) of your washer’s water inlet. The faucets
MUST be 3/4” (1.9 cm) garden hose-type so inlet hoses can
be connected. Water pressure MUST be between 10 and 120
pounds per square inch. Your water department can advise
you of your water pressure. The hot water temperature
should be set to deliver water at 120° to 140°F (48°–60°C).
DRAIN REQUIREMENTS BACK
INSTALLING THE WASHER
1. Run some water from the hot and
cold faucets to flush the water lines
and remove particles that might clog
up the inlet hoses and water valve
2. Obtain inlet hoses locally.
3. Ensure there is a rubber washer
in the hoses. Reinstall the rubber
washer into the hose fitting if it has
fallen out during shipment.
Carefully connect an inlet
hose to the outside “H” outlet
of the water valve. Tighten by
hand, then tighten another
2/3 turn with pliers. Carefully
connect the other inlet hose
to the inside “C” outlet of
the water valve. Tighten by
hand; then tighten another 2/3 turn with pliers. Do not
crossthread or over-tighten these connections.
4. Install the screen washers by inserting them into the free
ends of the inlet hoses with protruded side facing the
5. Connect the inlet hose ends to the HOT and COLD water
faucets tightly by hand, then tighten another 2/3 turn
with pliers. Turn the water on and check for leaks.
6. Carefully move the washer to its final location. Gently
rock the washer into position ensuring inlet hoses do
not become kinked. It is important not to damage the
rubber leveling legs when moving your washer to its final
location. Damaged legs can increase washer vibration. It
may be helpful to spray window cleaner on the floor to
help move your washer into its final position. NOTE: To
reduce vibration, ensure that all four rubber leveling legs
are firmly touching the floor. Push and pull on the back
right and then back left of your washer.
NOTE: Do not use the dispenser drawer or door to lift
NOTE: If you are installing into a drain pan, you can use
a 24-inch long 2x4 to lever the washer into place.
7. With the washer in its
final position, place
a level on top of the
washer (if the washer
is installed under a
should not be able to
rock). Adjust the front
leveling legs up or down
to ensure the washer is resting
solid. Turn the lock nuts on
each leg up towards the base
of the washer and snug with a
NOTE: Keep the leg extension at
a minimum to prevent excessive
vibration. The farther out the
legs are extended, the more the
washer will vibrate.
If the floor is not level or is damaged, you may have
to extend the rear leveling legs.
C H Inlet Hose Screen Washers Video Scan this code to watch a video on this topic. Video Scan this code to watch a video on this topic.24
Installation Instructions
INSTALLING THE WASHER
8. Attach the U-shaped hose guide to the end of
the drain hose. Place the hose in a laundry tub or
standpipe and secure it with the cable tie provided in
the enclosure package.
NOTE: Placing the drain hose too far down the drain pipe
can cause a siphoning action. No more than 7 inches of
hose should be in the drain pipe. There must be an air
gap around the drain hose. A snug fit can also cause a
9. Plug the power cord into a grounded outlet.
NOTE: Check to be sure the power is off at the circuit
breaker/fuse box before plugging the power cord into
10. Turn on the power at the circuit breaker/fuse box.
11. Read the rest of this Owner’s Manual. It contains
valuable and helpful information that will save you
12. Before starting the washer, check to make sure:
Main power is turned on.
The washer is plugged in.
The water faucets are turned on.
The unit is level and all four leveling legs are firmly
The shipping support hardware is removed
The drain hose is properly tied up.
There are no leaks at the faucet, drain line
13. Run the washer through a complete cycle.
Check for water leaks and proper operation.
14. If your washer does not operate, please review
the Before You Call For Service section before
calling for service.
15. Place these instructions in a location near the washer
for future reference. Cable Tie Cable Tie If replacement parts are needed for your washer, they
can be ordered in the United States by visiting our Web
site at GEAppliances.com or by calling 800.GE.CARES. In
Canada, call 800.661.1616.
REPLACEMENT PARTS Cable Tie Video Scan this code to watch a video on this topic.Before you call for service… GEAppliances.com
Below is a list of truths and myths to help you better understand your frontload washer
Truth or Myth? Answer Explanation
There is not enough water
to properly wash my clothes
6LQFHIURQWORDGZDVKHUVGRQRWUHTXLUHWKHWXEWR¿OOZLWKZDWHUVLJQL¿FDQWO\
less water is required to thoroughly wash and rinse each load. Except for certain
cycles like Delicates/Handwash and Basket Clean that use more water, you will
not see a visible water line on the door glass.
My frontload washer may
add time or run longer than
the original displayed time.
TRUE Occasionally, the washer may need to add more time to the cycle. This is mainly
due to automatic load redistributions to better balance the load and reduce
vibration. It is normal operation for the washer to add time to the cycle to
rebalance the load. Common causes of out-of-balance loads or longer cycle
WLPHVDUHDFORJJHGSXPS¿OWHUVHHWKHCare and Cleaning section), un-level
washer, or exceeding the recommended maximum load sizes.
I should see suds/foam
during a wash cycle in the
MYTH HE detergents, which should be the only detergents used in your
GE frontload washer, have been formulated to clean effectively
without causing a build-up of suds. If you add detergent until a
visible suds/foam level is reached, you may be using too much
detergent and negatively impacting washer performance.
Remember, more suds/foam does not equal more cleaning
power. Follow the manufacturer's directions for HE detergent.
It is best to wash full loads
and like fabrics together.
TRUE Wash multiple similar garments at one time for best results. Washing single
items can cause an out-of-balance condition.
I need to keep the washer
level for proper operation
and to reduce vibration.
,IWKHZDVKHULVXQHYHQDGMXVWWKHOHYHOLQJOHJVVRWKDWWKH\DUH¿UPO\WRXFKLQJ
WKHÀRRUDQGWKHORFNQXWVDUHVHFXUHO\WLJKWHQHG7KLVLVHVSHFLDOO\LPSRUWDQW
if the washer is installed on a pedestal. Leveling the legs on the washer or the
pedestal require the same steps.
It is impossible to overload
MYTH Although the capacity of the frontload washer allows for larger loads than a
traditional topload washer, care must be taken to not overload the wash basket.
See the Loading and Using the Washer section for recommended maximum
load sizes. Overloading the washer can lead to reduced wash performance and
clothes becoming trapped between the door glass and the gasket, possibly
causing damage to your gasket or your clothes.
If not periodically cleaned,
my wash basket and gasket
may not maintain a fresh
TRUE This is true for all washers, not just frontload. Regularly run a Basket Clean cycle
and clean around the rubber door gasket. When not in use, you may leave the
door slightly open for the inside of the washer to air dry. Close supervision is
necessary if this appliance is used by or near children.
Frontload washers have a
´SXPS¿OWHUµWKDWQHHGVWR
be cleaned periodically.
TRUE Due to the nature of the frontload washer, it is sometimes possible for small
DUWLFOHVWRSDVVWRWKHGUDLQSXPS7KHZDVKHUKDVD¿OWHUWRFDSWXUHORVWLWHPV
so they do not damage the drain pump. To retrieve lost items, clean out the
SXPS¿OWHUVHHWKHCare and Cleaning section). Indicators of a clogged pump
are long drain and cycle times, wet clothes at the end of a cycle, incomplete
cycles or washer pausing in the middle of a cycle.
I cannot add items to a
wash cycle once it has
MYTH To add items after the washer has started, press Start/Pause - Add a Garment
EXWWRQDQGZDLWXQWLOWKHGRRULVXQORFNHG7KHGUDLQSXPSPD\UXQEULHÀ\
before door is unlocked. Do not try to force open the door when it is locked. After
the door unlocks, open gently. Add items, close the door and press Start/Pause to
Items left in pockets can
TRUE This is true for all frontload washers. Remove all loose items from your clothes.
Troubleshooting Tips
Save time and money! Review the charts on the
following pages first and you may not need to call for
Load is out of balance
Drain hose is kinked or
improperly connected
Household drain may be
Drain hose siphoning; drain
hose pushed too far down the
• Redistribute clothes and run drain & spin or rinse & spin.
• Increase load size if washing small load containing heavy and light
• See page 15 on how to clean the Pump Filter.
• Straighten drain hose and make sure washer is not sitting on it.
• Check household plumbing. You may need to call a plumber.
• Ensure there is an air gap between hose and drain.
Leaking water Door gasket is damaged
Check back left of washer
Fill hoses or drain hose is
improperly connected
Household drain may be
Incorrect use of detergent
Dispenser box cracked
• Check to see if gasket is seated and not torn. Objects left in pockets
may cause damage to the washer (nails, screws, pens, pencils)
• Water may drip from the door when the door is opened. This is a
• Carefully wipe off rubber door seal. Sometimes dirt or clothing is left
in this seal and can cause a small leak
• If this area is wet, you have oversudsing condition. Use less
• Make sure hose connections are tight at washer and faucets and
make sure end of drain hose is correctly inserted in and secured to
• Check household plumbing. You may need to call a plumber.
• Powder soap may cause clogs inside the dispenser and cause water
to leak out the front of the dispenser. Remove drawer and clean
both drawer and inside of dispenser box. Please refer to Cleaning the
• Use only HE and correct amount of detergent.
• If new installation, check for crack on inside of dispenser box.
Clothes too wet Load is out of balance
Drain hose is kinked or
improperly connected
Household drain may be
Drain hose siphoning; drain
hose pushed too far down the
Increase load size if washing small load containing heavy and light
The machine will slow the spin speed down to 410 rpm if it has a hard
time balancing the load. This speed is normal.
See page 15 on how to clean the Pump Filter.
• The dry weight of the load should be less then 16 lbs.
• Straighten drain hose and make sure washer is not sitting on it.
• Check household plumbing. You may need to call a plumber.
• Ensure there is an air gap between hose and drain.GEAppliances.com
Drain hose is kinked or
improperly connected
Household drain may be
Drain hose siphoning; drain
hose pushed too far down the
• Timer adds 3 minutes to cycle for each rebalance. 11 or 15
rebalances may be done. This is normal operation.
Do nothing; the machine will finish the wash cycle.
• See page 15 on how to clean the Pump Filter.
• Straighten drain hose and make sure washer is not sitting on it.
• Check household plumbing. You may need to call a plumber.
• Ensure there is an air gap between hose and drain.
All rubber leveling legs are not
firmly touching the floor
• Washer is designed to move 1/4” to reduce forces transmitted to the
floor. This movement is normal.
• Push and pull on the back right and then back left of your washer to
check if it is level. If the washer is uneven, adjust the rubber leveling
legs so they are all firmly touching the floor and locked in place. Your
installer should correct this problem.
• Pause unit, open door and manually redistribute load. To check
machine, run rinse and spin with no load. If normal, unbalance was
• See page 15 on how to clean the Pump Filter.
Water supply is turned off
Circuit breaker/fuse is tripped/
Automatic self system checks
• Make sure cord is plugged securely into a working outlet.
• Turn both hot and cold faucets fully on.
• Check house circuit breakers/fuses. Replace fuses or reset breaker.
Washer should have separate outlet.
• First time the washer is plugged in, automatic checks occur. It may
take up to 20 seconds before you can use your washer. This is normal
Pens, pencils, nails, screws or
other objects left in pockets
Pins, snaps, hooks, sharp
buttons, belt buckles, zippers
and sharp objects left in
• Do not exceed maximum recommended load sizes. See
recommended maximum load sizes on page 13.
• Remove loose items from pockets.
• Fasten snaps, hooks, buttons and zippers.
This is normal • During spin the washer may need to rebalance the load sometimes
to reduce vibrations. When this happens, the estimated time is
increased causing time left to increase or jump.
This is normal • Horizontal washers do not require the tub to fill with water like top-
Pump clogged • See page 15 on how to clean the Pump Filter.
• Front-load washers start up differently than top-load washers, and it
takes 30 seconds to check the system. The door will lock and unlock.
• Simply open and close the door firmly; then press Start.Before you call for service…
Automatic self system checks
Water supply is turned off
Water valve screens are
Inlet hose screen washers are
• After Start is pressed, the washer does several system checks. Water
will flow 60 seconds after Start is pressed.
• Turn on both hot and cold faucets fully.
• Turn off the water source and remove the water connection hoses
from the upper back of the washer. Use a brush or toothpick to clean
the screens in the machine. Reconnect the hoses and turn the water
• Turn off the water source and remove the inlet hoses from the wall
faucets. Use a brush or toothpick to clean the screen washers in the
end of the hoses. Reconnect the hoses and turn the water back on.
Wrinkling Improper sorting
Incorrect wash cycle
Repeated washing in water
• Avoid mixing heavy items (like work clothes) with light items (like
• Load your washer so clothes have enough room to move freely.
• Match cycle selection to the type of fabric you arewashing (especially
for easy care loads).
• Wash in warm or cold water.
Not enough detergent
Not using HE (high efficiency)
Water is not hot enough
Detergent is not dissolving
• Use correct amount of detergent.
• Use only HE detergent.
• Use hottest water safe for fabric.
• Use a water conditioner like Calgon brand or install a water softener.
• Make sure water heater is delivering water at 120°–140°F (48°–60°C).
• Try a liquid HE detergent.
• Sort clothes by color. If fabric label states wash separately, unstable
dyes may be indicated.
Colored spots Incorrect use of fabric softener
• Check fabric softener package for instructions and follow directions
for using dispenser.
• Sort whites or lightly colored items from dark colors.
• Promptly remove wash load from washer.
Water supply is improperly
House water heater is not set
• Make sure hoses are connected to correct faucets.
• Make sure house water heater is delivering water at 120°–140°F
This is normal • Due to the metallic properties of paint used for this unique product,
slight variations of color may occur due to viewing angles and lighting
Washer unused for a long time,
not using recommended quality
of HE detergent or used too
• Run a Basket Clean cycle.
• In case of strong odor, you may need to run the Basket Clean cycle
• Use only the amount of detergent recommended on the detergent
• Use only HE (high efficiency) detergent.
• Always remove wet items from the washer promptly after machine
• Leave the door slightly open for the water to air dry. Close supervision
is necessary if this appliance is used by or near children. Do not allow
children to play on or in this or any other appliance.GEAppliances.com
• Make sure detergent insert is properly located and fully seated. Never
put detergent above max line.
• It is normal operation to see detergent leak on door gasket about 20
seconds after filling the dispenser.
Softener or bleach is filled
Softener or bleach cap issue
• Monthly clean the dispenser drawer to remove buildup of chemicals.
• Make sure to have the correct amount of softener or bleach.
• Make sure softener and bleach cap for dispenser are seated or they
Laundry detergent packet
placed in dispenser drawer
• Laundry detergent packets should not be used in the dispenser.
They should only be added directly to the wash basket following the
manufacturer's directions.
Clog in sump drain • This is normal. Drain sump is detecting an undesired water fill level
from a potential open faucet. Shut off water valve and inspect water
valve for blockage.For The Period Of: We Will Replace:
GE Washer Warranty. (For customers in the United States)
All warranty service provided by our Factory Service Centers,
or an authorized Customer Care
technician. To schedule service,
on-line, visit us at GEAppliances.com, or call 800.GE.CARES
(800.432.2737). Please have serial number and model number
availa ble when calling for service.
This warranty is extended to the original purchaser and any succeeding owner for products purchased for home
use within the USA. If the product is located in an area where service by a GE Authorized Servicer is not available,
you may be responsible for a trip charge or you may be required to bring the product to an Authorized GE Service
location for service. In Alaska, the warranty excludes the cost of shipping or service calls to your home.
Some states do not allow the exclusion or limitation of incidental or consequential damages. This warranty gives
you specific legal rights, and you may also have other rights which vary from state to state. To know what your
legal rights are, consult your local or state consumer affairs office or your state’s Attorney General. Service trips to your home to teach you how to use the product. Improper installation, delivery or maintenance. Failure of the product if it is abused, misused, or used for
other than the intended purpose or used commercially. Replacement of house fuses or resetting of circuit breakers. Products which are not defective or broken, or which are working as described in the Owner’s Manual. Damage to the product caused by accident, fire, floods or acts of God. Incidental or consequential damage caused by possible defects with this appliance. Defects or damage due to operation in freezing temperatures. Damage after delivery. Product not accessible to provide required service.
What Is Not Covered (in the United States):
Warrantor: General Electric Company. Louisville, KY 40225
Staple your receipt here.
Proof of the original purchase
date is needed to obtain
service under the warranty.
One Year Any part of the washer which fails due to a defect in materials or workmanship. During this
From the date of the limited one-year warranty, GE will also provide, free of charge, all labor and related service
original purchase costs to replace the defective part.
(;&/86,212),03/,(':$55$17,(6³<RXUVROHDQGH[FOXVLYHUHPHG\LVSURGXFWUHSDLUDVSURYLGHGLQWKLV/LPLWHG
Warranty. Any implied warranties, including the implied warranties of merchantability or fitness for a particular
purpose, are limited to one year or the shortest period allowed by law.
30GE Washer Warranty. (For customers in Canada)
All warranty service provided by our Factory Service Centres or an authorized
technician. For service, call 1.800.561.3344.
Please have serial number and model number available when calling for service.
What Is Not Covered (in Canada):
Warrantor: MC COMMERCIAL, BURLINGTON, ON, L7T 3R6
WARRANTOR IS NOT RESPONSIBLE FOR CONSEQUENTIAL DAMAGES.
This warranty is extended to the original purchaser and any succeeding owner for products purchased in
Canada for home use within Canada. In-home warranty service will be provided in areas where it is available
and deemed reasonable by MC Commercial to provide.
(;&/86,212),03/,(':$55$17,(6³<RXUVROHDQGH[FOXVLYHUHPHG\LVSURGXFWUHSDLUDVSURYLGHGLQWKLV/LPLWHG Warranty. Any implied warranties, including the implied warranties of merchantability or fitness for a particular purpose, are limited to one year or the shortest period allowed by law. For The Period Of: We Will Replace:
One Year Any part of the washer which fails due to a defect in materials or workmanship. During this
From the date of the limited one-year warranty, GE will also provide, free of charge, all labour and related
original purchase service costs to replace the defective part. Service trips to your home to teach you how to use the product. Improper installation, delivery or maintenance. Failure of the product if it is abused, misused, or used for
other than the intended purpose or used commercially. Replacement of house fuses or resetting of circuit breakers. Products which are not defective or broken, or which are working as described in the Owner’s Manual. Damage to the product caused by accident, fire, floods or acts of God. Incidental or consequential damage caused by possible defects with this appliance. Defects or damage due to operation in freezing temperatures. Damage after delivery. Product not accessible to provide required service.
Whites (Blancs), Colors/Normal (Couleurs/
1X remove for powder
Colors/Normal (Colores/Normal), Towels/
• Load your washer so clothes have enough room
Softener or bleach cap issue
Problemas con el suavizante o
la tapa del blanqueador
• Monthly clean the dispenser drawer to remove buildup of chemicals.
In the U.S.: GEAppliances.com
Have a question or need assistance with your appliance? Try the GE Appliances Website 24 hours a day,
any day of the year! For greater convenience and faster service, you can now download Owner’s Manuals,
order parts or even schedule service on-line. In Canada: www.GEAppliances.ca
Schedule Service In the U.S.: GEAppliances.com
Expert GE repair service is only one step away from your door. Get on-line and schedule your service at your
convenience any day of the year! Or call 800.GE.CARES (800.432.2737) during normal business hours.
In Canada, call 1.800.561.3344
Real Life Design Studio In the U.S.: GEAppliances.com
*(VXSSRUWVWKH8QLYHUVDO'HVLJQFRQFHSW³SURGXFWVVHUYLFHVDQGHQYLURQPHQWVWKDWFDQEHXVHGE\SHRSOHRI
all ages, sizes and capabilities. We recognize the need to design for a wide range of physical and mental abilities
and impairments. For details of GE’s Universal Design applications, including kitchen design ideas for people with
disabilities, check out our Website today. For the hearing impaired, please call 800.TDD.GEAC (800.833.4322).
In Canada, contact: Manager, Consumer Relations,MC Commercial
Suite 310, 1 Factory Lane
Moncton, N.B. E1C 9M3
Extended Warranties In the U.S.: GEAppliances.com
Purchase a GE extended warranty and learn about special discounts that are available while your warranty is still
in effect. You can purchase it on-line anytime, or call 800.626.2224 during normal business hours. GE Consumer Home
Services will still be there after your warranty expires. In Canada, call 1.888.261.2133
Parts and Accessories In the U.S.: GEAppliances.com
Individuals qualified to service their own appliances can have parts or accessories sent directly to their homes
(VISA, MasterCard and Discover cards are accepted). Order on-line today, 24 hours every day or by phone at
800.626.2002 during normal business hours.
Instructions contained in this manual cover procedures to be performed by any user. Other servicing generally should
be referred to qualified service personnel. Caution must be exercised, since improper servicing may cause unsafe
Customers in Canada should consult the yellow pages for the nearest Mabe service center, or call 1.800.661.1616.
Contact Us In the U.S.: GEAppliances.com
If you are not satisfied with the service you receive from GE, contact us on our Website with all the details including your
phone number, or write to: General Manager, Customer Relations
GE Appliances, Appliance Park
Louisville, KY 40225
In Canada: www.GEAppliances.ca, or write to: Director, Consumer Relations, MC Commercial
Suite 310, 1 Factory Lane
5HJLVWHU\RXUQHZDSSOLDQFHRQOLQH³DW\RXUFRQYHQLHQFH7LPHO\SURGXFWUHJLVWUDWLRQZLOODOORZIRUHQKDQFHG
communication and prompt service under the terms of your warranty, should the need arise. You may also
mail in the pre-printed registration card included in the packing material. In Canada: www.GEAppliances.ca