KVI 1103 - Fridge BAUKNECHT - Free user manual and instructions
Find the device manual for free KVI 1103 BAUKNECHT in PDF.
User questions about KVI 1103 BAUKNECHT
0 question about this device. Answer the ones you know or ask your own.
Ask a new question about this device
Download the instructions for your Fridge in PDF format for free! Find your manual KVI 1103 - BAUKNECHT and take your electronic device back in hand. On this page are published all the documents necessary for the use of your device. KVI 1103 by BAUKNECHT.
USER MANUAL KVI 1103 BAUKNECHT
Instructions for use
Mode d'emploi
Gebruiksaanwijzing
natural_image
Close-up of wooden clothespins and clips, no text or symbols visibleBrugsanvisning
Bruksanvisning
Käyttöohje
natural_image
Black and white photo of glass bottles and a small container, no visible text or symbols
natural_image
Black and white close-up of multiple glasses with blurred background (no text or symbols)Οδηγίες χρήσης
natural_image
Close-up of a white stainless steel kitchen appliance with perforated ventilation slots (no visible text or symbols)Návod k použití
Návod na použitie
text_image
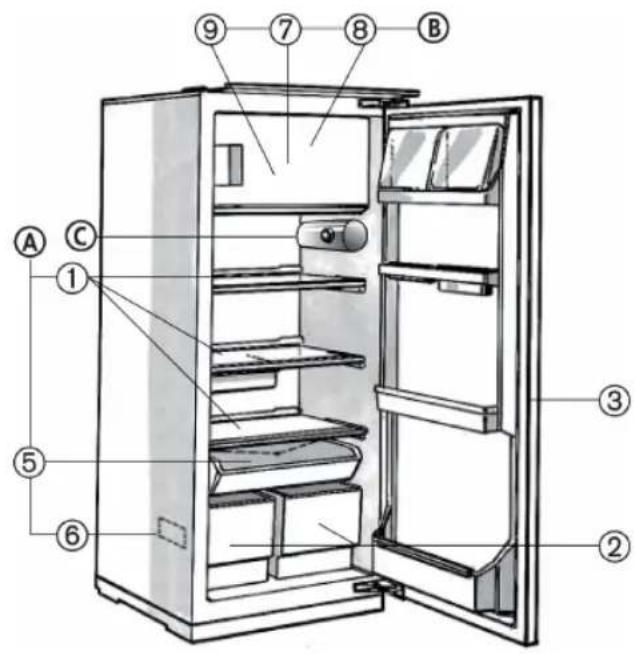
Labeled diagram of a refrigerator interior showing numbered compartments and doors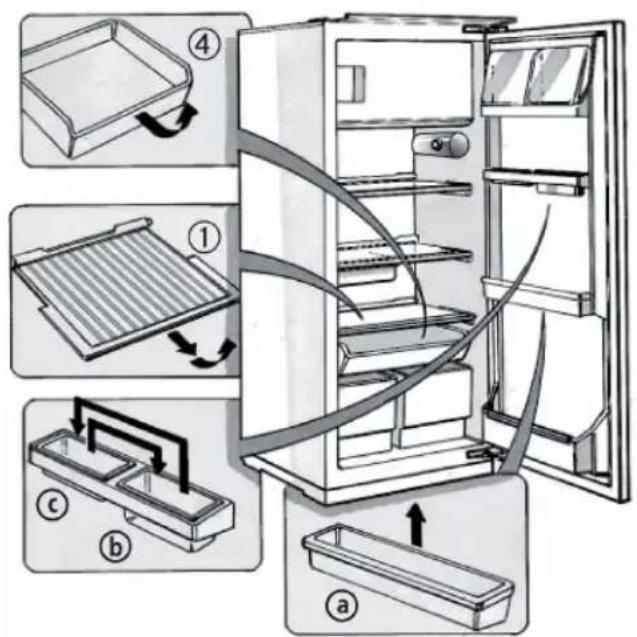
text_image
Diagram illustrating the internal components of a refrigerator with numbered parts and directional arrows indicating assembly or cleaning steps.A) Kühlraum
natural_image
Line drawing of a refrigerator with an open door and a hand inserting a scroll into the refrigerator (no text or symbols)
text_image
Diagram illustrating the food preparation steps of a refrigerator, showing labeled items like cake, milk, and vegetables.natural_image
Illustration of a refrigerator with open doors and a hand inserting a cable into the refrigerator (no text or symbols)natural_image
Illustration of a refrigerator with an open door and a hand inserting a cable into the refrigerator (no text or symbols)STÖRUNG - WAS TUN
natural_image
Illustration of a cylindrical object with a central knob and two protruding tubes (no text or symbols)natural_image
Line drawing of an open refrigerator with a lid and sun symbol above it (no text or symbols present)PRODUCT DESCRIPTION

text_image
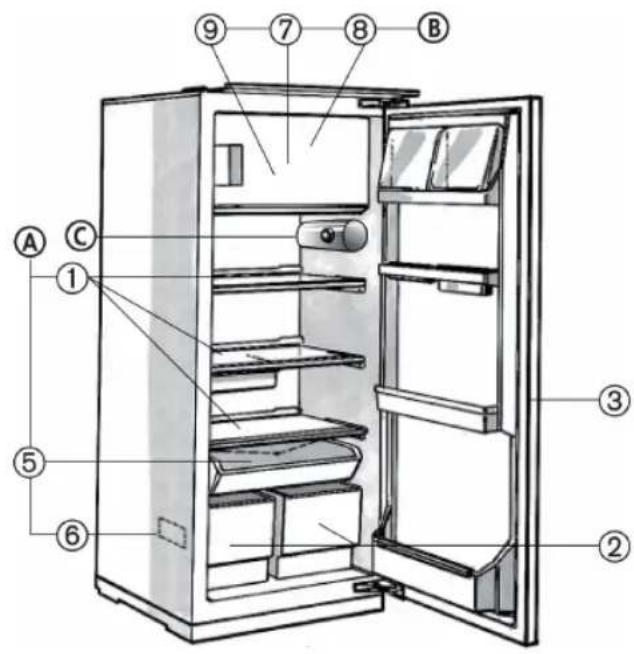
Labeled diagram of a refrigerator interior showing numbered compartments and doorsA) Refrigerator compartment
(for storage of fresh food and beverages)
I. Shelves (partly height adjustable)
2. Crispers
3. Refrigerator inner door with: (if supplied)
-
Drawer (telescopic extraction) (if supplied)
-
Pull-out defrost water drain
- Rating plate
CONTROLS
text_image
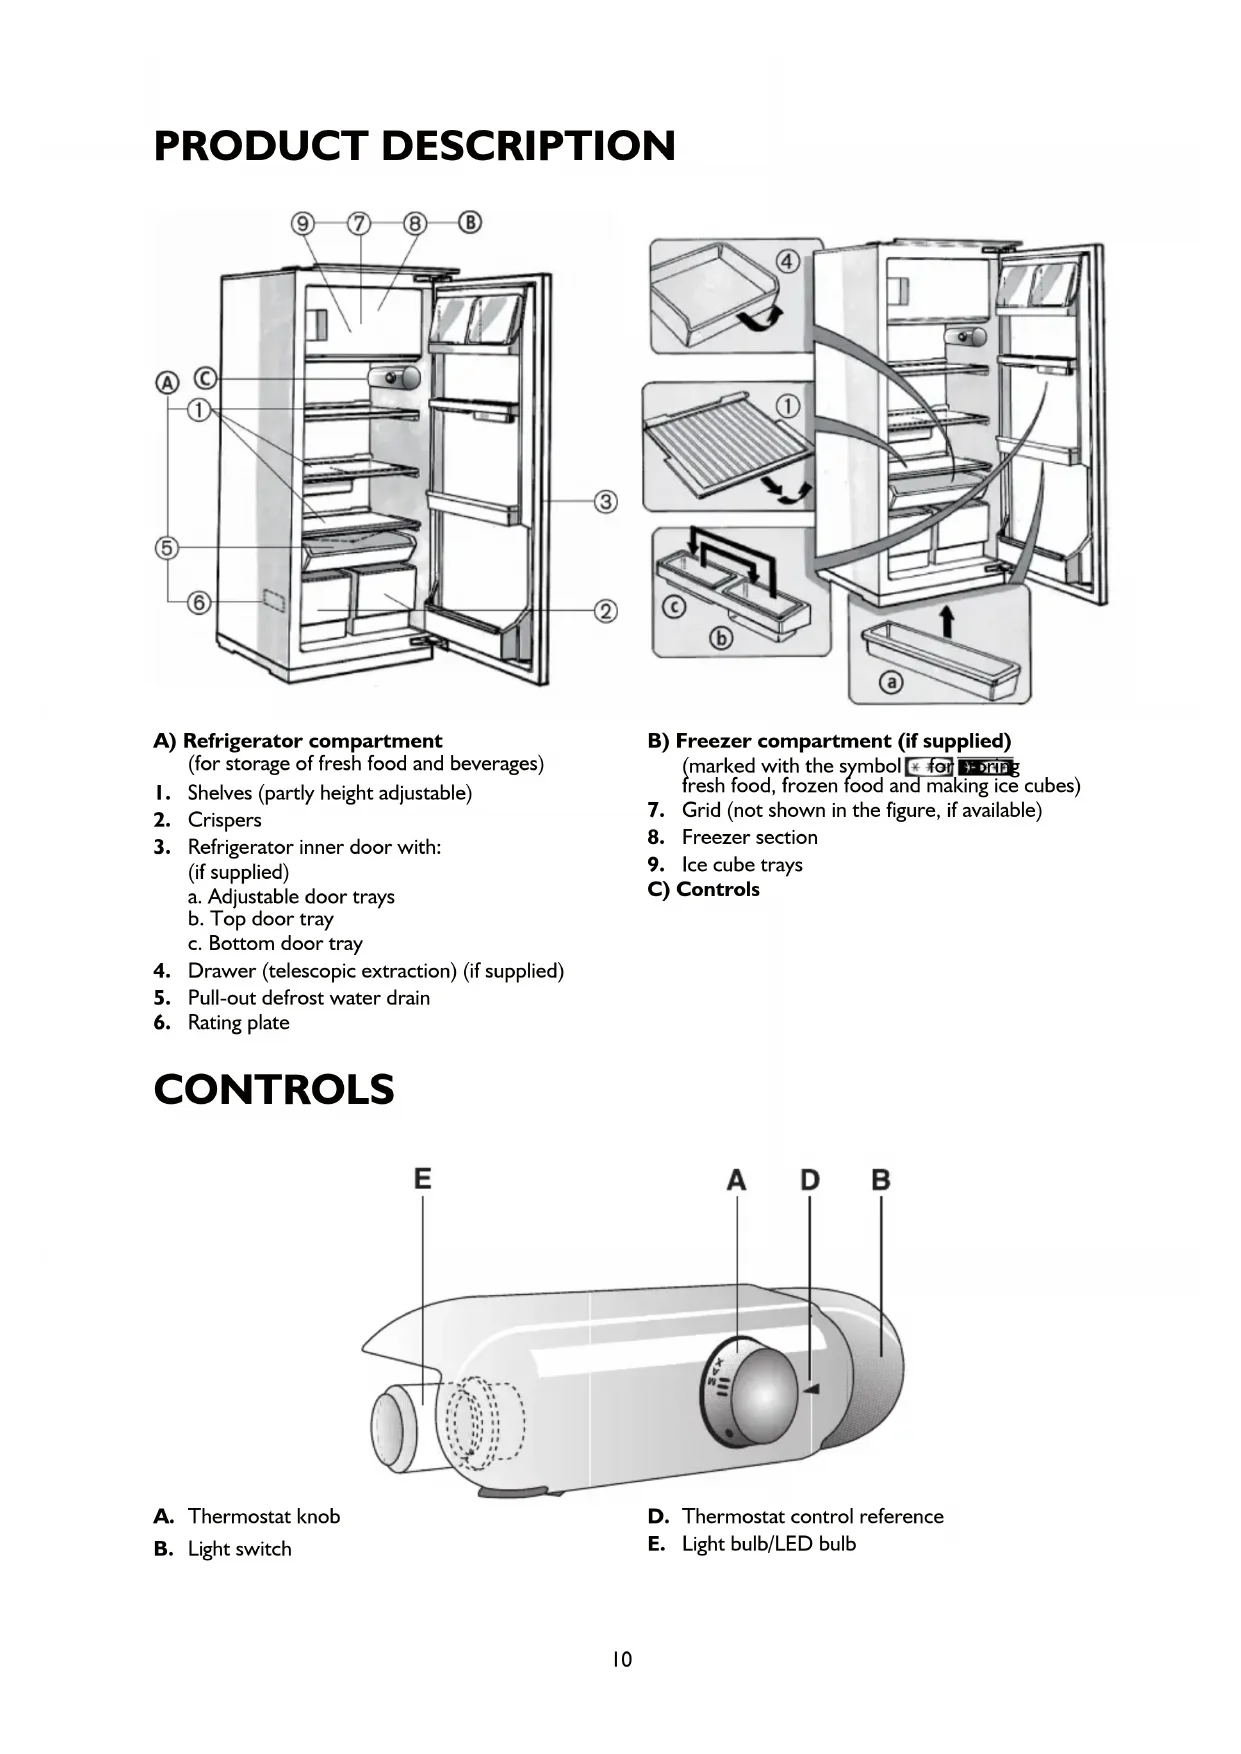
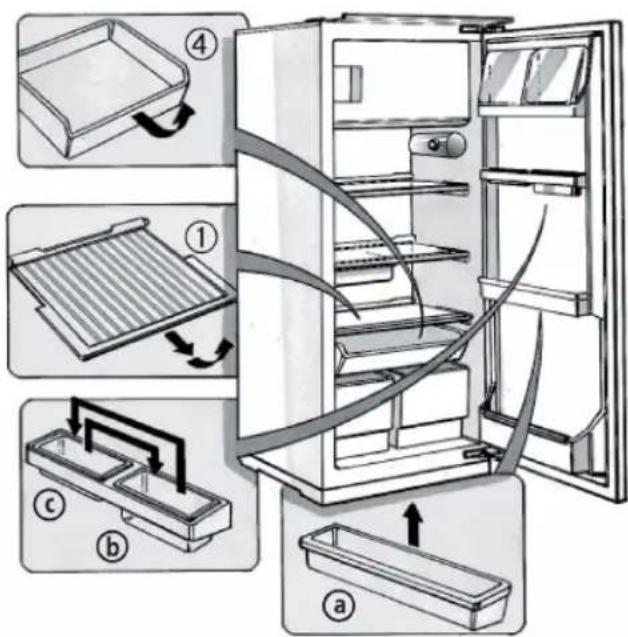
Diagram illustrating the internal components of a refrigerator with numbered parts and directional arrows indicating assembly or cleaning steps.B) Freezer compartment (if supplied)
(marked with the symbol * for y-dring fresh food, frozen food and making ice cubes)
- Grid (not shown in the figure, if available)
- Freezer section
- Ice cube trays
C) Controls
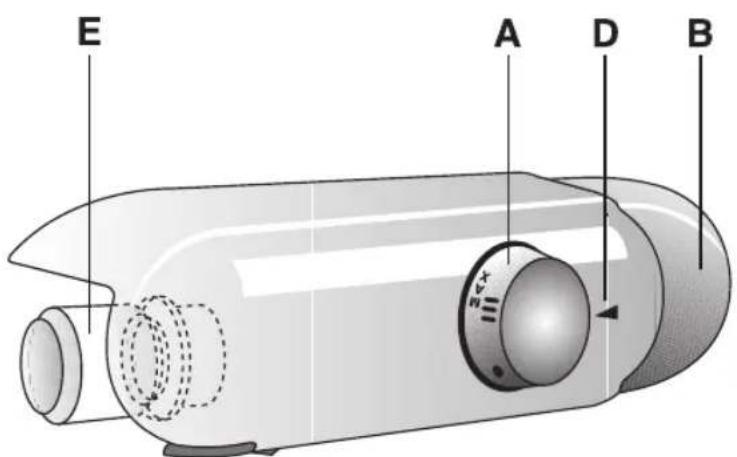
text_image
E A D BA. Thermostat knob
B. Light switch
D. Thermostat control reference
E. Light bulb/LED bulb
HOW TO OPERATE THE REFRIGERATOR COMPARTMENT
This appliance is a refrigerator with a star freezer compartment.
OR is a refrigerator with a *ta# freezer compartment.
Optimal appliance performance is obtained at ambient temperatures between +10°C and +38°C.
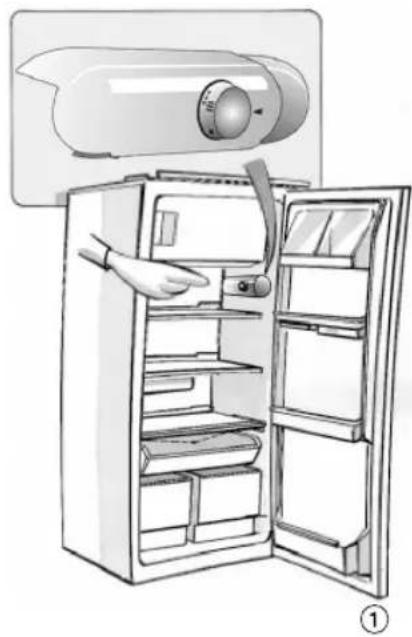
① Switching on the appliance
Once the power plug is inserted in the mains socket, unless the thermostat (I) is set to symbol ● the inside light switches on each time the door is opened.
Once the temperature has been set – see next chapter – the appliance is ready for use.
Adjusting the temperature
- To adjust the temperature in the compartment, turn the thermostat control knob:
• to lower numbers I-2/MIN for the LEAST COLD internal temperatures;
• to 3-4/MED for a MEDIUM temperature;
• to 5-7/MAX for the COLDEST temperature.
Thermostat setting on ●: no operation, no light.
Note:
The ambient air temperature, frequency of door opening and the position of the appliance can affect internal temperatures. These factors must be taken into account when setting the thermostat.
Important
- Thermostat adjustment (1) will depend on where the appliance is installed, ambient temperature and frequency of door opening.
How to use the refrigerator compartment:
③ Position the food as illustrated in the figure:
I. Cooked food
3. Fish, meat
4. Sliced cold meat
5. Fruit, vegetables, salad
6. Small jars, eggs
7. Tubes, small jars
8. Small bottles
9. Bottles
- Dairy products, preserves, cheese, butter
Note:
• Cover food to prevent it drying out.
- Hot food must be allowed to cool properly before being placed in the refrigerator.
• Make sure sufficient space is left for air to circulate around the food.
Defrosting of the refrigerator compartment is completely automatic.
natural_image
Illustration of a refrigerator with an open door and a mounted air conditioner unit (no text or symbols)
text_image
Illustration of a refrigerator with food items arranged around it, including a cake, cheese, bread, and vegetables.Only for or\*appiances:
④ Appliances with the symbol can be used to store already frozen food.
Appliances with the symbol 3-1A be used to store food for months and also to freeze food. The amount of fresh food (in kg) that can be frozen in 24 hours is indicated on the appliance rating plate (see paragraph "Product description", point 6).
Freezing food
- Set the thermostat knob (1) to 3-4.
- Arrange the food to be frozen centrally in the freezer compartment.
- Avoid contact between already frozen food and food that has yet to be frozen (approx. 20 mm distance).
• After 24 hours turn the thermostat knob (I) back to the normal position.

Important:
Wrap and seal the food in:
- Aluminium foil, cling film, watertight plastic bags, polythene containers with lids or special freezer containers.
When purchasing frozen food products:
- Ensure that the packaging is not damaged (frozen food in damaged packaging may have deteriorated). If the package is swollen or has damp patches, it may not have been stored under optimal conditions and defrosting may have already begun.
- Transport products in a thermally insulated cool bag.
- When shopping, leave frozen food purchases until last.
- Once at home, place the frozen foods immediately in the freezer.
- If food has defrosted even partially, do not re-freeze it. Consume within 24 hours.
- Avoid subjecting foods to temperature variations. Observe the "best before" date on the package.
• Always observe the storage information on the package.
Making ice cubes
- Fill the ice cube trays (9) 3/4 with water and place them at the bottom of the freezer compartment.
- Use a spoon handle to remove ice cube trays which stick to the compartment.
Do not use sharp or pointed instruments.

natural_image
Illustration of a refrigerator with open doors and a hand inserting food into the refrigerator (no text or symbols)HOW TO DEFROST AND CLEAN THE APPLIANCE
Before carrying out any maintenance or cleaning operations, unplug the appliance from the mains socket. Defrost the freezer compartment when the ice on the walls reaches a thickness of 3 mm.
- Remove foodstuffs from the turn the thermostat knob to
- The frozen food must be wrapped in sheets of newspaper (or a cover) and kept in a cool place.
- Clean the freezer compartment using a sponge dampened in a solution of lukewarm water and/or neutral detergent.
- Rinse and dry carefully.
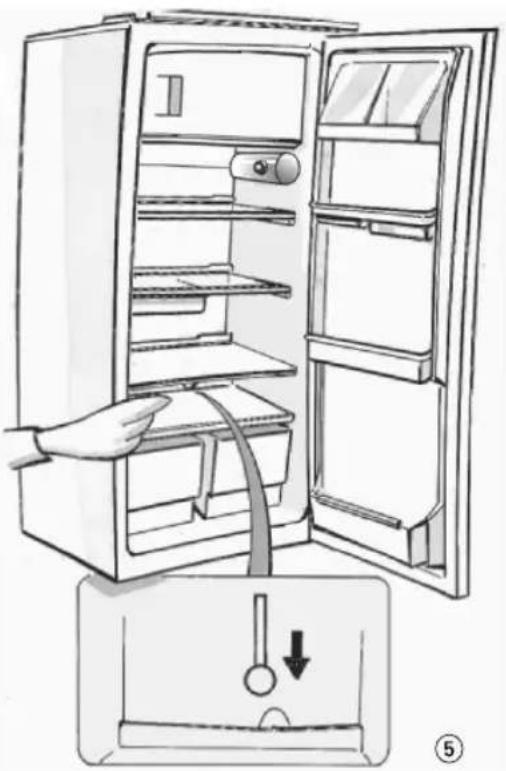
- Defrosting of the refrigerator compartment is fully automatic.
⑤ Clean the defrost water drain outlet regularly in order to ensure that defrost water is removed correctly.

After cleaning, reconnect the appliance to the power supply.
Do not use abrasive products.
Prolonged disuse.
• Empty the compartments.
- Disconnect the appliance from the mains power supply.
- Defrost and clean.
- Leave the doors open to prevent formation of unpleasant odours.
natural_image
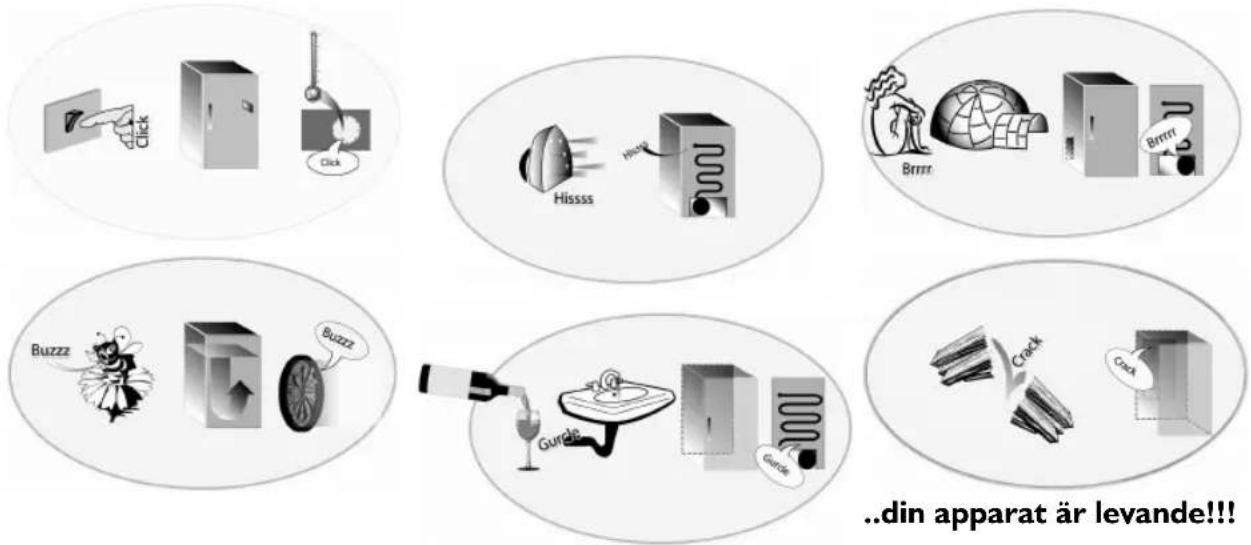
Line drawing of a refrigerator with an open door and a hand inserting a cable into the drawer (no text or symbols)TROUBLESHOOTING GUIDE
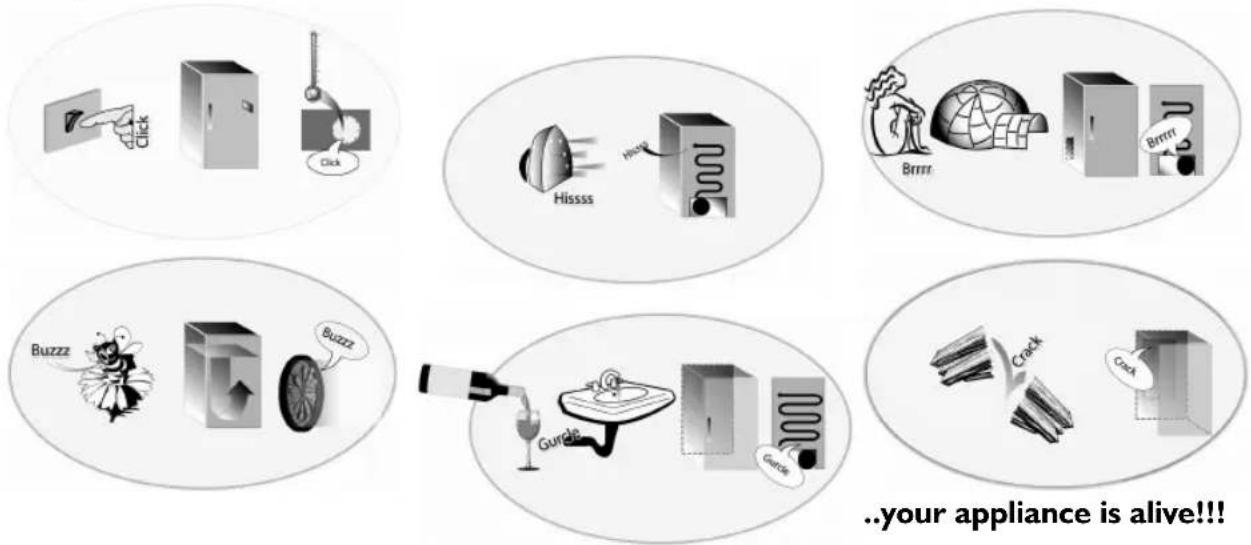
When you hear these noises
I. Temperature inside the compartments is not low enough.
• Is food preventing the doors from closing properly?
• Is the thermostat setting correct?
- Are the air circulation vents blocked?
- Temperature inside the refrigerator compartment is too low.
• Is the thermostat setting correct?
-
The appliance is excessively noisy.
-
Has the appliance been installed correctly?
- Are the pipes at the back touching or vibrating?
-
It is normal to hear the noise of the refrigerant liquid in circulation.
-
The appliance is not working?
• Is there a power failure?
• Is the plug properly inserted in the socket?
• Is the double-pole switch on?
- Do the household electrical system protection devices work correctly?
• Is the power cord damaged?
- Water collects at the bottom of the refrigerator compartment.
• Is the thermostat setting correct?
• Is the defrost water drain blocked?
natural_image
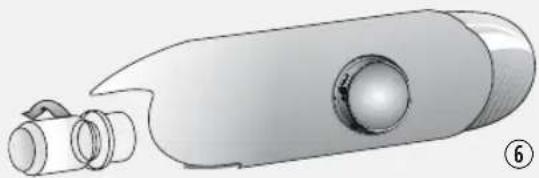
Illustration of a cylindrical device with a bulb and two protruding ports, labeled with number 6 (no text or symbols on the device itself)- The inside light is not working. ⑥ Perform the checks for point 4, and then:
- Disconnect the appliance from the power supply, check the light bulb and, if necessary, replace it with a new one:
- traditional light bulb (max 25W)
Or
- LED bulb
(with the same characteristics), only available from the After-Sales Service
- Removing the light bulb: Unscrew the bulb anticlockwise as shown in the figure.
AFTER-SALES SERVICE
Before contacting After-Sales Service:
I. See if you can solve the problem yourself with the help of the "Troubleshooting guide").
2. Switch the appliance on again to see if the problem has been solved. If it has not, disconnect the appliance from the power supply and wait for about an hour before switching on again.
3. If the problem persists after this course of action, contact After-sales Service.
Specify:
• the nature of the problem,
- the model,
- the Service number (the number after the word SERVICE on the rating plate on the inside of the appliance),
- your full address,
- your telephone number and area code.
SERVICE
0000 000 00000
Note:
The direction of door opening can be changed. If this operation is performed by After-sales Service it is not covered by the warranty.
INSTALLATION
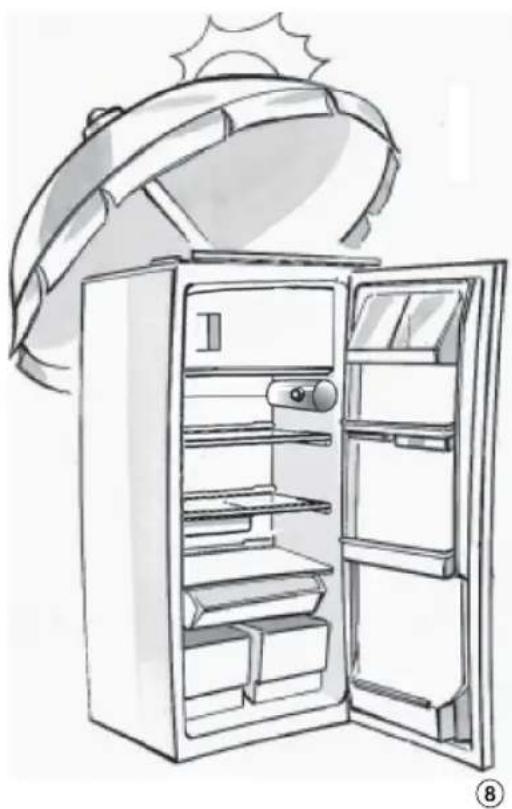
⑧ Install the freezer away from heat sources. Installation in a hot environment, direct exposure to the sun or installation near heat sources (heaters, radiators, cookers) will increase power consumption and should therefore be avoided. If this is not possible, the following minimum distances must be respected: 30 cm from coal or paraffin stoves 3 cm from electric stoves.
• Install the appliance in a dry, well-ventilated place.
- Clean the interior (see "How to defrost and clean the appliance").
- Fit the accessories.
- Check the door seal is not damaged or deformed, especially after installation or reversal of door opening.
Electrical connection
- Ensure that the voltage indicated on the appliance rating plate corresponds to the domestic supply voltage.
- Regulations require that the appliance is earthed. The Manufacturer declines all liabilities for injury to persons or damage to property resulting from failure to observe these regulations.
- If the plug and socket are not of the same type, have the socket replaced by a qualified electrician.
- Do not use extension cables, multiple sockets or adapters.
natural_image
Line drawing of an open refrigerator with a sun partially visible above it (no text or symbols)ELECTRICAL CONNECTION
I) For Great Britain only
Warning - this appliance must be earthed
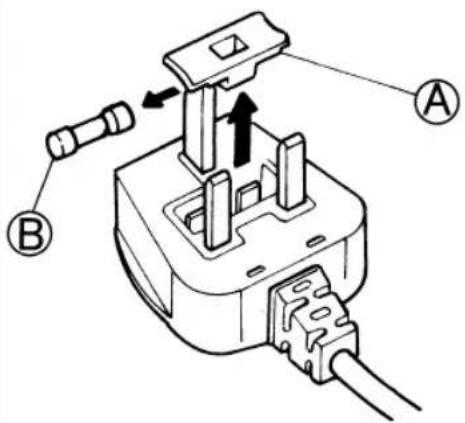
Fuse replacement
If the mains lead of this appliance is fitted with a BS 1363A 13amp fused plug, to change a fuse in this type of plug use an A.S.T.A. approved fuse to BS 1362 type and proceed as follows:
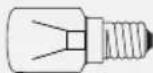
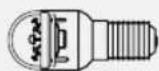
I. Remove the fuse cover (A) and fuse (B).
2. Fit replacement I3A fuse into fuse cover.
3. Refit both into plug.
Important:
The fuse cover must be refitted when changing a fuse and if the fuse cover is lost the plug must not be used until a correct replacement is fitted.
Correct replacement are identified by the colour insert or the colour embossed in words on the base of the plug.
Replacement fuse covers are available from your local electrical store.
2) For the Republic of Ireland only
The information given in respect of Great Britain will frequently apply, but a third type of plug and socket is also used, the 2-pin, side earth type.
3) Socket outlet / plug (valid for both countries)
If the fitted plug is not suitable for your socket outlet, please contact Whirlpool Service for further instruction. Please do not attempt to change plug yourself. This procedure needs to be carried out by a qualified Whirlpool technician in compliance with the manufactures instructions and current standard safety regulations.
text_image
Technical diagram of a plug electrical socket with labeled components A and B, showing internal structure and connection arrows.DESCRIPTION DE L'APPAREIL

text_image
Labeled diagram of a refrigerator interior showing numbered compartments and doors
text_image
Diagram illustrating the internal components of a refrigerator with numbered parts and directional arrows indicating assembly or cleaning steps.natural_image
Line drawing of a refrigerator with an open door and a scroll wheel, showing the interior shelves and handle (no text or symbols)
text_image
Illustration of a refrigerator with food items arranged around it, including a cake, cheese, bread, and vegetables.COMMENT FAIRE FONCTIONNER LE COMPARTIMENT CONGÉLATEUR
natural_image
Illustration of a refrigerator with open doors and a hand inserting food into the refrigerator (no text or symbols)COMMENT DÉGIVRER ET NETTOYER L'APPAREIL
natural_image
Line drawing of an open refrigerator with a hand inserting a cable to the door, showing internal shelves and a hanging handle (no text or symbols)DIAGNOSTIC RAPIDE
natural_image
Illustration of a cylindrical object with a central knob and two protruding tubes (no text or symbols)natural_image
Line drawing of an open refrigerator with a sun partially visible above it (no text or symbols)⑧
BESCHRIJVING VAN HET APPARAAT

text_image
Labeled diagram of a refrigerator interior showing numbered compartments and doors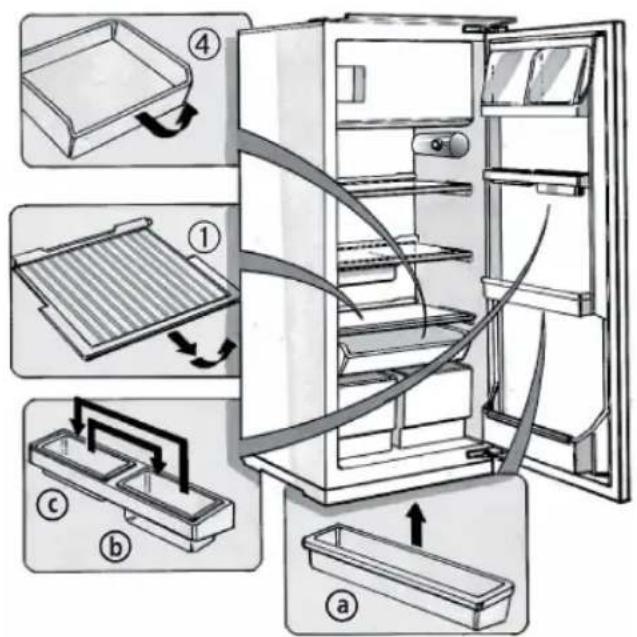
text_image
Diagram illustrating the internal components of a refrigerator with numbered parts and directional arrows indicating assembly or cleaning steps.A) Koelvak
natural_image
Line drawing of a refrigerator with an open door and a hand inserting a scroll into the refrigerator (no text or symbols)
text_image
Diagram illustrating the internal structure of a refrigerator with food items arranged around it, labeled with numbers ③.GEBRUIK VAN HET VRIESVAK
natural_image
Illustration of a refrigerator with open doors and a hand inserting food into the refrigerator (no text or symbols)HET APPARAAT ONTDOOIEN EN REINIGEN
natural_image
Illustration of a hand opening the refrigerator with a piping bag inserted, showing liquid level (no text or symbols)STORINGEN OPSPOREN
natural_image
Illustration of a cylindrical device with a bulb and two protruding ports, no text or symbols present.natural_image
Line drawing of an open refrigerator with a sun partially visible above it (no text or symbols)text_image
Labeled diagram of a refrigerator interior showing numbered compartments and doors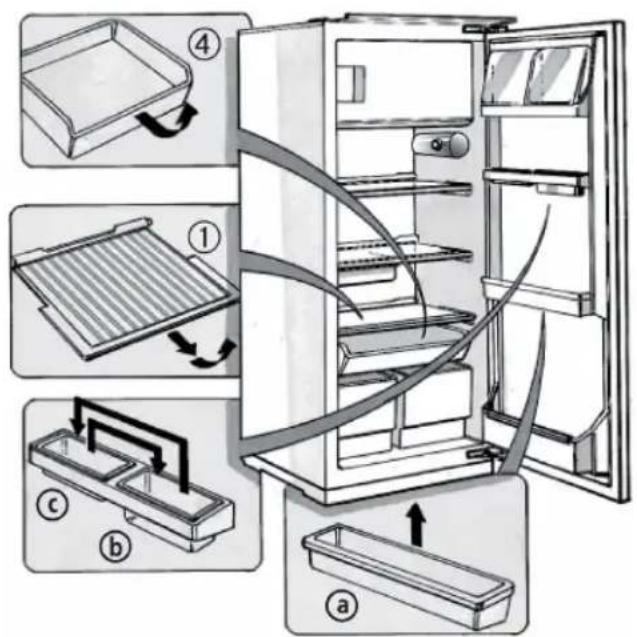
text_image
Diagram illustrating the internal components of a refrigerator with numbered parts and directional arrows indicating assembly or cleaning steps.natural_image
Line drawing of a refrigerator with an open door and a hand inserting a fan into the refrigerator (no text or symbols)
text_image
Illustration of a refrigerator with food items arranged around it, including a cake, cheese, and vegetables.PUESTA EN MARCHA DEL COMPARTIMENTO CONGELADOR
natural_image
Illustration of a refrigerator with open doors and a hand inserting food into the refrigerator (no text or symbols)natural_image
Line drawing of a refrigerator with an open door and a hand inserting a cable into the drawer (no text or symbols)natural_image
Illustration of a cylindrical device with a bulb and two protruding ports, labeled with number 6 (no text or symbols on the device itself)natural_image
Line drawing of an open refrigerator with a sun partially visible above it (no text or symbols)⑧
text_image
Labeled diagram of a refrigerator interior showing numbered compartments and doors
text_image
Diagram illustrating the internal components of a refrigerator with numbered parts and directional arrows indicating assembly or cleaning steps.natural_image
Illustration of a refrigerator with an open door and a handle, showing the interior shelves and top panel (no text or symbols)
text_image
Illustration of a refrigerator with food items arranged in a vertical stack, including a cake, cheese, bread, and vegetables.COMO USAR O COMPARTIMENTO CONGELADOR
natural_image
Illustration of a refrigerator with open doors and a close-up of food inside, showing a hand inserting food into a rack (no text or symbols)COMO DESCONGELAR E LIMPAR O APARELHO
natural_image
Line drawing of a refrigerator with an open door and a hand inserting a cable into the refrigerator (no text or symbols)natural_image
Illustration of a cylindrical device with a bulb and two protruding ports, labeled with number 6 (no text or symbols on the device itself)natural_image
Line drawing of an open refrigerator with a sun partially visible above it (no text or symbols)⑧
DESCRIZIONE DELL'APPARECCHIO
text_image
Labeled diagram of a refrigerator interior showing numbered compartments and doors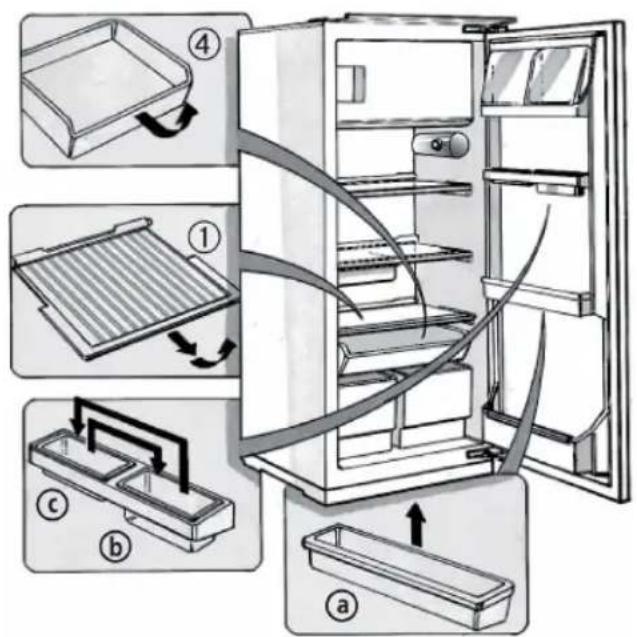
text_image
Diagram illustrating the internal components of a refrigerator with numbered parts and directional arrows indicating assembly or cleaning steps.A) Comparto frigorifero
natural_image
Illustration of a refrigerator with an open door and a hand inserting a scroll into the refrigerator (no text or symbols)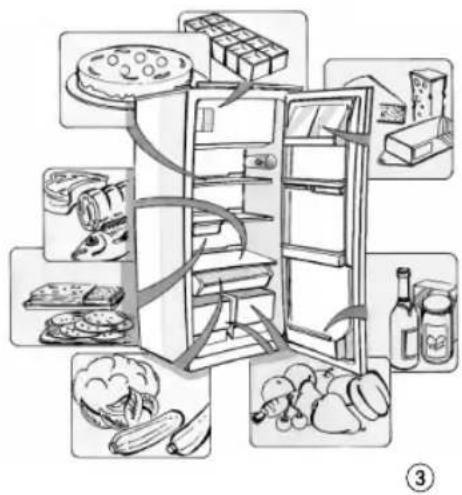
text_image
Diagram illustrating a multi-step grocery store refrigerator with labeled items including a cake, cheese, bread, and vegetables.COME FAR FUNZIONARE IL COMPARTO CONGELATORE
natural_image
Illustration of a refrigerator with open doors and a hand inserting food into the refrigerator (no text or symbols)COME SBRINARE E PULIRE L'APPARECCHIO
natural_image
Line drawing of a refrigerator with an open door and a hand inserting a piping bag into the drawer (no text or symbols)natural_image
Illustration of a cylindrical device with a bulb and two connected tubes, no text or symbols present.natural_image
Line drawing of an open refrigerator with a sun partially visible above it (no text or symbols)⑧
text_image
Labeled diagram of a refrigerator interior showing numbered compartments and doors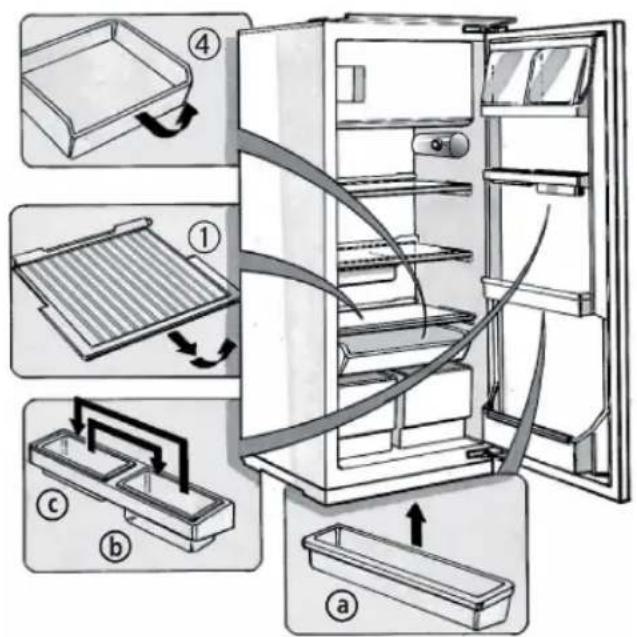
text_image
Diagram illustrating the internal components of a refrigerator with numbered parts and directional arrows indicating assembly or cleaning steps.A) Ψυγείο
natural_image
Line drawing of a refrigerator with an open door and handle, showing internal compartments (no text or symbols)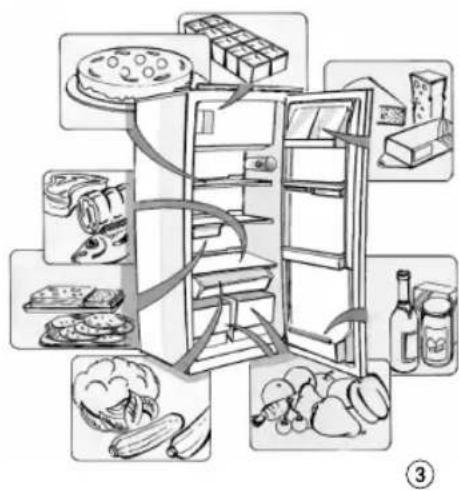
flowchart
graph TD
    A["Raw Food"] --> B["Cutary with餅 and plate"]
    B --> C["Processed Food"]
    C --> D["Processed Bread"]
    C --> E["Processed Bread"]
    C --> F["Processed Bread"]
    C --> G["Processed Bread"]
    C --> H["Processed Bread"]
    C --> I["Processed Bread"]
    style A fill:#f9f,stroke:#333
    style B fill:#ccf,stroke:#333
    style C fill:#cfc,stroke:#333
    style D fill:#fcc,stroke:#333
    style E fill:#cff,stroke:#333
    style F fill:#ffc,stroke:#333
    style G fill:#cfc,stroke:#333
    style H fill:#fcc,stroke:#333
    style I fill:#ffc,stroke:#333
natural_image
Illustration of a refrigerator with open doors and a hand inserting food into the refrigerator (no text or symbols)natural_image
Line drawing of a refrigerator with an open door and a hand inserting a cable into the drawer (no text or symbols)natural_image
Illustration of a cylindrical device with a bulb and a handle, shown from an angle (no text or symbols)natural_image
Line drawing of an open refrigerator with a sun partially visible above it (no text or symbols)8
BESKRIVNING AV APPARATEN

text_image
Labeled diagram of a refrigerator interior showing numbered compartments and doors
text_image
Diagram illustrating the internal components of a refrigerator with numbered parts and directional arrows indicating assembly or cleaning steps.A) Kyldel
natural_image
Line drawing of a refrigerator with an open door and a scroll inside, showing the interior shelves and handle (no text or symbols)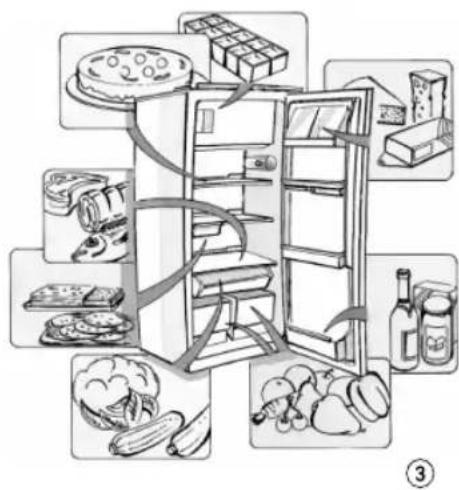
text_image
Illustration of a refrigerator with food items arranged around it, including a cake, cheese, bread, and vegetables.ANVÄNDNING AV FRYSDELEN OCH DESS FUNKTIONER
natural_image
Illustration of a refrigerator with open doors and a hand inserting food into the refrigerator (no text or symbols)AVFROSTNING OCH RENGÖRING AV APPARATEN
natural_image
Line drawing of a refrigerator with an open door and a hand inserting a cable to the front door, showing internal shelves and a handle (no text or symbols)FELSÖKNING
När dessa ljud hörs
natural_image
Illustration of a cylindrical device with a bulb and two connected ports, labeled with number 6 (no text or symbols on the device itself)natural_image
Line drawing of an open refrigerator with a sun partially visible above it (no text or symbols)⑧
BESKRIVELSE AV APPARATET

text_image
Labeled diagram of a refrigerator interior showing numbered compartments and doors
text_image
Diagram illustrating the internal components of a refrigerator with numbered parts and directional arrows indicating assembly or cleaning steps.A) Kjøleseksjon
A. Termostatbryter
B. Lysbryter
D. Referansemerke for termostatbryter
E. Lyspære/Diodepære
BRUK AV KJ∅LESEKSJONEN
natural_image
Illustration of a refrigerator with an open door and a hand inserting a pan into the refrigerator (no text or symbols)
text_image
Diagram illustrating the arrangement of food containers and kitchen appliances, labeled with icons for each item.BRUK AV FRYSESEKSJONEN
Kun for apparater med eller med :
natural_image
Illustration of a refrigerator with open doors and a close-up of food inside, showing a hand inserting food into the refrigerator (no text or symbols present)AVRIMING OG RENGJ∅RING
natural_image
Line drawing of an open refrigerator with a hand inserting a piping bag to the door (no text or symbols)FEILS∅KINGSLISTE
natural_image
Illustration of a cylindrical device with a bulb and two protruding ports, labeled with number 6 (no text or symbols on the device itself)natural_image
Line drawing of an open refrigerator with a sun partially visible above it (no text or symbols)⑧
BESKRIVELSE AF APPARATET
text_image
Labeled diagram of a refrigerator interior showing numbered compartments and doorsA) Køleskabet
text_image
Diagram illustrating the internal components of a refrigerator with numbered parts and directional arrows indicating assembly or cleaning steps.natural_image
Illustration of a refrigerator with an open door and a hand inserting a scroll into the refrigerator (no text or symbols)
text_image
Diagram illustrating the food pyramid with labeled items including a refrigerator, fries, snacks, and vegetables.BRUG AF FRYSEREN
Kun for apparater med eller med :
natural_image
Illustration of a refrigerator with open doors and a hand inserting food into the refrigerator (no text or symbols)CAFRIMNING OG RENG∅RING AF APPARATET
natural_image
Illustration of a refrigerator with an open door and a hand inserting a cable into the refrigerator (no text or symbols)FFEJLFINDINGSOVERSIGT
natural_image
Illustration of a cylindrical object with a central knob and two protruding tubes (no text or symbols)natural_image
Line drawing of an open refrigerator with a sun partially visible above it (no text or symbols)LAITTEEN KUVAUS

text_image
Labeled diagram of a refrigerator interior showing numbered compartments and doors
text_image
Diagram illustrating the internal components of a refrigerator with numbered parts and directional arrows indicating assembly or cleaning steps.A) Jääkaappiosasto
natural_image
Illustration of a refrigerator with an open door and a hand inserting a pan into the refrigerator (no text or symbols)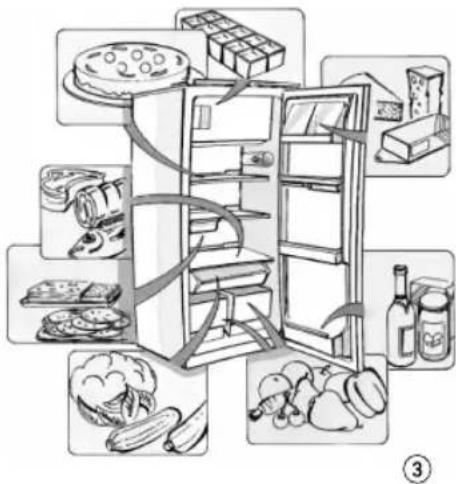
text_image
Illustration of a refrigerator with food items arranged around it, including a sandwich, cheese, and vegetables.PAKASTINOSASTON KÄYTTÖ
natural_image
Illustration of a refrigerator with open doors and a hand inserting a cable into the refrigerator (no text or symbols)LAITTEEN SULATUS JA PUHDISTUS
natural_image
Illustration of a hand opening the refrigerator with a piping bag inserted, showing internal shelves and a handle (no text or symbols)VIANETSINTÄ
natural_image
Illustration of a cylindrical device with a bulb and two protruding ports, labeled with number 6 (no text or symbols on the device itself)natural_image
Line drawing of an open refrigerator with a sun partially visible above it (no text or symbols)⑧