DWV902L - Vacuum Cleaner DEWALT - Free user manual and instructions
Find the device manual for free DWV902L DEWALT in PDF.
Download the instructions for your Vacuum Cleaner in PDF format for free! Find your manual DWV902L - DEWALT and take your electronic device back in hand. On this page are published all the documents necessary for the use of your device. DWV902L by DEWALT.
USER MANUAL DWV902L DEWALT
DWV902L, DWV902M, DWV902MT
DWV902L, DWV902M, DWV902MT
DWV902L, DWV902M, DWV902MT
DWV902L, DWV902M, DWV902MT
WARNING: To reduce the risk of injury, read the
instruction manual. Definitions: Safety Guidelines The definitions below describe the level of severity for each signal word. Please read the manual and pay attention to thesesymbols. EC-Declaration of Conformity Machinery Directive Heavy-Duty Construction Dust Extractor
DWV902L, DWV902M, DWV902MT
DeWALT declares that these products described under Technical Data are in compliance with: 2006/42/EC, EN60335-1:2012 +A11:2014 EN60335-2-69:2012. These products also comply with Directive, 2014/30/EU and 2011/65/EU. For more information, please contact DeWALT
the following address or refer to the back of themanual. The undersigned is responsible for compilation of the technical file and makes this declaration on behalf of DeWALT
English (original instructions)
HEAVY-DUTY CONSTRUCTION DUST EXTRACTOR
DWV902L, DWV902M, DWV902MT
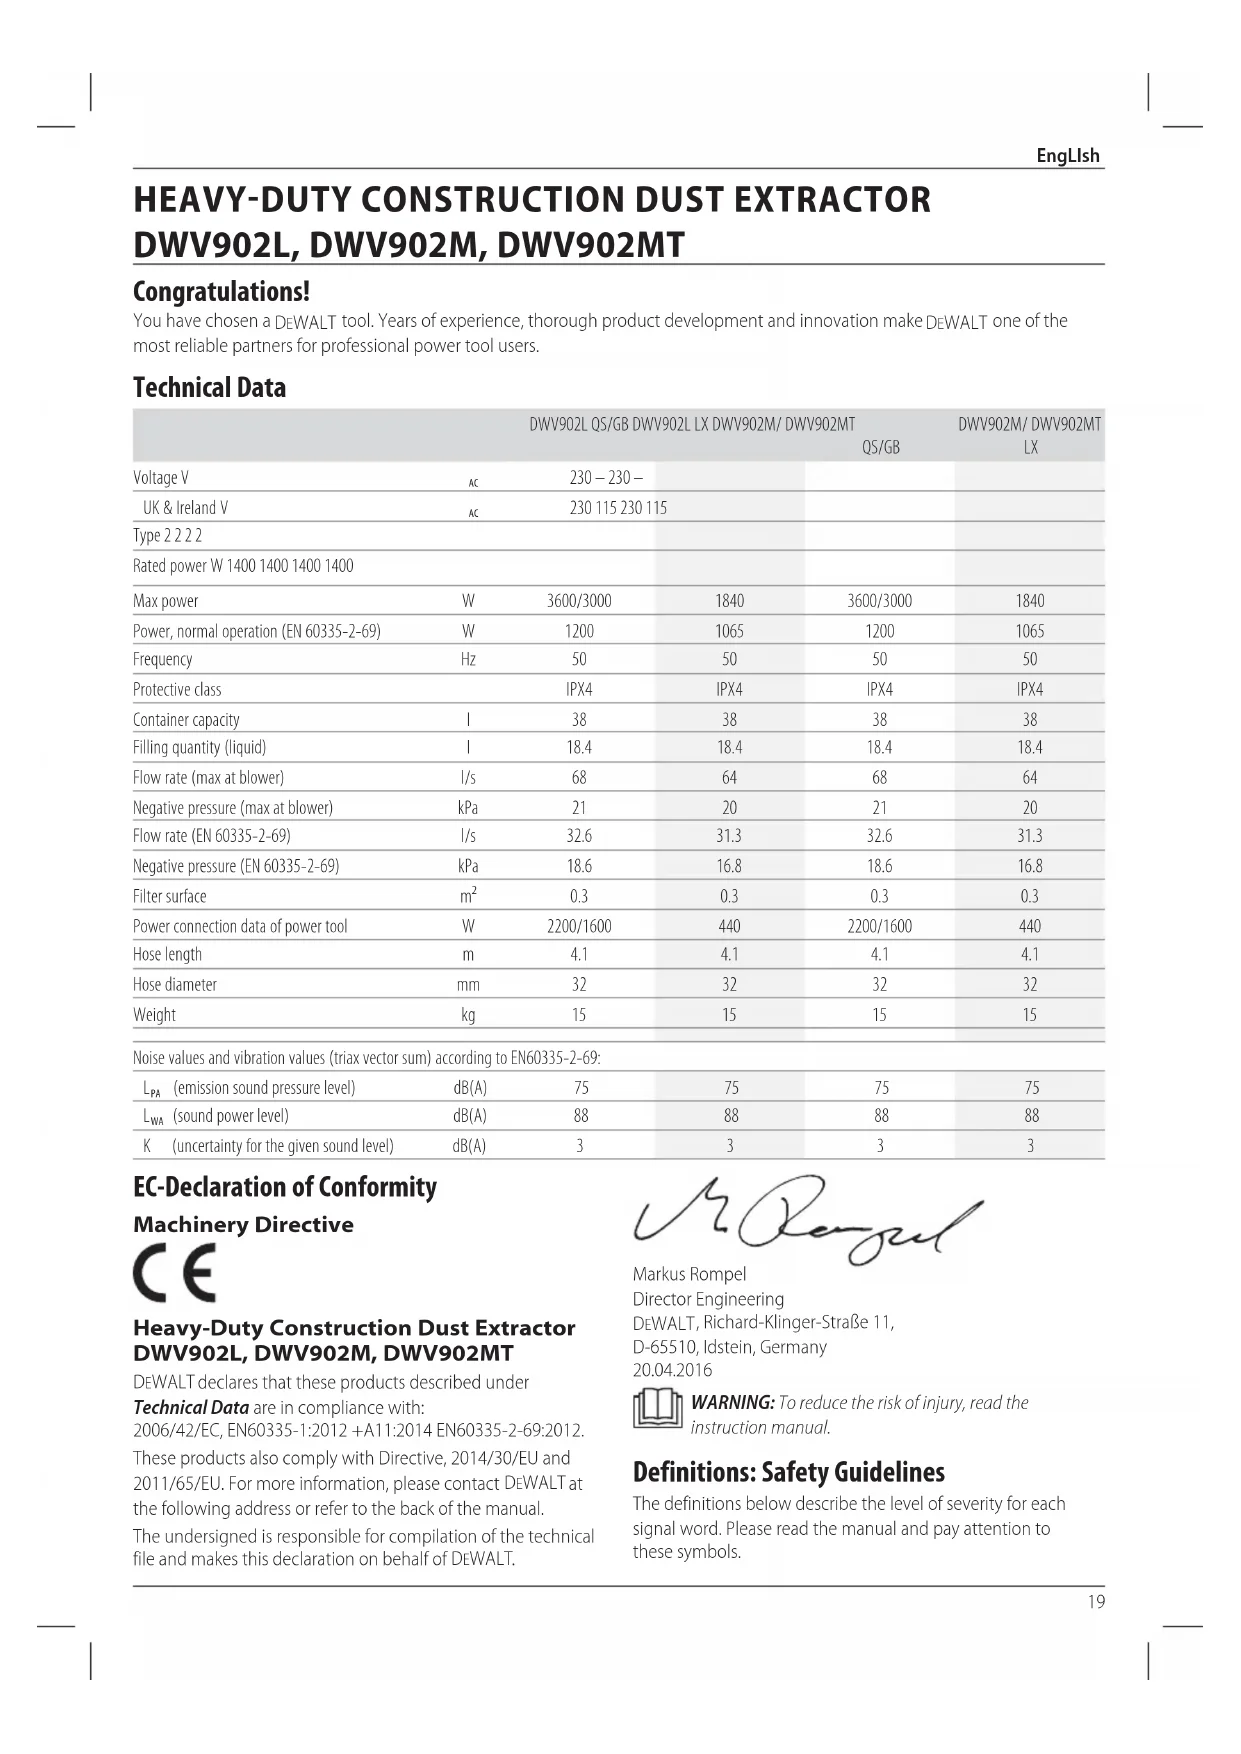
Congratulations! You have chosen a DeWALT tool. Years of experience, thorough product development and innovation make DeWALT one of the most reliable partners for professional power toolusers. Technical Data DWV902L QS/GB DWV902L LX DWV902M/ DWV902MT QS/GB
(emission sound pressure level) dB(A) 75 75 75 75
(sound power level) dB(A) 88 88 88 88 K (uncertainty for the given sound level) dB(A) 3 3 3 320 ENGLISH
DANGER: Indicates an imminently hazardous
situation which, if not avoided, will result in death or seriousinjury.
WARNING: Indicates a potentially hazardous situation
which, if not avoided, could result in death or seriousinjury.
CAUTION: Indicates a potentially hazardous situation which, if not avoided, may result in minor or moderateinjury. NOTICE: Indicates a practice not related to personal injury which, if not avoided, may result in propertydamage.
Denotes risk of electricshock.
Denotes risk offire. Important Safety Instructions
WARNING! Read all safety warnings and all instructions. Failure to follow the warnings and instructions may result in electric shock, fire and/or serious injury.
BEFORE USING THIS APPLIANCE, READ
WARNING: Operators shall be adequately instructed on
the use of these machines.
WARNING: To reduce the risk of electric shock. Do not
expose to rain. Store indoors.
- Before use, operators shall be provided with information, instruction and training for the use of the machine and the substances for which it is to be used, including the safe method of removal and disposal of the material collected.
- Operators should observe any safety regulations appropriate to the materials being handled.
- Do not leave the appliance when it is connected to a power source. Unplug it from outlet when not in use and before servicing.
- Do not allow the appliance to be used as a toy. Pay close attention when the appliance is used by or near children.
- Use this appliance ONLY as described in the manual. Use only
WALT recommended attachments.
- Do not use this appliance with a damaged cord or plug. If the appliance is not working correctly, or if it has been dropped, damaged, left outdoors, or dropped in water, return it to a service center.
- Do not pull or carry this appliance by the cord, use the cord as a handle, close a door on the cord, or pull the cord around sharp edges or corners. Do not run the appliance over the cord. Keep cord away from heated surfaces.
- Do not unplug this appliance by pulling on the cord. To unplug, grasp the plug, not the cord.
- Do not handle the plug or appliance with wet hands.
- Do not put any objects into the openings of the appliance. Do not use the appliance with any opening blocked; keep free of dust, lint, hair and anything else that may reduce air flow.
- Keep hair, loose clothing, fingers, and all body parts away from the openings and moving parts.
- Turn off all controls before unplugging appliance.
- Use extra care when cleaning on stairs.
- Do not use the appliance to pick up flammable or combustible liquids, such as gasoline, or use in areas where flammable or combustible liquids are present.
- Static shocks are possible in dry areas or when the relative humidity of the air is low. This is only temporary and does not affect the use of the vacuum. To reduce the frequency of static shocks, add moisture to the air with a console, installed humidifier or use DWV9316-XJ non-static hose accessory.
- To avoid spontaneous combustion, empty canister after eachuse.
SAVE THESE INSTRUCTIONS
Additional Safety Rules
- Do not pick up anything that is burning or smoking, such as cigarettes, matches, or hot ashes.
- Do not use to vacuum combustible explosive materials, such as coal, grain, or other finely divided combustible material.
- Do not use to vacuum hazardous, toxic or carcinogenic materials, such as asbestos or pesticide.
- Never pick up explosive liquids(e.g. gasoline, diesel fuel, heating oil, paint thinner, etc.), acids or solvents.
- Do not use vacuum without filter in place, except as described under Wet Pickup Applications.
- Some wood contains preservatives which can be toxic. Take extra care to prevent inhalation and skin contact when working with these materials. Request and follow any safety information available from your material supplier.
- Do not use vacuum as a step ladder.
- Do not place heavy objects on vacuum. Electrical Safety The electric motor has been designed for one voltage only. Always check that the power supply corresponds to the voltage on the rating plate.
WARNING: 115 V units have to be operated via a fail-safe
isolating transformer with an earth screen between the primary and secondary winding. If the supply cord is damaged, it must be replaced by a specially prepared cord available through the DeWALT
serviceorganisation. Mains Plug Replacement (U.K. & Ireland Only) If a new mains plug needs to be fitted:
- Safely dispose of the oldplug.
- Connect the brown lead to the live terminal in theplug.21 EngLIsh
- Connect the blue lead to the neutralterminal.
WARNING: No connection is to be made to the
earthterminal. Follow the fitting instructions supplied with good quality plugs. Recommended fuse: 13A. Using an Extension Cable An extension cord should not be used unless absolutely necessary. Use an approved extension cable suitable for the power input of your charger (see Technical Data). The minimum conductor size is 1.5 mm
; the maximum length is30m. When using a cable reel, always unwind the cablecompletely. Package Contents The package contains: 1 Dust extractor 1 Hose 1 DWV9210-XJ connector kit 2 Filters 1 Instruction manual
- Check for damage to the tool, parts or accessories which may have occurred duringtransport.
- Take the time to thoroughly read and understand this manual prior tooperation. Markings on Dust Extractor The following pictograms are shown on the appliance: Read instruction manual before use.
WARNING: This appliance contains harmful dust. The
emptying and maintenance, including the removal of the dust bag, may only be executed by trained personnel wearing suitable protection equipment. Do not switch on until the complete filter system has been installed. Class L dust extractors are suitable to extract dry, non- combustable dusts with workpace limit values of >1mg/m³. Class M dust extractors are suitable to extract dry, non- combustable dusts with workpace limit values of ≥ 0.1 mg/m³. Date Code Position (Fig. A) The date code
, which also includes the year of manufacture, is printed into the housing. Example: 2016 XX XX Year of Manufacture Description (Fig. A)
of it. Damage or personal injury could result.
Casters (one equipped with parking brake)
Twist-lock hose inlet
Outlet for power tools
Variable suction dial
Flow alarm adjustment (Class M models only)
Inlet plug (Class M models only)
DWV9210-XJ connector kit (includes DWV9000, DWV9120, DWV9130) Intended Use These vacuums are used for fine particulate pick-up, like wallboard or surface dust. DWV902L This appliance can be used as industrial vacuum cleaner and dust extractor for mobile operations to take up all types of dry, non-combustible dusts up to dust Class L with limit values for occupational exposure greater than 1 mg/m³.
This appliance can be used as industrial vacuum cleaner and dust extractor for mobile operations to take up all types of dry, non-combustible dusts up to dust Class M with limit values for occupational exposure greater than or equal to 0.1 mg/m³. DO nOT use under wet conditions or in the presence of flammable liquids orgases. These heavy-duty vacuums are for professional use. DO nOT let children come into contact with the tool. Supervision is required when inexperienced operators use thistool. DO nOT use the dust extractor for combustible dust. DO nOT use the dust extractor in explosive atmospheres.22 ENGLISH NOTE: This appliance is suited for the commercial use, e.g. in hotels, schools, hospitals, factories, shops, offices, rental companies, and on construction sites.
- Young children and the infirm. This appliance is not intended for use by young children or infirm persons without supervision.
- This product is not intended for use by persons (including children) suffering from diminished physical, sensory or mental abilities; lack of experience, knowledge or skills unless they are supervised by a person responsible for their safety. Children should never be left alone with thisproduct. Anti-Static Hose Option The DWV902L, DWV902M and DWV902MT are each equipped with an anti-static grounding system. An anti-static hose must be purchased at extra cost from your authorised service center. This hose (DWV9316-XJ) fits into the dust extractor system the same way as the standard hose. To contact your seller or check the location of your nearest authorised DeWALT repair agent in the DeWALT catalogue or contact your DeWALT office at the address indicated in this manual. ASSEMBLY AND ADJUSTMENTS (FIG. A–C)
WARNING: To reduce the risk of injury, turn
appliance off and disconnect appliance from power source before installing and removing accessories, before adjusting or changing set-ups or when making repairs. An accidental start-up can cause injury.
WARNING: The filters
must always be in place while vacuuming, except as described under Wet Pick Up Applications under Operation. When vacuuming fine dust, you may also use an additional paper bag or fleece bag to make emptying the canister easier.
WARNING: Dust collection bags must be used for dust
is to be used, install as shown in figureB. NOTE: Be careful not to tear the bag. Place bag securely onto inlet
to provide a tight seal for maximum dust collection performance.
2. Place the vacuum head
onto the canister and secure it by closing the canister latches
into twist-lock hose inlet
and rotate counterclockwise to lock in place. OPERATION Instructions for Use (Fig. A, D)
WARNING: Always observe the safety instructions and
applicable regulations.
WARNING: To reduce the risk of injury, turn
appliance off and disconnect appliance from power source before installing and removing accessories, before adjusting or changing set-ups or when making repairs. An accidental start-up can cause injury.
1. Plug the power cord into an appropriate outlet.
to the desired position. This feature allows the user to control the vacuum's power, suction and noise. NOTE: This setting also controls the level of suction. This is very useful in applications where the vacuum creates unacceptable levels of drag to the work piece.
4. Follow the direction under Connecting to Power Tools to
connect to the power tool to be used. Flow Alarm Adjustment (Fig. D) Class M models only Adjust the flow alarm adjustment control
to the correct hose (or tube) inside diameter size or accessory diameter referring to the largest section. The chosen diameter of the adjustment control must be equal or bigger as the largest diameter of the used hose/tube/ accessories. The hose supplied is 32mm inside diameter. An acoustic alarm will sound if the flow rate falls below 20 m/s. The system has a time delay to reduce unintended alarms. If the alarm sounds when there is no apparent blockage:
1. Ensure that the adjustment control is set to the correct
2. If the flow rate adjustment is set below the maximum,
increase this level until sufficient flow through the hose causes the alarm to stop.
3. If the alarm still continues to sound, remove hose and check
that it is clear. Remove and replace dust bag if full or blocked and check filter condition and replace where necessary. If the alarm continues to sound contact your local DeWALT
service agent. Connecting to Power tools (Fig. A, D, E)
for purposes specified in the instructions.
1. Plug the vacuum power cord into an appropriate outlet.
2. Plug the power tool into the outlet
NOTE: See Power connection data of power tool under Technical Data for the power allowance of the tool to be plugged into the outlet
to the ACTIVATION position . This allows the vacuum to be turned on and off automatically by the power tool. NOTE: The vacuum cleaner starts automatically within
0.5 seconds and continues to run for 15seconds after the
power tool has been turned off.
to the ON position ( ). In manual mode the tool and the vacuum are turned on and off independent of each other.
WALT construction dust extractor is fitted with the
WALT AirLock connection system. The AirLock allows for a fast, secure connection between the suction hose
and power tool. The AirLock connector
connects directly to
WALT compatable tools or through the use of an AirLock23 ENGLISH adapter (available from your local D
WALT supplier). Refer to the Accessories section for detail on available adapters. NOTE: If using an adapter ensure it is firmly attached to the tool outlet before following the steps below. a. Ensure the collar on the AirLock connector is in the unlock position. Align notches
on collar and AirLock connector as shown for unlock and lock positions. b. Push the AirLock connector onto the adapter connector point. c. Rotate the collar to the locked position. NOTE: The ball bearings inside collar lock into slot and secure the connection.The power tool is now securely connected to the dust extractor. Automatic Filter Cleaning System This vacuum has a highly effective filter cleaning system which minimizes filter clogging. Every 30seconds, one of the two filters gets automatically cleaned. The cleaning process alternates between the filters and continues through the life of the unit. NOTE: It is normal to hear a clicking sound during this process. NOTE: After many hours of operation the automatic filter cleaning system may not be effective. When this happens the filters will need to be cleaned or replaced. Refer to Filter under Maintenance. Parking Brake (Fig. A, F) The parking brake will lock one wheel in place to prevent vacuum from rolling.
1. To engage parking brake, depress
to snap the brake into the locked position.
2. To disengage parking brake, depress the brake button and
brake will snap into the unlocked position. Remove / Change Used Dust Collection Bag (Fig. A)
WARNING: Appropriate personal protective equipment
like dust mask and gloves should be used while handling used dust bags.
1. Turn off vacuum and unplug cord from outlet.
2. Close the twist-lock hose inlet
and remove vacuum head
4. Pull the collection bag carefully from inlet
5. Seal the collection bag opening tightly when removing it
6. Dispose of collection bag in appropriate container according
to statutory provisions. Wet Pick up applications (Fig. A, G)
WARNING: DO NOT connect power tools to outlet
when using the vacuum for wet pick up.
WARNING: Plug vacuum into residual current device
(RCD) protected outlet when using the vacuum for wet pick up.
switch off immediately.
CAUTION: Clean the water level limiting device regularly and examine it for signs of damage. NOTICE: DO NOT remove ball float
, doing so will cause damage to the vacuum. The ball float keeps water from entering the motor. Before using the vacuum for wet pick up:
- Ensure the canister is empty and free of excessive dust.
- Plug vacuum into a RCD protected outlet.
WARNING: Do not use the machine with this set up for
will block air to the motor when the canister is full and the sound of the motor will change at once. When the motor has a high pitched sound and air/water flow stops, empty the canister.
1. Turn off vacuum and unplug cord from outlet.
and remove vacuum head
into a suitable container or drain. To Convert Back to Dry Vacuum Operation (Fig. A)
1. Empty Canister, refer to To Empty Canister instructions.
2. Place canister upside down position until dry. DO NOT use
wet canister for dry pick up.
3. Place vacuum head
on a level surface until dry.
4. Reinstall filters when vacuum head is dry. See Filters under
5. When canister is dry place the vacuum head
onto the canister and secure it by closing the canister latches
to raise and lower the telescoping handle
to the OFF position.
3. Class M only: Close the twist-lock hose inlet
5. When transporting in vehicles, secure the machine.
MAINTENANCE Your DeWALT appliance has been designed to operate over a long period of time with a minimum of maintenance. Continuous satisfactory operation depends upon proper appliance care and regular cleaning.
WARNING: To reduce the risk of injury, turn
appliance off and disconnect appliance from power source before installing and removing accessories, before adjusting or changing set-ups or when making repairs. An accidental start-up can cause injury.24 ENGLISH
WARNING: For user servicing, the machine must be
dismantled, cleaned and serviced, as far as is reasonably practicable, without causing risk to the maintenance staff and others. Suitable precautions include, decontamination before dismantling, provision for local filtered exhaust ventilation where the machine is dismantled, cleaning of the maintenance area and suitable personal protection.
- The manufacturer, or an instructed person, shall perform a technical inspection at least annually, consisting of, for example, inspection of the filter for damage, air tightness of the machine and proper function of the control mechanism.
- When carrying out service or repair operations, all contaminated items which cannot be satisfactorily cleaned, are to be disposed of; such items shall be disposed of in impervious bags in accordance with any current regulation for the disposal of such waste.
- For Class M machines the outside of the machine should be decontaminated by vacuum cleaning methods and wiped clean or treated with sealant before being taken out of a hazardous area. All the machine parts shall be regarded as contaminated when removed from the hazardous area and appropriate action taken to prevent dust dispersal.
- For dust extractors it is necessary to provide for an adequate air change rate L in the room if the exhaust air is returned to the room. (NOTE: Reference to National Regulations is necessary.) Filter (Fig. A, I, J) Filter care The filters included with this vacuum are long life filters. To be effective in minimizing dust recirculation, the filters MUST be installed correctly and in good condition.
WARNING: Appropriate personal protective equipment
like dust mask and gloves should be used while handling the filters. To Remove Filters
to the OFF position ( ) and unplug cord from outlet.
2. Release canister latches
and remove vacuum head
from canister. Place vacuum head on a level surface upside down.
counterclockwise by gripping it on the plastic end cover as shown, and carefully remove from head, ensuring debris does not fall into mounting hole. NOTE: Use care to not damage filter material.
needs to be cleaned, use a cloth dampened with water and mild soap and allow it to dry. Dispose of cloth in an appropriate container.
5. Inspect filters for wear, tears or other damage.
NOTE: If there is any doubt on the condition of the filters they MUST be replaced. DO NOT continue use if filters are damaged.
WARNING: Never use compressed air or a brush to clean
filters, otherwise damage to the filter membrane will occur which will allow dust to pass through the filter. If needed, gently tap against a hard surface or rinse with room temperature water and let air dry. Cleaning of the filters is typically unnecessary, even if the filter is covered with dust. The automatic filter cleaning system will maintain maximum performance and continue to function. If visual damage to the filter membrane exists, replace filters. Filters typically last between six and twelve months depending on use and care. To Install Filters
1. Ensure filter seal
is in place and is secure
2. Line up filter threads
to vacuum head threads and using moderate force, turn filter clockwise until tight. NOTE: Use care to not damage filter material.
3. Place the vacuum head
onto the container and secure it by closing the canister latches
Lubrication Your appliance requires no additional lubrication. Cleaning
WARNING: Never use solvents or other harsh chemicals
for cleaning the non-metallic parts of the appliance. These chemicals may weaken the materials used in these parts. Never let any liquid get inside the machine; never immerse any part of the appliance into a liquid.
1. Vacuum the outside of the dust extractor. For further
cleaning use a cloth dampened only with water and mild soap if necessary.
2. After use dispose of cloth in an appropriate container.
1. Empty the canister, refer to To Empty Canister under
2. Clean the vacuum inside and outside. Refer to Cleaning.
3. Clean or replace filters, refer to Filters.
4. Store the suction hose and the power cord as shown in the
illustration. Place the unit in a dry room and secure it from unauthorized use. NOTE: Plug inlet plug
to keep debris inside canister when suction hose is removed. You can also attach the ends of the hose together and lock together with the twist-lock end.25 ENGLISH Optional Accessories
WARNING: Since accessories, other than those offered by
DeWALT , have not been tested with this product, use of such accessories with this appliance could be hazardous. To reduce the risk of injury, only DeWALT recommended accessories should be used with this product. ACCESSORIES DWV9340-XJ Filter DWV9315-XJ Crush-proof hose DWV9316-XJ Anti-static hose DWV9401-XJ Paper bag DWV9400-XJ Plastic liner DWV9402-XJ Fleece bag DWV9500-XJ Vac Rack DeWALT AirLock System DWV9000 Twist-Lock connection DWV9110 29–35mm tapered rubber adapter DWV9120 35–38mm stepped rubber adapter DWV9130 35mm OD adapter DWV9150 35mm OD angle adapter Vac Rack DWV9500 Installation (Fig. K, L) NOTE: The DWV902MT comes with DWV9500 vac rack attachment already installed,
1. Remove the 4 carry handle screws using a T-25 star bit and
remove the carry handle.
2. Install the vac rack reusing the carry handle screws. Put
them back in their original holes and tighten.
provided by placing them in the rear holes of the vac rack. Push down and turn each screw to break through the material and into the hidden screw boss below. Tighten.
CAUTION: Do not exceed 9 kg (20 lb) in each 14liter storage unit, maximum 2 storage units per dust extractor. Do not exceed 18 kg (40 lb) in a 28 liter storage unit, 1 storage unit per dust extractor. Exceeding the recommended height and/or weight could result in an unstable dust extractor would could cause injury or damage. NOTICE: Do not remove dust extractor head from tank with T-stack storage units attached. Doing so could result in damage to the dust extractor filter. Securing the Power Cord to the Hose (Fig. A) The power cord
can be secured to the suction hose
using the D279058CL hose clip(available from your local D
WALT supplier). Consult your dealer for further information on the appropriate accessories. Troubleshooting Problem Solution Motor does not run Check power cord, plugs and outlet. Ensure the on/off /tool control switch is in the ON position ( ). Suction capacity decreases Remove blockages in the suction nozzle, suction tube, suction hose or filters. Replace the paper or fleece bag. Check for proper installation of the filters. Clean or replace the filters. Empty canister, refer to Empty Canister under Operation. Vacuum stops running Thermal overload has been tripped:
1. Turn the vacuum off and disconnect
vacuum cleaner from power source.
2. Empty the canister, if needed.
3. Allow the unit to cool.
4. Plug the power cord into an appropriate
outlet and turn on/off/tool control switch to the ON position ( ) to test. If vacuum will not restart contact your seller or check the location of your nearest authorised DeWALT
repair agent in the DeWALT catalogue or contact your DeWALT office at the address indicated in this manual. Dust comes out while vacuuming Check for proper installation of the filters. Ensure filters are not damaged; replace if necessary. Ensure filter seals are in place and are secure. Automatic filter cleaning is not working Listen for the solenoid clicking to ensure the filter cleaning mechanism is working. Power tool does not turn on. Ensure the on/off/tool control switch is in the ACTIVATION position . Protecting the Environment Separate collection. Products and batteries marked with this symbol must not be disposed of with normal household waste. Products and batteries contain materials that can be recovered or recycled reducing the demand for raw materials. Please recycle electrical products and batteries according to local provisions. Further information is available at www.2helpU.com.26 EsPañOL Declaración de Conformidad CE Directriz de la Maquinaria Extractor de polvo de construcción para operaciones pesadas
DWV902L, DWV902M, DWV902MT
DWV902L, DWV902M, DWV902MT
DWV902L, DWV902M, DWV902MT
DWV902L, DWV902M, DWV902MT
DWV902L, DWV902M, DWV902MT
DWV902L, DWV902M, DWV902MT
DWV902L, DWV902M, DWV902MT
WAARSCHUWING: De filters