
CD 512 - Cd player/recorder Trevi - Free user manual and instructions
Find the device manual for free CD 512 Trevi in PDF.
| Product type | CD player/recorder with FM radio |
| Brand | Trevi |
| Model | CD 512 |
| Mains power | 100-240 V ~ 50/60 Hz |
| Battery power | 6 C batteries (UM-2) not included |
| Power consumption | 12 W |
| Output power | 2 × 0.8 W |
| Radio frequency band | FM 87.5 – 108 MHz |
| CD playback system | Semiconductor laser, wavelength 790 nm |
| Headphone jack | 3.5 mm jack, impedance 32 Ω |
| Auxiliary input | Yes (AUX 3.5 mm) |
| CD functions | Play, pause, stop, skip, fast search, repeat (1 track/entire disc), random, program (max 20 tracks) |
| Auto standby | After 15 minutes of inactivity in CD/AUX mode |
| Indicators | POWER, PROG, REP, ST FM |
| Antenna | Built-in FM |
| Maintenance | Soft cloth slightly dampened, avoid solvents and abrasives |
| Safety | Do not open (risk of electric shock and laser exposure) |
| Warranty | 24 months from date of manufacture |
Frequently Asked Questions - CD 512 Trevi
User questions about CD 512 Trevi
0 question about this device. Answer the ones you know or ask your own.
Ask a new question about this device
Download the instructions for your Cd player/recorder in PDF format for free! Find your manual CD 512 - Trevi and take your electronic device back in hand. On this page are published all the documents necessary for the use of your device. CD 512 by Trevi.
USER MANUAL CD 512 Trevi
WARNING: DO NOT OPEN THE SET. NEITHER CONTROLS OR SPARE PARTS TO BE USED BY THE USER ARE TO BE FOUND INSIDE IT. APPLY TO AUTHORISED TREVI CENTERS FOR SERVICE OPERATIONS.

ACHTUNG
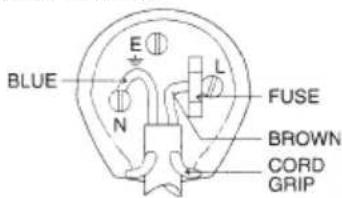
The wires in this mains lead are coloured in accordance with the following wiring codes:
Blue: Neutral
Brown: Live
The wires in this mains lead must be connected to the terminals in the plug as follows:
Blue wire: N or Black
Brown wire: L or Red
Neither wire is to be connected to the earth (E or W) terminal of three-pin plug.
Should the fuse fail in the plug remove the plug form the wall socket and replace the fuse with a 3 Amp. ASTA approved BS 1362 fuse.

VOLTAGGIO PERICOLOSO
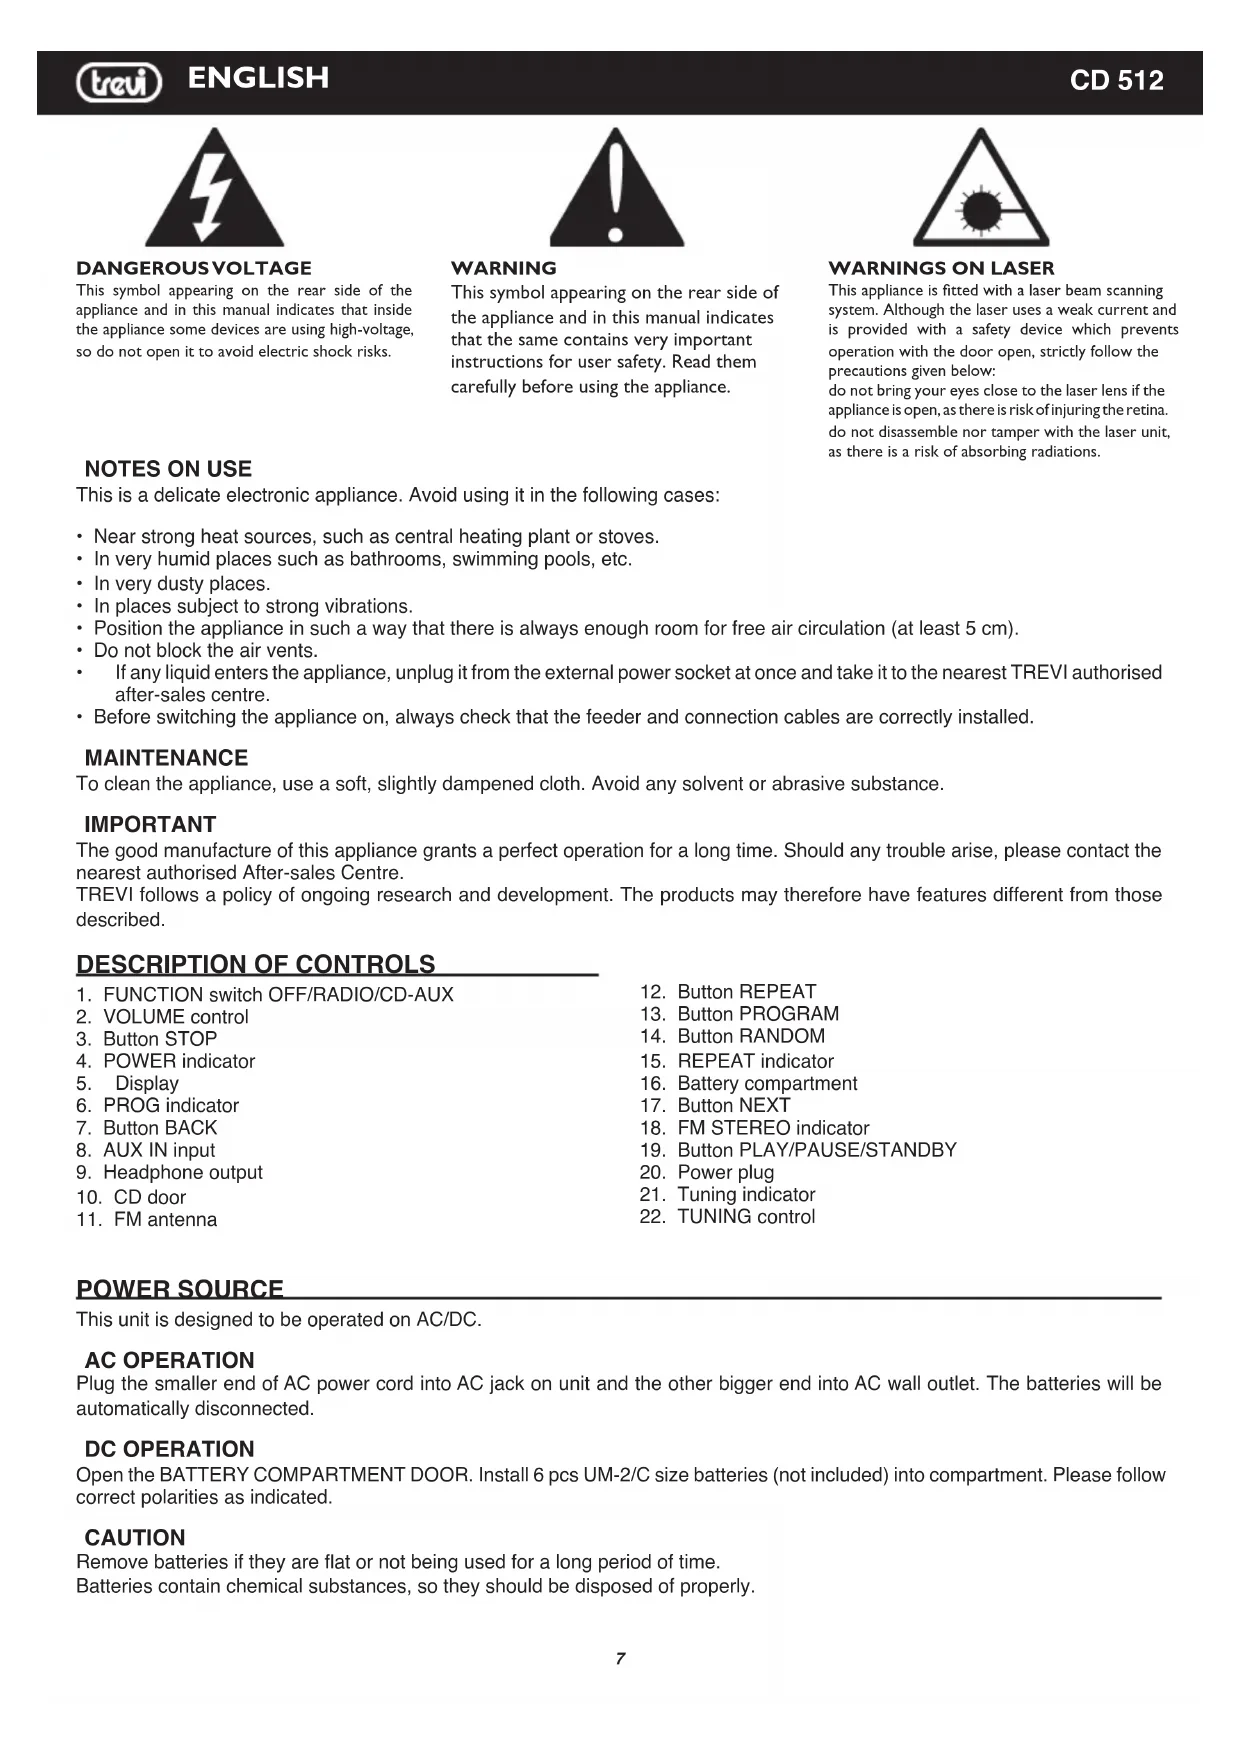
This symbol appearing on the rear side of the appliance and in this manual indicates that inside the appliance some devices are using high-voltage, so do not open it to avoid electric shock risks.

WARNING
This symbol appearing on the rear side of the appliance and in this manual indicates that the same contains very important instructions for user safety. Read them carefully before using the appliance.

WARNINGS ON LASER
This appliance is fitted with a laser beam scanning system. Although the laser uses a weak current and is provided with a safety device which prevents operation with the door open, strictly follow the precautions given below: do not bring your eyes close to the laser lens if the appliance is open, as there is risk of injuring the retina. do not disassemble nor tamper with the laser unit, as there is a risk of absorbing radiations.
NOTES ON USE
This is a delicate electronic appliance. Avoid using it in the following cases:
- Near strong heat sources, such as central heating plant or stoves.
• In very humid places such as bathrooms, swimming pools, etc.
• In very dusty places.
• In places subject to strong vibrations. - Position the appliance in such a way that there is always enough room for free air circulation (at least 5 cm).
- Do not block the air vents.
• If any liquid enters the appliance, unplug it from the external power socket at once and take it to the nearest TREVI authorised after-sales centre. - Before switching the appliance on, always check that the feeder and connection cables are correctly installed.
MAINTENANCE
To clean the appliance, use a soft, slightly dampened cloth. Avoid any solvent or abrasive substance.
IMPORTANT
The good manufacture of this appliance grants a perfect operation for a long time. Should any trouble arise, please contact the nearest authorised After-sales Centre.
TREVI follows a policy of ongoing research and development. The products may therefore have features different from those described.
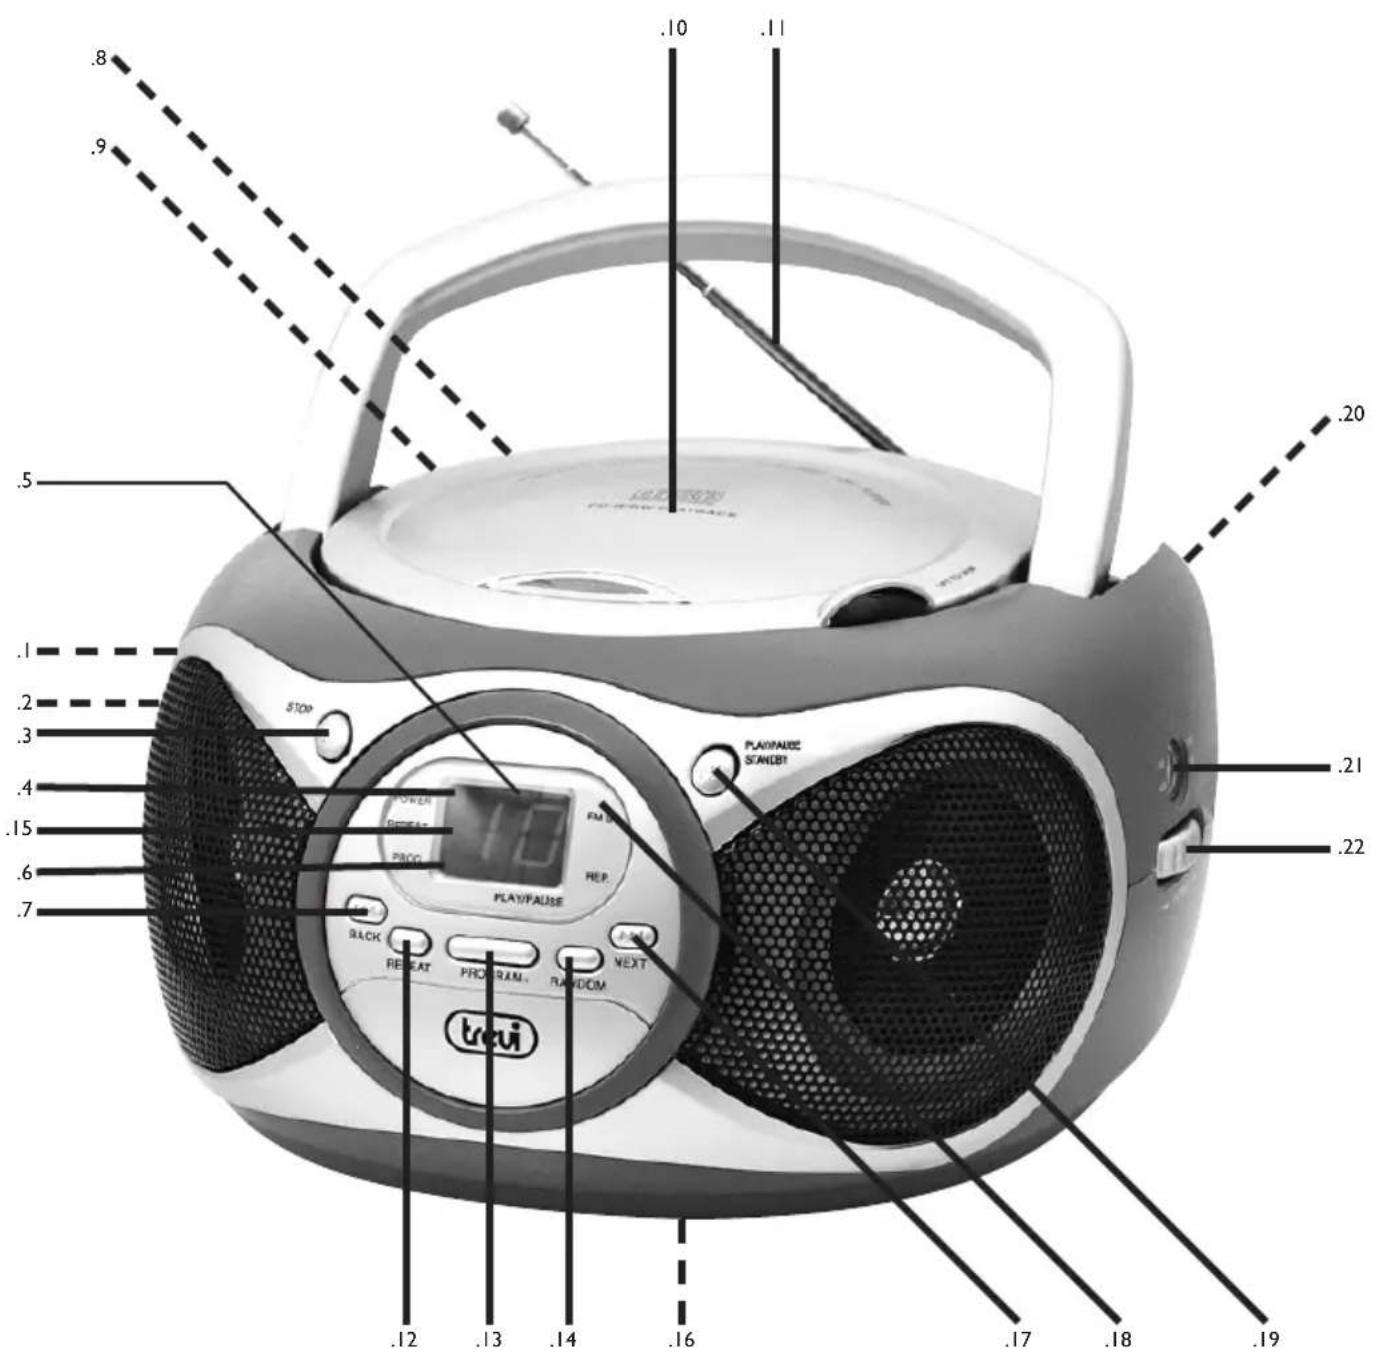
DESCRIPTION OF CONTROLS
- FUNCTION switch OFF/RADIO/CD-AUX
- VOLUME control
- Button STOP
- POWER indicator
- Display
- PROG indicator
- Button BACK
- AUX IN input
- Headphone output
- CD door
-
FM antenna
-
Button REPEAT
- Button PROGRAM
- Button RANDOM
- REPEAT indicator
- Battery compartment
- Button NEXT
- FM STEREO indicator
- Button PLAY/PAUSE/STANDBY
- Power plug
- Tuning indicator
- TUNING control
POWER SOURCE
This unit is designed to be operated on AC/DC.
AC OPERATION
Plug the smaller end of AC power cord into AC jack on unit and the other bigger end into AC wall outlet. The batteries will be automatically disconnected.
DC OPERATION
Open the BATTERY COMPARTMENT DOOR. Install 6 pcs UM-2/C size batteries (not included) into compartment. Please follow correct polarities as indicated.
CAUTION
Remove batteries if they are flat or not being used for a long period of time.
Batteries contain chemical substances, so they should be disposed of properly.
BASIC FUNCTION
Switching on the unit
Press the PLAY/PAUSE/STANDBY button.
Set the FUNCTION switch to CD/AUX or RADIO position to turn on the unit.
NOTE: In CD/AUX position, when the unit is not providing the main function for 15 minutes, the unit will automatically switch into standby mode.
ESD hints
The product maybe reset or not reset to operation of control due to electrostatic discharge, just switch off and reconnect again.
Volume adjusting
Switch VOLUME knob down or up to increase or decrease volume.
USING THE RADIO
TUNING IN RADIO STATIONS
- Move the FUNCTION switch to RADIO position, the POWER indicator will illuminate.
- Tune to required station by rotating the TUNING KNOB.
- Rotate the VOLUME CONTROL to comfortable volume level.
- Extend the TELESCOPIC ANTENNA to its full length if you are listening to FM broadcasting.
- Turn off the radio by switching the FUNCTION switch to "OFF" position.
USING THE CD
Set the FUNCTION SWITCH to "CD/AUX" position. Press the CD door LIFT TO OPEN to open the CD door to put in a compact disc. Close it and start reading. The LED display always shows the tracks of a disc which are still to be played.
Playing The Entire Disc
- Playback will start by pressing CD PLAY/PAUSE/STANDBY button, playback starts with the first track. The display will show the current track number.
- To interrupt playback, press CD PLAY/PAUSE/STANDBY button.
- To resume playback, press CD PLAY/PAUSE/STANDBY button once again.
- To stop playback, press CD STOP button.
Note:
- To ensure good system performance; wait until the disc tray completely reads the disc before proceeding.
- If no disc is loaded into the compartment, or the disc is placed upside down, the display will show "NO".
SELECTING A DESIRED TRACK/PASSAGE
To select a desired track
- Press SKIP/SEARCH NEXT/BACK button repeatedly in stop mode or during play until the desired track appears on the display.
- Press PLAY/PAUSE/STANDBY button to start play.
To search for a particular passage during playback (track scanning at high speed)
- Press and hold SKIP/SEARCH BACK/NEXT button to scan the current playing track at high speed until desired point(passage), then release the button.
- Playback will start again from this point.
REPEAT PLAY
When playing, press REPEAT button once. REPEAT INDICATOR will light up and flash for playing the same track only. If repeat all tracks, press the REPEAT button again, REPEAT INDICATOR will light up and steady. To cancel repeat play, press the REPEAT button until the repeat indicator disappears.
PROGRAM PLAY
- Press "PROG" button to make program memory in stop mode.
- “01” will be shown flashing on the display, Program indicator will light up and flash.
- Press CD SKIP/SEARCH NEXT/BACK button to select a track number. The track number will show "1".
- Press the "PROG" button to store the track number.
- “02” flashes again. Repeat step (3) to (4) to program other desired tracks.
- Press "PROG" button once more after 20 track in programmed and all the programmed track numbers will be shown one by one
- Press CD PLAY/PAUSE/STANDBY button, playback will start from the first programmed track.
- You can press CD SKIP SEARCH NEXT/BACK button to select the track number in memory.
- In stop mode, press STOP button to cancel the program play and the program indicator will disappear.
RANDOM PLAY
Press the CD RANDOM button in Play/Stop mode, the current track number and “- - ” will flashing again and again. And then press the CD PLAY/PAUSE/STANDBY button. Playback will start from any one track (not in the order of the disc). To cancel the RANDOM, press the RANDOM button again.
HEADPHONES
For private listening, plug the headphones/earphones (not included) into PHONES jack (3.5 mm diameter).
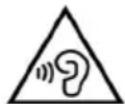
CAUTION: Long time listening with headphones/earphones at high volumes may cause harmful damage to users' ears.
AUX-IN OPERATION
This unit has provided special AUX-IN jack, through this jack other audio sources can be connected to this unit and be amplified.
- Set the FUNCTION switch to CD/AUX position.
- Connect the audio cable into the AUX-IN jack and the other end connect to the AUDIO OUT jack of the external audio source. The unit will change to AUX mode automatically.
- Adjust the volume of the main unit to your desired level.
- Press PLAY of the external audio source (eg. MP3 player) to start playback.
COMPACT DISC MAINTENANCE
- Always use a compact disc bearing the mark as shown.
TECHNICAL FEATURES
GENERAL FEATURES
Power supply: 100-240V 50/60Hz
6 Battery "C" (UM2) size (not included)
Consumption: 12W
Maximum output power: 2 × 0.8W
Headphone impedance 32ohm
CD PLAYER FEATURES
Player system......Semiconductor laser
RADIO FEATURES
Frequency range ...... FM 87.5 - 108 MHz
WARRANTY
- This unit is guaranteed for a period of 24 months from the date of production printed on the product itself or on label on product.
- The warranty is valid only if the unit has not been tampered with. The warranty is valid only at authorized TREVI assistance centres, that will repair manufacturing defects, excluded replacement of labels and removable parts.
- TREVI is not liable for damage to people or things caused by the use of this unit or by the interruption in the use of this unit.

VOLTAGE DANGEREUX
Precautions for correct disposal of the product.
The symbol shown on the equipment indicates that waste must be disposed of in “separate collection” and so the product must not be disposed of together with urban waste.
The user must take the product to special “separate waste collection centres” provided by local government, or deliver it to the retailer against the purchase of a new product.
Separate collection of waste and subsequent treatment, recycling and disposal operations promotes the production of equipment with recycled materials and limits negative effects on the environment and on health caused by improper handling of waste.
Illegal disposal of the product leads to the enforcement of administrative penalties.

SIMPLIFIED EU DECLARATION OF CONFORMITY
Hereby TREVI Spa declares that the radio equipment type CD 512 is in compliance with directive 2014 / 53 / EU.
The full text of the EU declaration of conformity is available at the following internet address https://www.trevi.it/dms/zidi/TREVI/DOCCD512.pdf


Made in CHINA


- VOLTAGGIO PERICOLOSO
- WARNING
- WARNINGS ON LASER
- NOTES ON USE
- MAINTENANCE
- IMPORTANT
- DESCRIPTION OF CONTROLS
- POWER SOURCE
- AC OPERATION
- DC OPERATION
- CAUTION
- BASIC FUNCTION
- Switching on the unit
- ESD hints
- Volume adjusting
- USING THE RADIO
- TUNING IN RADIO STATIONS
- USING THE CD
- Playing The Entire Disc
- Note:
- SELECTING A DESIRED TRACK/PASSAGE
- To select a desired track
- To search for a particular passage during playback (track scanning at high speed)
- REPEAT PLAY
- PROGRAM PLAY
- RANDOM PLAY
- HEADPHONES
- AUX-IN OPERATION
- COMPACT DISC MAINTENANCE
- TECHNICAL FEATURES
- GENERAL FEATURES
- CD PLAYER FEATURES
- RADIO FEATURES
- WARRANTY
- VOLTAGE DANGEREUX
- Precautions for correct disposal of the product.
- SIMPLIFIED EU DECLARATION OF CONFORMITY
Brand : Trevi
Model : CD 512
Category : Cd player/recorder