M1 ACTIVE 520 - Speaker NUMARK - Free user manual and instructions
Find the device manual for free M1 ACTIVE 520 NUMARK in PDF.
User questions about M1 ACTIVE 520 NUMARK
0 question about this device. Answer the ones you know or ask your own.
Ask a new question about this device
Download the instructions for your Speaker in PDF format for free! Find your manual M1 ACTIVE 520 - NUMARK and take your electronic device back in hand. On this page are published all the documents necessary for the use of your device. M1 ACTIVE 520 by NUMARK.
USER MANUAL M1 ACTIVE 520 NUMARK
Bi-Amplified Studio Reference Monitor
Quick Start Owner's Manual
BOX CONTENTS
- TWO M1ACTIVE 520 OR 620 MONITORS
- TWO POWER CABLES
• THIS QUICK START GUIDE
• IMPORTANT SAFETY INSTRUCTIONS
This page intentionally left blank.
M1Active 520/620
Quick Start User's Guide (English)
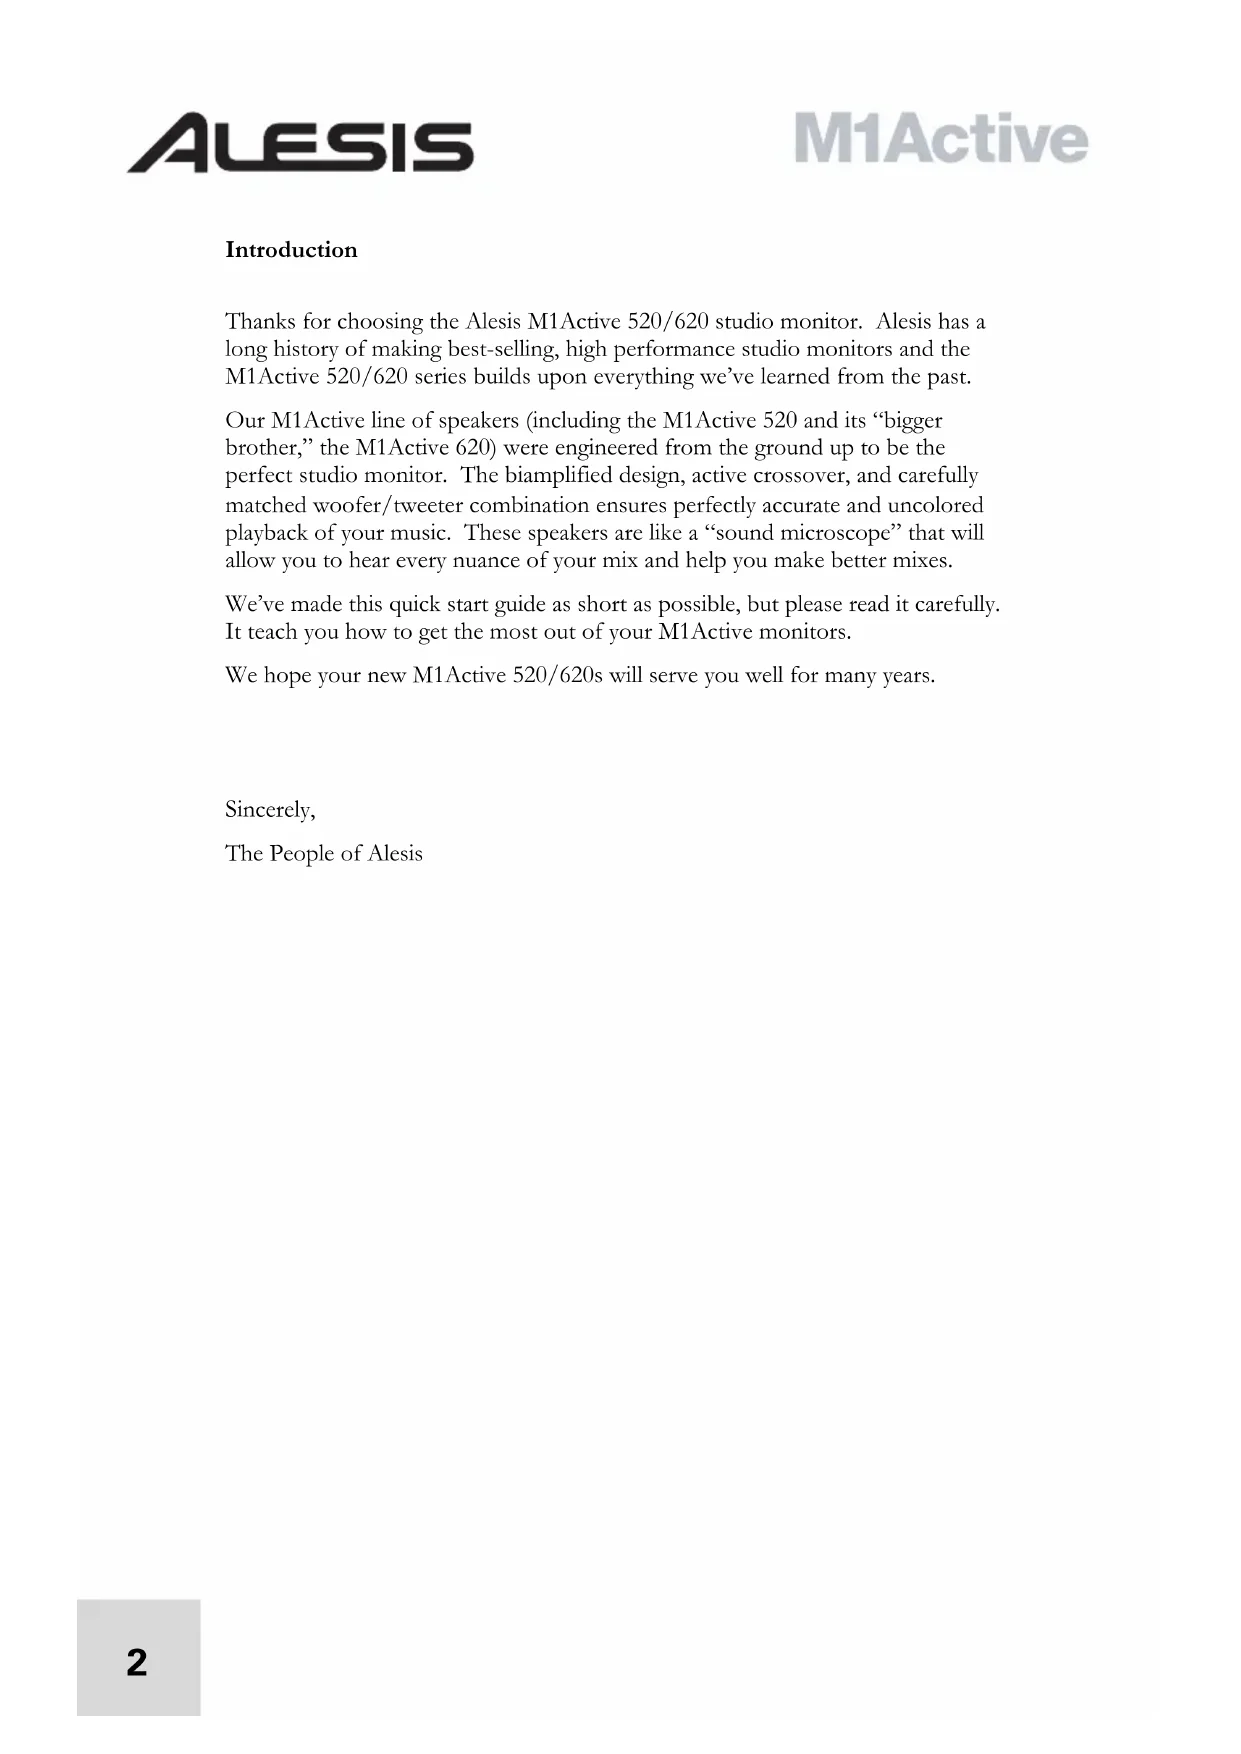
Introduction
Thanks for choosing the Alesis M1Active 520/620 studio monitor. Alesis has a long history of making best-selling, high performance studio monitors and the M1Active 520/620 series builds upon everything we've learned from the past.
Our M1Active line of speakers (including the M1Active 520 and its “bigger brother,” the M1Active 620) were engineered from the ground up to be the perfect studio monitor. The biamplified design, active crossover, and carefully matched woofer/tweeter combination ensures perfectly accurate and uncolored playback of your music. These speakers are like a “sound microscope” that will allow you to hear every nuance of your mix and help you make better mixes.
We've made this quick start guide as short as possible, but please read it carefully. It teach you how to get the most out of your M1 Active monitors.
We hope your new M1Active 520/620s will serve you well for many years.
Sincerely,
The People of Alesis
Key Features
M1Active 520 Monitors feature the following:
- 75-watt biamplified design with active crossover
- 5" Low Frequency woofer for punchy bass and clear midrange
- ^3/_4 " Silk dome tweeter for smooth highs without ear-fatiguing harshness
- Top mounted power switch/clip light
• Acoustical waveguide for superior imaging and minimal diffraction - Rear port for deep bass extension and increased loudness
• Acoustic Space switch allows speaker placement in any location
• Magnetic shielding for close placement to TVs and computer monitors
• 3 EQ switches to tailor the speaker for any control room environment
• XLR and 1/4" TRS Inputs
M1Active 620 Monitors feature the following:
• 100-watt biamplified design with active crossover
- 6.5" Low Frequency woofer for punchy bass and clear midrange
• 1" Silk dome tweeter for smooth highs without ear-fatiguing harshness
- Top mounted power switch/clip light
• Acoustical waveguide for superior imaging with minimal diffraction
- Rear port for deep bass extension and increased loudness
- 1" thick front baffle virtually eliminates speaker resonance
• Acoustic Space switch allows speaker placement in any location
• Magnetic shielding for close placement to TVs and computer monitors
• 3 EQ switches to tailor the speaker for any control room environment
• XLR and 1/4" TRS Inputs
Product Registration
Please go to http://www.alesis.com and register your M1Active 520/620 speakers.
Registering helps us to keep you up-to-date on any last minute product issues. If you would like, we can also send you information on other products that might interest you.
By registering with us, you let us know what products you use (or dream about) and this helps us bring you better products in the future.
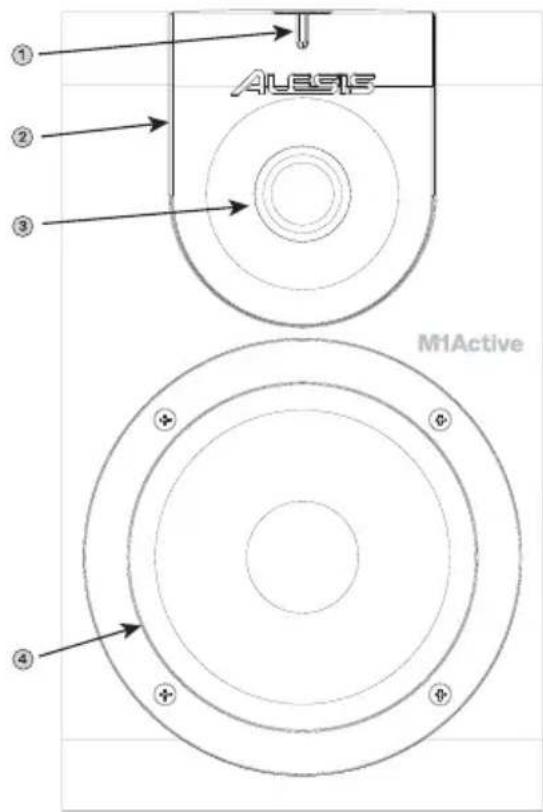
Front Panel
-
Power Switch/Clip Light- This bar turns blue when the M1Active 520/620 is powered up (the power switch is found on the top of the speaker) and the bar turns red when the speaker is being overloaded.
-
Acoustic Waveguide- Besides giving the speaker its devilishly good looks, our distinctive silver acoustical waveguide helps spread the tweeter's high frequency sound evenly across your control room.
-
Tweeter- Our silk dome tweeter is designed to handle all frequencies above 3 kHz. This driver was carefully selected because of its ability to match the woofer and provide crystal clear sound without car-fatiguing harshness.
-
Woofer- The ultra-light, super-stiff material found in our woofer cone helps the M1Active 520/620 deliver punchy bass and solid midrange (even at loud levels) without distortion.
text_image
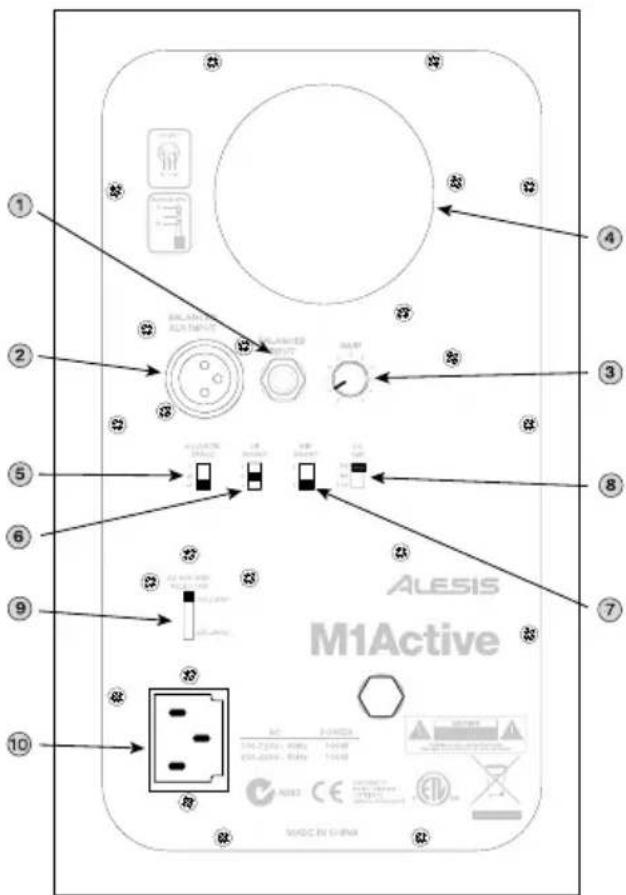
AUEIS M1ActiveBack Panel
-
TRS Input – This 14 ” input accepts balanced “TRS” or unbalanced “TS” cables from your mixer, computer, or any other line level source. Both types of cabling will work, but we recommend balanced TRS (or XLR) cables since they give you better performance and lower noise (especially if you’re using longer cables).
-
XLR Input - This jack functions exactly the same way as the TRS input (see above), but it uses balanced XLR cabling.
-
Gain - This knob sets the input gain of the speaker. Use this knob to set a comfortable loudness level for monitoring.
-
Rear Port – The rear port augments the bass generated by the woofer to increase the low frequency SPL over that of non-ported speakers. Make sure this hole is not obstructed since this will adversely affect bass response.
-
Acoustic Space Switch – This switch compensates for placement near walls and corners. Please see section titled “About the Acoustic Space Switch” for more on these settings.
-
Hi Boost – This switch allows you to tailor the speaker's high frequency response to your control room. Please see the section "About the Hi-Boost Switch" for more about these settings.
text_image
ALESIS M1Active Made in ChinaBoth XLR and TRS connectors have been provided for your convenience, but please use only one connection at a time to avoid overloading the inputs.
-
Mid Boost – This 2-position switch provides a 2.5 dB wide-band boost in the midrange at 1.8kHz. This has the effect of moving the soundstage “forward” closer to the mix position. Some engineers prefer to have this boost if the speakers are positioned farther than a few feet away. We recommend you try either the boosted “+” or bypassed “0” settings for a few mixes and select whichever one makes your mixes translate better.
-
Lo – This high-pass filter switch lets you pick the point at which the speaker will roll off low frequencies. Many subwoofers roll off frequencies above 80 Hz, so if you want to use your M1Active 520/620 speakers with a subwoofer, set this switch to “80.” If you do not have a subwoofer, leave this set to the lowest number to let the M1Active 520/620 play its full range of sound.
Alternatively, you may want to hear how your mix will translate on smaller speakers (such as a TV, or radio). Set this switch to 80Hz or 100Hz (if you have a subwoofer, turn it off) and you'll get a sense of how your mix will sound on smaller speakers with reduced bass output.
-
AC Voltage Selector – This 2-position switch sets the AC input voltage for the speaker. US users should set this switch to “100-120V” whereas UK and most European users will need to set this to “220-240V.”
-
AC Input - This jack accepts standard 3-prong IEC power cables. Make sure your AC Voltage Selector (see item #9 above) is set to the correct voltage for your country.
About the Acoustic Space Switch
The bass response of a speaker is greatly affected by the speaker's proximity to walls. You'll notice a buildup in bass frequencies as a speaker moves closer to a wall and even more buildup as the speaker moves closer to a corner. This happens because low frequencies radiate in all directions from the speaker cabinet and are reflected off your walls back into your control room. When this happens, the reflected sound mixes with the direct sound of the speaker itself resulting in “reinforced” bass.
Unlike bass frequencies, midrange and high frequency sounds are much more “directional” and only radiate forward. Because of this, the Acoustic Space Switch only deals with bass frequencies—there is no need for high frequency compensation near walls.
We know that most home and project studios are set up under less than ideal conditions, so we've added the Acoustic Space Switch to help you optimize your speakers to your room.
If your speakers are farther than about 3 feet away from the walls of your studio, leave this switch set to the default “0” setting. This “full space” setting outputs bass normally.
If the speaker is up against a wall, set the Acoustic Space Switch to “2.” This setting is known as “half-space” and compensates for boosted bass due to your speakers being placed near one wall.
Finally, if your speaker is positioned in a corner, set this switch to “4.” This is known as a “quarter-space” setting and compensates for placement next to two walls.
About the Hi-Boost Switch
This switch engages a 2dB shelving filter starting at 3 kHz that will boost when set to “+”, cut when set to “-”, and will be bypassed when set to “0.”
If your mixing environment has many acoustically reflective surfaces and sounds overly “bright,” you can compensate for this by reducing the high frequency output of the M1Active 520/620. Conversely, if you are mixing in an acoustically “dead” room with lots of sound absorption and little reflection, you can boost the high frequency output.
If you're not sure about your control room, leave this setting to “0,” mix a few songs, and play those songs in different environments (i.e., your living room, car, boombox, etc.) Your mixes should fall into one of the following three categories:
1.) Too bright: If your mixes have too much high frequency content and consistently sound too bright, then set Hi-Boost to “+” because your control room is acoustically “dead.”
2.) Too dull: If your mixes consistently lack high frequency “sparkle” and sound “dull” it means your control room is too acoustically reflective and that you should set your Hi Boost switch to “-.”
3.) Just right! If your mixes translate well, then leave this switch set to “0” since your control room is well balanced and you don’t need any high frequency compensation from the speaker.
Speaker Placement
The placement of your speakers has a huge impact on how well they will perform in your studio.
Although nearfield studio monitors (such as these M1Active 520/620s) are designed to be more forgiving when it comes to placement, you should do your best to make sure they form an equilateral triangle relative to your head. In other words, make sure that each speaker is equally distant from both your head as well as the other speaker. Once each speaker has been placed, rotate the speakers slightly so that the drivers are pointing toward the engineer.
Take a look at the diagram below. Notice that the distance from the engineer's head to each speaker is the same as the distance between the left and right speakers. Also note that the speakers are turned slightly so that the drivers are facing the engineer.
This is an ideal setup but if it is not practical (or possible) to do this, try to match this setup as closely as possible.

flowchart
graph TD
    A["Speaker at triangle"] --> B["Prime Listening Position"]
    C["Listener at triangle"] --> B
    D["Speaker at triangle"] --> B
    style A fill:#f9f,stroke:#333
    style C fill:#f9f,stroke:#333
    style D fill:#f9f,stroke:#333
    note1["The speakers and listener should be at the three corners of a triangle having equal length sides"]
Speaker Height:
The ideal height for M1Active 520/620 speakers is so that the speaker is parallel to the ground and that the midpoint of the woofer and tweeter is at ear-height.
The diagram below demonstrates the ideal placement height of the speakers relative to the engineer. Notice that the engineer's cars are directly between the woofer and tweeter.
Woofer/tweeter midpoint

flowchart
graph TD
    A["Top Left Panel"] --> B["Top Right Panel"]
    B --> C["Bottom Left Panel"]
    C --> D["Bottom Right Panel"]
    D --> E["Top Right Panel"]
    style A fill:#f9f,stroke:#333
    style E fill:#bbf,stroke:#333
If possible, use speaker stands and move the monitors off of your desk (or meter bridge, if you are using a mixer). This usually results in better imaging since the monitor is decoupled from your desk and there is less chance reflected sound from the desk (or mixer) reaching your ears and smearing the imaging of your studio monitors.
Speaker Orientation:
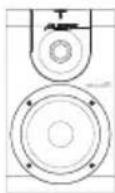
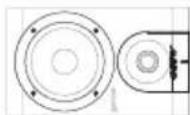
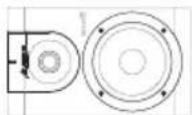
The M1Active 520/620 has been designed for maximum flexibility when it comes to speaker orientation (i.e., whether the speaker is upright or laying down on its side). For best performance, place the speakers vertically with the tweeter on top. If this is not practical in your control room, go ahead and lay each speaker on its side, but make sure the tweeters are on the “inside” and are closer to the engineer. This will give you the best possible soundstaging for this orientation. Avoid having the tweeter on the “outside” since the added distance between the tweeters may result in a “gap” in the middle of your soundstage.
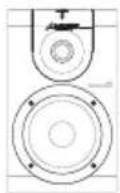
Ideal Orientation
Acceptable Orientation (tweeters on the inside)
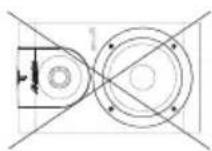
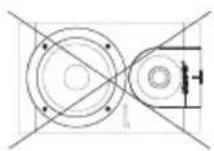
Poor Orientation (tweeters on the outside)
Hookup Diagrams
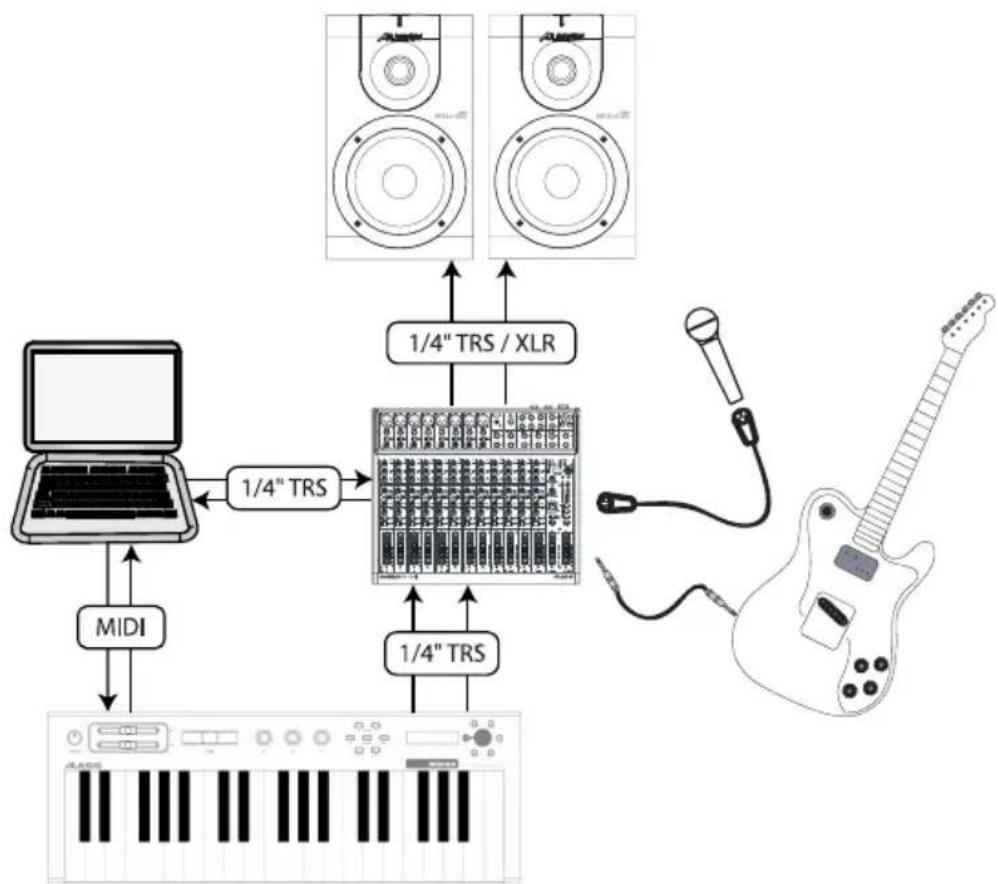
The following two hookup diagrams should give you an idea of how your M1Active speakers can fit into your recording rig.
If you are using a mixer in your studio, your setup will probably be similar to the one below. All audio is routed through the mixer into your M1Active monitors. If you wish to record the output of your mixer, you can take the output of the mixer and send it back to your computer (the diagram below is configured this way). The M1Active has both XLR and 14 " TRS inputs on the back for maximum flexibility, but remember to use only one input at a time.
flowchart
graph TD
    A["MIDI"] --> B["1/4" TRS"]
    B --> C["1/4" TRS / XLR"]
    C --> D["1/4" TRS"]
    D --> E["1/4" TRS"]
    E --> F["1/4" TRS / XLR"]
    F --> G["1/4" TRS / XLR"]
    G --> H["1/4" TRS / XLR"]
    H --> I["1/4" TRS / XLR"]
    I --> J["1/4" TRS / XLR"]
    J --> K["1/4" TRS / XLR"]
    K --> L["1/4" TRS / XLR"]
    L --> M["1/4" TRS / XLR"]
    M --> N["1/4" TRS / XLR"]
    N --> O["1/4" TRS / XLR"]
    O --> P["1/4" TRS / XLR"]
    P --> Q["1/4" TRS / XLR"]
    Q --> R["1/4" TRS / XLR"]
    R --> S["1/4" TRS / XLR"]
    S --> T["1/4" TRS / XLR"]
    T --> U["1/4" TRS / XLR"]
    U --> V["1/4" TRS / XLR"]
    V --> W["1/4" TRS / XLR"]
    W --> X["1/4" TRS / XLR"]
    X --> Y["1/4" TRS / XLR"]
    Y --> Z["1/4" TRS / XLR"]
For a more portable recording setup without a mixer, you may want to use a portable USB or Firewire interface. The diagram below illustrates how a portable setup might look. The interface to the computer via USB and sends audio out to the speakers through 14 " or XLR cables. Remember that the M1Active will accept both balanced and unbalanced signals, but we recommend balanced cabling for best performance.

flowchart
graph TD
    A["Laptop"] -->|USB| B["USB"]
    B --> C["1/4" TRS / XLR"]
    C --> D["Speaker with buttons and audio icons"]
    D --> E["Speaker with microphone"]
    E --> F["Guitar"]
    F --> G["Output"]
Note that the M1Active 520/620 is an “active” loudspeaker with built-in amplifiers for the woofer and tweeter. This means that you do not need any additional amplifiers and that the line-level audio output of your mixer or digital audio workstation should be connected directly to the speaker.
Do not use an external amplifier with the M1Active 520 speaker. The speaker has built-in amplification and using an external amplifier could damage the speaker.
M1Active 520 Technical Specifications
Woofer: 5" lightweight, magnetically-shielded, ultra-stiff polypropylene cone with rubber surround and high power handling voice coil.
Tweeter: 34 " silk dome with magnetic shielding
Frequency Response: 56 Hz – 20 kHz
Crossover Frequency: 2.8 kHz
Signal-to-Noise Ratio: >100 dB below full output, unweighted
Inputs: XLR and 14 " supporting both balanced and unbalanced cabling.
Polarity: Positive signal on “+” pin creates forward cone displacement
Input Impedance: 20k ohms balanced or 10k ohms unbalanced
Input Sensitivity: 85 mV noise (pink) produces 90 dB(A) output SPL at 1 meter. Gain knob turned fully clockwise (maximum).
Dimensions (W x H x D): 6.5" x 10.5" x 7.75" / 16.5 cm x 26.7 cm x 19.7 cm
Net Weight (each speaker): 13.0 lbs / 6.0 kg
M1Active 620 Technical Specifications
Woofer: 6 ½" lightweight, magnetically-shielded, ultra-stiff polypropylene cone with rubber surround and high power handling voice coil.
Tweeter: 1" silk dome with magnetic shielding
Frequency Response: 49 Hz – 20 kHz
Crossover Frequency: 2.8 kHz
Signal-to-Noise Ratio: >100 dB below full output, unweighted
Inputs: XLR and 14 " supporting both balanced and unbalanced cabling.
Polarity: Positive signal on “+” pin creates forward cone displacement
Input Impedance: 20k ohms balanced or 10k ohms unbalanced
Input Sensitivity: 85 mV noise (pink) produces 90 dB(A) output SPL at 1 meter. Gain knob turned fully clockwise (maximum).
Dimensions (W x H x D): 8.5" x 15.0" x 10.25" / 21.6 cm x 38.0 cm x 26.0cm
Net Weight (each speaker): 21 lbs / 9.6 kg
M1Active 520/620
flowchart
graph TD
    A["Laptop"] -->|USB| B["USB"]
    B --> C["1/4" TRS / XLR"]
    C --> D["Speaker with two speakers"]
    D --> E["Speaker with two speakers"]
    E --> F["Speaker with two speakers"]
    F --> G["Speaker with one speaker"]
    G --> H["Speaker with one speaker"]
    H --> I["Speaker with one speaker"]
    I --> J["Speaker with one speaker"]
    J --> K["Speaker with one speaker"]
    K --> L["Speaker with one speaker"]
    L --> M["Speaker with one speaker"]
    M --> N["Speaker with one speaker"]
    N --> O["Speaker with one speaker"]
    O --> P["Speaker with one speaker"]
    P --> Q["Speaker with one speaker"]
    Q --> R["Speaker with one speaker"]
    R --> S["Speaker with one speaker"]
    S --> T["Speaker with one speaker"]
    T --> U["Speaker with one speaker"]
    U --> V["Speaker with one speaker"]
    V --> W["Speaker with one speaker"]
    W --> X["Speaker with one speaker"]
    X --> Y["Speaker with one speaker"]
    Y --> Z["Speaker with one speaker"]
    Z --> AA["Speaker with one speaker"]
    AA --> AB["Speaker with one speaker"]
    AB --> AC["Speaker with one speaker"]
    AC --> AD["Speaker with one speaker"]
    AD --> AE["Speaker with one speaker"]
    AE --> AF["Speaker with one speaker"]
    AF --> AG["Speaker with one speaker"]
    AG --> AH["Speaker with one speaker"]
    AH --> AI["Speaker with one speaker"]
    AI --> AJ["Speaker with one speaker"]
    AJ --> AK["Speaker with one speaker"]
    AK --> AL["Speaker with one speaker"]
    AL --> AM["Speaker with one speaker"]
    AM --> AN["Speaker with one speaker"]
    AN --> AO["Speaker with one speaker"]
    AO --> AP["Speaker with one speaker"]
    AP --> AQ["Speaker with one speaker"]
    AQ --> AR["Speaker with one speaker"]
    AR --> AS["Speaker with one speaker"]
    AS --> AT["Speaker with one speaker"]
    AT --> AU["Speaker with one speaker"]
    AU --> AV["Speaker with one speaker"]
    AV --> AW["Speaker with one speaker"]
    AW --> AX["Speaker with one speaker"]
    AX --> AY["Speaker with one speaker"]
text_image
AUES13 M1Activetext_image
ALESIS M1Activeflowchart
graph TD
    A["Laptop"] -->|USB| B["USB"]
    B --> C["1/4" TRS / XLR"]
    C --> D["Speaker with buttons and audio icons"]
    D --> E["Speaker with microphone"]
    E --> F["Guitar"]
    F --> G["Output"]
Dimensions (L x H x P): 8,5 po x 15,0 po x 10 14 " po 21.6 cm x 38,0 cm x 26.0 cm
text_image
① ② ③ ④ ⑤ ⑥ ⑦ ⑧ ⑨ ⑩ ALESIS M1Active Made in Chinaflowchart
graph TD
    A["Laptop"] -->|USB| B["USB"]
    B --> C["1/4" TRS / XLR"]
    C --> D["Speaker with two speakers"]
    D --> E["Speaker with two speakers"]
    E --> F["Speaker with two speakers"]
    F --> G["Speaker with one speaker"]
    G --> H["Speaker with one speaker"]
    H --> I["Speaker with one speaker"]
    I --> J["Speaker with one speaker"]
    J --> K["Speaker with one speaker"]
    K --> L["Speaker with one speaker"]
    L --> M["Speaker with one speaker"]
    M --> N["Speaker with one speaker"]
    N --> O["Speaker with one speaker"]
    O --> P["Speaker with one speaker"]
    P --> Q["Speaker with one speaker"]
    Q --> R["Speaker with one speaker"]
    R --> S["Speaker with one speaker"]
    S --> T["Speaker with one speaker"]
    T --> U["Speaker with one speaker"]
    U --> V["Speaker with one speaker"]
    V --> W["Speaker with one speaker"]
    W --> X["Speaker with one speaker"]
    X --> Y["Speaker with one speaker"]
    Y --> Z["Speaker with one speaker"]
flowchart
graph TD
    A["Laptop"] -->|USB| B["USB"]
    B --> C["1/4" TRS / XLR"]
    C --> D["Speaker with buttons and audio icons"]
    D --> E["Speaker with microphone"]
    E --> F["Guitar"]
    F --> G["Output"]
Frequenza crossover: 2.8 kHz
Frequenza crossover: 2.8 kHz
natural_image
Simple line drawing of a trash bin with two crossed lines and a blank rectangular base below (no text or symbols)7-51-0202-A