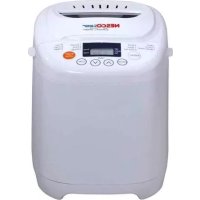
BDM100 - Bread maker Nesco - Free user manual and instructions
Find the device manual for free BDM100 Nesco in PDF.


User questions about BDM100 Nesco
0 question about this device. Answer the ones you know or ask your own.
Ask a new question about this device
Download the instructions for your Bread maker in PDF format for free! Find your manual BDM100 - Nesco and take your electronic device back in hand. On this page are published all the documents necessary for the use of your device. BDM100 by Nesco.
USER MANUAL BDM100 Nesco
NESCO® American Harvest®
Bread Classic

natural_image
Line drawing of a UNESCO bread maker with control panel and digital display (no text or symbols)Breadmaker model BDM-100
User Manual
NESCO® American Harvest® Bread Classic
Technical information: Model BDM-100 Electrical rating 120 Volts, 60 Hz., 580 Watts
Table of Contents
Important Safeguards ....1
Parts 2
Before first time use ....2
Operating Instructions 2-6
Care and Cleaning 6
Program chart 7
Recipes 8-13
One Year Limited Warranty ....14
Table des Matières
“NESCO®” is a registered trademark of
The Metal Ware Corporation
1700 Monroe St., P.O. Box 237
Two Rivers, WI 54241-0237
Phone: 1-(800) 288-4545
natural_image
Simple line drawing of a retro computer with monitor and keyboard (no text or symbols)For accessories and additional products, go to
www.nesco.com
IMPORTANT SAFEGUARDS
- This product is designed for household use only -
When using electrical appliances, basic safety precautions should always be followed, including the following:
- READ ALL INSTRUCTIONS.
- Do not touch hot surfaces. Use handles or knobs.
- To protect against electrical shock and personal injury, do not immerse this appliance, including cord and plug, in water or other liquid.
- Close supervision is necessary when any appliance is used by or near children.
- Unplug from outlet when not in use and before cleaning. Allow to cool completely before putting on or taking off parts, and before cleaning.
- Do not operate any appliance with a damaged cord or plug or after the appliance malfunctions or has been damaged in any manner. To avoid hazards, return appliance to NESCO® Factory Service Department for examination, repair or adjustment.
- The use of accessory attachments not recommended by the manufacturer may result in fire, electric shock or injury to persons.
- Do not use outdoors.
- Do not let cord hang over edge of table or counter, or touch hot surfaces.
- Do not place on or near a hot gas or electrical burner or in a heated oven.
- Do not use appliance for other than its intended use, as described in this manual.
- Do not use metal scouring pads to clean the appliance.
- This appliance is not intended for use by persons (including children) with reduced physical sensory or mental capabilities, unless they have been given supervision or instruction concerning use of the appliance by a person responsible for their safety.
- Make certain that the ventilation slits of the appliance are not covered.
SAVE THESE INSTRUCTIONS
Polarized Plug: This appliance has a polarized plug (one blade is wider than the other). To reduce risk of electric shock, plug is intended to fit into polarized outlet only one way. If the plug does not fit fully into the outlet, reverse the plug. If it still does not fit, contact a qualified electrician. Do not try to modify the plug in any way.
Short Cord Instructions: A short power supply cord is provided to reduce the risk resulting from becoming entangled in or tripping over a longer cord. Extension cords may be used if care is exercised in their use. If an extension cord is used, the marked electrical rating of the cord should be at least as great as the electrical rating of the appliance. The longer cord should be arranged so that it will not drape over the tabletop where it can be pulled on by children or tripped over unintentionally.
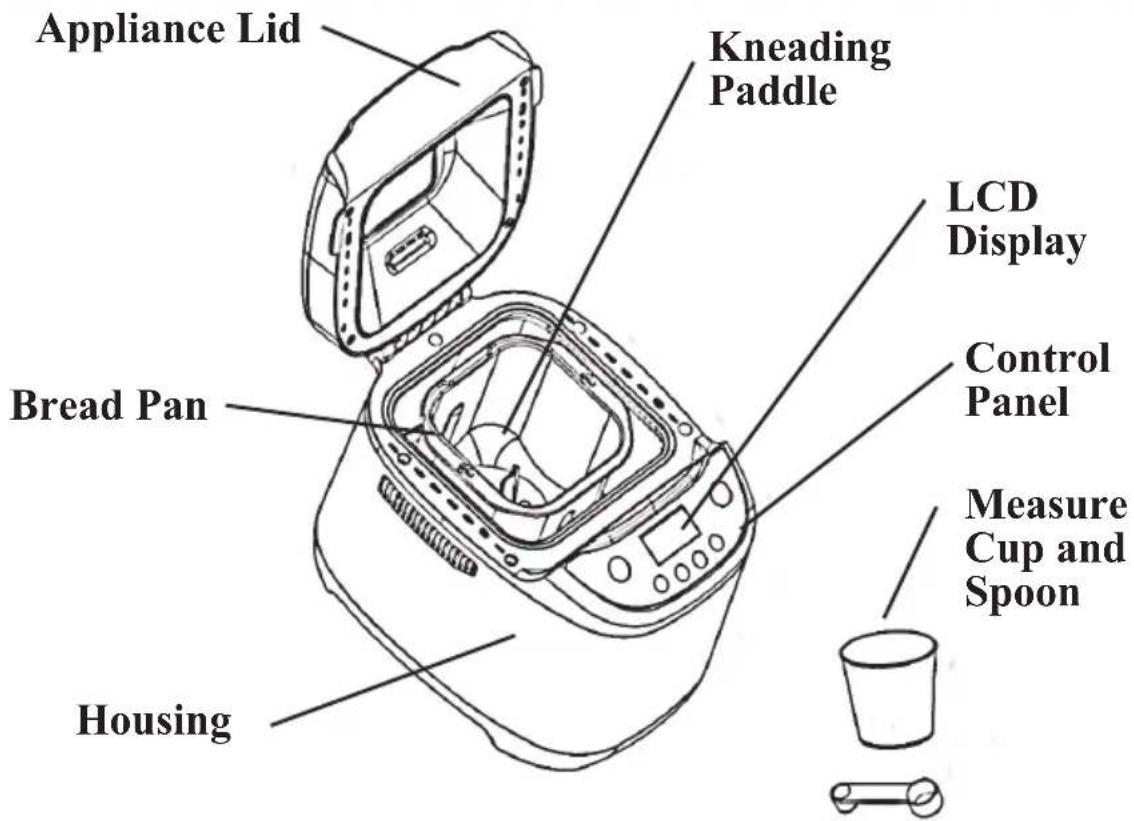
Parts
text_image
Appliance Lid Kneading Paddle LCD Display Bread Pan Control Panel Measure Cup and Spoon HousingBefore first time use
- Unpack your appliance and dispose of the packaging material in accordance with prevailing regulations.
- With a clean damp cloth wipe the bread pan, kneading paddle and outer surface of the bread baking machine before putting into operation. Do not use abrasive cleaners or pads.
- Remove the protective film on the control panel.
Operating Instructions
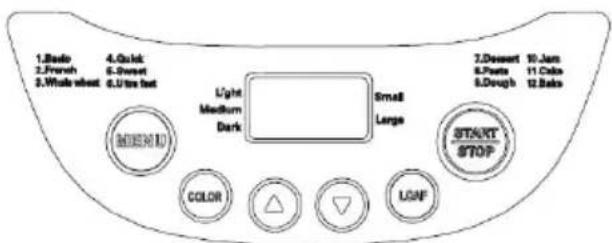
You can use the automatic bread maker to bake according to your taste. Choose from 12 baking programs to make jam, cake or to knead noodle dough.
text_image
1.Boe 2.French 3.Wake wheel 4.Quick 5.Sweet 6.U/te bus Light Medium Dark Small Large 7.Desert 8.Pouts 8.Dough 10.Jam 11.Cafe 12.Bats START STOP COLOR △ ▽ LGNFLCD INFORMATION DISPLAY
The LCD display will show you the following information:
- The program number that you have selected.
- The loaf size selected.
- The crust color setting.
- The time remaining in the baking cycle once the start button has been pressed. Note that the display will read 0:00 once baking cycle is complete.
COLOR BUTTON
Press the COLOR button to select your crust color, the LCD display will show your selection. This option is not available for programs Jam, Pasta, and Dessert.
LOAF BUTTON
You can choose between a small 1 pound loaf or a large 1.5 pound loaf. Press the LOAF button to select desired size. The LCD display will indicate the setting you have selected.
Note: The default setting of the appliance is Large (1.5 lb) and Loaf size option is disabled for programs #7-12.
START/STOP BUTTON
Press to start your program. Note, do not press the START/STOP button once your program has started, by pressing and holding down this button for two seconds the appliance will stop and the program you selected will reset.
MENU SELECT BUTTON
Press this button to select the kind of bread program you want. Each time you push the button you will hear an audible beep and a number will show up just above the time setting on the LCD display, this number will indicate which program you have selected. Below is a list of programs and descriptions that are available. Breadmaking time depends on the selected program combinations. When pressing buttons an audible signal will be heard, unless the appliance is in operation.
“For programs 1 thru 6 there is an option available that alerts you when the optimal time is to add nuts or fruit to the recipe if desired. A series of 10 audible beeps will occur, at this time you can add your additional ingredients, this will not disrupt the bread making process. Listed below, in the program description, are the times that the bread maker will notify you of this option.”
Program #1: Basic
For white and mixed breads mainly consisting of wheat flour or rye flour, has a compact consistency. When display reads “2:10” the bread maker will alert you to add extra ingredients
Program #2: French
For light breads made from fine flour. Normally the bread is fluffy and has a crispy crust. This is not suitable for baking recipes requiring butter, margarine or milk. When display reads “2:34” the bread maker will alert you to add extra ingredients
Program #3: Whole Wheat
For breads with heavy varieties of flour that require a longer phase of kneading and rising (for example, whole wheat flour and rye flour). The bread will be more compact and heavy. When display reads “2:44” the bread maker will alert you to add extra ingredients
Program #4: Quick
Kneading, rise and baking, but rise with soda or baking powder. When display reads "1:35" the bread maker will alert you to add extra ingredients
Program #5: Sweet
For breads with additives such as fruit juices, grated coconut, raisins, dry fruits, chocolate or added sugar. Due to a longer phase of rising the bread will be light and airy. When display reads “2:11” the bread maker will alert you to add extra ingredients
Program #6: Ultra-fast
Kneading, rise and baking is done in least time. The bread is the most course among all bread menus. When display reads “1:10” the bread maker will alert you to add extra ingredients.
Program #7: Dessert
For baking dessert.
Program #8: Pasta
For preparing noodle dough. In this program no baking is done.
Program #9: Dough
For preparing dough. In this program no baking is done.
Program #10: Jam
For making jam.
Program #11: Cake
Kneading, rise and bakes for cake.
Program #12: Bake
For additional baking of breads that are too light or not baked through. In this program there is no kneading or resting. The bread will be kept warm for nearly an hour after the end of the baking operation. This prevents the bread from becoming too moist. To turn off the warming function press the “Start/Stop” button for 2 seconds, until one long audible signal is heard. To switch off the appliance, disconnect the appliance from the power supply.
MEMORY FUNCTION
If you have a power outage or disruption while using your appliance, the LCD display will turn blank and the appliance will stop working. If power is resumed within 10 minutes of the outage, the appliance will start up and complete the program. If the outage is longer than 10 minutes it will be necessary to unplug the unit, clean the contents of the bread pan and start from the beginning. This does not apply, however, when you cancel or stop the baking process by pressing the “Start/Stop” button for 2 seconds.
DELAYED TIME SETTING
The timer function enables delayed baking. If you want the appliance to not start working immediately you can use this button to set the delay time. You must decide how long it will be before your bread is ready by pressing the “Time ▲”. Please note the delay time should include the baking time of program. That is, at the completion of delay time, there is hot bread that can be served. At first the program and degree of browning must be selected, then pressing “Time ▲” to increase the delay time at increments of 10 minutes. Maximum delay is 13 hours.
Example: Now it is 8:30 p.m., if you would like your bread to be ready in the next morning at 7 o'clock, i.e. in 10 hours and 30 minutes. Select your menu, color, loaf size then press the “Time ▲” to add the time until 10:30 appears on the LCD. Then press the “Start/Stop” button to activate this delay program. You can see the dot flashed and LCD will count down to show the remaining time. You will get fresh bread at 7:00 in the morning, If you don’t want to take out the bread immediately, the keep warm time of 1 hour starts.
Note: Do not use the delayed time setting when working with perishable ingredients such as eggs, milk, cream or cheese.
BEFORE BAKING BREAD
- Remove bread pan from appliance, before putting in the ingredients. If ingredients reach the baking area, a fire hazard may be caused by ingredients heating up on the heater.
• Always put the ingredients in the stated order into the bread pan. - All ingredients should be room temperature to maintain an optimal rising of the yeast.
- Measure the ingredients precisely. Even negligible deviations from the quantities specified in the recipe may affect the baking results.
Note: Never use larger quantities than those specified. Too much dough can rise out of the bread pan and drop onto the hot heating elements, causing a fire hazard.
Continued on next page
BAKING BREAD
Read all safety instructions. Place the bread machine on an even and firm surface.
Note: The maximum quantities of flour and yeast is 680g (1.5 lb.) recipes.
(1) Remove bread pan from appliance by turning to the left and lift.
(2) Push the kneading paddles onto the drive shafts in the bread pan. Make sure they are firmly in place.
(5) Put the ingredients for your recipe in the stated order into the bread pan. First add the liquids, sugar and salt, then the flour, adding the yeast as the last ingredient. (Make sure that yeast does not come into contact with salt or liquid for best results).
(6) Place the bread pan back into the appliance and twist right to lock.
(7) Close the appliance lid.
(8) Plug the power plug into the electrical outlet rated 120V. An audible signal sounds and the display indicates the program number and the duration of the normal program.
(9) Program your settings or select a pre-program with the “MENU” button. Each input is confirmed by an audible signal and shown on the LCD.
(10) Select the color of your bread. The marking on the display shows whether you have chosen light, medium or dark.
(11) You now have the possibility of setting the finish time of your program via the delay timer function. You can enter a maximum delay of up to 13 hours.
Starting a Program
After selecting desired program using MENU button, start the program using the “Start/Stop” button. The program will automatically run various operations. Occasionally, condensation may occur during baking in the window. The appliance lid can be opened during kneading but DO NOT open the lid during baking, which can cause bread to collapse.
Ending a program
When the baking process has been completed, an audible signal is heard and the display indicates 0:00. At the end of the program the appliance automatically changes to a warming mode for up to 1 hour. In this mode, warm air circulates inside the appliance. You can turn off the warming function by keeping the “Start/Stop” button pressed until audible signal is heard. Warning! Before opening the appliance lid, pull the power plug out of the electrical outlet.
(11) Taking out the bread, always use pot holders or oven gloves. Hold the bread pan tilted over a cooling rack and shake lightly until the bread slides out of the bread pan. Do not use any metal objects that may lead to scratches on the non-stick coating. After removing the bread, immediately rinse the bread pan with warm water. This prevents the kneading paddles from sticking to the drive shaft.
Tip: Remove the kneading paddles after the last kneading of the dough and the bread will remain whole when removed from bread pan. To do this, briefly press the Start/Stop button, to interrupt the baking process or pull the power plug out of the wall socket. Open the appliance lid and take out the bread pan. You can take the dough out with floured hands and remove the kneading paddles. Replace the dough and close the lid. Push the plug back into the wall socket and press the “Start/Stop” button. The baking program is resumed.
Let the bread cool for 15-30 minutes before eating. Before cutting bread, make sure that kneading paddle is not in the loaf.
Warning! Do not attempt to start operating the bread maker, before it has either cooled down or warmed up. If the display shows “H:HH” after the program has been started, it means that the temperature inside of bread pan is too high. You should stop the program and unplug the power plug immediately. Then open the lid and let the machine cool down completely before using again. If the display shows “L:LL” after the program has been started, it means that the temperature inside of bread pan is too low. You should place the bread maker in a warmer environment.
Care and Cleaning Instructions
Care and Cleaning
Pull the power plug out of the wall socket each time and allow the appliance to cool down. Protect the appliance against splashing water and moisture, as these could lead to an electrical shock hazard. Please also observe all safety instructions.
Important: The parts and accessories of the appliance should not be washed in a dishwasher.
Housing, Lid, and Baking area: Remove all particles left behind inside the baking area using a wet cloth or a slightly wet sponge. Wipe the casing and the lid with a wet cloth or sponge. Make sure that the inside area is fully dry. For easy cleaning, the appliance lid can be removed from the housing:
- Open the lid part way to align right post on lid with slot on housing extensions and lift by tilting to the right and up to remove.
- To attach the lid, insert the left hinge extension first, then align right post with slot on housing extension and push to insert.
Bread pan and kneading paddle: The surfaces of the bread pan and kneading paddle have a non-stick coating. While cleaning, do not use any abrasive detergents, cleaning powders or objects that may cause scratches on the surface. Due to moisture and vapor the surface of various parts may undergo changes in their appearance over a period of time. This does not affect the quality or functional performance of the appliance. Before cleaning, take the bread pans and kneading paddles out of the baking area. Wipe the outside of the bread pans with a damp cloth.
Never immerse the bread pan in water or other liquids. Clean the interior of the bread pan with warm, soapy water. If the kneading paddle is incrusted and hard to release, fill the bread pan with hot water for approx. 30 minutes. If the hole in the kneading paddle is clogged, you can clean it carefully with a wooden skewer. Do not use any chemical or abrasive cleaners to clean the appliance.
How to Convert a Bread Recipe to a Bread Machine Instructions
- Know the capacity of your bread machine: 1 lb., 1.5 lb. or 2 lb. fill the bread pan with water in one cup increments, keeping count of the number of cups the pan holds. Assume a one-pound machine holds two to three cups, a one-and-a-half pound machine holds three to four cups and a two pound machine holds four or more cups.
- Reduce the amount of total flour in your recipe to fit into your bread machine. Look at the amount of all the flour used in the recipe, even if the recipe uses multiple grains such as rye flour, wheat flour and rice flour. Use no more than two cups of flour in a one pound machine, three cups of flour in a one-and-a-half pound bread maker and four cups of flour in a two-pound machine.
- Decrease the amounts of all other ingredients by the same proportion as you did the flour. For example, an original recipe requiring 6 cups of flour converted to a one-pound bread machine would reduce the flour by 2/3. Decrease all other ingredients by 2/3, so 1 tbsp. (3 tsp.) of yeast would become 1 tsp. of yeast; 2/3 cup (about 12 tbsp.) of warm liquid would become about 1/4 cup (about 4 tbsp.) of water and 3 tbsp. Sugar would become 1 tbsp. of sugar.
- Bring all the ingredients to room temperature, unless your recipe specifies otherwise.
- Put the ingredients into the bread machine in the correct order: liquids, fats (butter or oils), liquid milk, salt, sugar or sweetener, dried spices or seasonings, whole wheat flour, all other flours and yeast.
- Replace all of the white flour in the recipe with bread flour or add one tbsp. of vital wheat gluten to the recipe with the flours when putting the ingredients into the bread machine.
- Plug in the machine and set it for a normal loaf.
- Wait for your bread machine to do the work and listen for the timer to go off.
- Let the bread cool for 10 minutes in the bread pan before turning the loaf onto a cooling rack to cool completely before slicing. Enjoy a homemade loaf of warm bread.
Recipes
Wonderful White Bread (1.5 pound loaf)
Basic Bread is primarily used for white and mixed breads mainly consisting of wheat flour or rye flour. The bread has a compact consistency.
Ingredients
* 1 1/4 cup water
* 2 tbsp butter or margarine
* 1 tsp salt
* 2 tbsp sugar
* 3 1/3 cup white bread flour
* 2 tbsp powdered milk
* 2 tsp active dry or 1 1/2 tsp rapid rise yeast
Remove pan and insert mixing paddle.
Measure ingredients and place in pan in the order listed.
Press Menu button; Select Program #1
Press Crust Color button to the desired crust color.
Press the Start - Stop button or select the delayed start button.
Crusty French Bread (1.5 pound loaf)
Ingredients
* 2/3 cup water
* 2 tsp oil
* 2 tsp salt
* 1 1/2 tbsp sugar
* 3 1/4 cup white bread flour
* 2 tbsp gluten flour
* 2/3 cup water
* 3 1/2 tsp active dry or 3 tsp rapid rise yeast
Remove pan and insert mixing paddle.
Measure ingredients and place in pan in the order listed.
Press Menu button; Select Program #2
Press Crust Color button to the desired crust color.
Press the Start - Stop button or select the delayed start button.
Honey Whole Wheat Bread (1.5 pound loaf)
Ingredients
* 2/3 cup water
* 2 tbsp vegetable or canola oil
* 1/3 cup honey
* 1 1/2 tsp salt
* 3 1/4 cup + 3 tbsp whole wheat flour
* 3 tbsp gluten flour
* 2 tbsp powdered milk
* 2/3 cup water
* 3 tsp active dry or 2 tsp rapid rise yeast
Remove pan and insert mixing paddle.
Measure ingredients and place in pan in the order listed.
Press Menu button; Select Program #3
Press Crust Color button to the desired crust color.
Press the Start - Stop button or select the delayed start button.
Awesome Oat Bran Bread (1.5 pound loaf)
Ingredients
* 1/2 cup frozen apple concentrate, thawed
* 1 cup of water
* 1 1/2 tbsp butter or margarine
* 2 tbsp sugar
* 1 1/2 tsp salt
* 2 tbsp dry milk
* 3 cups white bread flour
* 1/2 cup oat bran
* 3 tsp active dry or 2 1/2 tsp rapid rise yeast
Remove pan and insert mixing paddle.
Measure ingredients and place in pan in the order listed.
Press Menu button; Select Program #3
Press Crust Color button to the desired crust color.
Press the Start-Stop button or select the delayed start button.
Swiss cheese Bread (1.5 pound loaf)
Ingredients
* 1 1/4 cup water
* 1 tbsp butter or margarine
* 1 1/2 tbsp sugar
* 1 tsp salt
* 1 1/2 tsp hot mustard
* 1 1/2 tsp fennel seed
* 2 tbsp dry milk
* 3 cups white bread flour
* 1/3 cup corn meal
* 1/2 cup grated Swiss cheese
* 2 tsp active dry or 1 1/2 tsp rapid rise
Remove pan and insert mixing paddle.
Measure ingredients and place in pan in the order listed.
Press Menu button; Select Program #4
Press Crust Color button to the desired crust color
Press the Start - Stop button or select the delayed start button
Perfect Pesto Bread (1.5 pound loaf)
Ingredients
* 1 cup water
* 1/3 cup pesto sauce
* 1 1/2 tbsp sugar
* 1 tsp salt
* 3 cups white bread flour
* 1/3 cup wheat bran
* 2 tsp active dry or 1 1/2 tsp rapid rise
Remove pan and insert mixing paddle.
Measure ingredients and place in pan in the order listed.
Press Menu button; Select Program #4
Press Crust Color button to the desired crust color.
Press the Start - Stop button or select the delayed start button.
Easy Banana Bread (1.5 pound loaf)
Ingredients
* 2 large eggs
* 1/3 cup butter
* 1 oz. milk
* 2 bananas, mashed
* 1 1/3 cups bread flour
* 2/3 cup sugar
* 1 1/4 tsp baking powder
* 1 2 tsp baking soda
* 1/2 tsp salt
* 1/2 cup chopped nuts
Put the wet ingredients in the bread pan.
In a mixing bowl, mix the dry ingredients and then add to the bread pan.
Press Menu button; Select Program #4
Press Crust Color button to the desired crust color.
Press the Start - Stop button or select the delayed start button.
Note: Use a spatula to scrape sides of the pan after mixing five mins. to remove flour pockets.
Sun Dried Basil Bread (1.5 pound loaf)
Ingredients
* 1 1/4 cup water
* 3 tbsp olive oil
* 1 1/2 tbsp sugar
* 1 tsp salt
* 2 tbsp dry milk
* 1/4 tsp garlic powder
* 2 tsp dried basil
* 1/4 cup cornmeal
* 3 cups white bread flour
* 2 tsp active dry or 1 1/2 tsp rapid rise yeast
Remove pan and insert mixing paddle.
Measure ingredients and place in pan in the order listed.
Press Menu button; Select Program #5
Press Crust Color button to the desired crust color.
Cinnamon Raisin Bread (1.5 pound loaf)
Ingredients
* 1 1/4 cups water
* 2 tbsp powdered milk
* 2 tbsp butter or margarine
* 2 tbsp sugar
* 1 1/2 teaspoon salt
* 2 teaspoons cinnamon
* 3 cups white bread flour
* 3 tsp active dry yeast or 2 tsp rapid rise
Note: Add raisins at the beginning of the knead 2 cycle to ensure the raisins are mixed evenly.
Remove pan and insert mixing paddle.
Measure ingredients and place in pan in the order listed.
Press Menu button; Select Program #5
Press Crust Color button to the desired crust color.
Press the Start - Stop button or select the delayed start button.
Pasta
Ingredients
* 1 cup water
* 3 cups flour
Remove pan and insert mixing paddle.
Measure ingredients and place in pan in the order listed
Press Menu button; Select Program #8
Press the Start - Stop button or select the delayed start button.
Plain Pizza Crust Dough
Ingredients
* 1 1/2 cup water
* 2 tbsp olive oil
* 1 1/2 tbsp sugar
* 1 tsp salt
* 3 tbsp whole wheat flour
* 3 cups of white bread flour
* 3 tsp active dry yeast or 2 tsp rapid rise yeast
Remove pan and insert mixing paddle.
Measure ingredients and place in pan in the order listed.
Press Menu button; Select Program #9
Divide the dough into two pieces; roll each piece to fit a greased 12 inch pizza pan and pinch the dough around the edges to form a small rim. Spread with sauce, cheese and your favorite toppings. Makes two 12 inch pizzas.
Bake in oven at 375^ for 15-20 minutes or until done.
Bread Bowl
Ingredients
* 1 1/8 cup water
* 2 tbsp butter or margarine
* 1 tbsp sugar
* 1 1/2 tsp salt
* 3 tbsp powdered milk
* 3 cup white bread flour
* 1 tbsp active dry or 3 tsp rapid rise yeast
Remove pan and insert mixing paddle.
Measure ingredients and place in pan in the order listed.
Press Menu button; Select Program #9
Form dough into a ball (do not punch down). Place onto a greased cookie sheet and let rise in a warm place for 45 minutes or until double in size.
Let cool. Hollow out cooled bread as you would a pumpkin leaving a 34 inch shell. Cut bread you scooped out into 1 12 inch chunks for dipping and save the top of bread to be used as a lid. Spread inside of shell with butter or margarine. Fill with spinach dip or chili.
Focaccia
Ingredients
* 1 1/4 cup water
* 2 tbsp olive oil
* 1 1/2 tbsp sugar
* 1 tsp salt
* 3 tbsp whole wheat flour
* 3 cup white bread flour
* 1/2 cup grated Parmesan cheese (prepackaged)
* 3 tbsp active dry or 2 tsp rapid rise yeast
Remove pan and insert mixing paddle.
Measure ingredients and place in pan in the order listed.
Press Menu button; Select Program #9
Press the Start - Stop button or select the delayed start button.
Topping: 1
1/2 tsp garlic powder
3/4 tsp dried basil leaves
Topping: 2
1/2 tbsp finely chopped fresh garlic
3/4 tsp oregano
2 tbsp Parmesan cheese
Divide dough into two pieces; roll each piece into a 10" circle Place dough on greased pan or cookie sheet and allow to rise for 30 minutes, then prick with a fork. Brush with 2 tbsp of olive oil and sprinkle with toppings or seasonings of your choice. Bake at 400°F for 12-16 minutes until golden brown. Makes two 10" flat loaves.
Jam
Ingredients
* 2 cups of strawberry
* 1/4 cup starchy flour
* 1 cup sugar
* 2 tbsp lemon juice
Remove pan and insert mixing paddle.
Measure ingredients and place in pan in the order listed.
Press Menu button; Select Program #10
Press the Start - Stop button or select the delayed start button.
Pound Cake
Ingredients
* 6 tbsp butter
* 3/4 cup sugar
* 4 eggs
* 3/4 cup self rising flour
* 2 tsp dry custard
Soften butter and mix with sugar. Slowly add eggs, self rising flour and custard.
Beat at medium speed for 4 minutes.
Brush bread pan with oil and add the mix.
Press menu button: Select Program #11
Press the Start – Stop button or select the delayed start button.
Chocolate Cake
Ingredients
* 1/2 cup water
* 3 large eggs, lightly beaten
* 1/4 cup vegetable oil
* 1/4 cup unsweetened applesauce
* 2 tsp Vanilla extract
* 2 cups All purpose flour
* 3 tsp baking powder
* 1 cup sugar
* 7 tbsp unsweetened cocoa
* 1/2 cup chocolate chips
Mix together, the water, beaten eggs, vegetable oil, applesauce and vanilla extract. In another bowl mix your flour, baking powder and cocoa. Mix both wet and dry together well for 4 minutes on medium speed and pour into the bread pan.
Press menu button and Select Program #11
Add 20 additional minutes by pressing the up arrow key.
Add the chocolate chips right before the knead 2 mode.
Note: If cake is not fully baked when done, add additional baking time by pressing the Bake setting and then by using the up arrow key increase the baking time 15-20 minutes. Press the Bake setting twice to start the timer.
Bake Feature: This feature is used for additional baking of bread that may be too light or not baked thoroughly. The bread will be kept warm for nearly an hour after the end of the baking operation. This prevents the bread from becoming too moist.
ONE YEAR LIMITED WARRANTY
This appliance is warranted for one year from date of original purchase against defects in material and workmanship. This warranty does not cover transportation damage, misuse, accident or similar incident. This warranty gives you specific legal rights and you may have other rights, which vary from state to state. This product is intended for household use only, not for commercial use. Warranty does not cover commercial use.
Your new NESCO appliance comes equipped with numerous safety features. Any attempt to interfere with the operation of these safety features makes this warranty null and void. In the event we receive an appliance for service that has been tampered with, we reserve the right to restore it to its original state and charge for the repair.
For service in warranty - Defective products may be returned, postage prepaid, with a description of the defect to: The Metal Ware Corporation, 1700 Monroe Street, Two Rivers, Wisconsin 54241, for no-charge repair or replacement at our option.
Must include proof of purchase or copy of original bill of sale when returning product for warranty service.
Please call Customer Satisfaction at 1-800-288-4545 to obtain a Return Authorization before shipping.
- For service in warranty, follow instructions set forth in warranty. When ordering new parts, make sure that you always mention the model number of the product.
- Call us on our toll free number, 1-800-288-4545 and tell us about your problem.
- If we instruct you to send all or part of your appliance to us for repair or replacement, our Customer Satisfaction representative will provide a Return Authorization number (this number notifies our receiving department to expedite your repair). Pack your unit carefully in a sturdy carton with sufficient padding to prevent damage because any damage caused in shipping is not covered by the warranty.
- Print your name, address and Return Authorization number on the carton.
- Write a letter explaining the problem. Include the following: your name, address and telephone number and a copy of the original bill of sale.
- Attach the sealed envelope containing the letter inside the carton. Insure the package for the value of the NESCO® appliance and ship prepaid to:
Attn: Factory Service Dept.
The Metal Ware Corporation
1700 Monroe Street
Two Rivers, WI 54241
MESURES DE PRÉCAUTION IMPORTANTES
Programme #2: French
Programme #6: Ultra-fast
Attn: Factory Service Dept.
The Metal Ware Corporation
1700 Monroe Street
Two Rivers, WI 54241
Programa #3: Whole Wheat
Programa #6: Ultra-fast
text_image
Customer Satisfaction™1 - 800 - 288 - 4545