
DSH01 - Docking station TEAC - Free user manual and instructions
Find the device manual for free DSH01 TEAC in PDF.
| Product Type | Docking station for iPod/iPhone/iPad |
| Brand | TEAC |
| Model | DSH01 |
| Dimensions (W × H × D) | 215 mm × 70 mm × 225 mm |
| Power Supply | AC adapter PS-M0630 (100 V AC, 50/60 Hz) |
| Power Consumption | 18 W |
| Analog Audio Outputs | 2 × RCA (L/R), line level, impedance 600 Ω |
| Digital Audio Outputs | 1 × optical (TOSLINK), 1 × coaxial (RCA) |
| Video Outputs | 1 × composite (RCA), 1 × S-Video |
| USB Port | Type B (for PC synchronization) |
| Main Functions | Dock with charging, audio/video playback, iTunes sync, infrared remote control |
| iPod/iPhone/iPad Compatibility | iPod classic, iPod nano (2nd to 5th gen.), iPod touch (1st to 4th gen.), iPhone 4S/4/3GS/3G, iPad 2/iPad |
| Operating Temperature | +5°C to +35°C |
| Operating Humidity | 5% to 85% (non-condensing) |
| Cleaning | Soft cloth and diluted neutral liquid detergent. Do not use chemical products. |
| Safety | Unplug before cleaning. Do not expose to sunlight or a heat source. |
| Included Accessories | AC adapter, power cord, RCA audio cable, remote control (RC-1268), AAA batteries (2), instruction manual, warranty card |
| Repairability | In case of problem, contact the dealer or TEAC customer service. No user-serviceable parts. |
Frequently Asked Questions - DSH01 TEAC
User questions about DSH01 TEAC
0 question about this device. Answer the ones you know or ask your own.
Ask a new question about this device
Download the instructions for your Docking station in PDF format for free! Find your manual DSH01 - TEAC and take your electronic device back in hand. On this page are published all the documents necessary for the use of your device. DSH01 by TEAC.
USER MANUAL DSH01 TEAC
DIGITAL DOCKING STATION
ENGLISH
FRANÇAIS
ESPAÑOL
Made for

iPod

iPhone

iPad
OWNER'S MANUAL
What's in the Box 5
Before use 5
Connections 6
Names and Functions of Parts
(Docking Station) 8
Using an iPod/iPhone/iPad with the
Dock....9
Using the remote control ..... 1 0
Names and Functions of Parts
(Remote Control) 11
Basic Operation 12
Troubleshooting....16
Specifications 17
MODE D'EMPLOI
IMPORTANT SAFETY INSTRUCTIONS
1) Read these instructions.
2) Keep these instructions.
3) Heed all warnings.
4) Follow all instructions.
5) Do not use this apparatus near water.
6) Clean only with dry cloth.
7) Do not block any ventilation openings. Install in accordance with the manufacturer's instructions.
8) Do not install near any heat sources such as radiators, heat registers, stoves, or other apparatus (including amplifiers) that produce heat.
9) Do not defeat the safety purpose of the polarized or grounding-type plug. A polarized plug has two blades with one wider than the other. A grounding type plug has two blades and a third grounding prong. The wide blade or the third prong are provided for your safety. If the provided plug does not fit into your outlet, consult an electrician for replacement of the obsolete outlet.
10) Protect the power cord from being walked on or pinched particularly at plugs, convenience receptacles, and the point where they exit from the apparatus.
11) Only use attachments/accessories specified by the manufacturer.
12) Use only with the cart, stand, tripod, bracket, or table specified by the manufacturer, or sold with the apparatus. When a cart is used, use caution when moving the cart/apparatus combination to avoid injury from tip-over.
13) Unplug this apparatus during lightning storms or when unused for long periods of time.
14) Refer all servicing to qualified service personnel. Servicing is required when the apparatus has been damaged in any way, such as power-supply cord or plug is damaged, liquid has been spilled or objects have fallen into the apparatus, the apparatus has been exposed to rain or moisture, does not operate normally, or has been dropped.
- Do not expose this apparatus to drips or splashes.
- Do not place any objects filled with liquids, such as vases, on the apparatus.
- Do not install this apparatus in a confined space such as a book case or similar unit.
● The apparatus draws nominal non-operating power from the AC outlet with its POWER or STANDBY/ON switch not in the ON position.

● The apparatus should be located close enough to the AC outlet so that you can easily grasp the power cord plug at any time.
- The appliance coupler is used as the disconnect device, the disconnect device shall remain readily operable.
- If the product uses batteries (including a battery pack or installed batteries), they should not be exposed to sunshine, fire or excessive heat.
- Caution should be taken when using earphones or headphones with the product because excessive sound pressure (volume) from earphones or headphones can cause hearing loss.
WARNING: TO PREVENT FIRE OR SHOCK HAZARD, DO NOT EXPOSE THIS APPLIANCE TO RAIN OR MOISTURE.
CAUTION
● DO NOT REMOVE THE EXTERNAL CASES OR CABINETS TO EXPOSE THE ELECTRONICS. NO USER SERVICEABLE PARTS ARE WITHIN.
- IF YOU ARE EXPERIENCING PROBLEMS WITH THIS PRODUCT, CONTACT TEAC FOR A SERVICE REFERRAL. DO NOT USE THE PRODUCT UNTIL IT HAS BEEN REPAIRED.
For U.S.A.
This equipment has been tested and found to comply with the limits for a Class B digital device, pursuant to Part 15 of the FCC Rules. These limits are designed to provide reasonable protection against harmful interference in a residential installation. This equipment generates, uses, and can radiate radio frequency energy and, if not installed and used in accordance with the instructions, may cause harmful interference to radio communications. However, there is no guarantee that interference will not occur in a particular installation. If this equipment does cause harmful interference to radio or television reception, which can be determined by turning the equipment off and on, the user is encouraged to try to correct the interference by one or more of the following measures:
- Reorient or relocate the equipment and/or the receiving antenna.
- Increase the separation between the equipment and receiver.
- Connect the equipment into an outlet on a circuit different from that to which the receiver is connected.
- Consult the dealer or an experienced radio/TV technician for help.
CAUTION
Changes or modifications to this equipments not expressly approved by TEAC CORPORATION for compliance will void the user's warranty.
iPad, iPhone, iPod, iPod classic, iPod nano, and iPod touch are trademarks of Apple Inc., registered in the U.S. and other countries.
"Made for iPod," "Made for iPhone," and "Made for iPad" mean that an electronic accessory has been designed to connect specifically to iPod, iPhone, or iPad, respectively, and has been certified by the developer to meet Apple performance standards. Apple is not responsible for the operation of this device or its compliance with safety and regulatory standards. Please note that the use of this accessory with iPod, iPhone, or iPad may affect wireless performance.
Other company names and product names in this document are the trademarks or registered trademarks of their respective owners.
For European Customers
Disposal of electrical and electronic equipment
(a) All electrical and electronic equipment should be disposed of separately from the municipal waste stream via collection facilities designated by the government or local authorities.
(b) By disposing of electrical and electronic equipment correctly, you will help save valuable resources and prevent any potential negative effects on human health and the environment.
(c) Improper disposal of waste electrical and electronic equipment can have serious effects on the environment and human health because of the presence of hazardous substances in the equipment.
(d) The Waste Electrical and Electronic Equipment (WEEE) symbol, which shows a wheeled bin that has been crossed out, indicates that electrical and electronic equipment must be collected and disposed of separately from household waste.
(e) Return and collection systems are available to end users. For more detailed information about the disposal of old electrical and electronic equipment, please contact your city office, waste disposal service or the shop where you purchase equipment.

Disposal of batteries and/or accumulators
(a) Waste batteries and/or accumulators should be disposed of separately from the municipal waste stream via collection facilities designated by the government or local authorities.
(b) By disposing of waste batteries and/or accumulators correctly, you will help save valuable resources and prevent any potential negative effects on human health and the environment.
(c) Improper disposal of waste batteries and/or accumulators can have serious effects on the environment and human health because of the presence of hazardous substances in them.
(d) The WEEE symbol, which shows a wheeled bin that has been crossed out, indicates that batteries and/or accumulators must be collected and disposed of separately from household waste.
If a battery or accumulator contains more than the specified values of lead (Pb), mercury (Hg), and/or cadmium (Cd) as defined in the Battery Directive (2006/66/EC), then the chemical symbols for those elements will be indicated beneath the WEEE symbol.
(e) Return and collection systems are available to end users. For more detailed information about the disposal of waste batteries and/or accumulators, please contact your city office, waste disposal service or the shop where you purchased them.
What's in the Box
Should any of the following accessories be missing or damaged, please contact the retailer where you purchased the unit or our audiovisual customer support (see back cover).
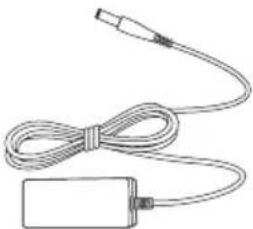
AC adapter (PS-M0630) × 1
natural_image
Simple line drawing of a cable and plug assembly (no text or symbols)AC adapter power cord × 1
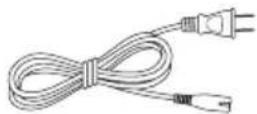
RCA audio cable × 1
Remote control (RC-1268) × 1
Dry cell batteries (AAA) × 2
Owner's manual (this document) × 1
Warranty card × 1
Before use

Precautions for placement
- Avoid placing the unit in direct sunlight, close to a source of heat or in other similar conditions. Do not place the unit on top of an amplifier or other equipment that might generate heat that exceeds the operating temperature range of this unit. Doing so could cause discoloration, deformation or malfunction. (This unit can be placed on top of a TEAC A-H01 without problem.)
- When the unit is turned on, if a TV is turned on nearby lines might appear on its screen depending on the characteristics of the TV broadcast signal. This is not a malfunction of the unit nor of the TV. If this occurs, turn the unit off.
Cleaning
Wipe the acrylic part of the top cover with a soft cloth. Clean dirt from panel surfaces by wiping them with a soft cloth that has been slightly dampened by a diluted neutral cleaning fluid. Do not use chemical cleaning cloths, thinner or similar substances as they could damage the surface of the unit.

For safety, disconnect the power plug from the outlet before cleaning.

After all connections are complete, connect the power cord's plug to the AC wall socket.
- Read the instructions of each device that you intend to use with this unit.
● To avoid hum and noise, do not bundle the connection cords. - Be sure to connect each plug securely.
flowchart
graph TD
    subgraph Computer
        A["TEAC UD-H01, A-H01, stereo amplifier or powered speakers"] --> B["Sound input (LINE IN, etc.)"]
        B --> C["RCA audio cable"]
        C --> D["PC SYNC"]
        D --> E["USB cable"]
        E --> F["Computer"]
    end

    subgraph Digital Out
        G["VIDEO OUT"] --> H["S-VIDEO VIDEO"]
        H --> I["C"]
        I --> J["TV (display)"]
        J --> K["S-VIDEO IN VIDEO IN"]
        K --> L["Video In"]
        L --> M["TV (display)"]
        M --> N["Video In"]
        N --> O["Video Out"]
        O --> P["LED OUT"]
        P --> Q["Digital OUT"]
        Q --> R["PC SYNC"]
        R --> S["USB"]
        S --> T["OFF ON"]
        T --> U["DC IN 6V"]
        U --> V["Power outlet"]
        W["PC ACAXIAL"] --> X["Digital IN (OPTICAL)"]
        X --> Y["UD-H01, A-H01 or other digital sound input device"]
        Y --> Z["Digital IN (COAXIAL)"]
        Z --> AA["UD-H01, A-H01 or other digital sound input device"]
        AA --> AB["Included AC adapter power cord"]
    end

    subgraph Digital Cable
        AC["S-VIDEO cable"] --> AD["S-video cable"]
        AD --> AE["Video cable"]
        AE --> AF["Video cable"]
        AF --> AG["Video cable"]
        AG --> AH["Video cable"]
        AH --> AI["Video cable"]
        AI --> AJ["Video cable"]
        AJ --> AK["Video cable"]
        AK --> AL["Video cable"]
        AL --> AM["Video cable"]
        AM --> AN["Video cable"]
        AN --> AO["Video cable"]
        AO --> AP["Video cable"]
        AP --> AQ["Video cable"]
        AQ --> AR["Video cable"]
    end

    subgraph Digital Control
        AS["Optical digital cable"] --> AT["Digital IN (OPTICAL)"]
        AT --> AU["Digital IN (COAXIAL)"]
        AU --> AV["Digital IN (OPTICAL)"]
        AV --> AW["Digital IN (COAXIAL)"]
        AW --> AX["Digital IN (OPTICAL)"]
        AX --> AY["Digital IN (COAXIAL)"]
        AY --> AZ["Digital IN (OPTICAL)"]
        AZ --> BA["Digital IN (COAXIAL)"]
        BA --> BB["Digital IN (OPTICAL)"]
        BB --> BC["Digital IN (COAXIAL)"]
    end

    subgraph Power Outlet
        DA["Included AC adapter power cord"] --> DB["Power outlet"]
    end
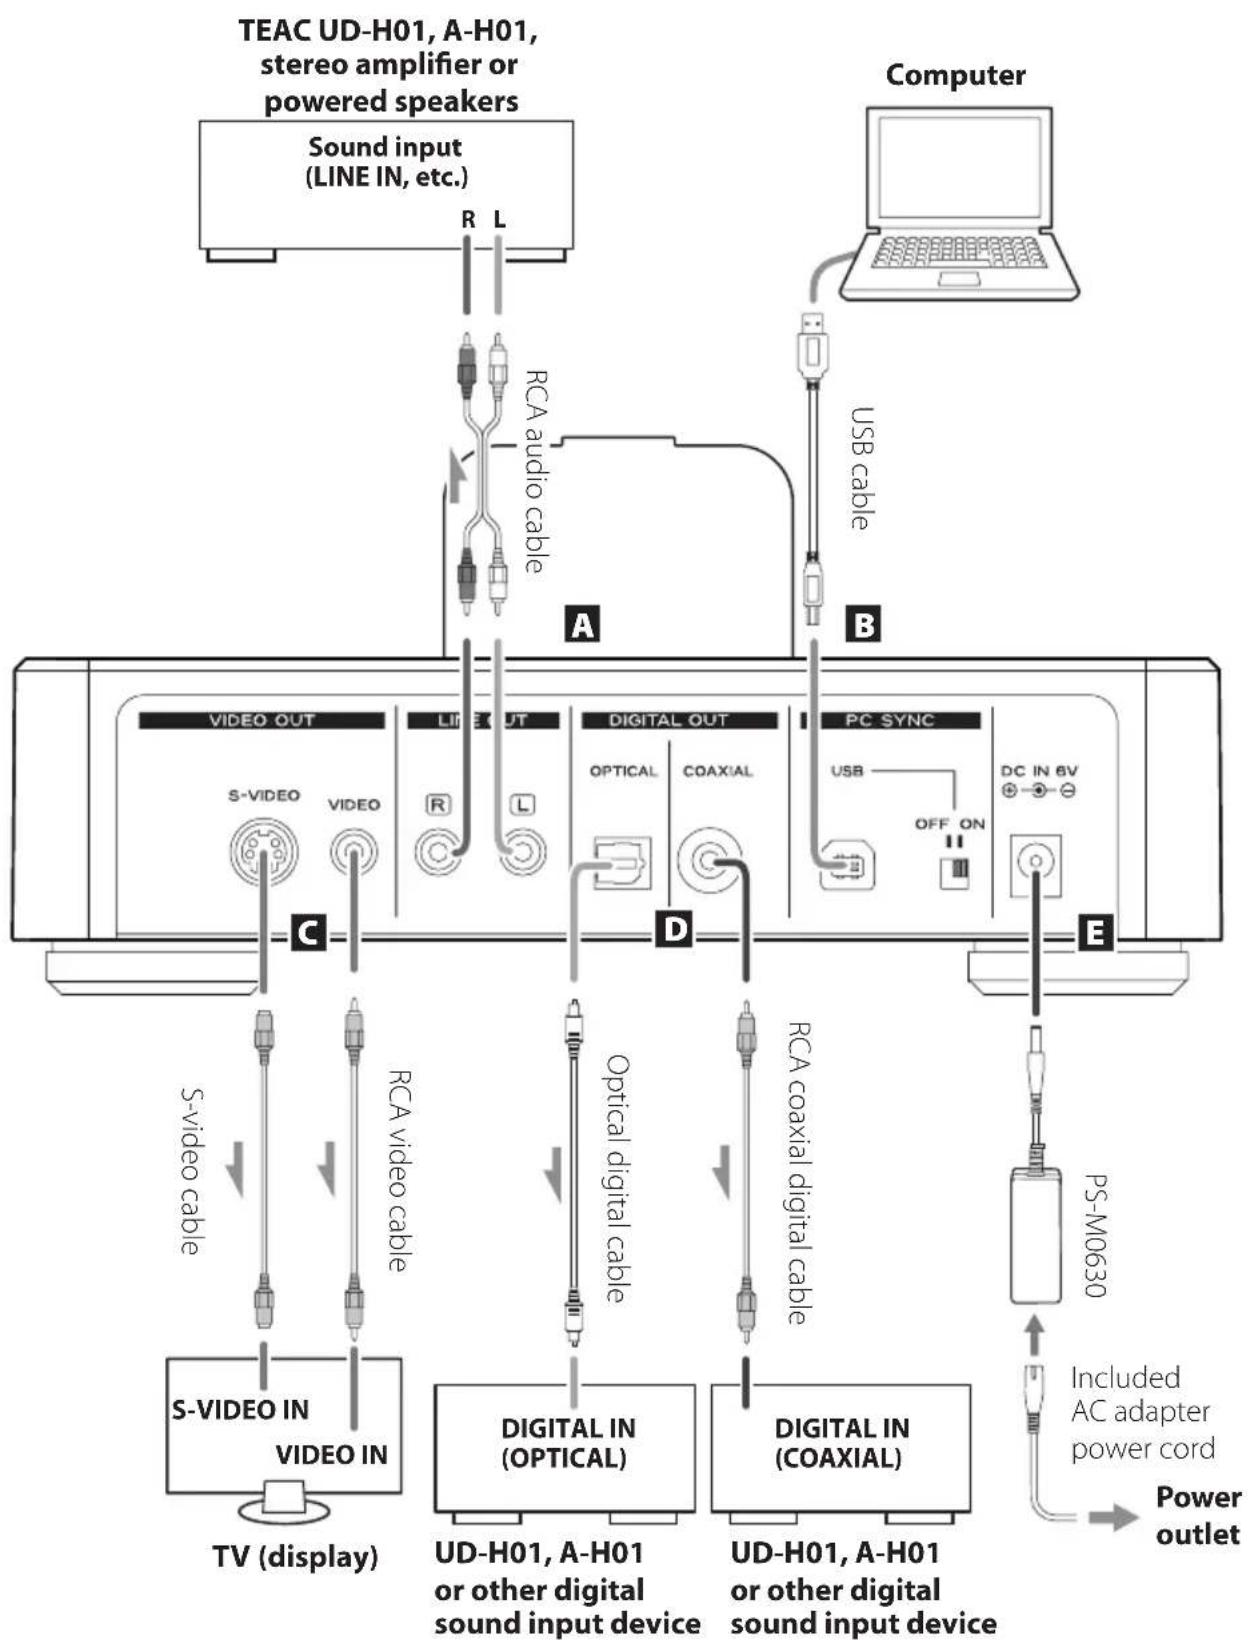
A Analog sound output jacks (LINE OUT)
These output the two channels of audio from the iPod/iPhone/iPad connected to this unit's dock as analog signals. Connect the RCA jacks to a stereo amplifier or speakers.
Connect this unit's R jack to the R jack of the device receiving sound input and this unit's L jack to the L jack of the receiving device.

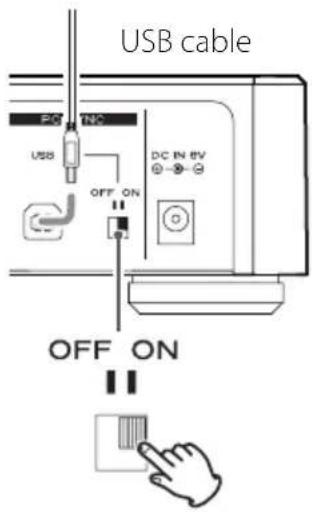
B USB port
Set the rear panel PC SYNC USB switch to ON to use this unit as an iPod Dock, enabling the synchronization of music files between the connected computer and the iPod/iPhone/iPad.
- Connect using a commercially available cable.
- When the PC SYNC USB switch is set to ON, no signals are output from the LINE OUT, VIDEO OUT or DIGITAL OUT connectors.
C VIDEO OUT connectors (S-VIDEO, VIDEO)
These output the video signal from the iPod/iPhone/iPad connected to this unit's dock. Use these to connect to the S-VIDEO input or composite video input of a TV or monitor.
- Connect using a commercially available cable.
- When outputting the iPod/iPhone/iPad video signal, no video will appear on its display.
- If the iPod/iPhone/iPad has a TV Out menu, select On or Ask. When set to Ask, a screen will be shown each time before a video is played back. You can then choose whether or not to have the device output the video signal.
- To output video from the iPod/iPhone/iPad via the output jack to a TV or other display, start playback after connecting the iPod/iPhone/iPad to this unit's dock.
D DIGITAL OUT connectors (OPTICAL, COAXIAL)
These output sound from the iPod/iPhone/iPad connected to this unit's dock. Connect one to a digital sound input port of another device.
COAXIAL: RCA coaxial digital cable
OPTICAL: Optical digital cable (TOS)
- Connect using a commercially available cable.
E DC input port (DC IN 6V)
After completing all other connections, connect the included AC adapter (PS-M0630) to this jack. Then, connect the AC adapter power cord to the adapter. Finally, connect the AC adapter power cord plug to a power outlet.
- When not using the unit for some time, disconnect the power cord from the power outlet.
⚠️ Use only the included AC adapter (PS-M0630) and AC adapter power cord.
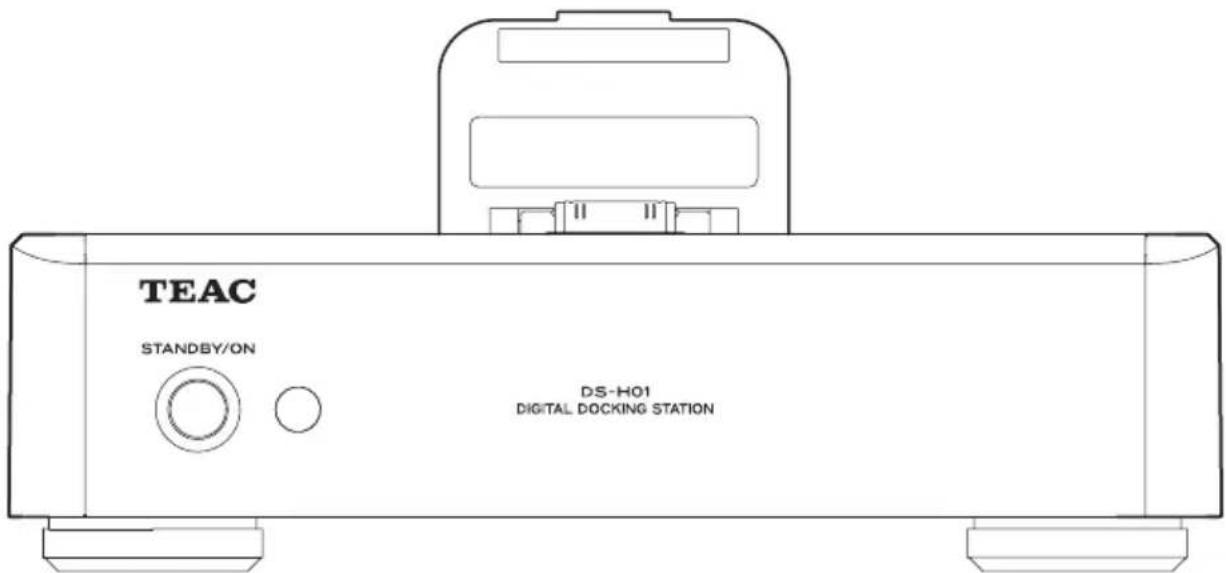
Names and Functions of Parts (Docking Station)
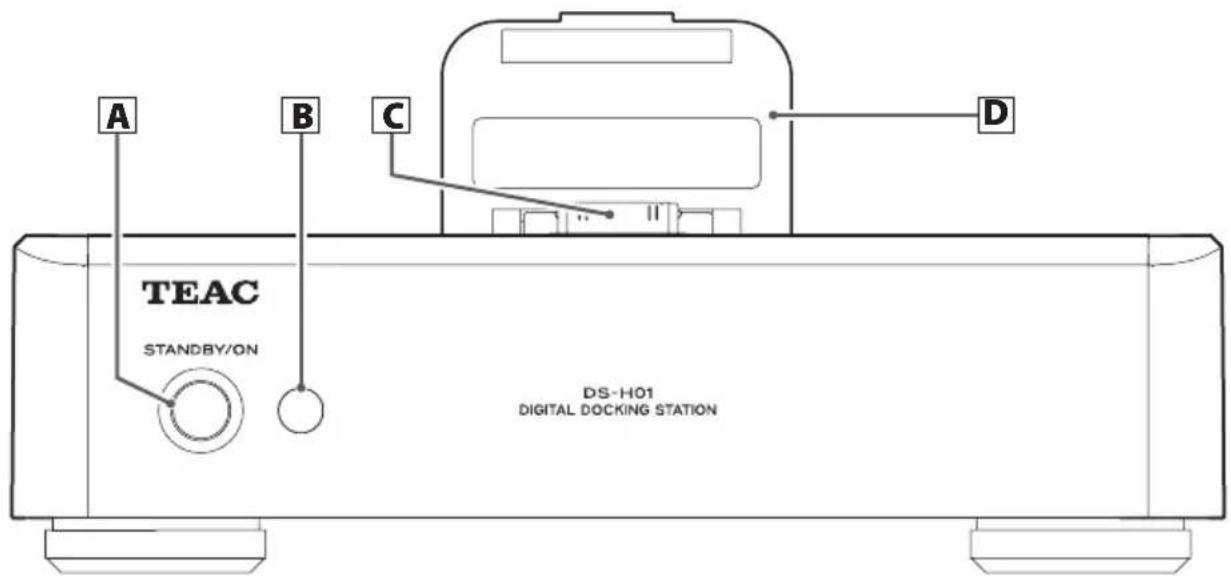
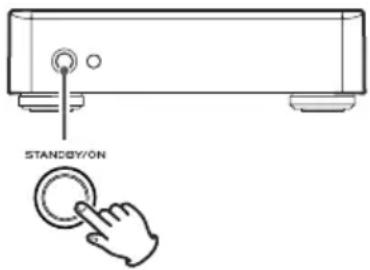
A STANDBY/ON
Press this button to turn the unit on and to put it into standby. When the power is on, the ring around the button (power indicator) lights blue.
- If nothing is connected to this unit when the power is turned on, it will enter standby mode, and the power indicator will not light blue. When you connect an iPod/iPhone/iPad to the dock connector or connect an operating computer to the unit using a USB cable, the power indicator will light blue.
B Remote control signal receiver
This receives signals from the remote control. When using the remote control, aim the end of the remote control toward the remote control signal receiver.
C Dock connector
Use this to connect an iPod/iPhone/iPad.
D Dock cover
When not using an iPod/iPhone/iPad, close this to protect the dock connector. When using an iPod/iPhone/iPad, open this and use it to hold the iPod/iPhone/iPad. For details, see "Using an iPod/iPhone/iPad with the Dock" on the next page.
- Fold the dock connector toward the dock cover before closing the cover.
Using an iPod/iPhone/iPad with the Dock
Compatible iPod/iPhone/iPad models
iPod classic
iPod nano (2nd, 3rd, 4th, and 5th generation)
iPod touch (1st, 2nd, 3rd, and 4th generation)
iPhone 4S, iPhone 4, iPhone 3GS, iPhone 3G
iPad 2, iPad
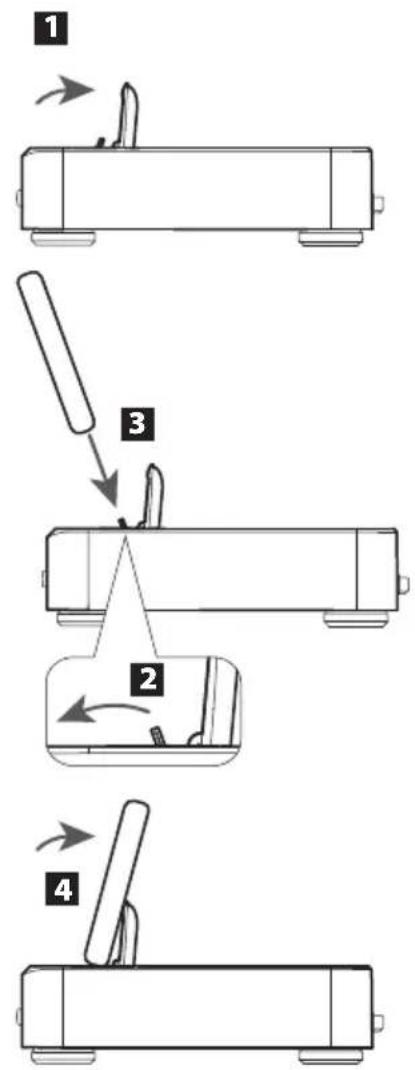
Connecting an iPod/iPhone/iPad
1 Open the dock cover.
2 Fold the dock connector forward.
3 Connect the iPod/iPhone/iPad.
4 Lean the iPod/iPhone/iPad against the dock cover.
iPod/iPhone/iPad software
If the unit or remote control buttons do not work properly with your iPod/iPhone/iPad, updating its software might solve the problem.
Download the latest software for your iPod/iPhone/iPad from the following Apple website.
http://www.apple.com/downloads/

flowchart
graph TD
    A["Step 1: Top view"] --> B["Step 2: Left arm, right arm, bottom arm"]
    B --> C["Step 3: Top view, left arm, right arm, bottom arm"]
    C --> D["Step 4: Right arm, bottom arm"]
Using the remote control
The included remote control allows this unit to be operated from a distance.
Point the remote control unit at the main unit's remote sensor from within 16 feet/5 meters of themain unit.
- Remote control operation may be impossible if there are any obstacles between the unit and the remote control.
- If direct sunlight or strong artificial illumination shines on the remote sensor, the remote control might not function. If that is the case, move this unit to another location.
- If the remote control unit is operated near other appliances which generate infrared rays, or if other remote control devices using infrared rays are used near the unit, it may operate incorrectly. And conversely, the other appliances may operate incorrectly.
Battery Installation
1 Remove the battery compartment cover.
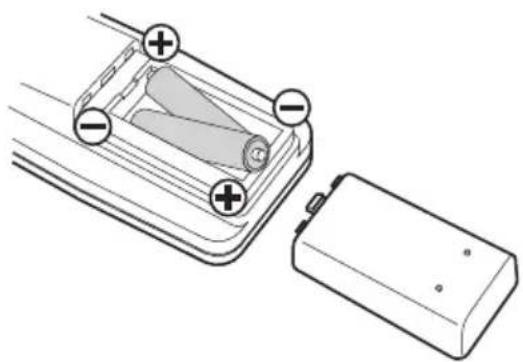
natural_image
Diagram of a battery pack with two labeled terminals and a cylindrical component inside (no text or symbols)2 Insert two "AAA" (R03, UM-4) dry batteries. Make sure that the batteries are inserted with their positive "+" and negative "-" poles positioned correctly.
3 Close the cover.
Battery Replacement
If the effective range decreases, the batteries are exhausted. In this case, replace the batteries with new ones.
For detailed information about collection of batteries, please contact your local municipality, your waste disposal service or the point of sale where you purchased the items.
Precautions concerning batteries
Misuse of batteries could cause them to rupture or leak leading to fire, injury or the staining of items nearby. Please read and observe the following precautions carefully.
- Be sure to insert the batteries with correct positive "+" and negative "-" polarities.
- Use batteries of the same type. Never use different types of batteries together.
● Rechargeable and non-rechargeable batteries can be used. Refer to the precautions on their labels. - When the remote control unit is not to be used for a long time (more than a month), remove the batteries from the battery compartment to prevent them from leaking. If they leak, wipe away the liquid inside the battery compartment and replace the batteries with new ones.
- Do not heat or disassemble batteries and never dispose of old batteries by throwing them in a fire.
Names and Functions of Parts (Remote Control)

The RC-1268 remote control can control both A-H01 and DS-H01 models. (The same remote control is included with the TEAC A-H01.)
This manual explains the buttons that can be used with the DS-H01.
Using the RC-1268 remote, you can control the iPod/iPhone/iPad connected to this unit's dock.
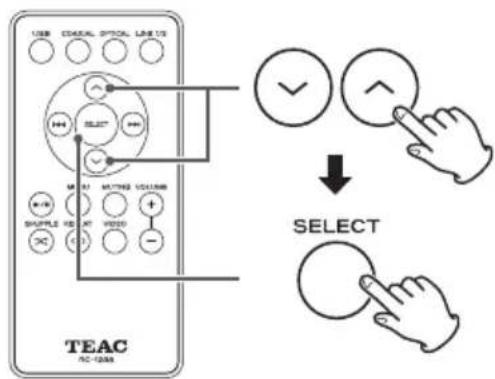
A Scroll buttons (√/∧)
Use these to scroll through menus.
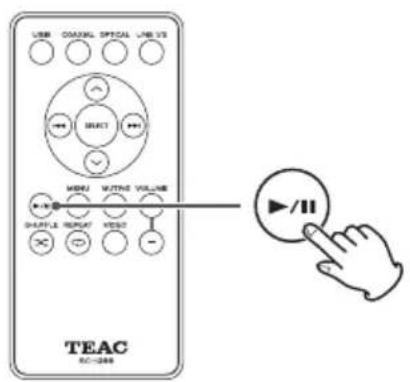
B Play/pause button (▶/II)
Starts/pauses playback.
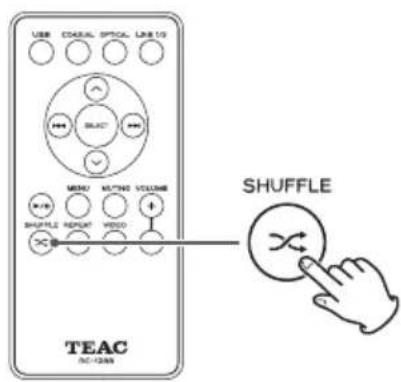
C Shuffle button ( ✉ )
Turns shuffle playback on/off.
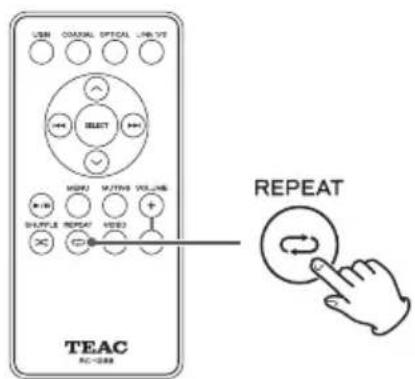
D Repeat button (REPEAT ↻)
Changes the repeat playback modes.
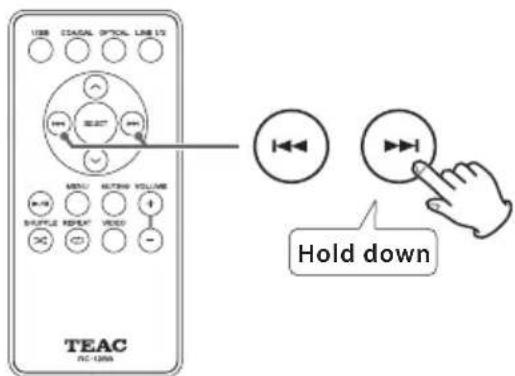
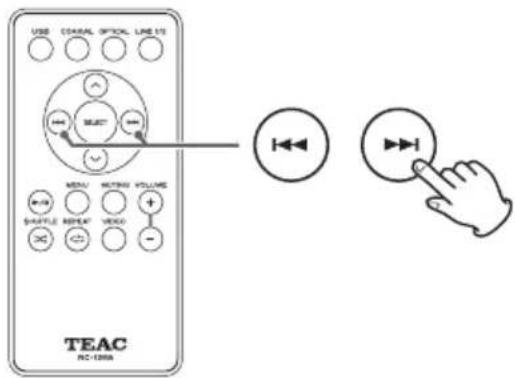
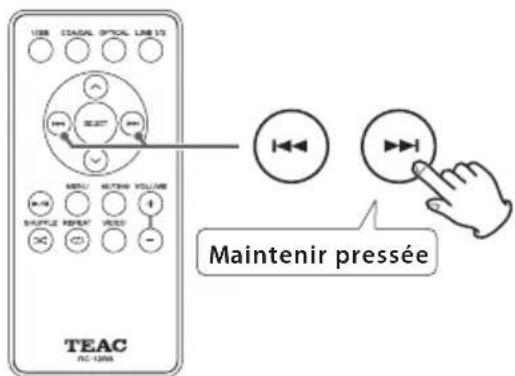
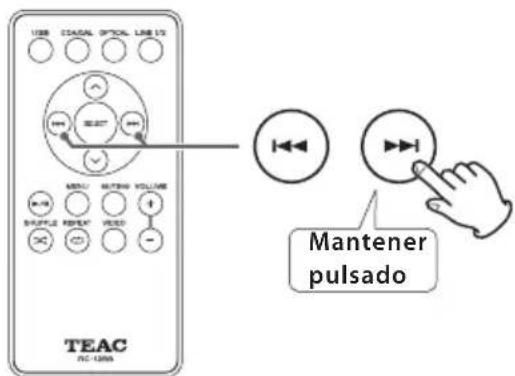
E Skip buttons (|◀◀/▶▶)
Press these buttons to skip to the previous or next song. Hold down these buttons to search forward or backward.
F Selection button (SELECT)
Press this button to confirm a selection in a menu.
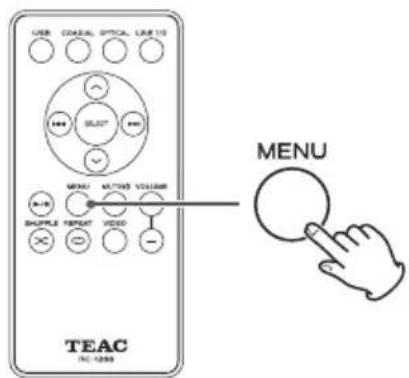
G MENU
Return to the previous iPod/iPhone menu. This is the same as the iPod MENU button.
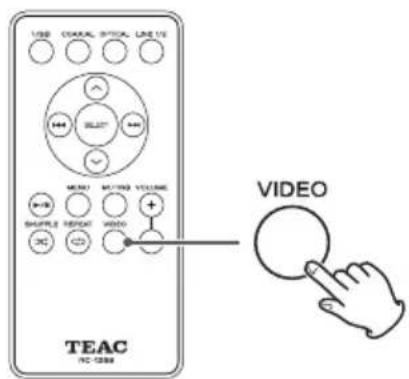
H Video output button (VIDEO)
Turns video send on/off.
- You can send the iPod/iPhone/iPad video signal from this unit's video output jacks (VIDEO OUT) to a TV or display. (See page 7 C and page 14.)
1 Press the power button (STANDBY/ON) to turn the power on.
- If nothing is connected to this unit when the power is turned on, it will enter standby mode, and the ring around the button (power indicator) will not light blue. When you connect an iPod/iPhone/iPad to the dock connector or connect an operating computer to the unit using a USB cable, the power indicator will light blue.
- When connected to an amplifier, always turn the amplifier's power on very last to avoid sudden loud noises.
2 After turning the iPod/iPhone/iPad power on, connect it to the dock.
For details about how to connect an iPod/iPhone/iPad, see "Using an iPod/iPhone/iPad with the Dock" on page 9.
- If you connect an unpowered iPod/iPhone/iPad to the dock, it might not operate correctly after its power is turned on.
- The iPod/iPhone/iPad in this unit's dock will be charged whenever this unit's power plug is connected to a power source and its power is turned on.
- With some iPod/iPhone/iPad models, no sound will be output from headphones that are plugged into them when the device is connected to the dock.
- You can output the iPod/iPhone/iPad video signal from this unit's video output jacks (VIDEO OUT) to a TV or display. (See page 7 and page 14.)
- When outputting iPod/iPhone/iPad video from a video output jack to a TV or other display, connect the iPod/iPhone/iPad to this unit's dock before starting playback.
- When using an iOS application on an iPod touch, iPhone or iPad, start the iOS application before connecting the device to the dock.
- If a case being used with an iPod touch, iPhone or iPad touches this unit's dock when the device is connected, remove the case and reconnect it.
Pausing playback
During playback, press the playback/pause button
(▶/Ⅱ) to pause playback.
When paused, press the playback/pause button
(▶/■) to restart playback.
Skipping songs
During playback, press a skip button (I◄◄/►►I) to skip to the previous or next song and start playing it.
Keep pressing the button until the desired song number is reached.
The selected song will be played from the beginning.
- During playback, if the ◀◀◀ button is pressed once the beginning of the current song will be found. Press it again if you want to play the previous song.
Searching forward and backward
During playback, hold down a skip (I◄◄/►►I) button to search forward or backward. Release it when you find the part you want to hear.
Repeat playback
Press the repeat button (⇨) to cycle through the iPod/iPhone/iPad repeat modes in the following order.

flowchart
graph LR
    A["Repeat one Repeat all Off"] --> B["→"]
    B --> C["→"]
- When set to repeat one song, the 📄 icon appears on the iPod/iPhone/iPad display.
- When set to repeat all songs, the 📊 icon appears on the iPod/iPhone/iPad display


Basic Operation (continued)
Shuffle playback
Press the Shuffle (✗) button to cycle through the shuffle modes of the iPod/iPhone/iPad in the following order.

- When set to shuffle, the ✗ icon appears on the iPod/iPhone/iPad display.
Returning to the previous iPod/iPhone/iPad menu
Press the MENU button to open the previous iPod/iPhone/iPad menu.
This has the same function as an iPod MENU button.
Selecting an iPod/iPhone/iPad menu item
Use the scroll buttons (√/∧) to select an item and then press the SELECT button.
When the iPod/iPhone/iPad video selection screen is open, press the remote control VIDEO button to turn video output on or off. Since this cannot be confirmed on the iPod/iPhone/iPad menu screen, start video playback and check whether video output is on or off on the TV (display) screen.
- If the device has a TV Out menu, select On or Ask. When set to Ask, a screen will be shown each time before a video is played back. You can then choose whether or not to have the device output the video signal.
- Set the TV signal to NTSC or PAL as appropriate for the region of the TV or other device that you are using.
Synchronizing with a computer
This unit can be used as an iPod/iPhone/iPad dock with recharging capability.
To synchronize an iPod/iPhone/iPad with a computer, set the rear panel PC SYNC USB switch to ON.
- When the PC SYNC USB switch is set to ON, no signals are output from the LINE OUT or DIGITAL OUT connectors.
- When connected to a computer that does not support recharging of an iPod/iPhone/iPad, the connected iPod/iPhone/iPad will not be recharged if the PC SYNC USB switch is set to ON. In this case, set the PC SYNC USB switch to OFF to recharge the connected device.
- While synchronizing an iPod/iPhone/iPad with a computer, do not set the PC SYNC USB switch to OFF. Doing so could cause a device to freeze or other operation problems.
Operation might differ according to the iPod/iPhone/iPad model and iOS software version.
Troubleshooting
If you experience a problem with the unit, please refer to the following troubleshooting advice before seeking repair. If you still have a problem, contact the retailer where you purchased the unit or TEAC customer service (on the back cover).
The following explanations refer to an iPod, but they also apply to use with an iPhone or iPad.
General
| No power Check that the power cord is properly connected to the power source. If the source is switched, make sure that the switch is turned on. Confirm that power is supplied to the outlet by plugging in another electric device. | |
| Power indicator does not light when power button pushed | If nothing is connected to this unit when the power is turned on, it will enter standby mode, and the ring around the button will not light blue. When you connect an iPod to the dock connector or connect an operating computer to the unit using a USB cable,the ring around the button (power indicator) will light blue. |
| iPod not recognized | Confirm that the iPod model can be used with this unit. (See page 9.) If you are using an iPod case, remove it so that the iPod can dock securely. |
| iPod music cannot be played back | If PC SYNC is set to ON, the iPod cannot be used for playback. Set the PC SYNC switch to OFF. (See page 15.) |
| The iPod does not recharge | When connected to a computer that does not support recharging of an iPod, the connected iPod will not be recharged if the PC SYNC USB switch is set to ON. In this case, set the PC SYNC USB switch to OFF to recharge the connected device. |
| No video output Press the VIDEO button on the remote control. (See page 14.) If the iPod has a TV Out menu item, set it to On or Ask. | |
| Noise appears on TV screen | Check that the iPod TV signal setting is NTSC or PAL as appropriate. (See page 14.) |
Since this unit uses a microcontroller, external noise and other interference can cause the unit to malfunction. If this occurs, unplug the power cord, wait for a while, then restore power to the unit and try using it again.
Analog sound output
Connectors RCA jacks ×2
Output impedance 600 Ω or less
Maximum output level (1 kHz, full-scale, into 10 kΩ load) ..2.0 Vrms
Frequency response 20 Hz–20 kHz (−3 dB)
S/N ratio 90 dB
Total harmonic distortion 0.05% (1 kHz)
Digital sound output
Coaxial digital jack .......×1
Optical digital connector ....x 1
Video output
Composite jack .......×1
S-Video jack .......×1
USB port
USB Type B ×1
General
Power supply
Europe model ...... AC 230 V, 50 Hz
U.S.A./Canada model ...... AC 120 V, 60 Hz
Power consumption 18 W
(including protrusions)
Weight 1.1 kg
Operating temperature....+5°C to +35°C
Operating humidity ....5–85 % (no condensation)
Included accessories
AC adapter (PS-M0630) × 1
AC adapter power cord × 1
RCA audio cable × 1
Remote control (RC-1268) × 1
Batteries (AAA) × 2
Owner's manual (this document) × 1
Warranty card × 1
- Specifications and appearance are subject to change without notice.
- Illustrations in this manual might differ in some aspects from the actual model.
natural_image
Simple line drawing of a cable and plug device (no text or symbols)B Port USB
http://www.apple.com/downloads/
flowchart
graph TD
    A["Step 1: Top view"] --> B["Step 2: Left arm, right arm, bottom arm"]
    B --> C["Step 3: Top view, left arm, right arm, bottom arm"]
    C --> D["Step 4: Bottom view, right arm, bottom arm"]
natural_image
Diagram of a battery pack with two labeled terminals and a positive charge symbol inside (no text or labels present)B Touche Lecture/Pause (▶/II)
Dimensions (mm) .....215 (l) × 70 (h) × 225 (p)
(hors tout)
Poids 1,1 kg
natural_image
Simple line drawing of a cable and plug device (no text or symbols)COAXIAL: cable digital coaxial RCA
OPTICAL: cable digital óptico (TOS)
http://www.apple.com/downloads/

flowchart
graph TD
    A["1: Open door"] --> B["2: Disassembly"]
    B --> C["3: Close door"]
    C --> D["4: Disassembly"]
natural_image
Diagram of a battery pack with two labeled terminals and a cylindrical component inside (no text or symbols)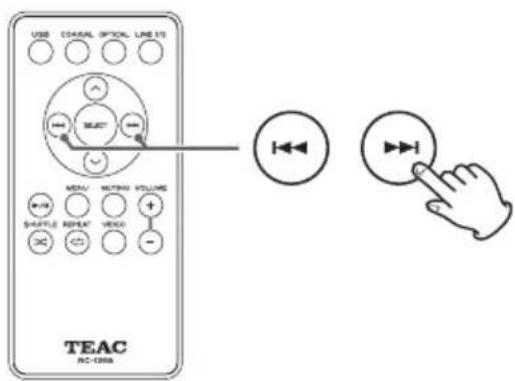

Terminal digital coaxial ....X1
Conector digital óptico .....x1
Salida de vídeo
This device has a serial number located on its back panel. Please record the serial number and retain it for your records.
Model name: DS-H01 Serial number
0112 MA-1750B

- OWNER'S MANUAL
- MODE D'EMPLOI
- IMPORTANT SAFETY INSTRUCTIONS
- CAUTION
- For U.S.A.
- For European Customers
- Disposal of electrical and electronic equipment
- Disposal of batteries and/or accumulators
- What's in the Box
- Before use
- Cleaning
- After all connections are complete, connect the power cord's plug to the AC wall socket.
- A Analog sound output jacks (LINE OUT)
- B USB port
- C VIDEO OUT connectors (S-VIDEO, VIDEO)
- D DIGITAL OUT connectors (OPTICAL, COAXIAL)
- E DC input port (DC IN 6V)
- Names and Functions of Parts (Docking Station)
- A STANDBY/ON
- B Remote control signal receiver
- C Dock connector
- D Dock cover
- Using an iPod/iPhone/iPad with the Dock
- Compatible iPod/iPhone/iPad models
- Connecting an iPod/iPhone/iPad
- iPod/iPhone/iPad software
- Using the remote control
- Battery Installation
- Battery Replacement
- Precautions concerning batteries
- Names and Functions of Parts (Remote Control)
- A Scroll buttons (√/∧)
- B Play/pause button (▶/II)
- C Shuffle button ( ✉ )
- D Repeat button (REPEAT ↻)
- E Skip buttons (|◀◀/▶▶)
- F Selection button (SELECT)
- G MENU
- H Video output button (VIDEO)
- Press the power button (STANDBY/ON) to turn the power on.
- After turning the iPod/iPhone/iPad power on, connect it to the dock.
- Pausing playback
- Skipping songs
- Searching forward and backward
- Repeat playback
- Basic Operation (continued)
- Shuffle playback
- Returning to the previous iPod/iPhone/iPad menu
- Selecting an iPod/iPhone/iPad menu item
- Synchronizing with a computer
- Troubleshooting
- Analog sound output
- Digital sound output
- Video output
- USB port
- General
- Included accessories
- B Port USB
- B Touche Lecture/Pause (▶/II)
- Salida de vídeo
Brand : TEAC
Model : DSH01
Category : Docking station