USER MANUAL 283069 PRINCESS
natural_image
Line drawing of a small kitchen appliance with a fan and vent (no text or symbols)
A
Read the manual carefully • before use. Keep the manual for future reference.
Only use the appliance and • the accessories for their intended purposes. Do not use the appliance and the accessories for other purposes than described in the manual.
Do not use the appliance if any part or any accessory is damaged or defective.
If a part or an accessory is damaged or defective, it must be replaced by the manufacturer or an authorised repair agent.
The appliance is not intended for use by persons (including children) with reduced physical, sensory or mental capabilities, or lack of experience and knowledge, unless they have been given supervision or instruction concerning use of the appliance by a person responsible for their safety.
Children should be supervised to ensure that they do not play with the appliance.
Do not use the appliance near bathtubs, showers, basins or other vessels containing water.
Do not immerse the appliance in water or other liquids. If the appliance is immersed in water or other liquids, do not remove the appliance with your hands. Immediately remove the mains plug from the wall socket. If the appliance is immersed in water or other liquids, do not use the appliance again.
Clean the appliance and the • accessories. Refer to the section "Cleaning and maintenance".
Electrical safety
Before use, always check that the mains voltage is the same as the voltage on the rating plate of the appliance.
The appliance is not intended to be operated by means of an external timer or separate remote-control system.
Connect the appliance to an • earthed wall socket.
If necessary, use an earthed extension cable of a suitable diameter (at least 3 × 1 mm^2 ).
For additional protection, install a residual current device
(RCD) with a rated residual operating current that does not exceed 30 mA.
Make sure that water cannot enter the contact plugs of the mains cable and the extension cable.
Always fully unwind the mains cable and the extension cable.
Make sure that the mains • cable does not hang over the edge of a worktop and cannot be caught accidentally or tripped over.
Keep the mains cable away • from heat, oil and sharp edges.
Do not use the appliance if • the mains cable or the mains plug is damaged or defective.
If the mains cable or the mains plug is damaged or defective, it must be replaced by the manufacturer or an authorised repair agent.
Do not pull the mains cable • to disconnect the mains plug from the mains.
Disconnect the mains plug • from the mains when the appliance is not in use, before assembly or disassembly and before cleaning and maintenance.
Safety instructions for ice-cube makers
The appliance is suitable for • domestic use only.
Do not use the appliance to • store or refrigerate food or beverages.
- Do not use the appliance
- outdoors.
Do not use the appliance in • humid surroundings.
Do not use the appliance in ambient temperatures lower than 5 °C.
Place the appliance on a • stable and flat surface.
Place the appliance on a • heat-resistant and splash-proof surface.
Do not place the appliance • on a hob.
Make sure that there is sufficient space around the appliance to allow heat to escape and provide sufficient ventilation.
Do not cover the appliance. Do not place objects on top of the appliance.
Make sure that the appliance does not come into contact with flammable material.
Keep the appliance away • from heat sources. Do not place the appliance on hot surfaces or near open flames. Do not operate the appliance without the lid in place. Do not insert foreign objects • into the appliance.
Do not move the appliance • while it is switched on.
Do not leave the appliance • unattended during use.
Store the appliance in a dry • place when not in use. Make sure that children do not have access to stored appliances.
Cleaning and maintenance
Warning!
- Before cleaning or maintenance, switch off the appliance, remove the mains plug from the wall socket and wait until the appliance has cooled down.
- Do not immerse the appliance in water or other liquids.
- Do not leave water in the appliance for a long period to prevent the water from being contaminated. Use the valve on the water outlet to remove any excess water.
Caution!
- Do not use aggressive or abrasive cleaning agents to clean the appliance.
- Do not use sharp objects to clean the appliance.
Regularly check the appliance for possible damage.
Clean the outside of the appliance with a soft, damp cloth. Thoroughly dry the outside of the appliance with a clean, dry cloth.
Clean the inside of the appliance with a soft, damp cloth. Thoroughly dry the inside of the appliance with a clean, dry cloth. Clean the ice cube scoop in soapy water or in the dishwasher. Rinse the ice cube scoop under running water. Thoroughly dry the ice cube scoop with a clean, dry cloth. It is recommended to regularly clean the appliance with an anti-algae and antibacterial agent. Follow the instructions on the packaging.
Description (fig. A & B)
Your 283069 Princess ice-cube maker has been designed for making ice cubes. The maximum capacity of the water reservoir is 2.8 kg. The maximum capacity of the ice-cube reservoir is 1 kg. The appliance is suitable for indoor use only. The appliance is suitable for domestic use only.
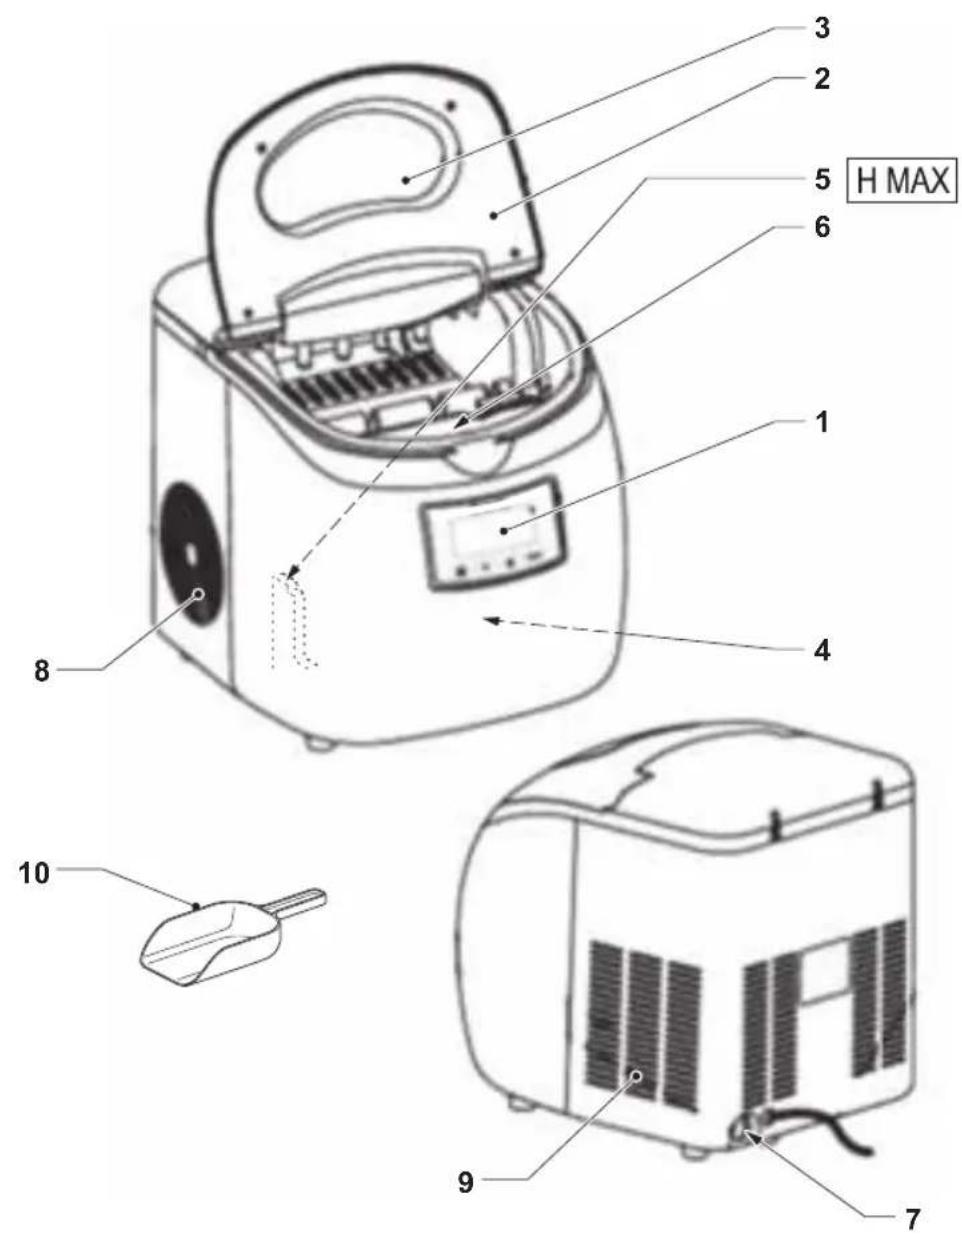
Ice-cube maker (fig. A)
- Control panel
- Lid
- Viewing window
- Water reservoir
- Water level indicator
- Ice cube reservoir
- Water outlet
- Air inlet
- Air outlet
- Ice cube scoop
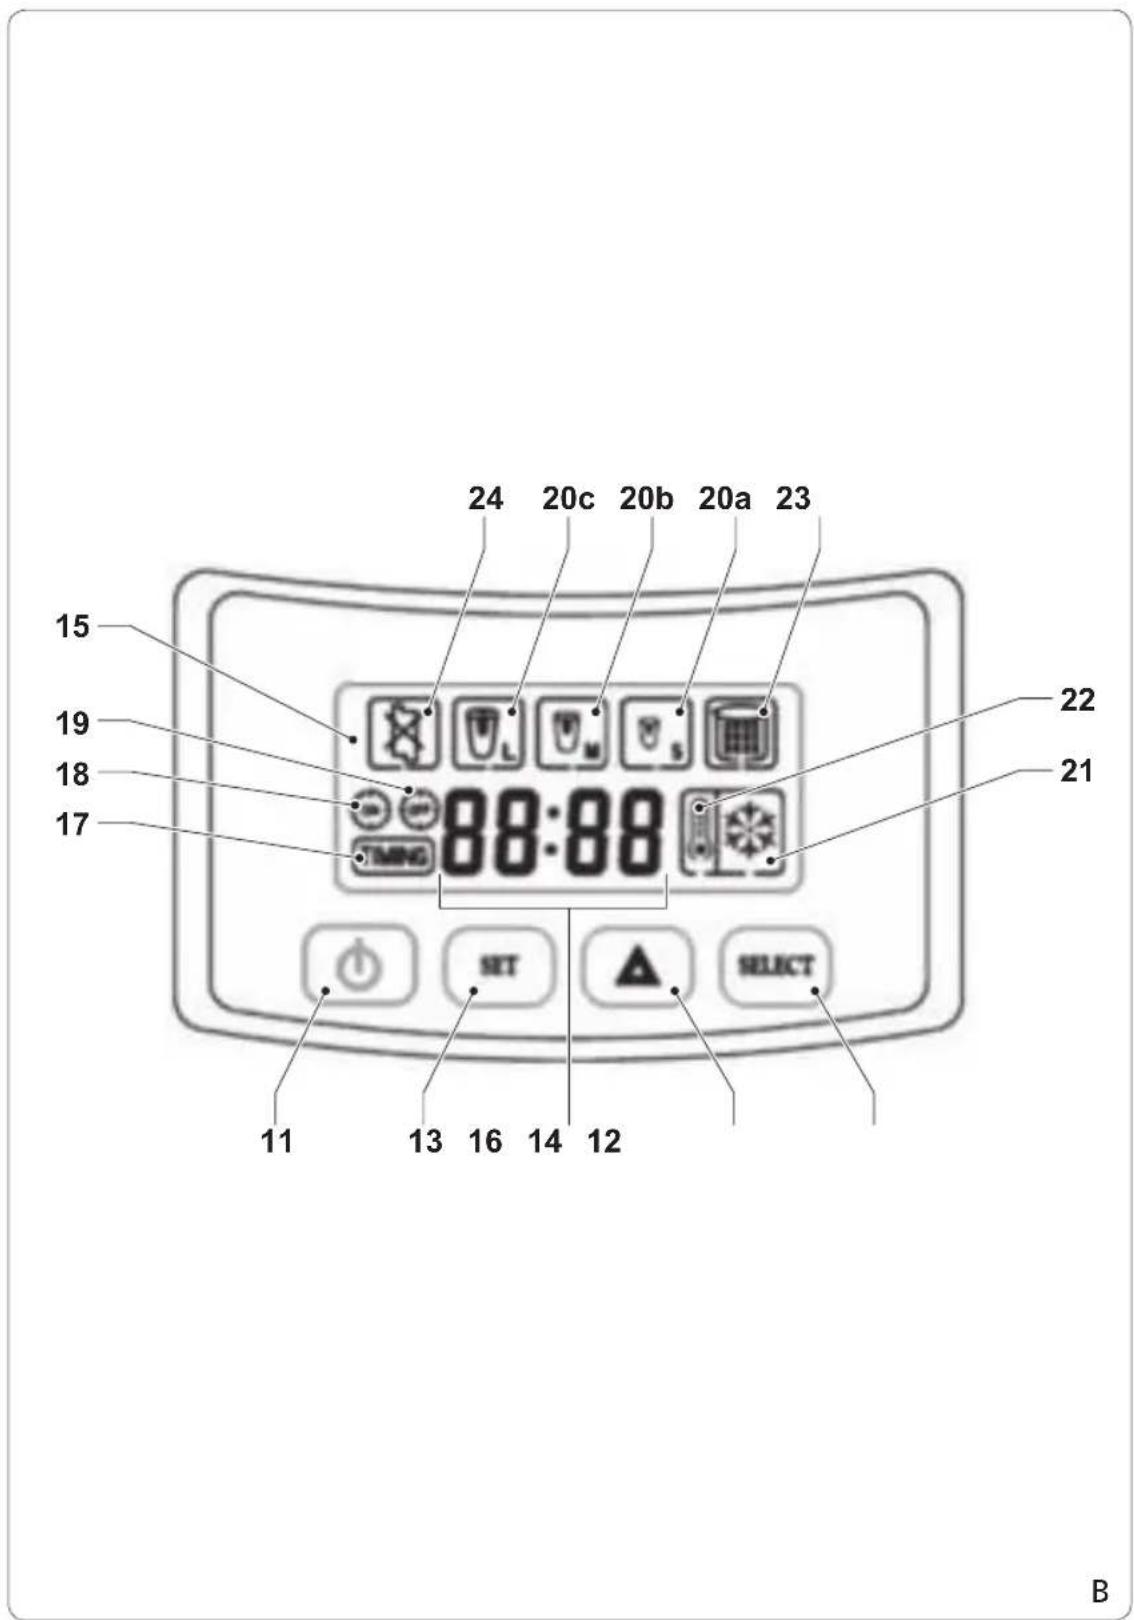
Control panel (fig. B)
- On/off/standby button
- Ice-cube size button
- Time button
- Arrow button
- Display
- Time indicator
- Real-time indicator
- Power-on time indicator
- Power-off time indicator
20a. Ice-cube size indicator (S)
20b. Ice-cube size indicator (M)
20c. Ice-cube size indicator (L)
- Ice-cube making indicator
- "Water reservoir empty" indicator
- "Ice cube reservoir full" indicator
- Ice-dropping fault indicator
Initial use
Warning!
- Before first use, allow the appliance to sit for at least 3 hours. The coolant first has to settle in the cooling element.
Clean the appliance. Refer to the section • "Cleaning and maintenance".
Clean the accessories. Refer to the section • "Cleaning and maintenance".
Use
Setting the time (fig. B)
Real time
Press the time button (13) 1x to set the · hours. The real-time indicator (17) comes on. The hour digits of the time indicator (16) start to flash. Press the arrow button (14) to adjust the hours.
Press the time button (13) 2x to set the · minutes. The minute digits of the time indicator (16) start to flash. Press the arrow button (14) to adjust the minutes.
Power-on time
Press the time button (13) 3x to set the • hours. The power-on time indicator (18) comes on. The hour digits of the time indicator (16) start to flash. Press the arrow button (14) to adjust the hours.
Press the time button (13) 4x to set the · minutes. The minute digits of the time indicator (16) start to flash. Press the arrow button (14) to adjust the minutes.
Power-off time
Press the time button (13) 5x to set the • hours. The power-off time indicator (19) comes on. The hour digits of the time indicator (16) start to flash. Press the arrow button (14) to adjust the hours.
Press the time button (13) 6x to set the • minutes. The minute digits of the time indicator (16) start to flash. Press the arrow button (14) to adjust the minutes.
Setting the ice cube size (fig. B)
Press the ice-cube size button (12) 1x to make small ice cubes. The ice-cube size indicator (20a) comes on.
Press the ice-cube size button (12) 2x to make medium ice cubes. The ice-cube size indicator (20b) comes on.
Press the ice-cube size button (12) 3x to make large ice cubes. The ice-cube size indicator (20c) comes on.
Hints for use (fig. A & B)
Caution!
- Do not switch on the appliance within 3 hours after moving the appliance.
- Make sure that there is sufficient space around the appliance to allow heat to escape and provide sufficient ventilation. Minimum distance from the air inlet and the air outlet: 20 cm.
- Only use tap water to fill the water reservoir.
- Do not exceed the maximum mark (5, "H-MAX") when you fill the water reservoir.
Place the appliance on a stable and flat surface.
Open the lid (2).
Fill the water reservoir (4) with the required amount of water.
Note: It is recommended to add 1 tablespoon of lemon juice each time you fill the water reservoir. The lemon juice releases a fresh citrus smell throughout your home. The acid in the lemon juice will combat the growth of bacteria, mould and airborne allergens.
Place the ice cube reservoir (6) into the appliance.
Close the lid (2).
Insert the mains plug into the wall socket. • The display (15) comes on.
If you want to use the timer function, set the power-on time and the power-off time. Refer to the section "Setting the time".
Set the required ice cube size. Refer to the section "Setting the ice cube size".
To switch on the appliance, press the • on/off/standby button (11). The ice-cube making indicator (21) starts to flash. The appliance starts making ice cubes.
Within 15 minutes, the appliance is at the correct temperature and the first ice cubes are ready. As long as the appliance is switched on, it will continue to produce 12 ice cubes every 9-13 minutes (depending on the size).
Regularly look through the viewing window ·
(3) to check whether the ice-cube making process runs smoothly.
To interrupt the process, press the on/off/standby button (11).
If the ice cube reservoir (6) is full, the "ice cube · reservoir full" indicator (23) will come on.
To switch off the appliance, press the • on/off/standby button (11).
Remove the mains plug from the wall socket.
The display (15) goes off.
Allow the appliance to cool down · completely.

