
MS 1131DVD - Home Theater System SEG - Free user manual and instructions
Find the device manual for free MS 1131DVD SEG in PDF.
| Product type | Home cinema system |
| Brand | SEG |
| Model | MS 1131DVD |
| Power supply | AC 100-240V, 50/60 Hz |
| Power consumption | ≤20 W |
| Radio tuner | FM 87.5 – 108 MHz, S/N ratio >46 dB |
| DVD player | NTSC/PAL/AUTO, resolution >500 lines, DAC 192 kHz/24 bits |
| Supported disc formats | DVD, VCD, SVCD, CD, CD-R/RW, MP3, JPEG |
| USB and memory card reader | USB 2.0, SD/MMC card, up to 8 GB (card) / 16 GB (USB) |
| Video outputs | CVBS (RCA), S-Video, SCART, HDMI (720p/1080i/1080p) |
| Audio outputs | Stereo RCA, digital coaxial (SPDIF) |
| Antenna input | FM (wired antenna supplied) |
| Audio signal-to-noise ratio | 95 dB |
| Audio distortion | <0.01% |
| Remote control | Yes, with batteries (type not specified, probably AAA) |
| Special functions | Zoom, A-B repeat, programming, subtitles, multi-angle, slow motion, frame by frame |
| Video settings | Brightness, contrast, hue, saturation, sharpness adjustable |
| Audio settings | SPDIF (RAW/PCM), tone, virtual surround mode (VSS), downmix LT/RT or stereo |
| Parental control | Rating (8 levels), password (default 0000) |
| Dimensions | Not specified |
| Weight | Not specified |
Frequently Asked Questions - MS 1131DVD SEG
User questions about MS 1131DVD SEG
0 question about this device. Answer the ones you know or ask your own.
Ask a new question about this device
Download the instructions for your Home Theater System in PDF format for free! Find your manual MS 1131DVD - SEG and take your electronic device back in hand. On this page are published all the documents necessary for the use of your device. MS 1131DVD by SEG.
USER MANUAL MS 1131DVD SEG
natural_image
Black and white photo of a desktop TV with a CD, remote control, and a digital display (no visible text or symbols)MINI-STEREOANLAGE MIT DVD
Benutzerhandbuch
Inhaltsverzeichnis

DVD: Normale Wiedergabe → ZL1/2 → ZL1/3 → ZL1/4 → ZL1/5 → ZL1/6 → ZL1/7
Audio: Stereo (RCA), digital koaxial
HF-Antenne UKW Radio

Locations and function of the player6
Connection 8
Remote Control 10
DVD Operation 12
Radio Operation 18
USB/CARD 18
Troubleshooting 19
Specification 21
Safety Information
Please read the following instructions and safety notes thoroughly before starting to use your product!
Intended Use: this product has been designed for playing back DVD/CD discs and reception of Radio broadcast. If the product is not used according to the instructions, the user's and other persons' safety is not guaranteed and the warranty will be void.
User manual: please read this User Manual thoroughly and keep it for any future reference in a safe place. For your own safety and in order to familiarize yourself with the different functions of the product, please follow the instructions in this manual carefully.
When passing this product to other persons, please also hand over this User Manual.
Please also read the user manuals of all devices that you are going to connect to this device.
Connecting to the Power Supply: do not use the device if the device or its cables present visible damage.
Connect the device only to the voltage indicated on the corresponding label on the product. Never connect the device to a different voltage. Connect the device to grounded power outlets that comply with the corresponding safety standards only. Do not bend or squeeze the cables.
WARNING: Inside the device there is dangerous voltage. Never open the housing of the device: there is risk of personal injury by electric shock.
Make sure that you can remove the power plug at any time. Always pull the power cord from the plug and never from the cable itself. Electric storms may damage any electric equipment; therefore disconnect the power plug from the wall outlet during a thunderstorm. It is also recommended to disconnect the device from the mains and to remove any batteries when you are intending not to use the device for a longer time.
Objects inside the device: make sure that no foreign objects or liquids enter the device via the ventilation holes or other openings. There is risk of electric shock, damage to the device and short-circuit. In case of any emergency, immediately pull the power plug and contact a qualified service technician.
DVD-Mechanism: Caution: do not put anything except an appropriate disc into the compartment. Foreign objects can damage the mechanism. Never place more than one disc into the disc compartment at any time.
Keep the compartment closed when not in use to prevent dirt and dust from entering the mechanism.
Laser product: DVD-products employ a laser system (Class 1 Laser). To ensure proper use of this product please read this owner's manual carefully and retain for future reference. There is laser radiation inside the device. Laser radiation can damage your eyes permanently. To prevent direct exposure to the laser beam, do not try to open the enclosure. Never attempt to repair the device. Hazardous laser radiation when open and interlock failed or defeated. DANGER: do not expose yourself to the laser beam!
Installation: place the device onto a reliable, flat and even surface; do not stand it on soft furnishings. Never cover the ventilation holes of the device and make sure that the air can easily flow around the device (keep at least 10 cm / 4 inch space on the back and sides).
The device has anti-skid rubber feet. Over the long-term, these feet can dissolve due to chemical substances. It is recommended that you place the device on an anti-skid surface.
WARNING: do not use this device outdoors!
Condensation: when bringing this device from a cold to a warm environment (e.g. after transportation) moisture can condensate inside the device. In order to protect the device from damage and failure wait at least 2 hours prior to using the device.
Health injury: extremely high audio volumes can damage your hearing permanently. Therefore carefully adjust the volume, specially if you enjoy sound via headphones or earphones (option).
Connect the headphones or earphones to the device (if available - option) prior to powering it on, as connecting it when already powered on can produce high sound levels causing damage to your hearing.
Children: Do not allow children to play with electrical devices. Children may not be able to comprehend the presence of potential risks.
Batteries: Keep batteries away from children.
Always replace all the batteries at the same time (never mix old and new batteries). Do not short-circuit any batteries. Keep batteries away from any heat sources (direct sun radiation, fire etc.). There is risk of explosion when misusing the batteries.
Do not place any objects on the device and never apply any pressure onto the housing or the display. Do not place any recipients containing liquids (beverages, vases, etc.) onto or next to the device. Do not place any fire sources (such as candles) onto the device. This could damage the product.
Environmental effects: Keep the device away from any heat sources (heating equipment, ovens, cooking places, candlelight, etc.), direct sun radiation, dirt, dust, vibrations, strong magnetic fields, moisture and rain.
Antenna: If your unit is equipped with a TV or radio receiver (option), which you want to connect to an antenna installation, please note the following: antenna installations need to be grounded according to regulations, which need to get observed.
Note: If the unit will not be used for a longer period of time or during a thunderstorm, please disconnect the power plug, as well as the connection to the antenna.
Cleaning: Disconnect from the mains supply. Clean the device with a soft, slightly moistened cloth. Do not use any chemicals, alcohol or solvents for cleaning. The finish of the device can be damaged by using these substances.
Always make sure that no moisture enters the device.
Servicing: when using the device according to the operating instructions, no special service or maintenance is required. In case of any loss of performance or other malfunction, contact a qualified service technician.
Repairs: never open the device! Any repairs must be performed by authorized technicians or service personnel. Any unauthorised opening or modification will void the warranty and also the safety of the product may be altered.
WARNING: Inside the device there is dangerous voltage. Never open the housing of the device: there is risk of personal injury by electric shock.
If any of the following situations arises, get the equipment checked by an authorized service technician:
- the equipment has been exposed to moisture.
- the equipment has been dropped and damaged.
- the equipment has obvious sign of breakage.
- the equipment has not been working well or you cannot get it work according to user's manual.
"The region number for this DVD Player is

EnvironmentEnvironment
Old batteries do not belong in with the domestic waste! Old batteries do not belong in with the domestic waste! Consumers are obliged by law to return any old batteries and rechargeable batteries to the corresponding local and/or public collection centres or to return them to the retail shops. This ensures that batteries will be disposed of respecting the environment. Make sure to return any batteries and rechargeable batteries discharged.
Disposal of old electric and electronic devices: Disposal of old electric and electronic devices:

The icon of a dashed-out waste bin means that a separate disposal of electric/electronic equipment is necessary.
According to the Legislation of the European Union, any electric and electronic devices may not be disposed of with domestic trash but must be returned to a special collection center enabled for the recycling of these devices. The local waste companies should have set up specific
collecting centres for this purpose, allowing private consumers to return any old devices for free. Please contact your local authorities or the local waste company for the available disposal possibilities.
Please support us actively by protecting the environment and recycle this product accordingly by returning it to a specific collection centre. This will protect the environment, other people and yourself. Thank you very much!
Disposal of Packaging and Packaging Materials: Disposal of Packaging and Packaging Materials:
Packaging and any packaging materials do not belong in with the domestic waste! Your system consists of materials which can be recycled and reused if disassembled by a specialized company. Please observe the local regulations regarding the disposal of packaging materials.
Warning
■ To prevent the risk of electric shock, do not open the cover or the back of the receiver.
■ Do not block the ventilation holes of the device. Leave appropriate gap above and around it to allow for adequate ventilation.
■ Do not place the device in an unventilated cabinet or on top of a unit which emits heat.
Copyright Statement
No part of this publication may be reproduced in any form by any means without the prior written permission. Other trademarks or brand names mentioned herein are trademarks or registered trademarks of their respective companies.
Disclaimer
Information in this document is subject to change without notice. The manufacturer does not make any representations or warranties (implied or otherwise) regarding the accuracy and completeness of this document and shall in no event be liable for any loss of profit or any commercial damage, including but not limited to special, incidental, consequential, or other damage.
Dolby
Manufactured under license to Dolby Laboratories. «Dolby» and the double-D symbol are trademarks of dolby laboratories.
ROVI
This item incorporates copy protection technology that is protected by U.S. patents and other intellectual property rights of Rovi Corporation. Reverse engineering and disassembly are prohibited.
Locations and Function of the Player
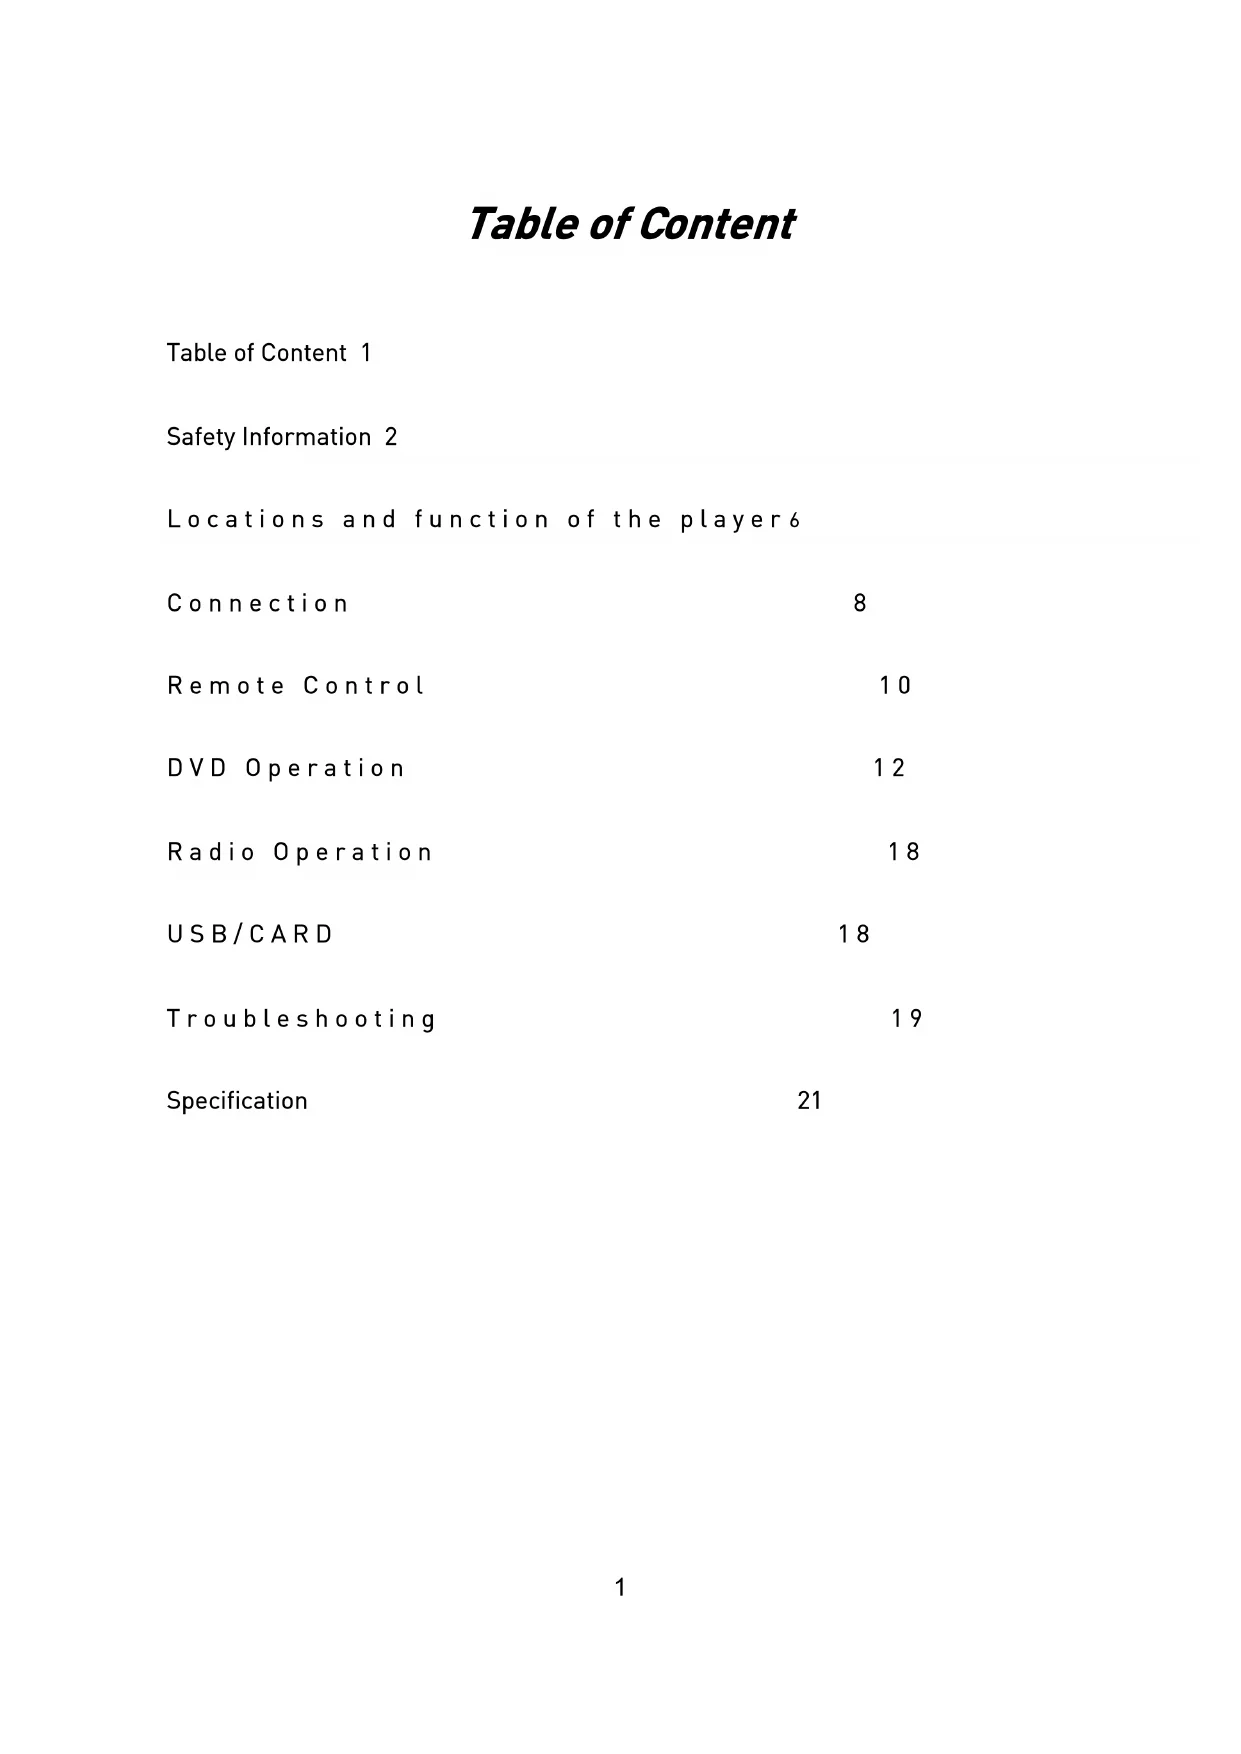
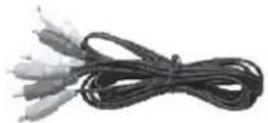
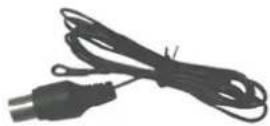
ACCESSORIES
• Audio/Video cable.....1
• FM cable.....1
- Owner's manual......1
- Batteries......2
- Remote control......1
Audio/Video cable
FM cable

Two batteries

Owner's manual
Remote control
Front View
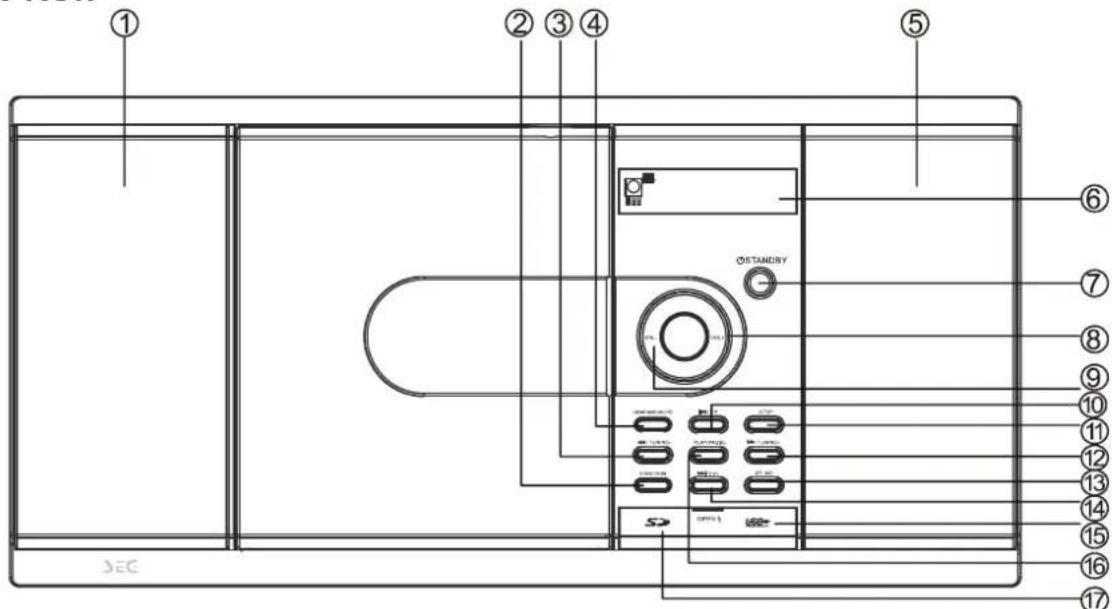
- & 5. Speakers
- FUNCTION button
- ◀◀/TUNING - button
- USB/CARD/AUTO
- STANDBY button
-
VOL+ button
9.VOL-button -
Display window/Remote sensor▶▶/CH+ button4.
/COH.-button
- STOP button
▶▶ 12. /TUNING+ button
- ST/MO button
▶▶▶/CH+ button4.
-
USB interface
-
PLAY/PAUSE button
-
CARD-Slot
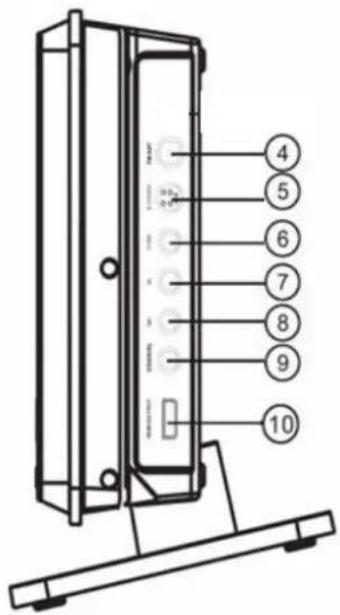
Side View
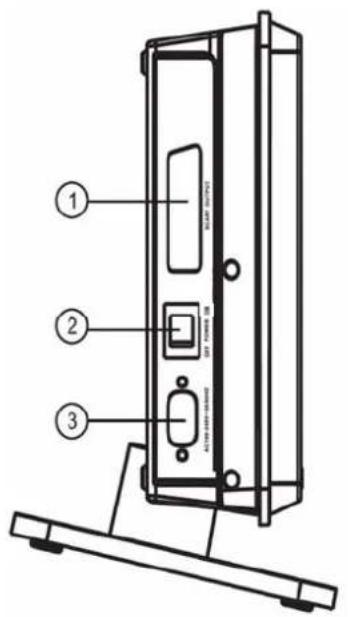
- SCART OUTPUT
- POWER switch
- AC 100-240V 50/60Hz power supply input
- FM ANT jack
- S-VIDEO jack
- Video output jack (CVBS)
- AUDIO L OUTPUT jack (ML)
- AUDIO R OUTPUT jack (MR)
- COAXIAL jack
- HDMI OUTPUT
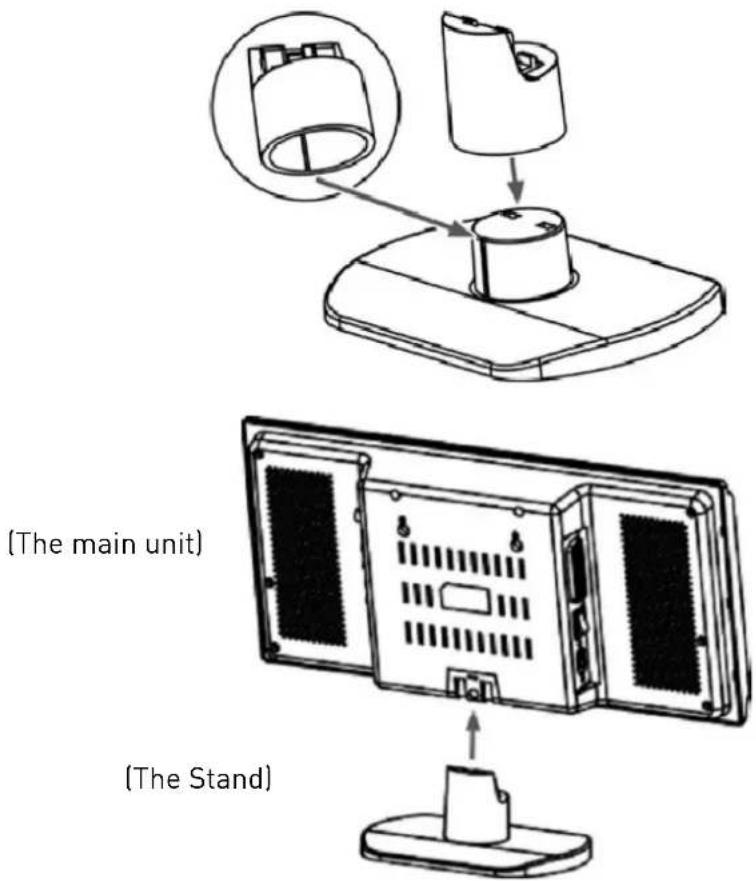
Installation
FOR TABLE TOP USE
The stand is attached to the main unit for table top use as the figure below.
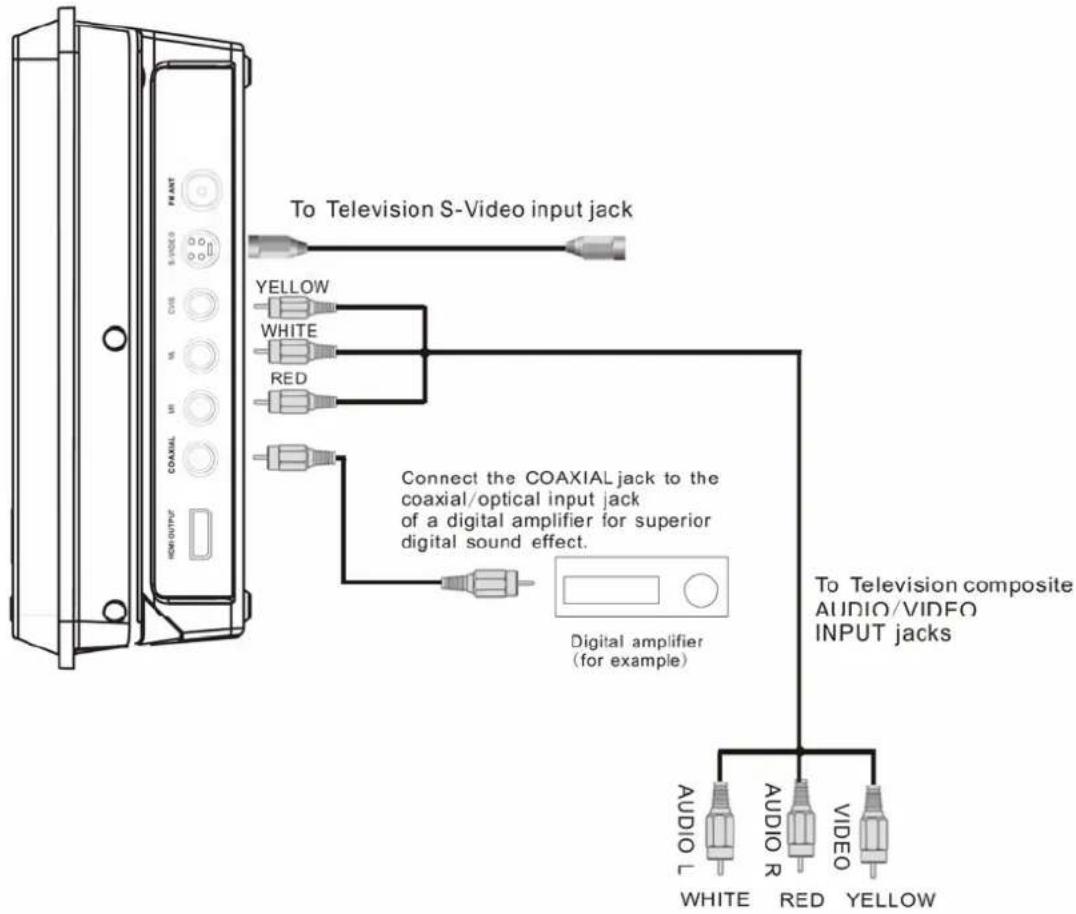
Connection
Connecting to Television/Amplifier
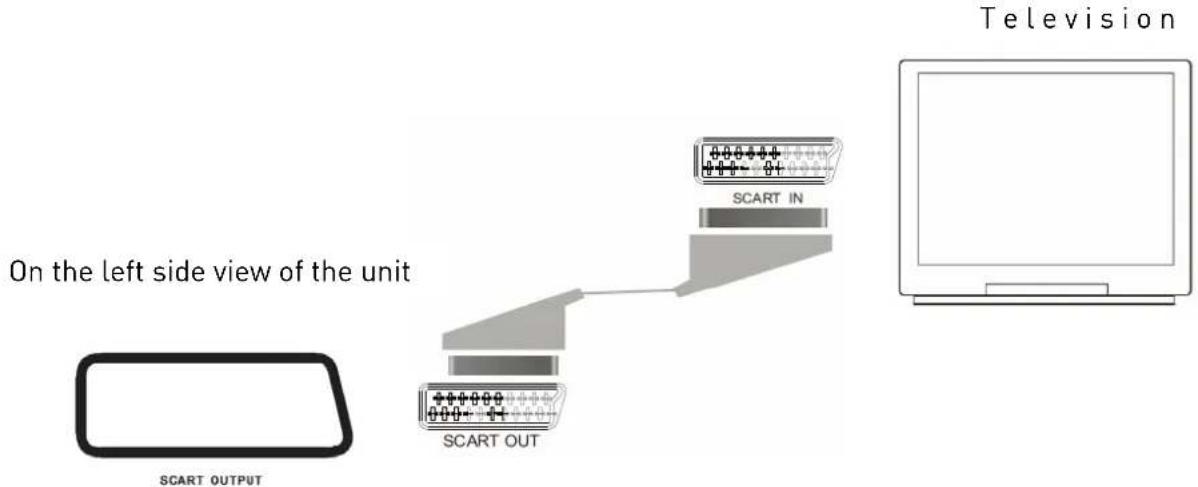
On the left view of the unit, there is a SCART OUTPUT interface. Use the SCART cable to connect the main unit to the SCART IN interface of the TV unit.
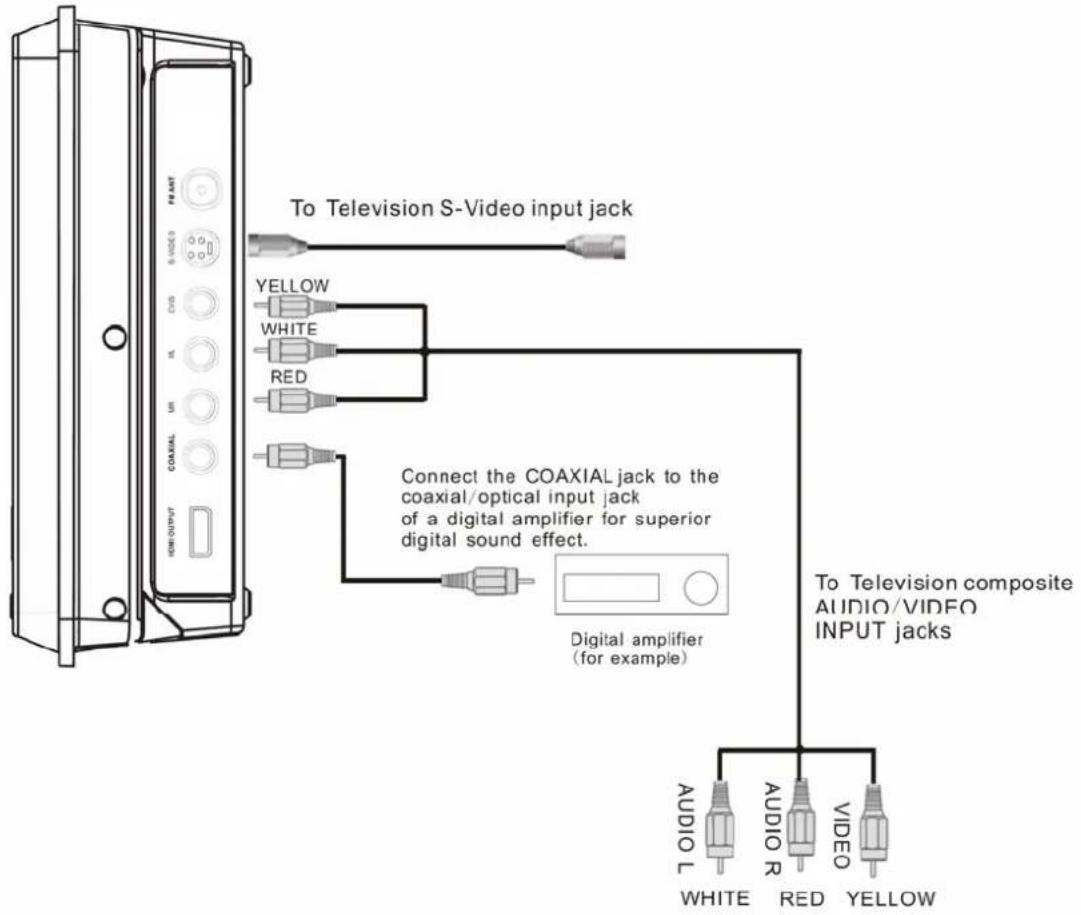
AUDIO/VIDEO OUTPUT CONNECTIONS
flowchart
graph TD
    A["Device with COAXIAL/VIDEO INPUT jack"] -->|To Television S-Video input jack| B["Yellow"]
    A -->|To Television S-Video input jack| C["White"]
    A -->|To Television S-Video input jack| D["Red"]
    A -->|To Television S-Video input jack| E["Black"]
    A -->|To Television S-Video input jack| F["Digital amplifier (for example)"]
    A -->|To Television composite AUDIO/VIDEO INPUT jacks| G["AUDIO L"]
    A -->|To Television composite AUDIO/VIDEO INPUT jacks| H["AUDIO R"]
    A -->|To Television composite AUDIO/VIDEO INPUT jacks| I["RED"]
    A -->|To Television composite AUDIO/VIDEO INPUT jacks| J["VIDEO"]
    A -->|To Television composite AUDIO/VIDEO INPUT jacks| K["YELLOW"]
Connection
IMPORTANT!
- There are various ways to connect the system to TV. You only need to make one of the best connections, depending on the capabilities of your TV system. If your TV system has HDMI-input, we recommend to use HDMI connection!
- If component video output jack or S-Video jack is used for video connection, the system's Component setting will need to be set accordingly. Details are shown in VIDEO setup under the "SYSTEM SETUP".
* Connect the CVBS jack (video output) to the video input jack on the TV.
OR
Connect the S-VIDEO output jack to the S-VIDEO input jack on the TV using the S-VIDEO cable.
HDMI Connection
Connecting using the HDMI cable guarantees very good playback quality.
Use HDMI to transmit video as well as audio data.
-
Plug the HDMI connector into the jack on the right side of the device.
-
Plug the HDMI connector into the corresponding jack on your play-back unit.
Remote Control
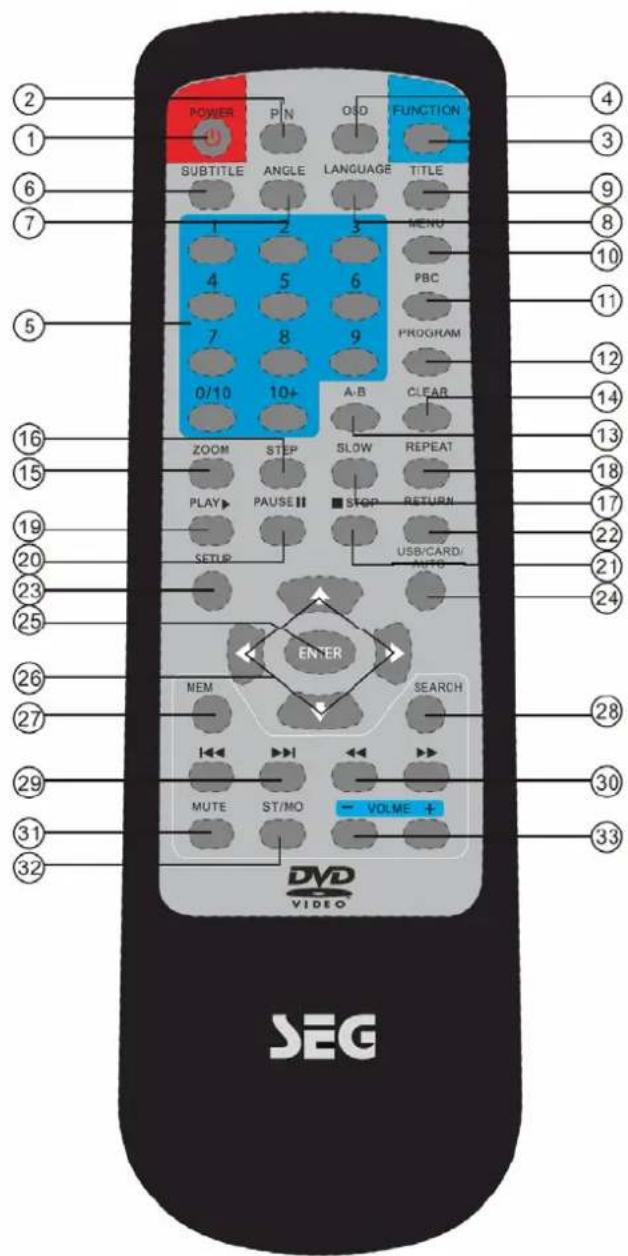
Buttons of the Remote Control:
- POWER button: press to turn on or off the unit.
- P/N button: press to select AUTO, NTSC or PAL mode.
- FUNCTION button: press to select the different mode, such as DVD, radio, USB, SD mode.
- OSD button: In media play mode, press to display OSD (the on-screen display) information.
- Numeric buttons (0-9, 10+): press to input number to select the track or channel.
- SUBTITLE button: press to select the subtitle language.
- ANGEL button: press to change the view angle on multi-angle DVD disc
- LANGUAGE button: press to display the audio information of the DVD/VCD disc.
- TITLE button: press to display the title menu of the DVD disc.
- MENU button: press to display/exit the menu information of the disc.
Remote Control
- PBC button: for VCD/SVCD, press to turn PBC (Playback Control) on or off in PBC mode.
- PROGRAM button: In media play mode, press to enter into program mode to play the track in your desired sequence.
- A-B button: press to repeat play the part you selected.
- CLEAR button: clear the program list and the number you input.
- ZOOM button: press to allow the picture to be increased in size
- STEP button: press to enter the step play.
- SLOW button: For some discs, press to start slow forward function.
- REPEAT button: press to switch the repeat modes of the program.
- PLAY button: press to play the playback.
- PAUSE button: press to pause the playback.
- STOP button: press once to enter pre-stop mode, press twice to enter stop mode.
- RETURN button: press to return to the previous menu.
- SETUP button: press to enter the DVD setup menu in DVD mode.
- USB/CARD/AUTO button: in DVD mode, press to select USB or CARD mode.
- ENTER button: press to confirm your selection.
- ← / →, ↑/ ↓ button: In case of menu mode, the buttons served as cursor buttons to select item left/right, up/down. Press ← / → to search the station manually in radio mode.
- MEM button: press to store the station into memory in radio mode.
- SEARCH button: press to search the stations automatically in radio mode.
- I◄◄/►press to select the channel down or up in radio mode.
- ◀◀/▶ In media play mode, press shortly to skip to the previous/next track. Press and hold it to activate fast reverse/forward function. In radio mode, press it to seek the frequency automatically.
- MUTE button: press to mute/resume the sound.
- ST/MO button: in radio mode, press to switch stereo or mono mode.
- VOLUME+/- button: press to adjust the volume level.
Insert batteries and Operation radius
Insert the battery into the receptacle and insert the receptacle into the remote.
For the best results, aim the remote towards at the player, screwing window. Stay within 5 meters and angles of 60 degrees or less.
Under normal use the battery will last for one year.
Remove battery during storage or when you are not using the DVD player for a long time.
Notes:
- Weak batteries can leak and several damage by the remote control.
- Leaking out battery acid can damage your health.
- Remove the battery from the battery compartment as soon as it is exhausted or if the remote control is not going to be used for a longer period of time.
- Wipe up leaked out battery acid with a cloth.
- In case of skin contact immediately wash the affected area.
- Seek medical advice if battery acid has been swallowed. In case of contact with your eyes wash out the eyes and seek medical advice.
DVD Operation
※ OPEN/CLOSE THE COVER
Open the top cover of the unit directly to display the disc tray. Then place the disc with the label facing up. Then close the cover and start disc play.
When playing a DVD disc in the DVD player:
1) The disc will be played automatically and stop at menu picture.
Use ← / →, ↑/ ↓ cursor buttons on the remote control to move between the highlight bars in the menu.
2) Press ENTER button on the remote control to confirm the selected item.
3) You can press MENU or TITLE button on the remote control to return to the menu or title menu of the DVD disc.
※ STOP PLAYBACK
Press STOP button on the remote control to stop the playback. Then press PLAY on the remote control or press ▶ on the front panel of the player to start play.
During playing, press ▶▶/l on the remote control or / buttons on the front panel during playback will skip to the previous/next track.
Note: For some VCD2.0 discs (PBC-playback control), ▶▶/I◀buttons may be unavailable.
Note you can use the numeric buttons (0-10) and 10+ button on the remote control to select the track directly.
Press ▶II on the unit or PAUSE button on the remote control during playback will stop playback temporarily. To return to normal playback, press ▶II or PLAY button on the remote control.
※ RAPID FORWARD/RAPID REVERSE
Hold press ▶▶▶/▶◀◀ on the remote control or hold press ▶▶▶/▶◀◀ on the unit during playback.
Each time the button is pressed, the speed of rapid forward /reverse changes according to the disc.
Press SLOW on the remote control during play. Each time the button is pressed, the speed of slow forward (SF) changes according to the disc as follows.
DVD: Normal playback → SF1/2 → SF1/3 → SF1/4 → SF1/5 → SF1/6 → SF1/7
In slow motion state, click PLAY icon on the screen or press ▶ or PLAY/PAUSE button, normal playback to recover normal playback.
Press the OSD button on the remote control or click OSD icon on the screen during playback to display the console information of the current disc on the screen.
For an example (when playing a DVD disc):
Once you press OSD button on the remote control or click OSD icon on the screen you will see the information as the following order.
DVD Operation
| DVD | TT | 3/5 | CH | 1/17 | C | 00:01:49 |
| DVD | TT | 3/5 | CH | 1/17 | ∅ | 00:01:50 |
| OFF | OFF | OFF | ||||
| DVD | TT | 3/5 | CH | 1/17 | C | -00:05:16 |
| DVD | TT | 3/5 | CH | 1/17 | T | 00:01:56 |
| DVD | TT | 3/5 | CH | 1/17 | T | -01:43:40 |
1) Item: TT
Function: Display the current title number and total title number.
2) Item: CH
Function: Display the current chapter number and total chapter number.
3) Item: Ⓞ (This icon only displayed for several seconds, after several seconds it will disappeared.)
Function: Display the played time of the current chapter.
4) C-: Display the remaining time of the current chapter.
5) T: Display the played time of the current title.
6) T-: Display the remaining time of the current title.
7) C: Display the played time of the current chapter.
8] OFF OFF OFF
Display the current disc's language, audio type, subtitle language and play angle.
Note: The displayed information is different according to different type of discs.
Repeat play: when you want to repeat playing the whole disc or a track or a chapter in the disc.
■ Press REPEAT button on the remote control repeatedly to select different repeat modes.
■ For different kinds of discs, pressing REPEAT button has different effects.
For example:
DVD:
REP:[OFF]→ REP:[CHAPTER]→ REP:[TITLE] → REP:[REP ALL]
Note: REPEAT feature does not support VCD2.0 (with PBC ON).
Paragraph play: When you want to play a paragraph repeatedly, A-B repeat allows a passage to be repeated continuously.
1) Press A-B button first at the start of the required passage: REPEAT A-
2) Press A-B button secondly at the end of the passage: REPEAT A-B
Then the unit will repeat playing the passage you just set from A to B.
3) Pressing A-B button again will exit repeating mode, and "A-B CANCEL" will be displayed on the screen.
※ ZOOM FUNCTION
Allows the picture to be increased in size. Press ZOOM button on the remote control to toggle among 2 scale, 3 scale and 4 scale, 1/2 scale, 1/3 scale, 1/4 scale.
When the scale is 1/4 times, press ZOOM button again to cancel the zoom function.
During Zoom mode, press ← / →, ↑/ ↓ buttons on the remote control to move pictures up, down, left or right direction.
DVD Operation
Multi-subtitle Language Function
Press SUBTITLE on the remote control during playback. The corresponding information will be shown on the screen.
Each time the button is pressed, the subtitle language changes in sequential order.
Notes:
- The language number is different according to the disc.
- Some discs only contain one subtitle language.
Multi-audio Language Function
Press LANGUAGE button on the remote control during playback. The corresponding information will be shown on the screen.
Each time the button is pressed, the audio soundtrack language changes on sequential order.
Notes:
- The language number is different according to the disc.
- Some discs only contain one soundtrack language.
Multi-angle Function
Press ANGLE button on the remote control during playback. The corresponding information will be shown on the screen.
Each time the button is pressed, the angle changes in sequential order.
Notes:
- The angle number is different according to the disc.
- The function only works for discs having scenes recorded at different angles.
※ FUNCTION FOR VCD
Press LANGUAGE button on the remote control on the main unit during playback to change the channel.
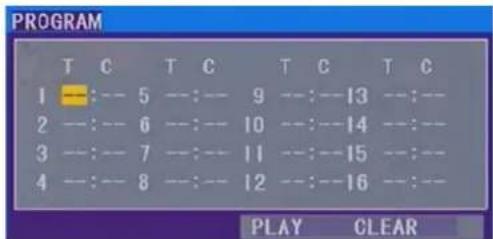
※ PROGRAM PLAY
In program play mode, you can play the track in your desired sequence.
To program play a disc, please follow the next instructions.
For VCD/CD:
1) In PBC OFF mode. Press PROG button on the remote control to enter program edit interface.
2) Use ← / →, ↑/ ↓ cursor buttons to select the items you want to program. The items you selected will become highlight.
3) Input the sequence number you want to program by numeric buttons (0-9) on the remote control.
4) Use cursor buttons to select PLAY character, then press ENTER button on remote control to confirm. The unit will play the tracks you programmed.
5) If you want to clear the program, use cursor buttons to select CLEAR character and press ENTER will clear the information you have programmed.
DVD Operation
For DVD/MP3:
The operation is the same as VCD/CD operation.
Press PROG button on the remote control the following media play window will be shown on the screen:
In DVD mode, when the disc is playing or in stop mode, press SETUP on the remote control to enter setup menu.
When the cursor is on the topside, use ← / → buttons to move between the different pages, such as SYSTEM SETUP, LANGUAGE SETUP, AUDIO SETUP, VIDEO SETUP and DIGITAL SETUP.
* Press ↓ button to move the cursor to the setup page below and then you can use ↑/ ↓ buttons to move between the different setup options.
* Press → button to display the choice list for each setup option and then use ↑/ ↓ buttons and ENTER button to change your selection.
1) SYSTEM SETUP
When you open the setup menu, you will see the system setup page at first, see below:
TV SYSTEM
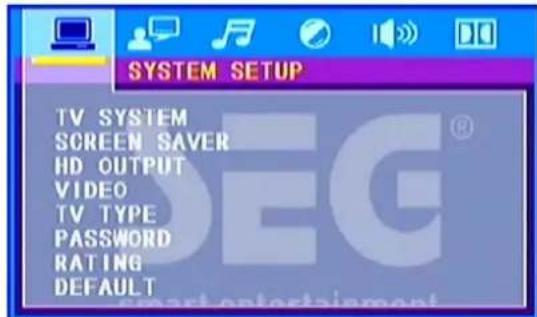
According to the color system of the TV, you can choose the TV system.
* NTSC: Choose this setting if your DVD player is connected to a NTSC TV.
* PAL: Choose this setting if your DVD player is connected to a PAL TV.
* AUTO: Choose this setting if your DVD player is connected to a multi-system TV.
SCREEN SAVER
Select Screen saver item to set on or off to activate the screen saver or deactivate the screen saver.
HD OUTPUT
On the side of the unit, there is a HDMI interface.
Select HD OUTPUT item to set HD OFF, 720P, 1080I or 1080P.
VIDEO
According to the TV type of line out connection, the choices are S-VIDEO and TV-REG.
*TV-RGB: Choose this setting if your DVD player is connected to a TV with a scart cable.
*CVBS: Choose this setting if your DVD player is connected to a TV with composite video cables.
DVD Operation
TV TYPE
*4:3PS (Pan&Scan): for standard TV, a full-height screen display with the sides trimmed.
*4:3LB (Letter Box): for standard TV, a 'wide-screen' display with black bars on the top and bottom.
*16:9 (Wide Screen): for wide-screen TV (frame ratio 16:9).
PASSWORD
Change the PASSWORD lock or unlock, the default PASSWORD is "0000".
RATING
The rating feature is a rating limit system, like movie rating. It works with DVD discs that have been assigned a rating. This helps you control the types of DVDs that your family watches.
There are eight rating options, such as 1KID SAFE, 2G, 3PG, 4PG13, 5PG-R, 6R, 7NC-17, 8ADULT.
Notes: If the password option is locked, you can not set the ratings limit. The rating limit does not work when the password option unlocked.
DEFAULT
Choose this option to resume all the setup options to default settings.
2) LANGUAGE SETUP
The language setup page is displayed as below:
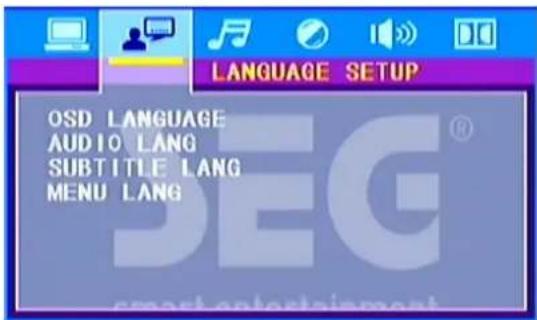
In this setup page, you can adjust the desired OSD language, audio language, subtitle language and menu language, such as English, German, Spanish, and Italian.
3) AUDIO SETUP
AUDIO OUT
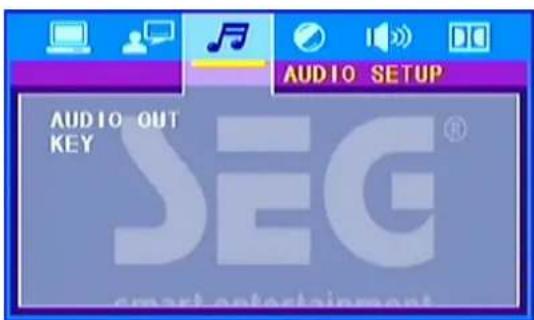
*SPDIF/OFF: Disable digital output.
*SPDIF/RAW: The device supports multi-channel audio formats.
DVD Operation
*SPDIF/PCM (pulse Code Modulation): The device is not capable of decoding multi-channel audio. Audio is downmixed to two-channel sound.
KEY
Use the ↑/ ↓ buttons to adjust the tone among a certain range.
4) VIDEO SETUP
The video setup page is displayed as below:
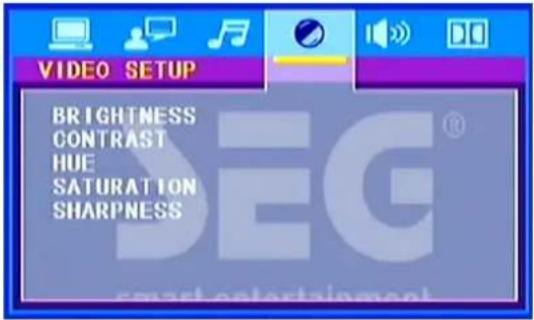
Use the ↑/ ↓ buttons on the remote control to adjust the value of the BRIGHTNESS, CONTRAST, HUE, SATURATION and SHARPNESS among a certain range.
5) SPEAKER SETUP
The speaker setup page is displayed as below:
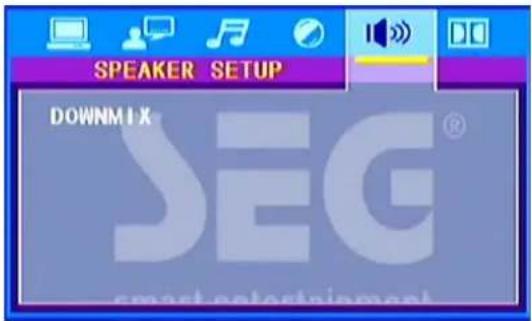
DOWNMIX
*LT/RT: When playing disc with Dolby Pro Logic effect, the disc information will be decoded.
*STEREO: Select this mode for Stereo sound using only two speakers.
*VSS: Select to create a Virtual Surround Sound using all speakers.
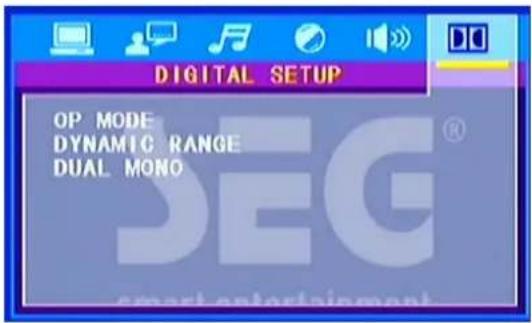
6) DIGITAL SETUP
Radio Operation
With the unit you can listen radio by using the FM Radio Tuner. Plug the FM antenna into the FM antenna jack on the right side of the main unit.
Press the FUNCTION button to select the radio mode.
If you use the first time the Radio, you should start to search the Radio stations.
AUTO SEARCH
Press the SEARCH button on the remote control or AUTO button on the main unit to start the searching automatically.
Press ◀◀/▶▶buttons on the remote control to start auto search, but it will stop when one station searched.
MANUAL SEARCH
Press the / buttons on the remote control or to adjust the frequency step by step manually.
SELECTING CHANNEL
Press the CH+/- buttons on the main unit or ▶▶I/I◀◀ buttons on the remote control to select channel up or down.
MEMORY
Press the MEM button on the remote control to store channel. If you have searched a Radio station by manual search, you can store it into memory by press MEM.
You can press the numeric buttons to input the frequency.
STEREO/MONO
Press the ST/MO button on the main unit to set the reception between mono mode or stereo mode.
USB/CARD Operation
USB/CARD Operation
Open the cover on the front of the main unit, you will see the USB and CARD interface.
This DVD player plays/views MP3, WMA, or JPEG files that are stored on USB device or memory card.
Playback Video
1 Connect a USB flash drive or a memory card to the USB jack or memory card interface on this DVD player.
2 Press FUNCTION button to select USB or memory card mode. A contents menu is displayed and play starts.
3 Select a file to play if play does not start automatically.
4 To stop play, press Stop button.
· If the device does not fit into the USB jack, connect it through a USB extension cable.
All the operations you can refer to the DVD operation.
Notes: The USB-host function and SD/MMC-card reader function of this product does not guarantee the compatibility with all of USB or SD/MMC memory devices.
Troubleshooting
What might appear to be a malfunction in your unit may just be the result of slight misoperation or miswiring. Before calling service, first check the following table for possible problems.
Under no circumstances should you try to repair the player yourself, as this will invalidate the warranty. Only qualified service personnel can remove the cover or service this player.
The power does not turn on.
The lead wires are not connected properly to the connectors.
■ Make sure the connection is correct.
The remote control does not work. The unit does not operate even when the correct buttons on the remote control are pressed.
▶ Battery capacity is low.
■ Install new batteries.
Some operations are disabled in specific states.
■ Enter the correct mode.
The disc can not play.
➢ Disc is of poor quality or damaged or not clean.
■ Clean or replace the disc with one of higher quality.
The disc installed is not supported by the unit.
■ Examine the disc type.
The disc installed is not compatible with the video system.
■ Replace the disc with one compatible with your video system.
Nothing happens when the button are pressed.
An optional unit required to listen to each source is not connected yet.
■ Connect the optional unit correctly.
The computer chip in the unit is not functioning normally.
No video image appears.
The video connection is not correct.
■ Make proper connections.
The sound quality is poor or distorted.
The speakers are not wired correctly.
■ Reconnect the speaker wires correctly.
The sound/picture skips on a DVD/VCD/CD/MP3.
The disc is scratched or dirty.
■ Clean the disc.
A track will not play.
➢ Random play has been selected.
■ Turn off random play.
A VCD cannot be played using menus.
The VCD disc being played is not compatible with PBC.
■ Menu playback is available only with VCD discs recorded with PBC.
Troubleshooting
The viewing angle cannot be changed.
The DVD disc being played does not contain the recording of more than one angle.
The viewing angle cannot be changed when the DVD disc being played does not contain the recording of more than one angle.
You are attempting to switch the angle in a DVD section where more than one angle is not recorded.
■ More than one viewing angle may be recorded only in limited sections in a disc.
Radio reception is poor.
The antenna is not connected well.
■ Check the radio antenna.
Specification
General
Power
| AC: | AC |
| Power consumption: | ≤slant 20 W |
100-240V
Radio Tuner
| Frequency FM 87.5 - 108MHz | |
| S/N Ratio | >46 dB |
| Monophonic | >46 dB |
DVD-Player
TV System NTSC/PAL/AUTO
Resolution Ratio Greater Than 500 lines
Video S/N Ratio 65 dB
Frequency Response 96 kHz /24bit
4 Hz - 44 kHz +/-2 dB
Audio S/N Ratio 95 dB
Degree of Distortion < 0.01%
D/A Converter 192 kHz / 24 bit
Video Out 1 V p-p
S-Video Out Y: 1 V p-p (75)
S-Video Out C: 0.3 V p-p (75)
Interface
| Video: | CVBS (RCA), S-Video, SCART, HDMI |
| Audio: | Stereo (RCA), digital coaxial |
| RF-Antenna | FM Radio |

This product's packing materials are recyclable and can be reused. Please dispose of any materials in accordance with your local recycling regulations. This product consists of materials which can be recycled and reused if disassembled by a specialized company.
Batteries should never be thrown away or incinerated but disposed of in accordance with your local regulations concerning chemical wastes.

This appliance complies with European Safety and Electrical directives. It fulfills the following EU regulations:
EN60065:2002+A1:2006+A11:2008
En 55013:2001+A1:2003+A2:2006
EN 55020:2007
EN 61000-3-2:2006
Table des matières
- & 5. Haut-parleurs
10.
/ Touche CH-
- SORTIE PÉRITEL
- Bouton MARCHE-ARRÊT
- Entrée d'alimentation CA 100-240 V, 50/60 Hz
- Prise Antenne FM
- Prise S-VIDÉO
- Sortie Vidéo (CVBS)
- SORTIE AUDIO GAUCHE (ML)
- SORTIE AUDIO DROITE (MR)
- Prise COAXIALE
- SORTIE HDMI
Installation
POUR UNE UTILISATION SUR UNE TABLE
DVD : Lecture normale → SF1/2 → SF1/3 → SF1/4 → SF1/5 → SF1/6 → SF1/7
RATING (Classification)
- & 5. Altoparlanti
- Pulsante FUNCTION
- ◀◀/Pulsante TUNING -
- USB/CARD/AUTO
- Finestra display/Sensore telecomando
- Pulsante STANDBY
-
Pulsante VOL+
9.Pulsante VOL- -
◀◀/Pulsante CH -
- Pulsante STOP
- /Pulsante TUNING+
- Pulsante ST/MO
14.▶▶I/Pulsante CH+
15.Interfaccia USB - Pulsante PLAY/PAUSE
- Slot per scheda memoria
Veduta laterale


- USCITA SCART
- INTERRUTTORE ALIMENTAZIONE
- Entrata di CA 100-240V 50/60Hz
- Entrata SANT FM
- Connettore S-VIDEO
- Uscita video (CVBS)
- USCITA AUDIO S
- USCITA AUDIO D
- Connettore COASSIALE
- USCITA HDMI
Installazione
PER USO DA TAVOLO
flowchart
graph TD
    A["Start"] --> B["SCART IN"]
    B --> C["SCART OUT"]
    C --> D["End"]
natural_image
Simple line drawing of a flat-screen computer monitor (no text or symbols)COLLEGAMENTI USCITA AUDIO/VIDEO
Collegamento
IMPORTANTE!
SCREEN SAVER (SALVASCHERMO)
5) SPEAKER SETUP (IMPOSTAZIONE ALTOPARLANTI)
service@schmid-electronics.de
service@schmid-electronics.de


- Inhaltsverzeichnis
- Safety Information
- EnvironmentEnvironment
- Warning
- Copyright Statement
- Disclaimer
- Dolby
- ROVI
- Locations and Function of the Player
- ACCESSORIES
- Front View
- Side View
- Installation
- FOR TABLE TOP USE
- Connection
- Connecting to Television/Amplifier
- IMPORTANT!
- HDMI Connection
- Remote Control
- Buttons of the Remote Control:
- Insert batteries and Operation radius
- Notes:
- DVD Operation
- ※ ZOOM FUNCTION
- Multi-subtitle Language Function
- Multi-audio Language Function
- Multi-angle Function
- ※ FUNCTION FOR VCD
- ※ PROGRAM PLAY
- 1) SYSTEM SETUP
- SCREEN SAVER
- HD OUTPUT
- VIDEO
- TV TYPE
- PASSWORD
- RATING
- DEFAULT
- 2) LANGUAGE SETUP
- 3) AUDIO SETUP
- AUDIO OUT
- DOWNMIX
- Radio Operation
- AUTO SEARCH
- MANUAL SEARCH
- SELECTING CHANNEL
- MEMORY
- STEREO/MONO
- USB/CARD Operation
- Troubleshooting
- The power does not turn on.
- The disc can not play.
- Nothing happens when the button are pressed.
- No video image appears.
- The sound quality is poor or distorted.
- The sound/picture skips on a DVD/VCD/CD/MP3.
- A track will not play.
- A VCD cannot be played using menus.
- Specification
- General
- Power
- Radio Tuner
- DVD-Player
- Interface
- Table des matières
- POUR UNE UTILISATION SUR UNE TABLE
- RATING (Classification)
- Veduta laterale
- Installazione
- PER USO DA TAVOLO
- Collegamento
- IMPORTANTE!
- SCREEN SAVER (SALVASCHERMO)
Brand : SEG
Model : MS 1131DVD
Category : Home Theater System