
WF1602NHW - Washing machine SAMSUNG - Free user manual and instructions
Find the device manual for free WF1602NHW SAMSUNG in PDF.
| Product Type | Front-loading Washing Machine |
| Brand | Samsung |
| Model | WF1602NHW |
| Washing Capacity | 6.0 kg |
| Dimensions (W x D x H) | 600 mm x 450 mm x 850 mm |
| Net Weight | 54 kg |
| Electrical Supply | 220-240 V, 50 Hz |
| Maximum Heating Power | 2400 W |
| Maximum Spin Speed | 1200 rpm |
| Required Water Pressure | 50 - 800 kPa |
| Energy Class | A+ |
| Annual Water Consumption | 8580 L/year |
| Annual Energy Consumption | 195 kWh/year |
| Water Volume per Cycle | 48 L |
| Wash Programs | Cotton, Synthetics, Wool, Baby Cotton, Daily, Quick 15 min, Rinse+Spin, Spin |
| Wash Options | Prewash, Rinse+, Intensive, Delay Start (3-19 h) |
| Child Safety | Yes (button lock) |
| Routine Maintenance | Cleaning of drain filter, detergent drawer, and mesh filter |
| Repairability | Repairable by a Samsung authorized technician |
| Warranty | Standard manufacturer warranty (see terms) |
Frequently Asked Questions - WF1602NHW SAMSUNG
User questions about WF1602NHW SAMSUNG
0 question about this device. Answer the ones you know or ask your own.
Ask a new question about this device
Download the instructions for your Washing machine in PDF format for free! Find your manual WF1602NHW - SAMSUNG and take your electronic device back in hand. On this page are published all the documents necessary for the use of your device. WF1602NHW by SAMSUNG.
USER MANUAL WF1602NHW SAMSUNG
WF1702AH(A/C/D/F/G/H/R/S/T/V/W/Z)(G) WF1702NH(A/C/D/F/G/H/R/S/T/V/W/Z)(G) WF1700AH(A/C/D/F/G/H/R/S/T/V/W/Z)(G) WF1700NH(A/C/D/F/G/H/R/S/T/V/W/Z)(G) WF1602AH(A/C/D/F/G/H/R/S/T/V/W/Z)(G) WF1602NH(A/C/D/F/G/H/R/S/T/V/W/Z)(G) WF1600AH(A/C/D/F/G/H/R/S/T/V/W/Z)(G) WF1600NH(A/C/D/F/G/H/R/S/T/V/W/Z)(G) WF1702AM(A/C/D/F/G/H/R/S/T/V/W/Z)(G) WF1702NM(A/C/D/F/G/H/R/S/T/V/W/Z)(G) WF1700AM(A/C/D/F/G/H/R/S/T/V/W/Z)(G) WF1700NM(A/C/D/F/G/H/R/S/T/V/W/Z)(G) WF1602AM(A/C/D/F/G/H/R/S/T/V/W/Z)(G) WF1602NM(A/C/D/F/G/H/R/S/T/V/W/Z)(G) WF1600AM(A/C/D/F/G/H/R/S/T/V/W/Z)(G) WF1600NM(A/C/D/F/G/H/R/S/T/V/W/Z)(G)
Washing Machine user manual
Planet First
100% Recycled Paper
This manual is made with 100% recycled paper.
imagine the possibilities
Thank you for purchasing this Samsung product.
CE
SAMSUNG
contents
SETTING UP YOUR WASHING MACHINE
13
WASHING A LOAD OF LAUNDRY
21
CLEANING AND MAINTAINING YOUR WASHING MACHINE
29
TROUBLESHOOTING AND INFORMATION CODES
33
CALIBRATING YOUR WASHING MACHINE
34
CYCLE CHART
35
APPENDIX
36
13 Checking the parts
14 Meeting installation requirements
14 -electrical supply and grounding
14 Water Supply
15 Drain
15 Flooring
15 Surrounding temperature
15 Above or closet installation
15 Installing your washing machine
21 Washing for the first time
21 Basicinstructions
22 Using the control panel
24 Chile lock
24 Delay end
25 Washing clothes using the cycle selector
26 Washing clothes manually
26Laundryguidelines
28 Detergent and additives information
28 Which detergent to use
28 Detergent drawer
29 Draining the washing machine in an emergency
29 Cleaning the exterior
30 Cleaning the detergent drawer and drawer recess
31 Cleaning the debris filter
32 Cleaning the water hose mesh filter
32 Repairing a frozen washing machine
32 Storing your washing machine
33 Check these points if your washing machine...
34Informationcodes
34Calibrationmode
35Cyclechart
36 Fabric care chart
36 Protecting the environment
37Specifications
39 Sheet of household washing machines (eu only)
43 INformation of main washing programmes
English - 2
safety information
Congratulations on your new Samsung ActivFresh™ washer. This manual contains important information on the installation, use and care of your appliance. Please take time to read this manual to take full advantage of your washer's many benefits and features.
WHAT YOU NEED TO KNOW ABOUT SAFETY INSTRUCTIONS
Please read this manual thoroughly to ensure that you know how to safely and efficiently operate the extensive features and functions of your new appliance and retain it at a safe place near the appliance for your future reference. Use this appliance only for its intended purpose as described in this instruction manual.
Warnings and Important Safety Instructions in this manual do not cover all possible conditions and situations that may occur. It is your responsibility to use common sense, caution, and care when installing, maintaining, and operating your washer.
Because these following operating instructions cover various models, the characteristics of your washer may differ slightly from those described in this manual and not all warning signs may be applicable. If you have any questions or concerns, contact your nearest service center or find help and information online at www.samsung.com.
IMPORTANT SAFETY SYMBOLS AND PRECAUTIONS
What the icons and signs in this user manual mean:
| WARNING | Hazards or unsafe practices that may result in severe personal injury, death and/or property damage. |
| CAUTION | Hazards or unsafe practices that may result in personal injury and/or property damage. |
| CAUTION | To reduce the risk of fire, explosion, electric shock, or personal injury when using your washer, follow these basic safety precautions: |
| Do NOT attempt. | |
| Do NOT disassemble. | |
| Do NOT touch. | |
| Follow directions explicitly. | |
| Unplug the power plug from the wall socket. | |
| Make sure the machine is grounded to prevent electric shock. | |
| Call the service centre for help. | |
| Note | |
These warning signs are here to prevent injury to you and others.
Please follow them explicitly.
After reading this section, keep it in a safe place for future reference.

Read all instructions before using the appliance.
As with any equipment using electricity and moving parts, potential hazards exist. To safely operate this appliance, become familiar with its operation and exercise care when using it.
safety information

WARNING: To reduce the risk of fire, electric shock, or injury to persons when using your appliance, follow basic precautions, including the following:
Do not let children (or pets) play in or on your washing machine. The washing machine door does not open easily from the inside and children may be seriously injured if trapped inside.
This appliance is not to be used by persons (including children) with reduced physical, sensory or mental capabilities, or lack of experience and knowledge, unless they have been given supervision or instruction concerning use of the appliance by a person responsible for their safety.
Children should be supervised to ensure that they do not play with the appliance.
For use in Europe: This appliance can be used by children aged from 8 years and above and persons with reduced physical, sensory or mental capabilities or lack of experience and knowledge if they have been given supervision or instruction concerning use of the appliance in a safe way and understand the hazards involved. Children shall not play with the appliance. Cleaning and user maintenance shall not be made by children without supervision.
If the supply cord is damaged, it must be replaced by the manufacturer, its service agent or similarly qualified persons in order to avoid a hazard.
This appliance should be positioned so that the power plug, the water supply taps, and the drain pipes are accessible.
For appliances with ventilation openings in the base, that a carpet must not obstruct the openings.
The new hose-sets supplied with the appliance are to be used and that old hose-sets should not be reused.
CAUTION: In order to avoid a hazard due to inadvertent resetting of the thermal cut-out, this appliance must not be supplied through an external switching device, such as a timer, or connected to a circuit that is regularly switched on and off by the utility.
safety information

SeVeRe WARNING SiGNS FoR iINSTALLATION

The installation of this appliance must be performed by a qualified technician or service company.
- Failure to do so may result in electric shock, fire, an explosion, problems with the product, or injury.
The appliance is heavy, take care upon lifting it
Plug the power cord into an AC 220-240V/50Hz/15A wall socket or higher and use the socket for this appliance only. In addition, do not use an extension cord.
- Sharing a wall socket with other appliances using a power strip or extending the power cord may result in electric shock or fire.
- Ensure that the power voltage, frequency and current are the same as those of the product specifications. Failure to do so may result in electric shock or fire. Failure Plug the power plug into the wall socket firmly.
Remove all foreign substances such as dust or water from the power plug terminals and contact points using a dry cloth on a regular basis.
- Unplug the power plug and clean it with a dry cloth.
- Failure to do so may result in electric shock or fire.
Plug the power plug into the wall socket in the right direction so that the cord runs towards the floor.
- If you plug the power plug into the socket in the opposite direction, the electric wires within the cable may be damaged and this may result in electric shock or fire.
Keep all packaging materials well out of the reach of children, as packaging materials can be dangerous to children.
- If a child places a bag over its head, it may result in suffocation.
When the appliance or power plug or power cord is damaged, contact your nearest service centre.

This appliance must be properly grounded.
Do not ground the appliance to a gas pipe, plastic water pipe, or telephone line.
- This may result in electric shock, fire, an explosion, or problems with the product
- Never plug the power cord into a socket that is not grounded correctly and make sure that it is in accordance with local and national codes.

Do not install this appliance near a heater, inflammable material.
Do not install this appliance in a humid, oily or dusty location, in a location exposed to direct sunlight and water (rain drops).
Do not install this appliance in a location of low temperature
- Frost may cause tubes to burst
Do not install this appliance in a location where gas may leak.
- This may result in electric shock or fire.
Do not use an electric transformer.
- It may result in electric shock or fire.
Do not use a damaged power plug, damaged power cord or loose wall socket.
- This may result in electric shock or fire.
Do not pull or excessively bend the power cord.
Do not twist or tie the power cord.
English - 6
Do not hook the power cord over a metal object, place a heavy object on the power cord, insert the power cord between objects, or push the power cord into the space behind the appliance.
- This may result in electric shock or fire.
Do not pull the power cord, when unplugging the power plug.
- Unplug the power plug by holding the plug.
- Failure to do so may result in electric shock or fire.
Do not lay the power cord and tubes where you may fall over them.

CAuTioN SiGNS FoR iINSTALLION

This appliance should be positioned in such a way that it is accessible to the power plug.
- Failure to do so may result in electric shock or fire due to electric leakage.
Install your appliance on a level and hard floor that can support its weight.
- Failure to do so may result in abnormal vibrations, moves, noise, or problems with the product.

SeVeRe WARNING SiGNS FoR uSiNG

If the appliance is flooded, cut the water supply and power immediately and contact your nearest service centre.
- Do not tough the power plug with wet hands
- Failure to do so may cause electric shock
If the appliance generates a strange noise, a burning smell or smoke, unplug the power plug immediately and contact your nearest service centre.
- Failure to do so may result in electric shock or fire.
In the event of a gas leak (such as propane gas, LP gas, etc.), ventilate immediately without touching the power plug. Do not touch the appliance or power cord.
- Do not use a ventilating fan.
- A spark may result in an explosion or fire.
Do not let children play in or on the washer. In addition, when disposing of the appliance, remove the washer door lever.
- If trapped inside, the child may become trapped and suffocate to death.
Make sure to remove the packaging (sponge, styrofoam) attached to the bottom of the washer before using it.
safety information

Do not wash items contaminated with gasoline, kerosene, benzene, paint thinner, alcohol or other flammable or explosive substances.
- This may result in electric shock, fire or an explosion.
Do not open the washer door by force while it is operating (high-temperature washing/drying/spinning).
- Water flowing out of the washer may result in burns or cause the floor to be slippery.
This may result in injury.
- Opening the door by force may result in damage to the product or injury.
Do not insert your hand under the washer.
- This may result in injury.
Do not touch the power plug with wet hands.
- This may result in electric shock.
Do not turn the appliance off by unplugging the power plug while an operation is in progress.
- Plugging the power plug into the wall socket again may cause a spark and result in electric shock or fire.
Do not let children or infirm persons use this washer unsupervised. Do not let children climb in the appliance
- Failure to do so may result in electric shock, burns or injury.
Do not insert your hand or a metal object under the washer while it is operating.
- This may result in injury.
Do not unplug the appliance by pulling at the power cord, always grip plug firmly and pull straight out from the outlet.
- Damage to the cord may cause short-circuit, fire and/or electric shock

Do not attempt to repair, disassemble, or modify the appliance yourself.
- Do not use any fuse(such as cooper, steel wire, etc.) other than the standard fuse.
- When repairing or reinstalling the appliance is required, contact your nearest service centre.
- Failure to do so may result in electric shock, fire, problems with the product, or injury.

If any foreign substance such as water has entered the appliance, unplug the power plug and contact your nearest service centre.
- Failure to do so may result in electric shock or fire.
When the water supply hose comes loose from the faucet and floods the appliance, unplug the power plug.
- Failure to do so may result in electric shock or fire.
Unplug the power plug when the appliance is not being used for long periods of time or during a thunder/lightning storm.
- Failure to do so may result in electric shock or fire.

When the washer is contaminated by a foreign substance such as detergent, dirt, food waste, etc., unplug the power plug and clean the washer using a damp and soft cloth.
- Failure to do so may result in discoloration, deformation, damage or rust.
The front glass may be broken by a strong impact. Take care when using the washer.
- When the glass is broken, it may result in injury.
After a water supply failure or when reconnecting the water supply hose, open the faucet slowly.
Open the faucet slowly after a long period of non-use.
- The air pressure in the water supply hose or the water pipe may result in damage to a part or in water leakage.
If a drain error occurs during an operation, check if there is a draining problem.
- If the washer is used when it is flooded because of a draining problem, it may result in electric shock or fire due to electric leakage.
Insert the laundry into the washer completely so that laundry does not get caught in the door.
- If laundry gets caught in the door, it may result in damage to the laundry or the washer, or result in water leakage.
Ensure that the faucet is turned off when the washer is not being used.
- Ensure that the screw on the water supply hose connector is properly tightened.
- Failure to do so may result in property damage or injury.
Check if the rubber seal is not contaminated by foreign substances (waste, thread, etc).
- If the door is not closed completely, it may result in water leakage.
Open the faucet and check if the water supply hose connector is firmly tightened and that there is no water leaking before using the product.
- If the screws or the water supply hose connector are loose, it may result in water leakage.
To reduce the risk of fire or explosion:
- Under certain conditions, hydrogen gas may be produced in a hot water system such as your hot water heater that has not been used for two weeks or more. HYDROGEN GAS IS EXPLOSIVE. If your hot water system has not been used for two weeks or more, turn on all hot water taps in your home, and let the water flow for several minutes before using your washing machine. This will release any hydrogen gas build-up. Since hydrogen gas is flammable, do not smoke or light an open flame during this time. Ventilate immediately without touching the power plug if there is a gas leak.
The product you have purchased is designed for domestic use only.
The use for business purposes qualifies as product misuse.
In this case, the product will not be covered by the standard warranty provided by
Samsung and no responsibility can be attributed to Samsung for malfunctions or damages resulting from such misuse.
safety information

Do not stand on top of the appliance or place objects (such as laundry, lighted candles, lighted cigarettes, dishes, chemicals, metal objects, etc.) on the appliance.
- This may result in electric shock, fire, problems with the product, or injury.
Do not spray volatile material such as insecticide onto the surface of the appliance.
- As well as being harmful to humans, it may also result in electric shock, fire or problems with the product.
Do not place an object that generates a electromagnetic field near the washer.
- This may result in injury due to a malfunction.
Since the water drained during a high-temperature wash or drying cycle is hot, do not touch the water.
- This may result in burns or injury.
Do not wash, spin or dry water-proof seats, mats or clothing (*) unless your appliance has a special program for washing these items.
- Do not wash thick, hard mats even if the washer mark is on the care label.
- This may result in injury or damage to the washer, walls, floor or clothing due to abnormal vibrations.
* Woollen bedding, rain covers, fishing vests, ski pants, sleeping bags, diaper covers, sweat suits, and bicycle, motor cycle, car covers, etc.
Do not operate the washer when the detergent box is removed.
- This may result in electric shock or injury due to water leakage.
Do not touch the inside of the tub during or just after drying as it is hot.
- This may result in burns.
Do not insert your hand into the detergent box after opening it.
- This may result in injury as your hand may be caught by the detergent input device. Do not place any objects (such as shoes, food waste, animals) other than laundry into the washer.
- This may result in damage to the washer, or injury and death in the case of pets due to the abnormal vibrations.
Do not press the buttons using sharp objects such as pins, knives, fingernails, etc.
- This may result in electric shock or injury.
Do not wash laundry contaminated by oils, creams or lotions usually found in skincare shops or massage clinics.
- This may result in the rubber seal becoming deformed and water leakage.
Do not leave metal objects such as a safety pin or hair pin, or bleach in the tub for long periods of time.
- This may cause the tub to rust.
- If rust starts appearing on the surface of the tub, apply a cleansing agent (neutral) to the surface and use a sponge to clean it. Never use a metal brush.
Do not use dry cleaning detergent directly and do not wash, rinse, or spin laundry contaminated by dry cleaning detergent.
- This may result in spontaneous combustion or ignition due to the heat of the oxidation of the oil.
Do not use hot water from water cooling/heating devices.
- This may result in problems with the washer.
English - 10
Do not use natural hand-washing soap for the washer.
- If it hardens and accumulates inside the washer, it may result in problems with the product, discoloration, rust or bad odors.
Do not wash large laundry items such as bedding in the washing net.
- Place socks and brassieres into the washing net and wash them with the other laundry.
- Failure to do so may result in injury due to abnormal vibrations.
Do not use hardened detergent.
- If it accumulates inside the washer, it may result in water leakage.
For washing machines with ventilation openings in the base, ensure that the opening is not obstructed by carpet or any other obstacles.
Make sure that the pockets of all clothing to be washed are empty.
- Hard, sharp objects, such as coins, safety pins, nails, screws, or stones can cause extensive damage to the appliance.
Do not wash clothing with large buckles, buttons, or other heavy metal.

SeVeRe WARNING SiGNS FoR CleANiNG

Do not clean the appliance by spraying water directly onto it.
Do not use the strong acid cleaning agent.
Do not use benzene, thinner or alcohol to clean the appliance.
- This may result in discoloration, deformation, damage, electric shock or fire.
Before cleaning or performing maintenance, unplug the appliance from the wall socket.
- Failure to do so may result in electric shock or fire.
safety information
iNSTRuCTioN AbouT THE Weee MARk
Correct Disposal of This Product (Waste Electrical & Electronic Equipment)
(Applicable in countries with separate collection systems)
This marking on the product, accessories or literature indicates that the product and its electronic accessories (e.g. charger, headset, USB cable) should not be disposed of with other household waste at the end of their working life. To prevent possible harm to the environment or human health from uncontrolled waste disposal, please separate these items from other types of waste and recycle them responsibly to promote the sustainable reuse of material resources.
Household users should contact either the retailer where they purchased this product, or their local government office, for details of where and how they can take these items for environmentally safe recycling.
Business users should contact their supplier and check the terms and conditions of the purchase contract. This product and its electronic accessories should not be mixed with other commercial wastes for disposal.
setting up your washing machine
Be sure to have your installer follow these instructions closely so that your new washing machine works properly and so that you're not at risk of injury when doing laundry.
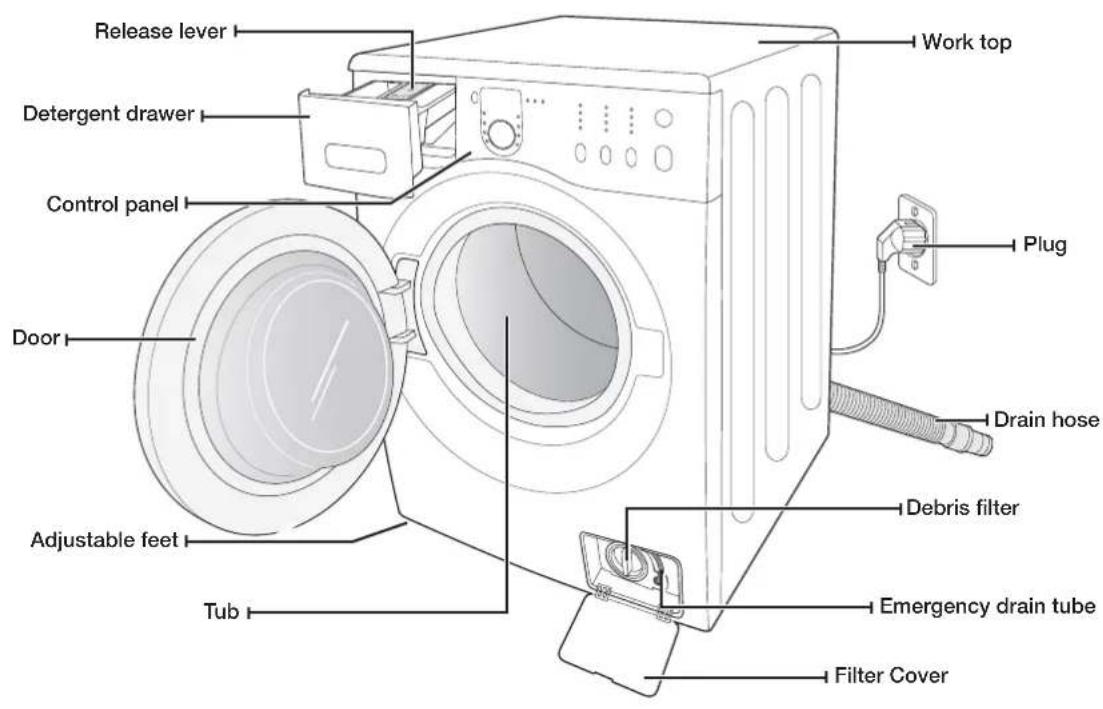
CHECKING THE PARTS
Carefully unpack your washing machine, and make sure you've received all of the parts shown below. If your washing machine was damaged during shipping, or if you do not have all of the parts, contact Samsung Customer Service or your Samsung dealer.

* Bolt hole covers : The number of bolt hole covers depends on the model (3\~5 covers).
English - 13

setting up your washing machine
MEETING INSTALLATION REQUIREMENTS
Electrical supply and grounding
To prevent unnecessary risk of fire, electrical shock, or personal injury, all wiring and grounding must be done in accordance with the National Electrical Code ANSI/FNPA, No. 70 Latest Revision and local codes and ordinances. It is the personal responsibility of the appliance owner to provide adequate electrical service for this appliance.

Never use an extension cord.
WARNING
Use only the power cord that comes with your washing machine.
When preparing for installation, ensure that your power supply offers:
• 220V\~240V 50Hz 15 AMP fuse or circuit breaker
• Individual branch circuit serving only your washing machine
Your washing machine must be grounded. If your washing machine malfunctions or breaks down, grounding will reduce the risk of electric shock by providing a path of least resistance for the electric current.
Your washing machine comes with a power cord having a three-prong grounding plug for use in a properly installed and grounded outlet.

Never connect the ground wire to plastic plumbing lines, gas lines, or hot water pipes.
Improperly connecting the equipment-grounding conductor can result electrical shock. Check with a qualified electrician or serviceman if you are unsure if the washing machine is properly grounded. Do not modify the plug provided with the washing machine. If it does not fit the outlet, have a proper outlet installed by a qualified electrician.
Water Supply
Your washing machine will fill properly when your water pressure is 50 kPa \~ 800 kPa. Water pressure less than 50 kPa may cause water valve failure, not allowing the water valve to shut off completely. Or, it may take the washing machine longer to fill than what the controls allow, resulting in your washing machine turning off. (A fill-time limit, designed to prevent overflows/flooding if an internal hose becomes loose, is built into the controls.)
The water taps must be within 4 feet (122cm) of the back of your washing machine for the provided inlet hoses provided to reach your washing machine.

Most plumbing supply stores sell inlet hoses of various lengths up to 10 feet (305cm) long.
You can reduce the risk of leaks and water damage by:
• Making water taps easily accessible.
• Turning off taps when the washing machine is not in use.
• Periodically checking for leaks at water inlet hose fittings.

Before using your washing machine for the first time, check all connections at the water valve and taps for leaks.
Drain
Samsung recommends a standpipe height of 65 cm. The drain hose must be routed through the drain hose clip to the standpipe. The standpipe must be large enough to accept the outside diameter of the drain hose. The drain hose is attached at the factory.
Flooring
For best performance, your washing machine must be installed on a solidly constructed floor. Wood floors may need to be reinforced to minimize vibration and/or unbalanced loads. Carpeting and soft tile surfaces are contributing factors to vibrations and the tendency for your washing machine to move slightly during the spin cycle.
Never install your washing machine on a platform or poorly supported structure.
Surrounding temperature
Do not install your washing machine in areas where water may freeze, since your washing machine always retains some water in its water valve, pump, and hose areas. Frozen water in the lines can cause damage to belts, the pump, and other components.
Alcove or closet installation
To operate safely and properly, your new washing machine requires minimum clearances of:
Sides - 25 mm Rear - 51 mm
Top - 25 mm Front - 465 mm
If both the washing machine and a dryer are installed together, the front of the alcove or closet must have at least 465 mm unobstructed air opening. Your washing machine alone does not require a specific air opening.
INSTALLING YOUR WASHING MACHINE
STEP 1
Selecting a location

Before you install the washing machine, make sure the location:
- Has a hard, level surface without carpeting or flooring that may obstruct ventilation
• Is away from direct sunlight
• Has adequate ventilation
• Will not be freezing (below 32 °F or 0 °C)
• Is away from heat sources such as oil or gas - Has enough space so that the washing machine doesn't stand on its power cord
setting up your washing machine
STEP 2
Removing the shipping bolts
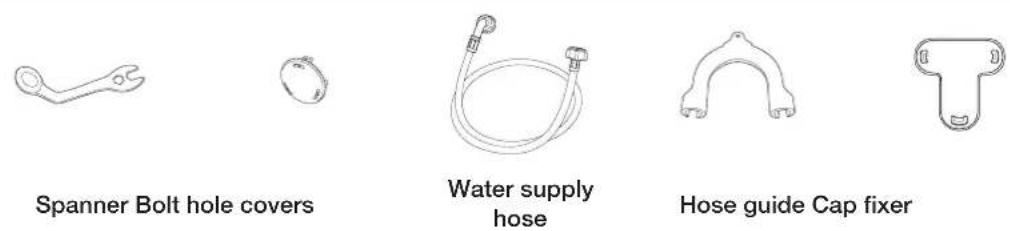
Before installing the washing machine, you must remove the five shipping bolts from the back of the unit.
- Loosen all the bolts with the supplied wrench.
natural_image
Hand holding a rotary knob on a device panel (no text or symbols visible)- Hold the bolt with the spanner and pull it through the wide section of the hole. Repeat for each bolt.
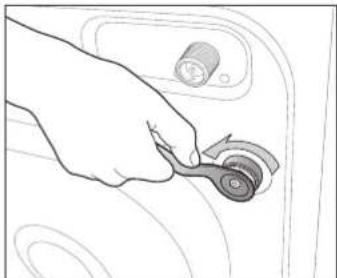
natural_image
Hand inserting a plug into a button on a device panel (no text or symbols visible)- Fill the holes with the supplied plastic covers.
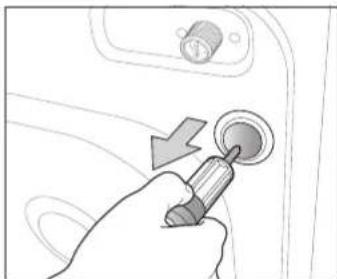
natural_image
Hand holding a circular button with an arrow pointing to the right button (no text or symbols visible)- Store the shipping bolts away safely in case you have to move the washing machine in the future.

Packaging materials can be dangerous to children; keep all packaging material (plastic bags, polystyrene, etc.) well out of the reach of children.

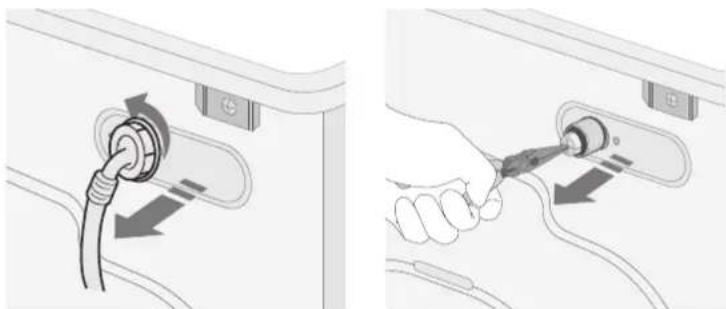
Insert the cap fixer, (one of the accessories in the vinyl pack), into the hole from which you removed the power cord at the back of the product.
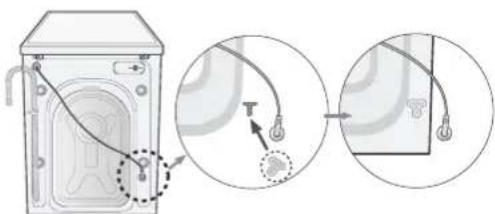
natural_image
Diagram showing a device with cable routing and two close-up views of the cable (no text or symbols)English - 16

STEP 3
Adjusting the levelling feet

When installing your washing machine, ensure that the power plug, the water supply and the drain are easily accessible.
-
Slide the washing machine into position.
-
Level your washing machine by turning the leveling feet in and out as necessary by hand.

natural_image
Line drawing showing hands using a tool to adjust or install a component, no text or symbols present- When your washing machine is level, tighten the nuts using the wrench supplied with your washing machine.

natural_image
Line drawing of a hand using a tool to adjust or install a component (no text or symbols present)STEP 4
Connecting the water and drain
Connecting the water supply hose
- Take the L-shaped arm fitting for the cold water supply hose and connect it to the cold water supply intake on the back of the machine. Tighten by hand.

The water supply hose must be connected to the washing machine at one end and to the water tap at the other. Do not stretch the water supply hose. If the hose is too short, replace the hose with a longer, high pressure hose.
- Connect the other end of the cold water supply hose to your sink's cold water tap and tighten it by hand. If necessary, you can reposition the water supply hose at the washing machine end by loosening the fitting, rotating the hose, and retightening the fitting.
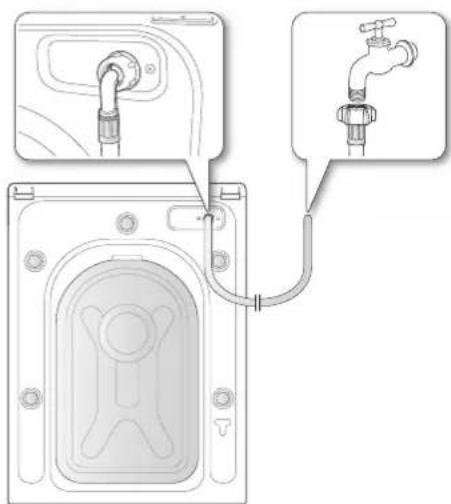
natural_image
Diagram showing a door panel connected to a piping outlet with a faucet, no text or symbols presentFor selected models with an additional hot water intake:
- Take the red L-shaped arm fitting for the hot water supply hose and connect it to the hot water supply intake on the back of the machine. Tighten by hand.
- Connect the other end of the hot water supply hose to your sink's hot water tap and tighten it by hand.
- Use a Y-piece if you only want to use cold water.
setting up your washing machine
Connecting the water supply hose (selected models)
- Remove the adaptor from the water supply hose.
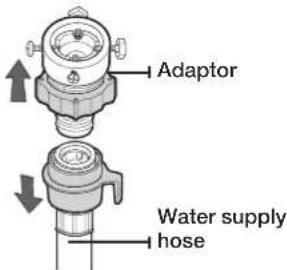
- First, using a '+' type screwdriver, loosen the four screws on the adaptor. Next, take the adaptor and turn part (2) following the arrow until there is a 5 mm gap.
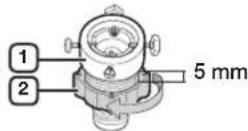
- Connect the adaptor to the water tap by tightening the screws firmly while lifting the adaptor upwards. Turn part (2) following the arrow and connect (1) and (2).
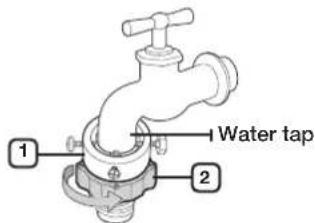
- Connect the water supply hose to the adaptor. When you release part (3), the hose automatically connects to the adaptor making a 'click' sound.
After you have connected the water supply hose to the adaptor, ensure that it is connected correctly by pulling the water supply hose downwards.
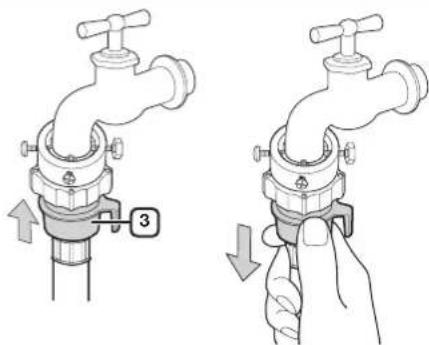
- Connect the other end of the water supply hose to the inlet water valve at the rear of the washing machine. Screw the hose clockwise all the way in.

natural_image
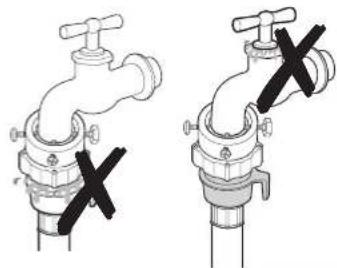
Diagram of a pipe fitting with a curved arrow indicating direction (no text or symbols)- Turn on the water supply and ensure that no water leaks from the water valve, tap or adaptor. If there is a water leaks, repeat the previous steps.

Do not use your washing machine if there is a water leak. This may cause electric shock or injury.
natural_image
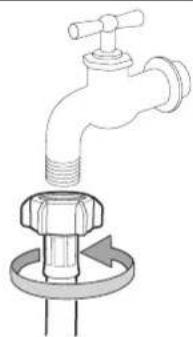
Two identical illustrations of a faucet with cross marks indicating no need or absence (no text or symbols present)- If the water tap has a screw type tap, connect the water supply hose to the tap as shown.
natural_image
Diagram of a faucet with a valve and central hub, showing fluid flow direction (no text or labels)
Use the most conventional type of tap for the water supply. In case the tap is square or too big, remove the spacing ring before inserting the tap into the adaptor.
setting up your washing machine
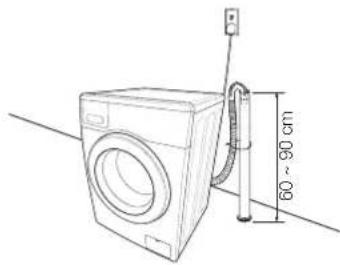
Connecting the drain hose
The end of the drain hose can be positioned in three ways:
- Over the edge of a wash basin: The drain hose must be placed at a height of between 60 and 90 cm. To keep the drain hose spout bent, use the supplied plastic hose guide. Secure the guide to the wall with a hook or to the tap with a piece of string to prevent the drain hose from moving.
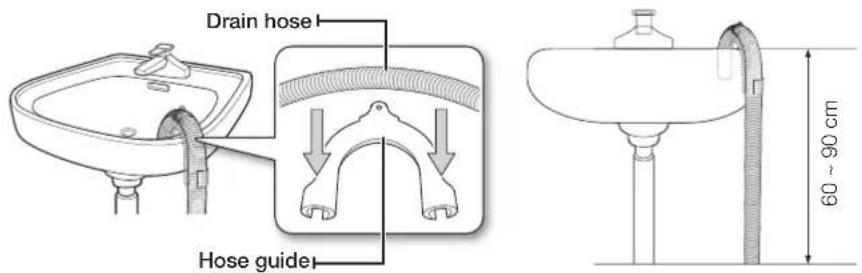
-
In a sink drain pipe branch: The drain pipe branch must be above the sink siphon so that the end of the hose is at least 60 cm above the ground.
-
In a drain pipe: We recommend using a 65 cm high vertical pipe; it must be no shorter than 60 cm and no longer than 90 cm.

The standpipe drain requires;
• minimum diameter 5 cm.
• minimum carry-away capacity 60 liter per minute.
natural_image
Line drawing of a washing machine with a pipe and cable, showing dimensions (no text or symbols)STEP 5
powering your washing machine
Plug the power cord into a wall sockets, an AC 220-240V / 50Hz approved electrical outlet protected by a fuse or circuit breaker. (For more information on electrical and grounding requirements, see page 14.)

Test run
Make sure that you install your washing machine correctly by running the Rinse+Spin cycle after the installation is complete.
washing a load of laundry
With your new Samsung washing machine, the hardest part of doing laundry will be deciding which load to wash first.
WASHING FOR THE FIRST TIME

Before washing laundry for the first time, you must run a complete empty cycle (i.e. no laundry).
- Press the Power button.
- Add a little detergent to the detergent compartment ⑪ in the detergent drawer.
- Turn on the water supply to the washing machine.
- Press the Start/Pause button.

This will remove any water that might be left over in the machine from the manufacturer's test run.
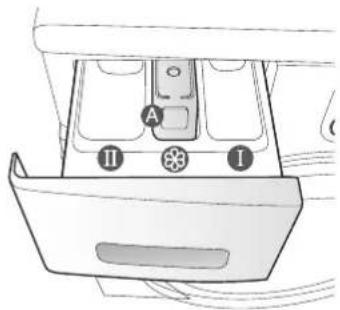
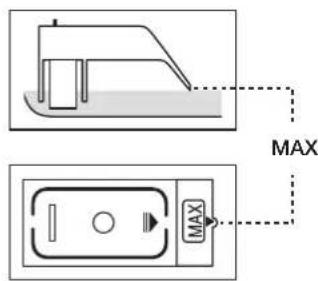
Compartment ① Detergent for prewash, or starch.
Compartment Ⓗ Detergent for the main wash, water softener, pre-soaking agent, bleach and stain removal product.
Compartment Ⓚ Additives, e.g. fabric softener or former (fill no higher than lower edge (MAX) of "A")
BASIC INSTRUCTIONS
- Load your laundry into the washing machine.

Do not overload the washing machine. To determine the load capacity for each type of laundry, refer to the chart on page 27.

• Make sure that laundry is not caught in the door, as this may cause a water leak.
- Washing detergent may remain in the front rubber part of the washer after a wash cycle. Remove any remaining detergent, as they may cause a water leak.
• Do not wash water-proofed items.
- Close the door until it latches.
- Turn the power on.
- Add detergent and additives to the dispenser drawer.
- Select the appropriate cycle and options for the load. The Wash Indicator light will illuminate and the estimated cycle time will appear in the display.
- Press the Start/Pause button.
washing a load of laundry
USING THE CONTROL PANEL
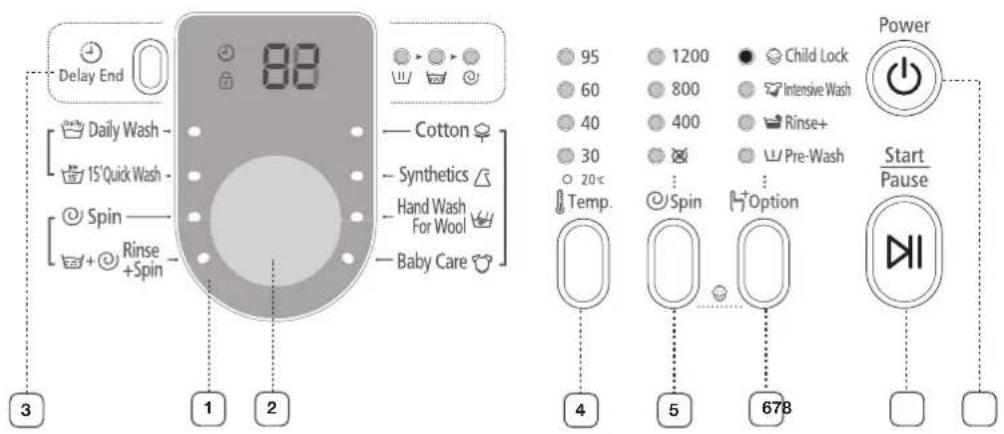
| 1 DIGITAL GRAPHIC DISPLAY | Displays the remaining wash cycle time, all cycle information, and error messages. | |
| 2 CYCLE SELECTOR | Select the tumble pattern and spin speed for the cycle.For detailed information, refer to “Washing clothes using the cycle selector” (see page 25).Cotton(♀) - For averagely or lightly soiled cotton, bed linen, table linen, underwear, towels, shirts, etc.Synthetics(♂) - For averagely or lightly soiled blouses, shirts, etc., made of polyester (diolen, trevira), polyamide (perlon, nylon) or other similar blends.Hand Wash For Wool(♂) - Only for machine-washable wool. A load should be less than 2.0 kg.The wool course washes the laundry using gentle cradling actions. During the wash, the gentle cradling and soaking actions are continued to protect the wool fibers from shrinkage / distortion and for a super gentle clean. This stop operation is not a problem.Neutral detergent is recommended for wool course, for improved washing results and for improved care of the wool fibers.Baby Care(♂) High temperature wash and extra rinses ensure that no washing powder remains to mark your thin clothes.Daily Wash(♂) - Use for everyday items such as underwear and shirts. Short programme for test institutes.15' Quick Wash(♂) - For lightly soiled garments that you require quickly.The values(15' minutes) can vary from the indicated values depending on water pressure, water hardness, water inlet temperature, room temperature, type and amount of washing and degree of soiling, utilized detergent, fluctuation in the electricity supply and extra options selected.Add only a small amount of detergent for a small amount of laundry (less than 2kg) for the 15' Quick Wash course, because if you add too much detergent, detergent may remain after the wash.Spin(♂) - Performs an additional spin cycle to remove more water.Rinse + Spin(♂+○) - Use for a load that needs rinsing only or to add rinse-added fabric softener to a load. | |
| 3 DELAY END SELECTION BUTTON | Press this button repeatedly to cycle through the available Delay End options (from 3 hours to 19 hours in one hour increments).The hour displayed indicates the time when the wash cycle will be finished. | |
| 4 TEMPERATURE SELECTION BUTTON | Press this button repeatedly to cycle through the available water temperature options:(20 °C(All Lamps Turn Off), 30 °C, 40 °C, 60 °C and 95 °C). | |
| 5 SPIN SELECTION BUTTON | Press the button repeatedly to cycle through the available speeds for the spin cycle. | |
| WF1702 / WF1602 | All Lamps Turn Off, ☒, 400, 800, 1200 rpm | |
| WF1700 / WF1600 | All Lamps Turn Off, ☒, 400, 800, 1000 rpm | |
| “No spin ☒” - The laundry remains in the drum and no spin cycle is performed after the final drain.“Rinse Hold (All Lamps Turn Off)” -The laundry remains soaking in the final rinse water. Before the laundry can be unloaded, either a Drain or Spin cycle must be performed. | ||
| 6 OPTION SELECTION BUTTON | Press this button repeatedly to cycle through the wash options:☐ (Pre-Wash) → ☑ (Rinse+) → ☑ (Intensive) → ☐ (Pre-Wash) + ☑ (Rinse+) → ☐ (Pre-Wash) + ☑ (Intensive) → (Rinse+) + (Intensive) → ☐ (Pre-Wash) + ☑ (Rinse+) + (Intensive) → (off)☐ (Pre-Wash): Press this button to select Pre-Wash. Pre-wash is only available with: Cotton(☐ Synthetics( ) Baby Care( ), Daily Wash( ). ☑ (Rinse+): Press this button to add additional rinse cycles. ☑ (Intensive): Press this button when the laundry is heavily soiled and needs to be washed intensively. The cycle time is increased for each cycle. | |
| 7 START/PAUSE SELECTION BUTTON | Press to pause and restart a cycle. | |
| 8 POWER BUTTON | Press it once to turn your washing machine on, press it again to turn your washing machine off.If the washing machine is left on for more than 10 minutes without any buttons being touched, the power automatically turns off. | |
English - 22
washing a load of laundry
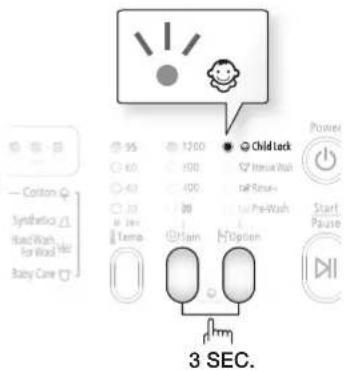
Child lock
The Child Lock function allows you to lock the buttons so that the wash cycle you've chosen can't be changed.
Activating/Deactivating
If you want to activate or deactivate the Child Lock function, press the Spin(💡) and Option(💡) buttons at the same time for 3 seconds. The "Child Lock 😊 will be lit when this feature is activated.
When the Child Lock function is activated, only the Power (⏻) button works. The Child Lock function remains on even after the power is turned on and off or after the disconnecting and reconnecting the power cord.
Delay end
You can set the washing machine to fi nish your wash automatically at a later time, choosing a delay of between 3 to 19 hours (in 1 hour increments). The hour displayed indicates the time at which the wash will be fi nished.
- Manually or automatically set your washing machine according to the type of laundry you are washing.
- Press the Delay End(4) button repeatedly until the delay time is set.
- Press the Start/Pause(Ⅱ) button. The "Delay End ⏱indicator will be lit, and the clock will begin counting down until it reaches the set time.
- To cancel a Delay End function, press the Power(⏻) button and then turn the washing machine on again.
Washing clothes using the cycle selector
Your new washing machine makes washing clothes easy, using Samsung's "Fuzzy Control" automatic control system. When you select a wash program, the machine will set the correct temperature, washing time, and washing speed.
- Turn on your sink's water tap.
- Press the Power( ⏻ ) button.
- Open the door.
- Load the articles one at a time loosely into the drum, without overfilling it.
- Close the door.
- Add detergent, softener, and pre-wash detergent (if necessary) into the appropriate compartments.

Pre-wash is only available when selecting the Cotton(♀), Synthetics(♀ Baby Care(♀) and Daily Wash(♂) cycles. It is only necessary if your clothing is heavily soiled.
- Use the Cycle Selector to select the appropriate cycle according to the type of material: Cotton(♀), Synthetics(♂) Hand Wash For Wool( ). Baby Care( ), Daily Wash( ), 15'Quick Wash( ). The relevant indicators will illuminate on the control panel.
- At this time, you can control the wash temperature, the amount of rinses, the spinning speed, and the delay time by pressing the appropriate option button.
- Press the Start/Pause button and the wash will begin. The process indicator will light up and the remaining time for the cycle will appear in the display.
Pause Option
Within 5 minutes of starting a wash, it is possible to add/remove laundry items.
- Press the Start/Pause( ▷) button to unlock the door.
The door cannot be opened when the water is too HOT or the water level is too HIGH. - After closing the door, press the Start/Pause( ▷) button to restart the wash.
When the cycle is finished:
After the total cycle has finished, the power will turn off automatically.
- Open the door.
- Remove laundry.
washing a load of laundry
Washing clothes manually
You can wash clothes manually without using the Cycle Selector.
- Turn the water supply on.
- Press the Power(⏻) button on the washing machine.
- Open the door.
- Load the articles loosely into the drum one at a time, without overfilling it.
- Close the door.
- Add detergent and, if necessary, softener or prewash detergent, into the appropriate compartments.
- Press the Temp.(☐) button to select the temperature. (20 °C(All Lamps Turn Off), 30 °C, 40 °C, 60 °C, 95 °C)
- Press the Option( In^+ ) button to select the Rinse+ to add a rinse time. The wash duration is increased accordingly.
- Press the Spin( Ⓞ) button to select the spin speed. The rinse hold function allows you to remove items that are still wet from the washing machine. ( ☑ No Spin (All Lamps Turn Off): Rinse Hold)
- Press the Delay End(4) button repeatedly to cycle through the available Delay End options (from 3 hour to 19 hours in one hour increments). The hour displayed indicates the time at which the wash will be finished.
- Press the Start/Pause(DII) button and the machine will begin the cycle.
LAUNDRY GUIDELINES
Follow these simple guidelines for the cleanest laundry and the most efficient wash.

Always check the Care label on clothing before washing.
Sort and wash your laundry according to the following criteria:
• Care Label: Sort laundry into cottons, mixed fibres, synthetics, silks, wools and rayons.
• Colour: Divide whites and colours. Wash new colour items separately.
• Size: Placing items of different sizes in the same load will improve the wash action.
- Sensitivity: Wash delicate items separately, using the Delicate wash cycle for pure, new woollen items, curtains and silk articles. Check the labels on the items you are washing or refer to the fabric care chart in the appendix.
Emptying pockets
Before each wash, empty all the pockets of your laundry. Small, irregularly shaped hard objects, such as coins, knives, pins, and paperclips could damage your washing machine. Do not wash clothing with large buckles, buttons, or other heavy metal objects.
Metal on clothing may damage your clothing as well as the tub. Turn clothing with buttons and embroidered clothes inside out before washing them. If zips of pants and jackets are open while washing, the spin basket may be damaged. Zips should be closed and fixed with a string before washing.
Clothing with long strings may become entangled with other clothes damaging them. Be sure to fix the strings before starting the wash.
Prewashing cotton
Your new washing machine, combined with modern detergents, will give perfect washing results, thus saving energy, time, water and detergent. However, if your cotton is particularly dirty, prewash with a protein-based detergent.
Determining the load capacity
Do not overload the washing machine or your laundry may not wash properly. Use the chart below to determine the load capacity for the type of laundry you are washing.
| Fabric Type Load Capacity | ||
| Model | WF1702WF1700 | WF1602WF1600 |
| Cotton- average/lightly soiled- heavily soiled | 7.0 kg 6.0 kg | |
| Synthetics 3.0 kg 2.5 kg | ||
| Hand Wash For Wool 2.0 kg 2.0 kg | ||

- When the laundry is unbalanced ("UE" lights up on the display), redistribute the load. If the laundry is unbalanced, the spin efficiency may be degraded.
- When washing Bedding or Duvets, the wash time may be lengthened or the spin efficiency may be degraded.
• For Bedding or Duvets, the recommended load capacity is 1.8(kg) or less.

Make sure to insert brassieres (water washable) into a laundry net (to be purchased additionally).
- The metal parts of the brassieres may break through the material and damage the laundry. Therefore make sure to place them inside a fine laundry net.
- Small, light clothing such as socks, gloves, stockings and handkerchiefs may become caught around the door. Place them inside a fine laundry net.
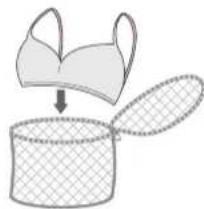
natural_image
Illustration of a braze being placed into a cylindrical box with a lid, showing no text or symbols.
Do not wash the laundry net by itself without other laundry. This may cause abnormal vibrations that could move the washing machine and cause an accident resulting in injury.
washing a load of laundry
DETERGENT AND ADDITIVES INFORMATION
Which detergent to use
The type of detergent you should use is based on the type of fabric (cotton, synthetics, items, Hand Wash For Wool), colour, wash temperature, and degree of soiling. Always use "low suds" laundry detergent, which is designed for automatic washing machines. Follow the detergent manufacturer's recommendations based on the weight of the laundry, the degree of soiling, and the hardness of the water in your area. If you do not know how hard your water is, enquire at your local water authority.

Do not use detergent that has hardened or solidified as the detergent may remain in the rinse cycle. It may cause your washing machine to not rinse properly or result in the overflow becoming blocked.

Please note the following when using the Wool course.
• Use a neutral liquid detergent for wool only.
- When using a powder detergent, it may remain on the laundry and cause damage to the material (wool).
Detergent drawer
Your washing machine has separate compartments for dispensing detergent and fabric softener. Add all laundry additives to the correct compartment before starting your washing machine.

Do NOT open the detergent drawer when your washing machine is running.
-
Pull out the detergent drawer on the left side of the control panel.
-
Add the recommended amount of laundry detergent directly into the detergent compartment ⑪ before starting your washing machine.
- Add the recommended amount of fabric softener into the softener compartment ® if required.

Do NOT add any powder/liquid detergent to the softener compartment (®).
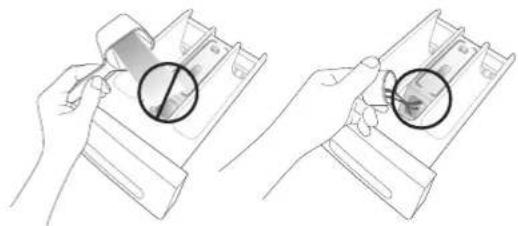
natural_image
Two-step line drawing showing hand holding a device with magnified circular detail (no text or symbols)
- When using the Prewash option, add the recommended amount of laundry detergent into the prewash compartment ①.

When washing large items do NOT use the following detergent types.
• Tablet and capsule type detergents
• Detergents using a ball and net

Concentrated or thick fabric softener and conditioner must be diluted with a little water before being poured into the dispenser (prevents the overflow from becoming blocked.)

Be careful that the fabric softener does not overflow, when you close the detergent drawer after adding fabric softener into the rinse detergent compartment.
cleaning and maintaining your washing machine
Keeping your washing machine clean improves its performance, wards off unnecessary repairs, and lengthens its life.
DRAINING THE WASHING MACHINE IN AN EMERGENCY
- Unplug the washing machine from the power supply.
- Open the filter cover using a coin or a key.
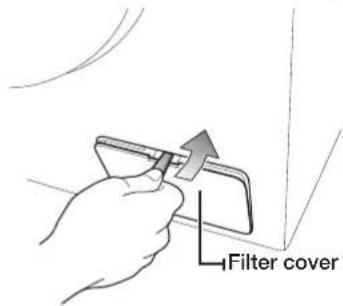
- Pull forward the emergency drain tube to separate it from the guide hook.
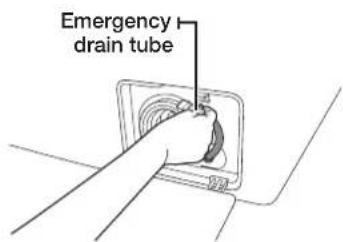
-
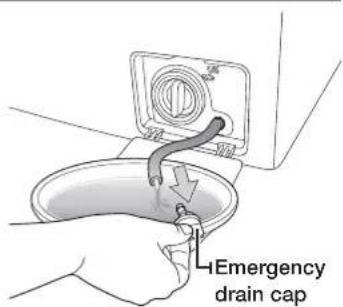
Take off the emergency drain cap closing the emergency drain tube.
-
Allow all the water to flow into a bowl.

Remain water maybe more than you expected. Prepare larger bowl.
-
Re-attach the cap to the emergency drain tube and then fix the emergency drain tube to the guide hook.
-
Replace the filter-cover.
CLEANING THE EXTERIOR
-
Wipe the washing machine surfaces, including the control panel, with a soft cloth using a nonabrasive household detergent.
-
Use a soft cloth to dry the surfaces.
-
Do not pour water onto the washing machine.
-
Wipe the washing machine surfaces, including the control panel, with a soft cloth using a nonabrasive household detergent.
- Use a soft cloth to dry the surfaces.
- Do not pour water onto the washing machine.
cleaning and maintaining your washing machine
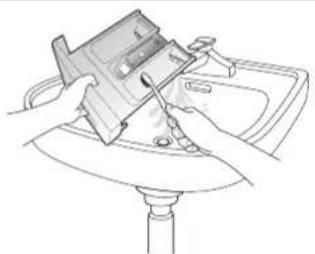
CLEANING THE DETERGENT DRAWER AND DRAWER RECESS
- Press the release lever on the inside of the detergent drawer and pull the drawer out.
- Remove the liquid detergent divider from the detergent drawer
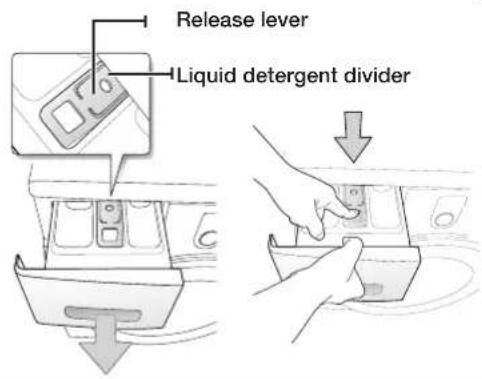
- Wash all parts under running water.
natural_image
Line drawing of hands using a tool to clean or repair a device on a sink (no text or symbols)- Clean the drawer recess with an old toothbrush.
- Replace the liquid detergent divider by pushing it firmly into the drawer.
- Push the drawer back into place.
- To remove any remaining detergent, perform a rinse cycle without any laundry in the drum.
natural_image
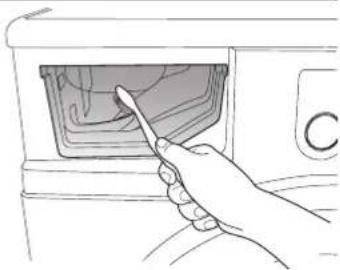
Hand inserting a cable into a device with a label 'C' (no text or symbols on the diagram itself)CLEANING THE DEBRIS FILTER
We recommend cleaning the debris filter 5 or 6 times a year, or when the error message of "5E" is displayed. (Refer to "Draining the washing machine in an emergency" in the previous page.)

Before cleaning the debris filter, make sure to unplug the power cord.
- Remove the remaining water first (refer to "Draining the washing machine in an emergency" on page 29.)

If you separate the filter without draining the remaining water, the remaining water may trickle out.
- Open the filter cover by using a key or coin.
- Unscrew the emergency drain cap by turning it to the left and drain off all the water.
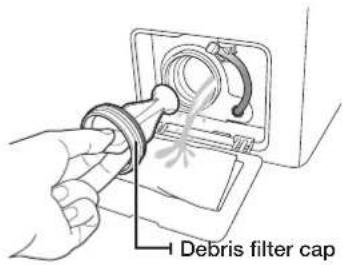
- Unscrew the debris filter cap.
- Wash any dirt or other material from the debris filter. Make sure the drain pump propeller behind the debris filter is not blocked.
- Replace the debris filter cap.
- Replace the filter cover.

Do not open the debris filter cap while the machine is running or hot water may flow out.
natural_image
Line drawing of hands using a tool to adjust or install a component on a sink (no text or symbols present)
- Make sure to replace the filter cap after the filter cleaning. If the filter is out of the machine, your washing machine may malfunction or leak water.
• The filter should be fully assembled after the filter cleaning.
cleaning and maintaining your washing machine
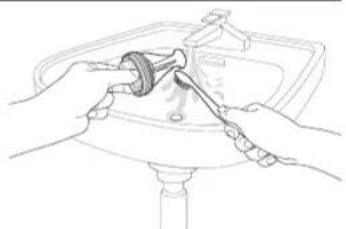
CleANiNG THE WATeR HoSe MeSH FilTeR
You should clean the water hose mesh filter at least once a year, or when the error message of "4E" is displayed:
- Turn off the water supply to the washing machine.
- Unscrew the hose from the back of the washing machine. To prevent water from gushing out due to the air pressure in the hose, cover the hose with a cloth.
- Gently pull out the mesh filter from the end of the hose using a pair of pliers and rinse it under water until clean. Also clean inside and outside the threaded connector.
- Push the filter back into place.
- Screw the hose back onto the washing machine.
- Make sure the connections are watertight and turn on the tap.
natural_image
Two-step diagram showing a hand inserting a cable into a device via a switch, with no visible text or symbols.RepAiRiNG A FRoZeN WASHiNG MACHiNe
If the temperature drops below freezing and your washing machine is frozen:
- Unplug the washing machine.
- Pour warm water over the tap to loosen the water supply hose.
- Remove the water supply hose and soak it in warm water.
- Pour warm water into the washing machine drum and let it sit for 10 minutes.
- Reconnect the water supply hose to the water tap and check if the water supply and drain are operating normal.
SToRiNG youR WASHiNG MACHiNe
If you need to store your washing machine for an extended time, it's better to drain and disconnect it. Washing machines can be damaged if water is left in the hoses and internal components before storage.
- Select the Quick Wash cycle and add bleach to the bleach compartment. Run your washing machine through the cycle without a load.
- Turn the water taps off and disconnect the inlet hoses.
- Unplug your washing machine from the electrical outlet, and leave your washing machine door open to allow air to circulate inside the tumbler.
If your washing machine has been stored in below-freezing temperatures, allow time for any leftover water in your washing machine to thaw out before using it.
troubleshooting and information codes
CHECK THESE POINTS IF YOUR WASHING MACHINE...
| PROBLEM SOLUTION | |
| Will not start • Make sure your washing machine is plugged in.Make sure the door is firmly closed.Make sure the water source tap(s) are turned on.Make sure to press the Start/Pause button. | |
| Has no water or not enough water | Turn the water tap on fully.Make sure the water source hose is not frozen.Straighten the water intake hoses.Clean the filter on the water intake hose. |
| Has detergent remains in the detergent drawer after the wash cycle is complete | Make sure your washing machine is running with sufficient water pressure.Make sure the detergent is added to the center of the detergent drawer. |
| Vibrates or is too noisy | Make sure your washing machine is on a level surface. If the surface is not level, adjust the washing machine feet to level the appliance.Make sure that the shipping bolts are removed.Make sure your washing machine is not touching any other object.Make sure the laundry load is balanced. |
| The washing machine does not drain and/or spin | Straighten the drain hose. Eliminate kinked hoses.Make sure the debris filter is not clogged. |
| Door is locked shut or will not open. | Make sure all the water in your drum is drained out.Make sure the door lock light is off. Door lock light will off after drained. |
If the problem persists, contact your local Samsung Customer Service.
troubleshooting and information codes
iNFoRMATioN CoDeS
When your washing machine malfunctions, you may see an information code on the display. If that happens, check this table and try the suggested solution before calling Customer Service.
| CODE SYMBOL SOLUTION | |
| dE | Make sure the door is firmly closed.Make sure that laundry is not caught in the door. |
| 4E | Make sure the source water tap is turned on.Check the water pressure.Clean the mesh filters of water hose.When the washer displays the “4E” code, the washer do draining for 3 minutes. During this time, the Power button is inoperative. |
| 5E | Clean the debris filter.Make sure the drainage hose is installed correctly. |
| UE | The laundry load is unbalanced. Redistribute the load. If only one item of clothing needs washing, such as a bathrobe or pair of jeans, the final spin result might be unsatisfactory and an “UE” error message will be shown in the display window. |
| cE/3E | Call the after-sales service. |
| Sd | This occurs when too much foaming is detected. It is also displayed while foaming is removed. When the removal is finished, the normal cycle proceeds.(This is one of the normal operations. It is an error for preventing non-sensing faults.) |
| Uc | If the voltage of the supplied power is instable, the washing machine will be paused to protect its electric devices.If the correct voltage is supplied, the cycle will resume automatically. |
For any codes not listed above, or if the suggested solution doesn't fix the problem, call your Samsung Service Centre or local Samsung dealer.
calibrating your washing machine
CALibRATioN MoDe
Samsung washing machine detects the laundry weight automatically. For more accurate weight detection, please run Calibration Mode after the installation. Calibration mode is done by following the steps below.
- Remove laundry or any contents in the machine and turn off the machine.
- Press the Temp button and Delay End button simultaneously, and press the Power button in addition. Then the machine turns on.
- Press the Start button to activate "Calibration Mode".
- The drum rotates clockwise and counterclockwise approximately for 3 minutes.
- When "Calibration Mode" is finished, "End(En)" appears on the display, and the machine automatically turns off. The washing machine is now ready for use.
cycle chart
CYCLE CHART
(● user option)
| PROGRAM | Max load(kg) DETERGENT | Max Temp (°C) | Spin Speed(MAX) rpm | Delay end | |||||
| WF1702 WF1700 | WF1602 WF1600 | Pre-wash | wash | Softener | WF1702 WF1602 | WF1700 WF1600 | |||
| Cotton(♀) | 7.0 6.0 | ● | yes | ● | 95 1200 1000 | ● | |||
| Synthetics(♂) | 2.5 2.5 | ● | yes | ● | 60 1200 1000 | ● | |||
| Hand Wash For Wool(♂) | 2.0 1.5 - yes | ● | 40 800 800 | ● | |||||
| Baby Care(♂) | 3.0 2.5 | ● | yes | ● | 95 1200 1000 | ● | |||
| Daily Wash(♂) | 2.0 2.0 | ● | yes | ● | 60 1200 1000 | ● | |||
| 15' Quick Wash(♂) | 2.0 2.0 - yes | ● | 40 800 800 | ● | |||||
-
A cycle with a prewash takes approx. 15 minutes longer.
-
The cycle duration data has been measured under the conditions specified in Standard IEC 60456 / EN 60456.
Please run Calibration Mode after the installation(see page 34).
-
Course time in individual homes may differ from the values given in the table due to variations in the pressure and temperature of the water supply, the load and the type of laundry.
-
When the Intensive Wash function is selected, the cycle time is increased for each cycle.
appendix
FAbRiC CARE CHART
The following symbols provide garment care directions. The care labels include four symbols in this order: washing, bleaching, drying and ironing, and dry cleaning when necessary.
The use of symbols ensures consistency among garment manufacturers of domestic and imported items. Follow the care label directions to maximize garment life and reduce laundering problems.
| Resistant material Can be ironed at 100 °C max | |||
| Delicate fabric Do not iron | |||
 | Item may be washed at 95 °C | A Can be dry cleaned using any solvent | |
 | Item may be washed at 60 °C | P Dry clean with perchloride, lighter fuel, pure alcohol or R113 only | |
 | Item may be washed at 40 °C | F Dry clean with aviation fuel, pure alcohol or R113 only | |
 | Item may be washed at 30 °C | ⊗ Do not dry clean | |
| Item may be hand washed | - Dry flat | ||
| Dry clean only Can be hung to dry | III | ||
| Can be bleached in cold water Dry on clothes hanger | |||
| Do not bleach Tumble dry, normal heat | |||
| Can be ironed at 200 °C max Tumble dry, reduced heat | |||
| Can be ironed at 150 °C max Do not tumble dry | |||
pRoTeCTiNG THE eNViRoNMeNT
- This appliance is manufactured from recyclable materials. If you decide to dispose of this appliance, please observe local waste disposal regulations. Cut off the power cord so that the appliance cannot be connected to a power source. Remove the door so that animals and small children cannot get trapped inside the appliance.
- Do not exceed the detergent quantities recommended in the detergent manu-facturers' instructions.
• Use stain removal products and bleaches before the wash cycle only when strictly necessary. - Save water and electricity by only washing full loads (the exact amount depends upon the program used).
SpeCiFiCATioNS
| TYPE FRONT LOADING WASHER | ||||
| DIMENSION | WF1702 / WF1700 | |||
| W600mm X D550mm X H850mm | ||||
| WATER PRESSURE 50 kPa ~ 800 kPa | ||||
| WATER VCLUME | 56l | |||
| NET WEIGHT | WF1702 / WF1700 | |||
| 56 kg | ||||
| WASH AND SPIN CAPACITY 7.0 kg | ||||
| POWER CONSUMPTION | MODEL WF1702 / WF1700 | |||
| WASHING | 220 V 150 W | |||
| 240 V 150 W | ||||
| WASH AND HEATING | 220 V 2000 W | |||
| 240 V 2400 W | ||||
| SPIN | MODEL WF1702 WF1700 | |||
| 230V 530 W 500 W | ||||
| PUMPING 34 W | ||||
| SpiN ReVoluTioNS | MODEL WF1702 | WF1700 | ||
| rpm 1200 1000 | ||||
The appearance and specifications of the product are subject to change without prior notice for purposes of product enhancement.
appendix
SpeCiFiCATioNS
| TYPE FRONT LOADING WASHER | ||||
| DIMENSION | WF1602 / WF1600 | |||
| W600mm X D450mm X H850mm | ||||
| WATER PRESSURE 50 kPa ~ 800 kPa | ||||
| WATER VCLUME | 48l | |||
| NET WEIGHT | WF1602 WF1600 | |||
| 54 kg | ||||
| WASH AND SPIN CAPACITY 6.0 kg | ||||
| POWER CONSUMPTION | MODEL WF1602 / WF1600 | |||
| WASHING | 220 V 150 W | |||
| 240 V 150 W | ||||
| WASH AND HEATING | 220 V 2000 W | |||
| 240 V 2400 W | ||||
| SPIN | MODEL WF1602 WF1600 | |||
| 230V 530 W 500 W | ||||
| PUMPING 34 W | ||||
| SpiN ReVoluTioNS | MODEL WF1602 | WF1600 | ||
| rpm 1200 1000 | ||||
The appearance and specifications of the product are subject to change without prior notice for purposes of product enhancement.
SHEET OF HOUSEHOLD WASHING MACHINES (EU ONLY)
According to Regulation (EU) No. 1061/2010

“*” Asterisk(s) means variant model and can be varied (0-9) or (A-Z).
| Samsung | ||||
| Model Name | WF1702NHWWF1702NHWG | WF1700*** | ||
| Capacity kg 7 7 | ||||
| Energy Efficiency | ||||
| A+++ (highest efficiency) to D (least efficient) A+ A+ | ||||
| Energy Consumption | ||||
| Annual Energy Consumption (AE_C)1) | kWh/yr 220 220 | |||
| Energy Consumption (E_t.60) Cotton 60 °C at full load kWh 1.23 1.23 | ||||
| Energy Consumption (E_t.60.1/2) Cotton 60 °C with partial load kWh | 0.89 0.89 | |||
| Energy Consumption (E_t.40.1/2) Cotton 40 °C with partial load kWh | 0.69 0.69 | |||
| Weighted power off-mode (P_o) W 0.45 0.45 | ||||
| Weighted power in left-on mode (P_I) W 5 5 | ||||
| Annual water consumption (AW_c)2) | L/yr | 10010 | 10010 | |
| Spin efficiency class3) | ||||
| A (most efficient) to G (least efficient) | B | C | ||
| Maximum Spin Speed | rpm 1200 | 1000 | ||
| Residual moisture | % | 53 | 62 | |
| Programs to which the information on the label and the Sheet relate | Cotton 60 °C and 40 °C + Intensive4) | |||
| Program duration of the standard program | ||||
| Cotton 60 °C at full load | min | 205 205 | ||
| Cotton 60 °C for partial load | min | 162 162 | ||
| Cotton 40 °C with partial load | min | 157 | 157 | |
| Weighted time in left-on mode | min | 2 2 | ||
| Airborne noise emissions | ||||
| Wash | dB (A) re 1 pW | 59 | 59 | |
| Spin | dB (A) re 1 pW | 78 | 74 | |
| Dimensions | ||||
| Unit dimensions | Height | mm | 850 | |
| Width | mm | 600 | ||
| Depth5) | mm | 550 | ||
| Net weight | kg | 56 | ||
| Gross weight | kg | 58 | ||
| Package weight | kg | 2 | ||
| Water Pressure | kPa | 50-800 | ||
| Electrical connection | ||||
| Voltage | V | 220-240 | ||
| Power consumption | W | 2000-2400 | ||
| Frequency | Hz | 50 | ||
| Name of company | Samsung Electronics Co., Ltd. | |||
appendix
- Annual energy consumption is based on 220 standard washing cycles for cotton programs at 60 °C and 40 °C at full and partial load, and the consumption of off and left-on modes. Actual energy consumption will depend on how the appliance is used.
- Annual water consumption is based on 220 standard washing cycles for cotton programs at 60 °C and 40 °C at full and partial load. Actual water consumption will depend on how the appliance is used.
- Spin extraction is very important when you use a clothes dryer to dry your clothes.
The energy for drying costs much higher than the energy for washing.
Wasing with the high spin saves more energy in drying your clothes in a clothes dryer. - The ‘standard cotton 60 °C program’ and ‘standard cotton 40 °C program’, which can be selected by adding the Intensive option to the cotton 60 °C and cotton 40 °C program, are suitable to clean normally soiled cotton laundry and they are the most efficient (concerning water and energy consumption) for this type of laundry.
Please run Calibration Mode after the installation(see page 34).
In these programs the actual water temperature may differ from the declared temperature. - Distance to the wall from the unit is not included in the depth dimension.
SHEET OF HOUSEHOLD WASHING MACHINES (EU ONLY)
According to Regulation (EU) No. 1061/2010

“*” Asterisk(s) means variant model and can be varied (0-9) or (A-Z).
| Samsung | ||||
| Model Name | WF1602NHWWF1602NHWG | WF1600*** | ||
| Capacity kg 8.6 | ||||
| Energy Efficiency | ||||
| A+++ (highest efficiency) to D (least efficient) A+ A+ | ||||
| Energy Consumption | ||||
| Annual Energy Consumption (AE_C)1) | kWh/yr 195 195 | |||
| Energy Consumption (E_t.60) Cotton 60 °C at full load kWh 1.06 1.06 | ||||
| Energy Consumption (E_t.60.1/2) Cotton 60 °C with partial load kWh | 0.79 0.79 | |||
| Energy Consumption (E_t.40.1/2) Cotton 40 °C with partial load kWh | 0.65 0.65 | |||
| Weighted power off-mode (P_o) W 0.45 0.45 | ||||
| Weighted power in left-on mode (P_I) W 5.5 | ||||
| Annual water consumption (AW_c)2) | L/yr 8580 | 8580 | ||
| Spin efficiency class3) | ||||
| A (most efficient) to G (least efficient) | B | C | ||
| Maximum Spin Speed | rpm 1200 | 1000 | ||
| Residual moisture | % | 53 | 62 | |
| Programs to which the information on the label and the Sheet relate | Cotton 60 °C and 40 °C + Intensive4) | |||
| Program duration of the standard program | ||||
| Cotton 60 °C at full load | min | 225 225 | ||
| Cotton 60 °C for partial load | min | 162 162 | ||
| Cotton 40 °C with partial load | min | 157 | 157 | |
| Weighted time in left-on mode | min | 2 2 | ||
| Airborne noise emissions | ||||
| Wash | dB (A) re 1 pW | 57 | 57 | |
| Spin | dB (A) re 1 pW | 77 | 74 | |
| Dimensions | ||||
| Unit dimensions | Height | mm | 850 | |
| Width | mm | 600 | ||
| Depth5) | mm | 450 | ||
| Net weight | kg | 54 | ||
| Gross weight | kg | 56 | ||
| Package weight | kg | 2 | ||
| Water Pressure | kPa | 50-800 | ||
| Electrical connection | ||||
| Voltage | V | 220-240 | ||
| Power consumption | W | 2000-2400 | ||
| Frequency | Hz | 50 | ||
| Name of company | Samsung Electronics Co., Ltd. | |||
appendix
- Annual energy consumption is based on 220 standard washing cycles for cotton programs at 60 °C and 40 °C at full and partial load, and the consumption of off and left-on modes. Actual energy consumption will depend on how the appliance is used.
- Annual water consumption is based on 220 standard washing cycles for cotton programs at 60 °C and 40 °C at full and partial load. Actual water consumption will depend on how the appliance is used.
- Spin extraction is very important when you use a clothes dryer to dry your clothes.
The energy for drying costs much higher than the energy for washing.
Wasing with the high spin saves more energy in drying your clothes in a clothes dryer. - The ‘standard cotton 60 °C program’ and ‘standard cotton 40 °C program’, which can be selected by adding the Intensive option to the cotton 60 °C and cotton 40 °C program, are suitable to clean normally soiled cotton laundry and they are the most efficient (concerning water and energy consumption) for this type of laundry.
Please run Calibration Mode after the installation(see page 34).
In these programs the actual water temperature may differ from the declared temperature. - Distance to the wall from the unit is not included in the depth dimension.
INFORMATION OF MAIN WASHING PROGRAMMES
| Model Course Temp (°C) | Capacity(kg) | Program Time (min) | Residual Moisture Content (%) | Water Consumption(€/cycle) | Energy Consumption(kWh/Cycle) | ||
| WF1702**** | Cotton 20 3.5 131 57 38 0.30 | ||||||
| Cotton + intensive | 40 3.5 | 57 53 38 0.67 | |||||
| 60 | 7.0 205 53 49 1.19 | ||||||
| 3.5 162 53 38 0.86 | |||||||
| Synthetics | 40 2.5 91 37 36 0.51 | ||||||
SAMSUNG
QUESTIONS OR COMMENTS?
| counTry call or | VisiT us onlinE aT | |
| BULGARIA | 800 111 31 , Безплатна телефонна линия | www.samsung.com/bg/support |
| CROATIA 072 726 786 www.samsung.com/hr/support | ||
| CZECH 800 - SAMSUNG (800-726786) www.samsung.com/cz/support | ||
| GREECE | 80111-SAMSUNG (80111 726 7864) only from land line (+30) 210 6897691 from mobile and land line | www.samsung.com/gr/support |
| HUNGARY | 0680SAMSUNG (0680-726-786)0680PREMIUM (0680-773-648) | www.samsung.com/hu/support |
| ROMANIA | 08008 726 78 64 (08008 SAMSUNG )Apel GRATUIT | www.samsung.com/ro/support |
| RUSSIA 8-800-555-55-55 www.samsung.com/ru/support | ||
| SERBIA 011 321 6899 www.samsung.com/rs/support | ||
| SLOVAKIA 0800 - SAMSUNG(0800-726 786) www.samsung.com/sk/support | ||
| LITHUANIA 8-800-77777 www.samsung.com/lt/support | ||
| LATVIA | 8000-7267 | www.samsung.com/lv/support |
| ESTONIA | 800-7267 | www.samsung.com/ee/support |
| SLOVENIA | 080 697 267090 726 786 | www.samsung.com/si/support |
Code No. DC68-02796Q-03_EN


WF1702AH(A/C/D/F/G/H/R/S/T/V/W/Z)(G) WF1702NH(A/C/D/F/G/H/R/S/T/V/W/Z)(G)
WF1700AH(A/C/D/F/G/H/R/S/T/V/W/Z)(G) WF1700NH(A/C/D/F/G/H/R/S/T/V/W/Z)(G)
WF1602AH(A/C/D/F/G/H/R/S/T/V/W/Z)(G) WF1602NH(A/C/D/F/G/H/R/S/T/V/W/Z)(G)
WF1600AH(A/C/D/F/G/H/R/S/T/V/W/Z)(G) WF1600NH(A/C/D/F/G/H/R/S/T/V/W/Z)(G)
WF1702AM(A/C/D/F/G/H/R/S/T/V/W/Z)(G) WF1702NM(A/C/D/F/G/H/R/S/T/V/W/Z)(G)
WF1700AM(A/C/D/F/G/H/R/S/T/V/W/Z)(G) WF1700NM(A/C/D/F/G/H/R/S/T/V/W/Z)(G)
WF1602AM(A/C/D/F/G/H/R/S/T/V/W/Z)(G) WF1602NM(A/C/D/F/G/H/R/S/T/V/W/Z)(G)
WF1600AM(A/C/D/F/G/H/R/S/T/V/W/Z)(G) WF1600NM(A/C/D/F/G/H/R/S/T/V/W/Z)(G)
Перална машина
natural_image
Hand holding a rotary knob on a device panel (no text or symbols visible)natural_image
Hand inserting a plug into a circular button on a vehicle door (no text or symbols visible)natural_image
Hand holding a button with an arrow pointing to the next button (no text or symbols visible)natural_image
Diagram showing a device with wiring and a close-up of its internal components (no text or symbols)СТЪПКА 3
natural_image
Line drawing showing hands using pliers to adjust or install a component (no text or symbols present)natural_image
Line drawing of a hand using a tool to adjust or install a component (no text or symbols present)СТЪПКА 4
natural_image
Diagram showing a door panel connected to a faucet, with no text or symbols present.natural_image
Diagram of a pipe fitting with a curved handle and arrow indicating direction (no text or symbols)natural_image
Two identical illustrations of a faucet with a valve, each marked with a black X symbol (no text or labels present)natural_image
Diagram of a faucet with a valve and central hub, showing fluid flow direction (no text or labels)natural_image
Line drawing of a washing machine with a pipe and attached cable, showing dimensions (no text or symbols)СТЪПКА 5
natural_image
Illustration of a braze being placed into a woven basket (no text or symbols)праве на дрехи
natural_image
Two-step line drawing showing hands holding a device with a magnified inset (no text or symbols)
natural_image
Illustration of a hand pressing down on a small object with a downward arrow (no text or symbols)natural_image
Line drawing of hands using a tool to clean or install a device on a sink (no text or symbols present)natural_image
Hand inserting a plastic into a washing machine (no text or symbols visible)natural_image
Line drawing of hands using a tool to adjust or install a mechanical component (no text or symbols visible)

natural_image
Two-step diagram showing cable insertion and disassembly of a device into a container (no text or symbols)РЕМОНТИРАНЕ НА ЗАМРЪЗНАЛА ПЕРАЛНА МАШИНА
natural_image
Hand holding a rotary knob on an airplane cabin (no text or symbols visible)natural_image
Hand inserting a plug into a circular button on a vehicle door (no text or symbols visible)natural_image
Hand holding a small circular component with an arrow pointing to a circular button (no text or symbols visible)Čeština - 16
krok 3
natural_image
Line drawing showing two hands holding a tool, one adjusting the other (no text or symbols present)natural_image
Line drawing of a hand holding a tool interacting with a mechanical component (no text or symbols)krok 4
natural_image
Diagram of a pipe valve with directional arrow indicating flow or movement (no text or symbols)natural_image
Two identical illustrations of a faucet with a valve, each marked with a black X symbol (no text or labels present)natural_image
Diagram of a faucet with a valve and central hub, showing fluid flow direction (no text or labels)natural_image
Line drawing of a washing machine with a 60–90 cm height dimension标注 (no text or symbols on the device itself)KROK 5
Napájení pračky
natural_image
Illustration of a braze being placed into a woven basket (no text or symbols)praní dávky prádla
INFORMACE O PRACÍM PROSTŘEDKU A PŘÍSADÁCH
natural_image
Line drawing showing two hands holding a device with a magnified inset (no text or symbols)
natural_image
Hand holding a small electronic device with a downward arrow above it (no text or symbols visible)natural_image
Line drawing of hands using a tool to clean or repair a surface (no text or symbols)natural_image
Hand inserting a plastic into a washing machine (no text or symbols visible)ČIŠTĚNÍ ODPADOVÉHO FILTRU
natural_image
Illustration of hands using a tool to adjust or install a component on a sink (no text or symbols visible)
natural_image
Two-step diagram showing a cable being inserted into a device, with arrows indicating direction of movement (no text or symbols present)opRAVA ZAMRZIé pRAČky
natural_image
Hand holding a rotary knob on a vehicle door panel (no text or symbols visible)natural_image
Hand inserting a screw into a circular button on a vehicle door (no text or symbols visible)natural_image
Hand holding a button with an arrow pointing to the next button (no text or symbols visible)SAMM 3
Jalgade reguleerimine

natural_image
Line drawing showing hands holding a tool to adjust or install a component, no text or symbols presentnatural_image
Line drawing of a hand using a tool to adjust or install a component (no text or symbols present)SAMM 4
natural_image
Diagram showing a door panel connected to a faucet, with no text or symbols present.natural_image
Diagram of a pipe valve mechanism with directional arrows (no text or labels)natural_image
Two identical illustrations of a faucet with a valve, each marked with a black X symbol (no text or labels present)natural_image
Diagram of a faucet with a valve and central hub, showing fluid flow direction (no text or labels)natural_image
Line drawing of a washing machine with a pipe and height dimension (60–90 cm) shown, no text or symbols present.SAMM 5
JUHISED PESU PESEMISEKS
natural_image
Illustration of a braze being placed into a woven basket (no text or symbols)pesu pesemine
PESUVAHEND JA LISANDID
natural_image
Line drawing showing two hands holding a wallet, one with a magnified inset highlighting the wallet area (no text or symbols present)
natural_image
Line drawing of hands using a tool to clean or repair a small electronic device on a sink (no text or symbols visible)natural_image
Hand inserting a plastic into a washing machine (no text or symbols visible)PRAHIFILTRI PUHASTAMINE
natural_image
Line drawing of hands using a tool to adjust or install a component on a sink (no text or symbols present)
natural_image
Two-step diagram showing cable insertion and hand tool application (no text or symbols)kÜLMuNuD peSuMASiNA pARANDAMiNe
RiiieTe HooLDuSMÄRGiSTe TABeL
natural_image
Hand holding a rotary knob on a vehicle control panel (no text or symbols visible)natural_image
Hand inserting a screw into a circular component on a door (no text or symbols visible)natural_image
Hand inserting a button into a device panel with an arrow indicating direction (no text or symbols)natural_image
Diagram showing a device with wiring and a magnified view of its internal components (no text or symbols)ETAPE 3
natural_image
Line drawing showing two hands holding a tool, one adjusting the other (no text or symbols present)natural_image
Line drawing of a hand using a tool to adjust or install a component (no text or symbols present)ETAPE 4
natural_image
Diagram showing a door panel connected to a faucet, with no text or symbols present.natural_image
Diagram of a pipe fitting with a curved arrow indicating direction (no text or symbols)natural_image
Two identical illustrations of a faucet with a valve, each marked with a black X symbol (no text or labels present)natural_image
Diagram of a faucet with a valve and central hub, showing fluid flow direction (no text or labels)
natural_image
Line drawing of a washing machine with a pipe and height dimension (no text or symbols)ETAPE 5
Activation/Désactivation
Arrêt différé
natural_image
Illustration of a bra, shown in a top view with an open lid and arrow indicating process (no text or symbols)
natural_image
Two-step line drawing showing hands holding a card or folder, with no visible text or symbols.
natural_image
Line drawing of hands using a tool to adjust or install a component on a sink (no text or symbols present)natural_image
Hand inserting a plastic into a washing machine (no text or symbols visible)NETTOYAGE DU FILTRE À IMPURETÉS
natural_image
Line drawing of hands using a tool to adjust or install a component on a sink (no text or symbols present)

natural_image
Two-step diagram showing a hand inserting a cable into a device's port, with no text or symbols present.RépAReR uN IAVe-liNGe qui A Gelé
Code No. DC68-02796Q-03_EN

WF1702AH(A/C/D/F/G/H/R/S/T/V/W/Z)(G) WF1702NH(A/C/D/F/G/H/R/S/T/V/W/Z)(G) WF1700AH(A/C/D/F/G/H/R/S/T/V/W/Z)(G) WF1700NH(A/C/D/F/G/H/R/S/T/V/W/Z)(G) WF1602AH(A/C/D/F/G/H/R/S/T/V/W/Z)(G) WF1602NH(A/C/D/F/G/H/R/S/T/V/W/Z)(G) WF1600AH(A/C/D/F/G/H/R/S/T/V/W/Z)(G) WF1600NH(A/C/D/F/G/H/R/S/T/V/W/Z)(G) WF1702AM(A/C/D/F/G/H/R/S/T/V/W/Z)(G) WF1702NM(A/C/D/F/G/H/R/S/T/V/W/Z)(G) WF1700AM(A/C/D/F/G/H/R/S/T/V/W/Z)(G) WF1700NM(A/C/D/F/G/H/R/S/T/V/W/Z)(G) WF1602AM(A/C/D/F/G/H/R/S/T/V/W/Z)(G) WF1602NM(A/C/D/F/G/H/R/S/T/V/W/Z)(G) WF1600AM(A/C/D/F/G/H/R/S/T/V/W/Z)(G) WF1600NM(A/C/D/F/G/H/R/S/T/V/W/Z)(G)
Πλυντήριο Ρούχων
Εγχειρίδιο Χρήσεως
Planet First
100% Recycled Paper
natural_image
Hand holding a rotary knob on a device control panel (no text or symbols visible)natural_image
Hand inserting a plug into a circular button on a vehicle door (no text or symbols visible)natural_image
Hand holding a circular knob with an arrow pointing to the right button (no text or symbols visible)natural_image
Diagram showing a device with wiring and a close-up of its internal components (no text or symbols)Ελληνικά - 16
BHMA 3
natural_image
Line drawing showing hands using pliers to adjust a component (no text or symbols)natural_image
Line drawing of a hand using a tool to adjust or install a component (no text or symbols present)BHMA 4
natural_image
Diagram showing a door panel connected to a piping outlet with a faucet, no text or symbols presentnatural_image
Diagram of a pipe valve mechanism with directional arrow (no text or labels)natural_image
Two identical illustrations of a faucet with a valve, each marked with a black X symbol (no text or labels present)natural_image
Diagram of a faucet with a valve and central hub, showing fluid flow direction (no text or labels)
natural_image
Line drawing of a washing machine with a pipe and scale indicator (no text or symbols)BHMA 5
natural_image
Illustration of a person lifting a box with a patterned lid (no text or symbols)πλύση
natural_image
Line drawing showing two hands holding a device with a magnified circular detail (no text or symbols)
natural_image
Line drawing of hands using a tool to adjust or install a component on a sink (no text or symbols visible)natural_image
Line drawing of a hand inserting a plastic into a washing machine (no text or symbols)Ελληνικά - 30
natural_image
Line drawing of hands using a tool to adjust or install a component on a sink (no text or symbols present)
natural_image
Two-step diagram showing cable insertion and disassembly of a device into a container (no text or symbols)natural_image
Hand holding a rotary knob on a device panel (no text or symbols visible)natural_image
Hand inserting a plug into a circular button on a door panel (no text or symbols visible)- Otvore prekrijte isporučenim plastičnim poklopcima.

natural_image
Hand holding a small circular component with an arrow pointing to a circular button (no text or symbols visible)natural_image
Diagram showing a washing machine with attached wires and a close-up of the cable being inserted (no text or symbols present)Hrvatski - 16
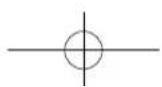
KORAK 3
natural_image
Line drawing showing two hands adjusting a mechanical component (no text or symbols present)natural_image
Line drawing of a hand using a tool to adjust or install a mechanical component (no text or symbols present)KORAK 4
Za odabrane modele s dodatnim dovodom tople vode:
- Uzmite crveni priključak u obliku slova L za crijevo dovoda tople vode i spojite ga na ulaz za toplu vodu na stražnjoj strani uređaja. Ručno pritegnite.
- Drugi kraj cijevi za dovod tople vode priključite na slavinu za toplu vodu u umivaoniku i ručno pritegnite.
- Koristite dio u obliku slova Y ako želite koristiti samo hladnu vodu.
postavljanje perilice za rublje
natural_image
Diagram of a pipe valve mechanism with directional arrow (no text or labels)- Otvorite dovod vode i provjerite ima li curenja iz ventila za vodu, priključka za vodu ili adaptera. Ako voda curi, ponovite prethodne korake.

natural_image
Two identical illustrations of a faucet with a valve, each marked with a black X symbol (no text or labels present)natural_image
Diagram of a faucet with a valve and central hub, showing internal components (no text or labels)
Koristite najuobičajeniju vrstu slavine za dovod vode. U slučaju da je slavina četvrtasta ili prevelika, skinite prsten prije umetanja priključka u adapter.
postavljanje perilice za rublje
natural_image
Line drawing of a washing machine with a pipe and height dimension (no text or symbols)KORAK 5
Odjeljak ① Deterdžent za predpranje ili štirkanje.
Odjeljak ⑪ Deterdžent za glavno pranje, omekšivač vode, sredstvo za prednamakanje, izbjeljivanje i sredstvo za uklanjanje mrlja.
natural_image
Illustration of a brached chest being lifted into a box (no text or symbols)pranje jednog punjenja rublja
INFORMACIJE O DETERDŽENTU I ADITIVIMA
Koji deterdžent koristiti
Tip deterdženta koji trebate koristiti ovisi o vrsti tkanine (pamuk, sintetika, osjetljiva odjeća, vuna), boji, temperaturi pranja i razini zaprljanosti. Uvijek koristite deterdžent sa "smanjenim pjenjenjem" koji je namijenjen automatskim perilicama za rublje.
natural_image
Two-step line drawing showing hands holding a device with a magnified inset (no text or symbols)
- Prilikom korištenja predpranja, dodajte preporučenu količinu deterdženta za rublje u odjeljak za predpranje ①.

Prilikom pranja velikih komada odjeće NE koristite sljedeće vrste deterdženata.
- Deterdžente u tabletama i kapsulama - Deterdžente koje koriste kuglicu i mrežu

natural_image
Line drawing of hands using a tool to clean or repair a small object on a sink (no text or symbols)- Očistite udubljenje u ladici starom četkicom za zube.
- Ponovno postavite razdjelnik za tekući deterdžent tako da ga čvrsto gurnete u ladicu.
- Gurnite ladicu na njezino mjesto.
- Za uklanjanje ostataka deterdženta izvršite ciklus ispiranja bez rublja u bubnju.
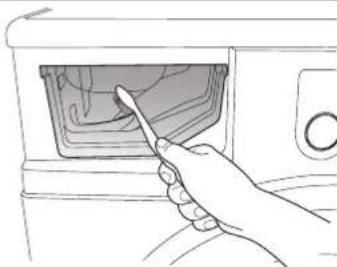
natural_image
Line drawing of a hand inserting a component into a device (no text or symbols)ČIŠĆENJE FILTERA ZA KRUPNE ČESTICE
Čišćenje filtera za krupne čestice preporučujemo 5 do 6 puta godišnje ili kada se pojavi poruka s pogreškom "5E". (Pogledajte "Pražnjenje perilice za rublje u slučaju nužde" na prethodnoj stranici.)

Prije nego započnete čišćenje filtra, uvjerite se da ste iskopčali mašinu iz struje.

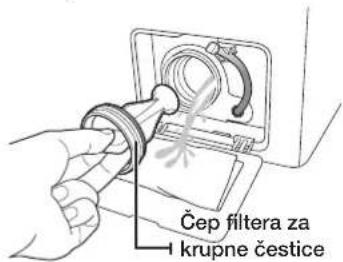
- Prije svega odstranite preostalu vodu (pogledati "Pražnjenje perilice za rublje u slučaju nužde" na strani 29.)
Ukoliko odvojite filtar prije nego što ste odstranili ostatak vode, preostala voda može iscuriti. - Otvorite poklopac filtera pomoću ključa ili kovanice.
- Odvrnite poklopac za hitno pražnjenje okretanjem ulijevo i pustite da sva vode isteče.
- Odvrnite poklopac filtera za krupne čestice.
- Isperite prljavštinu i druge nakupine iz filtera za krupne čestice. Provjerite je li propeler odvodne crpke iza filtera za krupne čestice blokiran.
- Vratite čep filtera za krupne čestice na mjesto.
- Vratite poklopac filtera na mjesto.

natural_image
Line drawing of hands using a tool to adjust or install a component on a sink (no text or symbols present)
- Uvjerite se da je nakon čišćenja filtra, poklopac vraćen na mjesto. Ukoliko filtar ostane van stroja, na vašoj perilici može nastati kvar ili curenje vode.
- Nakon čišćenja filtar mora biti u potpunosti sklopljen.
natural_image
Two-step diagram showing a hand inserting a cable into a device's port, with no text or symbols present.POPRAVAK ZAMRZNUTE PERILICE ZA RUBLJE
Ako temperatura padne ispod točke smrzavanja i perilica se zamrzne:
EGY ADAG SZENNYES MOSÁSA
21
natural_image
Hand holding a rotary knob on an airplane cabin (no text or symbols visible)natural_image
Hand inserting a plug into a button on a vehicle door (no text or symbols visible)natural_image
Hand holding a circular button with an arrow pointing to the right button (no text or symbols visible)3. lépés
natural_image
Line drawing showing two hands holding a tool, one adjusting the other's grip (no text or symbols present)natural_image
Line drawing of a hand using a tool to adjust or install a component (no text or symbols present)4. lépés
natural_image
Diagram of a pipe fitting with a curved arrow indicating direction (no text or symbols)natural_image
Two identical illustrations of a faucet with a valve, each marked with a black X symbol (no text or labels present)natural_image
Diagram of a faucet with a valve and central hub, showing fluid flow direction (no text or labels)natural_image
Line drawing of a washing machine with a vertical pipe and dimension annotation (60–90 cm), no text or symbols present.5. LÉPÉS
natural_image
Illustration of a brached top being lifted into a wireframe box (no text or symbols)natural_image
Two-step illustration showing hands holding a card or envelope, with no visible text or symbols
natural_image
Line drawing of hands using a tool to clean or repair a small object on a sink (no text or symbols)natural_image
Hand inserting a plastic into a washing machine (no text or symbols visible)natural_image
Line drawing of hands using a tool to clean or wash the sink surface (no text or symbols)

natural_image
Two-step diagram showing cable insertion and hand tool application (no text or symbols)beFAGYoTT MoSóGéP JAVíTáSA
natural_image
Hand holding a rotary knob on a device control panel (no text or symbols visible)natural_image
Hand inserting a plug into a circular button on a vehicle door (no text or symbols visible)natural_image
Hand holding a circular button with an arrow pointing to the right button (no text or symbols visible)Lietuvių - 16

3 ŽINGSNIS
natural_image
Line drawing showing hands using pliers to adjust or install a component (no text or symbols present)natural_image
Line drawing of a hand using a tool to adjust or install a mechanical component (no text or symbols present)4 ŽINGSNIS
natural_image
Diagram showing a door panel connected to a piping outlet with a faucet, no text or symbols presentRinktiniams modeliams su papildomu karšto vandens jsiurbimu:
natural_image
Diagram of a pipe valve mechanism with directional arrow (no text or symbols)natural_image
Two identical illustrations of a faucet with a valve, each marked with a black X symbol (no text or labels present)natural_image
Diagram of a faucet with a valve and central hub, showing fluid flow direction (no text or labels)natural_image
Line drawing of a washing machine with a pipe and scale indicator (no text or symbols)5 ŽINGSNIS
natural_image
Illustration of a bra, shown in a box with a handle and arrow indicating compression (no text or symbols)
natural_image
Two-step illustration showing hands holding a card with a magnified inset showing the magnified view of the card (no text or symbols present)
natural_image
Line drawing of hands using a tool to clean or repair a small object on a sink (no text or symbols)natural_image
Hand inserting a component into a washing machine (no text or symbols visible)Lietuvių - 30
NUOSĖDŲ FILTRO VALYMAS
natural_image
Line drawing of hands using a tool to adjust or install a component on a sink (no text or symbols present)natural_image
Two-step diagram showing a hand inserting cable into a device via a switch, with no visible text or symbols.UŽŠALUSIOS SKALBIMO MAŠINOS TAISYMAS
natural_image
Hand holding a rotary knob on a device control panel (no text or symbols visible)natural_image
Hand inserting a screw into a button on a vehicle door (no text or symbols visible)natural_image
Hand inserting a knob into a door panel with an arrow indicating the pointer (no text or symbols present)Latviešu - 16
3.SOLIS
natural_image
Line drawing showing two hands holding a tool, one adjusting the other (no text or symbols present)natural_image
Line drawing of a hand using a tool to adjust or install a component (no text or symbols present)4.SOLIS
Üdens caurules un novadcaurules pievienošana
Üdens padeves caurules pievienošana
natural_image
Diagram showing a door panel with pipe connections and a faucet, no text or symbols presentnatural_image
Diagram of a pipe fitting with a curved arrow indicating direction (no text or symbols)natural_image
Two identical illustrations of a faucet with a valve, each marked with a black X symbol (no text or labels present)natural_image
Diagram of a faucet with a valve and central hub, showing fluid flow direction (no text or labels)
natural_image
Line drawing of a washing machine with a 60–90 cm height pipe and attached cable (no text or symbols)5.SOLIS
Atliktā izslēgšana
natural_image
Illustration of a brached top emerging from a woven basket (no text or symbols)velas mazgāšana
INFORMAÇIJA PAR MAZGÄŠANAS LİDZEKLIEM UN PAPILDU PIEDEVÄM
natural_image
Two-step line drawing showing hand holding a device with magnified circular detail (no text or symbols)
natural_image
Hand holding a small object with a downward arrow above it, no text or symbols visiblenatural_image
Line drawing of hands using a cleaning tool on a sink (no text or symbols)natural_image
Line drawing of a hand inserting a plastic into a washing machine (no text or symbols)NETİRUMU FILTRA TİRİŞANA
natural_image
Line drawing of hands using a tool to adjust or install a component on a sink (no text or symbols present)
natural_image
Diagram of a cable being inserted into a device socket (no text or symbols visible)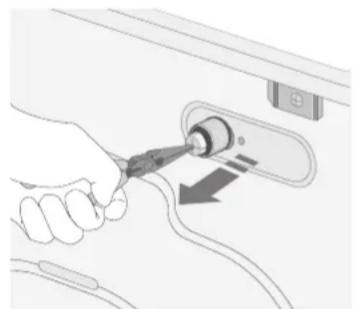
natural_image
Hand inserting a plug into a device panel with cable (no text or symbols visible)SASALUŠAS VEJAS MAZGĀJAMĀS MAŠĪNAS REMONTĒŠANA
natural_image
Hand holding a rotary knob on a vehicle control panel (no text or symbols visible)natural_image
Hand inserting a screw into a circular button on a vehicle door (no text or symbols visible)natural_image
Line drawing of a hand pressing a button on a device panel (no text or symbols)natural_image
Diagram showing a washing machine with attached tubing and a close-up of the device's cable (no text or symbols present)Македонски - 16
ЧЕКОР 3
natural_image
Line drawing showing hands using pliers to adjust a component (no text or symbols)natural_image
Line drawing of a hand using a tool to adjust or install a component (no text or symbols present)ЧЕКОР 4
natural_image
Diagram showing a door panel connected to a piping outlet, with an inset view of a faucet (no text or labels present)natural_image
Line drawing of a pipe fitting with a curved arrow indicating direction (no text or symbols)Македонски - 18
natural_image
Two identical illustrations of a faucet with a valve, each marked with a black X symbol (no text or labels present)natural_image
Diagram of a faucet with a valve and central hub, showing fluid flow direction (no text or labels)
natural_image
Line drawing of a washing machine with a 60–90 cm height dimension标注 (no text or symbols on the device itself)ЧЕКОР 5
natural_image
Illustration of a bra, shown in a box with a lid open, and a hand above it (no text or symbols)перење на алишта
natural_image
Two-step line drawing showing hands holding a card with a magnified inset (no text or symbols)
natural_image
Line drawing of hands using a tool to clean or install a device on a sink (no text or symbols present)natural_image
Hand inserting a plastic into a washing machine (no text or symbols visible)natural_image
Line drawing of hands using a tool to adjust or install a component on a sink (no text or symbols present)
natural_image
Two-step diagram showing cable insertion and tool application on a device (no text or symbols)ПОПРАВКА НА ЗАМРЗНАТА МАШИНАТА ЗА ПЕРЕЊЕ
ROZWIAZYWANIE PROBLEMÓW I KODY INFORMACYJNE
33
33Jeślipralka...
34Kodyinformacyjne
KALIBRACJA PRALKI
34
34Trybkalibracji
TABELA CYKLI
35
35Tabelacykli
DODATEK
36
natural_image
Hand holding a rotary knob on a device control panel (no text or symbols visible)natural_image
Hand inserting a screw into a circular button on a door (no text or symbols visible)natural_image
Hand holding a circular knob with an arrow pointing to the right button (no text or symbols visible)KROK 3
natural_image
Line drawing showing two hands holding a tool, one adjusting the other (no text or symbols present)natural_image
Line drawing of a hand using a tool to adjust or install a component (no text or symbols present)KROK 4
natural_image
Diagram of a pipe fitting with a curved arrow indicating direction (no text or symbols)natural_image
Two identical illustrations of a faucet with a valve, each marked with a black X symbol (no text or labels present)natural_image
Diagram of a faucet with a valve and central hub, showing fluid flow direction (no text or labels)
natural_image
Line drawing of a washing machine with a 60–90 cm height dimension标注 (no text or symbols on the device itself)KROK 5
Zasilanie pralki
natural_image
Illustration of a braze being placed into a woven basket (no text or symbols)pranie
INFORMACJE DOTYCZĄCE DETERGENTÓW I DODATKÓW
natural_image
Line drawing showing two hands holding a card or folder, with one hand pointing at a magnified view of the card (no text or symbols present)
natural_image
Line drawing of hands using a tool to adjust or install a mechanical component on a sink (no text or symbols present)natural_image
Line drawing of a hand inserting a plastic into a washing machine (no text or symbols)CZYSZCZENIE FILTRA ZANIECZYSZCZEŃ
natural_image
Line drawing of hands using a tool to adjust or install a component on a sink (no text or symbols present)
natural_image
Two-step diagram showing cable insertion and disassembly of a device into a socket (no text or symbols)INFORMACJE NA TEMAT GŁÓWNYCH PROGRAMÓW PRANIA
Code No. DC68-02796Q-03_EN


WF1702AH(A/C/D/F/G/H/R/S/T/V/W/Z)(G) WF1702NH(A/C/D/F/G/H/R/S/T/V/W/Z)(G)
WF1700AH(A/C/D/F/G/H/R/S/T/V/W/Z)(G) WF1700NH(A/C/D/F/G/H/R/S/T/V/W/Z)(G)
WF1602AH(A/C/D/F/G/H/R/S/T/V/W/Z)(G) WF1602NH(A/C/D/F/G/H/R/S/T/V/W/Z)(G)
WF1600AH(A/C/D/F/G/H/R/S/T/V/W/Z)(G) WF1600NH(A/C/D/F/G/H/R/S/T/V/W/Z)(G)
WF1702AM(A/C/D/F/G/H/R/S/T/V/W/Z)(G) WF1702NM(A/C/D/F/G/H/R/S/T/V/W/Z)(G)
WF1700AM(A/C/D/F/G/H/R/S/T/V/W/Z)(G) WF1700NM(A/C/D/F/G/H/R/S/T/V/W/Z)(G)
WF1602AM(A/C/D/F/G/H/R/S/T/V/W/Z)(G) WF1602NM(A/C/D/F/G/H/R/S/T/V/W/Z)(G)
WF1600AM(A/C/D/F/G/H/R/S/T/V/W/Z)(G) WF1600NM(A/C/D/F/G/H/R/S/T/V/W/Z)(G)
Maşină de spălat
Manual de utilizare
Planet First
100%
Recycled Paper
INSTRUCTIUNI PRIVIND MARCA WEEE
natural_image
Hand holding a rotary knob on a device control panel (no text or symbols visible)natural_image
Hand inserting a screw into a circular button on a device panel (no text or symbols visible)natural_image
Hand holding a knob with an arrow pointing to the right button (no text or symbols visible)Română - 16

pAsul 3
Reglarea piciorușelor de echilibrare

natural_image
Line drawing showing hands holding a tool to adjust or install a component, no text or symbols presentnatural_image
Line drawing of a hand using a tool to adjust or install a component (no text or symbols visible)pAsul 4
natural_image
Diagram showing a door panel with pipe connections and a faucet, no text or symbols presentnatural_image
Diagram of a pipe valve mechanism with directional arrows (no text or symbols)natural_image
Two identical illustrations of a faucet with cross marks indicating no change or failure, no text or symbols present.natural_image
Diagram of a faucet with a valve and central hub, showing fluid flow direction (no text or labels)
natural_image
Line drawing of a washing machine with a 60–90 cm height dimension标注 (no text or symbols on the device itself)PASUL 5
INDICATII PENTRU RUFE
natural_image
Illustration of a brached bag being lifted into a patterned open box (no text or symbols)natural_image
Two-step line drawing showing hand holding a device with a magnified inset highlighting the screen area (no text or symbols present)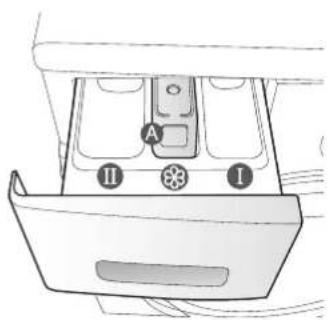
natural_image
Hand holding a small object with a downward arrow above it, no text or symbols visiblenatural_image
Line drawing of hands using a tool to clean or repair a small object on a sink (no text or symbols)natural_image
Hand inserting a plastic into a washing machine (no text or symbols visible)CURĂȚAREA FILTRULUI DE SCAME
natural_image
Line drawing of hands using a tool to adjust or install a component on a sink (no text or symbols present)
natural_image
Two-step diagram showing a hand inserting a cable into a device's port, with no text or symbols present.REPARAREA UNEI MAŞINI DE SPĂLAT ÎNGHETATE
natural_image
Hand holding a rotary switch inside a vehicle control panel (no text or symbols visible)natural_image
Hand inserting a screw into a circular button on a door (no text or symbols visible)natural_image
Hand holding a circular button with an arrow pointing to the right button (no text or symbols visible)natural_image
Diagram showing a device with internal components and two circular insets illustrating cable installation (no text or symbols)ШАГ 3
natural_image
Line drawing showing two hands holding a tool, one adjusting the other's grip (no text or symbols present)natural_image
Line drawing of a hand using a tool to adjust or install a component (no text or symbols present)ШАГ 4
natural_image
Diagram of a pipe fitting with a curved arrow indicating direction (no text or symbols)natural_image
Two identical illustrations of a faucet with a valve, each marked with a black X symbol (no text or labels present)natural_image
Diagram of a faucet with a valve and central hub, showing fluid flow direction (no text or labels)
natural_image
Line drawing of a washing machine with a 60–90 cm height measurement annotation (no text or symbols on the device itself)ШАГ 5
natural_image
Illustration of a braze being placed into a woven basket (no text or symbols)стирка белья
natural_image
Two-step line drawing showing hands holding a card or folder, with no visible text or symbols.
natural_image
Line drawing of hands using a tool to clean or repair a small object on a sink (no text or symbols)natural_image
Hand inserting a plastic into a washing machine (no text or symbols visible)natural_image
Line drawing of hands using a tool to adjust or install a component on a sink (no text or symbols present)
natural_image
Two-step diagram showing a hand inserting a cable into a device panel, with no visible text or symbols.natural_image
Hand holding a rotary knob on a device panel (no text or symbols visible)natural_image
Hand inserting a screw into a circular button on a vehicle door (no text or symbols visible)natural_image
Hand holding a circular button next to a circular knob with an arrow pointing to the right button (no text or symbols visible)natural_image
Diagram showing a device with wiring and a close-up of its internal components (no text or symbols)Slovenčina - 16

KROK 3
natural_image
Line drawing showing two hands using a tool to adjust or install a component, no text or symbols presentnatural_image
Line drawing of a hand using a tool to adjust or install a component (no text or symbols present)KROK 4
natural_image
Diagram of a pipe fitting with a curved arrow indicating direction (no text or symbols)natural_image
Two identical illustrations of a faucet with a valve, each marked with a black X symbol (no text or labels present)natural_image
Diagram of a faucet with a valve and central hub, showing internal components and a rotating arrow (no text or labels)
natural_image
Line drawing of a washing machine with a pipe and cable, showing dimensions (no text or symbols)KROK 5
natural_image
Illustration of a bra knuckle being lifted into a box (no text or symbols)pranie bielizne
PRACIE PROSTRIEDKY A PRÍSADY
natural_image
Two-step line drawing showing hands holding a card or folder, with no visible text or symbols.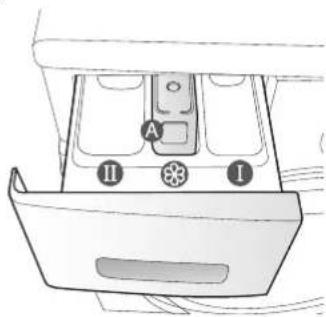
natural_image
Hand holding a small container with a downward arrow above it, no text or symbols presentnatural_image
Line drawing of hands using a tool to clean or repair a surface, no text or symbols present- Vyčistite vnútorné časti dávkovača pomocou starej zubnej kefky.
- Zásobník na tekutý prací prostriedok vrátte na svoje miesto zasunutím do dávkovača.
- Zasuňte dávkovač naspät na svoje miesto.
- Zvyšky čistiaceho prostriedku odstránite tak, že spustíte plákanie bez bielizne.

natural_image
Hand inserting a plastic into a washing machine (no text or symbols visible)ČISTENIE ODPADOVÉHO FILTRA A NEČISTÔT
natural_image
Line drawing of hands using a tool to adjust or install a mechanical component on a sink (no text or symbols present)

natural_image
Two-step diagram showing a hand inserting a cable into a device, with arrows indicating direction (no text or symbols present)OPRAVA ZAMRZNUTEj AUTOMATICKEj PRÁČKY
natural_image
Hand holding a rotary knob on a device panel (no text or symbols visible)natural_image
Hand inserting a screw into a circular component, no text or symbols visiblenatural_image
Hand holding a small circular component with an arrow pointing to a circular button (no text or symbols visible)HAPI 3
natural_image
Line drawing showing two hands holding a tool, one adjusting the other (no text or symbols present)natural_image
Line drawing of a hand using a tool to adjust or install a component (no text or symbols present)HAPI 4
natural_image
Diagram of a pipe valve mechanism with directional arrow (no text or symbols)natural_image
Two identical illustrations of a faucet with a valve, each marked with a black X symbol (no text or labels present)natural_image
Diagram of a faucet with a valve and central hub, showing fluid flow direction (no text or labels)
natural_image
Line drawing of a front-loading washing machine with a 60–90 cm height dimension标注 (no text or symbols on the machine itself)HAPI 5
natural_image
Illustration of a brached coat being lifted into a box (no text or symbols)
natural_image
Two-step line drawing showing hand holding a device with magnified circular detail (no text or symbols)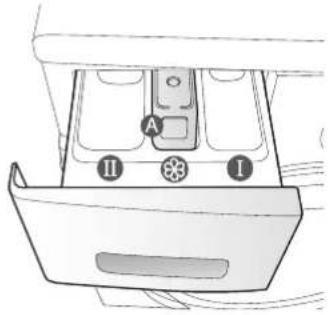
natural_image
Line drawing of hands using a tool to clean or repair a surface, no text or symbols presentnatural_image
Line drawing of a hand inserting a plastic into a washing machine (no text or symbols)PASTRIMI I FILTRIT TË COPËZAVE.
natural_image
Line drawing of hands using a tool to clean or wash a basin (no text or symbols)
natural_image
Two-step diagram showing cable insertion and hand tool application on a device (no text or symbols)RIPARIMI I NJË MAKINË LARËSE TË NGRIRË
natural_image
Hand holding a rotary knob on a device control panel (no text or symbols visible)natural_image
Hand inserting a screw into a circular button on a door (no text or symbols visible)natural_image
Line drawing of a hand inserting a button into a device panel (no text or symbols)natural_image
Diagram showing a washing machine with attached wires and a close-up of the cable being inserted (no text or symbols present)Srpski - 16
KORAK 3
Podešavanje nožica za ravnanje

Kada instalirate mašinu za pranje veša, proverite da li su lako dostupni kabl za napajanje, dovod i odvod vode.
-
Namestite mašinu za pranje veša na mesto.
-
Poravnajte mašinu za pranje veša ručnim pomeranjem nožica za ravnanje po potrebi na unutra ili ka spolja.
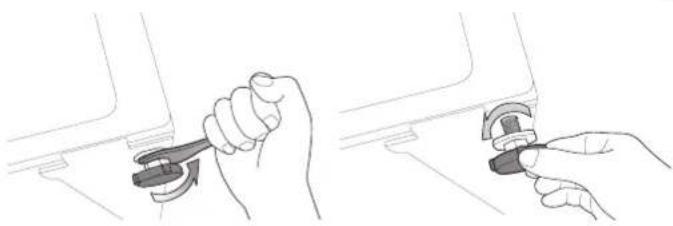
natural_image
Line drawing showing hands using pliers to adjust or install a component (no text or symbols present)- Kada poravnate mašinu za pranje veša, pritegnite matice pomoću ključa za odvijanje koji ste dobili sa mašinom za pranje veša.
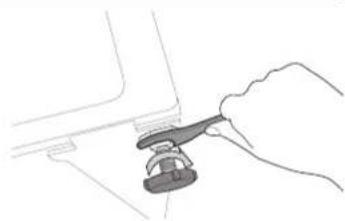
natural_image
Line drawing of a hand using a tool to adjust or install a component (no text or symbols present)KORAK 4
Za označene modele sa dodatnim dovodnim otvorom za vruću vodu:
- Uzmite crvenu cev u obliku slova L za crevo za dovod vruće vode i povežite je sa dovodnim otvorom za vruću vodu na zadnjem delu mašine. Zavrnite rukom.
- Povežite drugi kraj creva za dovod vruće vode na slavinu za vruću vodu na lavabou i zavrnite rukom.
- Ako želite da koristite samo hladnu vodu, upotrebite Y-deo.
- Drugi kraj creva za dovod vode povežite sa dolaznim ventilom za vodu na zadnjem delu mašine za pranje veša. Zavrnite crevo do kraja u smeru kretanja kazaljke na satu.
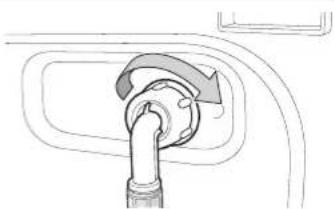
natural_image
Diagram of a pipe fitting with a curved arrow indicating direction (no text or symbols)- Otvorite dovod vode i proverite da nema curenja vode na ventilu za vodu, slavini ili adapteru. Ako ima curenja vode, ponovite prethodne korake.

natural_image
Two identical illustrations of a faucet with a valve, each marked with a black X symbol (no text or labels present)natural_image
Diagram of a faucet with a valve and central hub, showing fluid flow direction (no text or labels)Za dovod vode koristite najuobičajeniji tip česme. U slučaju da je česma kvadratnog oblika ili da je prevelika, uklonite prsten graničnik pre povezivanja sa adapterom.
natural_image
Line drawing of a washing machine with a pipe and attached cable, showing dimensions (no text or symbols)KORAK 5
Priključivanje mašine za pranje veša na napajanje
natural_image
Illustration of a person's torso and chest cover being lifted into a box (no text or symbols)pranje veša
INFORMACIJE O PRAŠAKU I ADITIVIMA
Izbor praška
natural_image
Two-step line drawing showing hands holding a card or folder, with no visible text or symbols
- Kada koristite opciju Prewash (Pretpranje), dodajte preporučenu količinu praška za veš u pregradu za pretpranje ①.

Kada perete velike komade veša NEMOJTE da koristite navedene tipove praška.
• Prašak u tabletama i kapsulama
• Prašak koji je u loptici ili mrežici

Koncentrovan ili gust omekšivač za tkaninu morate rastvoriti u maloj količini vode pre nego što ga sipate u posudu (sprečava zapušavanje odvoda).

Vodite računa da ne stavite previše omekšivača kako se pregrada ne bi prepunila pri zatvaranju fiokice za prašak.
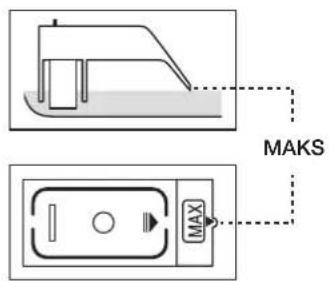
čišćenje i održavanje mašine za pranje veša
natural_image
Line drawing of hands using a tool to clean or repair a surface (no text or symbols)- Otvor na fioci očistite starom četkicom za zube.
- Vratite graničnik za tečni prašak na mesto tako što ćete snažno da ga gurnete u fioku.
- Vratite fioku na mesto.
- Za uklanjanje ostataka praška, pokrenite ciklus ispiranja bez veša u bubnju.

natural_image
Line drawing of a hand inserting a plastic into a washing machine (no text or symbols)ČIŠĆENJE FILTERA ZA OTPATKE
Preporučuje se čišćenje filtera za otpatke 5 ili 6 puta godišnje ili kada se pojavi poruka o grešci "5E". (Pogledajte odeljak "Ispuštanje vode iz mašine za pranje veša u hitnim slučajevima" na prethodnoj strani.)

Pre čišćenja filtera za nečistoće proverite da li ste izvadili strujni kabl iz napajanja.
- Najpre uklonite preostalu vodu (pogledajte odeljak „Ispuštanje vode iz mašine za pranje veša u hitnim slučajevima“ na 29. stranici.)

Ako odvojite filter pre pražnjenja vode može doći do curenja.
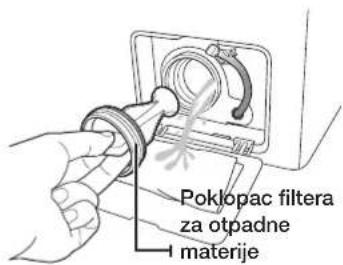
- Poklopac filtera otvorite pomoću ključa ili novčića.
- Otpustite poklopac cevi za otpuštanje u hitnim slučajevima tako što ćete da ga okrenete ulevo i ispustite svu vodu.
- Otpustite poklopac filtera za otpatke.
- Isperite prljavštinu i ostatke iz filtera za otpatke. Proverite da li je propeler odvodne pumpe iza filtera za otpatke slobodan.
- Zamenite poklopac filtera za otpatke.
- Vratite poklopac filtera.
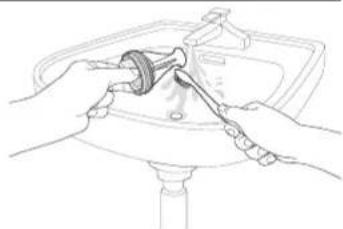
natural_image
Line drawing of hands using a tool to adjust or install a mechanical component on a sink (no text or symbols present)
natural_image
Two-step diagram showing a hand inserting a cable into a device's port, with no text or symbols present.POPRAVLJANE ZAMRZNUTE MAŠINE ZA PRANJE VEŠA
- Washing Machine user manual
- contents
- SETTING UP YOUR WASHING MACHINE
- WASHING A LOAD OF LAUNDRY
- CLEANING AND MAINTAINING YOUR WASHING MACHINE
- TROUBLESHOOTING AND INFORMATION CODES
- CALIBRATING YOUR WASHING MACHINE
- CYCLE CHART
- APPENDIX
- English - 2
- safety information
- WHAT YOU NEED TO KNOW ABOUT SAFETY INSTRUCTIONS
- IMPORTANT SAFETY SYMBOLS AND PRECAUTIONS
- SeVeRe WARNING SiGNS FoR iINSTALLATION
- English - 6
- CAuTioN SiGNS FoR iINSTALLION
- SeVeRe WARNING SiGNS FoR uSiNG
- English - 10
- SeVeRe WARNING SiGNS FoR CleANiNG
- iNSTRuCTioN AbouT THE Weee MARk
- Correct Disposal of This Product (Waste Electrical & Electronic Equipment)
- CHECKING THE PARTS
- MEETING INSTALLATION REQUIREMENTS
- Electrical supply and grounding
- Water Supply
- Drain
- Flooring
- Surrounding temperature
- Alcove or closet installation
- INSTALLING YOUR WASHING MACHINE
- STEP 1
- Selecting a location
- STEP 2
- Removing the shipping bolts
- STEP 3
- Adjusting the levelling feet
- STEP 4
- Connecting the water and drain
- Connecting the water supply hose
- For selected models with an additional hot water intake:
- Connecting the water supply hose (selected models)
- Connecting the drain hose
- STEP 5
- powering your washing machine
- Test run
- WASHING FOR THE FIRST TIME
- BASIC INSTRUCTIONS
- Child lock
- Activating/Deactivating
- Delay end
- Washing clothes using the cycle selector
- Pause Option
- When the cycle is finished:
- Washing clothes manually
- LAUNDRY GUIDELINES
- Sort and wash your laundry according to the following criteria:
- Emptying pockets
- Prewashing cotton
- Determining the load capacity
- Make sure to insert brassieres (water washable) into a laundry net (to be purchased additionally).
- DETERGENT AND ADDITIVES INFORMATION
- Which detergent to use
- Please note the following when using the Wool course.
- Detergent drawer
- DRAINING THE WASHING MACHINE IN AN EMERGENCY
- CLEANING THE EXTERIOR
- CLEANING THE DETERGENT DRAWER AND DRAWER RECESS
- CLEANING THE DEBRIS FILTER
- CleANiNG THE WATeR HoSe MeSH FilTeR
- RepAiRiNG A FRoZeN WASHiNG MACHiNe
- SToRiNG youR WASHiNG MACHiNe
- iNFoRMATioN CoDeS
- CALibRATioN MoDe
- FAbRiC CARE CHART
- pRoTeCTiNG THE eNViRoNMeNT
- SHEET OF HOUSEHOLD WASHING MACHINES (EU ONLY)
- SAMSUNG
- Перална машина
- СТЪПКА 3
- СТЪПКА 4
- СТЪПКА 5
- праве на дрехи
- РЕМОНТИРАНЕ НА ЗАМРЪЗНАЛА ПЕРАЛНА МАШИНА
- krok 3
- krok 4
- KROK 5
- Napájení pračky
- praní dávky prádla
- INFORMACE O PRACÍM PROSTŘEDKU A PŘÍSADÁCH
- ČIŠTĚNÍ ODPADOVÉHO FILTRU
- opRAVA ZAMRZIé pRAČky
- SAMM 3
- Jalgade reguleerimine
- SAMM 4
- SAMM 5
- JUHISED PESU PESEMISEKS
- pesu pesemine
- PESUVAHEND JA LISANDID
- PRAHIFILTRI PUHASTAMINE
- kÜLMuNuD peSuMASiNA pARANDAMiNe
- RiiieTe HooLDuSMÄRGiSTe TABeL
- ETAPE 3
- ETAPE 4
- ETAPE 5
- Activation/Désactivation
- Arrêt différé
- NETTOYAGE DU FILTRE À IMPURETÉS
- RépAReR uN IAVe-liNGe qui A Gelé
- Πλυντήριο Ρούχων
- Εγχειρίδιο Χρήσεως
- BHMA 3
- BHMA 4
- BHMA 5
- πλύση
- KORAK 3
- KORAK 4
- Za odabrane modele s dodatnim dovodom tople vode:
- postavljanje perilice za rublje
- KORAK 5
- pranje jednog punjenja rublja
- INFORMACIJE O DETERDŽENTU I ADITIVIMA
- Koji deterdžent koristiti
- ČIŠĆENJE FILTERA ZA KRUPNE ČESTICE
- POPRAVAK ZAMRZNUTE PERILICE ZA RUBLJE
- EGY ADAG SZENNYES MOSÁSA
- lépés
- lépés
- LÉPÉS
- beFAGYoTT MoSóGéP JAVíTáSA
- ŽINGSNIS
- ŽINGSNIS
- Rinktiniams modeliams su papildomu karšto vandens jsiurbimu:
- ŽINGSNIS
- NUOSĖDŲ FILTRO VALYMAS
- UŽŠALUSIOS SKALBIMO MAŠINOS TAISYMAS
- 3.SOLIS
- 4.SOLIS
- Üdens caurules un novadcaurules pievienošana
- Üdens padeves caurules pievienošana
- 5.SOLIS
- Atliktā izslēgšana
- velas mazgāšana
- INFORMAÇIJA PAR MAZGÄŠANAS LİDZEKLIEM UN PAPILDU PIEDEVÄM
- NETİRUMU FILTRA TİRİŞANA
- SASALUŠAS VEJAS MAZGĀJAMĀS MAŠĪNAS REMONTĒŠANA
- ЧЕКОР 3
- ЧЕКОР 4
- ЧЕКОР 5
- перење на алишта
- ПОПРАВКА НА ЗАМРЗНАТА МАШИНАТА ЗА ПЕРЕЊЕ
- ROZWIAZYWANIE PROBLEMÓW I KODY INFORMACYJNE
- KALIBRACJA PRALKI
- TABELA CYKLI
- DODATEK
- Zasilanie pralki
- pranie
- INFORMACJE DOTYCZĄCE DETERGENTÓW I DODATKÓW
- CZYSZCZENIE FILTRA ZANIECZYSZCZEŃ
- Maşină de spălat
- Manual de utilizare
- INSTRUCTIUNI PRIVIND MARCA WEEE
- pAsul 3
- Reglarea piciorușelor de echilibrare
- pAsul 4
- PASUL 5
- INDICATII PENTRU RUFE
- CURĂȚAREA FILTRULUI DE SCAME
- REPARAREA UNEI MAŞINI DE SPĂLAT ÎNGHETATE
- ШАГ 3
- ШАГ 4
- ШАГ 5
- стирка белья
- pranie bielizne
- PRACIE PROSTRIEDKY A PRÍSADY
- ČISTENIE ODPADOVÉHO FILTRA A NEČISTÔT
- OPRAVA ZAMRZNUTEj AUTOMATICKEj PRÁČKY
- HAPI 3
- HAPI 4
- HAPI 5
- PASTRIMI I FILTRIT TË COPËZAVE.
- RIPARIMI I NJË MAKINË LARËSE TË NGRIRË
- Podešavanje nožica za ravnanje
- Za označene modele sa dodatnim dovodnim otvorom za vruću vodu:
- Priključivanje mašine za pranje veša na napajanje
- pranje veša
- INFORMACIJE O PRAŠAKU I ADITIVIMA
- Izbor praška
- čišćenje i održavanje mašine za pranje veša
- ČIŠĆENJE FILTERA ZA OTPATKE
- POPRAVLJANE ZAMRZNUTE MAŠINE ZA PRANJE VEŠA
Brand : SAMSUNG
Model : WF1602NHW
Category : Washing machine