
HB33K550 - Built-in oven SIEMENS - Free user manual and instructions
Find the device manual for free HB33K550 SIEMENS in PDF.
| Product type | Built-in oven |
| Brand | Siemens |
| Model | HB33K550 |
| Cooking modes | Natural convection, 3D hot air, Intensive hot air / Pizza position, Bottom heat, Hot air grilling, Small area grill, Large area grill, Defrost, Rapid heating |
| Number of shelf levels | 3 levels |
| Included accessories | Rack (HZ 334000), Baking tray (HZ 332000), Enameled baking sheet (HZ 331000) |
| Optional accessories | Special rack (HZ 3240000), Pizza plate (HZ 317000), Triple telescopic system (HZ 338307) |
| Interior lighting | Incandescent bulb E14, 230-240 V, 25 W, heat resistant up to 300°C |
| Display | Digital display with control keys (Time, Key, Timer, +, -) |
| Programming functions | Timer, cooking duration, delayed cooking end, automatic shut-off |
| Child safety | Yes, temporary locking via Key key |
| Cleaning | Self-cleaning catalytic enamel back wall, removable oven door, foldable grill heating element |
| Cooling fan | Yes, starts and stops automatically |
| Safety instructions | Do not use high-pressure or steam cleaners; hot door: open carefully; repairs by authorized technician |
| Electrical connection | By an authorized specialist; voltage and power not specified in the manual |
| Dimensions (approx.) | Not specified in the manual; standard dimensions for built-in oven (e.g., 595x595x548 mm) |
| Weight (approx.) | Not specified in the manual; about 35 kg (estimate) |
Frequently Asked Questions - HB33K550 SIEMENS
User questions about HB33K550 SIEMENS
0 question about this device. Answer the ones you know or ask your own.
Ask a new question about this device
Download the instructions for your Built-in oven in PDF format for free! Find your manual HB33K550 - SIEMENS and take your electronic device back in hand. On this page are published all the documents necessary for the use of your device. HB33K550 by SIEMENS.
USER MANUAL HB33K550 SIEMENS
Eine Störung, was tun? 30
Eine Störung, was tun?
Making cooking as much fun as eating
Please read this instruction manual. This will ensure that you make use of all the technical benefits the cooker has to offer.
You will be given important safety information. You will then be introduced to the individual components of your new cooker and we will show you how to adjust it step by step. It is quite simple.
The tables list the settings and shelf heights for numerous well-known dishes. All these dishes are tested in our cooking studio.
In the unlikely event of a fault, look here for information on how to rectify minor faults yourself.
A detailed table of contents will help you to find your way around quickly.
Enjoy your meal!
Table of contents
| Important information | 53 |
| Before installation | 53 |
| Safety information | 53 |
| Reasons for damage | 54 |
| Your new cooker | 55 |
| The control panel | 55 |
| Function selector | 55 |
| Temperature selector | 56 |
| Control buttons and display panel | 57 |
| Push-in control knobs | 57 |
| Types of heating | 57 |
| Oven and shelving accessories | 60 |
| Cooling fan | 62 |
| Before using for the first time | 62 |
| Heating up the oven | 62 |
| Pre-cleaning the accessories | 62 |
| Setting the oven | 63 |
| Setting procedure | 63 |
| If the oven is to switch off automatically | 64 |
| If the oven ist to switch on and off automatically | 65 |
| Rapid heating | 66 |
| Setting procedure | 66 |
| Time | 67 |
| Setting procedure | 67 |
| Timer | 68 |
| Setting procedure | 68 |
| Basic settings | 69 |
Table of contents
Changing the basic settings 70
Childproof lock 71
Care and cleaning 72
Oven exterior 72
Oven 73
Cleaning the glass panels 74
Cleaning the rails 75
Seal 78
Accessories 78
Troubleshooting 78
Replacing the oven light 79
After-sales service 79
Packaging and old appliances 80
Tables and tips 81
Cakes and pastries 81
Baking tips 85
Meat, poultry, fish 86
Tips for roasting and grilling 91
Frozen foods 91
Defrosting 92
Drying 92
Preserving 93
Energy saving tips 95
Acrylamide in food 95
What can you do? 96
Test dishes 97
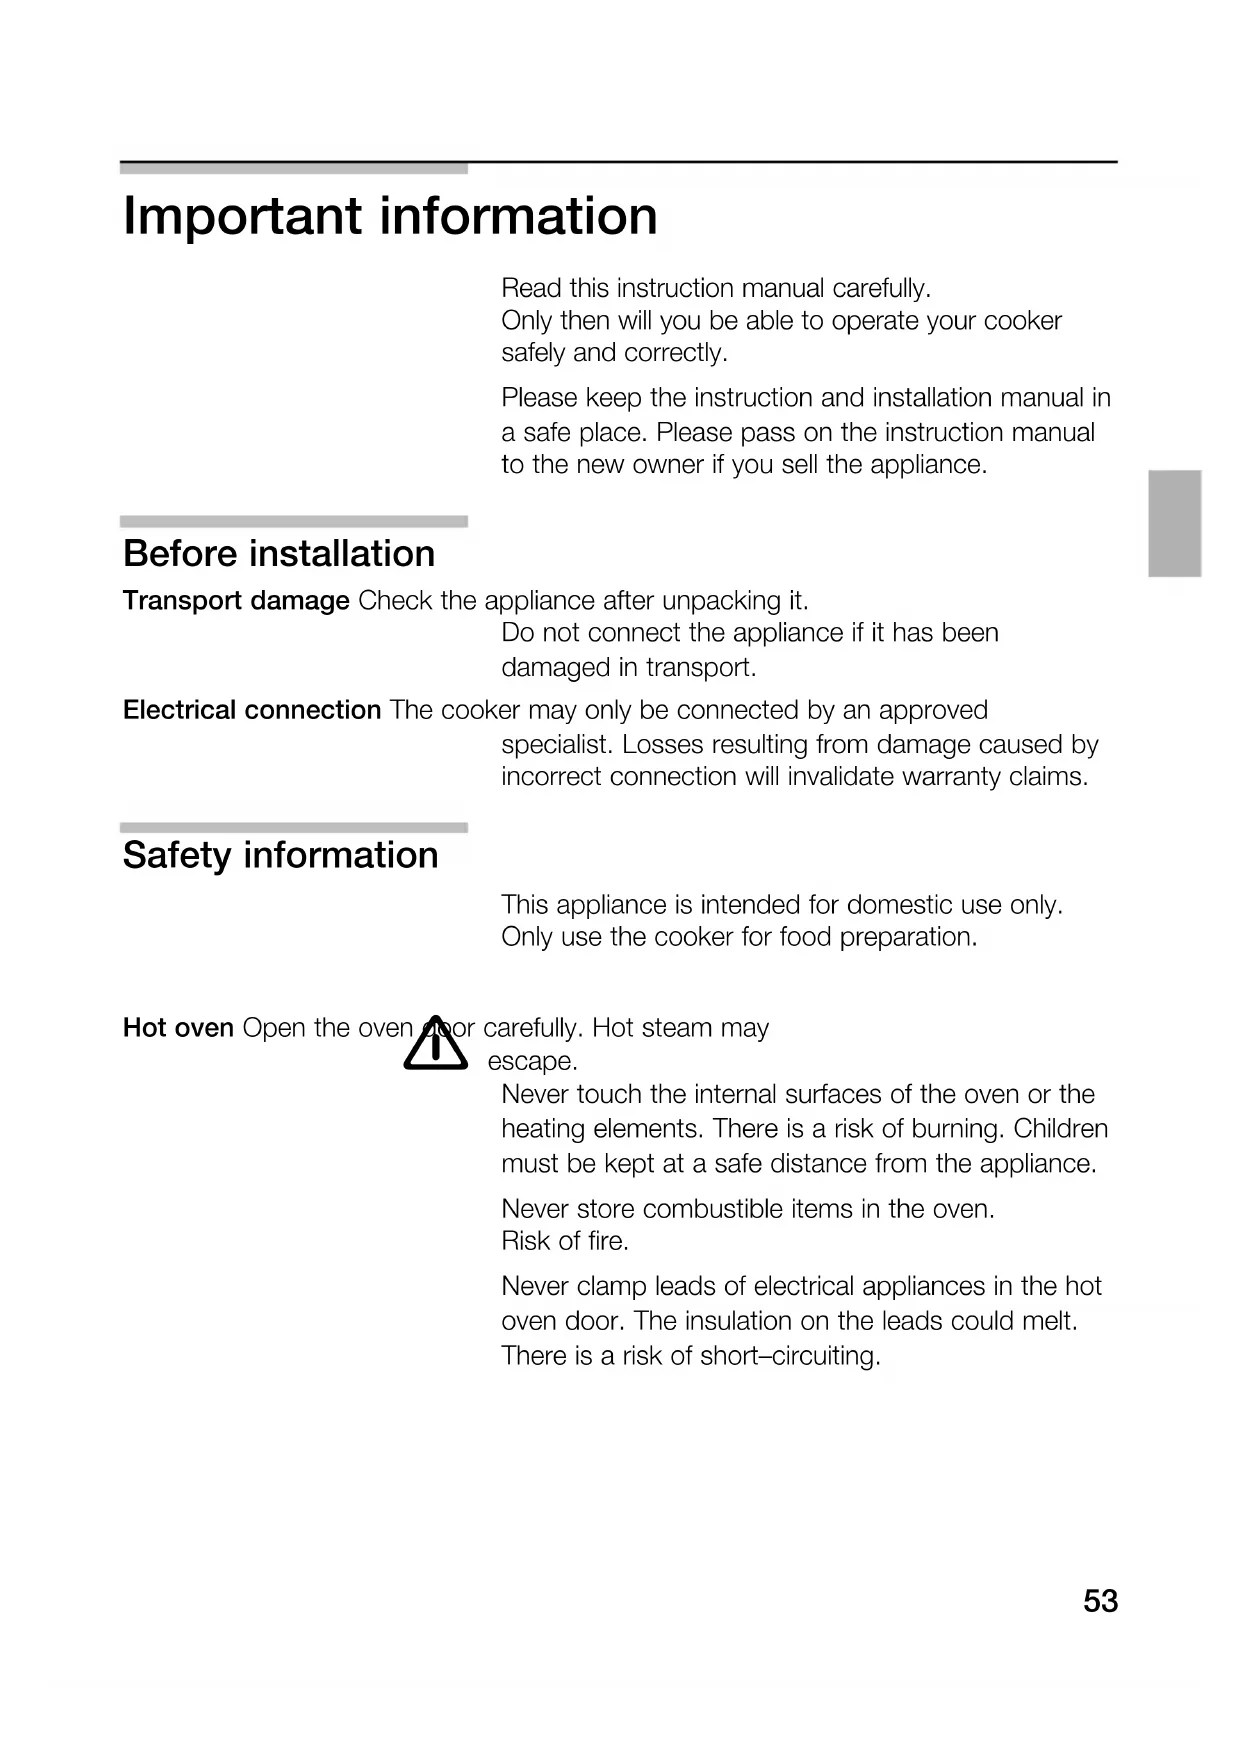
Important information
Read this instruction manual carefully.
Only then will you be able to operate your cooker safely and correctly.
Please keep the instruction and installation manual in a safe place. Please pass on the instruction manual to the new owner if you sell the appliance.
Before installation
Transport damage Check the appliance after unpacking it.
Do not connect the appliance if it has been damaged in transport.
Electrical connection The cooker may only be connected by an approved
specialist. Losses resulting from damage caused by incorrect connection will invalidate warranty claims.
Safety information
This appliance is intended for domestic use only. Only use the cooker for food preparation.
Hot oven Open the oven door carefully. Hot steam may

escape.
Never touch the internal surfaces of the oven or the heating elements. There is a risk of burning. Children must be kept at a safe distance from the appliance.
Never store combustible items in the oven.
Risk of fire.
Never clamp leads of electrical appliances in the hot oven door. The insulation on the leads could melt.
There is a risk of short-circuiting.
Repairs Incorrectly done repairs are dangerous.

There is a risk of electrocution.
Repairs may only be carried out by after-sales service technicians who have been fully trained by BSH.
If there is a fault, switch off the oven fuse at the fuse box. Call the after-sales service.
Reasons for damage
Baking tray, aluminium foil Do not place the baking tray on the oven floor. or dishes on the oven floor Do not cover it with aluminium foil.
Do not place dishes on the oven floor.
This will cause heat accumulation. The baking and roasting times will no longer be correct and the enamel will be damaged.
Slide-in accessories
To avoid damage, insert slide-in accessories carefully.
Baking paper If using 3D-hot air
, do not place greaseproof
paper loosely in the oven (e.g. when heating the oven).
The hot-air fan could draw in the paper which may damage the heater and fan.
Water in the oven Never pour water directly into a hot oven.
This could damage the enamel.
Fruit juice When baking very moist fruit cakes, do not put too
much on the baking sheet. Fruit juice dripping from the baking sheet leaves stains that cannot be removed.
It is recommended that you use the deeper universal pan.
Cooling with the oven door Only leave the oven to cool with the door closed. Do open not allow anything to become trapped in the oven
door. Even if you only leave the oven door open slightly, the fronts of adjacent units may become damaged over time.
Very dirty oven seal
If the oven seal is very dirty, the oven door will no longer close properly when the oven is in use. The fronts of adjacent units could be damaged. Keep the oven seal clean.
Using the oven door as a Do not stand or sit on the oven door. seat
Your new cooker
Here you will learn more about your new oven. The control panel and its switches and indicators are explained here. The heating modes and the accessories included with your oven will be explained here.
The control panel Details vary according to the appliance model.
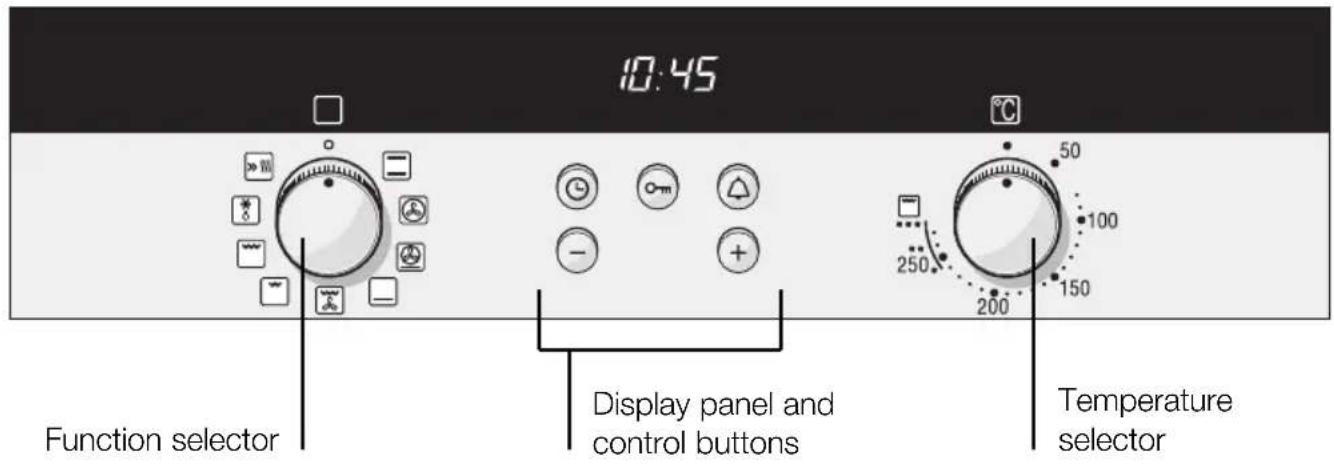
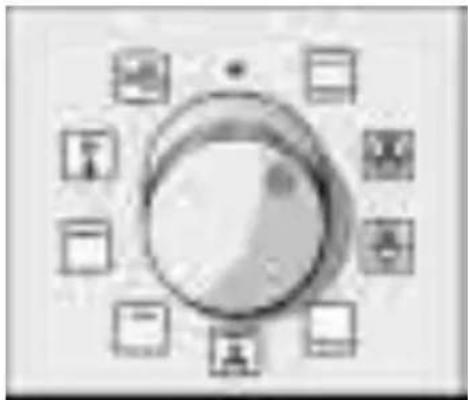
Function selector
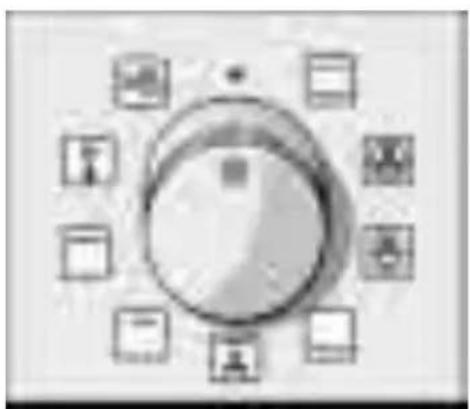
Use the function selector to select the type of heating for the oven.
Settings

Conventional heat

3D hot air*

Intensive fan-assisted cooking / pizza setting

Bottom heating

Hot air grilling
| Settings | |
| ○ | Radiant grill – small area |
| ○ | Radiant grill – large area |
| ○ | Defrosting |
| ○ | Rapid heating |
*Type of heating with energy efficiency class determined in accordance with EN50304.
When you select a function, the symbol above the function selector lights up. The oven light switches on.
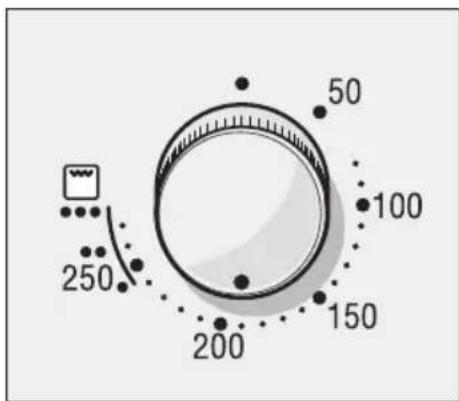
Temperature selector
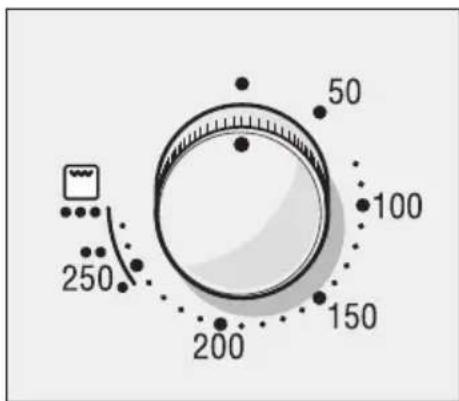
Use the temperature selector to set the temperature or grill setting.
Temperature
50-270 Temperature range in ^ C
Grill Setting
- Low grill 1
Medium grill 2
High grill 3
Grill settings
The symbol above the temperature selector comes on while the oven is heating up. It goes out during pauses in heating. The symbol does not come on for grilling and defrosting.
You can adjust the grill setting on the radiant grill to small area or large area using the temperature selector.
Control buttons and display panel
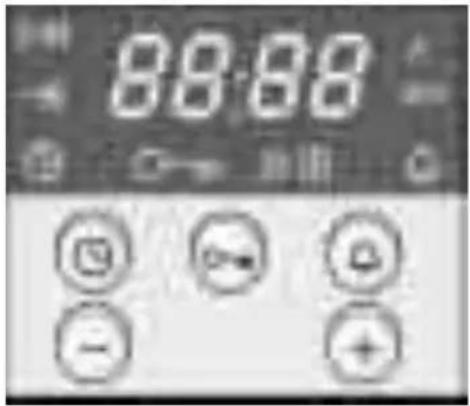
| Clock button ⋆ Use this button to set the time of day, the cooking time ➔ and the completion time ➔ |
| Key button ⋆ Use this button to switch the childproof lock on and off. |
| Timer button ⋆ Use this button to set the timer |
| Minus button – Use this button to reduce the values set. |
| Plus button + Use this button to increase the values set. |
The values set can be seen in the display panel.
Push-in control knobs
The control knobs can be pushed in. Simply press the control knob to release or lock it.
The function selector can be turned clockwise or anticlockwise, whereas the temperature selector can only be turned clockwise.
Types of heating
Different types of oven heating are available. You can therefore select the best method for cooking any dish.

Top and bottom heating
This ensures the even distribution of heat onto the cake or roast from the top and bottom of the oven. This type of heating is best for cake mixtures in tins or for bakes. Top and bottom heating is also suitable for cooking lean roasts of beef, veal and game.
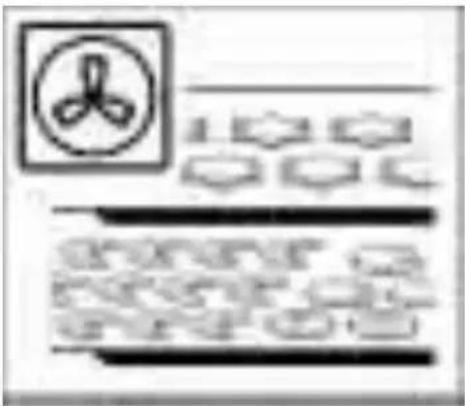
3D hot air
A fan in the rear panel distributes the heat from the ring heating element evenly inside the oven.
Using 3D hot air, it is possible to bake cakes and pizza on two shelves. You can cook biscuits and puff pastry on two levels at the same time. The required oven temperatures are lower than those for top and bottom heating. Additional baking trays may be obtained from specialist shops.
3D hot air is ideal for drying food.
Intensive hot air / pizza setting
This type of heating uses bottom heating and the ring heating element.
This type of heating is particularly suitable for deep-frozen foods. It is ideal for cooking pizzas, chips or strudels, without requiring preheating.
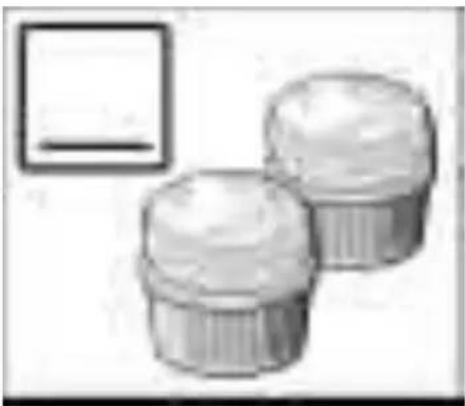
Bottom heat
You can reheat or brown meals using bottom heating.
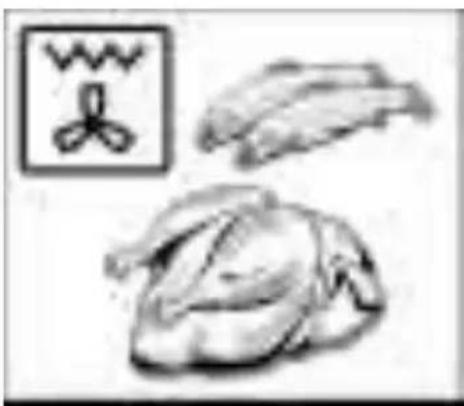
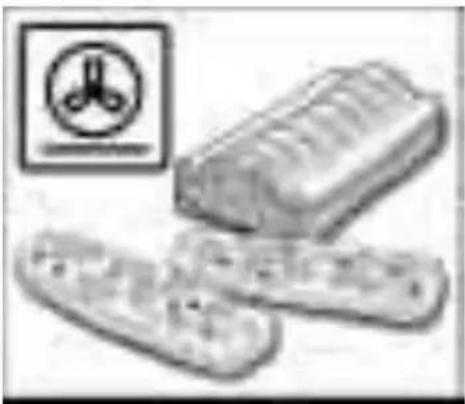
Hot air grilling
This type of heating involves the grill element and the fan switching on and off alternately. During the pause in heating, the fan circulates the heat generated by the grill around the food. This ensures that pieces of meat are crisped and brown on all sides.
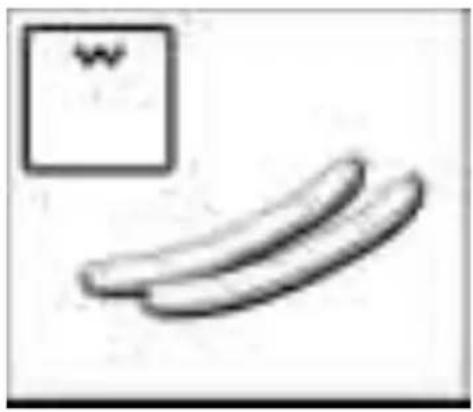
Radiant grill - small surface
This involves the middle section of the grill element being switched on. This type of heating is ideal for cooking small quantities. This saves energy. Place the pieces to be grilled in the centre of the wire rack.
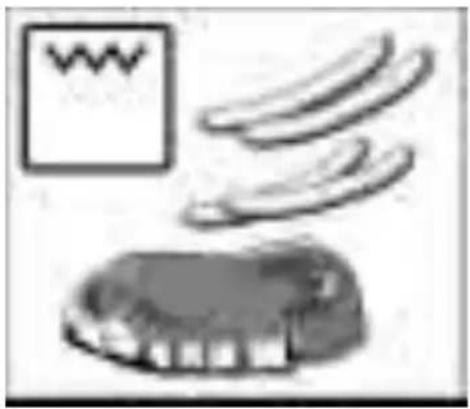
Radiant grill - large area
The entire area under the grill element becomes hot. This is ideal if you wish to cook several steaks, sausages, fish or slices of toast.
Defrosting
A fan in the rear wall of the oven circulates the air in the oven around the frozen food. Frozen pieces of meat, poultry, bread and cakes defrost evenly.
Oven and shelving accessories
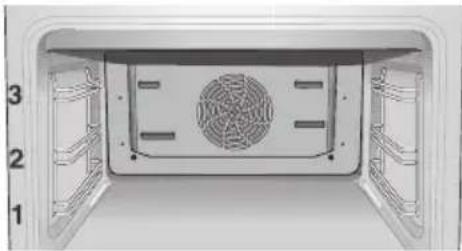
The shelf can be inserted at 3 different heights in the oven.
You can remove the shelf two thirds of the way without it tipping. This makes it easier to take food out of the oven.
When using 3D hot-air baking, do not use shelf position 2 in order not to block air circulation.
Accessories Accessories may be purchased at a later date from the after-sales service or from specialist shops. Please specify the HZ number.
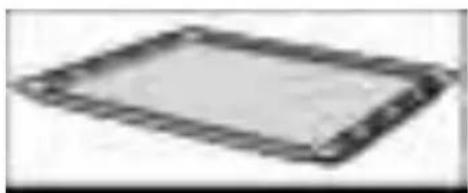
HZ 334000 wire rack
For ovenware, cake tins, roasts, grilling and frozen meals. Place the wire racks curved downwards
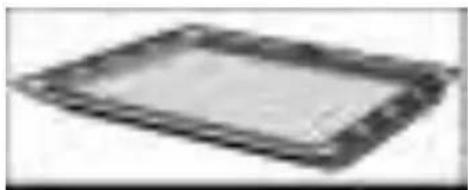
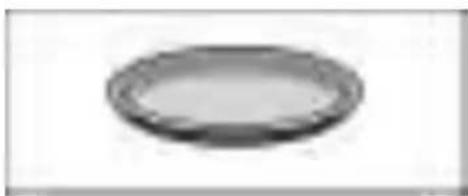
Universal pan HZ 332000
for moist cakes, pastries, frozen food and large roasts. It can also be used to catch dripping fat when you are grilling directly on the wire rack.
Push the universal pan with the sloping edge facing towards the oven door.
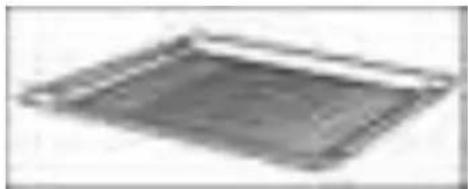
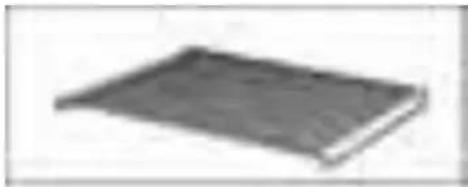
Enamel baking tray HZ 331000
for cakes and biscuits.
Push the baking tray with the sloping edge facing towards the oven door.
Optional accessories Optional accessories may be purchased from the after-sales service or from specialist shops.
HZ 324000 wire rack
for grilling. Always place the wire rack in the universal pan. Fat and meat juices are collected.
Pizza tray HZ 317000
Ideal for pizza, frozen foods and large round cakes, for example. You can use the pizza tray instead of the universal pan. Place the tray on the wire rack. Observe the information provided in the tables.
3 tier telescopic shelf HZ 338307
The ledges at heights 1, 2 and 3 allow you to pull the shelf out further without it tipping.
Cooling fan
The oven is fitted with a cooling fan. It switches itself on and off as necessary. The warm air escapes above the door.
Before using for the first time
This section will tell you everything you need to do before using the cooker for the first time.
Heat the oven and clean the accessories. Read the safety instructions in the „Important information“ section.
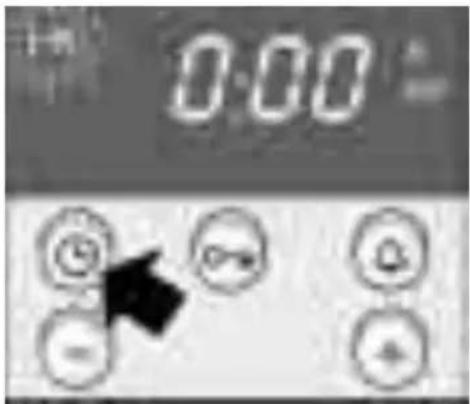
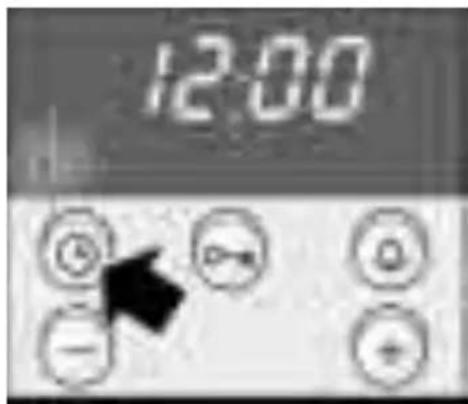
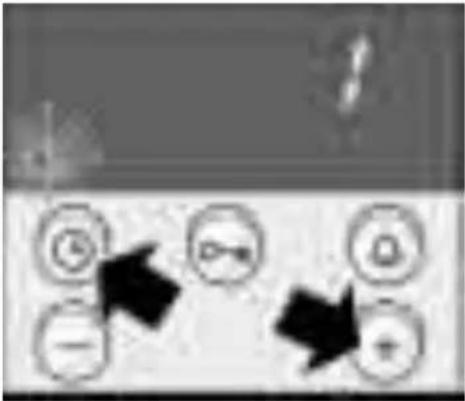
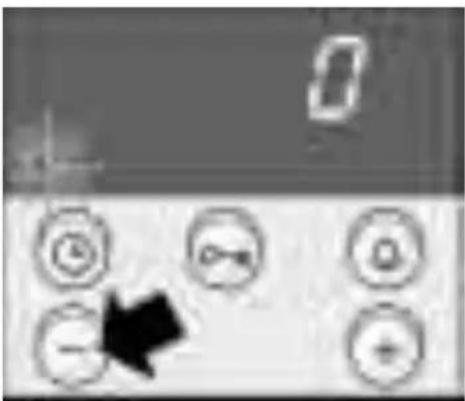
Firstly, check to see if the symbol and three zeros are flashing in the display.
If the symbol and three Set the time.
zeros are flashing
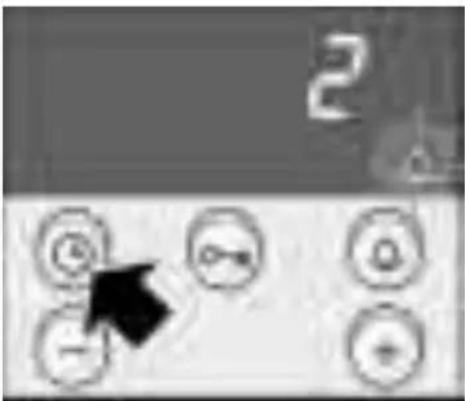
- Press the clock button.
12:00 appears and the clock symbol flashes. - Set the time using the + or - button.
The time selected is adopted after a few seconds.
The cooker is now ready for use.
Heating up the oven
Heat the empty oven with the door closed to remove the new oven smell.
Method
- Set the function selector to .
- Use the temperature selector to set the temperature to 240^ .
Switch off the function selector after 60 minutes.
Pre-cleaning the accessories
Please wash the accessories thoroughly with soapy water and a cleaning cloth before using them.
Setting the oven
You have various options for setting the oven.
Switching off the oven When your meal is ready, switch off the oven manually yourself.
The oven switches off automatically
You can leave the kitchen for a long period.
The oven switches on You can put your meal in the oven in the morning, and off automatically for example, and set the oven so that your meal is ready at midday.
Tables and tips
The correct settings for many dishes can be found in the Tables and tips section.
Setting procedure
Example: Top/bottom heating 190^ C
- Select the desired type of heating using the function selector.
- Use the temperature selector to set the temperature or grill setting.
Switching off Switch off the function selector when the meal is ready.
Changing the setting
You may change the temperature or grill setting at any time.
If the oven is to switch off automatically
Make settings as described in steps 1 and 2. Set the cooking time (duration) for your meal.
Example: Cooking time of 45 minutes
- Press the clock button. The cooking time symbol will flash.
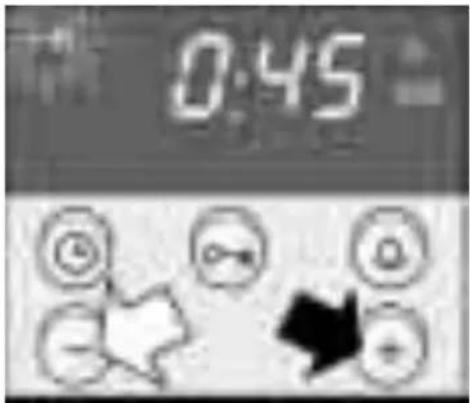
- Set the cooking time using the + or - button.
- button default value = 30 minutes.
- button default value = 10 minutes.
The oven switches on after a few seconds. The I I symbol lights up in the display.
The cooking time has A signal sounds. The oven switches off. Press the elapsed button twice and switch off the function selector.
Changing the setting Press the
clock button. Change the cooking time using the + or - button
Cancelling the setting
Press the clock button. Press the - button until the display is at zero. Switch off the function selector.
Setting the cooking time Press the ⑨ clock button twice and perform the when the clock time is hidden setting as described in item 4.
If the oven is to switch on and off automatically
Please remember that easily spoiled foods must not be allowed to remain in the oven for too long.
Perform the settings as described in items 1 to 4. The oven starts.
Example: Imagine - it's 10:45 a.m. The meal will take 45 minutes to cook and must be ready at 12:45 pm.
- Press the clock button until the end symbol flashes. In the display you will see the time when the meal will be ready.

- Use the ^+ button to set a later end time. The setting is adopted after a few seconds. The display will show the end time until the oven switches on.
The cooking time has A signal sounds. The oven switches off.
elapsed Press the
button twice and switch off the function selector.
Note You can change the setting while the symbol is
flashing. The setting has been adopted if the symbol lights up permanently. You may change the waiting time that elapses before the setting is adopted. See the Basic settings section for more details.
Rapid heating
This allows you to heat up the oven particularly quickly.
Setting procedure
- Switch the function selector to rapid heating
- Use the temperature selector to set the required temperature.
The oven switches on after a few seconds.
The indicator light above the temperature selector will come on.
The rapid heating process is complete The indicator light goes out.
Put your meal in the oven and set the oven.
Time
When the oven is first connected, or following a power cut, the symbol and three zeros flash in the display. Set the time.
The function selector must be switched off.
Setting procedure
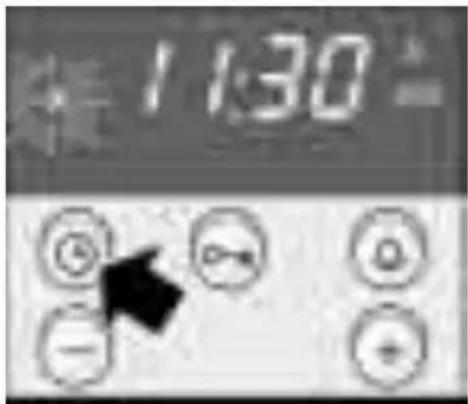
Example: 13:00
- Press the clock button. 12.00 appears in the display and the symbol flashes.
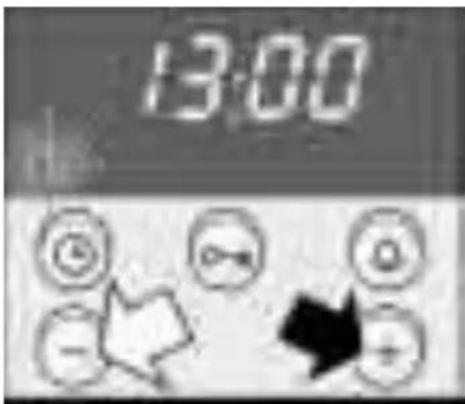
- Set the time using the + or - button. The time selected is adopted after a few seconds.
Changing the time e.g. Press the
clock button twice and change the time
from summer to winter with the + or - button. timer
Hiding the time
You can hide the time. It will then only be visible when you are performing settings.
To do this, you must change the basic setting.
See the Basic settings section.
Timer
You can use the timer as a kitchen timer. It operates independently of the oven.
The timer has a special signal. This means that you can tell whether the set timer period has elapsed or the cooking time is complete.
You can also set the timer if the childproof lock is active.
Setting procedure
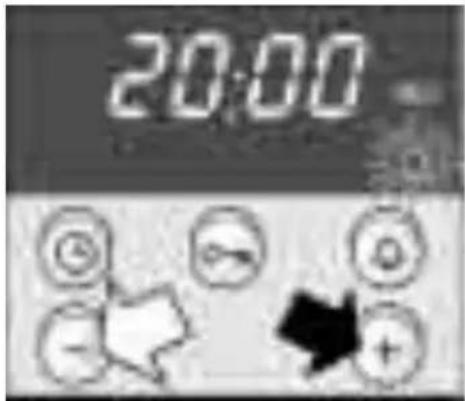
Example: 20 minutes
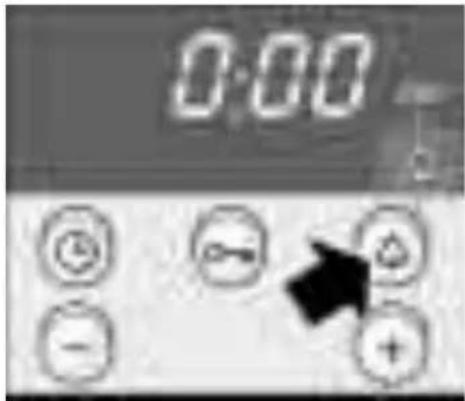
- Press the timer button.
The symbol will flash.
-
Set the timer period using the + or - button.
-
button default value = 10 minutes.
-
button default value = 5 minutes.
The timer starts after a few seconds. The symbol lights up in the display. The time counts down visibly.
The time has elapsed A signal sounds. Press the
timer button. The timer
display will go out.
Changing the timer period
Press the timer button. Change the time using the + or - button.
Cancelling the setting
Press the timer button. Press the - button until the display is at zero.
The timer and cooking time count down simultaneously
The symbols light up. The timer period counts down visibly in the display.
To call up remaining cooking time , end time or time : Press the clock button until the symbol in question flashes.
The value called up will then appear in the display for a few seconds.
Basic settings
Your oven has several basic settings. You may change the basic settings for time, the signal duration and the reset time for a setting.
| Basic setting Function Change to | ||
| Time ⊕ Time display Time i = Time in the 0 = Time hidden foreground | ||
| Signal duration ⊕ Signal after cooking Signal duration 2 = approx. time or timer period i = approx. 2 minutes has elapsed. 10 seconds | ||
| 3 = approx. 5 mins | ||
| Reset time i→i | Waiting time between 2 = medium the adjustment i = short increments before the setting is adopted. | Reset time |
| 3 = long | ||
Changing the basic settings
Example: Hiding the time
There must be no program set.
- Press the clock button and the + button at the same time until a 1 appears in the display. This is the basic setting for the time in the foreground.
- Change the basic setting using the + or - button.
- Conform with the clock button.
A2 will appear in the display for the basic setting for the signal duration.
You do not wish to change all the basic settings
Change the basic setting as described in step 2 and confirm with the clock button. You can now change the reset time. To finish press the clock button.
If you do not wish to change a basic setting, press the clock button. The next basic setting will appear.
Correcting settings
You may change your settings again at any time.
Childproof lock
The oven has a childproof lock to prevent children switching it on accidentally.
Locking the oven
Press the o-m key button until the o-m symbol appears in the display. This will take approximately 4 seconds.
Unlocking
Press the o-m key button until the o-m symbol goes out.
Notes You can set the timer and the clock even when the oven is locked.
The childproof lock setting will be lost if there is a power cut.
Care and cleaning
Do not use high-pressure cleaners or steam jets.
Oven exterior
Wipe the oven with water and a little washing-up liquid. Dry it with a soft cloth.
Caustic or abrasive substances are not suitable. If any such substances come into contact with the frontage, wipe it off immediately with water.
Notes Slight differences in the colours on the appliance
front are caused by the use of different materials, such as glass, plastic and metal.
Shadows on the door panel which resemble smears are reflections from the oven light.
Appliances with stainless Always remove any flecks of limescale, grease, steel fronts cornflour and egg white immediately. Corrosion can
form under such flecks.
Use stainless steel care products. Follow the manufacturer's instructions. Try out the product on a small area first, before using on the whole surface.
Appliances with aluminium Use a mild window-cleaning detergent. Wipe the fronts area with a soft window cloth or a fluff-free
micro-fibre cloth, using a horizontal action without applying pressure.
Aggressive cleaning products, scratchy sponges and rough cleaning cloths are not suitable.
Oven
Never use coarse scouring pads or cleaning sponges. Oven cleaner may only be used on enamelled oven surfaces.
For ease of cleaning
you can switch on the oven light and detach the oven door.
Switching on the oven light Set the function selector to
Detaching the oven door The oven door can be easily detached.
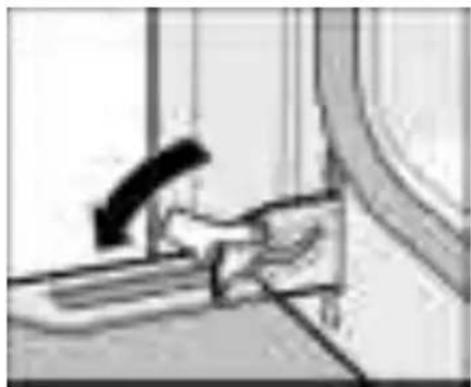
- Open the oven door fully.
- Move the two locking levers on the left and right-hand sides.

- Half-close the oven door.
With both hands, grip the door on the left and right-hand sides.
Close the door a little more and pull it out.
When pulling the door out, make sure that you do not reach into the hinge. There is a risk of injury.
After cleaning, refit the oven door in the reverse order to removal.
Cleaning the catalytic The rear wall of the oven is coated with self-cleaning surfaces of the oven enamel. The surfaces clean themselves while the
oven is in operation. Large splashes may only disappear after the oven has been used several times.
Never use oven cleaner on self-cleaning surfaces.
Should the enamel become slightly stained, this will not affect its self-cleaning properties.
Cleaning the oven floor Use hot soapy water or a vinegar solution.
It is best to use oven cleaner if the oven is very dirty. Only use oven cleaner in a cold oven.
Never use oven cleaner on the self-cleaning surfaces of the oven.
Note:
Enamel is baked on at very high temperatures. This can cause some slight colour variation. This is normal and does not affect the function. Do not use coarse scouring pads or strong cleaning agents to remove such discolorations.
The edges of thin trays cannot be completely enamelled. As a result, these edges can be rough. Anti-corrosion protection is guaranteed.
Cleaning the glass cover It is best to clean the glass cover with washing-up for the oven light liquid.
Folding down the Fold down the grill element to facilitate cleaning of grill element the oven cover.

Warning: the oven must be cold. There is a risk of burning.
Pull the handle on the folding grill towards the front and push it upwards until you hear it click into place. At the same time, hold the grill element and fold it down.
After cleaning:
Fold the grill element back up. Push the handle down until the grill element engages.
Cleaning the glass panels
Removal
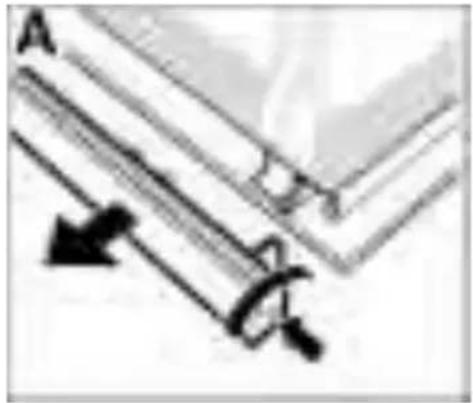
The glass panel on the oven door can be removed to assist in cleaning.
- Remove the oven door and lay it down on a cloth with the handle underneath.
- Unscrew the cover at the top of the oven door. To do this, undo the right and left-hand screws (Fig. A).
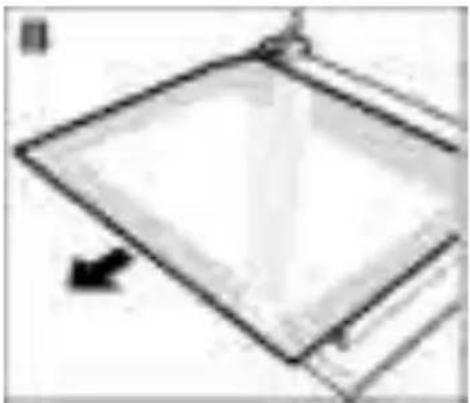
- Slide out the top panel. (Fig. B).
Clean the glass panels with glass cleaner and a soft cloth.
Removal
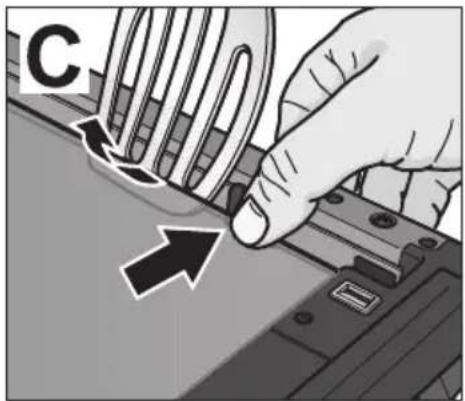
- Press in the retaining clip with your thumb on one side and disengage the inner door glass e.g. with the spatula, then repeat on the other side. (Fig. C).
Installation Installation after cleaning:
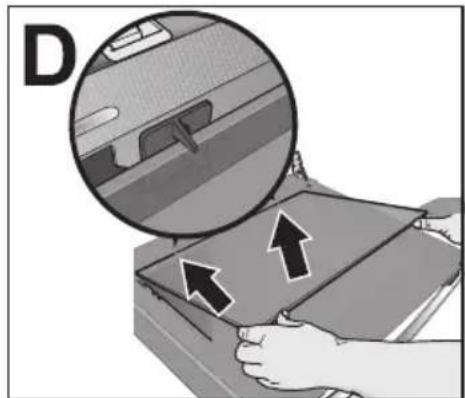
- Insert inner door glass into the holder. First engage the right side and then the other side. (Fig. D)
- Push the top panel back in. Make sure that the smooth surface is facing outwards.
- Replace the cover and screw it back on.
- Refit the oven door.
The oven must not be used again until the panels have been correctly installed.
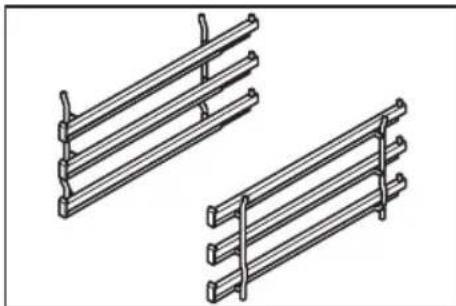
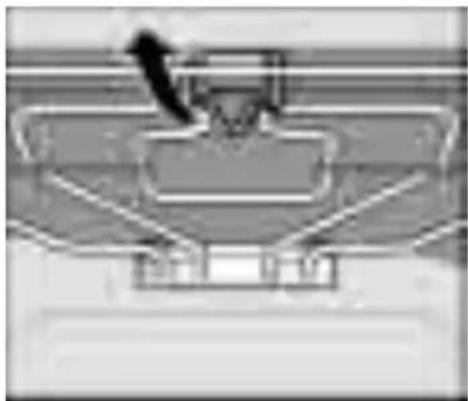
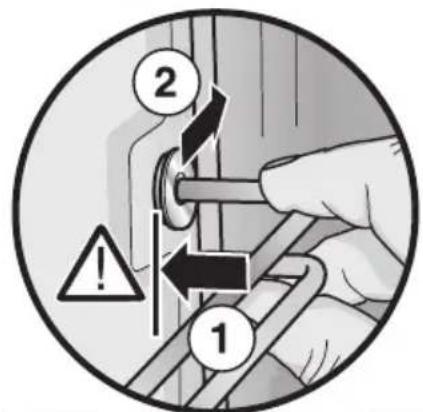
Cleaning the rails Removing
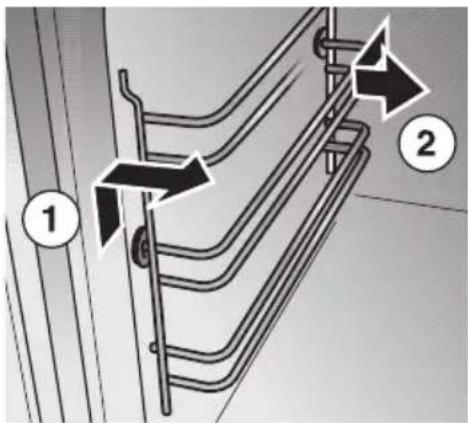
You can remove the inset rails for cleaning.
- At the front, press the rails up and take it off.
- At the back, pull the rails forward and take it off.
Clean the rails using washing-up liquid and pan scrapers or brushes.
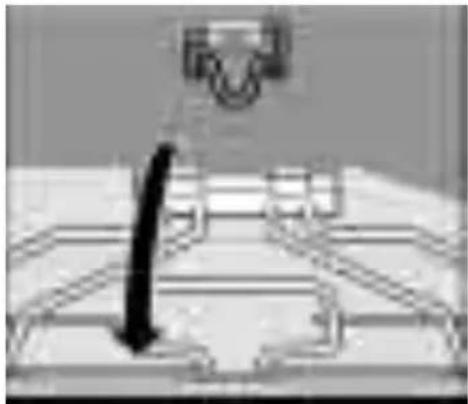
Replacing
The rails fit on the left and right side.
When installing the rails, do not twist them, otherwise the shelf positions for the accessories will not correspond.
The extension (a) must always be at the top.
- At the back, put the rails in as far as it goes.
- Push the rails back.
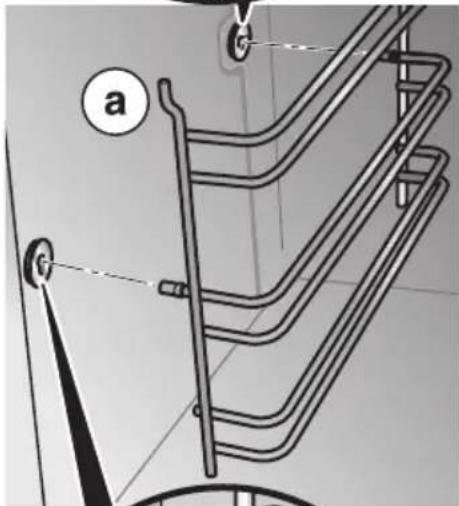
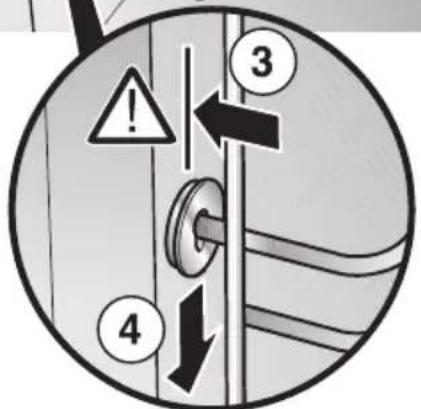
- Insert the front of the rails as far as it will go.
- Push the rails down.
Seal
Clean the seal on the oven with washing-up liquid. Never use caustic or abrasive detergents.
Accessories
Immediately after use, soak the accessories in washing-up liquid. Food residues can then be easily removed with a brush or sponge.
Troubleshooting
Should a malfunction occur, it is often only due to a minor fault. Please read the following instructions before calling the after-sales service:
Problem Possible cause Comments/remedy
The oven does not work. Blown fuse Look in the fuse box and check that
the fuse is in working order.
The clock display flashes. Power cut Reset the time.
Repairs may only be carried out by fully trained after-sales service technicians.
Improper repairs may constitute serious hazards to the user.
Replacing the oven light
Caution: Unplug the appliance or remove the fuse! By actuating the miniature circuit-breaker or by unscrewing the fuses in the fuse box in your house.
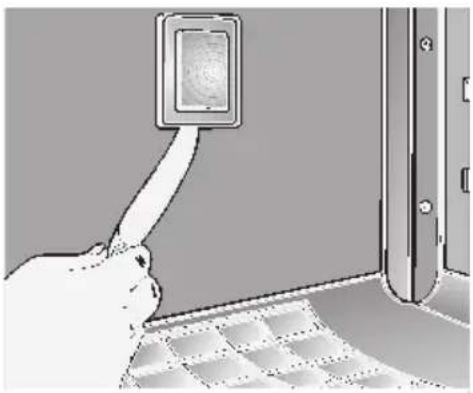
- To prevent damage, place a dish towel into the cold oven.
- Remove the glass cover by inserting a knife or similar object between the glass and the frame.
- Replace the lamp.
T ype: Incandescent bulb E 14, 230 - 240 V, 25 W, heat-resistant to 300^ C
- Y ou can obtain this lamp from customer service.
Replacing the glass cover The glass cover on the oven light must be replaced if it is damaged. Replacement glass covers may be obtained from the after-sales service. To this end, please specify the E number and FD number of your appliance.
After-sales service
Our after-sales service is there for you if your oven needs repairing. You will find the address and telephone number of your nearest after-sales service centre in the phone book. The after-sales service centres listed will also be happy to advise you of a service point in your local area.
E number and FD number Please quote the E number (product number) and the FD number (production number) of your appliance when contacting the after-sales service. The rating plate containing these numbers is found on the right, on the side of the oven door. You can make a note of these numbers in the space below to save time in the event of your appliance malfunctioning.
E no. FD no.
After-sales service
Packaging and old appliances
Your new appliance was protected by suitable packaging while it was on its way to you. All materials used for this purpose are environmentally friendly and can be recycled. Please make a contribution to protecting the environment by disposing of the packaging appropriately.
Old appliances are not worthless rubbish. Environmentally-conscious recycling can reclaim valuable raw materials.
Before disposing of your old appliance, please make sure that it is unusable, or label it with a sticker stating „Caution, scrap".
Up-to-date information on how to dispose of your old appliance and the packaging from the new one can be obtained from your retailer or local authority.
This appliance is labelled in accordance with European Directive 2002/96/EG concerning used electrical and electronic appliances (waste electrical and electronic equipment - WEEE). The guideline determines the framework for the return and recycling of used appliances as applicable throughout the EU.
Tables and tips
This table contains a selection of dishes and the optimum settings at which to cook them. You can find out which type of heating and temperature is best for your dish, which accessories to use, and at which oven level the dish should be inserted. You will find a variety of tips about ovenware and preparation, and a small troubleshooting section in case anything should go wrong.
Cakes and pastries
Baking tins It is best to use dark baking tins. You should use
3D-hot air when using thin baking tins, or glass containers. This means, however, that the baking time is increased and the cake does not brown so evenly.
Always place the cake tin on the wire rack.
Tables The values in the table apply to dishes placed in a
cold oven. This saves energy. Shorten the baking times indicated by 5 to 10 minutes if you have preheated the oven.
The tables show which type of heating is best for different cakes and bakes.
The temperature and cooking time you select depends on the quantity and type of pastry. This is why „ranges“ are given in the tables. You should try to use a lower temperature setting to start with, since this allows more even browning. If necessary, use a higher temperature setting the next time.
More information can be found in the „Baking tips" section which follows the tables.
Type of pastry Shelf Temperature Baking duration Shelf Temperature position in ^ C minutes position in ^ C
| Cake mixtures | |||||
| Pasty with topping | |||||
| 1 sheet | 1 | 150-160 | 30-45 | 2 | 160-170 |
| 2 sheets | 1+3 | 150-160 | 35-55 | - | - |
| Cake in round / | |||||
| rectangular tin | 1 | 150-160 | 60-75 | 1 | 160-170 |
| Fruit flan base | 1 | 150-160 | 20-35 | 1 | 160-170 |
| Short pastry | |||||
| Pasty with dry topping | |||||
| e.g. crumble | |||||
| 1 sheet | 1 | 160-170 | 55-70 | 2 | 170-180 |
| 2 sheets | 1+3 | 160-170 | 60-75 | - | - |
| Pasty with moist topping | |||||
| e.g. icing | |||||
| 1 sheet | - | - | 70-85 | 2 | 170-180 |
| Cake in tin | 1 | 160-170 | 50-90 | 1 | 170-180 |
| Fruit flan base | |||||
| (preheat) | 1 | 160-170 | 20-30 | 1 | 180-190 |
| Sponge mixtures | |||||
| Swiss roll (preheat) | 1 | 180-190 | 10-15 | 2 | 190-200 |
| Fruit flan base | 1 | 150-160 | 20-35 | 1 | 160-170 |
| Fine sponge cake (6 eggs) | 1 | 150-160 | 30-45 | 1 | 160-170 |
| Fine sponge cake (3 eggs) | 1 | 150-160 | 25-35 | 1 | 160-170 |
Type of pastry Shelf Temperature Baking duration Shelf Temperature position in ^ C minutes position in ^ C
| Yeast dough | |||||
| Pasty with dry topping e.g. crumble | |||||
| 1 sheet | 1 | 170-180 | 40-60 | 2 | 170-180 |
| 2 sheets | 1+3 | 170-180 | 40-60 | - | - |
| Pasty with moist topping e.g. icing | |||||
| 1 sheet | - | - | 70-90 | 2 | 160-170 |
| Savarin and plaited bun (500 g flour) | 1 | 160-170 | 35-50 | 2 | 170-180 |
| Cake in shallow tin | 1 | 160-170 | 35-45 | 1 | 170-180 |
| Cake in deep tin | 1 | 160-170 | 40-50 | 1 | 170-180 |
| Biscuits | |||||
| Meringue | 1 | 80-90 | 130-160 | 2 | 80-90 |
| Puff pastry (preheat) | |||||
| 1 sheet | 1 | 180-190 | 20-30 | 2 | 200-210 |
| 2 sheets | 1+3 | 190-200 | 20-30 | - | - |
| Choux pastry (preheat) | |||||
| 1 sheet | 1 | 190-200 | 25-35 | 2 | 200-210 |
| 2 sheets | 1+3 | 190-200 | 25-35 | - | - |
| Cake mixture (e.g. muffins) | |||||
| 1 sheet | 1 | 150-160 | 25-35 | 2 | 150-160 |
| 2 sheets | 1+3 | 150-160 | 25-40 | - | - |
| Short pastry (e.g. butter biscuits) | |||||
| 1 sheet | 1 | 130-140 | 15-25 | 2 | 140-150 |
| 2 sheets | 1+3 | 130-140 | 15-25 | - | - |
| Savoury food | |||||
| Pizza (preheat) | |||||
| 1 sheet | 1 | 170-180 | 30-45 | 2 | 180-190 |
| 2 sheets | 1+3 | 170-180 | 30-45 | - | - |
| Tarte flambée (preheat) | 1 | 180-190 | 15-25 | 1 | 200-220 |
| Quiche (preheat) | 1 | 180-190 | 40-50 | 1 | 200-220 |
| Bread (preheat) | |||||
| Bake for a short time | 1 | 200 | 10-15 | 1 | 240 |
| Finish baking | 1 | 180 | 40-45 | 1 | 200 |
Baking at the pizza setting

The values in the table are approximate and refer to enamelled baking sheets. The values may vary depending on the type and amount of dough and the baking tin. Follow the preheating instruction in the table.
At the first attempt we recommend that you set lower temperatures than those indicated. In principle, a lower temperature gives a more even browning.
If you are baking according to your own recipes, look for similar pastries in the table.
The values refer to insertion of food into a cold oven.
| Dish Accessories Shelf Temperature Duration | position in °C minutes | ||
| Pizza Baking sheet 1 180 – 200 20 – 30 | |||
| Tarte flambée Baking sheet 1 190 – 210 20 – 25 | |||
| Tart Tinplate pie dish or | spring form tin | 1 200 – 210 30 – 35 | |
| Quiche | Tinplate pie dish or spring form tin | 1 180 – 200 30 – 45 | |
| Cheesecake | Spring form tin | 1 160–170 | 60–75 |
| Fruit/savoury flap Baking sheet 1 190 – 200 35 – 45 | |||
| Strudel | Baking sheet 1 190 – 210 35 – 45 | ||
Baking tips
| You wish to cook to your own recipe. | Refer to the instructions in the tables for similar types of food. |
| How to check that a sponge cake is cooked properly. | Approximately 10 minutes before the end of the baking time given in the recipe, pierce the tallest point of the cake with a cocktail stick. The cake is done if the cocktail stick comes out clean. |
| The cake collapses. Next time, use less liquid or decrease the oven temperature by 10 degrees. Observe the cooking times in the recipe. | |
| The cake has risen in the centre but is lower at the edges. | Do not grease the sides of the springform cake tin. As soon as the cake is done, carefully loosen the cake around the edges using a knife. |
| The cake is too dark at the top. | Insert it at a lower level in the oven, select a lower temperature and cook the cake a little while longer. |
| The cake is too dry. Use a toothpick to make small holes in the finished cake. Then drizzle fruit juice or alcohol over the top. Next time you should decrease the temperature by around 10 degrees and reduce the baking times. | |
| The bread or cake (e.g. cheesecake) looks fine, but is soggy on the inside (soft, with watery areas). place the topping over this. Please observe the recipe and the baking times. | |
| The pastry is unevenly browned. | Select a slightly lower temperature to ensure that the pastry is baked more evenly. Check the shelf position and the rails (see section "Cleaning the rails"). Baking paper that protrudes over the food can affect the air circulation. For this reason, always cut the baking paper to fit the baking tray. |
| The fruit cake is too light at the bottom. The fruit juice flows over. | Use the deeper universal pan next time. |
| You were baking on several levels. The food on the top baking tray is darker than that on the bottom baking tray. | Always use 3D-hot air when baking on several levels. Baking trays that are placed in the oven at the same time will not necessarily be ready at the same time. |
| Condensation is formed when baking cakes containing fresh fruit. | Baking may result in the formation of water vapour. It escapes above the door handle. The steam may settle and form water droplets on the control panel or on the fronts of adjacent units. This is a normal physical process. |
Meat, poultry, fish
Ovenware You may use any heat-resistant dishes. The universal
pan is also suitable for larger roasts.
Always place the dishes in the centre of the wire rack.
Hot glass dishes should be placed on a dry kitchen towel after being removed from the oven. The glass could crack if placed on a cold or wet surface.
Advice on roasting The roasting result depends on the type and quality of meat.
Add 2 to 3 soup spoons of liquid to lean meat, and 8 to 10 soup spoons of liquid to pot roasts, depending on the size.
Meat should be turned half way through the cooking time.
When the roast is ready, switch off the oven and leave the roast to stand for 10 minutes with the oven door closed. This allows the meat juices to distribute more favourably.
Advice on hot-air grilling Use the wire rack and the universal pan.
When grilling with hot air on the wire rack, the oven may become very dirty depending on the food which is being grilled. Therefore, always clean the oven after use to prevent dirt from burning in.
For particularly crispy poultry or joints (pork joint with skin).
Turn large joints after approx. half the grilling time.
Turn the whole bird after approx. two thirds of the grilling time. Prick the skin under the wings of duck and goose so that the fat can roast right through.
Advice on radiant grilling Always close the oven door when grilling.
If possible, use pieces of meat which are of the same thickness. They should be at least 2 to 3 cm thick. Such pieces will be browned evenly and stay juicy and soft in the middle. Only salt the steaks after they have been grilled.
Place the pieces of meat directly onto the wire rack. If you are grilling just one piece of meat, it will turn out best if you place it in the centre of the wire rack. You should also insert the universal pan at level 1. The meat juices are collected here and the oven is kept clean.
Turn the pieces of meat after two thirds of the cooking time indicated.
The grill element automatically switches itself off and back on again. This is normal. The number of times this happens depends on the grill setting you have selected.
Table of roasting values
The time specifications are provided as guidelines only and depend on the type and quality of the meat.
| 3D hot airTop and bottom heating | |||||
| Food Shelf Temperature Roasting time Shelf Temperature position in °C minutes position in °C | |||||
| Pork | |||||
| Joint with skin (2 kg) (e.g. shoulder or knuckle) | 1 | 160-170 | 100-130 | - | - |
| Joint/roast (1.5 kg) | 1 | 160-170 | 90-120 | 1 | 190-210 |
| Smoked pork (1 kg) | 1 | 160-170 | 70-80 | 1 | 190-210 |
| Pork fillet | 1 | 170-180 | 30-45 | 1 | 200-230 |
| Meat loaf (750 g) | 1 | 170-190 | 60-70 | 1 | 190-210 |
| Beef | |||||
| Fillet | 1 | 180-190 | 45-65 | 1 | 200-220 |
| Sirloin (rare) | 1 | 180-190 | 30-45 | 1 | 200-220 |
| Veal | |||||
| Joint/breast | 1 | 160-170 | 90-120 | 1 | 180-200 |
| Knuckle | 1 | 160-170 | 100-130 | 1 | 190-210 |
| Lamb | |||||
| Leg | 1 | 180-190 | 70-110 | 1 | 200-220 |
| Saddle | 1 | 160-170 | 90-120 | 1 | 200-220 |
| Poultry | |||||
| Chicken 1 kg | 1 | 170-180 | 60-70 | 1 | 200-220 |
| Duck 2 kg | 1 | 160-170 | 90-120 | 1 | 190-210 |
| Goose 3 kg | 1 | 150-160 | 130-180 | - | - |
| Game | |||||
| Saddle of venison | 1 | 160-170 | 90-120 | 1 | 200-220 |
| Venison joint | 1 | 160-170 | 90-120 | 1 | 190-210 |
| Pork/venison joint | 1 | 160-170 | 100-120 | 1 | 190-210 |
| Serving of fish (e.g. trout) | 1 | 160-170 | 30-40 | 2 | 180-200 |
Grilling Use the wire rack and the universal pan.
Exercise Caution when grilling. Always keep children at a safe distance.
Hot-air grilling
Place the grill into the universal pan and slide them together into the same shelf position. You can obtain a wire rack insert for the universal pan from any autorized dealer.
The values in the tables are approximate. The values may vary depending on the type and amount of food to be grilled and refer to insertion of food into a cold oven.
| Food Weight Utensil Temperature Shelf Grilling time setting position | |||||
| Pork joint Wire rack/with skin | 2 kg | universal pan | 170-190°C | 1 | 120-140 min. |
| Beef Sirloin | 1.5 kg | Wire rack/universal pan | 200-220°C | 1 | 45- 55 min. |
| Poultry | |||||
| Half chicken 1-3 pieces 500 g | approx. universal pan per piece | Wire rack/ | 210-230°C | 1 | 40- 50 min. |
| Whole chicken 1-2 pieces 1 kg universal pan per piece | approx. | Wire rack/ | 190-210°C | 1 | 45- 60 min. |
| Duc | 2-2.5 kg | Wire rack/universal pan | 150-170°C | 1 | 90-120 min. |
| Goose | 3-3.5 kg | Wire rack/universal pan | 150-160°C | 1 | 130-180 min. |
Radiant grill use the wire rack and universal pan together at level 1.
The values in the tables are approximate. The values may vary depending on the type and amount of food to be grilled and refer to insertion of food into a cold oven.
| Food Grill Shelf Wire Grilling time Remarks setting position shelf 1 position | st side 2 | nd side | ||||
| Pork fillet steaks (2 - 2.5 cm) Neck steaks Sausages | 3 3 10 - 15 min. | 5 - 10 min. | 10 - 14 min. | 6 - 8 min. | Score gently | |
| 3 | 3 | 6 - 10 min. | 5 - 7 min. | |||
| Beef Fillet steaks Tournedos | 3 | 3 | 10 - 13 min. | 4 - 8 min. | Grilling times can be reduced or extended depending on the required degree of cooking. | |
| 3 | 3 | 8 - 11 min. | 4 - 6 min. | |||
| Fish Small fish | 2 | 2 | 10 - 15 min. | 5 - 10 min. | Turn | |
Tips for roasting and grilling
| The table does not contain information for the weight time. of the roast. | Select the next lowest weight from the instructions and extend the |
| How can you tell when the roast is ready? out a „spoon test". Press down on the roast with a spoon. If it feels firm, it is ready. If the spoon can be pressed in, it needs to be cooked for a little longer. | Use a meat thermometer (available from specialist shops) or carry |
| firm, it is ready. If the spoon can be pressed in, it needs to be | |
| The roast is too dark and the crackling is partly burnt. | Check the shelf position and temperature. |
| The roast looks good, but the juices are burnt. | Next time, use a smaller roasting dish or add more liquid. |
| The roast looks good, but the juices are too clear and watery. | Next time, use a larger roasting dish or add less liquid. |
| Steam rises from the roast when the juice is basted. bottom of the roast from becoming too hot, thereby producing less steam. | Use hot air grilling instead of top/bottom heating. This prevents the |
Frozen foods Please observe the instructions on the packaging.
| Dish Accessories Shelf Type of Temperature Duration | |||||
| positon | heating | in °C | minutes | ||
| Pizza (preheat) with thin base | Wire rack covered with greaseproof paper | 1 | ® | 190-210 | 10-20 |
| Pizza (preheat) with thick base greaseproof paper | Wire rack covered with 1 | ® | 180-200 | 15-25 | |
| Potato products (preheat) (e.g. chips) | Universal pan | 1 | ® | 200-220 | 15-25 |
| Cakes and pastries (preheat) (e.g. bread rolls) | Wire rack covered with greaseproof paper | 1 | ® | 200-220 | 5-15 |
| Strudel (preheat) | Baking tray | 1 | ® | 200-220 | 25-45 |
Note
The universal pan and the baking tray may become warped when baking frozen foods. This is caused by the considerable temperature fluctuations which affect the accessories. This warping is eliminated during the baking process.
Defrosting
Remove the food from its packaging and place it in a suitable dish on the wire rack.
Please observe the instructions on the packaging.
The defrosting times depend on the type and amount of food.
Meal Accessories Level Type of Temperature
heating in ^ C
Frozen foods* Wire rack 1

The temperature
e.g. cream gateaux, cream cakes, cakes with selector remains chocolate or icing, fruit, chicken, sausages and meat, switched off bread, rolls, pastries and other baked goods.
- Cover frozen food with microwave foil. Place poultry onto the plate with the breast side down.
Drying
Only use perfectly fresh fruit and vegetables, and wash them thoroughly.
Allow the food to drain well and dry it yourself.
Line the universal pan and wire rack with baking paper or greaseproof paper.
| Meal Level Type of Temperature | Cooking time in heating | in °C | hours |
| 600 g apple rings | 1+3 | 80 | Approx. 5 |
| 800 g sliced pears | 1+3 | 80 | Approx. 8 |
| 1.5 kg prunes or plums | 1+3 | 80 | Approx. 8-10 |
| 200 g fresh herbs, washed | 1+3 | 80 | Approx. 1 1/2 |
Note
Very moist fruit or vegetables should be turned several times. Once dried, remove the food from the paper immediately.
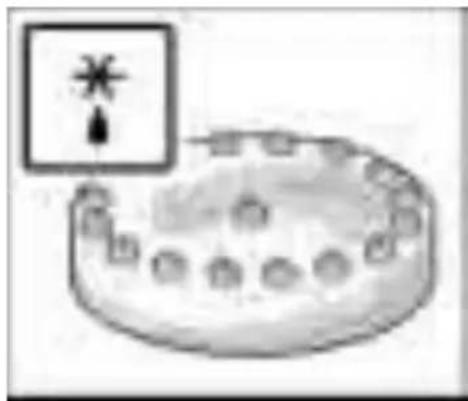
Preserving
Preparation The jars and rubber sealing rings must be clean and
intact. Use jars of the same size if possible. The instructions in the table refer to round 1-litre jars. Caution Do not use larger or taller jars. The lid could crack.
Only use perfectly fresh fruit and vegetables. Wash them thoroughly.
Pour the fruit or vegetables into the jars. Wipe clean the tops of the jars again if necessary. They must be clean. Place a wet rubber sealing ring and lid on each jar and lock the jars using clamps.
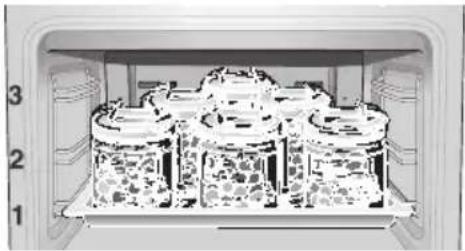
Place the preserving jars in a triangle (see fig.), ensuring that they are approx. 5 cm from the rear of the oven.
The times specified in the tables are guidelines only. They can be influenced by the room temperature, the number of jars and the amount and temperature of the jar contents. Before you change settings or switch off the appliance, make sure that the contents of the jars are actually bubbling.
Setting procedure
- Place the universal pan on level 1. Place the jars inside the pan so that they do not come into contact with each other.
- Pour 1/2 litre of hot water (approx. 80^ ) into the universal pan.
- Close the oven door.
- Switch the function selector to
- Set the rotary knob to approx. 160^
| Fruit, Cucumbers and tomato purée | Vegetables (however not cucumbers) | ||
| 1 | Insert jars. 1 Insert jars. | ||
| 2 | Select function and set to approx. 160 °C. | 2 | Select function and set to approx. 160 °C. |
| 3 | The rear jar and the right jar in the second row bubble first. Jars with 1/2+1 l after approx. 50-60 minutes. As soon as the other jars begin to bubble, switch off the oven. | 3 | The rear jar and the right jar in the second row bubble first. Jars with 1/2+1 l after approx. 50-60 minutes. As soon as the other jars begin to bubble, reduce the oven temperature to 100°C. |
| 4 | Leave the jars for further minutes in a closed oven. -Raspberries, strawberries, cherries, cucumbers: 5-10 min. -another fruit: 10-15 min. -Tomato purée, Apple purée: 15-20 min. | 4 | Leave the jars to bubble in a closed oven for approx. 60 minutes. Switch off the oven. Leave the jars for approx. a further 15-30 minutes in a closed oven. |
Energy saving tips
Only preheat the oven if it specifies in the recipe or in the table in the instruction manual that you should do so.
Use non-stick, black painted or enamelled tins.
They absorb the heat especially well.
If you have several cakes to bake it is best to bake them one after the other. The oven is still warm. This shortens the baking time for the second cake. You can also put two baking tins in one after the other.
For long cooking times, the oven can be switched off 10 minutes before the end of the cooking time and the remaining heat can be used to finish the cooking.
Acrylamide in food
Experts are currently discussing how dangerous acrylamide in food can be. We have compiled this information sheet for you on the basis of current research.
Where does acrylamide Acrylamide in food does not come from external come from? contamination. It is formed in the food itself during
preparation - provided that the food contains carbohydrate and protein. Exactly how this happens has not yet been completely explained. However, it appears that the acrylamide content is strongly influenced by
high temperatures
a low water content in food
intensive browning of the food.
What sort of foods are Acrylamide forms mostly in grain and potato affected? products that are prepared at high temperatures,
e.g.:
crisps, chips,
toast, rolls, bread,
baked goods made from shortcrust pastry (speciality biscuits and cakes).
What can you do?
You can avoid high levels of acrylamide when baking, frying and grilling.
The following recommendations were published by AID1 and BMVEL2 to help you minimise acrylamide levels:
In general Keep cooking times as short as possible.
"Brown rather than burn" - cook food only until it is golden brown.
The larger and thicker the food is, the less acrylamide it contains.
Baking Set the temperature to a maximum of 200^ when
using the top/bottom heating setting, and to a maximum of 180^ for the 3D hot air setting.
Cookies: Set the temperature to a maximum of 190^ when using the top/bottom heating setting, and to a maximum of 170^ for the 3D hot air setting. The presence of egg or egg yolk in a recipe reduces the formation of acrylamide.
Spread oven chips evenly over the baking sheet in one layer where possible. To prevent the food from drying out quickly, place at least 400g on each baking sheet.
^1 AID "Acrylamide" information leaflet, published by AID (German Evaluation and Information Service for Nutrition, Agriculture and Forestry) and BMVEL (German Federal Ministry for Consumer Protection, Food and Agriculture), as at 12/02, Internet: http://www.aid.de.
^2 BMVEL press release 365, as at 4.12.2002, Internet: http://www.verbraucherministerium.de
Test dishes
Follow the preheating instruction.
Values in the table apply without rapid heating up.
Baking according to standard 44547 and EN 60350
| Meal Accessories and notes Level Type of Tempera- | Baking times heating ture °C in minutes | |||
| Viennese whirl (preheat) Baking tray 2 | 150-170 | 15-25 | ||
| Baking tray | 1 | 140-160 | 20-30 | |
| 2 baking trays | 1+3 | 140-160 | 20-35 | |
| Small Cakes | Baking tray | 2 | 25-35 | |
| Baking tray | 1 | 25-35 | ||
| Water biscuit | Spring form cake tin | 1 | 160-170 | 30-40 |
| Spring form cake tin | 1 | 160-170 | ||
| Yeast pasty | Baking tray | 2 | 45-55 | |
| Baking tray | 1 | 50-60 | ||
| 2 baking trays | 1+3 | 60-75 | ||
| Apple pie | Wire racks + tinplate | 1 | 70-80 | |
| Spring form cake tin φ 20 cm | ||||
Grilling
| Meal | Accessories and notes | Level | Type of heating | Grill setting | Cooking times in minutes |
| Toast (preheat for 10 min.) | Wire rack* | 3 | ☐ 3 | 0.5-1.5 | |
| Beef steak, 12 pieces** | Wire rack* + universal pan | 3 | ☐ | 3 | 1stside 10-15 2ndside 7-12 |
| * Wire grills may be obtained as optional accessories from specialist shops. ** Turn after 2/3 of the time has elapsed. Always insert the universal pan at level 1. | |||||
SIEMENS
Avaries de transport
Convection naturelle
Gril, grande surface
Convection naturelle

Convection naturelle

Convection naturelle

Family Line 018 0 5-2223
€ 0,12/min. DTAG
Siemens-Hausgeräte


- Eine Störung, was tun?
- Making cooking as much fun as eating
- Table of contents
- Important information
- Before installation
- Safety information
- Reasons for damage
- Slide-in accessories
- Very dirty oven seal
- Your new cooker
- The control panel Details vary according to the appliance model.
- Function selector
- Settings
- Temperature selector
- Control buttons and display panel
- Push-in control knobs
- Types of heating
- Top and bottom heating
- 3D hot air
- Intensive hot air / pizza setting
- Bottom heat
- Hot air grilling
- Radiant grill - small surface
- Radiant grill - large area
- Defrosting
- Oven and shelving accessories
- HZ 334000 wire rack
- Universal pan HZ 332000
- Enamel baking tray HZ 331000
- HZ 324000 wire rack
- Pizza tray HZ 317000
- tier telescopic shelf HZ 338307
- Cooling fan
- Before using for the first time
- Heating up the oven
- Pre-cleaning the accessories
- Setting the oven
- Setting procedure
- If the oven is to switch off automatically
- If the oven is to switch on and off automatically
- Rapid heating
- Time
- Timer
- Cancelling the setting
- Basic settings
- Changing the basic settings
- You do not wish to change all the basic settings
- Correcting settings
- Childproof lock
- Care and cleaning
- Oven exterior
- Oven
- For ease of cleaning
- Cleaning the glass panels
- Removal
- Installation Installation after cleaning:
- Cleaning the rails Removing
- Replacing
- Seal
- Accessories
- Troubleshooting
- Problem Possible cause Comments/remedy
- Replacing the oven light
- After-sales service
- Packaging and old appliances
- Tables and tips
- Cakes and pastries
- Baking at the pizza setting
- The values refer to insertion of food into a cold oven.
- Baking tips
- Meat, poultry, fish
- Table of roasting values
- Hot-air grilling
- Radiant grill use the wire rack and universal pan together at level 1.
- Tips for roasting and grilling
- Frozen foods Please observe the instructions on the packaging.
- Note
- Meal Accessories Level Type of Temperature
- heating in ° C
- Drying
- Preserving
- Energy saving tips
- Acrylamide in food
- What can you do?
- Test dishes
- SIEMENS
- Avaries de transport
- Convection naturelle
- Gril, grande surface
- Family Line 018 0 5-2223
Brand : SIEMENS
Model : HB33K550
Category : Built-in oven