Superior Fryer - Deep fryer PRINCESS - Free user manual and instructions
Find the device manual for free Superior Fryer PRINCESS in PDF.
Download the instructions for your Deep fryer in PDF format for free! Find your manual Superior Fryer - PRINCESS and take your electronic device back in hand. On this page are published all the documents necessary for the use of your device. Superior Fryer by PRINCESS.
USER MANUAL Superior Fryer PRINCESS
You have purchased a Princess product. Our aim is to provide quality products with a tasteful design and at an affordable price. We hope that you will enjoy this product for many years.
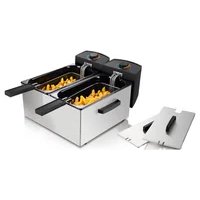
Description (fig. A)
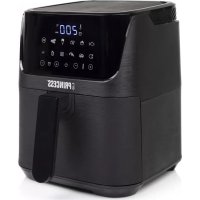
Your 182001 Princess deep fryer been designed for deep-frying food using oil or liquid fat. The appliance is not suitable for deep-frying food using solid fat. The appliance is suitable for indoor use only. The appliance is suitable for domestic use only.
The maximum capacity of the appliance is 3 litres. The maximum quantity for chips is 600 grams.
- Electronic control unit
- Thermostat dial
- Temperature indicator
- Reset button
- Reset stick
- Removable pan
- Safety filter
- Basket
- Basket grip
- Lid
Initial use
Before you proceed, we need you to pay attention to the following notes:
- Make sure that there is sufficient space around the appliance to allow heat to escape and provide sufficient ventilation.
Clean the appliance. Refer to the section "Cleaning and maintenance".
Clean the accessories. Refer to the section "Cleaning and maintenance".
Assembly (fig. A & B)
Before you proceed, we need you to pay attention to the following notes:
- Before assembly or disassembly, remove the mains plug from the wall socket and wait until the appliance has cooled down.
The deep fryer has a 'cold zone' at the bottom of the appliance. The 'cold zone' is a zone where larger food particles sink and the lower temperature keeps them from being burnt by the oil or the liquid fat. Deep fryers with a 'cold zone' have many advantages, but also require special attention. Deep fryers with a 'cold zone' are sensitive to water as the heating element is immersed in oil or liquid fat. Water can get in touch with the oil or the liquid fat due to various causes:
- Most food, especially potatoes, naturally contains water.
- Condensation of hot steam.
- Ice particles in frozen food.
Food is washed but not dried thoroughly before use. - The removable pan is not dried thoroughly after cleaning.
- The wrong type of oil or liquid fat is used. If water gets in touch with the oil or the liquid fat, the substance may start to splash, effervesce or overflow excessively. In order to optimise the deep fryers, Princess has developed a special safety filter which further decreases the temperature of the 'cold zone' and distributes water particles more effectively. The safety filter prevents the substance from splashing, effervescing or overflowing.
Before you proceed, we would like you to focus your attention on the following notes:
- Regularly change the oil or the liquid fat.
- Regularly clean the safety filter. Make sure that the openings in the safety filter are not blocked.
Place the removable pan (6) into the appliance.
Place the safety filter (7) onto the bottom of the removable pan (6).
Mount the electronic control unit (1) to the appliance.
Mount the basket grip (9) to the basket (8). Place the basket (8) into the removable pan (6).
Place the lid (10) onto the appliance.
Use
Switching on and off (fig. A)
The appliance is equipped with a thermostat that keeps the oil or the liquid fat at the required temperature.
Before you proceed, we need you to pay attention to the following notes:
- Do not use the appliance when the removable pan is not filled with oil or liquid fat.
Insert the mains plug into the wall socket. To switch on the appliance, turn the thermostat dial (2) to set the required temperature. The temperature indicator (3) remains on while the thermostat heats the oil or the liquid fat. The temperature indicator (3) goes off when the oil or the liquid fat has reached the required temperature.
While the appliance is switched on, the temperature indicator (3) will illuminate and extinguish as the thermostat switches on and off to maintain the required temperature. To switch off the appliance, turn the thermostat dial (2) to the off position. Make sure that the dots on the thermostat dial (2) and the electronic control unit (1) are aligned. The temperature indicator (3) goes off.
Remove the mains plug from the wall socket.
Setting the temperature (fig. A)
The temperature can be adjusted from 150^ to 190^ .
Turn the thermostat dial (1) to set the temperature. The temperature indicator (3) goes off when the oil or the liquid fat has reached the required temperature.
Deep-frying temperature
Food Temperature (^)
Chips (pre-frying) 170
Chips (final frying) 175
Parmesan fondue 170
Cheese croquettes 170
Potato croquettes 175
Meat croquettes 175
Fish croquettes 175
Fish 170
Fish fingers 180
Cheese fritters 180
Prawn fritters 180
Minced-meat hot dogs 180
Chicken 170
For the best fresh chips, it is recommended to proceed as follows:
- Deep-fry the chips at 170^ for 5-10 minutes. Shake the basket to loosen the chips. Allow the chips to cool down in a bowl for a short period.
- Deep-fry the chips at 175^ for 2-4 minutes. Shake the basket to loosen the chips. Allow the chips to cool down in a bowl for a short period.
Resetting the appliance (fig. A)
If the appliance does not function properly or if an error occurs, the appliance can be reset.
- Press the reset button (4) on the electronic control unit (1) to reset the appliance. Use the reset stick (5).
Hints for use
- Place the appliance on a stable and flat surface.
- Assemble the appliance. Refer to the section "Assembly".
- Fill the removable pan with oil or liquid fat. Make sure that the oil/liquid fat level is between the minimum mark and the maximum mark on the removable pan (fig. C). Insert the mains plug into the wall socket.
- Set the required temperature. Consult the food packaging for the required temperature and the required time. The temperature indicator goes off when the oil or the liquid fat has reached the required temperature.
- Allow the appliance to pre-heat for approximately 15 minutes with the oil or liquid fat at the required temperature.
- Remove ice from frozen food and dry the food to avoid splashing of hot oil or liquid fat.
- Fill the basket with the food.
- Place the basket into the appliance.
- Place the lid onto the appliance.
- If the process is completed, remove the lid and the basket from the appliance.
Take one of the following actions:
- Hold the basket grip and shake the basket to remove excessive oil or liquid fat.
- Let the basket rest on the hook of the removable pan to remove excessive oil or liquid fat.
Empty the basket onto a plate or a dish. If you want to deep-fry more food, repeat the above steps.
Regularly check whether the oil/liquid fat level is between the minimum mark and the maximum mark on the removable pan (fig. C). If necessary, add more oil or liquid fat.
After use, switch off the appliance, remove the mains plug from the wall socket and wait until the appliance has cooled down.
General tips
Use liquid vegetable oil, such as peanut oil, corn oil or soya oil for the tastiest results.
Always deep-fry the food at the right temperature. Make sure that the food is in the basket during the automatic heat-up time.
Defrost the food before use for the • healthiest results.
Do not deep-fry pre-cooked chips more than once. Always pre-fry fresh chips.
Do not fill the basket with too much food to avoid undesired frying results.
Regularly refresh the oil or the liquid fat for the healthiest results. Always change the oil or the liquid fat after deep-frying raw snacks like chicken legs.
Keep the oil or the liquid fat fresh for a longer period by sieving it after use to remove food residues.
Cleaning and maintenance
Before you proceed, we need you to pay attention to the following notes:
- Before cleaning or maintenance, remove the mains plug from the wall socket and wait until the appliance has cooled down.
- Do not immerse the appliance in water or any other liquids.
- Do not immerse the electronic control unit in water or any other liquids.
Before you proceed, we would like you to focus your attention on the following notes
- Do not use aggressive or abrasive cleaning agents to clean the appliance.
-
Do not use sharp objects to clean the appliance.
-
Regularly check the appliance for possible damage.
- Clean the outside of the appliance with a soft, damp cloth. Thoroughly dry the outside of the appliance with a clean, dry cloth.
Clean the accessories:
- Disassemble the appliance.
- Disassemble the lid. Clean the lid with a soft, damp cloth and a few drops of washing-up liquid. Thoroughly dry the parts of the lid with a clean, dry cloth. Assemble the lid as shown (fig. B).
- Clean the appliance and the electronic control unit with a soft, damp cloth and a few drops of washing-up liquid. Thoroughly dry the appliance and the electronic control unit with a clean, dry cloth.
- Clean the basket, the safety filter and the removable pan in soapy water. Rinse the basket, the safety filter and the removable pan under running water. Thoroughly dry the basket, the safety filter and the removable pan with a clean, dry cloth.
- Assemble the appliance.
Refreshing oil or liquid fat
The oil or the liquid fat must be refreshed after every 4 uses.
- Remove the lid, the basket and the electronic control unit from the appliance.
- Remove the removable pan from the appliance.
Hold the handle of the safety filter to remove the safety filter from the removable pan.
- Put the oil or the liquid fat in a container. Dispose of the oil or the liquid fat.
Clean the safety filter in soapy water.
Clean the removable pan in soapy water.
Thoroughly dry the accessories. - Assemble the appliance. Fill the removable pan with fresh oil or liquid fat just before using the appliance again.
Storage
Put the appliance and the accessories in the original packaging.
Store the appliance with the accessories in a dry place, out of the reach of children.
Safety instructions
General safety
Read the manual carefully before use. Keep the manual for future reference.
Only use the appliance and the accessories for their intended purposes. Do not use the appliance and the accessories for other purposes than described in the manual.
Do not use the appliance if any part or any accessory is damaged or defective. If a part or an accessory is damaged or defective, it must be replaced by the manufacturer or an authorised repair agent.
Children should be supervised to ensure that they do not play with the appliance.
The use of this appliance by children or persons with a physical, sensory, mental or motorial disability, or lack of experience and knowledge can give cause to hazards. Persons responsible for their safety should give explicit instructions or supervise the use of the appliance.
Do not use the appliance near bathtubs, showers, basins or other vessels containing water.
Do not immerse the appliance in water or other liquids. If the appliance is immersed in water or other liquids, do not remove the appliance with your hands. Immediately remove the mains plug from the wall socket. If the appliance is immersed in water or other liquids, do not use the appliance again.
Do not immerse the electronic control unit in water or other liquids. If the electronic control unit is immersed in water or other liquids, do not remove it with your hands. Immediately remove the mains plug from the wall socket. If the electronic control unit is immersed in water or other liquids, do not use it again.
This appliance is intended to be used in domestic and similar applications such as staff kitchen areas in shops, offices and other working environments; farm houses; by clients in hotels, motels and other residential type environments; bed-and-breakfast type environments.
Electrical safety
Before use, always check that the mains voltage is the same as the voltage on the rating plate of the appliance.
The appliance is not intended to be operated by means of an external timer or separate remote-control system.
Connect the appliance to an earthed wall - socket. If necessary, use an earthed extension cable of a suitable diameter (at least 3 × 1 ~mm^2 ).
For additional protection, install a residual - current device (RCD) with a rated residual operating current that does not exceed 30mA .
Make sure that water cannot enter the contact plugs of the mains cable and the extension cable.
Always fully unwind the mains cable and the extension cable.
Make sure that the mains cable does not hang over the edge of a worktop and cannot be caught accidentally or tripped over. Keep the mains cable away from heat, oil and sharp edges.
- Do not use the appliance if the mains cable or the mains plug is damaged or defective. If the mains cable or the mains plug is damaged or defective, it must be replaced by the manufacturer or an authorised repair agent.
Do not pull the mains cable to disconnect the mains plug from the mains.
Disconnect the mains plug from the mains when the appliance is not in use, before assembly or disassembly and before cleaning and maintenance.
Safety instructions for deep fryers
Place the appliance on a stable and flat surface.
- Place the appliance on a heat-resistant and splash-proof surface.
Do not place the appliance on a hob.
Make sure that there is sufficient space - around the appliance to allow heat to escape and provide sufficient ventilation.
Do not cover the appliance.
Make sure that the appliance does not come into contact with flammable material. Keep the appliance away from heat sources.
Do not immerse the basket grip in hot oil or liquid fat. The plastic will melt and contaminate the oil or the liquid fat. If the basket grip is immersed in hot oil or liquid fat, refresh the oil or the liquid fat before use.
Only use oil or liquid fat. Do not use solid - fat. It is allowed to use vegetable oils, such as sunflower oil, olive oil, sesame oil, and rapeseed oil.
Remove ice from frozen food and dry the food to avoid splashing of hot oil or liquid fat. Beware of splashes when putting food in the appliance with hot oil or liquid fat.
Beware of hot parts. The surfaces marked with a caution symbol for hot surfaces are liable to become hot during use. The accessible surfaces can become hot when the appliance is operating. The outer surface can become hot when the appliance is operating.
Make sure that your hands are dry before touching the appliance.
Do not move the appliance while it is switched on or is still hot. Remove the mains plug from the wall socket and wait until the appliance has cooled down.
Store the appliance in a dry place when not in use. Make sure that children do not have access to stored appliances.
U.K. Wiring instructions
The wires in the mains lead are coloured in accordance with the following code:
BLUE NEUTRAL
BROWN LIVE
GREEN/YELLOW EARTH
As the colours of the wire in the mains lead of this appliance may not correspond with the colour markings identifying the terminals on your plug, proceed as follows:
The wire which is coloured BLUE must be connected to the terminal which is marked with the letter N or coloured black.
The wire which is coloured BROWN must be connected to the terminal which is marked with the letter L or coloured red.
The wire which is coloured GREEN/YELLOW must be connected to the terminal which is
marked with the letter E or and is coloured GREEN or GREEN/YELLOW.
Warning! This appliance must be earthed.
Disclaimer
Subject to change; specifications can be changed without further notice.
Felicitations!
ExTe ayopaoEi eva npoiov nC Princess.
Tóxoc macéivai vaacnapéxoume TIOIOTiKa Tpoiovtae wpaio oxediagmo oikovouke C Tlnc. EAnizouve aatolauoete auto to Tpoiov yia tonla xpovia.
περιγραφή (εικ. A)
Kpoketec TnataTac 175
KpokTeC kpeatoC 175
KpokTeεs qapiou 175
Pap 170
iAETa yapiou 180
Tnyavnta tupia 180
Tnyavitev yapidεs 180
Aoukavika a tro kiá 180
Korótnoula 170
Tia Tc kalutepeC ppoekeC TATATEs, ouviotatai va TPOxwpnoTe TPOxwpnoTe wS akolouthetawS:
Tnyaviote TIC TATATEC OTouc 170 ^ C yia 5-10 ATTA. TivaTe TO KAALaOYIA VA EKoAAHooov OI TATATEC.APNOTE TIC TATATEC va Kpuwoov eva mToA YIA eva MIKPO diaotma.
Tnyaviote TIG TATATEC OTouc 175 ^ C yia 2-4 LEITa. TivaTE TO KAALBI YIA VA EKoAAHNOUV OI TATAECS.APOTe TIG TATATEC VA Kpuwoov OE EvA MIOA YIA EVA MIKPO diaotma.
EtnavaopαTnsoukeuns (EK.A)
Eav n oukeun V aeitoupyei kavoviká n av utapxei opaalma, n ouokeu n Ttopei va ettavaepephei.
xallg jol yj g oal a 1y 1
clll aill jie 5kall g jao jaiy jaiy jaiy jaiy jaiy jaiy jaiy jaiy jaiy jaiy jaiy jaiy jaiy jaiy jaiy jaiy jaiy jaiy jaiy jaiy jaiy jaiy jaiy jaiy jaiy jaiy jaiy jaiy jaiy jaiy jaiy jaiy jaiy jaiy
aillllg j 1
4 15 ailll g j jll j j j j j j j j j j j j j j j j j j j j j j j j j j j j j j j j j j j j j j j j
J 1 J 1 1 1 1 1 1 1 1 1 1 1 1 1 1 1 1 1 1 1 1 1 1 1 1 1 1 1 1 1 1 1 1 1
. 10000000000000000000000000000000000000000000000000000000
#
J 1 J
a
aalal y
Jdally bai.1 12iWyI Jg Aizy Jdy I j 1jaiwll g 1g jll LalisiWyI y! Caiolall jgaiy
J 1
a 1 a 1 a 1 a 1 a 1 a 1 a 1 a 1 a 1 a 1 a 1 a 1 a 1 a 1 a 1 a 1 a 1 a 1 a 1 a 1 a 1 a 1 a 1 a 1 a 1 a 1 a 1 a 1 a 1 a 1 a 1 a 1 a 1 a 1 a
aalgl a
11111111111111111 1111111111111111 111111111111111 11111111111111 11111111111 1
JL 150
JL 150
JL 150
JL 150
JL 150
JL 150
JL 150
JL 150
JL 150
JL 150
JL 150
JL 150
JL 150
JL 150
JL 150
J L 150
J L 150
J L 150
J L 150
J L 150
J L 150
J L 150
J L 150
J L 150
J L 150
J L 150
J L 150
J L 150
J L 150
J L 200
J L 200
15 15 15 15 15 15 15 15 15 15 15 15 15 15 15 15 15 15 15 15 15 15 15 15 15 15 15 15 15 15 15 15 15 15 20
j j j j j j j j j j j j j j j j j j j j j j j j j j j j j j j j j j j j j j j j j j j j j j j j j j j j j j j j j j j j j j j j j j j j j j j j j j j j j j j j j j j j j j j j j j j j j j j j j j j j j
aie 1
Jgll jz jililal lilll c yjll .
Jgall lgall t jz j g j gldgll
. jkl iic
A
yjgl gld plall g
g plall g jn j dli .
gailll cn wll clg elal
plisiyl jplall jc yagill all jy p
jzl qilii j
Lla gall aas wblbll gila y
gila r la g .do g no jsl taac
laa a jlbll wblbll
slai plall n jkll olaall e Jpa Y
. gge g ge g ld jgall