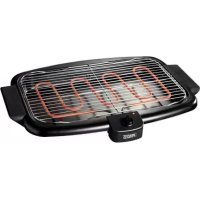
112246 - Barbecue PRINCESS - Free user manual and instructions
Find the device manual for free 112246 PRINCESS in PDF.


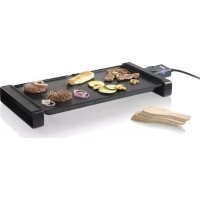
| Product type | Electric barbecue for grilling and frying without fat |
| Brand | Princess |
| Model | 112246 |
| Use | Outdoor, domestic use |
| Cooking surface | Grill rack (grill shelf) |
| Thermostat | Yes, temperature control knob |
| Temperature indicator | Yes, light indicator |
| Water tank | Yes, with level indicator |
| Safety | Micro-switch (activation by tab), do not immerse, hot surfaces, do not use in rainy weather |
| Cleaning | Damp cloth, no abrasive products, do not immerse appliance |
| Assembly | Table assembly: insert rods, install handles, place heating element and grill rack |
| Use without stand | On a stable and heat-resistant table (model 112246) |
| Use with stand | Possible only for model 112245 |
| Preparation before use | Clean the grill rack, fill the water tank to the maximum mark |
| Starting up | Plug in, turn the knob, wait for the indicator to turn off (approx. 10 minutes) |
| Turning off | Unplug the power cord |
| Storage | In a dry place, out of reach of children |
| Regular maintenance | Check that the appliance is not damaged |
| Provided accessories | Grill shelf, heating element, table, handles, screws |
| Plug type | Mains plug with grounding recommended |
| Power supply | See nameplate (mains voltage) |
Frequently Asked Questions - 112246 PRINCESS
User questions about 112246 PRINCESS
0 question about this device. Answer the ones you know or ask your own.
Ask a new question about this device
Download the instructions for your Barbecue in PDF format for free! Find your manual 112246 - PRINCESS and take your electronic device back in hand. On this page are published all the documents necessary for the use of your device. 112246 by PRINCESS.
USER MANUAL 112246 PRINCESS
natural_image
Line drawing of a portable grill with a grater and heater (no text or symbols)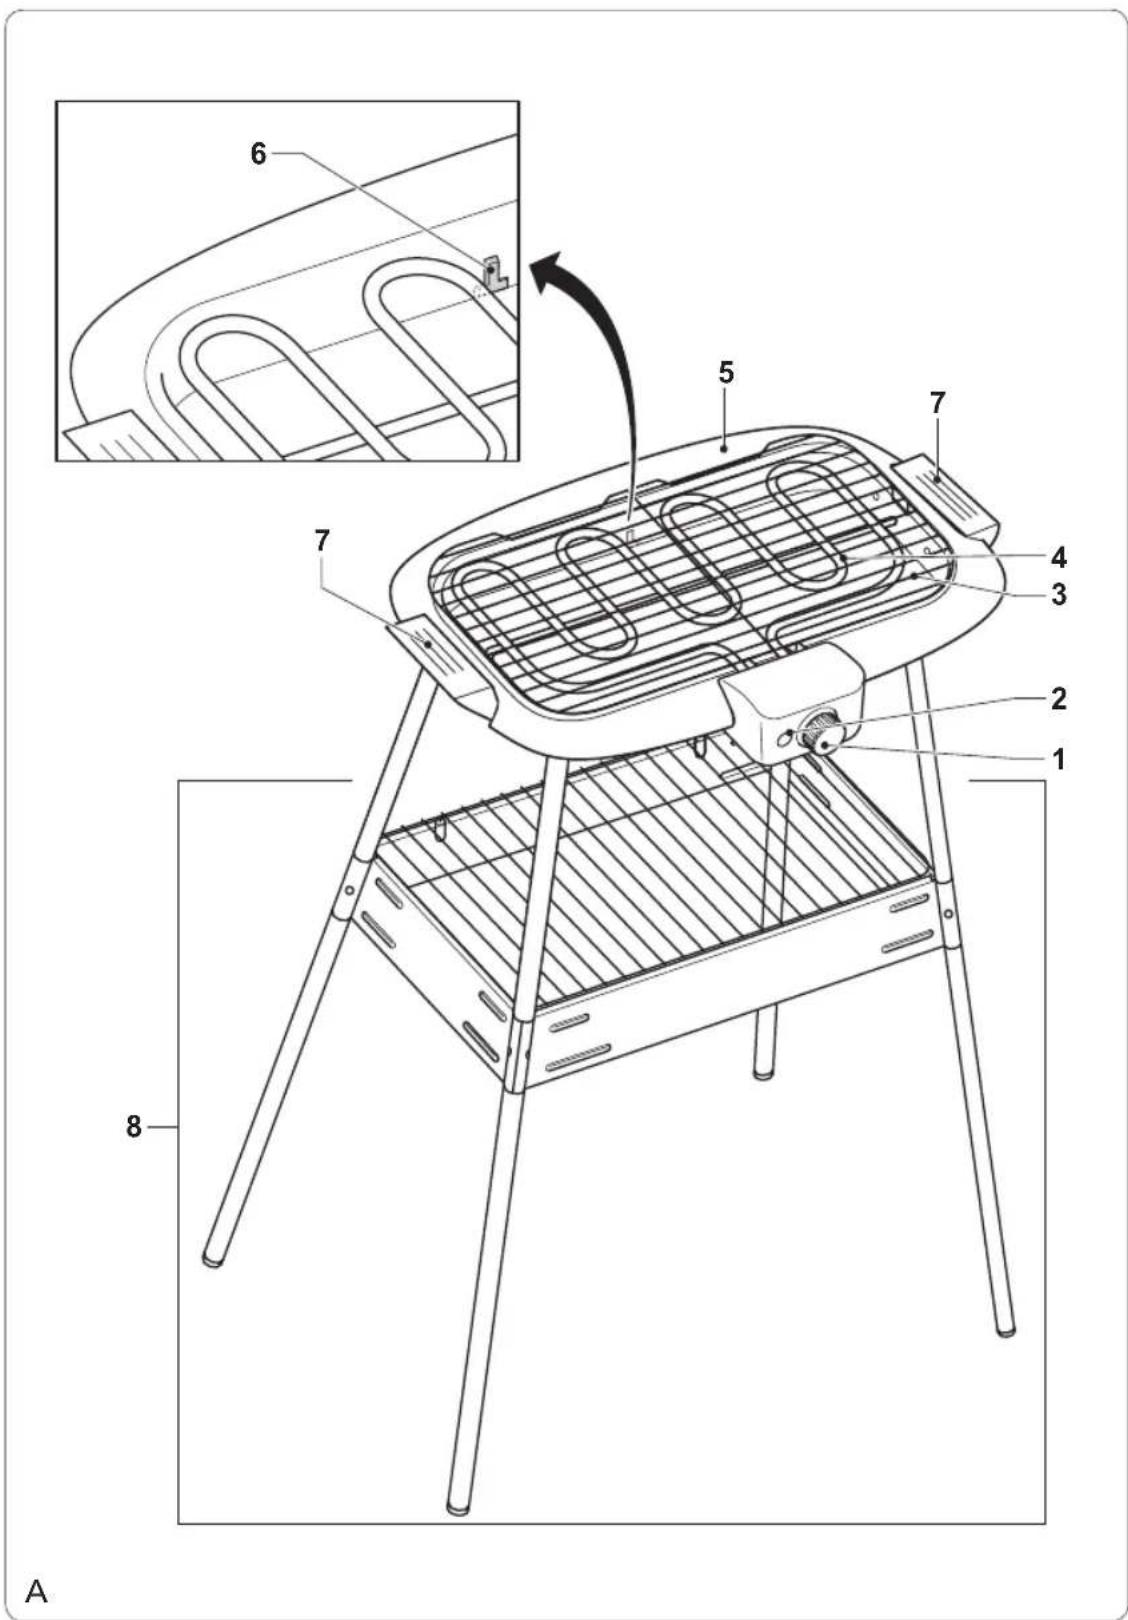
Gefeliciteerd!
You have purchased a Princess appliance. Our aim is to provide quality products with a tasteful design and at an affordable price. We hope that you will enjoy this appliance for many years.
Safety instructions
The appliance can be used by children from 8 years and above and by persons with a physical, sensory, mental or motorial disability, or lack of experience and knowledge if they are supervised or instructed on how to use the appliance in a safe way and understand the hazards involved. Children shall not play with the appliance. Cleaning and maintenance shall not be made by children unless they are older than 8 years and supervised. Keep the appliance and the mains cable out of the reach of children younger than 8 years.
General safety
- Read the manual carefully before use. Keep the manual for future reference.
- Only use the appliance and the accessories for their intended purposes. Do not use the appliance and the accessories for other purposes than described in the manual.
- Do not use the appliance if any part or any accessory is damaged or defective. If a part or an accessory is damaged or defective, it must be replaced by the manufacturer or an authorised repair agent.
- Do not use the appliance near bathtubs, showers, basins or other vessels containing water.
- Do not immerse the appliance in water or other liquids. If the appliance is immersed in water or other liquids, do not remove the appliance with your hands. Immediately remove the mains plug from the wall socket. If the appliance is immersed in water or other liquids, do not use the appliance again.
Electrical safety
- Before use, always check that the mains voltage is the same as the voltage on the rating plate of the appliance.
- Connect the appliance to an earthed wall socket. If necessary, use an earthed extension cable of a suitable diameter (at least 3 x 1.5 mm ^2 ).
- For additional protection, install a residual current device (RCD) with a rated residual operating current that does not exceed 30 mA.
- The appliance is not intended to be operated by means of an external timer or separate remote-control system.
• Make sure that water cannot enter the contact plugs of the mains cable and the extension cable.
• Always fully unwind the mains cable and the extension cable.
• Make sure that the mains cable does not hang over the edge of a worktop and cannot be caught accidentally or tripped over. - Keep the mains cable away from heat, oil and sharp edges.
- Regularly check the mains cable and the mains plug for signs of damage. Do not use the appliance if the mains cable or the mains plug is damaged or defective. If the mains cable or the mains plug is damaged or defective, it must be replaced by the manufacturer or an authorised repair agent.
- Do not pull the mains cable to disconnect the mains plug from the mains.
- Disconnect the mains plug from the mains when the appliance is not in use, before assembly or disassembly and before cleaning and maintenance.
Safety instructions for BBQ
- Place the appliance on a stable and flat surface.
- Place the appliance on a heat-resistant and splash-proof surface.
• Do not place the appliance on a hob.
• Make sure that there is sufficient space around the appliance to allow heat to escape and provide sufficient ventilation.
• Do not cover the appliance.
Before you proceed, we need you to pay attention to the following notes:
- Do not cover the grill rack with aluminium foil.
-
Do not cover the grill rack with aluminium trays.
-
Keep the appliance away from heat sources.
• Make sure that the appliance does not come into contact with flammable material.
• Do not use charcoal or similar combustible fuels. - Do not operate the appliance if your hands are wet. Do not operate the appliance if you are barefoot.
- Beware of hot parts. The surfaces marked with a caution symbol for hot surfaces are liable to become hot during use. The accessible surfaces can become hot when the appliance is operating. The outer surface can become hot when the appliance is operating.
• The grill rack becomes very hot during use. Do not touch the hot grill rack.
• Use oven gloves if you need to touch the appliance during or shortly after use. - Do not use the appliance in rainy conditions. Do not use the appliance in humid surroundings.
- Do not use the appliance near water basins, such as ponds or swimming pools.
- Do not move the appliance while it is switched on or is still hot. Remove the mains plug from the wall socket and wait until the appliance has cooled down.
- Store the appliance in a dry place when not in use. Make sure that children do not have access to stored appliances.
Description (fig. A)
Your 112245/112246 Princess BBQ has been designed for frying or grilling food without using fat. The appliance is suitable for outdoor use.
The appliance is suitable for domestic use only.
- Thermostat dial
- Temperature indicator
- Grill rack
- Heating element
- Table
- Water level indicator
- Handgrip
- Table support
Initial use
- Clean the appliance. Refer to the section "Cleaning and maintenance".
- Clean the grill rack with a damp cloth. Thoroughly dry the grill rack.
Assembly (fig. B)
Before you proceed, we need you to pay attention to the following notes:
- Before assembly, always remove the mains plug from the wall socket.
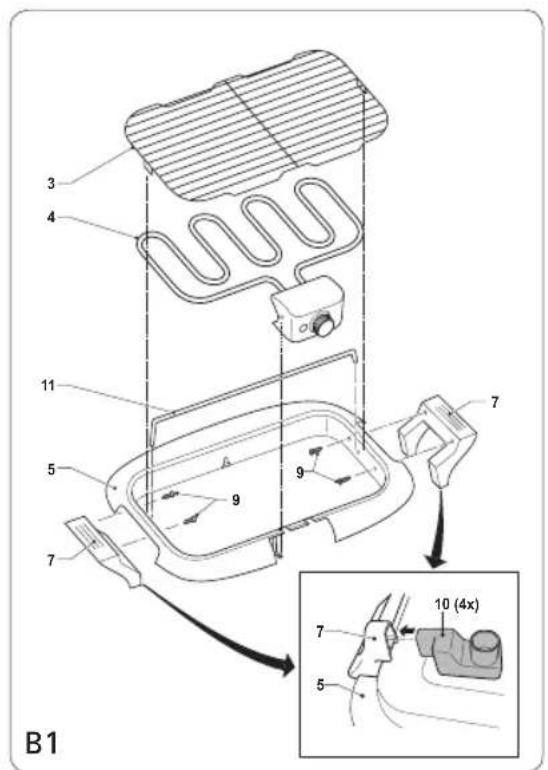
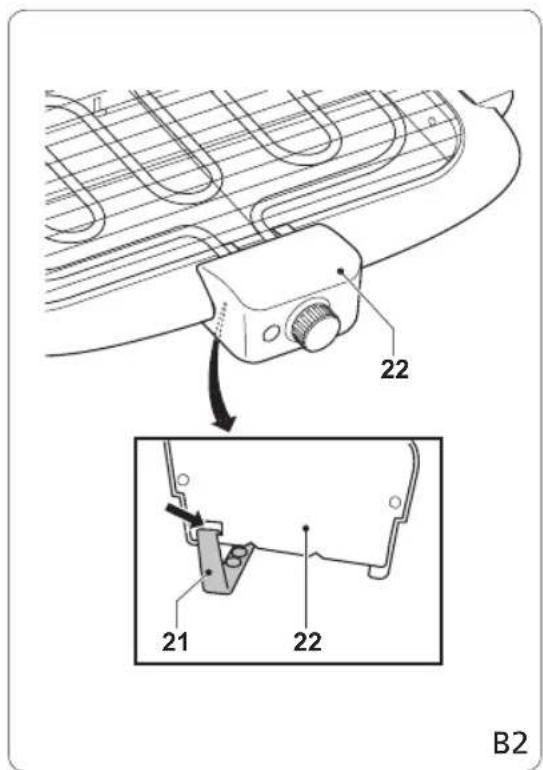
Assembling the table (fig. B1 & B2)
- Insert the ends of the rod (11) into the holes in the table (5).
- Mount the handgrips (7) to the table (5) using the screws (9).
- Insert the connection pieces (10) into the handgrips (7).
- Place the heating element (4) onto the table (5). Make sure that the heating element (4) is properly supported by the rod (11).
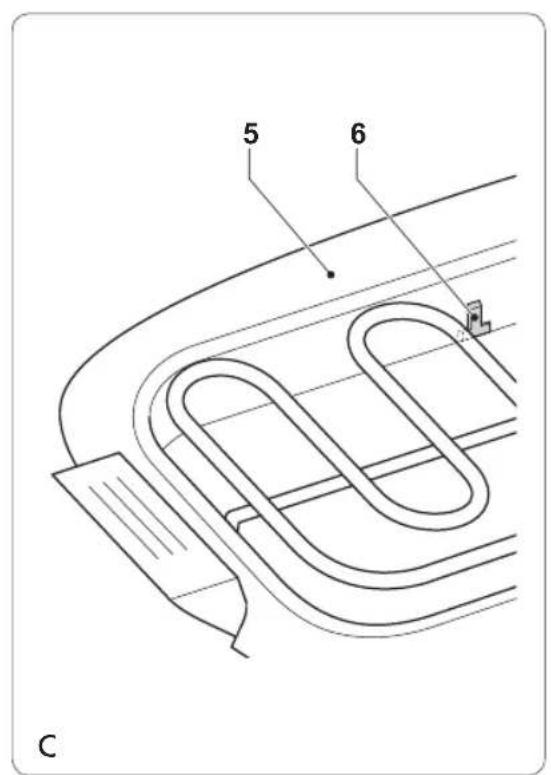
• Make sure that the bracket (21) is properly inserted into the hole in the control box (22) in order to activate the microswitch (fig. B2). - Place the grill rack (3) onto the table (5).
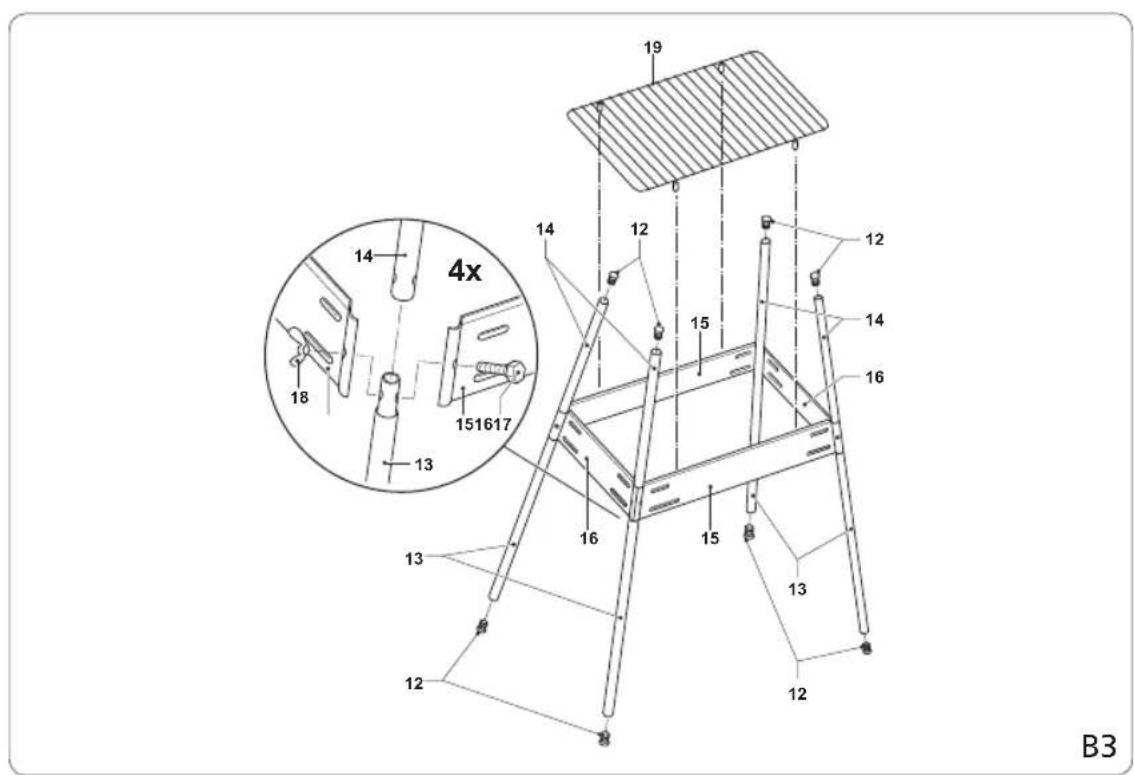
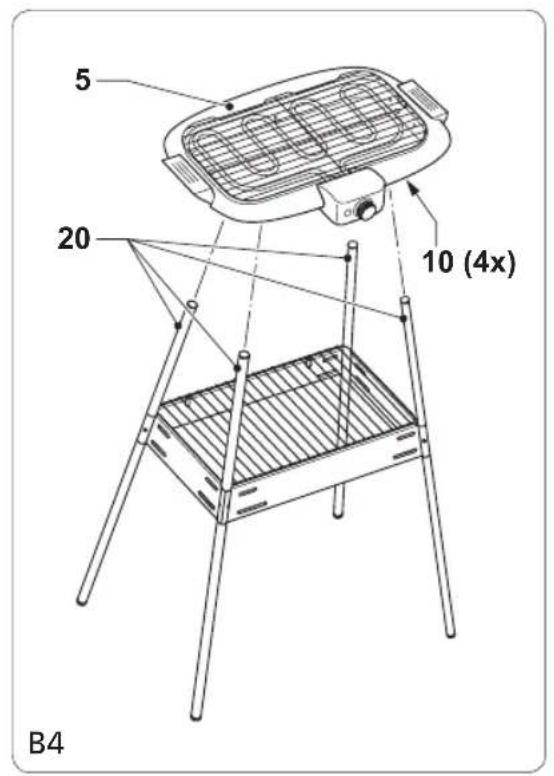
112245 - Use with the table support (fig. B3 & B4)
- Mount the feet (12) to the lower part (13) and the upper part (14) of the legs.
- Insert the lower part (13) into the upper part (14).
- Mount a long support bracket (15) and a short support bracket (16) to the legs using a bolt (17) and a wingnut (18).
- Place the base rack (19) onto the support brackets (15 & 16).
- Place the table (5) with the connection pieces (10) onto the legs (20).
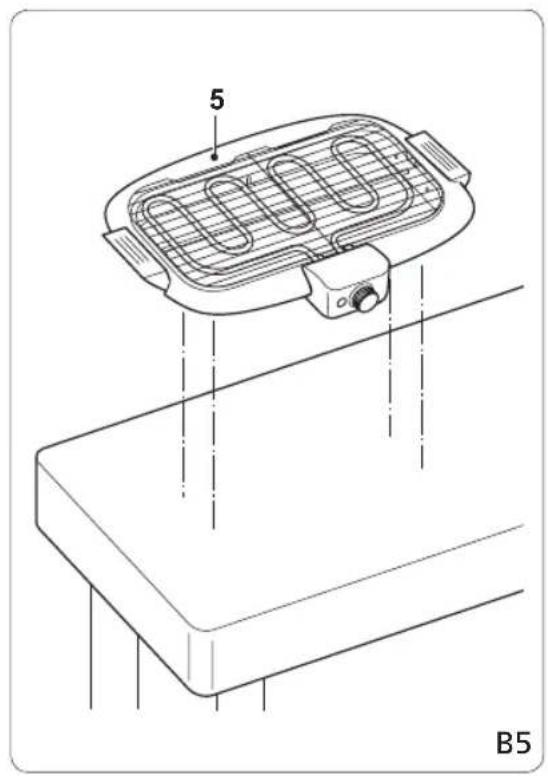
112245 & 112246 - Use without the table support (fig. B5)
- Place the table (5) onto a stable and flat tabletop.
Switching on and off (fig. A)
The appliance is equipped with a thermostat that keeps the grill rack at the required temperature.
• To switch on the appliance, insert the mains plug into the wall socket.
- Turn the thermostat dial (1) to set the required temperature. The temperature indicator (2) remains on while the thermostat heats the heating element (4). The temperature indicator (2) goes off when the heating element (4) has reached the required temperature.
- While the appliance is switched on, the temperature indicator (2) will illuminate and extinguish as the thermostat switches the heating element (4) on and off to maintain the required temperature.
• To switch off the appliance, remove the mains plug from the wall socket.
Setting the temperature (fig. A)
• Turn the thermostat dial (1) clockwise to increase the temperature of the grill rack (3).
- Turn the thermostat dial (1) counter clockwise to decrease the temperature of the grill rack (3).
Hints for use
• Prepare the ingredients.
• Clean the grill rack with a damp cloth.
- Place the appliance on a stable and flat surface.
- Fill the water reservoir with water up to the maximum mark on the water level indicator (fig. C). Do not exceed the maximum mark when you fill the water reservoir.
- Insert the mains plug into the wall socket.
- Turn the thermostat dial to set the required temperature.
- Wait for 10 minutes until the temperature indicator goes off. The grill rack has reached the required temperature.
• Note: Small pieces will grill or fry better and more quickly than large pieces.
- Set the thermostat to suit the ingredients. Experiment with the required cooking time and the required temperature to achieve the best results.
Cleaning and maintenance
Before you proceed, we need you to pay attention to the following notes:
- Before cleaning or maintenance, remove the mains plug from the wall socket and wait until the appliance has cooled down.
- Do not immerse the appliance in water or any other liquids.
Before you proceed, we would like you to focus your attention on the following notes:
- Do not use aggressive or abrasive cleaning agents to clean the appliance.
- Do not use sharp objects to clean the appliance.
• Regularly check the appliance for possible damage.
• Clean the appliance after each use:
- Remove any residues with a paper towel.
- Clean the grill rack with a damp cloth. Thoroughly dry the grill rack.
- Clean the heating element with a damp cloth. Thoroughly dry the heating element.
- Clean the appliance with a damp cloth. Thoroughly dry the appliance.
- Store the appliance in a dry place, out of the reach of children.
U.K. Wiring instructions
The wires in the mains lead are coloured in accordance with the following code:
BLUE NEUTRAL
BROWN LIVE
GREEN/YELLOW EARTH
As the colours of the wire in the mains lead of this appliance may not correspond with the colour markings identifying the terminals on your plug, proceed as follows:
The wire which is coloured BLUE must be connected to the terminal which is marked with the letter N or coloured black.
The wire which is coloured BROWN must be connected to the terminal which is marked with the letter L or coloured red.
The wire which is coloured GREEN/YELLOW must be connected to the terminal which is marked with the letter E or ( ± ) and is coloured GREEN or GREEN/YELLOW.
If a 13Amp (BS1363) plug is used, a 13Amp (BS1362) fuse must be fitted, or if any other type of plug is used, a 13Amp fuse must be fitted, either in the plug or adaptor, or on the distribution board.
Warning! This appliance must be earthed.
Disclaimer
Subject to change; specifications can be changed without further notice.
Félicitations!



- Gefeliciteerd!
- Safety instructions
- General safety
- Electrical safety
- Safety instructions for BBQ
- Description (fig. A)
- Initial use
- Assembly (fig. B)
- Assembling the table (fig. B1 & B2)
- - Use with the table support (fig. B3 & B4)
- & 112246 - Use without the table support (fig. B5)
- Switching on and off (fig. A)
- Setting the temperature (fig. A)
- Hints for use
- Cleaning and maintenance
- U.K. Wiring instructions
- Disclaimer
- Félicitations!
Brand : PRINCESS
Model : 112246
Category : Barbecue