RKR50 - Radio Ricatech - Free user manual and instructions
Find the device manual for free RKR50 Ricatech in PDF.

| Product type | Clock radio |
| Brand | Ricatech |
| Model | RKR50 |
| Mains power | 230 V – 50 Hz |
| Memory backup battery | 9 V (type 6LR61, not supplied) |
| Power consumption | 4 W |
| Frequency range | FM 87.5 – 108 MHz |
| Main functions | FM radio, alarm (beep or radio), timer, time display |
| Mounting | Under a cabinet (screws Ø 2 mm not supplied) or on a flat surface |
| Cleaning | Dry cloth only |
| Safety | Do not expose to moisture, do not open, unplug during storm |
| General information | Manufactured by Ricatech BV - Cornusbaan 1, 2908KB - info@ricatech.com |
Frequently Asked Questions - RKR50 Ricatech
User questions about RKR50 Ricatech
0 question about this device. Answer the ones you know or ask your own.
Ask a new question about this device
Download the instructions for your Radio in PDF format for free! Find your manual RKR50 - Ricatech and take your electronic device back in hand. On this page are published all the documents necessary for the use of your device. RKR50 by Ricatech.
USER MANUAL RKR50 Ricatech
text_image
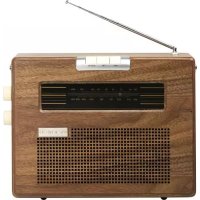
RICATECH®RICATECH RKR50
Kitchen radio
USER MANUAL
VEILIGHEIDSINSTRUCTIES
Carefully read the safety instructions and only use this set in the manner described in the operation instructions. Keep the operation instructions for later reading. If you give away or sell your radio to someone else, please hand the new owner these operating instructions.
The set should not come in contact with moisture, due to the risk of electric shock. Therefore do not use the set over the sink or the draining board. Never operate the set with wet hands or if you are standing on a wet floor.
Only connect the set to a regulated installed socket outlet, which has a line voltage consistent with the technical information of the set.
Leave the ventilation openings at the bottom of the set clear. If they are blocked the set can get overheated.
Place the power cord in such a way that nobody can get tangled up in it and in such a way that it will not be exposed to extreme heat.
Do not turn the set on if the set is damaged or if the power cord is visibly damaged.
Do not open the set. The voltage carrying components that are inside the set could cause electric shock when touched.
Please have repairs to the set or to the power cord done only at the specialised repair shops or at our service centre.
Lightning can cause damage to the sets if they are plugged in to the power supply.
Therefore remove the plug from the power outlet during a thunderstorm.
Batteries are not included with the set. If you decide to start using a battery, please remember the following:
Batteries could be life threatening if swallowed. Therefore keep batteries in places that cannot be reached by children.
Never throw batteries in a fire. Regular batteries should also never be recharged.
This causes danger of explosion.
Do not throw batteries in the household refuge, but rather hand them in as small chemical waste.
For instance, you can place them in the containers at the shops where batteries are sold (such as super-markets) or turn them in at the municipal domestic waste collection service.
MOUNTING
The clock radio can be mounted to the bottom of a hanging cabinet or a cabinet shelf or similar.
It can also just be placed on a surface.
Instructions:
The clock radio is provided with rubber antiskid feet. However it cannot be completely excluded that certain paints or synthetics affect these rubber feet and weaken them. With certain sensitive surfaces if desired you could place another layer under the feet.
Do not mount the clock radio over a stove or kitchen sink, that way the radio will be protected from moisture, grease and heat.
Make sure there is a power outlet nearby.
To be able to mount the radio to a hanging cabinet or cabinet shelf or anything like that you will need four screws with a diameter of 2 mm. These screws are not included.
Instruction:
In cabinets with a fascia you could, if desired, first mount a small space board to the bottom of the cabinet.
-
Pull the mounting plate out from the set towards the back.
-
The fastening holes are marked with arrows at the bottom of the mounting plate. Mark the four hour holes that need to be drilled by using the mounting plate and fasten the mounting plate with four screws.
-
Slide the radio from the front onto the mounting plate up to the stop.
Instruction:
You can remove the two front rubber feet by carefully pulling them out and save them if so desired.
OPERATION
Storage battery
The storage battery is designed to keep the present time and the alarm time in the memory in case of a power failure. Thus after a power failure you will not have to reset the time and you can rely on being awakened if the power is resumed before the set alarm time.
It is advisable to replace the storage battery once per year to safeguard operation without problems.
For this you will need a 9v block battery (type 6LR61). This battery is not included in the standard delivery.
Mains connection
Place the plug in a 230v-50Hz power outlet.
- Place the function switch of the radio (on the left side of the set) in the ON position. The control light RADIO ON indicates that the radio is turned on.
- Turn the VOLUME control knob clockwise till you hear a click and set the radio to the desired sound level. Turn the volume control knob counter-clockwise till it clicks to turn the radio off again.
- Select the desired station with the frequency regulator TUNING. On the frequency range you will see which radio station frequency is currently selected.
- You should pull out and unwind the entire cable antenna for a better reception.
- Place the function switch of the radio (on the left side of the set) in the OFF position to turn the radio off. The control light RADIO ON will go off.
SETTING TIME
Important: In setting the time the countdown has to be switched off.
This means that the TIMER switch has to be set in the OFF position.
- Hold down the TIME button.
- At the same time press down the HOUR button to set the right hour.
- Then, while holding down the time button, press down the MIN button to set the minutes.
- Release the TIME button. The time is now set.
ALARM
Your clock radio has an alarm function.
You can be awakened by either the radio or an alarm signal.
Setting the alarm time
Important: In setting the alarm time the countdown has to be switched off. This means that the TIMER switch has to be set in the OFF position.
- Hold down the ALARM button. On the display the alarm time that is set will appear.
- At the same time press down the HOUR button to set the right hour.
- Then, while holding down the alarm button, press down the MIN button to set the minutes.
- Release the ALARM button when the correct alarm time is set.
The display will return to the time display.
Awaken to an alarm signal
- Turn the VOLUME knob clockwise till you hear the click.
- Place the function switch of the radio (on the left side of the set) in the AUTO position.
The control light of the alarm AUTO indicates that the alarm is operational.
Instruction: The volume of the alarm signal cannot be adjusted.
Awaken to the radio
- Place the function switch of the radio (on the left side of the set) in the ON position.
- Select with the frequency regulator TUNING the desired station to which you want to wake up.
- Set the sound level with the VOLUME regulator to a wake up volume that is pleasant to you.
- Place the function switch of the radio (on the left side of the set) in the AUTO position.
The control light of the alarm AUTO indicates that the alarm is operational.
Turning off the alarm
Press the ALARM button to turn off the wake up signal of the radio alarm.
The wake up signal/radio alarm will switch itself off after approximately 2 hours automatically.
The wake up remains stored. If you leave the function switch of the radio in the AUTO position, the wake up function will operate at the same time again the next day.
If you want to completely switch off the alarm function, slide the function switch of the radio to the OFF position.
TIMER
Your clock radio has a countdown or timer function. You can set the time between 1 minute and 1 hour and 59 minutes.
After that time has passed an uninterrupted signal will sound. The timer also works when the radio is playing.
Instruction: the timer does not allow for time measurements that are accurate to the second, because the timer will automatically start when switched to the ON position.
Important: For timer use the alarm function should be switched off.
This means that the function switch of the radio should not be in the AUTO position.
-
Set the TIMER switch to the ON position. On the display 0:59 will appear.
-
If more than 59 minutes have to be set, press the HOUR button. Then 1:59 will appear on the display.
-
Hold down the MIN button for setting the time. The time will go backwards. Release the button as soon as the desired time is indicated.
Instruction: If you accidentally set the wrong time, slide the TIMER switch to the OFF position for a moment and then back to the ON position to reset the correct time.
Switching off the timer
Slide the TIMER switch to the OFF position to turn it off.
Next the actual time is displayed again.
CLEANING
When necessary, clean the radio with a dry cloth.
TECHNICAL INFORMATION
Electric supply: 230V-50Hz
Storage battery: 9V block battery (type 6LR61)
Frequency reach: UKW 87,5-108 MHz
Power deprivation: 4W
Ricatech BV
Cornusbaan 1 - 2908KB
Service & support : ricatech.support@ssb-repair.com
Website : www.ricatech.com