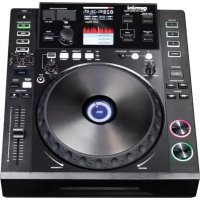
CDJ700 - DJ Equipment GEMINI - Free user manual and instructions
Find the device manual for free CDJ700 GEMINI in PDF.



| Product Type | CD/USB/SD Player with MIDI and HID |
| Dimensions | 333 x 304 x 114 mm |
| Weight | 3.3 kg |
| Power Supply | 100-240 V AC, 60/50 Hz, 10 W |
| Supported Audio Formats | WAV (PCM 16-bit, 8-48 kHz), MP3 (16-bit, 44.1 kHz, MPEG1 Layer III), AAC (16-bit, 44.1 kHz), AIFF (16-bit, 44.1 kHz) |
| Supported File Systems (USB/SD) | FAT, FAT32, HFS+, NTFS |
| Connectivity | RCA line outputs, S/PDIF digital output, USB type B port (MIDI/HID audio), USB and SD ports for media |
| Built-in Effects | FLTR, FLANGER, ECHO, WAH, TRANCE, BUBBLE |
| Advanced DJ Functions | Loop (In/Out), Hot Cue (3), Auto Cue, Slip mode, Master Tempo, Pitch Bend, Reverse, Scratch (Vinyl mode) |
| Display | 240x320 touch screen LCD, waveform display, progress bar, BPM, tempo |
| Jog Wheel | Touch-sensitive wheel with inertia adjustment (Jog Adjust), adjustable Start/Stop time |
| Pitch Ranges | +/- 4%, 8%, 16%, 24%, 50%, 100% |
| Reverse Playback | Yes (Reverse button) |
| MIDI/HID Control | MIDI and HID mode for DJ software control, audio via USB |
| Digital Audio Output | Coaxial S/PDIF (44.1 kHz, 16-bit) |
| Frequency Response | 20 Hz - 20 kHz |
| Total Harmonic Distortion | < 0.05% |
| Signal-to-Noise Ratio | > 100 dB |
| Maintenance and Cleaning | Soft, dry cloth; for stubborn dirt, distilled water/isopropyl alcohol solution (2:1); avoid harsh solvents |
| Safety | Do not open, do not expose to water, use shielded cables, do not block ventilation |
| Warranty | 1 year |
Frequently Asked Questions - CDJ700 GEMINI
User questions about CDJ700 GEMINI
0 question about this device. Answer the ones you know or ask your own.
Ask a new question about this device
Download the instructions for your DJ Equipment in PDF format for free! Find your manual CDJ700 - GEMINI and take your electronic device back in hand. On this page are published all the documents necessary for the use of your device. CDJ700 by GEMINI.
USER MANUAL CDJ700 GEMINI
IN THE USA: IF YOU ARE EXPERIENCING PROBLEMS WITH THIS UNIT CALL 1-732-346-0061 FOR GCI TECHNOLOGIES CUSTOMER SERVICE. DO NO ATTEMPT TO RETURN THIS EQUIPMENT TO YOUR DEALER.
Parts of the design of this product may be protected by worldwide patents. Information in this manual is subject to changes without notice and does not represent a commitment on the part of the vendor.
GCI Technologies Corp. shall not be liable for any loss or damage whatsoever arising from the use of information or any error contained in this manual.
No part of this manual may be reproduced, stored in a retrieval system or transmitted, in any form or by any means, electronic, electrical, mechanical, optical, chemical, including photocopying and recording, for any purpose without the express written permission of GCI Technologies Corp.
It is recommended that all maintenance and service on this product is performed by GCI Technologies. Corp or its authorized agents. GCI Technologies will not accept liability for loss or damage caused by maintenance or repair performed by unauthorized personnel.
Worldwide Headquarters • 280 Raritan Center Dr. Edison, NJ 08837 • USA
Tel: (732) 346-0061 • Fax: (732) 346-0065
Gemini Sound Products Unit 44
Brambles Enterprise Centre
Waterlooville P07 7TH, UK
Tel: 087 087 00880
Fax: 087 087 00990
GCI Technologies S.A. Caspe, 172 - 5º A
08013 Barcelona, Spain
Tel: 34 93 436 37 00
Fax: 34 93 347 69 61
© GCI Technologies Corp. 2011 All Rights Reserved.
CDJ-700
PROFESSIONAL MEDIA PLAYER
gemini®
www.geminidj.com
ENGLISH
Warning 4
Introduction 5
Unit overview 7
Connections 8
Displays 9
Loading discs and memory devices 10
Playback Controls 11
Effects Controls 14
Jogwheel Controls 15
Display Controls 16
Midi Controls 17
Troubleshooting 19
Specifications 20
Warranty Information 75
Product Registration 77
ESPAÑOL
Advertencias 22
Introducción 23
Resumen 25
Conexiones 26
Pantallas 27
Assistance Technique 55
Caractéristiques 56
PLEASE READ BEFORE USING APPLIANCE IMPORTANT WARNING AND SAFETY INSTRUCTIONS!

RISK OF ELECTRIC SHOCK DO NOT OPEN!
CAUTION: This product satisfies FCC regulations when shielded cables and connectors are used to connect the unit to other equipment. To prevent electromagnetic interference with electric appliances such as radios and televisions, use shielded cables and connectors for connections.
The exclamation point within an equilateral triangle is intended to alert the user to the presence of important operating and maintenance (servicing) instructions in the literature accompanying the appliance.
The lightening flash with arrowhead symbol, within an equilateral triangle, is intended to alert the user to the presence of uninsulated "dangerous voltage" within the product's enclosure that may be of sufficient magnitude to constitute a risk of electric shock to persons.
READ INSTRUCTIONS: All the safety and operating instructions should be read before the product is operated.
RETAIN INSTRUCTIONS: The safety and operating instructions should be retained for future reference.
HEED WARNINGS: All warnings on the product and in the operating instructions should be adhered to.
FOLLOW INSTRUCTIONS: All operating and use instructions should be followed.
CLEANING: The product should be cleaned only with a polishing cloth or a soft dry cloth. Never clean with furniture wax, benzine, insecticides or other volatile liquids since they may corrode the cabinet.
ATTACHMENTS: Do not use attachments not recommended by the product manufacturer as they may cause hazards.
WATER AND MOISTURE: Do not use this product near water, for example, near a bathtub, wash bowl, kitchen sink, or laundry tub; in a wet basement; or near a swimming pool; and the like.
ACCESSORIES: Do not place this product on an unstable cart, stand, tripod, bracket, or table. The product may fall, causing serious injury to a child or adult, and serious damage to the product. Use only with a cart, stand, tripod, bracket, or table recommended by the manufacturer, or sold with the product. Any mounting of the product should follow the manufacturer's instructions, and should use a mounting accessory recommended by the manufacturer.
CART: A product and cart combination should be moved with care. Quick stops, excessive force, and uneven surfaces may cause the product and cart combination to overturn. See Figure A.
VENTILATION: Slots and openings in the cabinet are provided for ventilation and to ensure reliable operation of the product and to protect it from overheating, and these openings must not be blocked or covered. The openings should never be blocked by placing the product on a bed, sofa, rug, or other similar surface. This product should not be placed in a built-in installation such as a bookcase or rack unless proper ventilation is provided or the manufacturer's instructions have been adhered to.
POWER SOURCES: This product should be operated only from the type of power source indicated on the marking label. If you are not sure of the type of power supply to your home, consult your product dealer or local power company.
LOCATION: The appliance should be installed in a stable location.
NON-USE PERIODS: The power cord of the appliance should be unplugged from the outlet when left unused for a long period of time.
GROUNDING OR POLARIZATION:
• If this product is equipped with a polarized alternating current line plug (a plug having one blade wider than the other), it will fit into the outlet only one way. This is a safety feature. If you are unable to insert the plug fully into the outlet, try reversing the plug. If the plug should still fail to fit, contact your electrician to replace your obsolete outlet. Do not defeat the safety purpose of the polarized plug.
• If this product is equipped with a three-wire grounding type plug, a plug having a third (grounding) pin, it will only fit into a grounding type power outlet. This is a safety feature. If you are unable to insert the plug into the outlet, contact your electrician to replace your obsolete outlet. Do not defeat the safety purpose of the grounding type plug.
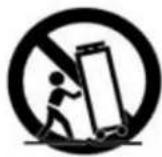
Fig. A
POWER-CORD PROTECTION: Power-supply cords should be routed so that they are not likely to be walked on or pinched by items placed upon or against them, paying particular attention to cords at plugs, convenience receptacles, and the point where they exit from the product.
OUTDOOR ANTENNA GROUNDING: If an outside antenna or cable system is connected to the product, be sure the antenna or cable system is grounded so as to provide some protection against voltage surges and built-up static charges. Article 810 of the National Electrical Code, ANSI/NFPA 70, provides information with regard to proper grounding of the mast and supporting structure, grounding of the lead-in wire to an antenna discharge unit, size of grounding conductors, location of antenna-discharge unit, connection to grounding electrodes, and requirements for the grounding electrode. See Figure B.
LIGHTNING: For added protection for this product during a lightening storm, or when it is left unattended and unused for long periods of time, unplug it from the wall outlet and disconnect the antenna or cable system. This will prevent damage to the product due to lightening and power-line surges.
POWER LINES: An outside antenna system should not be located in the vicinity of overhead power lines or other electric light or power circuits, or where it can fall into such power lines or circuits. When installing an outside antenna system, extreme care should be taken to keep from touching such power lines or circuits as contact with them might be fatal.
OVERLOADING: Do not overload wall outlets, extension cords, or integral convenience receptacles as this can result in a risk of fire or electric shock.
OBJECT AND LIQUID ENTRY: Never push objects of any kind into this product through openings as they may touch dangerous voltage points or short-out parts that could result in a fire or electric shock. Never spill liquid of any kind on the product.
SERVICING: Do not attempt to service this product yourself as opening or removing covers may expose you to dangerous voltage or other hazards. Refer all servicing to qualified service personnel.
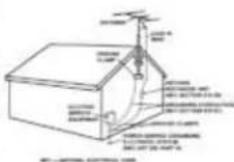
Fig. B
DAMAGE REQUIRING SERVICE: Unplug this product from the wall outlet and refer servicing to qualified service personnel under the following conditions
- When the power-supply cord or plug is damaged.
- If liquid has been spilled, or objects have fallen into the product.
- If the product has been exposed to rain or water.
- If the product does not operate normally by following the operating instructions. Adjust only those controls that are covered by the operating instructions as an improper adjustment of other controls may result in damage and will often require extensive work by a qualified technician to restore the product to its normal operation.
- If the product has been dropped or damaged in any way.
- When the product exhibits a distinct change in performance, this indicates a need for service.
REPLACEMENT PARTS: When replacement parts are required, be sure the service technician has used replacement parts specified by the manufacturer or have the same characteristics as the original part. Unauthorized substitutions may result in fire, electric shock, or other hazards.
SAFETY CHECK: Upon completion of any service or repairs to this product, ask the service technician to perform safety checks to determine that the product is in proper operating condition.
WALL OR CEILING MOUNTING: The product should not be mounted to a wall or ceiling.
HEAT: The product should be situated away from heat sources such as radiators, heat registers, stoves, or other products (including amplifiers) that produce heat.
INTRODUCTION
Thank you for purchasing our Gemini CDJ-700. We are confident that the Gemini platform of products will not only make your life easier through the use of the latest technological advancements in cross-platform connectivity and sound reproduction but will raise the bar for DJ and pro audio products. With the proper care & maintenance, your unit will likely provide years of reliable, uninterrupted service. All Gemini products are backed by a 1-year limited warranty*.
Please ensure that you find these accessories included with the CDJ-700:
(1) Power cord
(1) RCA cable
(1) Operating instructions
(1) Warranty Card
1 Do not use this CD player at temperatures below 41^ F/ 5^ C or higher than 95^ F/ 35^ C.
2 The apparatus should not be exposed to dripping or splashing, and no objects filled with liquids such as vases should be placed on the apparatus.
3 Place the unit in a clean and dry location.
4 Do not place the unit in an unstable location.
5 When disconnecting the power cord from the AC outlet, always grasp by the plug. Never pull the power cord.
6 To prevent electric shock, do not remove the cover or the bottom screws.
7 There are NO USER SERVICEABLE PARTS INSIDE. Please refer to a qualified technician.
8 Do not use chemical solvents to clean the unit.
9 Keep the laser pickup clean by keeping the tray closed.
10 Keep this manual in a safe place for future reference.
Laser Diode Properties
Material: Ga - Al - As
Wavelength: 755 - 815 nm (25°C)
Laser Output: Continuous Wave, max. 0.5 mW
- In the USA- if you experience problems with this unit call Gemini customer service at 1 (732) 346-0061. Do not attempt to return this equipment to your dealer
CLEANING THE UNIT
To clean the CDJ-700, use only a dry soft cloth and/or compressed air. If the unit is soiled with stubborn dirt, we suggest using a 2:1 solution of distilled water and 30% isopropyl alcohol. Avoid using harsh cleaning chemicals such as benzene, paint thinner, bleach, or hydrochloric acid, which will damage the unit.
OPERATING CONDITIONS
For optimum performance, the temperature of the operating environment should be between +5^ to +35^ (+41^ - +95^) . Failure to maintain proper operating temperature may result in difficulty reading the display, thermal overload, or system-wide instability. Avoid exposing the unit to direct sunlight.
When placing the unit in an installation, make sure that it is placed on a stable surface, as far away from vibrations as possible. Even though the unit is impervious to vibration, the storage devices (specifically hard drive based ones) that are designed to be used in conjunction with it are typically not. Also be sure not to place or use the player on heat generating sources, such as amplifiers or near spotlights.
PLAYABLE FORMATS AND DISCS
The CDJ-700 plays discs (CD compatible) as well as music files on USB memory devices. All of the following file formats are supported:
• WAV (16-bit PCM, sample rates of 8 kHz, 11.025 kHz, 12 kHz, 16 kHz, 22.50 kHz, 24 kHz, 32 kHz, 44.1 kHz, 48 kHz)
• MP3 (16 bit, 44.1 kHz, MPEG-I, Layer III)
- AAC (16 bit, 44.1 kHz, stereo, AAC Core, AAC Plus, AAC Plus v2)
• AIFF (16 bit, 44.1 kHz, stereo)
Supported file systems on Memory Stick Devices include:
• FAT
- FAT32
• HFS+
- NTFS
USING MIDI CONTROL
The CDJ-700 can also send MIDI data from the buttons and dials to a computer to control the parameters and playback controls of DJ software. The audio playback from the computer can also be output from the CDJ-700.
Before using the CDJ-700 as an audio device, connect the CDJ-700 with a USB cable and allow your PC/MAC to detect it. Open your DJ software and select the CDJ-700's output device in the DJ software's settings. For instructions on how to do this, see your DJ software's operating instructions.
CONNECTING TO A COMPUTER
The CDJ-700 is a plug and play device that requires no software installation. The CDJ-700's audio and MIDI drivers are compatible with PC and MAC.
- To use the CDJ-700 with a computer using Windows, connect the CDJ-700 to your PC after starting up the computer. The CDJ-700 will configure standard WDM drivers. Select the CDJ-700 as your device to use it as your audio device. ASIO drivers can also be configured for use with the CDJ-700, such as ASIO4ALL.
- To use the CDJ-700 with a computer using a MAC operating system, connect the CDJ-700 to your MAC after starting up the computer. Use the system's standard CORE Audio drivers and select the CDJ-700 as the device.
UNIT OVERVIEW
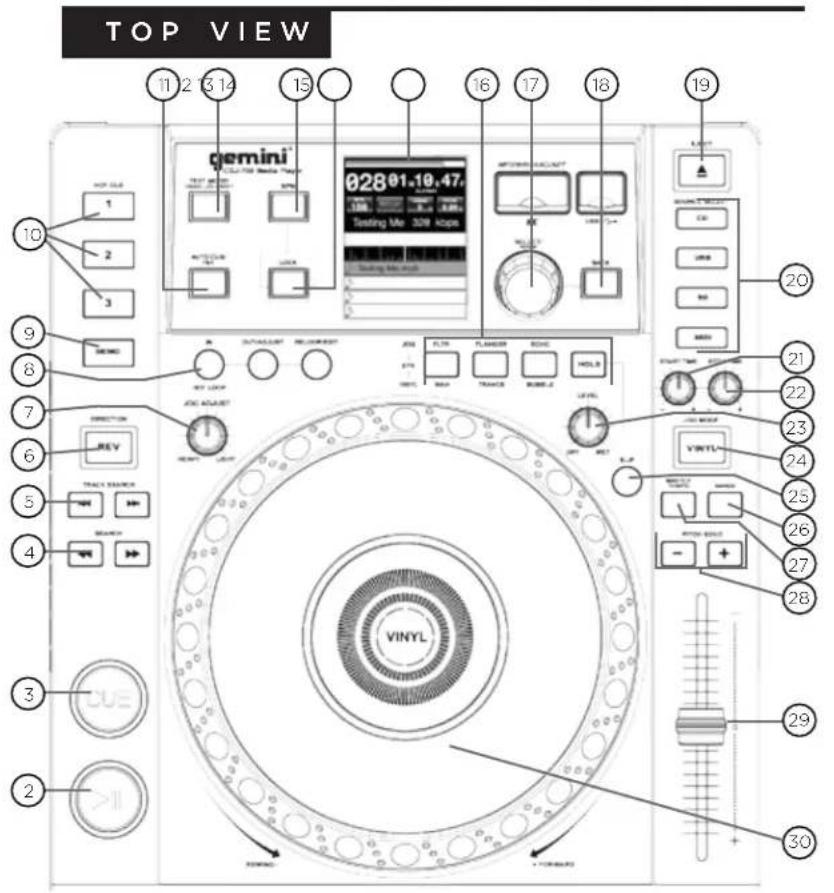
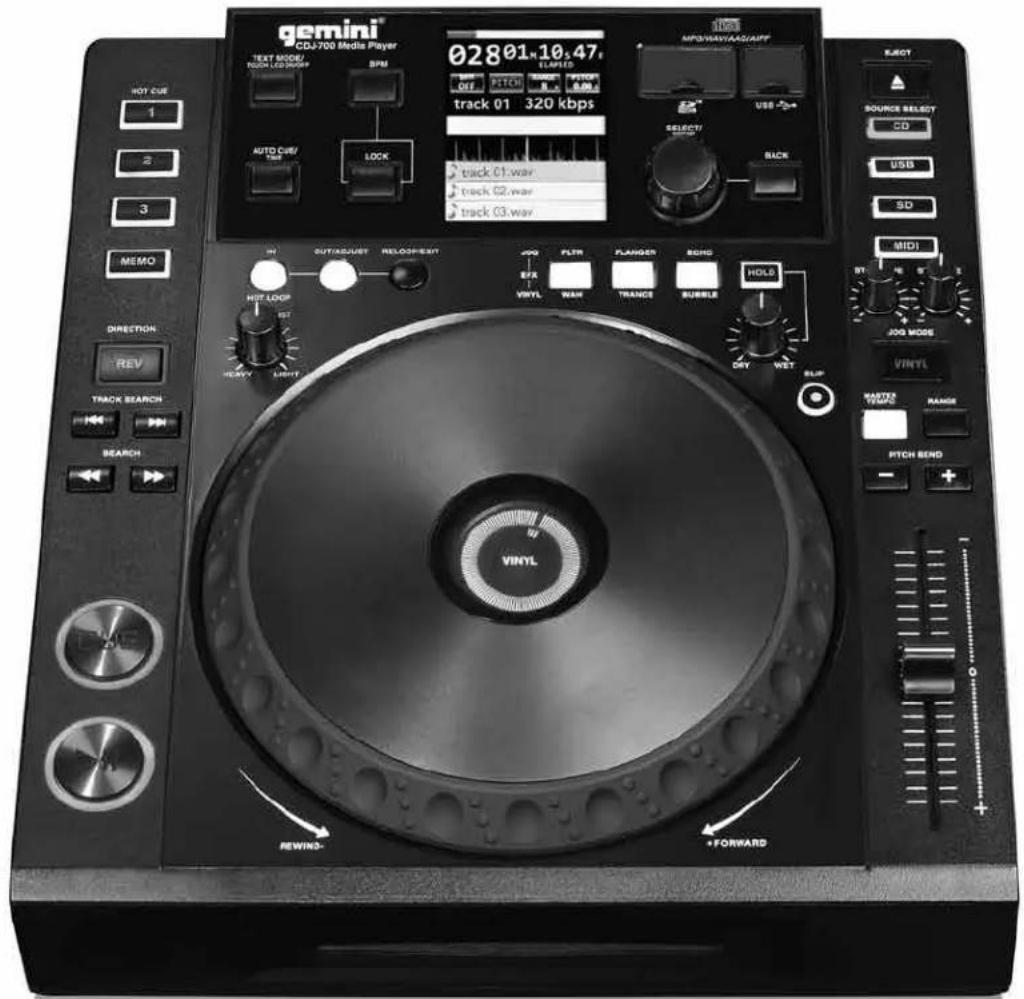
CONTROLS
① Power
② Play/Pause ▶/11
③ Cue
4 Search
⑤ Track search |◀◀/▶▶|
6 Reverse
⑦ Jog adjust
⑧ Loop in / loop out/adjust / reloop/exit
9 Memo
10 Hot cues
⑪ Auto cue / time
⑫ Text mode / touch on/off
13 BPM
14 Lock
15 Lcd touch display
16 Effects
17 Rotary encoder / select / contrast
18 Back
19 Eject
20 Source select
21 Jog start time
22 Jog stop time
23 Effect dry/wet
24 Vinyl
25 Slip mode
26 Range
27 Master tempo
28 Pitch bend [+] [-]
29 Pitch control fader
30 Jogwheel
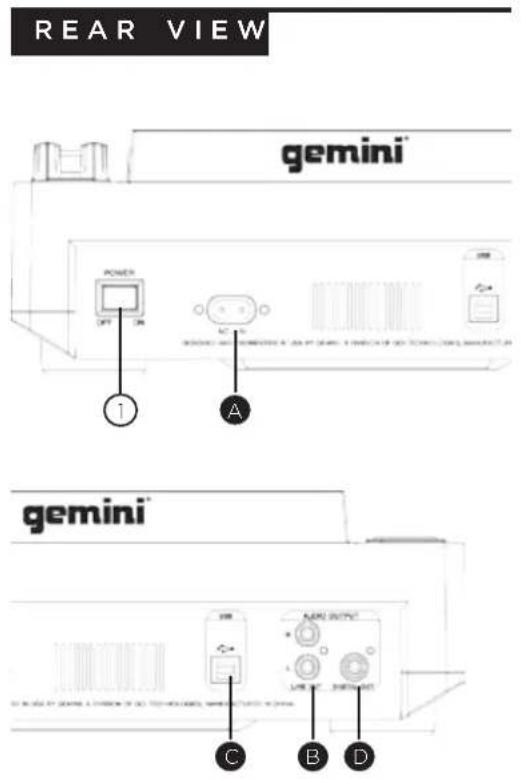
CONNECTING THE CDJ-700
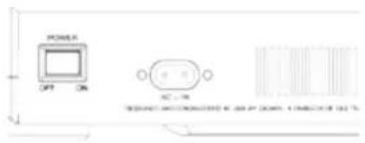
POWER
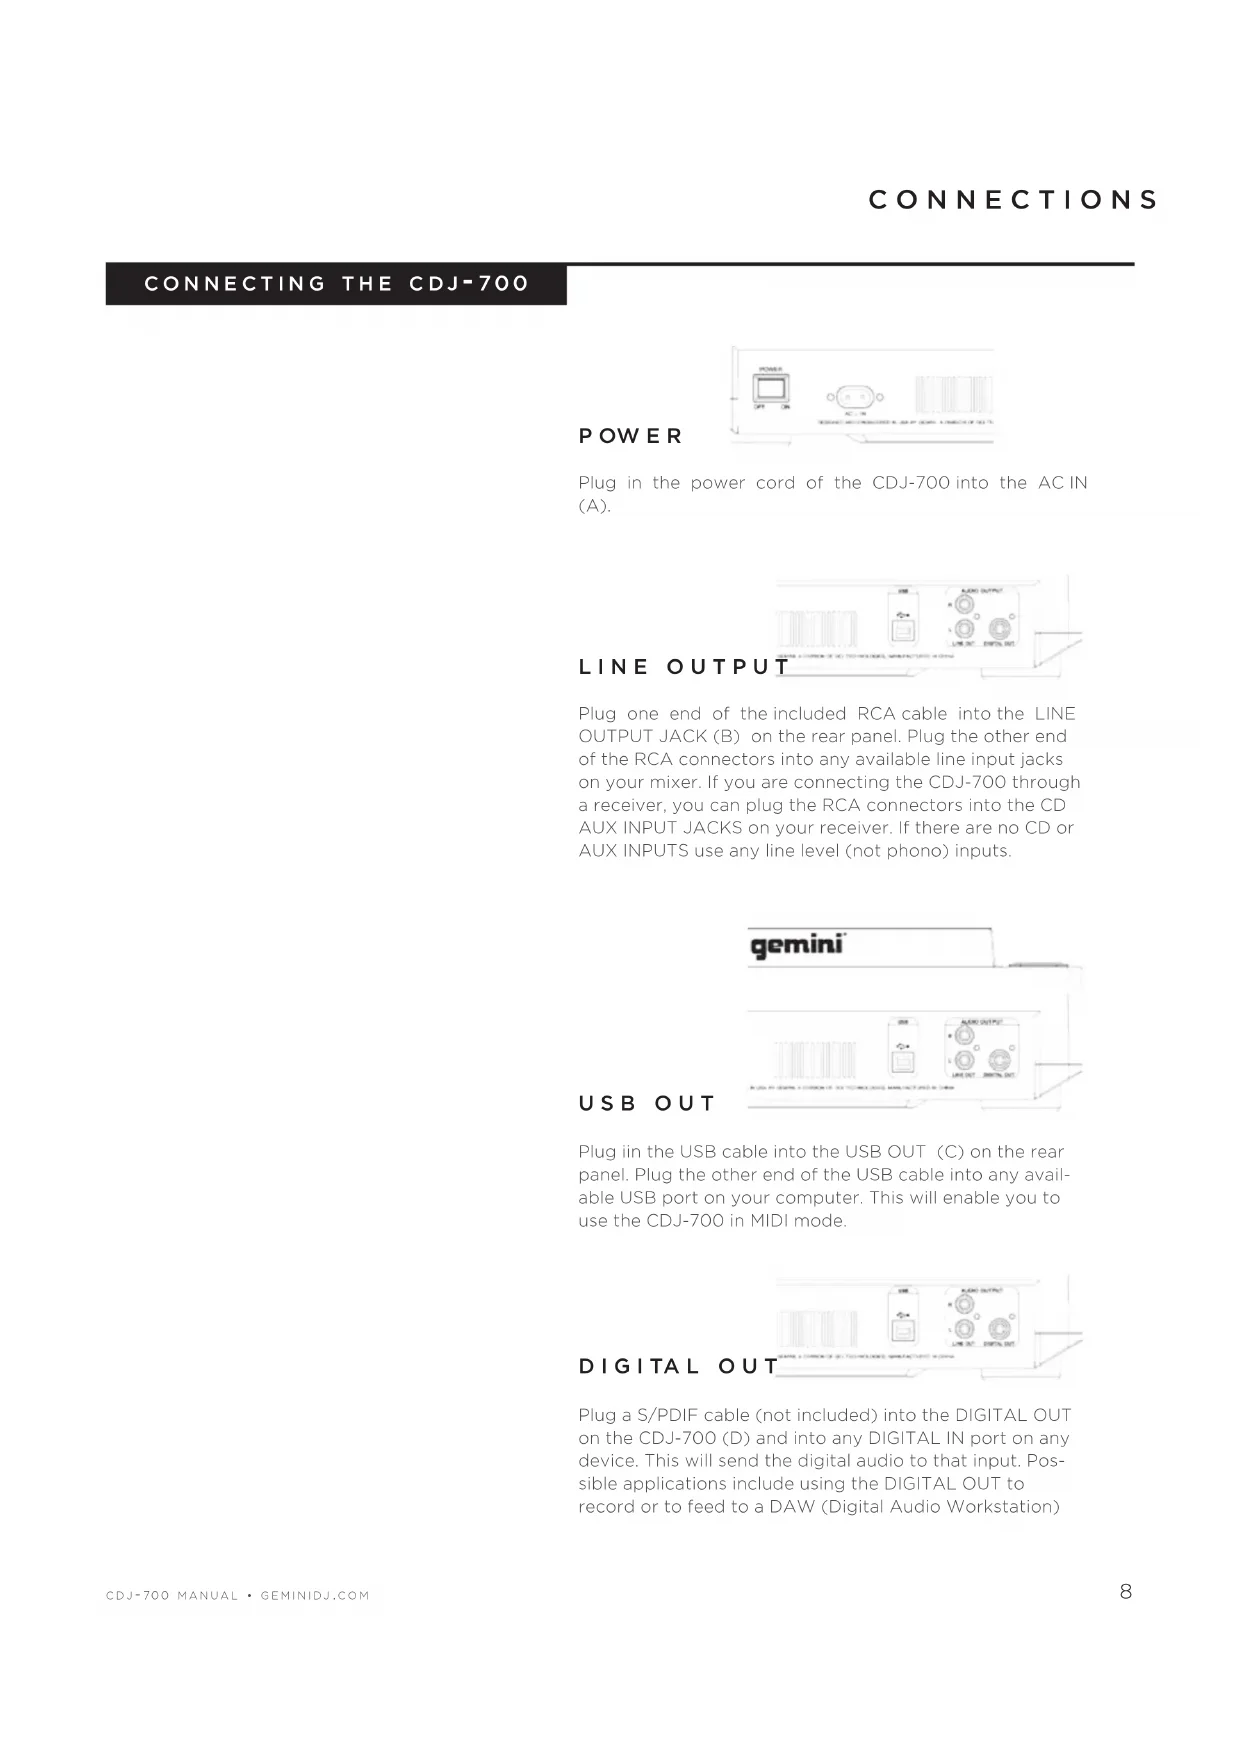
Plug in the power cord of the CDJ-700 into the AC IN (A).
LINE OUTPUT
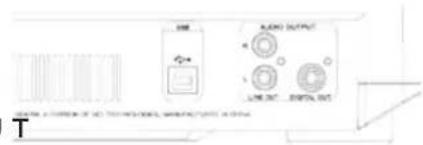
Plug one end of the included RCA cable into the LINE OUTPUT JACK (B) on the rear panel. Plug the other end of the RCA connectors into any available line input jacks on your mixer. If you are connecting the CDJ-700 through a receiver, you can plug the RCA connectors into the CD AUX INPUT JACKS on your receiver. If there are no CD or AUX INPUTS use any line level (not phono) inputs.
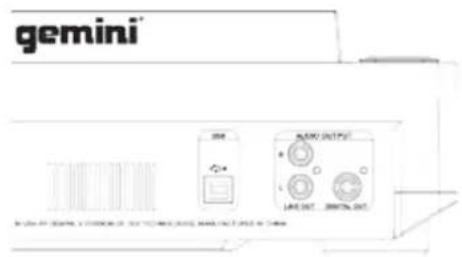
USB OUT
Plug in the USB cable into the USB OUT (C) on the rear panel. Plug the other end of the USB cable into any available USB port on your computer. This will enable you to use the CDJ-700 in MIDI mode.
DIGITAL OUT
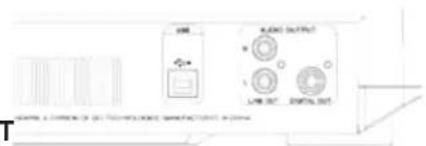
Plug a S/PDIF cable (not included) into the DIGITAL OUT on the CDJ-700 (D) and into any DIGITAL IN port on any device. This will send the digital audio to that input. Possible applications include using the DIGITAL OUT to record or to feed to a DAW (Digital Audio Workstation)
LCD TOUCH DISPLAYS
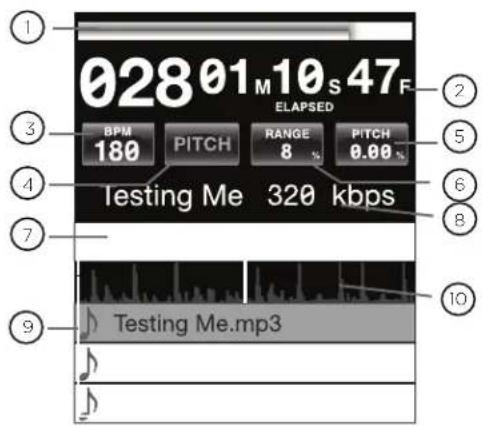
① Time PRogReSS BAR
Shows the current position in the track.
② Time diSPLAY
Shows the current time value of the track.
3 BPm
Displays current BPM value in auto and manual BPM mode or displays the tempo information from the ID3 tag.
④ TemPo
When MASTER TEMPO is OFF, PITCH is displayed in this field. When MASTER TEMPO is ON, TEMPO is displayed in this field.
⑤ PiTcH/mT VALUe
Shows current PITCH/TEMPO value.
RAnge
Displays the current PITCH/TEMPO range selected.
⑦ eFFecTS PARAmeTeR BAR
Displays effect parameter value
⑧ TRAcK inFoRmATion diSPLAY
Displays track information.
⑨ LiBRARY BRowSeR
Displays playable tracks and folders
10 TRAcK wAVeFoRm
Displays a visual representation the loaded track's audio. Pressing the waveform changes the magnification. The values are: 3.2 seconds, 6.5 seconds, 12 seconds, and 24 seconds.
JOGWHEEL DISPLAYS
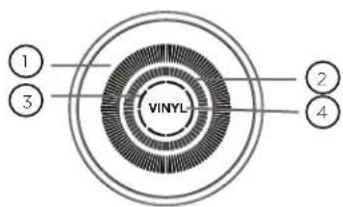
① TRAcK diSPLAY
Simulates a turntable playing at 33 1/3 RPM and displays the current track position.
② cUe PoinT/SLiP diSPLAY
Displays the CUE point assigned to the track. In SLIP mode, it displays the normal playback position (page 14).
③ jogwHeeL ToUcH diSPLAY
The jogwheel touch display illuminates when the jogwheel is pressed.
④ VinYL
The VINYL display illuminates when VINYL mode is activated.
LOADING DISCS AND MEMORY DEVICES
Once you have connected all your cables, you can turn the CDJ-700's POWER on by pressing the POWER (1) button, pressing the button a second time will turn off the unit.
SOURCE SELECT
The SOURCE SELECT (20) allows you to choose the media from which you will play music:
cd Pressing the CD source button allows you to play music from the CD drives.
USB Pressing the USB source button allows you to play music from a USB device.
Sd Pressing the SD source button allows you to play music from a SD/SDHC card.
midi Pressing the MIDI source button switches the unit to MIDI mode with bi-directorial support. In this mode, all controls (button pressings, pitch potentiometers moving and wheel rotations) are registered on the unit and transferred to PC via USB MIDI. This can be used in conjunction with DJ software to control the software's parameters. (For more information, see page 9).
LOADING/EJECTING DISCS
The SLOT-IN CD-ROM (pictured below) is where the CD is held during loading, unloading and playback, and holds both 12 cm and 8cm CD's.
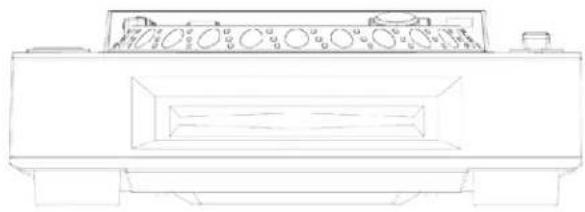
natural_image
Line drawing of a mechanical device with control panel and base mount (no text or symbols)Pressing the EJECT (19) button will eject the disc from the SLOT-IN CDROM. The disc will not eject in PLAY mode.
LOADING/EJECTING USB/SD DEVICES
USB Insert the USB memory device into the USB input (E) on the top of the CDJ-700. Upon loading the device, the LCD Touch Display will show the folders and tracks on the USB memory device.
Sd Insert the SD card into the SD card slot (F) on the top of the CDJ-700. Upon loading the device, the LCD Touch Display will show the folders and tracks on the SD memory device.
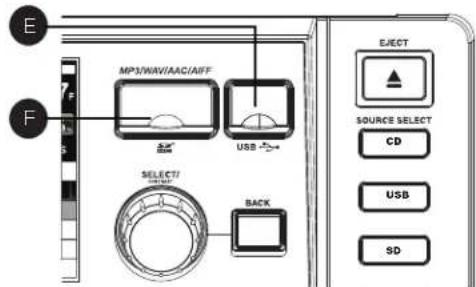
To eject the USB and SD card, change the SOURCE SELECT (20) to another selection and remove the USB memory device or SD card. To eject the SD card, press the SD card in. When it pops up, pull the SD card out vertically.
*NOTE: Before powering off the CDJ-700, remove any USB memory device or SD card to ensure that no corruption of data occurs.
BROWSING TRACKS/FOLDERS
The browsing display shows the playable files and folders on the CD, USB memory device, or SD card.
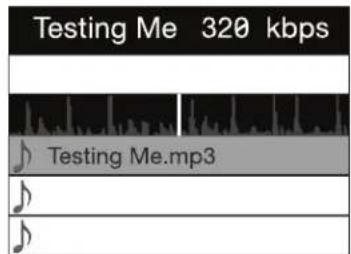
Rotating the rotary ENCODER(17) allows searching through the browser. This can also be done via touching the screen in the browsing display area.

To open a folder, highlight a folder and press in the ENCODER (17) to select. To load a track, highlight a track to load and press the ENCODER(17) again.
To return to the previous folder, press the BACK (18) button.

PLAYBACK CONTROLS
Once you have loaded a track, the TRACK TITLE on the LCD Touch Screen will display the loaded track.
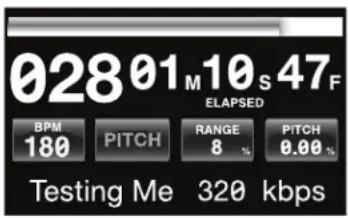
PLAY/PAUSE
Pressing PLAY/PAUSE ▶ / II (2) will begin playback of the selected track. Pressing PLAY/PAUSE ▶ / II (2) again will pause playback and hold the track at the current position.
- Pausing playback before the disc is ejected: -Before ejecting a disc, the unit must be PAUSED. The disc will not eject while the unit is playing.
SEARCH
Pressing SEARCH ◀◀/▶▶(4) will search through the track in the direction (forward/reverse). Pressing and holding SEARCH ◀◀/▶▶(4) will fast-search through the track in the direction (forward/reverse).
TRACK SEARCH
Pressing TRACK SEARCH ▶▶ (5) will advance to the beginning position of the next track. Pressing TRACK SEARCH I◀(5) will return the current track to the beginning position. Pressing TRACK SEARCH I◀(5) twice consecutively returns to the beginning point of the previous track.
- When searching through folders:
- When files are organized in folders, only tracks within the same folder are searched.
- Autocue function:
- When autocue is enabled, the player will pause at the beginning of the track.
REVERSE
Pressing REVERSE (6) will begin playback in the reverse direction.

PITCH BEND
Pressing the PITCH BEND [+] [-] (28) will raise the pitch up to +100% or lower the pitch down to -100% from the existing pitch setting. Releasing the buttons will return the pitch to the original pitch setting.

ADJUSTING PITCH TEMPO
Moving the PITCH CONTROL FADER (29) will accelerate the pitch/tempo when moved towards [+] and deaccelerate the pitch/tempo when it is moved towards [-] .
The current PITCH/TEMPO value is displayed on the LCD Touch Display.
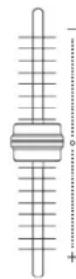
Pressing the RANGE (26) button adjusts the range of the PITCH CONTROL FADER between +/- 4%, 8%, 16%, 24%, 50% and 100%

MASTER TEMPO
MASTER TEMPO (27) allows tempo adjustment without changing the original pitch.

The current mode, either PITCH or TEMPO, is displayed on the LCD Touch Display.
• RANGE in MASTER TEMPO:
-In MASTER TEMPO mode, the range is +/- 4%, 8%, 16%, 24%, 50% and 100%
- Sound quality:
-The sound is digitally processed in MASTER TEMPO mode, so a loss in sound quality may occur if drastic tempo adjustments are employed.
BPM
Press and hold the BPM (13) button to toggle between different BPM modes: BPM ID3 / AUTO BPM / MANUAL BPM.
id3 when BPM mode is set to ID3, the BPM information from the ID3 will be displayed.
AUTo BPm When BPM mode is set to AUTO BPM, the beats per meter is calculated automatically and corresponding info is displayed on LCD in BPM field.
mAnUAL BPm When BPM mode is set to MANUAL, the BPM (13) button can be used to set the beats per minute of playback by a series of TAPS at the desired tempo.
noTe If a BPM value is present in file info ID3 tag, the value is loaded into the unit and displayed.
BPM LOCK
The BPM LOCK feature allows the user to set the desired value of the BPM by rotating the rotary knob and pushing down to set BPM. After the mode is activated the pitch/master tempo value will be automatically adjusted to match desired BPM level.
To enable the LOCK feature, set the desired BPM and press the LOCK (14) button.
To turn OFF the LOCK feature, press the LOCK (14) button again.
NOTE: Valid BPM range for setting is restricted to the following: 80 - 196 BPM.
CUE CONTROLS
SeTTing A cUe PoinT
While the unit is in playback, press PLAY/PAUSE ▶/II (2) to pause the track. While the track is paused, press CUE (3) to set the cue point at the current position. The CUE indicator illuminates when the CUE point is set as well as the marking the CUE point on the Jogwheel display.

AdjUSTing THE cUe PoinT
After the cue point has been programmed, press PLAY/PAUSE ▶/II (2) to pause the track at the cue point. Press SEARCH ◀◀/▶▶ (4) or rotate the jogwheel to adjust the cue position. Press CUE (3) to set the cue point at the current position.
ReTURning To THE cUe PoinT
While the unit is playing and after the cue point has been programmed, pressing CUE (3) will cause the unit to enter the PAUSE mode (PLAY/PAUSE BUTTON blinks) at the programmed cue point (the CUE LED is lit). Holding down the CUE button changes the function to preview, and allows you to stutter start or play from the programmed CUE POINT. Releasing the CUE button will return the CD to the preset CUE point.
AUTO cUe
The AUTO CUE (11) function sets the cue at the point immediately before sound starts, skipping the beginning silent section of tracks. Press AUTO CUE (11) to enable auto cue.
CUE CONTROLS CONTINUED
SETTING HOT CUES
During playback or in pause mode, press HOT CUE 1, 2 or 3 (10) at the point in the track where the HOT CUE is to be set.
Once pressed, the programmed HOT CUE (1, 2, or 3) should now be illuminated.
To delete a hot cue, press MEMO (9) to enable deleting and select the hot cue for deletion.


PLAYING HOT CUES
Before playing hot cues, make sure MEMO (9) is not enabled.
During playback or in the pause mode, press HOT CUE 1, 2 or 3 (10) and playback starts instantaneously from the point recorded on that HOT CUE.
LOOP CONTROLS
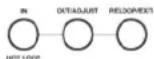
Pictured LOOP IN / LOOP OUT/ADJUST / RELOOP/EXIT (8)
SETTING A LOOP
During playback, press LOOP IN (8) at the desired starting position for the loop (loop in point).

Press LOOP OUT / ADJUST (8) at the desired ending position for the loop (loop out position). The loop out point is now set and loop playback starts from the loop in point.

ADJUSTING A LOOP
To adjust the loop once the loop is set, press the OUT/ADJUST (8) button. The LOOP IN (8) button will stop blinking.

- The length of the loop can be adjusted by rotating the jogwheel (30) clockwise to extend the loop. Rotate the jogwheel counterclockwise to shorten the loop.
CANCELING A LOOP
While the loop is engaged, press RELOOP/EXIT (8) to disengage the loop. Playback continues after the loop out point.

RETURNING TO A LOOP
After canceling a set loop, press RELOOP/EXIT (8) during playback to reengage the last set loop. Loop playback begins at the loop in point.

EFFECTS SECTIO
The CDJ-700 has six built-in effects: FLTR, FLANGER, ECHO, WAH, TRANCE, and BUBBLE.
FLTR The FLTR effect is a band-pass filter and will filter out either the high frequencies or the low frequencies depending on the position of the EFFECT PARAMETER BAR. In the center position, there is no effect on the sound. Adjusting the effect towards the left will gradually remove high frequencies until there is just lowend (bass). Adjusting the effect towards the right will gradually remove the low frequencies until only high frequencies (treble) remain.
FLAngeR The FLANGER effect is a time-based audio effect that occurs when two identical signals are mixed together, but with one signal time-delayed by a small and gradually changing amount. Varying the time delay causes these to sweep up and down the frequency spectrum. By sliding the EFFECTS PARAMETER BAR to the left the flanger gets slower and when you slide the parameter bar to the right the flanger gets faster.
ecHo The ECHO effect repeats the audio several times, softer each time. Adjusting the EFFECTS PARAMETER BAR towards the left will shorten the time between the repeats and decrease the volume of the repeats, while adjusting the EFFECTS PARAMETER BAR towards the right will lengthen the time between the repeats and increase the volume of the repeats.
wAH The WAH effect is an autowah effect that uses a variable cutoff frequency lowpass filter that exhibits a resonant peak just at its lowpass rolloff frequency to emulating the human voice making a “waaaaah” tone, or its tonal inverse, “aaaooow”.
BUBBLE The BUBBLE effect is a preset effect that combines the WAH and ECHO effects.
TRAnce The TRANCE effect uses amplitude modulation in order to cut the audio's volume in and out.
enABLing An eFFecT
During playback, the EFFECT (16) section allows you to enable/disable effects.
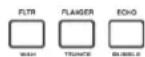
When VINYL (24) mode is disabled, the FLTR / FLANGER / ECHO effect set are the effects that can be used. When VINYL (24) mode is enabled, the WAH / TRANCE / BUBBLE effect set are the effects that can be used.

AdjUSTing THE eFFecTS
The EFFECTS DRY/WET (23) control adjusts the mix of the non-affected signal and the affected signal. Turn clockwise to increase the amount of the affected signal. Turn counter-clockwise to increase the amount of the non-affected signal.

The EFFECTS PARAMETER BAR located on the LCD shows the value of the effects parameter for the FLTR / FLANGER / ECHO effect set. The WAH / TRANCE / BUBBLE effect set does not have any adjustable parameters.
To adjust the parameter of the FLTR / FLANGER / ECHO effect set, touch the EFFECTS PARAMETER BAR on the LCD touch display and adjust the parameter position to the desired spot. The effect parameter can also be adjusted by using the jogwheel (30). Rotating the jogwheel (30) clockwise will increase the value of the parameter, rotating the jogwheel counterclockwise will decrease the parameter.
NOTE: When the effect is selected the name of the effect should appear at this place of the screen for about 5 seconds.
HoLd mode
Pressing HOLD will enable/disable effect HOLD mode. This will apply effect with selected parameters to music.

When an effect is enabled, but HOLD mode is disabled, you can change the effect's parameters and listen to it by rotating the jogwheel (30) or moving the finger along effect bar on the LCD touch screen. When the jogwheel (30) stops rotating, the effect will disengage. To keep the effect engaged, apply HOLD mode.
It is possible to change the effect parameters in HOLD mode as well which will preserve the parameter value and keep the effect enabled.
JOGWHEEL CONTROLS
jogwHeeL AdjUST
The JOG ADJUST (7) rotary allows adjustment to the feel of the jogwheel. For a stiffer and heavier feel, rotate the JOG ADJUST (7) rotary to the left. For a looser and lighter feel, rotate the JOG ADJUST (7) rotary to the right.

VinYL mode
Pressing the VINYL (24) button enables VINYL mode and illuminates the Vinyl indicator on the joghwheel display.

Enabling VINYL mode allows scratch-like effects when the JOGWHEEL (30) is depressed and rotated. When VINYL mode is disabled, the JOGWHEEL (30) will be in SEARCH MODE and will allow searching through the track.
The VINYL button also activates WAH / TRANCE / BUBBLE effects set instead of FLTR / FLANGER / ECHO set. In this mode rotating the JOG WHEEL will produce scratch sound and change the parameters of the effects.
START Time / SToP Time
Adjusting the START TIME (21) jog mode adjustment adjusts the speed at which playback returns to normal when the top of the jogwheel is released and when the unit resumes playback from pause mode. The start time increases when turned clockwise and decreases when turned counterclockwise.

The STOP TIME (22) jog mode adjustment adjusts the speed at which playback slows when the top of the jog-wheel is touched and when pause is enabled. The stop time increases when turned clockwise and decreases when turned counterclockwise.
SLiP mode
When SLIP (25) is enabled, normal playback continues inaudibly underneath SCRATCH, LOOP, and REVERSE effects. When SCRATCH, LOOP, or REVERSE mode is exited, normal playback resumes from the in-audible playback spot as indicated on the JOGWHEEL (30) display.

SLiP wiTH ScRATcH
To use SLIP while scratching, enable VINYL mode by pressing the VINYL (24) button. Enable SLIP mode by pressing the SLIP (25) button.
Using the jogwheel will now create scratch effects while normal track playback continues inaudibly undeneath.
The position playing underneath is shown on the jog-wheel display.
Once the jogwheel is released, track playback will continue from the playback position playing underneath.
NOTE: When using SLIP mode with scratch, SLIP reverse operations will not be performed.
SLiP wiTH LooP
To use SLIP with loop playback, enable SLIP mode by pressing the SLIP (25) button.
Set a loop (page 12) using the IN/OUT controls and loop playback will begin. The SLIP (25) button will begin flashing indicating SLIP mode is active and the position playing underneath is shown on the jogwheel display.
Upon exiting the loop, track playback will continue from the playback position playing underneath.
SLiP wiTH ReVeRSe
To use SLIP with reverse playback, enable SLIP mode by pressing the SLIP (25) button.
Press REVERSE (6) to begin playback in the reverse direction. The SLIP (25) button will begin flashing indicating SLIP mode is active and the position playing underneath is shown on the jogwheel display.
Press REVERSE (6) again to exit reverse playback. Upon exiting reverse playback, track playback will continue from the playback position playing underneath.
DISPLAY OPTIONS
AdjUSTing conTRAST
Pressing and holding the ENCODER (17) and rotating the rotary will adjust the contrast of the 240x320 display. To increase the contrast ratio, rotate clockwise. To decrease the contrast ratio rotate the counter-clockwise.

TRAcK TeXT diSPLAY mode
Press the TEXT MODE / TOUCH ON/OFF (12) to alter the displayed information on the LCD TOUCH DISPLAY (15) between title/artist/album/genre info for files.

PRESS and HOLD the TEXT MODE / TOUCH ON/OFF (12) to enable/disable touch screen functionality.
Time eLAPSed/RemAin diSPLAY
Press and hold the TIME/AUTOCUE (11) button to switch track time display modes between time elapsed and time remain.

LCD TOUCH SCREEN FUNCTIONS
The CDJ-700's LCD display also has touch functionality. The following features can be used by touching the LCD TOUCH DISPLAY (15)
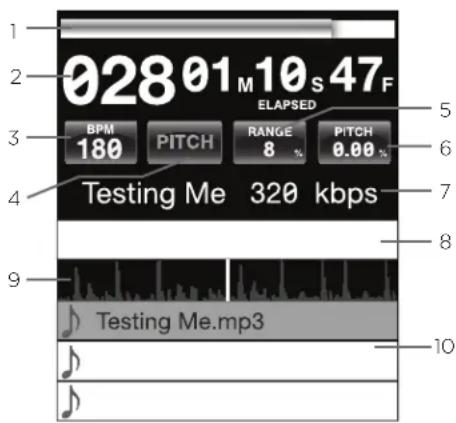
1 TIME PROGRESS BAR Touching the TIME PROGRESS BAR will skip to the selected position of the track.
2 TIME Toggles between time elapsed and time remain display modes.
3 BPM Displays current BPM value in auto and manual BPM mode or displays the BPM information from the ID3 tag when BPM mode is set to ID3.
4 TEMPO/PITCH Has the same functionality as MASTER TEMPO button (page 10). When MASTER TEMPO is OFF, PITCH is displayed in this field. When MASTER TEMPO is ON, TEMPO is displayed in this field.
5 RANGE Has the same functionality as RANGE button (page 10).
6 PITCH/MT VALUE Allows you to enable/disable PITCH/MT (page 10). Additionally it shows current PITCH/MT value.
7 TRACK TITLE Allows you to select title/artist/album/genre text displaying. Touch on this area will switch between display modes.
8 EFFECTS PARAMETER BAR Allows you to set effect values by touching the desired position.
9 TRACK WAVEFORM Displays a visual representation the loaded track's audio. Pressing the waveform changes the magnification. The values are: 3.2 seconds, 6.5 seconds, 12 seconds, and 25 seconds.
10 TRACK SELECT Allows you to select a track or enter a folder. Touching this area will enter a folder.
MIDI CONTROLS
midi mode
The CDJ-700 has MIDI mode, which allows the data from the buttons and dials of the CDJ-700 to be encoded into MIDI format. If the unit is connected via a USB cable to a computer with MIDI-compatible DJ software, the DJ software can be operated from the unit. The computer audio can also be played from the CDJ-700's outputs.
It may not be possible to use some buttons to operate the DJ software. For a list of MIDI messages refer the the MIDI Device Messages Table.
noTe For instructions for your specific DJ software's settings refer to your DJ software's operating manual.
Hid mode
In addition to MIDI, the CDJ-700 also uses HID protocol which allows greater speeds.
If your software supports HID devices, disable MIDI devices in your software, and search for HID devices. This should locate the CDJ-700 and allow you to use it as a HID device.
MIDI DEVICE MESSAGES TABLE
conFigURing midi mode
Connect the USB cable from the unit's rear USB port (D) to the computer. Press the MIDI source selection on the CDJ-700 (20). This will terminate playback of the CD/USB/SD sources.
The CDJ-700 will then display an audio configuration prompt for audio bit rate and sampling rate on the touch screen with the following audio settings:
- 24-bit/192kHz
- 24-bit/96 kHz
- 24-bit/48 kHz
• 16-bit/44.1 kHz
Press and hold the MIDI source select button to switch between audio settings. Press MIDI to toggle between audio settings and press the ENCODER (14) to apply the setting. Press BACK (15) to exit.
noTe Higher bit depth and sampling rates will create greater latency and may impact performance.
After configuring the audio settings on the CDJ-700, start the DJ software:
- Select the CDJ-700 as your MIDI device*
- Select the CDJ-700 as your AUDIO device*
* Refer to DJ software's instructions
MIDI DEVICE MESSAGES TABLE
| Controller Parameter | Software Parameter | Send Number | Min Value | Max Value |
| Cue Cue 1 0 127 | ||||
| Play/Pause Play/Pause | 2 0 127 | |||
| +(pitch bend) Pitch | + 3 0 127 | |||
| -(pitch bend) Pitch | - 4 0 127 | |||
| HotCue 1 | Cue 1 | 5 | 0 | 127 |
| HotCue 2 | Cue 2 | 6 | 0 | 127 |
| HotCue 3 | Cue 3 | 7 | 0 | 127 |
| Memo | Memo | 8 | 0 | 127 |
| Track Search << | Track reverse | 9 | 0 | 127 |
| Track Seach >> | Track forward | 10 | 0 | 127 |
| Browse Left | Up in tracklist | 11 | 0 | 127 |
| Browse Right | Down in tracklist | 12 | 0 | 127 |
| Master Tempo | Master Tempo | 13 | 0 | 127 |
| Vinyl | Scratch | 14 | 0 | 127 |
| Select | Load Track | 15 | 0 | 127 |
| Loop In | Loop In | 16 | 0 | 127 |
| Loop Out/Adjust | Loop Out | 17 | 0 | 127 |
| Reloop/Exit | Reloop | 18 | 0 | 127 |
| BPM | BPM | 19 | 0 | 127 |
| Effect1 (wah) | Effect1 (select) | 20 | 0 | 127 |
| Effect2 (flanger) | Effect2 (select) | 21 | 0 | 127 |
| Effect3 (echo) | Effect3 (select) | 22 | 0 | 127 |
| Back | Folder Out | 23 | 0 | 127 |
| Wheel Touch | Wheel Touch | 24 | 0 | 127 |
| Effect Param | Effect Param | 25 | 0 | 127 |
| Time | Elapsed/Remain | 26 | 0 | 127 |
| Autocue | Autocue | 27 | 0 | 127 |
| LOCK | LOCK | 28 | 0 | 127 |
| Range | Range | 29 | 0 | 127 |
| Reverse | Reverse | 30 | 0 | 127 |
| Slip Slip | 31 0 127 | |||
| Jogwheel | Jogwheel | 32 | 0, 63 | 63, 128 |
| Pitch Slider | PitchSlider | 33 | 0 | 127 |
| Track Skip << | Prov. track | 34 | 0 | 127 |
| Track Skip >> | Next track | 35 | 0 | 127 |
| Hold | Effect On/Off | 36 | 0 | 127 |
| Eject | Deck Select | 37 | 0 | 127 |
| Effect4 (wah) | Effect4 (select) | 38 | 0 | 127 |
| Effect5 (trance) | Effect5 (select) | 39 | 0 | 127 |
| Effect6 (bubble) | Effect6 (select) | 40 | 0 | 127 |
| Dry/Wet | Dry/Wet Effect | 41 | 0 | 127 |
| Start time | Parameter 42 | 0 127 | ||
| Stop time | Parameter | 43 | 0 | 127 |
| Pitch Slider (14bit) | Pitch Slider | 44 | 0 | 127 |
*NOTE: 14-bit pitch slider allows for greater accuracy when transmitting pitch information but may not be compatible with all DJ Software.
HID DEVICE MESSAGES TABLE
| Controller Parameter | Software Parameter | Bit | Byte | Value |
| Cue | Cue | 1 | 1 | 1-on, 0-off |
| Play/Pause | Play/Pause | 2 | 1 | 1-on, 0-off |
| +(pitch bend) | Pitch + | 3 | 1 | 1-on, 0-off |
| -(pitch bend) | Pitch - | 4 | 1 | 1-on, 0-off |
| HotCue 1 | Cue 1 | 5 | 1 | 1-on, 0-off |
| HotCue 2 | Cue 2 6 1 | 1-on, 0-off | ||
| HotCue 3 | Cue 3 7 1 | 1-on, 0-off | ||
| Memo | Memo 8 1 | 1-on, 0-off | ||
| Track Search << | Track reverse | 9 | 1 | 1-on, 0-off |
| Track Seach >> | Track forward | 10 | 1 | 1-on, 0-off |
| Browse Left | Up in tracklist | 11 | 1 | 1-on, 0-off |
| Browse Right | Down in tracklist | 12 | 1 | 1-on, 0-off |
| Master Tempo | Master Tempo | 13 | 1 | 1-on, 0-off |
| Vinyl | Scratch | 14 1 | 1-on, 0-off | |
| Select | Load Track | 15 | 1 | 1-on, 0-off |
| Loop In | Loop In | 16 | 2 | 1-on, 0-off |
| Loop Out/Adjust | Loop Out | 17 | 2 | 1-on, 0-off |
| Reloop/Exit | Reloop | 18 | 2 | 1-on, 0-off |
| BPM | BPM | 19 | 2 | 1-on, 0-off |
| Effect1 (wah) | Effect1 (select) | 20 | 2 | 1-on, 0-off |
| Effect2 (flanger) | Effect2 (select) | 21 | 2 | 1-on, 0-off |
| Effect3 (echo) | Effect3 (select) | 22 | 2 | 1-on, 0-off |
| Back | Folder Out | 23 | 2 | 1-on, 0-off |
| Wheel Touch | Wheel Touch | 24 | 3 | 1-on, 0-off |
| Time | Elapsed/Remain | 26 | 3 | 1-on, 0-off |
| Autocue | Autocue | 27 | 3 | 1-on, 0-off |
| LOCK | LOCK 28 3 | 1-on, 0-off | ||
| Range | Range | 29 | 3 | 1-on, 0-off |
| Reverse | Reverse | 30 | 3 | 1-on, 0-off |
| Slip | Slip | 31 | 3 | 1-on, 0-off |
| Track Skip << | Prev. track | 34 | 4 | 1-on, 0-off |
| Track Skip >> | Next track | 35 | 4 | 1-on, 0-off |
| Hold | Effect On/Off | 36 | 4 | 1-on, 0-off |
| Eject | Deck Select | 37 | 4 | 1-on, 0-off |
| Effect4 (wah) | Effect4 (select) | 38 | 4 | 1-on, 0-off |
| Effect5 (trance) | Effect5 (select) | 39 | 4 | 1-on, 0-off |
| Effect6 (bubble) | Effect6 (select) | 40 | 5 | 1-on, 0-off |
| Jog wheel | Jog wheel | 64-71 | 8 | Min = 0, Max= 225 |
| Effect Parameter | Effect Parameter | 72-79 | 9 | Min = 0, Max= 255 |
| Dry/Wet | Dry/Wet Effect | 80-87 | 10 | Min = 0, Max= 255 |
| Start time | Parameter | 88-95 | 11 | Min = 0, Max= 255 |
| Stop time | Parameter | 96-103 | 12 | Min = 0, Max= 255 |
| Pitch Slider | Pitch Slider | 104-117 | 13, 14 | Min = 0, Max= 800 |
TROUBLESHOOTING
TROUBLESHOOTING
cd eRRoRS
- If a disc will not play, check to see if the disc was loaded correctly (label side up). Also check the disc for excessive dirt, scratches, etc.
- If a disc contains a non-compliant file format causing a playback error, press and hold the EJECT (19) button for 4 seconds. The unit will eject the disc and reboot.
- If the disc turns but there is no sound, check the cable connections, if they are ok, check your amplifier or receiver.
-If the CD skips, check the CD for dirt or scratches. Do not assume that the CD layer is defective. Many CD's are recorded out of spec and will skip on most or all CD players. Before sending the unit for repair, try playing a CD that you are sure plays properly.
USB memoRY deVice eRRoRS
Some USB devices may not operate properly with the CDJ-700. Gemini accepts no responsibility for any possible data loss that may occur. To ensure that data is not permanently lost, please make sure to backup any data prior to connecting the USB device to the the unit.
- USB hubs cannot be used with the CDJ-700.
- If the unit does not read the USB memory device, check to see if the memory device was inserted completely.
- If a "Too many devices" message appears, it is because a USB hub is in use. The CDJ-700 does not work with USB hubs. Disconnect the USB hub and connect the USB memory device directly into the CDJ-700.
-If a "Media err. Please Check Media Format and Try Again" message appears, this signifies that your USB memory device is formatted incorrectly.
Sd cARd eRRoRS
- If the unit does not read the SD memory card, check to see if the memory card was inserted correctly and inserted completely.
- If a "Media err. Please Check Media Format and Try Again" message appears, this signifies that your SD memory device is formatted incorrectly.
midi eRRoRS
-If the computer does not recognize the device, try powering the unit off and rebooting the computer.
-If the DJ software does not list the device, ensure that you are using the latest version by downloading any updates to your DJ software. If the CDJ-700 mapping does not appear in your DJ software's list, go to geminidj.com for downloads and support.
SPECIFICATIONS
geneRAL
Type..... CD/USB/SD media player w/ MIDI and HID
USB output type....Type B
Disc Type......Standard Compact discs (12 cm & 8 cm)
Power Supply....AC 100/240V, 60/50 Hz
Power consumption.... 10W
Dimensions.... 13 1/8 x 12 x 4.5 inches (333 3/8 x 304 x 114.3 mm)
Weight 7.2 lbs. (3.3 kg)
AnALog AUdio
Quantization....1 Bit Linear/Channel, 3 Beam Laser
Oversampling Rate....8 Times
Frequency Response....20 Hz to 20 kHz
Total Harmonic Distortion......Less Than 0.05%
Signal to Noise Ratio....< 100dB
Dynamic Range >100dB
Output Level....1.0 +/- 0.2V R.M.S.
digiTAL AUdio
Output type....Coaxial digital (S/PDIF)
Output format....44.1 kHz, 16-bit
USB AUdio
Bit Depth....24-bit, 16-bit
Sampling rate....192kHz, 96kHz, 48kHz, 44.1kHz
SPeciFicATionS And deSign ARe SUBjecT To cHAnge wiTHoUT noTice FoR PURPoSe of imPRoVemenT.
ESPAÑOL
Fig. B
ENCHUFE
natural_image
Line drawing of a vintage computer monitor with control panel and buttons (no text or symbols)• 24 bits/192 kHz
- 24 bits/96 kHz
- 24 bits/48 kHz
• 16 bits/44.1 kHz
MANUEL D'INSTRUCTIONS
gemini®
AVANT TOUTE UTILISATION DE L'APPAREIL, MERCI DE PRENDRE CONNAISSANCE DES INSTRUCTIONS D'UTILISATION & DE SECURITE! RISQUE DE CHOC ÉLECTRIQUE, NE PAS C UVRIR!

RISQUE DE CHOC LECTRIQUE NE PAS OUVRIR!
POWER
USB OUT
natural_image
Line drawing of a mechanical device with control panel and base mount (no text or symbols)• 24-bits/192 kHz
- 24-bits/96 kHz
- 24-bits/48 kHz
• 16-bits/44.1 kHz
LINE-AUSGANG
DIGITAL OUT
natural_image
Line drawing of a mechanical device with control panel and buttons (no text or symbols)Samplingrate....192 kHz, 96 kHz, 48 kHz, 44,1 kHz
UnAngeKÜndigTe ÄndeRUngen deR TecHniScHen dATen Und deS eRScHeinUngSBiLdS BLeiBen im Sinne STÄndigeR PRodUKTVeRBeSSSeRUngen VoR-BeHALTen.
Warranty and Repair:
All GCI products are designed and manufactured to the highest standards in the industry. With proper care and maintenance, your product will provide years of reliable service.
LIMITED WARRANTY
A. GCI warrants its products to be free from defects in materials and workmanship for One (1) year from the original purchase date. Exceptions: Laser assemblies on CD Players, cartridges, and crossfaders are covered for 90 days.
B. This limited warranty does not cover damage or failure caused by abuse, misuse, abnormal use, faulty installation, improper maintenance or any repairs other than those provided by an authorized GCI Service Center.
C. There are no obligations of liability on the part of GCI for consequential damages arising out of or in connection with the use or performance of the product or other indirect damages with respect to loss of property, revenues, of profit, or costs of removal, installation, or reinstallation. All implied warranties for GCI, including implied warranties for fitness, are limited in duration to One (1) year from the original date of purchase, unless otherwise mandated by local statutes.
RETURN/REPAIR
A. In the U.S.A., please call our helpful Customer Service Representatives at (732)738-9003, and they will be happy to give you a Return Authorization Number (RA#) and the address of an authorized service center closest to you.
B. After receiving an RA#, include a copy of the original sales receipt, with defective product and a description of the defect. Send by insured freight to: GCI Sound Products Corp, and use the address provided by your customer service representative. Your RA# must be written on the outside of the package, or processing will be delayed indefinitely!
C. Service covered under warranty will be paid for by GCI and returned to you. For non-warranted products, GCI will repair your unit after payment is received. Repair charges do not include return freight. Freight charges will be added to the repair charges.
D. On warranty service, you pay for shipping to GCI, we pay for return shipping within the continental United States. Alaska, Hawaii, Puerto Rico, Canada, Bahamas, and the Virgin Islands will be charged for freight.
E. Please allow 2-4 weeks for return of your product. Under normal circumstances your product will spend no more than 10 working days at Gemini. We are not responsible for shipping times.
GCI Technologies Corp.
Worldwide Headquarters
280 Raritan Center Dr
Edison, NJ 08837 USA
Tel: (732) 346-0061
Fax: (732) 346-0065
IN THE UNITED KINGDOM
In the event that you need service on your GCI product under warranty, simply write a letter describing the problem, along with your contact information. Make sure to enclose a copy of your receipt for proof of warranty information. A return number is not required. You will be responsible for shipping charges to Gemini UK, and Gemini UK will pay to return the unit to you if it is considered under warranty.
GCI Technologies Ltd
Unit 44 Brambles Enterprise Centre
Waterberry Drive
Waterlooville
Hampshire, P07, 7TH, UK
Tel: +44 (0) 87 087 00880
Fax: +44 (0) 87 087 00990
EN ESPAÑA
80995 München, Munich, Germany
T: +49 (0) 89 319 019 80
F: +49 (0) 89 319 019 819
Register your product online at www.geminidj.com to be eligible for great prize giveaways! If you do not have Internet access, fill out the form included and mail it to the appropriate address listed previously.
First and Last Name
Address (Number and Street)
Apartment Number
City and State or Province
Country
Zip Code or Postal Code
Email Address
Telephone Number
Date of Birth
Date of Purchase
Purchase Price (Excluding Tax)
City of Purchase
Model Number (Example: CDT-05)
Serial Number (back of unit)

- IN THE USA: IF YOU ARE EXPERIENCING PROBLEMS WITH THIS UNIT CALL 1-732-346-0061 FOR GCI TECHNOLOGIES CUSTOMER SERVICE. DO NO ATTEMPT TO RETURN THIS EQUIPMENT TO YOUR DEALER.
- CDJ-700
- gemini®
- ENGLISH
- ESPAÑOL
- PLEASE READ BEFORE USING APPLIANCE IMPORTANT WARNING AND SAFETY INSTRUCTIONS!
- GROUNDING OR POLARIZATION:
- INTRODUCTION
- CLEANING THE UNIT
- OPERATING CONDITIONS
- PLAYABLE FORMATS AND DISCS
- USING MIDI CONTROL
- CONNECTING TO A COMPUTER
- UNIT OVERVIEW
- CONTROLS
- CONNECTING THE CDJ-700
- POWER
- LINE OUTPUT
- USB OUT
- DIGITAL OUT
- LCD TOUCH DISPLAYS
- JOGWHEEL DISPLAYS
- LOADING DISCS AND MEMORY DEVICES
- SOURCE SELECT
- LOADING/EJECTING DISCS
- LOADING/EJECTING USB/SD DEVICES
- BROWSING TRACKS/FOLDERS
- PLAYBACK CONTROLS
- PLAY/PAUSE
- SEARCH
- TRACK SEARCH
- REVERSE
- PITCH BEND
- ADJUSTING PITCH TEMPO
- MASTER TEMPO
- BPM
- BPM LOCK
- CUE CONTROLS
- SeTTing A cUe PoinT
- AdjUSTing THE cUe PoinT
- ReTURning To THE cUe PoinT
- AUTO cUe
- CUE CONTROLS CONTINUED
- SETTING HOT CUES
- PLAYING HOT CUES
- LOOP CONTROLS
- SETTING A LOOP
- ADJUSTING A LOOP
- CANCELING A LOOP
- RETURNING TO A LOOP
- EFFECTS SECTIO
- enABLing An eFFecT
- AdjUSTing THE eFFecTS
- HoLd mode
- JOGWHEEL CONTROLS
- jogwHeeL AdjUST
- VinYL mode
- START Time / SToP Time
- SLiP mode
- SLiP wiTH ScRATcH
- SLiP wiTH LooP
- SLiP wiTH ReVeRSe
- DISPLAY OPTIONS
- AdjUSTing conTRAST
- TRAcK TeXT diSPLAY mode
- Time eLAPSed/RemAin diSPLAY
- LCD TOUCH SCREEN FUNCTIONS
- MIDI CONTROLS
- midi mode
- Hid mode
- MIDI DEVICE MESSAGES TABLE
- conFigURing midi mode
- TROUBLESHOOTING
- cd eRRoRS
- USB memoRY deVice eRRoRS
- Sd cARd eRRoRS
- midi eRRoRS
- SPECIFICATIONS
- geneRAL
- AnALog AUdio
- digiTAL AUdio
- USB AUdio
- ENCHUFE
- AVANT TOUTE UTILISATION DE L'APPAREIL, MERCI DE PRENDRE CONNAISSANCE DES INSTRUCTIONS D'UTILISATION & DE SECURITE! RISQUE DE CHOC ÉLECTRIQUE, NE PAS C UVRIR!
- LINE-AUSGANG
- Warranty and Repair:
- LIMITED WARRANTY
- RETURN/REPAIR
- IN THE UNITED KINGDOM
- EN ESPAÑA
Brand : GEMINI
Model : CDJ700
Category : DJ Equipment