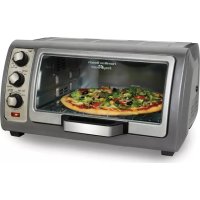
31333 - Oven HAMILTON BEACH - Free user manual and instructions
Find the device manual for free 31333 HAMILTON BEACH in PDF.
User questions about 31333 HAMILTON BEACH
0 question about this device. Answer the ones you know or ask your own.
Ask a new question about this device
Download the instructions for your Oven in PDF format for free! Find your manual 31333 - HAMILTON BEACH and take your electronic device back in hand. On this page are published all the documents necessary for the use of your device. 31333 by HAMILTON BEACH.
USER MANUAL 31333 HAMILTON BEACH
840211000 ENv02.qxd:Layout 1 12/22/11 1:14 PM Page 1

READ BEFORE USE
LIRE AVANT UTILISATION
LEA ANTES DE USAR
Visit www.hamiltonbeach.com for our complete line of products and Use and Care Guides – as well as
delicious recipes, tips, and
to register your product online!
Please call us – our friendly
associates are ready to help.
USA: 1.800.851.8900
Questions?
natural_image
Line drawing of a toaster oven with three handles and front panel (no text or symbols)English 2
Français ...... 17
Español 31

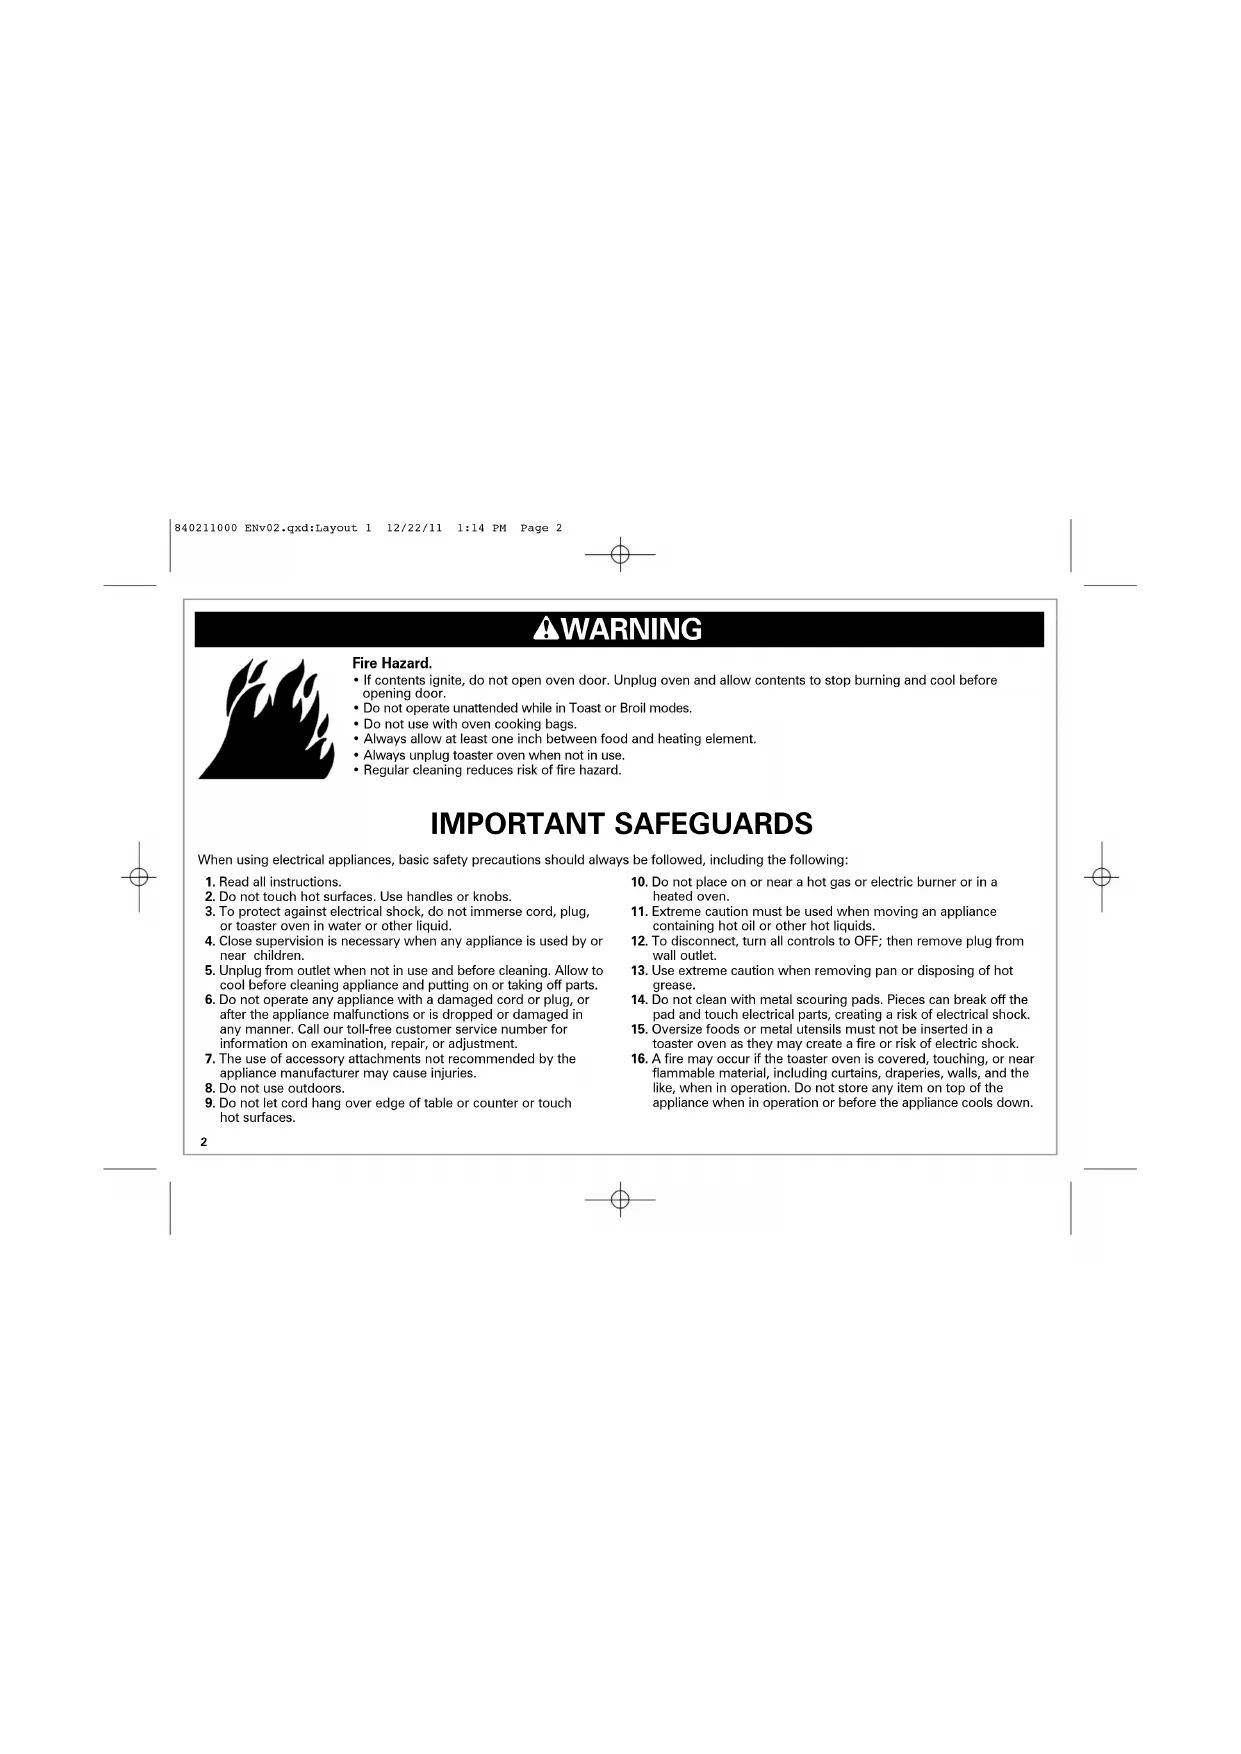
WARNING

Fire Hazard.
- If contents ignite, do not open oven door. Unplug oven and allow contents to stop burning and cool before opening door.
- Do not operate unattended while in Toast or Broil modes.
- Do not use with oven cooking bags.
• Always allow at least one inch between food and heating element.
• Always unplug toaster oven when not in use. - Regular cleaning reduces risk of fire hazard.
IMPORTANT SAFEGUARDS
When using electrical appliances, basic safety precautions should always be followed, including the following:
- Read all instructions.
- Do not touch hot surfaces. Use handles or knobs.
- To protect against electrical shock, do not immerse cord, plug, or toaster oven in water or other liquid.
- Close supervision is necessary when any appliance is used by or near children.
- Unplug from outlet when not in use and before cleaning. Allow to cool before cleaning appliance and putting on or taking off parts.
- Do not operate any appliance with a damaged cord or plug, or after the appliance malfunctions or is dropped or damaged in any manner. Call our toll-free customer service number for information on examination, repair, or adjustment.
- The use of accessory attachments not recommended by the appliance manufacturer may cause injuries.
- Do not use outdoors.
-
Do not let cord hang over edge of table or counter or touch hot surfaces.
-
Do not place on or near a hot gas or electric burner or in a heated oven.
- Extreme caution must be used when moving an appliance containing hot oil or other hot liquids.
- To disconnect, turn all controls to OFF; then remove plug from wall outlet.
- Use extreme caution when removing pan or disposing of hot grease.
- Do not clean with metal scouring pads. Pieces can break off the pad and touch electrical parts, creating a risk of electrical shock.
- Oversize foods or metal utensils must not be inserted in a toaster oven as they may create a fire or risk of electric shock.
- A fire may occur if the toaster oven is covered, touching, or near flammable material, including curtains, draperies, walls, and the like, when in operation. Do not store any item on top of the appliance when in operation or before the appliance cools down.
840211000 ENV02.qxd:Layout 1 12/22/11 1:14 PM Page 3

-
Extreme caution should be exercised when using containers constructed of materials other than metal or glass.
-
Do not store any materials, other than manufacturer-recommended accessories, in this oven when not in use.
-
Do not place any of the following materials in the oven: paper, cardboard, plastic, and the like.
-
Do not cover crumb tray or any part of the oven with metal foil. This will cause overheating of the oven.
-
To turn oven off, turn Toast/Timer and OFF to OFF position. See "Parts and Features" section.
-
Do not place eyes or face in close proximity with tempered safety glass door, in the event that the safety glass breaks.
-
Always use appliance with crumb tray securely in place.
-
Do not use appliance for other than intended use.
-
Clean oven interior carefully. Do not scratch or damage heating element tube.
-
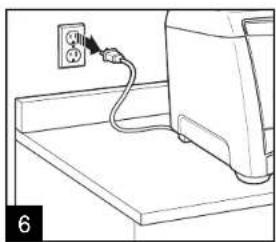
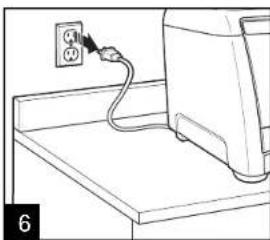
Check that the control is OFF before plugging cord into wall outlet. To disconnect, turn the control to OFF, then remove plug from wall outlet.
SAVE THESE INSTRUCTIONS!
OTHER CONSUMER SAFETY INFORMATION
This appliance is intended for household use only.
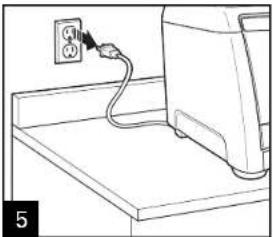
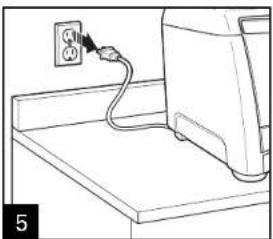
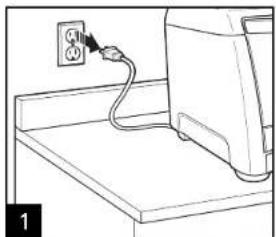
WARNING! Shock Hazard: This appliance has a polarized plug (one wide blade) that reduces the risk of electric shock. The plug fits only one way into a polarized outlet. Do not defeat the safety purpose of the plug by modifying the plug in any way or by using an adapter. If the plug does not fit fully into the outlet, reverse the plug. If it still does not fit, have an electrician replace the outlet.
The length of the cord used on this appliance was selected to reduce the hazards of becoming tangled in or tripping over a longer cord. If a longer cord is necessary, an approved extension cord may be used. The electrical rating of the extension cord must be equal to or greater than the rating of the appliance. Care must be taken to arrange the extension cord so that it will not drape over the counter-top or tabletop where it can be pulled on by children or accidentally tripped over.
This appliance is equipped with a fully tempered safety glass door. The tempered glass is four times stronger than ordinary glass and more resistant to breakage. Tempered glass can break; however, it breaks into pieces with no sharp edges. Care must be taken to avoid scratching door surface or nicking edges. If the door has a scratch or nick, call our toll-free customer service number.
Always unplug your toaster oven from the outlet when not in use.
Before First Use
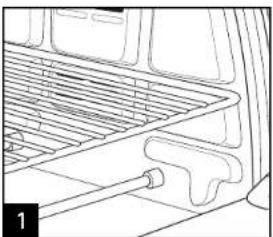
Most heating appliances produce an odor and/or smoke when used the first time. Plug the toaster oven into an outlet. Turn Temperature Dial to 450°F (230°C). Heat at this temperature for 10 minutes. The odor should not be present after this initial preheating. Wash baking pan, broil rack, and oven rack before using.
840211000 ENv02.qxd:Layout 1 12/22/11 1:14 PM Page 4

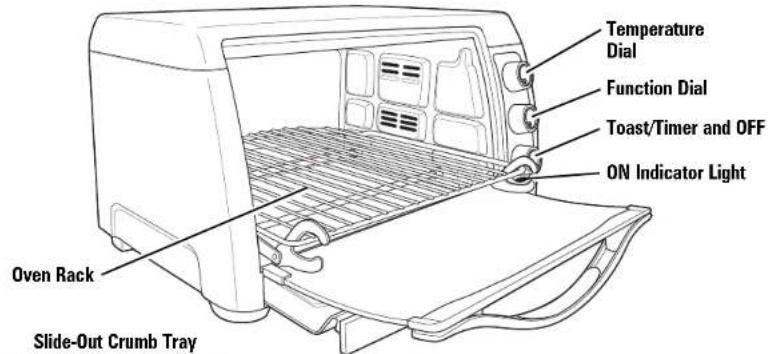
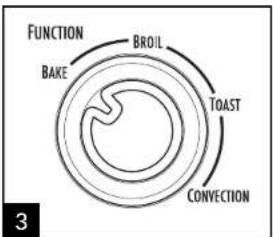
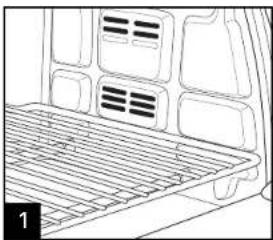
Parts and Features
Convection Baking Function (on select models)
MIDDLE RACK POSITION: baking, broiling, and toasting
natural_image
Line drawing of a car interior showing the front and rear seats with ventilation grilles (no text or symbols)LOW RACK POSITION: baking
natural_image
Line drawing of a car interior showing the rear air gap and exhaust vent (no text or symbols)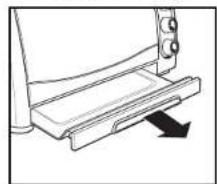
natural_image
Line drawing of a mechanical device with a downward arrow indicating motion (no text or symbols)4
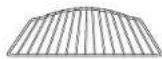
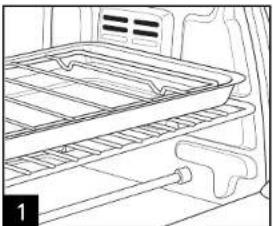
Rack/Toasting Area
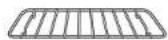
Broil Rack
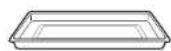
Baking Pan
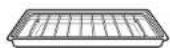
Broil Rack in Baking Pan

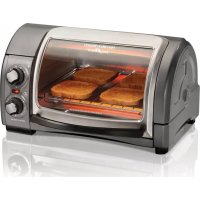
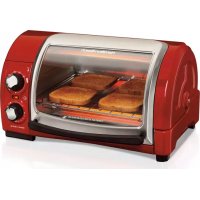
How to Toast
WARNING
Fire Hazard.
- If contents ignite, do not open oven door. Unplug oven and allow contents to stop burning and cool before opening door.
- Do not leave appliance unattended when in operation.
• Always unplug toaster oven when not in use.
natural_image
Line drawing of a car interior showing roof rack and door panel (no text or symbols)Place oven rack in MIDDLE RACK POSITION (shown) for toast, English muffins, bagels, and waffles.
Turn Temperature Dial to BROIL/TOAST.
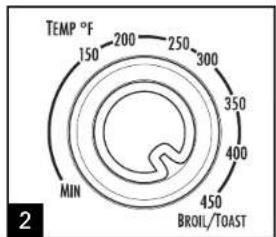
Place food in oven. Turn Function Dial to TOAST.
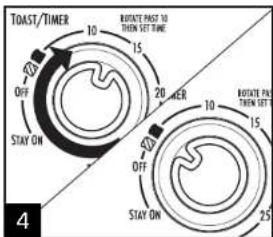
Rotate Toast/Timer past 10 and then back to desired toast color. A bell will sound when the toast cycle is complete. Rotate Toast/Timer and OFF to OFF to end cycle at any time.
natural_image
Line drawing of a computer monitor with an attached power outlet (no text or symbols)
Medium

Dark
840211000 ENV02.qxd:Layout 1 12/22/11 1:14 PM Page 6

How to Toast (cont.)
- When toasting only two slices of bread, place bread in center of toasting area on middle rack position to get even toasting on top and bottom.
- For best results, always position bread, bagels, etc., within toasting area.
- To toast bagels, English muffins, and waffles, place oven rack in MIDDLE RACK POSITION and place food cut/split side facing up. This will toast the cut/split side more than the outside food. Set Toast/Timer and OFF to desired setting.
- To toast regular toaster pastries or frozen pastries, place oven rack in the MIDDLE RACK POSITION. Select a color lighter than Medium and toast directly on the oven rack. If pastry has a glaze or frosting, use baking pan.
- When toasting, condensation may form on the oven door. The moisture will slowly escape from the enclosed oven.
- The number of slices of bread and the bread freshness will affect toast color. For example, toasting 4 slices of bread will require a darker toast color setting than 2 slices of bread. Adjust the Toast/Timer and OFF based on desired color and number of slices
- If you are not satisfied with the color balance between the two sides of your food in the recommended rack position, select a different rack position.
840211000 ENv02.qxd:Layout 1 12/22/11 1:14 PM Page 7

How to Bake
WARNING
Fire Hazard.
- If contents ignite, do not open oven door. Unplug oven and allow contents to stop burning and cool before opening door.
- Do not use oven cooking bags.
• Always allow at least one inch between food and heating element.
• Always unplug toaster oven when not in use.

natural_image
Line drawing of a vehicle rear vent with grating and ventilation slots (no text or symbols)Place oven rack on MIDDLE RACK POSITION or LOW RACK POSITION (depending on food to be cooked). LOW RACK POSITION shown.
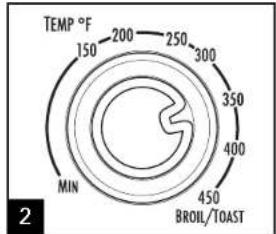
Turn Temperature Dial to desired temperature.
flowchart
graph TD
    A["BAKE"] --> B["TOAST"]
    B --> C["CONVECTION"]
    C --> D["FUNCTION"]
    D --> E["BROIL"]
    E --> F["TOAST"]
Turn Function Dial to BAKE.
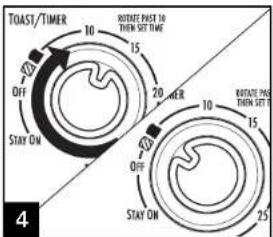
Rotate Toast/Timer and OFF past 10 and then back to "dark toast" to preheat oven for 5 minutes before beginning to bake.
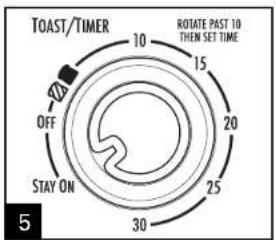
After oven is preheated, set Toast/Timer and OFF to desired time by rotating Toast/Timer and OFF past 10 and then to desired baking time or rotate Toast/Timer and OFF to STAYON. Rotate Toast/Timer and OFF to OFF to end cycle at any time.
natural_image
Line drawing of a computer setup with an electrical outlet and cable (no text or symbols)840211000 ENv02.qxd:Layout 1 12/22/11 1:14 PM Page 8

How to Bake (cont.)
- Do not totally enclose foods in aluminum foil. Foil can insulate foods and slow down heating.
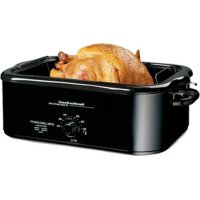
• To reheat rolls or biscuits, place on baking pan and heat at 300^ F (149°C) for 10 minutes. -
Reheat leftover roasts or casseroles at 350^ (177°C) for 20 to 30 minutes or until heated through.
-
Bake foods such as pizza on the MIDDLE RACK POSITION. Place food directly on oven rack or in baking pan.
- Bake foods such as a whole chicken on the LOW RACK POSITION. Place food in baking pan.
| INTERNAL TEMPERATURES | |||
| FOOD | APPROX. BAKE TIMES | F | C |
| Fresh Chicken Breast | 30 minutes | 170° | 77° |
| Fish Fillet | 15 minutes | 145° | 63° |
Turn foods halfway through cooking time. Visit foodsafety.gov for more safe cooking temperature information.

Convection Bake
(on select models)
WARNING
Fire Hazard.
- If contents ignite, do not open oven door. Unplug oven and allow contents to stop burning and cool before opening door.
- Do not use oven cooking bags.
• Always allow at least one inch between food and heating element.
• Always unplug toaster oven when not in use.
natural_image
Line drawing of a vehicle rear vent with ventilation grilles and ventilation grilles (no text or symbols)Place oven rack on MIDDLE RACK POSITION or LOW RACK POSITION (depending on food to be cooked). LOW RACK POSITION shown.
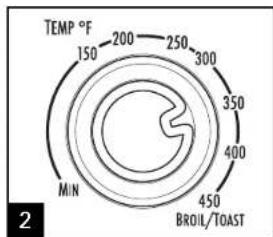
Turn Temperature Dial to desired temperature.
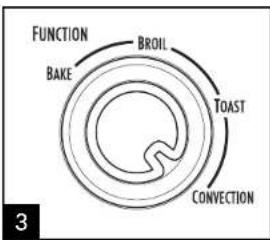
Turn Function Dial to CONVECTION.

Rotate Toast/Timer and OFF past 10 and then back to "dark toast" to preheat oven for 5 minutes before beginning to bake.
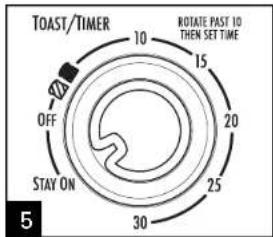
After oven is preheated, set Toast/Timer and OFF to desired time by rotating Toast/Timer and OFF past 10 and then to desired baking time or rotate Toast/Timer and OFF to STAY ON. Rotate Toast/Timer and OFF to OFF to end cycle at any time.
natural_image
Line drawing of a computer monitor with an attached power outlet (no text or symbols)840211000 ENV02.qxd:Layout 1 12/22/11 1:14 PM Page 10

Convection Bake (cont.)
• The convection bake function provides superior browning and crisping of food items. It is ideal for cookies, pizza, and meats.
- The convection method cooks up to one-third faster than traditional baking. When first using, check to determine if time or temperature should be adjusted.
- Do not totally enclose foods in aluminum foil. Foil can insulate foods and slow down heating.
- Bake foods such as pizza on the MIDDLE RACK POSITION. Place food directly on oven rack or in baking pan.
- Bake foods such as a whole chicken on the LOW RACK POSITION. Place food in baking pan.
- Ovens with convection mode: When baking pizza, use convection setting and reduce cooking time by 25%.

How to Broil
▲WARNING
Fire Hazard.
- If contents ignite, do not open oven door. Unplug oven and allow contents to stop burning and cool before opening door.
- Do not leave oven unattended during operation.
natural_image
Line drawing of a refrigerator interior showing the tray and side arm (no text or symbols)Place oven rack in oven. MIDDLE RACK POSITION is for faster broiling times. LOW RACK POSITION is for foods needing longer broiling times, like chicken breasts. Place food on broil rack or directly onto baking pan. Place in oven. DO NOT PREHEAT OVEN.
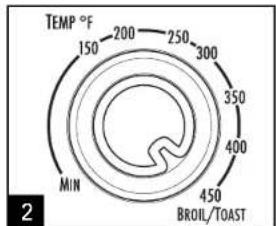
Turn Temperature Dial to BROIL/TOAST.

Turn Function Dial to BROIL.
- Keep one inch between food and heating element.
- Do not use oven cooking bags.
- Do not heat foods in plastic containers.
• Follow food manufacturer's instructions.
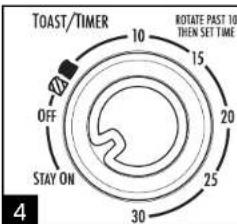
Rotate Toast/Timer and OFF past 10 and then to the desired broiling time or rotate Toast/Timer and OFF to STAY ON. Turn foods when browned or halfway through cooking time.

How to Broil (cont.)
natural_image
Line drawing of a computer monitor with an attached power outlet (no text or symbols)| FOOD | APPROX. BROIL TIME |
| Hamburgers | 20 minutes |
| Hot Dogs | 15 minutes |
| Sausage Links or Patties(pierce casings before cooking) | 15 to 20 minutes |
| Fish | 15 minutes |
These cooking times are an average and should be adjusted to individual preferences. Turn foods halfway through cooking time.
Cook beef and pork to at least 160°F (71°C).
Cook chicken to at least 165°F (73°C).
Cook fish until at least 145^ F ( 63^ C) or until opaque or flakes with a fork.
Visit foodsafety.gov for more safe cooking temperature information.
IF YOU LIVE IN A HIGH-ALTITUDE AREA:
The Extension service will have detailed information about cooking for your area. To locate the Cooperative Extension service in your county, please visit: http://www.csrees.usda.gov/Extension/.
Visit www.hamiltonbeach.com for our complete line of products and Use and Care Guides – as well as delicious recipes, tips, and to register your product online!
840211000 ENv02.qxd:Layout 1 12/22/11 1:14 PM Page 13
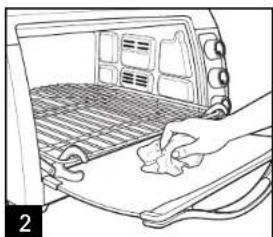
Cleaning
AWARNING
Electrical Shock Hazard.
Do not clean with metal scouring pads. Pieces can break off pad and touch electrical parts.
Your toaster oven should be cleaned regularly for best performance and long life. Regular cleaning will also reduce the risk of fire hazard.
natural_image
Line drawing of a computer monitor with an attached cable and a power outlet (no text or symbols)Unplug and allow to cool.
natural_image
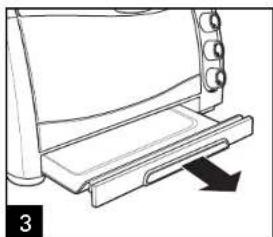
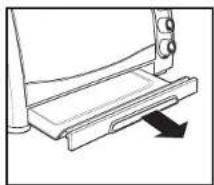
Line drawing of a hand pressing down on a surface near a vehicle back panel (no text or symbols)To clean inside of oven, wipe oven walls, bottom of oven, and glass door with a damp, soapy cloth. Repeat with a damp, clean cloth.
natural_image
Line drawing of a toaster front panel with cooling tower and slide (no text or symbols)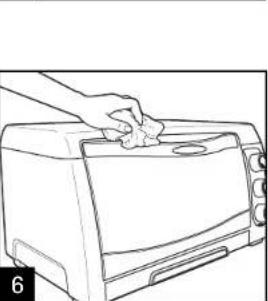
natural_image
Line drawing of a hand cleaning a toaster oven with a cloth (no text or symbols)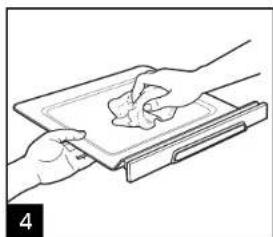
natural_image
Line drawing of hands holding a tray with a piece of food, no text or symbols present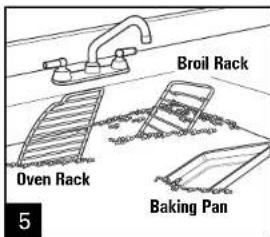
For stubborn stains, use a plastic scouring pad.
Wipe outside of oven with a damp cloth. Do not use abrasive cleansers or metal scouring pads.
Troubleshooting
| PROBLEM | PROBABLE CAUSE |
| Oven will not heat. | Check to make sure electrical outlet is working and the oven is plugged in. Turn Temperature Dial to 350^ ( 180^ ). Turn Function Dial to BAKE; then turn Toast/Timer and OFF to STAY ON. |
| Moisture forms on inside of oven door when toasting. | This is normal when toasting in a toaster oven. Moisture is slower to escape from a toaster oven than from a toaster. The amount of moisture will differ between fresh bread, bagels, and frozen pastries. |
| An odor and smoke come from oven. | Smoke and odor are normal during first use of most heating appliances. These will not be present after initial heating period. |
| Oven will not toast. | Check to make sure outlet is working and oven is plugged in. Turn Temperature Dial to TOAST/BROIL. Turn Function Dial to TOAST; then rotate Toast/Timer and OFF past 10 and then back to desired toast color. |
| Some foods burn and some are not done. | Adjust oven rack position to center food in oven.Adjust oven temperature or cooking time for best results with your recipes. |
840211000 ENv02.qxd:Layout 1 12/22/11 1:14 PM Page 15
Notes
15
840211000 ENV02.qxd:Layout 1 12/22/11 1:14 PM Page 16

Limited Warranty
This warranty applies to products purchased and used in the U.S. and Canada. This is the only express warranty for this product and is in lieu of any other warranty or condition.
This product is warranted to be free from defects in material and workmanship for a period of one (1) year from the date of original purchase. During this period, your exclusive remedy is repair or replacement of this product or any component found to be defective, at our option; however, you are responsible for all costs associated with returning the product to us and our returning a product or component under this warranty to you. If the product or component is no longer available, we will replace with a similar one of equal or greater value.
This warranty does not cover glass, filters, wear from normal use, use not in conformity with the printed directions, or damage to the product resulting from accident, alteration, abuse, or misuse. This warranty extends only to the original consumer purchaser or gift recipient. Keep the original sales receipt, as proof of purchase is required to make a warranty claim. This warranty is void if the product is used for other than single-family household use or subjected to any voltage and waveform other than as specified on the rating label (e.g., 120V \~ 60 Hz).
We exclude all claims for special, incidental, and consequential damages caused by breach of express or implied warranty. All liability is limited to the amount of the purchase price. Every implied warranty, including any statutory warranty or condition of merchantability or fitness for a particular purpose, is disclaimed except to the extent prohibited by law, in which case such warranty or condition is limited to the duration of this written warranty. This warranty gives you specific legal rights. You may have other legal rights that vary depending on where you live. Some states or provinces do not allow limitations on implied warranties or special, incidental, or consequential damages, so the foregoing limitations may not apply to you.
To make a warranty claim, do not return this appliance to the store. Please call 1.800.851.8900 in the U.S. or 1.800.267.2826 in Canada or visit hamiltonbeach.com in the U.S. or hamiltonbeach.ca in Canada. For faster service, locate the model, type, and series numbers on your appliance.
▲AVERTISSEMENT

Danger d'incendie.
natural_image
Diagram of a mechanical component with a downward arrow indicating motion (no text or symbols)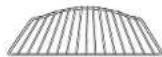
Grille/Zone grille-pain
natural_image
Line drawing of a car interior showing the roof, exhaust grille, and side-mounted door (no text or symbols)POSITION INFÉRIEURE
natural_image
Line drawing of a car interior showing the roof and side panel (no text or symbols)natural_image
Line drawing of a refrigerator interior showing roof, door, and window (no text or symbols)natural_image
Line drawing of a computer monitor with an attached power outlet (no text or symbols)
Moyenne

Foncée

Le grillage (suite)
natural_image
Line drawing of a vehicle rear vent with grating and ventilation slots (no text or symbols)natural_image
Line drawing of a computer monitor with an outlet cable connected to the top panel (no text or symbols)
natural_image
Line drawing of a vehicle rear vent with ventilation grilles and ventilation ducts (no text or symbols)natural_image
Line drawing of a computer monitor with an attached power outlet cable (no text or symbols)natural_image
Line drawing of a refrigerator interior showing tray, drawer, and storage racks (no text or symbols)natural_image
Line drawing of a computer monitor with an attached power outlet cable (no text or symbols)natural_image
Line drawing of a computer monitor with an attached power outlet (no text or symbols)natural_image
Line drawing of a hand cleaning a car interior with a mesh grille and handle (no text or symbols)natural_image
Line drawing of a printer or printer with a slide and arrow indicating compression (no text or symbols)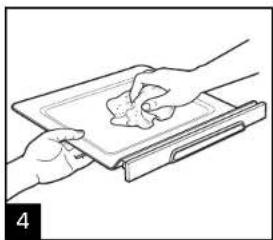
natural_image
Line drawing of two hands exchanging a tray with a small object, no text or symbols present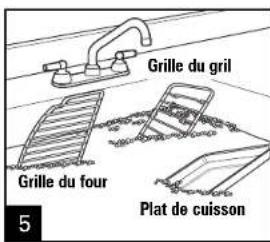
natural_image
Line drawing of a hand cleaning a toaster oven with a handle (no text or symbols)natural_image
Line drawing of a car interior showing the front and rear seats with ventilation grilles (no text or symbols)natural_image
Line drawing of a car interior showing the roof and side panel (no text or symbols)Charola de Migajas Desilzante
natural_image
Diagram of a mechanical device with a lever and directional arrow (no text or symbols)natural_image
Line drawing of a vehicle rearview structure with no text or symbolsnatural_image
Line drawing of a computer monitor with an attached power outlet (no text or symbols)
Intermedio

Oscuro
840211000 SPv02.qxd:Layout 1 12/22/11 1:15 PM Page 35
Como Tostar (cont.)
natural_image
Line drawing of a vehicle rear vent with airflow indicators (no text or symbols)natural_image
Line drawing of a computer monitor with an attached power outlet (no text or symbols)natural_image
Line drawing of a vehicle rear vent with airflow indicators (no text or symbols)natural_image
Line drawing of a computer monitor with an attached power outlet (no text or symbols)natural_image
Line drawing of a refrigerator interior showing the tray and side arm (no text or symbols)natural_image
Line drawing of a computer monitor with an attached cable and a power outlet (no text or symbols)natural_image
Line drawing of a computer monitor with an attached power outlet (no text or symbols)natural_image
Illustration of a hand cleaning a car interior with a mesh grille and door panel (no text or symbols)natural_image
Line drawing of a kitchen grater with a slide and handle, no text or symbols present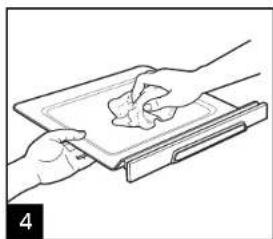
natural_image
Illustration of hands holding a tray with a piece of food, no text or symbols present
natural_image
Line drawing of a hand cleaning a toaster oven with a cloth (no text or symbols)Col. Palmitas Polanco
Mixcoac MEXICO 03910 D.F.
Tel: 01 55 5563 8723 • Fax: 01 55 5615 1856
Nuevo Leon
Ruperto Martinez No. 238 Ote
Centro MONTERREY, 64000 N.L.
Tel: 01 81 8343 6700 • Fax: 01 81 8344 0486
Jalisco
SERVICIOS DE MANTENIMIENTO CASTILLO
Garibaldi No. 1450
Ladrón de Guevara
GUADALAJARA 44660 Jal.
Tel: 01 33 3825 3480 • Fax: 01 33 3826 1914