LST 5337 X - Dishwasher HOTPOINT-ARISTON - Free user manual and instructions
Find the device manual for free LST 5337 X HOTPOINT-ARISTON in PDF.
| Product type | Dishwasher |
| Brand | HOTPOINT-ARISTON |
| Model | LST 5337 X |
| Dimensions (W x H x D) | 44.5 x 82 x 57 cm |
| Capacity | 10 standard place settings |
| Supply water pressure | 0.05 – 1 MPa (0.5 – 10 bar) |
| Supply voltage | 220-240 V ~ 50 Hz |
| Total absorbed power | 1900 W (estimated) |
| Energy consumption (Eco cycle) | 1.00 kWh/cycle |
| Water consumption (Eco cycle) | 13 litres/cycle |
| Eco cycle duration | 2 h 50 min |
| Wash programs | Eco, Auto Normal, Soak, Intensive, Quick, Crystal, Super Intensive |
| Options | Delayed start, Half load, Multifunction tablets |
| Installation type | Built-under worktop |
| Tub material | Stainless steel |
| Weight (estimated) | 40 kg |
| Water hardness setting | Yes (5 levels) |
| Salt reservoir capacity | Approximately 1 kg |
| Rinse aid dose setting | Yes (6 positions) |
| Leak protection | Water cut-off device in case of anomaly |
| Filter maintenance | Regular cleaning recommended |
| Standby consumption (left-on) | 3 W |
| Off consumption (off) | 1.3 W |
Frequently Asked Questions - LST 5337 X HOTPOINT-ARISTON
User questions about LST 5337 X HOTPOINT-ARISTON
0 question about this device. Answer the ones you know or ask your own.
Ask a new question about this device
Download the instructions for your Dishwasher in PDF format for free! Find your manual LST 5337 X - HOTPOINT-ARISTON and take your electronic device back in hand. On this page are published all the documents necessary for the use of your device. LST 5337 X by HOTPOINT-ARISTON.
USER MANUAL LST 5337 X HOTPOINT-ARISTON
Ecodesign Regulation
TexHnueckne daHhble
Onncnne n3dennr,5
Obni BnD
PanaheIynpaBneHnA
3arpy3ka kOp3nH,6
HxKnKaKp3Ha
Kop3nHa dnn cToIObBix np6oPob
BepxHЯKOp3nHa
BkIIOueHne n 3KcIIpyataqna,7-8
3anyck nocydomoeuHmMaunHbI
3arpyka moojoero BeuecTba
DOnONHHTeNbHbIeФyHKUIMMOJKN
Iporpammbi,9
Tabniua nporpamM
OnonacknBaTeIb npereHepnpuyoua corb, 10
3aJIbKa OOnJaCKBaTeTЯ
3arpyka pereheepnpuoue coI
Texnueckoe 06cnykubahne uyo,11
OTKnHoueHHe BOdbn 3JneKtpnueCKOro Toka
UcTaNocydomOeHouMaunHbI
CpeCTBa npOTnB HnPnAaX 3anaXOB
UncTa opocTee
UNTkaФINJBTPOB
ДиNTeNBHyI npOCTOn MaUNHbI
PpeynpeKdeHn pekomedauu,12
ObuIe Tpe6oBaHnK 6e30napocOtn
YTNIN3aIa
3Kohomna 3JIeKtpo3HepnI OxpaHa OkpykaHooJe Cpebl
HencnpaBHOCTn MeToDbI Nx ycTpahEnHn, 13
CepBnC TexHnueckoro 06cnyKnBaHHa,14
RU
RU
A BaxHo coXpaHntb daHHoe pykoBoDCTBO nIra erO nocJeDyUoHx KOHCylbTaun. B cIyuae npodaxn, nepeaHn IINn peee3da npOBepbTe, yTo6bl daHHoe texHueeckoe pykoBoDCTBO coNPoBOxJaIOn 3dennie.
A BHHMaTeNbHO npOHTaIe HNCTpyKUHn: B HIX COePjXaTcB BaxKbIe CBeDeHnO 6yCTaHOBKe N3dEJIra, ero 3KcNpyaTaunn N 6e3oNaCHOCTn.
A B cnyuae nepee3da nepeB03nTe MaunHy B BepTnKaIbHOM noIOxehm. B cnyuae kpaHHe Heo6xoDMocTH MaunHa MoKeT 6bITb noIOxeha 3aDHe cTOPOHO BH3.
A DaaHnMaunHa npeDycmToPeHa dIa 6bITOBoro nn dpyrOra aHaIOnuHOro IcNoJIb3OBAHnra, a IMeHHO:
-B NomeeHnX, npeHa3HaueHHbIX IaI npiroToBneHnIINI INI INepcoHaHa Mara3uHOB, Ofncob INpoHXypeKeJeHn;
-B arpoTypnCTnuecknx ycaIb6ax;
-ДЯИСПОЛБЗOBAHЯ ПОЖИВАЮUMN B ROCTHHINCE, MOTEЕ И ПОЧИМecTAX ПОЖИВAHЯ;
-BROCTHINUaX TnA «HOmep PIIOC 3aBTPaK»
PacnoJoxKeHne HnBeJInpOBka
1.CHIMnTe ynaKOBky C n3dEJIy INpoBepbTe, YTObHa HEm He 6blIO NOBpeJxHeN, HaHeceHHbIX pIpyHCnpTIpOBe. PpI ObnapyKeHm NOBpeJxHeN He NoDCoeHNrYe MaunHy, a obaPntbcry K npoDaBuCy.
2. YctahOBInTe NocydomOeHyIO MaunHy B HmUy KxohHOro rapHnTpya, TaK TTo6bl C60KOB mnn C3aDn OHa npnnerana K CTHe nn K KyOHbIM 3JemeHTam. N3dJeNtakKe MoKet 6bITb BCtpoEHO nOc cnouHoi CToneuHnuey KxohHOro rapHnTpya* (cm. cxemy MoTHaKa).
3.YctaHOBtne nocydomoeyHy MaunHy Ha pOBhI N TBepdbI non. BbipOBHnTe MaunHy,OTBnHcNBA rnn 3aBnHcNBa nepeHnne onOpHbIe HOKKn Do ndeAIBHO rnp3OHTaIbHoro noIOXeHnMaunHbI.ToTHa HnBeJIropOBKa rapaHTnpye TcAbNbHocTh n NOMraet n36exKaTb BN6paun, yMmOB n CmeueHn MaunHbI.
4'. Otperynpyte BbICOTy 3aHHe onOpbl, NOBepHyB WeCTnRpaHHyO KpacHyO BtUkKy, pacNoIoxKeHHyO cnepeN, B CEHTpaJIbHOH HIXKHe YAcTn NocydOMoeHoi MaIHbI, WeCTnRpaHHbIM pa3BOdHbIM KInOcHcM CpackpItHem 8 MM No YacOBoC TpeIke DnY BvEINeHnB BbICOTbI N IpOTNB YACOBi CTpeKN DnE ee yMeHbSeHn. (CM. JNCT C INHCTpyKzmaN NO BCTpoEHHom MOHTaXy, PpINarAOuINcK DOKymeHTaUN Ha MaunHy).
BoDoppoBdoHoe n 3Jektpueeckoe noCoednHeHne
3NeKtpnueckoN BOOPOBOHOHoe NOcEOHeHnMaIINHbIOJIKHb BInOHHTBCa TOJIbKO KBaINΦuNtPOBaHHbIM TEXHKOM.
NocydomoeyHMaUNHa He DoJXHa daBt b Ha TpybI NnHa npOBd 3JIeKTPOnNTAHIA.
N3dJIeIe IOnJHo 6bITb NOpCoEINHeHO K BOOpPBOy npn NOMOuHOBbIX Tpy6. He nCNoJIb3yIe 6/y Tpy6bl.
Tpy6bI noaun BOdy n cInBa n Ka6eJb 3neKtpoNTaHn DaJIKNbI paONaratc CNeBa Nn cnpaba OT dN oTNMaJIbHOyCTaHOBKn MaINHbI.
IopcoeHHeHne 7JnHaHra nOdauN BObl.
- POnCoeAnHeHnE K BODonpoBOy XoNoHOH BoBbI: npOuHnPnBnHTnte Tpy6y Noaun BObl K pKaHy C pe3b6OBbIMOTBepCTnem 3/4 r3. Ipeep 3akpyTKoJ daTe CTeYb BOde Do Tex nop, noka OH He cTaHe TnpOzpaHNO Bn36ExaHne 3acopeHnMaHHb HeueNCTOTAMN.
-ПодсоeДинeнeКВОДОпоВOу rорчeь BOы:ecnB BaшeM DOME ueHTpaJIN3OBaHHa CnCTeMa OTONJIeHn, NocydomoeHЯ MaWHa MoKet 6bIb 3aNTaHa rORpчeь BOdOиЗ BOДОпоВOda,ecnT TempePaTypa BOdy He npebblaeaT 60°C.
PnBHTTE Tpy6y K KpaHy, KaK OINcaHO Bblpe dIa Tpy6bIXOIOHOBODbl.
A Ecnn DnHa BOOnpOBOHOro WJNaHra 6yDen HeNoCTaTOHoi, cneMyet ObaTbCBy CneuAn3npOBaHHb Mara3HN INN K yNONHomOeHHomy caHTexHnky (cm. TexHuueckoe ocbnyKuaHue).
A DabJIeHne BObI DoJIXHO 6bITB NppeJenax 3HaueHn, yka3aHHbIX B Ta6mIe TexHnueckNe daHHble (cM. c6Oky).
A IpoBepbTe, YTObI BOJOpBoHbI ⅢaHaHr He 6bl 3aIOMJIe HII CkAT.
IopcoeHHeHne cInBHoro WJahra
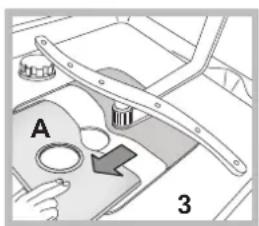
noDcoeHNHTe CnHBHou WHaHr, He cN6aero, K CNHBOMy Tpy6oPBOOyCMNHIMaJIbHbIM DnAmETpOM 4 CM.
CnBHOI ⅢaHr D0JIKe H6bTb paonIOKeH Ha Bbcote OT 40 Do 80 cm OT nOa IINOT PAtOpMbIOocydoMoEuy HoMaINHbI (A). Pepei NOcOeHNHeHem CInBHorO WHaHra K cnfoHy MoKN cHIMTe pNaCTKOByIO npo6ky (B).
3aunTa npOTNB 3aTOnJIeHnA
Bo n36eKaHne 3aToTnIeHnI NOcyDoMoEuHaMaUHa:
- OchauheHa CnCTeMoI, NepeKpbBaHooJe NODaCy BoDbI BcNyae aHOMaJIIN INI INBHyTpEHHNX yTeHeK.
HeKOTOpBle MoeIIN OChaIeHbI DoONHITeNbHbIM 3aUHTbIM ycTpoNCTBOM New Acqua Stop, npedoxpaHraIOUM OT 3aTOnJIeHn DaKe Bcnyae pa3pbBa BOdONpOBdHO rJNaHra.

Kateropueeckn 3apeaaetcra 6bepaTb INaHr nOdauN BoBt, TAK KAK BDOJIb Hero npoxoJr 3JeMeHTb IOD HapprKeHem.
* IMeetcTOnbkoB HeKoTOpbIX MoJeIax
3neKtpnueckoe noDcoeHHeHne
IpeepnoedoeHHeHemBnKnMaunHbK3eKtpuecko npo3eTke Heo6xOIMO npOBepntb CneDyUoee:
CetEBApo3eKaDOLXHa6bITbCOeINHeHa C 3a3EmJIeHNEM COOTBETCTBOBaT HopMaTHNtBAM;
ceteba po3etka doJnxha 6bIb paCCHTaHa Ha MaKcMaJIbHyIO Ntpe5nReMyIO MoUHocTb N3denny, yKa3aHHyIO Ha nacnopTHo Ta6nueKe (cm. pa3deI «OnucHue NocydoomoeHou MauHbI)
HaipjxHHe CTeIeKTPoNTaHnI DoJXHO COOTBeTCTBOBaTb DaHHbIM Ha nacnopTHo TabNmuKe, pacnoIOxeHHo C BHyTpEHHe CTOpHbI DBePbMaINHbI;
- ceTeBa p03eTka dONkHa 6bItb COBMeCTnMa co wTeNCelHoB BnIKo n3dJIyra. B npOTNBHom cnyae nopUHTe 3aMeHy BnIKu yNoIhOMOeHHOMy TexHNUKy (cM. TexHuCeCKoe obcIykuBaHue); He nCIOJIb3yIte yDINHInTeN n TPOHNK.
A N3dneIe DOnxH0 6bItb yctaHOBnEHO TaKIM O6pa3OM, YTO6bl npoBOD 3JIeKTpOHTaHnI N 3JIeKTpopo3eTka 6blJIN JERKO DOCTyHbI.
Ka6eIb 3JIeKtpoNTaHnIu3dEINr He doJIKeH 6bITb corHyT uIN cKAT.
Perynepno npoBepaTe coctOraHne kabeJnaJeKtponTuHaHn I B Cnyae Heo6xoDMIOCTN NOpuyTte erO 3aMeHy ToJIbKO yOnHOMOeHHbIM TexHNkAM (CM. TexHupeckoe obcIyueBaHue).
A Ipnou3BODnteIb He Hecet OTBeTCTBeHHoCTN 3a NocJeDCTBnH Heco6blOJeHnpeueuCneHbIX BblIe Tpe6oBaHn.
Плеснka зашины OT KOнданcaTa\*
Iocne yctahOBKn nocydomoeyHn MaunHBnHny KxOHHO 3JemeHTa OTKpoIte ee DBepyu HnakneTe np03paHyIO camokneryIOcnoIOCKy CHN3y DepeBHHNO KxOHHO pa6OeIN NOBepxHOCTN DnEe 3aUNTbOT BO3MOXHORO KOHDeHCATA.
PpeynpeKdHn no nepBomy nCnoJb3OBAHNO MaunHbI
Iocne yctahOBKn MaunHbI, HenocpeDCTBHeHNO nepeI nepBbIM UKNLOM MoKn 3aONHInTe 6aOcK CoN BDOJ N 3acblte B Hero npimepno 1 Kr coN (cm. pa3den OnonackueamEn b u peaehepuyouaa coNb): ecn BOa byet BbTEKaTb N3 BaUka, 3TO HopMaJIbHOe RAJIeHne. Bbl6epnte CTeneH JxecTKoCTN BObl (cm. pa3den OnonackueamEn b u peaehepuyouaa coNb). - Iocne 3arpy3kn coN nHdikatop OTCYTCTBNE COIN racHT.
A Ecnn 6aouk He 6ydt 3aONJIHeH cOnbIO, CMrYHTeJIb BOdBi HarpeBaTeJIbHiI 3JeMeHT MOrYT nobpeDITbcra.
ECODESIGN REGULATION
LHKMOKNC ECO 3TO cTaNdapTHa nporpMa, K KOtopo OTHocrTa dAnHbIe Ha nacnpToHaTabnue; daHHbIe pneHa3NaueH DnI NocyDbl C HopMaJIbHbIM 3aIrpA3HeHHeM, I 3Ta nporpMaMA Hau6Oonee 3ΦΦeKTUBH B PnAHe 3KOHOMN 3JIeKTPo3HepRn IN BObl DnI NocyDbl TAKOROTINa DnI 60JbWe 3KOHOOMN NocydomoeyH MaunHy CneJeTy 3arpYkaTb NOHOCBHO.
PacxoBpeKIme3Hepc6EkepeHn:PaXoBpeKIme left-on:3W-pacxoBpeKIme off:1,3 W
Tabnua paXOda dno oChOBhIx nporpaMM
TIN KOP3INHKN DnIe CTOIOBbIX INPbOOpOB MOKeT BApbIpOBaTbB 3aBNCIMOCTN OT MoDeH NOCyDOMOeHHO MaINHbl.
Kop3nHka nIa cTOnOBbIX np6OpOB MoKeT 6bITb yCTaHOBNeHa B nepeDHe qactn HxKHe KOp3nHbI, npOBe ee MeJxdy fHKcnpoBaHHbIM BCTaBkAMN, INN B BepXHe KOp3nHe. NocJeDHee peWeHne peKomeHdYetcA IJI MbITb NOcyDb B pexnme nONOBHbI 3arpy3Kn (B MOeJIax, IMeHOuNX 3Ty yHKnIO).
-Kop3nHa ochaueHa pa3DbNkHbIM NOKaMn dny 6onee ydoHoro pa3MeueHn cTOnOBbx np6opob.
HOxNIOCTpbIE cTOnOBbIe np6OpBIOJXHb 6blb NOMeueHB KOp3HHky DnIc TOnOBbIX pN6OpOB OCTpbIMK OHNCAAM BHN3 INI rOpIN3OHTaJIbHO yIOXeHb Ha OTKnHbIX NOJkAX BepxHei KOp3INbI.
PpMep yctahOBKn KOp3nHbI DnA CT0JOnBblx np6opob
BepxHra KOp3nHa
B 3ty KOp3nHy nomeuaetcXpykay nIerkaJnoCcyda: cTaKaHbI, yaHbIe N KoFeHbIe YauKu, 6NIOua, MeNKne caNaTHNuCbI, CKOBOPOdbI, MeNKne KaCTpOIN C He3HaHTeINbHbIM 3aRpa3HeHMeB COOTBetCTBm C PnpMepam 3aRpy3Kn
- YauKn YauWeukn, DInHHbIe N ocTpbIe HOKn, pa3DeNoCHbIe cToNOBbIe np6Opbl: pa3MeCTnTe INx HA oTKuNDhIX nonKaX
OTKnHbIe NOKn C BapbnpyEmbIM HAKIOHOm
-Haknoh noKoNo3BOnrRe nOyUHTb 60JIbe MeCTa B BepxHei KOp3HHe, pa3MeCTnTb 60KaJIbI C HOKKAMn pa3HOJ DInHbI ONTUMN3INPOBaT pe3YNbTaT cyuKn.
HaKIOH A HaKIOH B HaKIOH C
- PpnoHmnte OTKnHyIO NOky, cIerka npotoKHTe yCTaHOBtE CHyKbIM HAKNoHOM..
Perynraa BbICOTbBepxHe KOp3nHbI
IЯ obnereHn pa3MeJeHn Nocybl MoXHO OtperynpoBaTb BbICOTy BepxHei KOp3HbI:
ApeKoMeHdyeTcpeyInpoBaTb BblcoTy BepxHei Kop3HHbI BE3 NOCyDbI.
HnKOrda He NoDnHMaTe H He onyckaTc KOp3NHy, B3RbUnCb 3a Hee ToJbKO C OdHOI CTOpOHbl.
OTkpOte KpENHnHaNpaBnIounx Kop3nHb Cnpaba N CneBa N BbHbTe Kop3nHy. YcTaHOBnTe ee BBepx nn Bn3y, npOnyCTnb ee No HApPaBnIooM BnIOt b Do BXoJapeDnHex PoJNKOB n 3aKpOte KpENHeHn (cm.CXeMy).
Ecni Kop3nHa ochaeta pykamu Dual
Space* (CM.CXEMY), BbIDBnHtBe BepxHIO
Kop3nHy Do ynpa, B3bMnTEcb 3a pykni
no 6okam Kop3nHi nepemecntte ee
BbEPx nnnn BnI, Nocne Yero 3aDnHbTe
Kop3nHy Ha3a.
PpIMepb3arpy3KnBepxHeiKOp3nHbI

PpMepb3arpy3Kn HnKHei KOp3HbI
Nocya, HenoXoJaAa dMa MoKn B NocydomoeHou MaunHe
- DepeBHHaH NOcyDa, Nocya C DepeBHHbIMN, KOCTHBIMN pyKamN INN CKJneHHa H NOcyDa.
- AnOMHHeBa, MeHa, NaTyHHa, OIOBHHa Nocya nn n3 cnJaBa ONoBa.
-Пл actmaccobar HeTepeMoYcToHnBaNoCyda. - CtapHHbIΦapΦop nnn nocya c pyHoi pocncsbIO.
CTapHHaCepebpaHnOcyHa.COBpeMeHHyIO cepebpyHOPOCyDmMOxHOMbITB MaUNHe NO DeJIKATHOH IpORpAMMe,IpOBepIN,HTo6bI 3Ta Nocya He KacaJACb NocyDbI IN DpyrNXMetaJIIOB.
A PeKOMeHdyEM NOJIb3OBAtBCa Nocydo, PnIroDHOI MblTB B NocydomoeyHOI MaUNHe.
3anyck nocydomoeHOn MaunHBi
- OTkpoTe BOOOnpOBoHbI KpaH.
-
OTkpoTe DBepeu MaunHbI Hn HaxMNte KOnky BKN.-BblKl.. pa3dactcK oPOTkn CnHaJ, INnDnKaTOp BKN.-BblKl., dncnnne n INnDnKaTOpbI DOONNHTeNbHbIX FyHKU 3aropTcra.
3.ПометитemeошeeсрдеввДлозаТор (СM.нжke).
4.3arpy3nTe nocdy B KOp3nHbI (cm. 3arpy3Ka KOp3nH). -
Bb6epnte nporpaMMy B 3aBnCmocn OT Tnna nocydbi n CTeneHn ee 3arpra3HeHn (cm. TaBnUy nporpaM), Haxab KhoNkP.
- BbIbepnTe DoNoHnHTeBhHe ΦyHKmMOnK (CM.c60ky).
7.3anyctnte zukn,3akpbib DBepey:DNHHbI 3BykoBOcHHaI coo6uaeTo hauane BbINOJIHeHn nporpaMMbl. - ⅡaBepHenn nKna Dba KopoTKnx 3ByKObIX CnHaHn OoHHn coo6aHOT o 3aBepHenn nporpaMMbl, Ha DCnPee MraeT HmOp nporpaMMbl. OTkpOte DBepuy, BkIIIOHTe MaunHy npn NOMOnn KONKn BKJI.-BbIKI., 3akpoTe BOJOnpOBHDhI KpaN IOTcoEINHInTe WtEnceIbHyIO BnIKy MaunHbI OT 3NEKTPnuecko p03eTKn.
- NIOOKDHe HeCKoNbKO MNHyT NepeI TEM, KaK BbHyTB NOcydy n3 MaunHb, BO n36eKaHne OKeRb. BbIrpy3Ky NOcyDbI n3 MaunHb HaunHaTe C HxKHei KOp3HbI.
A-B cenx 3heprocbepexhenB HeKOTopbix cnuyax PPOCTO Maunha OTKnIOyaeTcra ABTomatNueckn.
A nporpamM AUTO*: daHna MoJeN IocydmoeHoi MaunHy yKoMnIeKToBaHa CneuHaNbHbIM CeHCopOM, ONpeJenIOUcIM CTeneHb 3aqr3HeHIn N nporpamMnpyUcIM ONTMaNbHbI N eKOHOUMHbI peKM MoiKN.
IpoDOnJXnTeJIbHOCTb aBtOMaTnueeCKNX nporpaMM MoKET BapbIPOBaTb 6laRoJaPra TOMy ceHcopy.
I3meHHeNTEkyue nporpaMMbI
Ecnn BbI HenpaBnBHO BbIbpaNN nporpamMy, ee MoXHo
m3MeHnTb, ecnn C MOMeHTa ee 3anycka npoJno HeckonbKO
MNHyT: ocToPOxHO oTKpoNe TeBepu, yTo6bl He 06KeYbcra
BbIXOaNIM napom, HaxMNTe KhoNky BKl.-BblKn. Ha HeckonbKO
ceKyHd, pa3DaCTcR dHHbI CNHaI MaunHa BkNIOHTcR.
PiobTOPO BKNIOHTe MaunHy npn NOMOn KNONKn BKl.-
BblKn. n BbIbepnte HOyIO nporpamMy n npn Heo6xOImocTn
doONHnTeJIbHbIe FyHKU, 3anyCTne TcKKn, 3akpbIB DBepuy.
Popraok dorgy3kn nocybI
He BbIKIOHAY MaUNHy, OCTOPOKHO OTKPOIte DBepy, YTO6BI He 06KeYbcra BbIXOIAIM NapOM, IN DOONKITE NOCydy.3aKPOIT DEBpy MaINHb: UKN MOKN PNOJONKNTCRA.
CnyuainHoe npepbIBaHne MoKn
EcIn B npouecce MoKn Bbl OTkpoeTe DBepy MaunHb INN BHe3aHNO OTKlnOHTcraJIeKTPoNTaHne, IpOrpAMMa MOKn IpepBetc. Korda DBepca MaunHb 3akpoetc INN BepHeTc 3JIeKTPo3HepTna, IpOprpAmMa BO306HOBNTcC TTO MOMeHTa, B KOTOpBIOHa 6bIa IpepBaHa.
3arpy3ka MOUoero BeuectBa
XopoWNIpe3yIbTaT MoKN 3aBNCIT TaKke OT npaBnBHOIdo3npOBKn MOIOeRO cpeCTBa, IN3NIMeK KOTOPORo He ynyuHaet 3ΦΦeKTNBHOCTb MoKN, a TOJIbKO 3aRpa3HReT OkpykaUOуHoCpeNy.
NcnoB3yTe TOnbKO CneuNaHbHbIe MoIOUme cpeCTBa DnI NocydomoeyHbIX MaunH.
AHE NcnoJIb3yIte moIOuIe cpeIcTba dIra pyHoro MblIbI NOcybl.
N3nIweK MOUeero CpeDCTBa MOKeT OCTaBNTb CneDbI OT NeHb I NO 3aBepWeHn cIKJa.
ONTnMaBbHbIe pe3yNbTaTbIMoKINcUkNdoCTnraOTcToNkoBcnyaeNCNoJIb3OBaHNMAOIOero cpeCDBaBNopouke,KNDKOROnONaACKNbBaTeJnPEReHeppyuoeCoJIN.
D03aTop A:Moouee cpeCTBO
do3atopB:MoUeee cpeCTBO nIpyeBapntbHOn MoKn
- OtkpoTe KpbIuKy C, HauKab Ha KHONky D.
- NomeCTnE B Do3atop MOUuee CpeCTBO cornacho peKoMeHdaunM, npuBeDeHHbIM B TaBnue nporpamM:
B npoWke:do3aTOpbA n B. B Ta6NeTkax:ecnI NO nporpamMe Tpe6yetc1 Wtka, noJoknte Ta6NeTKy B do3aTOp A n 3akpoiTe
KpbIshky. Ecnn no nporpaMme npedycMoTpeHo 2 Ta6neTk, NOJIOXnTE BTOpyHO DAHO MaUNHbI..
3.YdAnTe ocTaKMOUeero CpeCTBa C KpaEB Do3aTopa N 3akpoTe KpbIuKy C UeNtKOM.
DOnoJIHnTeIbHbIe cyHKun MoIKN
Ecn KaKaJa-TO DoOnJHnTeIbHna FyHKnra YBaJIeTc HecOBMeCTmOc BbIbpaHHo NpOrpaMMo (CM. TaJInu cy npOrpaMM), COOTBETCTByUcN INHnKATOp 6bICTpo MmHet 3 pa3a n pa3daNyTc2 KopoTKnx CnHaNA.
3anyckc 3aedeppkoi
3anyck nporpaMMbMOKet 6bITb OTIOXeH Ha 3, 6 n 9 yacob.
- Haxmnte KhoNky 3ADEPXXKA 3ANYCKA: npK KaJdoM HkaTIN KHOKN pa3daeTc8 3ByKOBoi CnHaJ N noka3bIbaeTc8 Bb6paHHoe BpeMra3aepXKn;
- BbIepnTe nporpammy MoKNu 3aKpoTne DBepuy MaUNHbI: nocNe KopoTKoro 3ByKOro CnHaJa NaUHeTcra ObaTHbI OTCHTBpeMeHi;
3.По OkOHaHmОbpaTHOrO OTCHeTa INHdNKaTOp rachet NcIKN MoIKN 3anyckaETcR.
IIN3MeHeHn BpeMeHn 3aepKKn N cokpaueHn BpeMeHn 3aepKKn HauKMTe KhoNky 3AEPKKA 3ANYCKA. IIn OTMHebl 3aepKKn HauKMTe 3Ty KhoNky HeckoJbKO pa3 Do Tex nop, noka INDnKaTOp 3aDaHHo3 aepKKn He noracHT. IporpMaM3anyckaetcNoCte 3aKpbBaHn DBepcbl.
IIOOBnHa 3arpy3Kn B BepxHei HnHxHe KOp3InHe
Ecn y Bac mano rpa3Hoi nocydi, moxho 3anporpammpoBaTb NOOBHy 3arpy3Kn, YTO no3BOJare TcKOHOmNTb BDOy, 3JeKtpo3HeprnIO n MOUooee BeueCTBO. Ipeed b6Opom nporpammbo MoKN HaxKMnte KHOIky NOLOBHNA 3APY3KN
HECKoIbKO pa3: 3arOpNTcTpeYroIbHNK, COOTBeCTbYIOuNIM BbIpaHHOMy peKIMMy 3aRpy3KN, N 3aNyCTNTcTcIKN MoIKN ToIbKO B BepxHei NITOnIbKO B HIXKeH KOp3nHe.
Функцу Плобина 3агузkn 英列ETС HECOBmecTUMO CdoONHHTeJIbHbIMnФункцуМn HocHoN PexMn CokpaueHHe Bpem.
He 3a6ydbTe 3aRpy3nTb NocuydToIbKO B BepxHIOU INN HIXXHOIO KOp3Hy I NOMEcHTNb B Do3aTOP NIOBHy Do3bl MOOeero BeuecCTBa.
MHorOyHKnHOHaBbHbIe Ta6JETKn
3Ta cyHKUINo3BOJnEeYnyuHTbpe3yIbTAT MOKNi CuyKNI. B cnyae nCnoNtB3OBAHmMHOroOyHKUHOHaJIbHbIX Ta6NeTOK HAKMITE KONKy MHOROOFyHKUHOHAJIbHbIE TABNETKN. 3aorpntc cooTBeCTByIOUm INHdkatOp. DOnoHNTeJIbHaJ FyHKUINr《MHorOFOyHKUHOHaJIbHbIE Ta6NETK》yBEInuHbaET npoDOnKNTeJIbHOCT nbporpAMMBI.
A Ecnn FyHKmMHOOFOYHKUHOHbHbIX TABJETOK He 6blna OTKIOUeHa, OHa OCTaHETc BKNIOUeHHoN pni NocJeDyUOxN BKIOUeHNX MaunHbl.
PekomeHdyetcNcNoIb30BaTbMoOuee CpeICTBOB Ta6JIeTKax,ToIbKOecNnBBaSeMmoIeN NMeETcN dOnoINHTeINbHaYHKun MHOFOyHKUHOHAJBHbIE TABJETKN.
AHe pekomeHdyETcNcNoB3OBAb 3Ty DOnONHnTeIbHyOfYHKUHO B nporpamMax, He npeducMaTpNbauOuNXNCNoB3OBAHMe MHOroOyHKUHOHaNbHbIX Ta6neTOK.
Bce nocydomoeyhble MaunHbI yKomnneKToBaHbI cMraHTeIeM BObl, KOtbpN 6bnarOapr cneuaanbHO perehepnpyouei COII IJIOcYdmoEHybIX MaunH ydaIaReT N3BeCTb IN3 BObl, IcNoJIb3yUoIeCra DnMaITbA NOcybl.
JaHHa nocydomoueHna MaunHa MoKeT 6bItb OtperynnpObaHa TaKIM o6pa30m, yTo6bl cokpTaNTb 3aqr3HeHne OkpykaHoue CpeDbI ONTUMn3nPoBaTb KaueCTBO MblTB NocdyB B 3aBNCIMOCTN OT JcEeKtKoCTN BoDbl. Bbl MoKeTe y3HaTb rpaDyc JcEeKtKoCTN BoDbl B BaWe mpaHone, 6paTnBUnncB OprHaHn3aUIO BOOChA6keHn.
-OTKpoTe DBepu N BkIIOHTe MaunHy npn nOoN KHOIKBKN/BbIKJ.
-HaKMnTe KHOkny P npimepHo Ha 5 cekyH. Pa3daaytca DaKoPOTKnx CnHaJa H a Dncnnee peko 3amraet Homep,
COOTBETCTBYUOUI CTENEHN JecTKOCTN (KeKaJIbCUNΦNkATOp HAcTPOEH Ha No 3).
- Haxmte KhoNky P HeckoIbko pa3 BnNoTb Do nOnyeHnHyxHoro Homepa XecTKocTn (1-2-3-4-5 CM. TaBnuy cTeeneHxXecTKocTn BObl).
IπaOTMeHbI 3Toi ΦyHKUIN NOOxKdTe HeCKoNbKO CeKYHd INn HAKMNTe KHOKNy DOONHITeNBbIX ΦyHKUIN* INn OTKnHcHTe MaunHy KHOKNBKL./BblKl.
EcnBbNoB3yeTecb MHOrOcYHKUHOHaJIbHbIMTu TabTeKAMN, 6aOK cpeHepuOeJ coIbIOdoJIxeh 6bITb B IIO6OM cnYae 3anONHe.
| Таблиca щecTKоCTn BODы | Средяя abTOHOMHOCTb** 6aчok дя соли | |||
| уровен | °dH | °FH | mmol/l | Месусы |
| 1 | 0-6 | 0-10 | 0-1 | 7 месяць |
| 2 | 6-11 | 11-20 | 1,1-2 | 5 месяць |
| 3 | 12-17 | 21-30 | 2,1-3 | 3 месяць |
| 4 | 17-34 | 31-60 | 3,1-6 | 2 месяць |
| 5* | 34-50 | 61-90 | 6,1-9 | 2/3 недени |
| От 0°FDA 10°F pekomehduyetся He Испожьзоватсь сoly. * priу установке 5, пюдогдітейьность ріклі мочет у被告псься. ** 1uzкь в дeyh. | ||||
(^ dH=J KecTKocTb) Hemeukx rpaDycax -fH = JekcTKocTb BO φpaHy3ckx rpaDycax -MMON/π = MMINMOJB/NTp
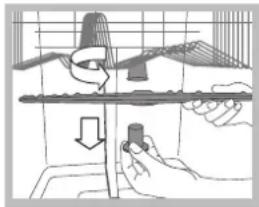
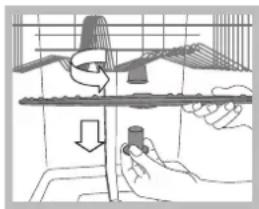
3arpy3ka pereHepnpuyouei coJIi
Дяхopoшero pe3yNbTaTа Моин Heo6xOIMMo npOBepaTb, yTO6bI 6aOK coJIN HNKOrJa He 6bIn nyCT. PereHepnpuOua CoJIb ydaJIaReT n3 BObl n3BeCTb, KOtOpaB B npOTnBHom cnyae OCTaETcHa nocyuDe.
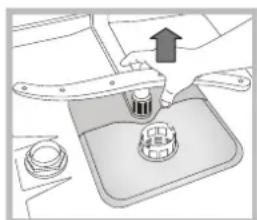
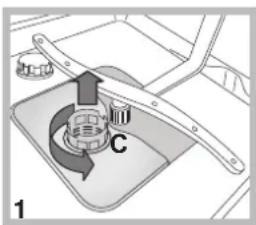
Bauok coi pacnoonoxe B HnKHeu qactn nocydomoeuho MaunHb (cm. Onncane) n 3anoJIHReTc:
KoIJa 3eJIeHbI NonIaBOK* He BnDeH Upe3 KpbIiKy 6aYka;
Korda Ha naneu npabneHn 3aropaetc HndkaTOp OTCYTCTBNE COIN*
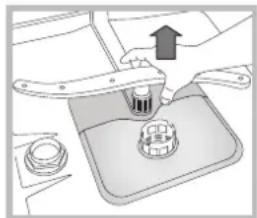
- BbHbTe HxHIO KOp3NHy N NOBepHnTe KpbIky EMKoCTn IpOTNB YacOBO CTpeKN.
- TOnbKo npn NcNoNb3OBAHmB nepBbI pa3: HANOHNTE EMKOCTb BOOn Do KpaEB.
- BCTaBbTe BOPOHky* (CM. pucyHOK)
N 3acbNbTe B EMKoCTb CONb Do KpaEB
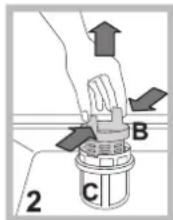
(πριΜερηο 1 K); BixoD BoIb I3 EMKOCTN ABnEeTcH HopMaIbHbIM. 4.CHmnte BOpOHky* u ydaIne OCTaTKn cOnn Ha BXODHom OTBepCTTN; CNOLOCHNTe KpbIbKy CTpye BOnbl NpexKe Yem 3aKpyTntb ee, paCnoIarag ee roIOBko BHn3 n IO3BOJRA BOe CTekat No YeTbEpM 3Be3doobpa3HbIM npope3m B HIXHe qactN KpbIbKN.
Pekomehnyem BbINOpHnTb 3Ty onepaunKkXdbi pa3 npN 3arpy3ke coN.
Xopoio 3akpoTe KpbIuKy,ДЯ TOrO UTo6bI BO BpeM MoKnB E MOKoCTb He nonaJaNo MOIOue CpeDcTBO (MOKeT 6bITbHEnonpaBnMo NOBpeKJeHO yCtpoCTBO CMrYeHn BOdbl).
A Pn Heo6xOaMOCn 3arpy3nte coJIb nepeD uKlOM MoiKn Dny ydaJeHn CoJHoro paCTbopa, BblNBWeOcR Chepe3 KpaB 6aKa.
* IMeetcra TOnbko B HeKoTOpbIX MoJeIax
OTKJIIOUeHHe BObI N 3JEKTPnueCKORO TOKa
- PepeKpbIaBte BOOOnpOBOHbI KpaH NocIe KaKdoM MoKn BO n36exKaHne onaChOCTn yTeueK.
BbHbTe 1eNcBHyu BnIky MaunHbI n3 3JekTpopo3eTKn nepeH hauanom uCTkn I TexHnueckoRo 06cnykBaHn.
YnCTKa NOCVDOMOeHNo MaunHbI
-ДячNTKи HapyЖыX NOBepxHocTeи nHaJIeY npaBNeHnMaUNHbI NCNoJIb3yIte MЯrkyI O Tprkny, CMOueHHyIO BdoI. He nCnoJIb3yIte paCTBOpHTeIN IIn a6pa3NHBIe YnCTraIe cpeDcTba.
Bo3MOxHbIe IaTHa BHyTpN KAmepbIMoIKM MoXHO ydaIITb npi NOMOu TpIKN, CMOueHHoB BODoC He6oJIbWIM KOINHeCTBOM YKCycA.
CpeCTBa npoTnB HnepnTbIX 3anaXOB
Bcerda ocTabnIe DBepy MaunHbI nOy-npKpbToB O n36exAHne 3acto BnaXHOCTN.
- Perynpho npouuau Te nepumetpaHbIe yIIOTHENy DBepcI N DO3aTOPOB MOUeero CpeCDBa Ipn NOMOUIBIAJXHOI r6Kn. TaKIM Oba3OM YdaIaIOTcOCTaTKNIIu - OCHOBHOINpuHHbIOpa3BaHnHHeNPnTbIX 3aIaxOB.
Unctka opocntenei
OCTKNIIMNMOYT PNPINHHTB KNONACTM opoCteJIe IN 3acOpNTb OTBepCTnI, N3 KOToPbIX BbIXOaNT BoDa: BpeMOT BpeMeHN CNEyET PNOBeprTb OPoCtJIIn I npOuNcaTb IN HEmTeaNNueCKOJ UeTKoI.
06a opocnteJRABJIOTcBcEMhbIMN.
Дясьем Верхимо opocntЯ Heo6xOДIMO OTBnHTNtIb npOTNB YacOBО CTPTeKNIIaCTMaCCBOyU raKy. BepxHni opocntJe yctaHaBnIBaETcR OTBepCTnAmM BBepx.
HnKnn opocntenb chmaetcna, notaHyB erO BBepx.
OuHCTKa BOHOrO 0nJIbTpata
EcnBDOONPOBOHOBINIINecnOHdoJIOReBpEmHe HNCNOb3OBAIcN,peepnoCoEDHHeHEmdaTe BOeCTeYb DoTexnop,nokaOnaHEcTahETnpo3paHoi.HecobJIODeHne 3TOROycNOBMAOKETPnBeCTNK3acopeHIOΦJIbTpA IN NOBpeXKeHIO NOCyDOMoeHHO MaHHbl.
- IMeetcTc TOnbKO B HeKoTOpbIX MoJeJx
A NepnoDnueckn OunuTaTe BoHbI ΦnIbTp, paCNOJIOKeHHbI Ha BixOnde KpaHa.
- IpepkpoTe BOOnpOBOHbKpaH.
-OTKpyTnTe KpA Tpy6bl 3aRpy3Kn BObl, CHIMITE fNbTp n AkkypaTHo npOMoIte ero noD cTpye BODbl.
- CHOBA BCTaBbTe ΦnIbTp I 3aKpeNITe Tpy6y.
UncTkkaФnIbTpOBA
Фильтуюши y3eI cocToNT n3 Tpex ФильtpoB, KOTOpe cIyKAT dIЯ OUHCTKN BOdI dIЯ MOIKN OT OCTaTKOB NIIuN I BO3BaPaaIOT BODY B UINKpyJNAIIO: dIЯ XOPOUIXN pe3yNbTaTOB MOIKN Heo6xOIMNO pOouNtA bФиьtpbl.
A Perynpno npouuuaTe funltpbj.
3anpeuaetcnoIb3oBaTcnoCyDmOeHNO MaunHO6e3 1nbltpOBnnC He3akpenneHHbIM nnbltpom.
-
Nocne HeckonbKx UnknoB MoKn npoBepBe fNbtpuOnn y3e n npn Heo6xoDmOcTn TsaTeJbHo npomoiTe ero nOd cTpye BODbl npn NOMOuH MeMaTnueckoI ueTKn, CneDyra npNBedeHHbIM HKe EINCTpykUaM:
-
NOBepHnTe npOTnB YacOBn CTpeKN ZININHdpWueckn FmNbTp C n BbHbTe erO (cxema 1).
- BbHbTe cTaKaH cnIbTp B, cIeKa HaxaB Ha 60koBle BblcTybl (Cxema 2);
3.BbHbTe pnockn fnbTp n3 HepkaBeoue ctaJN A (cxema 3). - Поберka Oстоникa И yдалене ВОЗмохьix OCTaTKOB niiu. HNKOrДA HE CHIMAJTE кршky Hacoca (TeTaNb chephoroцBetα) (puc. 4).
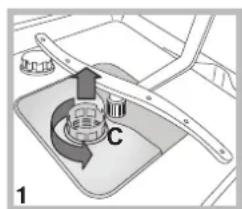
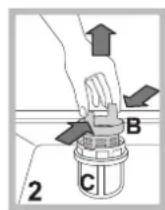
Iocnie NCTKNfNtPOB TOHOb yctAHOBnTe fNtbpTyIOuyny3eHa CBOE MeCTo, YTO RAJIReTcBAKHBIM dIg NCpBaHO pa60tI NOcyDOMOeHOr MaINHbI.
ДиTeIbHbI npocToMaunHbI
- OTCOeDnHHeMaUHHyOTcETN3NEKTPoNTaHnI NpeEkoTBe BOOnPOBDoHbI KpaH.
- OctabTe DBepu MaunHbI noJy-npKpbToi.
- Pocne dIInTeBHO rpoCToMaHnHb npOn3BeDHTe OINH XONOCToU cIKT MoKn.
IpeydypexkdeHn npekomehdaun
RU
M3denncnpoeKtnpoBaHO H3rOToBHeHO B COOTBeTCTBm C MEXdyHapOnDbHMn HOPMaTINBaAMn No 6e3onacNoCTn. Heo6xOduMo BHIMaTeJIbHO npOHTaTB HAcTOrUne npEynpeKeHHn, COCTaBNeHHbe B cIeJX BaWei 6e3onacNoCTn.
06üne Tpe6oBaHnK 6e3onacHOCTN
JaHHbI 3NEKTPponp6Op He MoKet 6bItb NcNoJIb3OBAH IuqAMn (BKNIOUaJr DeTe) COrpaHueHHbIMn FmN3UeCKIMN, CEHCOPHBIMn JIN yMCTBeHHbIMn CNOOCHOCTaMn, HEONbITbIMn JIN He3HaKOMbIMn C HHTpyKlunmN O6paueHnC 3NEKTPponp6Opom, BOTCYTCTBne KOHTPOJn Iu4,OTBEcTBHeHHbIX 3a IN 6e3OnaCHOCTb.
B3pocIbIeDJIKHbIcIeIITb,HTO6blTeTnHeIrpaIIN c3NeKTPoPnp6Opom.
-Данhoeи3делпгдна3нayaeТСДгНерофсногьногИСПОЛБЗOBAHВВДOMaWHIXYCNOBnIX.
- 3dEIne PpeHa3HaueHo IIN MaBtBnOcybI B DOMaHINX YCIOBnX, MOKET 6bITb NcNOb3OBaHO TOnbKO B3PocJbIMN JIODbMn B COOTBeCTBm C NHCtpyKUmaMn, PpNBedeHHbIMN B DaHHOM TEXHNueCKOM PYKOBODCTBE.
3anpeaetc yctHaBnBaTb n3JeNHe Ha yInue, daKe NOI HABECOM, TAK KAK BO3DeiCTBne Ha Hero DoXy I rpo3bl YBnreTCype3BbUaHIO NaChbIM.
- He npikacaiTecb K nocydomoeuHm MaunHe c 6ocbIMn HOrAM.
He TaHnTe 3a Ka6eB 3neKtpoNTaHnD nIg OTcoEiHHeHn BUNk N3DeJIINr IN3 CeTeBOI PO3eTKN, BO3bMnTEcB 3a BNJky pyko.
Heo6xOIMO nepeKpbIb BOONpOBOHbIK paH N BblHyTb WTeNcBHyIO BNJky n3 po3eKn pePeJ HauaIOM YnCTKN I TexHNueCKOrO 06CnyKbAHnmaunHbl.
B cnyuae HeucnpaBnocTn KaTeropueeckn 3anpeuaeTc0TKpbIbTaB BHyTpEHHne MexAHN3MbI N3deJIInr C cIeIbIO nx camocToTeIbHOro peMOHTa.
- HnKoRda He npKacaiTeCb K cOnpOTnbJIeHInIO.
He onnpaTecb HnH He caNTecb Ha oTKpbTyIO Dbepuy MaunHbI: OHA MOKeT ONpOKnHyTbc.
- He ĀpχnTe έBepу OΚpbIToN, TαK KaK o6 Hee MoχHo CnyaHObCNOTKHHTbCra.
XpaHNTe MOUuue cpeCTBa N OOnJaCKnBaTeNb BdaJN OT detEn.
- He pa3pewaTb DeTAM UrpaTb C ynaKOBOuHbIMMaTepeNaanM.
YTNn3aun
- YHHTOKeHHe yNAKOBOHybIX MaTePnaNoB: CoBIOdaIte MeCTHbIE HOpMaTbbl No yTNIN3aUN yNAKOBOHybIX MaTePnaNoB.
Cornacno Ebponecko DnpeKtnbe 2012/19/CE KacaTeNbHO yTIN3aunm 3neKtpOnhBx n 3neKtpueeCKnx 3neKtponpnp6opOB 3neKtpnp6opbl He DoJNkHb Bbl6paBbATcB CMeCTe C o6bUHbIM rOpOckM MycOpom. BblBeDeHHbI N3 cTpor np6opbl DonXhbl CoBpaTbc OToENbHO dnn ONtMN3aunm IN yTIN3aunm IN peKynepaunm CoCTabNIOuIX IN MATEPNAIOB, A taKaKe IJI 6e3Oanachocn OkpykaIoJe CpeBn IM 3DopOBBa. CmBON 3auePKHyTae MycOpHg Kop3MHKA, IMEOUcnS Ha BCex np6opax, Cnyknt HAnOMHaHHeM 6 Ib NTdEhBOy TIN3aunm.
3a 6oJIee nOJpO6Hoi INΦOpMaüne O npaBnIbHOYtINI3aUNN 6bITOBbIX 3NeKTpOpiu6OpOB NOnb3OBATeIN MOrYT o6paTNTbc R CNEUaJIbHyIO rOcydApCTBeHHyIO orpAHn3aUNIO INN B MaRa3HN.
3KoHOMn 3JIeKTPo3Heprn n OxpaHa OkpyKaIOSei cpeDbI
3KOHOMNBAObln3JIeKtpo3HepmN
- IcnoIb3ayTe nocydomoeHyO MaunHy C noJHou 3aRpy3koB OxuHaHne noHoro 3anJHeHnMaunHb BO n36ekaHne o6pa3oBaHHn HnpeYTHbIX 3anaxOB BKIOUHTe cIKOnonackKBAHne (cm. Pporpammbl).
BbIbIpaTne nporpammy MoKn, noxodayuD nDaHoro Tnna nocydbi nCTeEHn 3aep3HeHH B COOTBeTcTBm C Ta6nue nporpamM:
-ДЯHopMaJIbH0 3aRpa3HeHHoNocSyblI NcNoJIb3yItePnppaMMy Eco,ObecneuBaIOUyIO H3KmI paCXoD aNekTpOHeprnIN BObl. -ecn MaunHa 3aRpyKeHa HeNOHocTbIO,BKnOHTe DoONHITeNbHyOФyHKUIO POnOBnHa 3aRpy3K* (cm.3anyck n 3Kcnnyataua).
Ecnn BaW KOHTpAKT C NoCTaBUnKOM 3NeKTPo3HeprnnpedycmatPbBaET pa3HbIe YacOBBe TaPnFb IINr 3KOHOOMN3NeKTPo3Heprn, NOb3yIteCb MaunHOB BO BpeM r C NbROTHbIMTapnFOM. DOnONHtEbnHag FyHKnra 3anyck C 3aepkKo * (CM.3anyck n 3Knpyatau) MoKeT NmOuy cnnAHHPOBaTB MoKynocydB 60onee paunHOHaBHom peXnme.
Mooune cpeIcTba, He coepkaune focpaTOB, Xnpa n coepkaune fepeMeHTbl
HactoTEnbHO peKOMeHdyem NcNoJIb30BaTb MOUuine cpeDCTBa, He coepkaune focpaTOB INXLOPA, YTO NOMORAET COxPAHHTb OKpyKaIOUyIO cpeIy.
-ΦepeMeHTbOka3bIaIOTOCo6o əfpeKtNBHOe BO3dIcTBe NpntemnepaType oKOIO 50^ ,no3ToMpy npn nCNoJIb3OBAHm MOUuxBeueCTB CΦepeMeHTAMN MOXHO BbIbpaTB pOriPamMbIMoIKN CHN3KMn TemnepaTpamN,noNyayTe Xe pe3yJbTaTbI,TOI npmoiKe npn 65^
- AkkypaTHO Do3npyTe MOUe CeDCTBO B COOTBeTCTBNN C yka3aHnMn IpOn3BOJNTen, C CTeNeHbIO JcKcTOKCTN BObl, Co CTeNeHbIO 3aqr3HeHH N C KOJIuYeCTBOM Nocdy Bo N36EkaHne HepaNoHaIbHoro pacXoA. XToT MoUe cpeCTBa IraJIaTOc BnOpa3NaRaemblm, OHn CoJePkaT BeIeCTBa, OTPuCaTeNbHO BInnaHoune Ha npnpoyd.
B cnyuae o6hapykeHn aHomaii B pa6ote n3dennn npoBepbTe cneDyUuie nyHKtbi nepeTem, kak o6paTntbcra B CepBnc texHueckoro 06cnykBaHn.
RU
| HeincnpabHoctn: Bo3moXhBle npuHb / MeToDbI yctpaHeneH: | |
| Посydомочная машина He Залуckaetся пи He pearpuyet Na КOMaHdbI | • Выклочite машины рппnomоши КнокьВКЛ./ВыКЛ., Ввовь Вклочite ee пrimерно чес оndHy мИнHyТУ и Ввовь зааде пordpammy. • Роберъ,хорош liштencьнога ВикьВставлени в сетевую розту. • ДBERца машины пLOXX зakрытA. |
| Дberцa He 3akpbiaBaTcR | • 3aushelknhyncя 3amok;энepriuquho TolknHite DBerpzv Bnnotbdo soienkka. |
| Посydомочная машина He cInBaet Бody. | • Поррамma eшe He 3abepuHnacb. • Сливоншланr corHyT (cm. МОнмж). • 3acopunlca cInb V MOiKe. • Фильър 3azopener octatkamn Niuichi. |
| Ш汞ная работа поydомочнoi mашиь. | • Пocуда 6bETcДpyr Odpyra nii O noJonactn opocintelen. •Чeзмрhoe peHoo6paZOBaHne: HENpabunlhaJЯdo3inpobKа nii HENpriroDHOe MOUüee crepdCTBOДЯ NOscydomoeyno MauinbI. (cm. Вкlnolyehne i экspnyatauŋa). |
| Ha nocуde i stakahax octaeTcR беловать пи ИЗвстковьйнatel. | • OTCyTCTByET perEneprpuyUOaJag coNь nii perUyIaIaJe ee pacxoda He coOTBETCTByET CTeNeHn JcEcTKOCTN BODI (cm. OnOpackueamelb u coNb). • Кышka bachka coNII pLOxo 3akpytA. • 3akOHUnCЯ onOLACKINBATENB II IN ERO Do3NPOBKa HeNoCTaTOUHa. |
| Ha nocуde i stakahax octaIOTcR rOly6OBaTbe pa3BodI пи Ин Halte. | •Чeзмр纳Дdo3inpobKа onOLACKINBATEN. |
| Пocуда пloxo blycUeHa. | • Быla Выбран prorpamma moKni 6e3 cyuKn. • 3akOHUnCЯ onOLACKINBATENB II IN HAcTPOEHa HeNoCTaTOUHa Do3NPOBKa (cm. OnOLACKUaMeNb u coNb). • HENpabunlbo N aHcTPOEHa Do3NPOBKa onOLACKINBATEN. • Пocуda C TeФLoHOBbl MOKpbITnem nii n3 PnactNka. |
| Пocуда пloxo blymbIta. | • Kopr3инпpeperpuyKeHes (cm. 3a2py3ka Kop3uH). • Пocуда пLOXO paccnoJoxHe B KOP3Hax. • Пocуда mewsTe BpaSeHnIO nonacte OpoCtelen. • Выбран HeaФФeKTINHЯ prorpamma moKni (cm. InpoZpAMMbI). •Чeзмрhoe peHoo6paZOBaHne: HENpabunlhaJЯdo3inpobKa nii HENpriroDHOe MOUüee cpeCDSTBOДЯ NOscydomoeyno MauiNbI. (cm. Вкlnolyehne i экspnyatauŋa). • Кышka onOLACKINBATEN pLOxo 3akpytA. • Фильър 3azopener (cm. ТхHuYeckoe obScnyJueHue u yxod). • OTCyTCTByET perEneprpuyUOaJag coNь (cm. OnOLACKUaMeNb u coNb). |
| Посydомочная машина He Залуbae TBody -Сигнал兹aцnia ЗakpytOrTO кран. (pa3daiotc koporokte 3bYkoBbIe mRaTaE INIduKATop BKN./BbIKL. nHa ДИсрпee noko3aBIAeTcS zuΦp4 6). | •ВВODOnPobOBoDE HeT BodI. •ВODOnPobOBoDHy shaHr corHyT (cm. MoHmJz). •ОТрочte BODOnPobOBoDHy крAn, И машина 3aNycTntcya Hepe3 HeCKONbKO mHyT. •Машина 3a6LokpOBoVanacb, tak kaK noCne 3bYkoBov CRIHaNIZaIuNHe He bIINO npon3BeDeHNO HNKAKNX DeIcTBN. BbIKLpOHTe mAsmHy npri nomOuI KNOpKn BKN./BbIKL., OTKPouTe BODOnPobOBoDHy крAn Ycepe3 20 cekHyD BHOB BKNpOHTe mAsmHy npri nomOuI ToJ KeHONK. IpepePporgpAmmpuyte mAsmHy n BHOB 3aNcyTNTe UcKnL. |
| Сигнал兹aцnia спвHoro shaHra BodI / 3acopenФильър подч BodI. (miraet indikakopBKN./BbIKL., nHa ДИсрпee noko3aBIAeTcS coO6uzHene N°7). | •Выклочte машины рпnomоши КнокьВКЛ./ВыКЛ. 3akPoyte ВODOnPobOBoDHy крAn BO n36ExaHne 3aTOnPleHnry, OTcoEdinHte stencseHhyu BUNKy mAsmHyIOTsete BOK.IIpOBePbTe, He zacopen liФиьtr пocdavn BodI NeHcNCTOTamn. (CMOTPnTe pa3dJe «TexNueckoe obScnyKuBaHne и ухд») |
CepBnC TexHnueckoro
O6cnyxnbHnY
RU
Mbl 3a6otmcm o CBOHX NOKyNaTeJnx I cTapaemc rCenatb cepBnchoe 06cnykBaHne HAn6oJIe KaueCTBeHHbIM. Mbl nocToarHNO COBepseHCTByem Haun npOdyKtbl, YTO6bl cDenatb Bawe o6uEHe cTexHkoI npocTbIM n npraTHbIM.
YXo3aTexHnKoI
PpOJIInTe CPOK 3KcNPIyatauIN CHIN3bTe BepoRTHOCb NOJOMKn TEXHnK.
BocnoIb3yIeTc6I npOceccnHaJIbHbIMn CpeICTBaMn IJra yXoJa 3a TeXnIKoI OT Indesit Professional IJra HAn6Oonee npocToR, 3oPfekTINBHorO n IerKoro yXoJa 3a BaWei 6bITOBn TexNkoI.
PpOdykTbI Indesit Professional npOn3BODaTcB NtAINn C cObJIOeHHeM BbcOKnx Ebponeckx CTaNapTOB B o6NaCTN KaueCTBa, 3KoIOrnn n 6e30nacHOCTn NCIOJIb3OBaHNr N CO3DaHbIC yYeTOM MHOroTeHrO OnblTa npOn3BOUntEJIraTexHKn. Y3HaIte noDpo6Hee Ha caIte www.hotpoint-ariston.ru B pa3dene «CepBuc» n cnpaunbaIte B mara3nHex BaUero ropoda.
ABTOPn3OBaHHbIe cepBnChbIe cHTpbI
YTo6bIb 6bIb 6bnxke K haunm nOTpe6ntenam, Mbl CO3daJIu WnpoKyo cepBnchyO cetb, Oco6eHnOCTbIO KOtopoJ RAJIaETcBAICOKa NOrTOBka, npoceccnoHaJIINM uYeCTHOCTb CepBnCHbIX MaTePOB. Ha cerOJHnHn DeHb OHa HacHTbIBaEt OKIo 350 cepBnCHbIX ceHTpOB Ha TeppntOpnn Pocnn n CHr.
IX KOHTaKtBi BbIMoKeTe HaITnB cepBnCHOM cepTnФkaTe nHa caIe www.hotpoint-ariston.ru b pa3dene «CepBnC».
Ecnn Bam hao o6paTbC8 B cepBnchbl ueHtp:
BHHMaHHe! PnppeMOHTe Tpe6yIte IcNoJIb3OBAHnOpINHaJIbHbIX 3aIacHbIX YAcTeN.
IpeepTeM kak o6paTbCBA CepBnC TexHueckoro 06cnyKuBaHHa:
- PpOBeBpTe, MoXHO JIn yCtpaHnTb HeNCnPpABHoCTb CamoCToTeJbHO (CM. HeNCpPabHOcTn MeToDbI IN yCtpaHeHn).
BHOb3anyCTnTe npoPamMy dny npOBepKn nCnpaBHOCTM MaunHbI.
B npoTnBHOM cnyae o6paTntecb ByynoHMOOeHHb CepBnC TexHueckoro 06cnykBaHa.

HnkOrda He o6paauTecb K HeynoHHomOeHHbIM TexHNkaM.
Pn o6paueHH B CepBna TexHnueckoro 06cnyxnbAHn coo6uHTe:
XapakTeP HeucnpaBHOCTN
MoDJIb n3dennr (MoI.)
- cepinHbH Homep (S / N)
3Tn daHHbIe Bbl haJdeTe Ha nacnopTHoT Ta6nnuKe, pacnoIOxehHOHa n3denn (cm. OnncHne n3dennr).
Dpyrno nOe3Hyu INHOpMaunu HOBocn Bbl MoKeTe haHTn Ha caTne www.hotpoint-ariston.ru bpa3dene «CepBnc».
KZ
Ka3aKa7a, 15
Ma3MyHbI
OpHaty, 16-17-18
OphatyXeHeTy3yney
Cy MeH TOKTbIKOCY
BipinjiyyuKnblHaKaTbIcTbKeHec
Ecodesign Regulation
Kypblfbl cnaTtAmcbl, 19
Kannbi wony
Backapy taKTabi
Taptnapdbj kkykTey, 20
Temehri TapTna
blblic-aykcebei
Korapfbi Taptna
LST 5337
Kocy XeHe naJaIaIaNy, 21-22
bldbic kyy MaunHacbI h icke Kocy
Xyfbll 3aTbI eJIwey
Kyy onuynapbl
Kyy uKnIaIapbl, 23
Kyy uKnIaPbIbHbN KeCTeci
Wahora Komekwi 3aT XHe Ta3aHaH Tγ3,24
Wahora KEMeku3aTTbEnwey
Ta3anaHraH Tz3dbI eJnwey
Kytim KepceTy XaHe TexHnKaIbIK KbI3MeT KepceTy, 25
Cy MeH ToKtBleuipy
bldbic kyy MaunHacbH ta3anay
Kafbimcbi niCtepdi andbih any
To3aHdaTkbIu 03ekwenepeiTa3anay
Cydbln kipic cy3ricin Ta3anay
Cyrinepdi rataanay
MaunhaHbI y3ak yaKbIT naJaIaHaH6ayfKaandbipy
CaKtbIK Wapanapbl MeH KeHec, 26
KannbKayinci3ik
Kokbicka Tactay
KyattbyyHemdeyKHeKopwafahOpTaHbI KypMettey
AkaynbikTapdbjXoIO,27
Kemek, 28
KZ
KZ
A Byn HcyaybIKbI KeiH Kapay ywiH Kofanbln KaJMaHTbIHdai 6ip Jepre caKtan KoBbH3. KypblfblcTaBnca, Terih 6epince HeMece XblkbTbJnca, HcyaybIK MaunHameh 6ipre 6oNaTbIHbIN KaMTamacb3 etH3, coaJha OHbIH XaHa neci HcyaybIKbIH iwiHderi KeheCtepdi naDanaHa anaAbI.
OcbHyckayIbIKbMyKnT OKbn IbIFbHb3: OHbIH iuHde Kpyblfblhkyainci3 Typde opHaTy, naDanahy XeHe orAh KbImET KepcTeYRe KaTbICTbAknapaT 6ap.
KypbIfblHbXblNkblTy Kepek 6oJca, OHbl TIK YCTaHb3; aca KaKeT 6oJca, OHbl apTkA kaPai eHKeIyTre 6oJaIbI.
BnykpybInfbyyIeXHeOraH yKcac XaFdaNapDa KOndaHyFa apHaHaRan:
- dyKeHepderi, KeHceIepderi xeHe 6aca Kymblc opbHapbHdafbKb3MeTkePnpdrnac6eImecinHe;
-epma yinepinhe;
-KoHaK YInepiHderi, MoTeIbIepderi XHe 6aKa Da KOHaK KytU opbIaPbIHdafty TtBHybIap TapanbHaH; - Kiichi KOHaK yInepi CnKtblOpbHapda.
OpHaTy XeHe TsyIey
- KypblfnbHb6apnBk opamacbHaH 6ocatbHb3 XHe ON TaCbImaJday Ke3iHde 3akbIMdaMaFaHbIH TeKcepH3. On 3akbIMdaFah 6oJca, catyubira xaabapnaCbHb3 XHe opHaTy ydepiciH TOKtaTbHb3.
- bIbIC Kyy MaunHacBih H KaHapbl HeMece apKbI NaHeJI KaBHaftbl WkaTapmeh HeMece Tinti KaBipramen TneTinDe KoBbIN, OHbl TekcepH3. Byn KpyBnFbHb Tinti bip YcTeNdiH yCTIHr TaKaTaNbHbAcbHda Da kipri3yRe 6oNaDb * (OpHaty BoBbHwa Hyckaynbk npaFbHkapaHb3).
- bIbIc Jyy MaunHacbIH Teric api KaIbIbIe eHeRe opHaJnactbIpbIbI3. Eeden teric 6oImaca, KypblfblHbI anDbIbI aAaTapbI H petTen, OHJI KeJeHeKaNbINKa XeTI3yRE 60anaBly. Kypblfbldpybc TY3yNeHCE, ON KaIbIbTIb 60anaBlyXe He YMbIC ICTEN TpyraH Ke3De XbInKy Hemece dipin MeH WbyIn WbIfapy MymkiHdi r3 60anaBly.
- ApTbI aKbTH 6NIKTIRIN KypblfHbH andbHbf KaftbHaH petTeHi3 bIDc Kyy MaunHacbHbH TeMeHI opta 6eniriHe 8 MM Teciri 6ap antb 6pyltbraikKaITIN (kb3bn Tycti) carat TINI 6afbltBMeH 6ypcahb3 6NIKTIK apTaB, an cafat Tinihe KapcbI 6afblTTa 6ypcahb3, 6NIKT 3a3aBbl.
Cy MeH TOKTbI Kocy
A Cy MeH TOKTBI TEK biNikTI MAMAH KOCybl TnIC.
Ablbc Jyy MaunHacbCy TYtIKtePiH Hemece Tok cbIMdapbHbH yCTIHNe TypMaybKepek.
A KypbIbHbI cy XeTki3y XeNiciHe XaHa TYtIKTepeMeH Kocy KaKeT.
EckyTytikTepeKoJdaHbAHyI3.
CydbH Kipic XaHe WbIbIC TyTikTePiH, COHaA-ak, TOK cbIMbIH eX KaKcbOpHaTyfKa KOn KeTki3y YuH KpybInfbHbIH OH Hemece coJXaFbIHah EtKi3yRe 60naBbl.
Cydbin kipic tyririh kaifay
KonaIb cybk cybl klanfay hKyTecHe: TykTikJ kAnFamac 6ypbH, cydafti KaNdbkTap KpylbfiHb 6itten Tactamaybi yuH, cy tan-ta3a BonFaHwa, OHb afb3bn anbHb3; 6yn apeketti opbIHdaraHHah KeHH, Kipic tyTirH wymeke %4 ra3dbk 6paHda KocblnbIMbImeH mbkTan 6paHb3.
KonaIbI bICTbIK cydbI kAnfay HkTeciHe: TemnepaTypacbl 60^ TaH acnaca, bIDbc Kyy MaunHacbHa XeNiDeH bICTbIK cy 6epyre 6oana (paanatopnapb6ap optabIK kblby Kyneh3 6oIca).
CybIK cydbI Kocya aaiTbJnFaHdai, TyriKTI Wymekke 6ypaHb3.
A Kipic tyirihin y3bHdbfj xetkiniKci 6oJca, MaHaHdbipbnFaH dyKeHRe Hemece KyaHaDbipbnFaH MaHaHa xaapnacBHy3 («KeMeK» 6eImiH kapaHbI3).
CydbH KbicbIMbI TexHnKaJIbIK DepeKTeP KecTeciHdKepcetinreH MHeep apaJIbIFHda 6Olybl Tnic (KacbIHdaBlaaknapaTbI kapaHbI3).
Tytikti Maibictbipyfa HeMece oafn KbicbIM caNyfa 6oImaIbI.
Cydbin wibfbc TyTiriXkanray
Tytirih(maibctbipma)DnameTpieh a3bHda4cm 60naTbH cy arby Tytirihe kanaRaB13.
IbIfbc TyTir eEHHHeH Hemece bIbIC Kyy MaunHacb TypFaH 6eTTeh 40-80 cm apaIbIFbIHda 6OJIybl Tnic (A).
Cydih Wbifbc TyTirH WHyBiluHaBH aBby3y TyTiriHe Kocnac 6ypbH, nactKanblk TbIfbHdbI anBIn TaTaHb3 (B).
Cy anbIn KeTydeH Kopfay
Cy anbIn KeTyInHe konBepMey yuHIn, bIDbc Kyy MaunHacbl: -KaIbInCb3 KaJaInnapa HEmece KypbInFbInH iUiHeH cy arbIn KeTKeH Ke3de Cy Ke3IH 6yraTaNbH apHaNbI KyyMeH Ka6DbkTaNfH.
CoHdai-ak, Kei6ip ynrinep New Acqua Stop * den atanaTbH Kocblima Kayinc3dk KypalbIme XabkTanfA, on Tinti Kpic TyirHHXbPTbIN KetkeHHde de cy anBn Ketydhen KopraaBb.
ECKEPTY: KAYINTI KEPHEY!
Cydibn Kipic Tyirin ew6ip kafdaa da KIOuBb 6oImahb3, ce6ebi OHda TOK eTeiH 3neKtp 6eikTep 6ap.
* Tek kei6ip yIrrinepe 6ap.
Tokka KaJfay
AibipbIpo3eTKaFAKocnac6ypbH,MbHaXaFdaNapFaKe3 XeTki3iH3:
- Po3eTka Jepre TyMbIKTaIraH XHe aRbIMdaRbI epKxeJepre caikec Keenei.
- Po3eTka KpybInfBihH en KEN KyaTbHa Wbdaan anaDbI. Bym meh ecikTIH iWki JkaFbIHDa opHanaackaH depeKTeP tinimwecinHe KepcetinreH (KpybInfBihH Cunammmacbi) den amanambiH mapayobkapaHb13.
- Tok keniiciHH kepheyi depeKep TijimueciHne kepcetinre HmHdep aykbimbHa KaTbIP.
- P03eTka KpybIbIbHbI WTeNceIbIq YbIbHa CaiKec KeNedi. Oaai 6oImaca, KyaNaHdbIpBlnFaH MaMaHdbI WaKbIptBn, aIbipDa aybICtBpHiB13 («KeMeK» 6enim KaPaHb3); y3apTy Ka6eJIbDepiH Hemece 6ipHewe po3eKaHb I kondaH6aHbI3.
KypbIfbl opHaTbIraHHaH KeiH, TOK cbIMb MeH po3eTKara OHai KOJ XeTIkiy MyMKIH 6Olybi Tnic.
A CbIMdb MaibicTbipyHa Hemece OfAH KbICbIM canyfa 6oJmaDbI.
A TOK cbIMb 3aKbIMdAnca, 6apIbIK bIKTmAm KaTePnepDeH caKTahy ywiH OHbl eHdpuyi Hemece OHbIH TexHHKaJIbIK KEmEK Kepcety KbI3MeTI aybIcTbpybI KepeK. («KeMeK» 6eImiH KapaHbI3)
A Byn epexepe npbHdAmaca, KomnaHn Ke3 KeIreH XaFBIMcb3 OKFaJnapra XayanTb6OImaiDbI.
KoHdeHcaunJaH KopfauTbIH JeHTa
blblic kyy MaunHacbI opHaTkaHHa KeiH,ecikTi aWbIn, TY3IyI yMmKIH KOHeHcaUNaHd KOpFay yuHJKeiIMDi MeNip JeHTaHbI aFaU TapTnAhhI actbHa Xa6bICTbIbH3.
BipihwixyyuKKBbHaKaTbICTbKeHeC
KpybIfbl opHaTbIiFaHHa KeiH, 6ipiHsi Kyy uKnblh icKe Kocnac 6ybpH, Ty3 dncneHcepi H cyMeH TObnk TOntbIpbHb3 Da, cOan KeiHa fAha OraH WAMAmEH 1 Kf Ty3 KocbHb3 (《Wiaora KEmekui 3am XeHe my3》den amanambH mapaydbI kappaHb3). Cy acBn Terinyi MmKIn: 6yn KaNbINTb Jxafdai XeHe npo6nema emec. Cy kattbIbFbIHbH mHiH TaHdaHb3 (《Wiaora KEmekui 3am XeHe my3》den amanambH mapaydbI kappaHb3). -Ty3 MaunHara KyBnIHaHHaH KeiH, TY3 A3 INDnKaTOP wAmbl* ceHepi.
A Ty3 KOHTeHepi ToTbIpbIMaca, HaTNXecIHDe cy KymCapTKblbMeH XblbTy 6eniri 3akbldaNybl MyMkiH.
3KoIIN3AHTJALABbl
ECO (3ko) kyy uklbl - kyat 6enricinderi depekTepe hycan typran ctaHapTbI ukn; 6yn uknblnla nactany depexeci opTaawa bIbIc-aakTbI kyy yuH KOJaHaYf aonabJxHe ocbblbc-ayK TyPiHe KyaT neH cydbI eH TImDi Type JyMcaNbI. TybHydbI OaH epi a3aityuH bIDc kyy MaunHacbl H TK TOJIbPbIN JyMbIC icTeTIi3.
Ky Kyinderi TybHy: Kocbltn Typy peximHderi TybHy: 3 Bt -Kyy eipnyi pexmiHderi TybHy: 1,3BT Heriunapra aphanfah tybHy depekterhi Kecteci
Uaiofa kOMeKwi 3aT KHe
Ta3aJHFaH T¥3
KZ
blblic kyy MaunHaapbHa apHaBIn XacaIraH eHimdepdi rHa KOnDaHbIHbI3.
AcTy3bIH, eHdpic Ty3bIH HeMece KOImeH bIbIC KyyFa apHaIraH cyBbIKTBtI naJaIaHa6aHbI3.
Opamada6epinreHyckaynapdbIopbIHdaHbI3.
BipHeWe fynKUncBc6ap eHIMdi KOnlaHaTbH 60nCaHb3,
waora KEMekwi 3aTbI naDanaHydbH KaKeTI JOK; DereHMeH, TY3 KockaHDbJxOH CaHaMlb3, ocipece cybl KaTTbI HeMece
eTe KaTbI XepDe TypaTbH 60nCaHb3. Opamada bepinre HycKaynapdbOpbHdaHb3.
A Ty3 Hemece waIora Komekui 3aTTbI KocnacaHbI3, TY3 A3* XHe IIAOFA KOMEKUI 3AT A3* INDnKaTOp WAMdapbl KaHbIN Tpya 6pepi.
Jiaora KeMeKw3aTTb eJnwey
Haora KEmekui 3at bIbIC-akTbKe6yIH KeHInTei,ce6eCi cy 6etTepine HkBnDAMbpak aBn KeTei XHe COHdbIKaHcIbIKTap HeMece DaKTap KaNbIPMaJbI.
Haora KEmekui 3at dncneHoePiMbHa XaFainapda TOTbIpTuTmic
- WAIOFA KEMEKU 3AT A3* INHdikatop wambl baskapy TaKaTa/duCnneJxHaIbI;

- KaKaKaTbI (G) caFat TiniHe KapcbI 6aBItTa 6ypay apKbIbI duCneHcepDi auBiHbI.
-
Dnncncepden tonbin afbin KeTneyiHe Ha3ap aydapa oTbipbn, Waiofa KEmekw 3aTbI KybHbI3. ByOpBn anca, Terinre CynblkTbIKtBkyprak uSybepeKeHn Depey cyptin anbHbI3.
-
KaKnaKTbOpHbHa 6ypaHbI3.
Waora KemeKwI 3aTbI KypblfBbHbI iwihe TikeNei EUKKAwAH KyIOWB60MaHbI3.
Wiaora komeki 3aTTbH mIwepih pettey
Kentipy HETnKecine ToIbIbIme KaHaFAT 60JMaCaHb3, KOJaHbIaTbIH Waiora KEmekui 3aTbIH MeIWeepiH peTeyiH3re 6oIaIbI. MIIeepney petteriiin (F) anDbIH ana opHaTbIraH 6 no3uHbIH 6ipHe 6ypaBUnneh 6ypaH3 (aDenki no3uH4 4-Ke KOJIbIraH):
- bɪdɪc-ərɪkTæ cbɪ3bɪKtap 6ap 6oɪca, petTey Kɪpɑnɪh TemeHipeK caɪfə opHaTbɪHbɪ 3 (1-3).
bIbIc-aIKaTa cy TamMbInapbI KaIca Hemece uKn aKrTaIraHHaKeiIH KAK DaKTapbI 6ap 6oNca, peTteriWti Xofapbpak caHa opHaTbHbI3 (4-6).
Cydbin KaTbInbIfbIn Ophaty
Op6ip bIbIC Kyy MaunHacbl, dIOn c0bl KpybIbI TyPihe apHaIraH Ta3aIaNfAH T3dbI NaIaIaHa OTbIpbIN bIDc-AaKTbl Kyy yuiH naIdaIaNbIaNbIH KaKcbIc cybl KaMTaMaCbI 3 eTeTih cy KymcapTkblbIMeH ka6blkTaJaBl.
ByI bIbIc Kyy MaunHacbl KoppaHaH opTaHbI nactaybl a3aIyFa
KEMekTecetIH npaMeTpI yCbHaNbJx He MekeHHi3deri cyblH
KaTbIbIbHbH deHreIne cKeC Kyy eHIMdINIH OHtaNanBbPaBl.
ByI aknapaTbI yHjare cy KeTKi3eTI H MekeMeDeH anya 60anaBl.
- EciKti aubin, KpybIbfHbI KOCy yuH KOCY/OLIPY TymeciH 6acbIHb3.
-Kaketti KaTbIbIKdeHreHHe XeTeKHeUe P TyMecin BacIn, WAmameH 5ceyHcYCTan TpybHb3; ekiBcKa CnHaN ecTineJxHe OPhaTbIFa KaTbIbIK CaHbI DnCnneJe 6aay XbIbIK TaNdb (CyblXMCapTy
Xymei MbHa CaHFA opHaTbInFaH:3).
-KaKETTI KaTbIbIK DeHreIHe XeTeKeHJIe P TYMecIH KaITa-KaITa 6acbIb3 (1-2-3-4-5* Cy kammblbirfbHbIH KecmecIH KapaHb3).
-Функцядан wbyf yuih wamamen 6iphewe ckyHd kyTih3 Hemece 6aca onuia Tynmeepinih biipin bacbHb3, *bomaca, KpybInfbHbI eWIPy yuih KOCY/EWIPY Tymecin 6acbHb3.
Tinti 6ipHewe fynKuncaBb 6ap Ta6neKaIapDbk KondaHcAhb3 Da,Ty3 DnCneHcepi TOnTbIpbIybl Tnic.
| Су катылбийн kecteci | Туз koHTeHneHepiHn сылмдылбийн opTaша Мерзimi** | |||
| Денгел | dHfHMMоьl | bIaI | ||
| 1 | 0-6 | 0-10 | 0-1 | 7 aI |
| 2 | 6-11 | 11-20 | 1,1-2 | 5 aI |
| 3 | 12-17 | 21-30 | 2,1-3 | 3 aI |
| 4 | 17-34 | 31-60 | 3,1-6 | 2 aI |
| 5* | 34-50 | 61-906 | 1-9 | 2/3 anTa |
| 0°F men 10°F apaылбийн мeндер ушIутзdi KoПДану усынлбийд....* 6yInapaMeTp uклдарын МерзIMIN сал узартуbl МУМКИ. ** KUHIne 1 Jxuу Uклbl. | ||||
(^ dH = 蕴pMaH d e p e k e e i i i i i i i i i i i i i i i i i i i i 1 ) dapekepeiHde eneHre KaTbIbIK - MMoNb/ = 6 ip nItpderiMNIIIMMOB)
Ta3aHaHFaH Ty3dbI eJlwey
Kyy uiklbH KOndahyda bapbHua Jxakcb HTeNkere KOn JeKeTki3y yuiH, dncneHcep eukaWan 6oc 60MaNTbHbH KaMTaMacbi 3 etIH3. Ta3anaHaF an 3 cybl KaKaTaH Ta3anaJbI, OcbIaNbI bIDbc-AaKaTa tyh6anapdbn naJa 60nybHa kon 6epMeiDi.
Ty3 DnncneHcepbiDbcIyMyMaunHacbHbH TEmeHI6eniriHde opHaIacKaH(《CnataTama》6eimH KapaHb3)XeHEMbHa KaFaInapTaTOnTbPbNyblTnic:
Kacbl KanTkb T3 DncnEhcepH yCTiHeH Kaaf Hapa Kepih6eHTIN Ke3ne.
T¥3A3* INHДИΚAΤΟ ΦΑΜβI 6açapу TaKTaCbHda/DɪncnneJdeKaHfAH Ke3nde;
- TemeHri TaTnAbHb WbIFapBn aIbIN, KOthEnHep KaKaNafBn 6ypan WbIFapBn aJIbHb3 (caraT tiniHe Kapcbi 6aftTTa).
- Myhbl biipinpiet opbHaFaH Ke3e: cy bIbIcbH IeTIHe DeIH ToTbIPbIHbI3.
- BopoHkaHbI opHaJacTbIpbIn* (cypeTTI kapaHbI), Ty3 KOtHeHepiH WeTIhe DeIH
TOnTbIpbHbI3 (on JAmamEn 1 KcBHybpyb Tnic);6pa3 cydbH aBIn KeTy KaJIbITbJkaFdai.
- BopohkaHbI anbln Tactan*, TecikTeH ty3 kaIbIKapbH cyptin anblHbI; KaKakTbI cy aflbHbI actbHaDa IaMlbHbI Da, KaKakTbIH TeMeHJXaBlnDaBf JyUdbI nllHHer Tep KektkeH cy aflbN KeTyI yUinh, 6etH TeMeH KapabH b6paHbI. (Kacbln KaIbIcblb Sap ty3 KaKnaB)
KoHTeHepre ty3 KocKaH caBbH 6yI npOueDypaHbI opbHaFaH xH.
KyyuikblbapbcibHda KOHTHeHepRe KYfbl3aTkipin KeTneiHdeKaTnakMbIKtan Ka6bnFaHbHaKe3KeTk3ihj3 (aHTnce, cy KymCapTkblbIeKHeHdyeKeJMeHtIHde6y3bIyblMYMkiH).
Kaket Ke3e, Kyy uikbHaH 6ypbIH Ty3bl eIiwn anbHb3, coaia T3 dncneHcepHeH WbIKKaH Ke3 KeJIReH Ty3 epiriHici KObIaBbl.
*TeK Kei6ip yIrrinepe 6ap.
Kytim KopceTy XaHe TexHnKaJIbIc
KbI3MeT KOpCeTy
Cy MeH TOKTbI eWipy
Cy afbin Ketneyi yuhi ep6ip kyy uKlbHAn KeiH cy wymerih kaybin OTbipbl3.
KypblfblHb Ta3anaFAH Ke3de XeHE TexHNKaIbIK KbI3MET KepcTeY KymbICTapbiH opbiHaF Ke3de OHb TOKtAH axkbpTaHbI3.
blbcjyyMaunHacbInTa3anay
KpybIyfbHbH cbIpykbI 6eTepi Meh backapy TaKtaBcH cyMeH bIFaHaHaH, a6pa3nBTi emec wSybepeKeH Ta3aayra 6oana. EpiKlWTePdI Hemece a6pa3nBTi eHiMdePdi KOnJaHa6aHb13.
KypbIbHbIH iuiHdi Ke3 KeiReH canTak i3epdi CymeH xHe a3dAn cipKeMeH bInFaIaHaHaH Iy6peKeH eKtipyre 6oIaIbI.
Xaftbimcbi3 niCTepin aIdbin any
KypbifhbiH iui DmKBnDaHIn Ketneyi yuH OHbH ecirH epaibim bipa3 aubin ycTaHb3.
EciakaiHaIacbHdaBf6eKITkiTepMeJkyfb3aT DnCHeHcepIepMep3imDITpydBanYbKaMeH Ta3anAn OtbpHb3.MyHbH HeTVKeciHde 6eKITkiTepDe TAmK TypbN KaImaDb, aI 6yJkaFdJ KafbIMcbN icTepeHn NaDa 6onybHbH Herizri ce6e6i.
To3aHdaTkbIe 3ekwepepi Ta3anay
TamaKaIbIKTapbTo3aHdaTkbiE3eKwenepein6etHe KaTbIN KaBbIN, cywaataBH TecikTeepi 6iteyi MymkiH CoHbIKTaH, e3eKwenepei MepImDi Typde Tekcepin, MetaIcbl3 uETkAmeh Ta3aJahbIn TyPfAhbIXeH.
Eki to3aHaTbIi e3eKWeHi de wblapbn anyfa 6oJabl.
Korapfbl To3aHdaTkbW e3eKwHei WbIfapbn any ywiH KynbINTay CaKnHaCbH Cafat Tinihe Kapcb6aftta 6paHb3.
KorapfTo3aHdAe3KHeI TecikTePH KORAPb KaPAtBn KaTadaH OphHa KO Kepek.
TeMeHri To3aHdTaKbIe3EKeUeHi Kofapbl Kapai TapTy apKbInbl WbIfapbl anyFa 60JaBl.
Cydibn kipic cy3ricin Ta3anay\*
Cy tyiktepi kaha Hemece y3ak yakbl 60bki KOnlaHbIMaHa 6oIca, kAnfamac 6ypbih Onap apkbl cy etki3in, ta3 apei iuiHne kaNbIKTap kOK eKehiHe ke3 keTki3iH3. Byn caKtbik 1wapacbi opbHdAmaca, cybH Kipic 6iteni, bDbc Jyy MaunHacbi 3akbIMdaNybl MyMKIH.
A Ljymek XaBbHdaBc cydbH Kipic cy3rici H Mep3imdi Typed Ta3anan OTbIPbHb3.
-CyIyMeryHka6bHb13.
-CydbiKipicTyirihWetIH6ocatbInanbHb3,OaHKeHH cy3riHi anBn,OHcy afbHbActbHdaXakcbinan Ta3anaHb3.
-Cy3rHiOpHbHaKoBIn,CyTyTirHInOpHbHa6paHa3.
Cy3rinepdi Ta3anay
Cy3ri KINHArbl Cybl TaMaK KaNDbIKTapbIH Ta3aIaNbIH KHe OdaH KeiH Cybl KaT a HAnNbIpTaBH Yw Cy3rIeH TypaBb. 2p6ip Kyyda eH KAcBb HEtNkere KoJ KETKI3riH3 KeNce, Onapbl Ta3anay KepeK.
Cy3rinepdi Mep3imDi Tpyde Ta3an OTabpbHbI3.
Ablbc kyy MaunacbH cy3rici3 Hemece cy3ri 6ocan KeTKeH Ke3de naJaIaNHyfA 60MaJdbI.
Biphewe pet KyaHann KeiH, cy3ri XnHaBbH TeKcePiH3 XaHe KaKeT 6oNca OHbI MetaCbI 3 1eTKaMeH epi TEmeHderi HcaynapdbOpbHdAn OTbIPbIn, cy aRbHbI actbHda XaKcbIan Ta3anaHbI3:
- LInnHpNik C cy3ricin caF TiniHe KapcbI 6aftTa 6ypaHb3 da, cybpH anbHb3 (1-cypet).
- 甲HbIaR B cy3ricin kneKTepi a3an 6acy apkblb WbIFapbl anbHbI3 (2-cypT).
- Tot 6acnaiBtBn 6oNt TiniMWe A cy3riciH cybipbn anbHbI3 (3-cypet).
- Ty3akblkapan WbIfbHb3 da, Ke3 KeIReH TaMaK KaJIbIKTapbIHah Ta3apTbHb3. Kyy UKNJIbIHc COPfbcIH ELKAWAH ANYWb1 BOJMAHbl3 (4-cypet).
Cy3rinepDi Ta3aJanaFHHa KeiH, cy3ri XnHaBbH opHbHa KOybln OHbI dypbCTan 6ekiriH3; BybIbIC Kyy MaunHacbHbH TImdi Kymblcbl yuH eTe MaHb3bl.
MaunHaHbI y3aK yaKbIT naJaIaN6ayFa KaIDbipy
KypbInFbHbTOKTaH aFbITbIN, cy WyMerIH KaabHbI3.
KypbInfbecirihcaneaibkkandbipbHb3.
KaTbIn KeIReH Ke3Je, bIbIC Kyy MaunHacbH 6oc yctan Kyy cIKbIH iCke KocbiHbI3.
- Tek kei6ip yvnirinepe 6ap.
KZ
A Byn Kpybnfbl afbMdafl xanbikapabnk Kayinc3iK cTahdaptTapaHa caN KpybnfHa XeHe eHidipinre. TeMeHderi aknapaT kayinc3ik MaKaTaBnDa 6epinre, coHdbkTaH OHbl MYKNRT OKbl WbIFy KaXeT.
XaJIbI kayinci3ik
- BykpybIbIkyainic3ikTepiHe kayanTbI aam KpyblfHbI KondaHy BoBbHua KeHec He Hcyay bepMerer XaFdaJa, deHe, ceiHy hemece on Kabineti TEmeH hemece taXipn6eci Meh 6iniMi XekTkiikci3 aamdapMeH (ObIH iWihde 6aanapMeH) kondaHbIyfa apHaJmaFaH.
- BaIanap KypbIINFBImeH OIHAMaybI yWIn ONAPDbI 6akblay KepeK.
Kypblfbyne KOnJaHyra apHaIraH,Ohbl KomMepnraBik Hemece eHdiPictIK TyPbda KOnJaHyra 60MaJbI.
Kypblfbyyderibidc-aykTbOCbHcyKayltarblHYckaynapfa cKeec xyy yinhepeceKaamdapmeKoandaHbinyf aphanrah.
Kabik Kep 60nca da, Kpbilfihb cbiPTa konlaH6ay kaxeT. Kpbilfihb XaybiH MeH Hau3aaf aCTbHda Kaandbye tKayinti
KanaaKa6 BonFaH Ke3e KypbIITbIfa TImeHi3.
KpybIfblHbEwipreHeWTeNcBdkyUbIxeni po3kacbHaH epdaibm axbipaTbHb3, KaebJeH TapbIn cybpMaHb3.
KypbIbHbTa3aHaMaH HeMece Ke3 KeJIreH Kbl3MeT KepeCteTy XyMbIcBH OpbIHdAmac 6ypbIH cy WymerH Xaoby XeHe aBipDbIp03eTKaDaH arby KepeK.
KypbInfbl 6y3blnIn Kanca, eW6ip JkaFda Ea 36BtiH36e HKeHDey MaKcatbHa iUki 6nikTepre TnOwi 6oMaHbI3.
Kb3dbipy b9nirHe ekwaaan TtHoi 60ImaHbI.
KypblfnbHbH aBbK ecirihe cyneH6eH3 Hemece oAH OTbIPMaHb3: 6yn KypblfnbHb aydpabn Tyci MmKiH.
EciKti aushk kaIbIpbIn KeTyre 60ImaIbI, ce6ebi on Kayinti kepepri 60bn Ta6blnabI.
Kyfb3aTneHwaIora KEmeku3aTTb6anapdah aynaK yCTaHbl3. - OpaMa MaTePnAblb H OblHlBk peTInDe KOnJaHyFa 6oImaMdbI.
KoBicKaTacTay
- OpaMa MaTePnAnDapbIH KOKbIcKa TAcTay: opaMaHbIH KaTaNanDaNaHbIybl MyMKiH 6oNaTbIHdai XeprinikTi 3aHdbi KaDaranaHbI3.
3NeKtp XeHe 3NeKTPoHnKaIbIK KypaIapDbIH KaIbIKTapbHa (WEEE) KaTbcTb 2012/19/EC Eypona 3aHaMaCbHa cKeC yKypblfBnapbl KaNbITb ToNbIK KaIaNbIK KaIbIK aHaJIbIMbIH naJaIaNbIN KOblImaybi Tnic. KopuaFaH opTa MeH XaIbIK DeHCayblfBaHt TneTIH 3nHaHHbIH aIbIH aHa OTbIPbn, KApamCbI3 KypblfBnap KaTt NaIaNalHy MeH MaunHa iHiDeri MaTePnAndapDbEhDey KyHbIH OHtaJnAHHby PmKcTaBHa da 6eJek XInHaNybl Kepek. BaplbK eHIMepderi cb3blrHan KOKbcXewiri eHim NeciH HBeJeKTeJIreH KOBIC XInHayfa KaTbCTb MiHdetIH ecke caNaIbI.
Yi KpybIbnIapbIH TnictI Typde KOkbIcKa Tactay TypaIbIKcbIMua aKnapaTany yuiH ne aamdap Tnicti MeKemere Hemece Jepriikti KpybIbnI caTyUbIcbHa xaabnpacybl MyMKH.
KyaattbI yHemdey XaHe KOpwaFaH opTaHbI KypMeTTey
Cy meh KyaattbI yHemdey
bIdbc Kyy MaunHacbl Tonrah Ke3de faha Kyy cKnbln bactaHb3. bIdbc Kyy MaunHacblHbIn TonybH KyTy 6apbcHda Jxafmbc3 niTeprin andbH any ywiH Cyra canbin KOU KKnbln KondaHbHb3 (Kyy cKnnapbl) 6enim HkapaHb3).
Kyy uKnnpabHbH KecTecH naDanaHa OtbpBIn, bDbc-aRk TypHe XeHe NaCTaHy dApexKeciHe KonaNbl Kyy uKnbl H TaHdAHB3:
- Optawa nactaHfah bIdicTap yuih 3Ko Kyy uKnbln naJaIanaHbIHbI3, on Kyat neH cydbH TeMeH deHrei KOJaHaBnTaHbHkAMTaMaCbI3 eTeJI.
- Kytey eTteriH a3bIpaK 60nca, KapIbnai Kytey onuIcBih* KOJaHbHbI3 («Icke Kocy XeHe naJaHaY» 6enimH kapaHbI3).
Erep Tok KeTki3y Kenicim-WaptbHda TokTbI yHemdeyea apHaHanfah yaKbIT apaIbIKTapbI 60nca, TeMeH 6afa KOnDaHbIaNtBn Ke3De Jyy uKnDapbH opbIHdHi. KeuikTipin 6actay Tymeci (《ICke Kocy XeHe naIdaNHy》6enimin KapaHbI3) Jyy uKnDapbH TnicTi Typde YnbIMdaCTbIpYfa KEmekTeceDi
Oocpat neH xIopdbI KaMTbImaHTbIH, KypambIHda cepMeHTepi 6ap xyfbiu 3aTAP
Positioning and levelling
Connecting the water and electricity supplies
Advice regarding the first wash cycle
Technical data
Ecodesign Regulation
Description of the appliance, 32
Overall view
Control panel
Loading the racks, 33
Lower rack
Cutlery basket
Upper rack
LST 5337
Start-up and use, 34-35
Starting the dishwasher
Measuring out the detergent
Wash options
Wash cycles, 36
Table of wash cycles
Rinse aid and refined salt, 37
Measuring out the rinse aid
Measuring out the refined salt
Care and maintenance, 38
Shutting off the water and electricity supplies
Cleaning the dishwasher
Preventing unpleasant odours
Cleaning the sprayer arms
Cleaning the water inlet filter
Cleaning the filters
Leaving the machine unused for extended periods
Precautions, advice and Assistance, 39
General safety
Disposal
Saving energy and respecting the environment
Assistance
Troubleshooting, 40
EN
A Keep this instruction manual in a safe place for future reference. If the appliance is sold, given away or moved, please ensure the manual is kept with the machine, so that the new owner may benefit from the advice contained within it.
A Please read this instruction manual carefully: it contains important information regarding the safe installation, use and maintenance of the appliance.
If the appliance must be moved at any time, keep it in an upright position; if absolutely necessary, it may be tilted onto its back.
This appliance is intended to be used in household and similar applications such as:
- staff kitchen areas in shops, offices and other working environments;
-farm houses;
- by clients in hotels, motels and other residential type environments;
- bed and breakfast type environments.
Positioning and levelling
- Remove the appliance from all packaging and check that it has not been damaged during transportation.
If it has been damaged, contact the retailer and do not proceed any further with the installation process. - Check the dishwasher by placing it so that its sides or back panel are in contact with the adjacent cabinets or even with the wall. This appliance can also be recessed under a single worktop* (see the Assembly instruction sheet).
- Position the dishwasher on a level and sturdy floor. If the floor is uneven, the front feet of the appliance may be adjusted until it reaches a horizontal position. If the appliance is levelled correctly, it will be more stable and much less likely to move or cause vibrations and noise while it is operating.
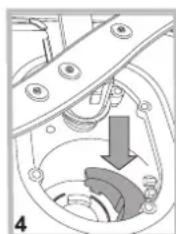
- Adjust the height of the rear foot from the front of the appliance* on the central lower part of the dishwasher, turning a hexagonal spanner (red color) with an opening of 8mm in a clockwise direction to increase the height or in an anticlockwise direction to decrease the height.
Connecting the water and electricity supplies
A Connection to the water and electricity supplies should only be performed by a qualified technician.
The dishwasher should not stand on top of the water hoses or the electricity supply cable.
The appliance must be connected to the water supply network using new hoses.
Do not use old hoses.
The water inlet and outlet hoses and the electricity supply cable may be positioned towards the right or the left in order to achieve the best possible installation.
Connecting the water inlet hose
- To a suitable cold water connection point: before attaching the hose, run the water until it is perfectly clear so that any impurities that may be present in the water do not clog the appliance; after performing this operation, screw the inlet hose tightly onto a tap with a 3/4 gas threaded connection.
- To a suitable hot water connection point: your dishwasher may be supplied with hot water from the mains supply (if you have a central heating system with radiators) provided that it does not exceed a temperature of 60^ .
Screw the hose to the tap as described for connection to a cold water supply.
A If the inlet hose is not long enough, contact a specialist store or an authorised technician (see Assistance).
The water pressure must be within the values indicated in the Technical data table (see adjacent information).
The hose should not be bent or compressed.
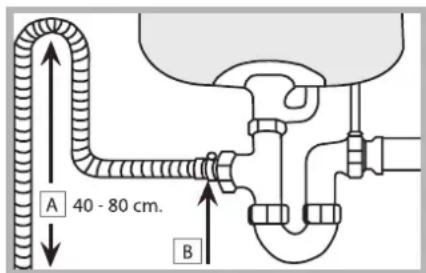
Connecting the water outlet hose
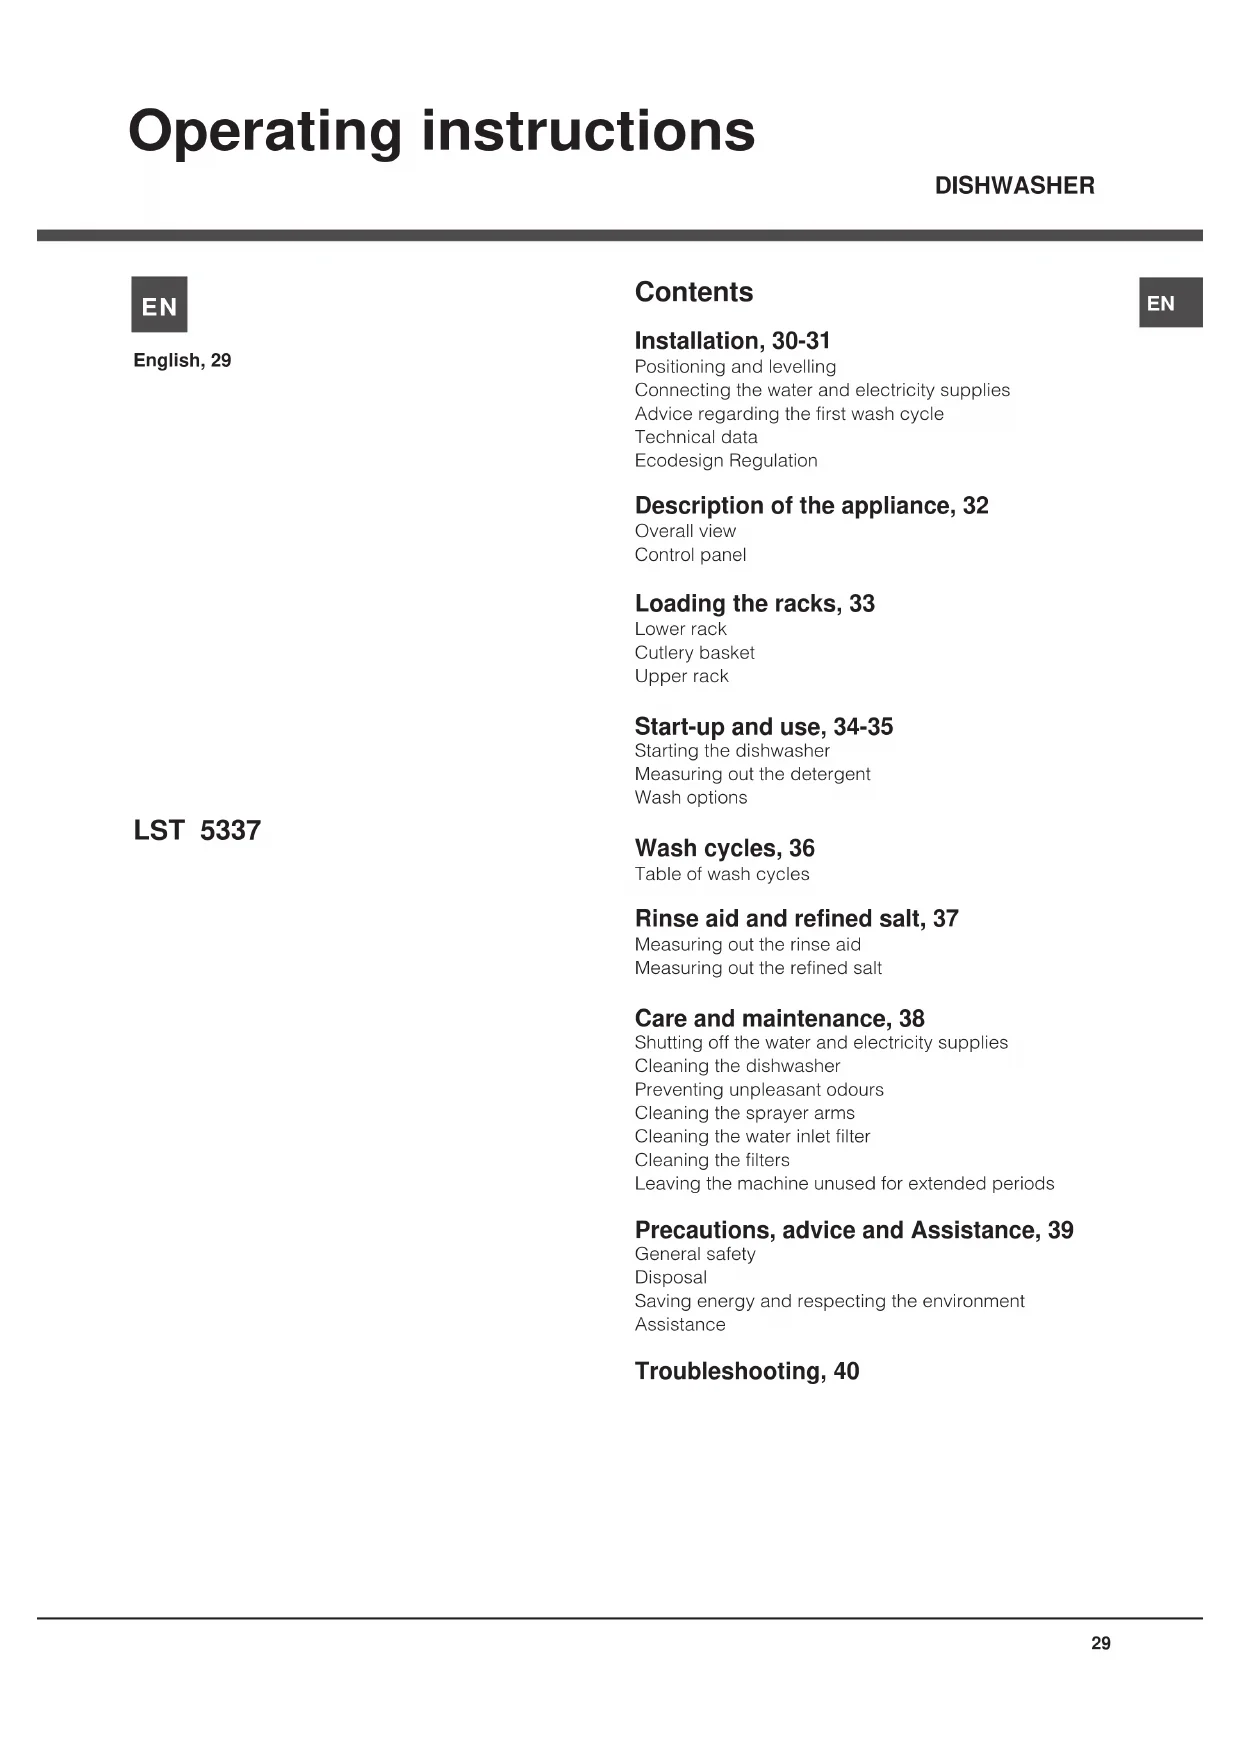
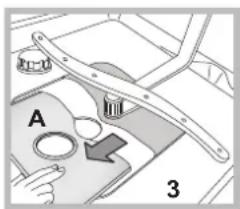
Connect the outlet hose (without bending it) to a drain duct with a minimum diameter of 4cm .
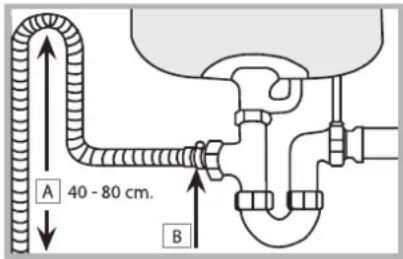
The outlet hose must be at a height ranging from 40 to 80 cm from the floor / surface where the dishwasher rests (A). Before connecting the water outlet hose to the sink drain, remove the plastic plug (B).
Anti-flooding protection
To ensure floods do not occur, the dishwasher:
- is provided with a special system which blocks the water supply in the event of anomalies or leaks from inside the appliance.
Some models are also equipped with the supplementary safety device New Acqua Stop*, which guarantees anti-flooding protection even in the event of a supply hose rupture.

WARNING: HAZARDOUS VOLTAGE!
Under no circumstance should the water inlet hose be cut as it contains live electrical parts.
- Only available in selected models.
Electrical connection
Before inserting the plug into the electrical socket, make sure that:
The socket is earthed and complies with regulations.
- The socket can withstand the maximum appliance, which is indicated on the data plate located on the inside of the door (see chapter entitled Description of the appliance).
- The power supply voltage falls within the values indicated on the data plate on the inside of the door.
- The socket is compatible with the plug of the appliance. If this is not the case, ask an authorised technician to replace the plug (see Assistance); do not use extension cables or multiple sockets.
Once the appliance has been installed, the power supply cable and the electrical socket should be easily accessible.
A The cable should not be bent or compressed.
A If the power supply cable is damaged, it must be replaced by the manufacturer or its Technical Assistance Service in order to prevent all potential hazards. (See Assistance)
The Company shall not be held responsible for any incidents that occur if these regulations are not observed.
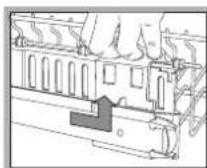
Anti-condensation strip*
After installing the dishwasher, open the door and stick the adhesive transparent strip under the wooden shelf in order to protect it from any condensation which may form. current
Advice regarding the first wash cycle
After the appliance has been installed, immediately before running the first wash cycle, completely fill the salt dispenser with water and add only then approximately 1kg of salt (see chapter entitled Rinse aid and refined salt). The water may overflow: this is normal and is not a cause for concern. Select the water hardness value (see chapter entitled Rinse aid and refined salt). - After the salt has been poured into the machine, the LOW SALT indicator light* switches off.
If the salt container is not filled, the water softener and the heating element may be damaged as a result.
| Technical data | |
| Dimensions | width 44.5 cm height 82 cm depth 57 cm |
| Capacity 10 standard place-settings | |
| Water supply pressure | 0,05 ÷ 1MPa (0.5 ÷ 10 bar) 7,25 - 145 psi |
| Power supply voltage See appliance data plate | |
| Total absorbed power See appliance data plate | |
| Fuse See appliance data plate | |
| CE | This dishwasher conforms to the following European Community Directives: -2006/95/EC (Low Voltage -2004/108/EC (Electromagnetic Compatibility) -2009/125/EC (Comm. Reg. 1016/2010) (Ecodesign) -97/17/EC (Labelling) -2012/19/ EC (Waste Electrical and Electronic Equipment WEEE) |
ECODESIGN REGULATION
ECO wash cycle is the standard cycle to which the energy label data refers; this cycle can be used to wash crockery with a normal soil level and is the most efficient in terms of energy and water consumption for this type of crockery. To reduce consumption even further, only run the dishwasher when it is full.
Standby consumption: Left-on mode consumption: 3 W - Off mode consumption: 1,3 W
Consumption data table for the main cycles
| Standard conditions*User conditions** | ||||||
| Energy consumption (kWh/cycle) | Water consumption (l/cycle) | Duration (min/cycle) | Energy consumption (kWh/cycle) | Water consumption (l/cycle) | Duration (min/cycle) | |
| INTENSIVE | 1,25 13 150 1,05 13 140 | |||||
| NORMAL | 1,00 13 115 | 0,90 13 110 | ||||
* Cycle data refers to the values recorded in a laboratory, in accordance with European standard EN 50242.
** Data is obtained by recording values when the appliance is operational and loaded with user crockery.
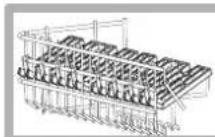
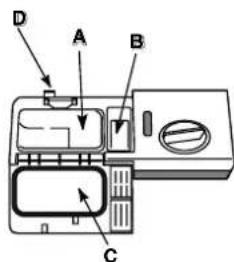
Description of the appliance
EN
Overall view
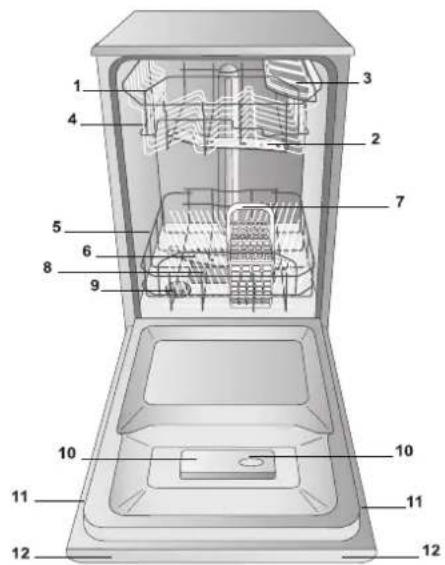
- Upper rack
- Upper sprayer arm
- Tip-up compartments
- Rack height adjuster
- Lower rack
- Lower sprayer arm
- Cutlery basket
- Washing filter
- Salt dispenser
- Detergent and rinse aid dispensers
11.Data plate - Control Panel***
Control panel
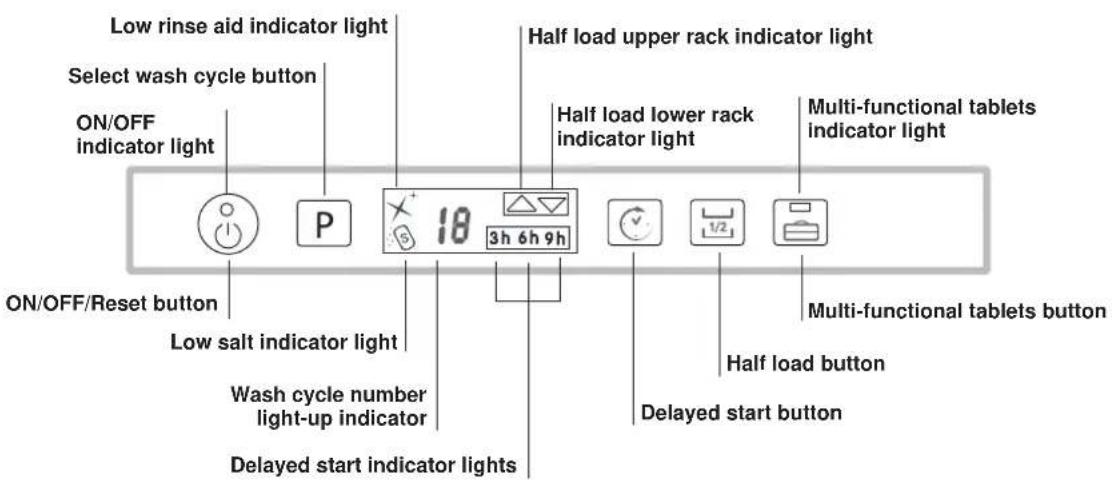
*** Only in completely built-in models.
* Only available in selected models.
The number and type of wash cycles and options may vary depending on the dishwasher model.
Before loading the racks, remove all food residues from the crockery and empty liquids from glasses and cups. Arrange the crockery so that it is held in place firmly and does not tip over.
After loading the appliance, check that the sprayer arms can rotate freely.
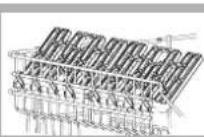
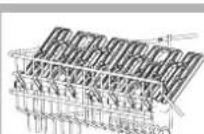
Lower rack
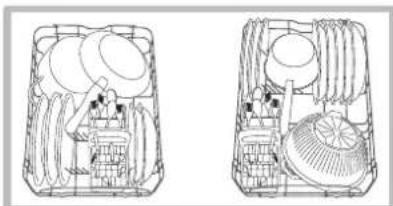
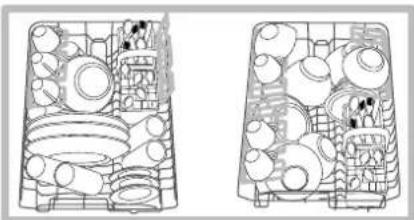
The lower rack can hold pans, lids, plates, salad bowls, cutlery, etc. as seen in the Loading examples.
Plates and large covers should be placed at the sides of the rack, ensuring that they do not block the rotation of the upper sprayer arm.
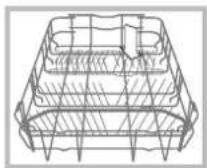
Some dishwasher models are fitted with tip-up sections, which can be used in a vertical position when arranging plates or in a horizontal position when arranging pans and salad bowls.
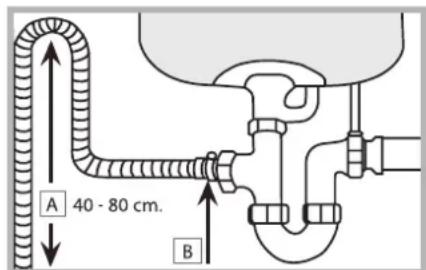
Cutlery basket
The type of cutlery basket may vary according to the dishwasher model: The cutlery basket should be positioned at the front of the lower rack, by sliding it between the fixed inserts, or on the upper rack when the half load option has been selected (in models featuring this option).

- It has a collapsible sliding system which means the cutlery can be arranged in the best possible way.
Knives and other utensils with sharp edges must be placed in the cutlery basket with the points facing downwards, or they must be positioned horizontally in the tip-up compartments on the upper rack.

Cutlery basket positioning examples
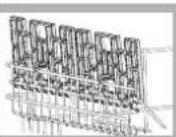
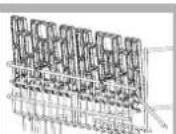
Upper rack
Load this rack with delicate and lightweight crockery: glasses, tea and coffee cups, saucers, small salad bowls, saucepans and small saucepans which are not too soiled, using the Loading examples as a guide.
- Mugs and cups, long sharp knives and serving utensils: place these on the tip-up compartments**.
Tip-up compartments with adjustable tilt*
- The tilt feature can be used to increase the space in the upper rack, to position wine glasses with different stem lengths safely and to improve drying performance.
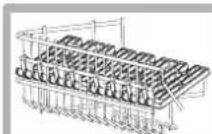
Tilt A
Tilt B
Tilt C
-Lift the tip-up compartment, slide it gently and position it in the desired tilt angle.
Adjusting the height of the upper rack
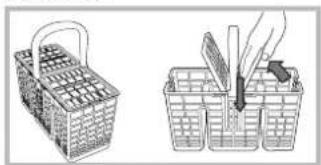
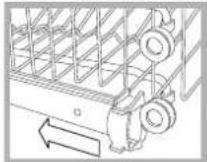
In order to make it easier to arrange the crockery, the upper rack may be moved to a higher or lower level.
The height of the upper rack should ideally be adjusted WHEN THE RACK IS EMPTY.
Never lift or lower the rack on one side only.

Open the left and right guide rail stops and pull out the rack; position it higher or lower as required, slide it along the guide rails until the front wheels are in place and close the stops (see figure).
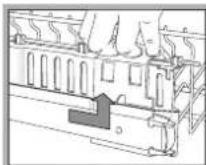
If the rack is fitted with "Dual Space" handles (see figure), pull out the upper rack until it reaches its stop point, grip the handles at the sides of the rack and move it upwards or downwards, then slowly let it fall back into place.
Loading examples for the upper rack
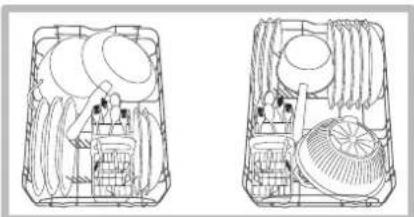
Loading examples for the upper rack
Items which should not be washed in the dishwasher
- Wooden items, objects with wooden or horn handles or glued on parts.
- Items made from aluminium, copper, brass, pewter or tin.
- Items made from plastic material which is not heat-resistant.
Antique or hand-painted porcelain.
Antique silver. Silver which is not antique may, howev be washed in the dishwasher using a delicate wash cycle, provided that it does not come into contact with other metals.
We recommend the use of crockery which is dishwasher safe.
EN
Starting the dishwasher
- Turn the water tap on.
- Open the door and press the ON/OFF button: you will hear a short beep and the display and option indicator lights switch on.
- Measure out the detergent (see below).
- Load the racks (see Loading the racks).
- Select the wash cycle in accordance with the type of crockery and its soil level (see Table of wash cycles), by pressing the P button.
- Select the wash options (see adjacent information).
- Start the wash cycle by shutting the door: a long beep signals the start of the wash cycle.
- Two short beeps and one long one indicate the end of the wash cycle and the wash cycle number flashes on the display. Open the door, switch off the appliance by pressing the ON/OFF button, shut off the water tap and unplug the appliance from the electricity socket.
-
Wait for a few minutes before removing the crockery, in order to avoid burns. Unload the racks, beginning with the lower level.
-
The machine will switch off automatically during certain periods of inactivity, in order to minimise electricity consumption.
AUTO WASH CYCLES*: this model of dishwasher is equipped with a special sensor which can be used to assess the level of soiling and automatically select the most efficient and economic wash cycle accordingly.
The duration of the auto wash cycles may vary due to the operation of the sensor.
If the crockery is only lightly soiled or if it has been rinsed with water before being placed in the dishwasher, reduce the amount of detergent used accordingly.
Modifying a wash cycle in progress
If a mistake was made during the wash cycle selection process it is possible to change the cycle, provided that it has only just begun: open the door, avoiding the escaping steam, and press and hold the ON/OFF button; the machine will switch off with a long beep. Switch the machine back on using the ON/OFF button and select the new wash cycle and any options desired; start the cycle by closing the door.
Adding extra crockery
Without switching off the machine, open the door, taking care to avoid the escaping steam, and place the crockery inside the dishwasher. Close the door: the cycle starts from the point at which it was interrupted.
Accidental interruptions
If the door is opened during the wash cycle, or if there is a power cut, the cycle stops. It starts again from the point at which it was interrupted once the door has been shut or once the electricity supply is restored.
Measuring out the detergent
A good wash result also depends on the correct amount of detergent being used; exceeding the stated amount does not result in a more effective wash and increases environmental pollution.
Only use detergent which has been specifically designed for dishwashers.
DO NOT USE washing up liquid.
Using excessive detergent may result in foam residue remaining in the machine after the cycle has ended.
The use of tablets is only recommended for models which offer the MULTI-FUNCTIONAL TABLETS option.
To achieve the best results from each washing and drying cycle, powder detergent, rinse aid liquid and salt should be used.
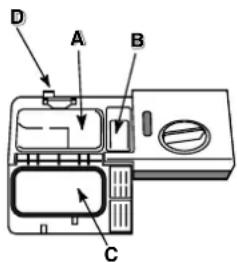
Compartment A: Washing detergent
Compartment B: Pre-wash detergent
- Open cover C by pressing button D.
- Pour in the detergent after consulting the Table of wash cycles:
- For powder detergent compartments A and B.
- For detergent in tablet form: when the cycle requires 1 tablet, place it in compartment A and close the cover; when it requires 2, place the second
tablet at the bottom of the appliance.
- Remove detergent residues from the edges of the compartment and close the cover until it clicks.
use
Wash options
If an option is not compatible with the selected was cycle (see Table of wash cycles), the corresponding LED flashes rapidly 3 times and 2 short beeps will sound.
Delayed start
It is possible to delay the start time of the cycle by 3, 6 or 9 hours.
- Press the DELAYED START button: every time it is pressed a buzzer sounds and the selected period of time is displayed.
- Select the wash cycle and shut the door: after the beep sounds, the timer begins counting down.
- Once this time has elapsed, the indicator light switches off and the wash cycle begins.
To adjust the delay time and select a smaller period of time, press the DELAYED START button. To cancel it, press the button repeatedly until the selected delayed start indicator light switches off. The wash cycle will start automatically as soon as the door is shut.
Half load using the upper or lower rack*
If there are not many dishes to be washed, a half load cycle may be used in order to save water, electricity and detergent. Select the wash cycle and press the HALF LOAD button repeatedly: the triangle corresponding to the selected load will illuminate and the wash cycle will take place only using the upper or the lower rack.
The Half load option is not compatible with the Rapid, cycle.
Remember to load the upper or lower rack only, and to reduce the amount of detergent accordingly.
Multi-functional tablets*
This option optimises washing and drying results. When using multi-functional tablets, press the MULTIFUNCTIONAL TABLETS button. The corresponding indicator light will illuminate. The "Multi-functional tablets" option results in the lengthening of the wash cycle.
A The MULTI-FUNCTIONAL TABLETS option remains set for subsequent wash cycles If it is not deselected.
The use of tablets is only recommended for models which offer the MULTI-FUNCTIONAL TABLETS option.
A This option is not recommended for use with wash cycles which do not specify the use of multi-functional tablets.
| Table of options | A B C | ||
| Delayed Start | Half Load Tabs | ||
| 1. Eco Yes Yes Yes | |||
| 2. Auto Normal Yes | Yes Yes | ||
| 3. Soak Yes Yes No | |||
| 4. Intensive Yes Yes | Yes | ||
| 5. Rapid | Yes | No | Yes |
| 6. Crystal | Yes Yes Yes | ||
| 7. Ultra Intensive | Yes Yes Yes |
For available OPTIONS please refer to the Table of options on the Start-up and use page.
The number and type of wash cycles and options may vary depending on the dishwasher model.
| Wash cycle selection instructions | Wash cycle | Detergent (A) = compartment A (B) = compartment B | Wash cycles which include drying | Options | Wash cycle duration (tolerance ±10%) Hrs. Min. | ||
| Powder | Liquid Tablets | ||||||
| Environmentally-friendly wash cycle with low energy consumption levels, suitable for pans and dishes. | 50eco1.Eco* | 25 g (A) | 25 ml (A) 1 (A) Yes A-B-C | 2:50' | |||
| Normally soiled pans and dishes.Standard daily wash cycle. | 2.AutoNormal Wash | 21 g (A)4 g (B) | 21 ml (A)4 ml (B) | 1 (A) Yes | A-B-C 1:50' | ||
| Pre-wash for dishes while awaiting completion of the load with the dishes from the next meal. | 3.Soak | No No | No No A-E | 0:08' | |||
| Heavily soiled dishes and pans (not to be used for delicate items). | 4.Intensive | 25 g (A) | 25 ml (A) 1 (A) Yes A-B-C | 2:25' | |||
| Economic and fast wash to be used for lightly soiled dishes. (Run cycle immediately after use) (2 plates + 2 glasses + 4 pieces of cutlery + 1 saucepan + 1 small frying pan). | 5.Rapid | 21 g (A) | 21 ml (A) | 1 (A) | No | A - C | 0:25' |
| Economic and fast wash for delicate items which are sensitive to high temperatures. (Run cycle immediately after use) (glasses upper rack + delicate plates lower rack). | 6.Crystal | 25 g (A) | 25 ml (A) | 1 (A) | Yes | A-B-C | 1:30' |
| Heavily soiled saucepans or pans with residual dried-on food. | 7.Ultra Intensive | 25 g (A)4 g (B) | 25 ml (A)4 ml (B) | 1 (A)1 (bottom of the appliance) | Yes A-B-C | 2:35' | |
Notes:
Optimum performance levels when using the "Rapid wash" cycle can be achieved by observing the maximum amounts of crockery specified.
To make it easier to measure out the detergent, it is worth remembering that:
1 tablespoon = 15 gr. of powder = approximately 15 ml of liquid - 1 teaspoon = 5 gr. of powder = approximately 5 ml of liquid
- The Eco wash cycle adheres to the regulation EN-50242. Although it has a longer duration than other wash cycles it uses less energy and is less harmful to the environment.
Note for Test Laboratories: for information relating to comparative EN testing conditions, please send an email to the following address: ASSISTENZA_EN_LVS@indesitcompany.com
Rinse aid and refined salt
Only use products which have been specifically designed for dishwashers.
Do not use table salt or industrial salt, or washing up liquid.
Follow the instructions given on the packaging.
A If using a multi-functional product it is not necessary to add rinse aid; however, we recommend that you add salt, especially if you live in an area where the water is hard or very hard. Follow the instructions given on the packaging.
A If you do not add salt or rinse aid, the LOW SALT and LOW RINSE AID indicator lights remain lit.
Measuring out the rinse aid
Rinse aid makes it easier for the crockery to dry, as water runs off surfaces more readily and therefore does not leave streaks or marks.
The rinse aid dispenser should be filled:
- When the LOW RINSE AID* indicator light on the control panel is illuminated;
3. Screw the lid back on.
- Open the dispenser by turning the lid (G) in an anticlockwise direction.
- Pour in the rinse aid, making sure it does not overflow from the dispenser. If this happens, clean the spill immediately with a dry cloth.
NEVER pour the rinse aid directly into the appliance tub.
Adjusting the amount of rinse aid
If you are not completely satisfied with the drying results, you may adjust the quantity of rinse aid used. Use a screwdriver to turn the dosage adjuster (F) to one of the 6 pre-set positions (the default position is set to 4):
- If there are streaks on the crockery, set the adjustment device to a lower number (1-3).
- If drops of water remain on the crockery or if there are limescale marks present after the cycle has finished, set the adjuster to a higher number (4-6).
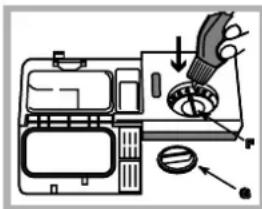
Setting the water hardness
Every dishwasher is equipped with a water softener which, by using refined salt designed especially for this type of appliance, supplies water without limescale which is then used to wash the crockery.
This dishwasher offers a setting which helps to reduce pollution and optimises washing performance in accordance with the water hardness level in your area. This information can be obtained from the organisation which supplies your household with water.
-
Open the door and switch on the machine by pressing the ON/OFF button.
-
Press the P button and hold for approximately 5 seconds; two short beeps will sound and the set hardness number will flash slowly on the display (the water softening system is set to number 3).
-
Press the P button repeatedly until the desired hardness level has been reached (1-2-3-4-5* see Water hardness table).
- To exit the function, wait a few seconds or press one of the option buttons , or switch off the machine using the ON/OFF button.
Even if using multi-functional tablets, the salt dispenser should still be filled.
| Water Hardness Table | Average salt container capacity duration** | |||
| Level °dH °fH mmol/l months | ||||
| 1 0 - 6 0 - 10 | 0 - 1 7 months | |||
| 2 6 - 11 11 | 20 1,1 - 2 | 5 months | ||
| 3 | 12 - 17 | 21 - 30 | 2,1 - 3 | 3 months |
| 4 | 17 - 34 | 31 - 60 | 3,1 - 6 2 months | |
| 5* | 34 - 50 | 61 - 90 | 6,1 - 9 | 2/3 weeks |
| For values between 0°f and 10°f, we do not recommend the use of salt. * this setting may cause a slight increase in the duration of the cycles. ** for 1 wash cycle per day. | ||||
(^ dH)= hardness measured in German degrees - ^ f= hardness measured in French degrees - mmol/l = millimoles per litre
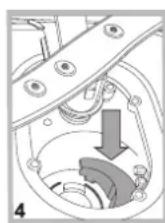
Measuring out the refined salt
In order to achieve the best possible results using a wash cycle, make sure that the dispenser is never empty. Refined salt removes limescale from the water, thus avoiding the formation of deposits on crockery.
The salt dispenser is located in the lower part of the dishwasher (see Description) and should be filled:
- When the green float cannot be seen by simply looking at the cap of the salt dispenser.
- When the LOW SALT* indicator light on the control panel is illuminated;
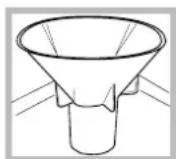
- Remove the lower rack and unscrew the container cap (anticlockwise).
- The first time you do this: fill the water tank right up to its edge.
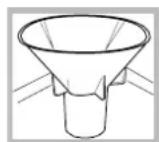
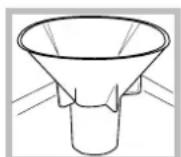
- Position the funnel (see figure) and fill the salt container right up to its edge (this
should hold approximately 1kg ; it is not unusual for a little water to leak out.
- Remove the funnel and wipe any salt residue away from the opening; rinse the cap under running water and then screw it on, the head facing downwards so as to let the water flow out of the four cracks which are arranged in a star shape on the lower part of the cap. (Salt cap with green float)
It is advisable to perform this procedure every time you add salt to the container.
Make sure the cap is screwed on tightly, so that no detergent can get into the container during the wash cycle (this could damage the water softener beyond repair).
When necessary, measure out the salt before a wash cycle so that any saline solution which has leaked out of the salt dispenser is removed.
- Only available in selected models.
Care and maintenance
EN
Shutting off the water and electricity supplies
- Turnoff the water tap after every wash cycle to avoid leaks.
- Alwaysunplug the appliance when cleaning it and when performing maintenance work.
Cleaning the dishwasher
- The external surfaces of the machine and the control panel may be cleaned using a non-abrasive cloth which has been dampened with water. Do not use solvents or abrasive products.
- Anymarkson on the inside of the appliance may be removed using a cloth dampened with water and a little vinegar.
Preventing unpleasant odours
Alwayskeep the door of the appliance ajar in order to avoid moisture from forming and being trapped inside the machine.
- Clear the seals around the door and detergent dispensers regularly using a damp sponge. This will avoid food becoming trapped in the seals, which is the main cause behind the formation of unpleasant odours.
Cleaning the sprayer arms
Food residue may become encrusted onto the sprayer arms and block the holes used to spray the water. It is therefore recommended that the arms are checked from time to time and cleaned with a small non-metallic brush.
The two sprayer arms may both be removed.
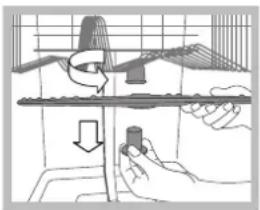
To remove the upper sprayer arm, rotate the locking ring in an anti-clockwise direction.
The upper sprayer arm should be replaced with the holes facing upwards.
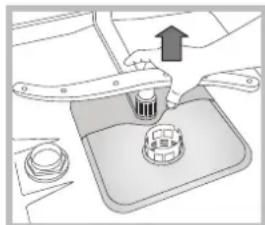
The lower sprayer arm may be removed by pulling it upwards.
Cleaning the water inlet filter*
If the water hoses are new or have not been used for an extended period of time, let the water run to make sure it is clear and free of impurities before performing the necessary connections. If this precaution is not taken, the water inlet could become blocked and damage the dishwasher.
Clean the water inlet filter at the tap outlet regularly. -Turn off the water tap.
- Unscrew the end of the water inlet hose, remove the filter and clean it carefully under running water.
- Replace the filter and screw the water hose back into position.
Cleaning the filters
The filter assembly consists of three filters which remove food residues from the washing water and then recirculate the water. They should be cleaned if you wish to achieve the best results in every wash.
Clean the filters regularly.
The dishwasher should not be used without filters, or if the filter is loose.
After several washes, check the filter assembly and necessary clean it thoroughly under running water, using a non-metallic brush and following the instructions below:
1. Turn the cylindrical filter C in an anti-clockwise direction and pull it out (fig. 1).
- Remove the cup filter B by exerting a slight pressure on the side flaps (fig. 2).
- Slide out the stainless steel plate filter A (fig. 3).
4.Inspect the trap and remove any food residue.
NEVER REMOVE the wash cycle pump (black detail) (fig. 4).
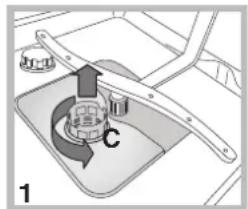
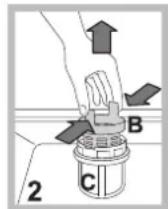
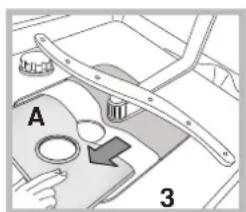

After cleaning the filters, replace the filter assembly and fix it in position correctly; this is essential for maintaining the efficient operation of the dishwasher.
Leaving the machine unused for extended periods
- Disconnect the appliance from the electricity supply and shut off the water tap.
- Leave the door of the appliance ajar.
- When you return, run a wash cycle when the dishwasher is empty.
* Only available in selected models.
Precautions, advice and Assistance
This appliance was designed and manufactured in compliance with current international safety standards. The following information has been provided for safety reasons and should therefore be read carefully.
General safety
- This appliance is not intended for use by persons (including children) with reduced physical, sensory or mental capabilities, or lack of experience and knowledge, unless they have been given supervision or instruction concerning use of the appliance by a person responsible for their safety.
Children should be supervised to ensure that they do not play with the appliance.
The appliance was designed for domestic use home and is not intended for commercial or industrial use. - The appliance must be used by adults only, to wash domestic crockery in accordance with the instructions in this manual.
- The appliance must not be installed outdoors, covered areas. It is extremely dangerous to leave the machine exposed to rain and storms.
- Do not touch the appliance when barefoot.
- When unplugging the appliance always pull the plug from the mains socket, do not pull on the cable.
- The water supply tap must be shut off and the plug should be removed from the electrical socket before cleaning the appliance or carrying out any maintenance work.
- If the appliance breaks down, do not under any circumstances touch the internal parts in an attempt to perform the repair work yourself.
- Never touch the heating element.
- Do not lean or sit on the open door of the appliance: this may cause the appliance to overturn.
- The door should not be left open as it may create a dangerous obstacle.
- Keep detergent and rinse aid out of reach of children.
The packaging material should not be used as a toy.
Disposal
- Disposal of packaging materials: observe local legislation so that the packaging may be reused.
The European Directive 2012/19/EC relating to Electrical and Electronic Equipment (WEEE) states that household appliances should not be disposed of using the normal solid urban waste cycle. Exhausted appliances should be collected separately in order to optimise the cost of re-using and recycling the materials inside the machine, while preventing potential damage to the atmosphere and to public health. The crossed-out dustbin is marked on all products to remind the owner of their obligations regarding separated waste collection.
For further information relating to the correct disposal of household appliances, owners may contact the relevant public authority or the local appliance dealer.
Saving energy and respecting the environment
Saving water and energy
- Only begin a wash cycle when the dishwasher is full. While waiting for the dishwasher to be filled, prevent unpleasant odours using the Soak cycle (see Wash cycles).
-
Select a wash cycle which is suited to the type of crockery and to the soil level of the crockery using the Table of wash cycles:
-
For dishes with a normal soil level, use the Eco wash cycle, which guarantees low energy and water consumption levels.
- If the load is smaller than usual activate the Half load option (side set start-up and use).
- If your electricity supply contract gives details of electricity saving time bands, run wash cycles during the periods when a lower tariff is applied. The Delayed start* button (see Start-up and Use) helps you organise the wash cycles accordingly.
Phosphate-free and chlorine-free detergents containing enzymes
- We strongly recommend that you use detergents that do not contain phosphates or chlorine, as these products are harmful to the environment.
- Enzymes provide a particularly effective action at temperatures around 50^ , and as a result detergents containing enzymes can be used in conjunction with low-temperature wash cycles in order to achieve the same results as a normal 65^ wash cycle.
- To avoid wasting detergent, use the product in appropriate quantities based on the manufacturer's recommendations, the hardness of the water and the soil level and quantity of crockery to be washed. Even if they are biodegradable, detergents contain substances which may alter the balance of nature.
Assistance
Waste Before contacting Assistance:
- Check whether the problem can be resolved using the Troubleshooting guide (see Troubleshooting).
- Restart the programme to check whether the problem has ceased to exist.
If the problem persists, contact the Authorised Technical Assistance Service.
Never use the services of unauthorised technicians.
Please have the following information to hand:
The type of malfunction.
The appliance model (Mod.).
The serial number (S/N).
This information can be found on the appliance data plate (see Description of the appliance).
EN
Whenever the appliance fails to work, check for a solution from the following list before calling for Assistance.
| Problem: Possible causes / Solutions: | |
| The dishwasher does not start or cannot be controlled | Switch off the appliance by pressing the ON/OFF button, switch it back on after approximately one minute and reset the program.The appliance has not been plugged in properly.The dishwasher door has not been shut properly. |
| The door won't close | The lock was released. Strongly push the door until a "clacking" noise is heard. |
| No water drains out from the dishwasher. | The dishwasher cycle has not yet finished.The water inlet hose is bent (see Installation).The drain duct is blocked.The filter is clogged up with food residues. |
| The dishwasher makes excessive noise. | The dishes are rattling against each other or against the sprayer arms.An excessive amount of foam has been produced: the detergent has not been measured out correctly or it is not suitable for use in dishwashers (see Start-up and use). |
| The dishes and glasses are covered in a white film or timescale deposits. | The level of the refined salt is low or the dosage setting is not suited to the hardness of the water (see Rinse aid and salt).The lid on the salt dispenser is not closed properly.The rinse aid has been used up or the dosage is too low. |
| The dishes and glasses are streaked or have a blulsh tinge. | The rinse aid dosage is too high. |
| The crockery has not been dried properly. | A wash cycle without a drying program has been selected.The rinse aid has been used up or the dosage is too low (see Rinse aid and salt).The rinse aid dispenser setting is not suitable.The crockery is made from non-stick material or plastic. |
| The dishes are not clean. The racks are overloaded (see Loading the racks).The crockery has not been arranged well.The sprayer arms cannot move freely.The wash cycle is too gentle (see Wash cycles).An excessive amount of foam has been produced: the detergent has not been measured out correctly or it is not suitable for use in dishwashers (see Start-up and use).The lid on the rinse aid compartment has not been shut correctly.The filter is dirty or blocked (see Care and maintenance).The refined salt level is low (see Rinse aid and salt). | |
| The dishwasher does not take any water in - Tap shut-off alarm(several short beeps are emitted)(the ON/OFF indicator light flashes and the number 6 appears on the display). | There is no water in the mains supply.The water inlet hose is bent (see Installation).Turn on the tap and the appliance will start after a few minutes.The appliance lock has been activated because no action was taken when the beeps sounded.Switch off the appliance using the ON/OFF button, turn on the tap and switch the appliance back on after 20 seconds by pressing the same button. Re-program the appliance and restart the wash cycle. |
| Water inlet hose alarm / Water inlet filter blocked(the ON/OFF indicator light flashes and the number 7 appears on the display). | Switch off the appliance by pressing the ON/OFF button. Shut off the water tap to eliminate the risk of flooding and remove the plug from the electrical socket.Make sure the water inlet filter has not become blocked by impurities (see "Care and maintenance" chapter). |
* Only available in selected models.
FR
Français, 41
Sommaire
Installation, 42-43
Ecodesign Regulation
Onnc npnila, 56
3araanbHn Bnrrn
NaHEnb KOMaHd
Ja3aBaHTaxnTn Kopo6n, 57
HnKni Kopo6
KoWNk dny np6opib
Bepxhi kopo6
LST 5337
Nyck Ta BnKOpncTaHHa 58-59
Yk yBIMKHyTn NocydomMnHy MaunHy
Ja3aBaHTaxnTmNIOUCh 3ac6
Onui MTT
Pporpamn 60
Tabnua nporpam
PerenepaizHa cInb i o6nonickyBauch, 61
Ja3aBaHTaxKInTppeHepauiHy ciNb
Jk 3aBaHTaxKInTu peRehepauiHy ciNb
TexHicHe 06cnyroByBaHHra Ta dOrgla, 62
Yk BiKIOUHTN BODy N eJIeKtpuHHe KINBnEHHA
YK HCTHTN NOCYDOMHMy MaHHy
Jk 3anobirn HnnpemHm 3anaxam
YK UcNCTHTn PO3NIJIIOBaui
JHKYNCTNTNΦINbTpHaNoaQiBOHn
YK OCHCTHTN fIbTpN
Bpaai trpmbaoi BiCythocti
3anobixkhi 3axoJn Ta nopadn/CepBicn ceHtp,63
3araanbHa 6e3neKa
Ytunizazij
Oxopohai6aainBBeBIDHOWeHHnDIOBOkInn
Hecnpabhocti Ta 3ac06n ix ycyHenHra, 64
UA
UA
A Heo6xidno 36epiratn daHy 6poWpy, uo6 MaTn HaroDy 3BepHyTncra do Hei y 6ydb-kynn MOMeH. Y pa3i npOdaKy, nepeaHi nHi oco6i a60 nepeizdy nepekoHaTeC8 B TOMy, 10 BOHa 3aIIu7aetbca pa30m 3 Bnpobom.
YBaJXHO BnBcIb IHCTpyKciIO: B HiMiCTNtBCaBaxJINaBa IHΦopMaciI ΣOIO BCTaHOBJIeHHe, BnKOpNCaHHa Ta 6e3neKn.
AПд уас поевпду пилад Мас 3нхоитияу Вертikальому
положенhi, рпн HeobxidHocTi HaxиЯТе НOrO Ha3ad.
A Lcien npnlaed npn3haeHm dna no6ytoBoro a6o ananorichoro npn3haeHHa, HapnKnaIad:
-y KyxHxIJIy IepcoHany y Maar3nHex, ophiax i Hux po6oHx npMlueHHax;
-BeINKnx CInbcbkNx 6yDIBnX;
- BUKOPINCTaHH3 60ky KIneHTiB y roTeJnx, MOTeJnx i iHux roTeJIbHnX cTpyKtypax;
- nahciohax 3i CHidaHkamn.
Po3miueHHn i BnpiBnHOBaHHn
- Po3nakyIe npinad Ta BDOCKOHaJIbTeC8, 0io NOro He 6yNo nowkoJKeHo NiJ cac nepeBe3EHN.
3a HaBBOCTI NOKoXeHb He BnKOHyTe HIX NIKIOUeHb Ta HeaHb 3BepHiTcdo NoocTaayhNka. - Po3auyte nocydomiHy MaunHy TaK, 0o6 6iHi CTINKn a6o cinnka npnraan Do hai6nnkXnx Me6nib a6o do CTInn. Ppnaad Moke B6ydoByatncr NiD pIBHy po6oyy nobepxH (du8. IHcmpkyuio 3 MOhmaxky).
- BctaHOBiB nocydomnHy MaunHy ha pibHni Ta TBepdi niIIO3i
Rkuo nIiNora He e idealbHO ropntoHaIbHO, KOMneHCyIte
HepiBHOCTi 3a donomoro IO nepeHIX HIXOK - po3kpuyOuH N3
3akpyUOuix. HanexKHe BIPIBHOBaHHra Hadae Cta6ilbHicTB
MaunHi ta 3anobirae Bi6paui, ymy Ta nepecyBaHHIO nI qac
po60tN. - *Дя налайтувань виси заимь сюку вулку, яka 3нхдься уцетri визу на пойчаси машин. Сорпсуншега лесгогань раннм raikobim кюем на 8 MM и оберайтze за ratиннковоctpiлково дя 36ильшени виси та потив ratиннковоiteстпдя II 3meншени. (due.iHcmpkykuio 3 ebydybaHHa y dodamky do dokymehmaii)
IiKluHHeBn BOnn eJeKtpoeHeprii
HaHanaWtYBaHHcNCTeM eNeKtpuHoro KnBHeHH Ta BOJOnOCTaayHHMaE 3DiIChIOBaTnc TInbKn qaxIBzAM.
3a6bOHOYcTcABNTINNOCyDOMnHyMaHInHyHa Tpy6n a6o HaIshynepEnEeKtpuHOrO KMBHeHH.
Pi'deHaHH npnauy do MepeXi BOONoCTaHaHH MaC 3diCHOBATNCI Nwue 3a DOnOMoTOHOBUX Tpy6. 3a6opOHcTBcN IOBtPOH BkOpNCtOByBATN BxNBaHI Tpy6N.
Tpy6n noaqui Ta 7uHaHn 3JInBy BoDn, a TAKoX uHyp eJeKTPuHoro JINBHeHH MaIObT DnBHTncb ynpaBO abo BnIO, 3abe3neuyou ONTMaJIbHe BCTaHOBHeHH MaUHN (duE.MaHHOHK).
PiδεdHaHH Tpy6n noaui BODn
- Do BOJOpO36ipHOro KpaHy XOJIOHOI BOiN: Oobpe npnKpyTtB Tpy6y noaqui BOi Do KpaHy 3 p3b6OBIM OTBOPOM Ha 3/4 ra3; Nepei 3aTAYBaHHM CNYCKaJIe BOiY, NOKI BOHa He cTHe YnCTOIO: Ye 3anO6ixNtB 3acMIeHHIO npnJa.
- Do BODOP36ipHoro KpaHy rapaHoi BOiN: y pa3i ζeHTpAlI3OBaHOI CnCTEmN ONaJIeHHra rapAa BOJa DO NocyDOMNHOI MaUNHIMOKe TAKOX NoCTaHaTcR 3 Mepexi 3a yMOBn TEMpePApTi, He BNIOI 3a 60^
PnKpyTtB Tpy6y Do KpaHy, Jk OncaHo y npoueDpyi DnR BOdopo36ipHoro KpaHy 3 XoNoHOIO BOdoio.
AЯкюdoBxHn Tpy6n noaHi Boi He BnCTaHaC,3BepHtbcy cneuiianIOBaHy KpaMHnO a6o do ynoBHoxeHoro qaxibza (du. Donomoa).
Tnck BoDn Mae nepe6yBaTn y MeXi 3HaueHb, HabeJeHx y Ta6nCi TeXHiHnx DaHnx (du8. npoyu).
3BepHitb ybary, 06 Tpyba He mna 3nHIB Ta ytnckib.
Piδ'εdhaHHaHaHy dπa 3nBy BoDn
niEHaHTe 3nBn WnA H, He 3nHaOnu Noro, Do KaHai3auiHoro Tpy6oPbOBy dAmETpOM He MeHwe 3a 4 cm.
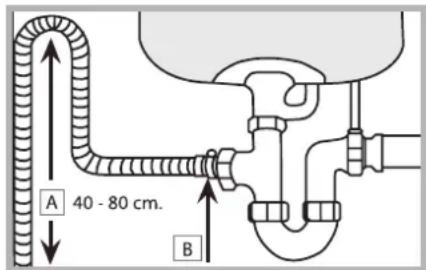
3nBnHn 1nHaR Mae po3aOoByBaTnc Ha BnCOTi BiD 40 do 80
BiD nIIOrna6o onipHOIO nobepxHi nocydomnHOI Maunn (A).
Pepn HIX nID'EDHaTN 3nBnHn 1nHaHr Do cnfoHy MnKn,
BnuDanitb nactKOBy np6ky (B).
3axnCT Bi3aTOnnneHH
Uo yHEmoKnBTH 3aToJIeHHN, NocyDoMnHy MaunHy:
- ochuHcncTeMoIO,ka nepepNBac noaay BODNpa3i npuyHeB pO60T a6o BVtikAh BCEpeHei Maunnn.
Ieaki moJIeni ochauehi DoaTKOBIM npncTpoem 6e3neKn New Acqua Stop*, kIn 3anobiraac 3aToPnEHHIO TaKoX y BUNaIKy po3pNBy Tpybni noaui.
YBAGA: HEBE3NEUHA HANPYA!
3a6bopnoHReTbcB Bldpi3atn Tpy6y noaHi BOu, OckijKn y hi MicTbcbYacTHHn NiHapyroHO.
*HaBHe NIIe B DeEaKIN MoDJIeX.
Enktpnhi nikpoeyHn
Nepu HIX yBIMKHyTN BUNKy B eJekTpunHy po3eTKy, nepekoHaHTeCra, 0o:
- PO3ETka Ma€ 3a3eMJIeHHy BIDIOBIIHOCTI DO BCTaHOBJEHNX HOpM;
- p03eTka BNTpMMyE MaKcMaJIbHe HabaHTaxeHrN NOTyXHocTi MaunHn, Bkazane Ha TaBnUci 3 xapakTepcntuKaMn Ha noDbIiHNx DBePcTaX (due.po3din Onuc nocydomuHoi MaunHu);
- Happyra XINBJIeHH 3HaxOJNTbC B MeJax 3HaueHb, Bka3aHxN y Tabnuci 3 XapaKTepNCtHKamn Ha noDBiHnx DBepTuTAX;
- po3eTka cymiHa 3 wTeIcenbHIO BuNkoIO npuJa. B IHwOMy BnnaKky 3BepHiTbcra Do yNoBHOBaKeHoro faxIBa i3 npoxAHm 3amHHTu BuNky (du. DOnoMo2a); He BnKOpNCTOByte NoOBxByaHi TpiHNKn.
A BiD BCTaHOBHeOi MaUHnMa 3a6e3neYBaTncb JeRKn IocTyI Do UHpy KINBHeHHN eJEnKTPuHoi p03eTKn.
A LHyp xINBJIeHN He NOBIneMaTn 3rNHi b aOyTnCKiB.
3aDnBaWoI 6e3NeKn NooKoJKeHn UHp KInBHeHn Mae 3aMHiTNCrTiBKn Bnpo6HnKOM a6o Ioro BnaCHO CnyK6oHO TexHiHOI DonOMOrn. (Db.NOnomora)
PiinpncmctBo 3Himae 3 ce6e biinobidaaibhictb y paai HeNDOTPnmaHNA KxN Bka3iBOK.
CtpiKa npToy yTbOpEHnKoHdEhCaTy\*
Iicra B6dyBaHHN OcydOmHoi MaunHn BiDkpiTe DBepuTa Ta npKpinitb NiD DepeB'HOIO NOBepxHeIO npO3Opy KneKy CTpiKy 3 MeTOO 3axNCTy BiD KOHeHCaty.
3açtepejexHn nepei nepuM BnKOpNCtAHnM
Ncna BCTaHOBnEHn Ta 6e3nocepHb no nepn nepuHMMNTTAM3anOBHtB BOIO BCIO emHicTB Ira perehepauiHoI coni Ta tINbKn nicn zbo rOoDOnaiTe np6bn3HO 1 Kr coni (due.p03din Obnonickyau ma pezehepauiHa cInb): BNINBAHHBOU nepe3Kpae HOpMaJIbHM.Bn6epiTb CTynHb JopCtKocTi BOu (due. po3dn Obnonickyau ma pezehepauiHa cInb). Ncna doaBaHHcoJI iHnKaTopHa lamna BiICCYTHICTb COJI* 3rache.
A BiCyTHiCt b CoJI B EMHoCTI MOKe BnKJIInKaTn yUkOJKeHH npIcTpIO NOM'AKUeHH BOrTa HarpBaJIbHOro eJeMeHTy.
- HaraBHe NIIe B DeEaKnx MoJeIax.
Onii MttT
Kaio onui He cymicho3 Bn6paHO nporpaMOIO, (INB.Ta6HNUO nporpaM), BiIDNOiHN CBITNIOIO TpUc cnanaxHe Ta nouyIbCBA KOpOTKoyacHi 3ByKOBI ciHaJI.
BiDcTpoueHn nyck
Moxha BiDcTpoHTn noaTOK nporpaMn Ha 3,6,9 roHn:
- Hatncihb Ha Khonky BIDCTPOUEHORI NYCKY: KoxHe HATnckaHnry CynpoBxKyEc3BykoBm CnHaONi Noka3OM B6paHoro Yacy;
- Bn6epitb nporpamy i 3akpnTe DBepcraTa: nicra 3BykoBOrO cnHany nouHaetbcra 3BOpOTHI BiNik Yacy;
3.ПисязавершенизаданогуacyiHДИКaTOp rache i nporpaMa nouHaCTbcr.
Ioo3miHnTuac BiDCTPOeHHa Ha MeHm,HaTncHtB Ha KhoNky BIDCTPOEHOIYCKY.ДЯckacyBaHHaTnCKaTe Ha KhoNky, noKHe 3rache iHdkaTop o6paHOro BiDCTPOeHHa. Iporpama 3anyckaetbca npn 3akpTTi DBePcrt.
IIOOBHHe 3aBaHTaXeHHaBepxHbOrO a6o HxHbOrO kopo6y\*
PnHeBEnKi KJIbKoCTI Nocdy MoXHa 3aDatN cNkN NOJOBHHORO 3aBaHTaxKeHH, 3aOuaJxUoyu BDOy, eJeKtpoeHepriIO Ta MInouh 3aci6. Bn6epitb nporpamy Ta HATNCHTb KONky INOBOHNHO 3ABAHTAXEHH: cnaJaxye TpuKyTHNK o6paHOrO 3aBaHTaxKeHH, i NounHaetbcr MNTTg TiNbKn dJa BepxHbOro a60 TiNbKn dJa HNkhBoTO Kopo6y.
A Nam'raTae npo 3aBaHTaxeHH Ta npo 3MeHueHH MNoOro 3acOby yDbiv.
A Taka onui Biccyy y nporpamax: Rapid.
BaratofoyHKioHaBHi Ta6neTkn
3a donomoro 1i ci onl MOxHa ONTm3yBaTu pe3yIbTaTN MTTI CYHINH.
PnBnBnKopnCTaHHi 6aRaTOpyHKUHOHaNbHnx Ta6NetOK HaNTCHITb KhoNky BaratoophyHKUIOHaNbHi Ta6NetKn, cnaIaxye BiINOBiDHa lamna. PnBnBnKOpCTaHnOuCi" BaratoophyHKUIOHaNbHi Ta6NetKn" TpBaJIcTb npOrpAmn 36InbWntbcr.
AЯкwo He ckacybTaOnuio "BAFGATOФYHKLIOHAJIbHI TABJETKN", BOHa npaцюBaTmE TaKox npn HactynHnx ZIKNAX MTTT.
A PekomeHnyetbcBnKOpncTObByBaTH 6araTofoyHKUHOHaJIbHI Ta6NeTK, TiJIbKNa HauBHOCTi Onii "BArATOFOYHKUIOHAJIbHI TabJIETKN".
A He peKoMeHdycTbcra kTnByBaTn 0u onuio nporpaMax, De He nepe6aueHO BnKOpncTaHHraToyHKUOHaJIbHnx Ta6NeTOK.
He BxNBAIte CTOnOBy a6o npomncIOby cinb. He BxNBAIte 3ac0ib dny puyHoro MHTTn nocdy.
CniyTe Bkazikam Ha ynakOBkax 3ac06ib.
A Pn BnKOpNCTaHHI 6araToOpHkuioHaJIbHnx 3aco6IB HeMae Heo6xIDHOCTi B 0bnonickyBaui , npote peKoMeHdyETbcra DoaAHn CoJI, OcO6HnBO pnp JXOpCTkI aO dyKe JXOpCTkI BoDi. CIndyTe Bka3iBkam Ha ynaKOBkax 3aco6IB.
He doabaTe He cInb, He oBnonickyBaH, HopMaIbHnM e yBIMKHyTNI CTaH INdIkATOpHN JAmn BIDCYTHCINb* Ta BIICYTHI O6N0NICKYBAU*.
Jk 3aBaHTaxHTn pereHepauiHy cijb
OboNlckyBaH npncckopoe BucuSyBaHHn nocdy, 3a6e3neyuOn CTiKaHHB OoN 3 HbO, 10 yHEMOxJIINBIOE yTBOpEHn PIIAM Ta pO3BeDeHb.
Emhictb nIy 6bnlckyBaHa 3anOBHIOETbc:
KoHnHa nanei KomaHd 3anaHoeTbc iHnKaTOpHa naMnoUka BIDCYTHICTb OBNOJICKYBA4A*
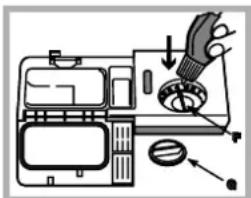
-
BɪdɪkpɪnɪTe éMɪchɪb, nɒBepTæHʊn Kpɪsʌkɪy (G) nɒpɪtɪn rɒdɪnHŋkɔBOi CTpɪjʌn.
2.Пи дадаанні obnonickувачунkaite noro nepenBaHnaYepe3кай.Y pazi nepeinBaHnBuTpibBntiK cyxioI raHipkoIO. -
3akpyTitb 3HOby KpniKy.
3A5OPOHReTbCRAHaJIINBaTn 06noniCKyBauch 6e3nocepeHbO y 6ak.
BidmipbTe 03y 6nonickyBaHa
KIO Bu He 3aOBoNbHeHPe3yNbTaTAMCyHHM,MOXHa BiDpyrNtOBaTn Do3y O6NoNlckyBaA. BkpyTKoIO NOBepHITb peryIaTOp (F) Ha OdHe 3 6 NOnOKeHb (Ha 3aBOi MaunHy HanaIToBaHO Ha NOnOKeHH4):
- RaKIo Ha nocydi cnoctepiraIbC6iNyBaTi po3BeDeHHa, nobepHtB Ha MeHsi HOMepn (1-3).
- kio 3aHuaToBc BODHi Kpann i a6o nnMn HAKny, nobephi Ha 6inbHi Homep (4-6).
BctaHOBJeHHJXOpCTKoCti BOH
KoKHa nocydomnHa MaunHa oShaueHa nom' kUyBaem BOH, AKN, BnKOpNCBOYUOHN CneuaJIbHy pereHepaIHy ciNb DnA NOcYDOMnHnx MaunH, 3a6e3neUe BOy 6e3 BaHry DN MNTTn NOcydy.
LnaocydomnHaMaunHa3a6e3neuepepylnoBaHHXJopcTkOCT BoN3MeTOIOKpaInxEckIpyaTauiHINxNOKa3HKnIBMTT Ta MeHwOrO 3a6pydHeHHNdoBkInn.10bBn3HaHTn CTyneHb JopcTkOCTiBoN,3BepHiTbc4D0BOOnocTaayhNcxCnyKb
-BiKpNTe DBePcTaYyBIMKHITb MaUHHy UJXOM HATNCKAHK KHONK ON/OFF.
- Hatncihb Ha KhoNkpy P BnpoD8K 5 cekyHn; nooytbcB Dba Kopotkoachi 3ByKObi CnHann Ta noyhe nobInbHO 6JIMMaTIN iHnKaTop CTyneHIO BCTaHOJIeHOI KOpcTKOcTi BOIN (POM'kUWBAuBOIN BCTaHOBNEHO HA 3aBOJHa CTynIHb 3).
- HatnckaIte Ha KhONky P do DocarHHeHH 6axaHOJ kOpCTKoCTi
BOU (1-2-3-4-5Due.ma6nuiu zoKpcmKocmi 0oU).
- ⅢoB BnHtN 3 ΦyHKuII, 3aueKaIte DeKeIbKa ceKyHd a6o HATNCHTb Ha KHONKy onui* a6o BUMKHITb MaunHy KONKOHO ON/OFF.
PnBukopncTaHHi 6araTofoyHKIOHaIbHx Ta5neTOK 3aBXn3aONBHIOTe EMHCTb DJIra CoJI.
| Tašpânza xopćtkocesti BODNI | Cepedni terpmin clyjxbn**konteyhepa 3 perehepauiynoocinlu | |||
| ctynihb | °dH | °FH | MMolby/ln | miciarci |
| 1 | 0-6 | 0-10 | 0-1 | 7 miciarciB |
| 2 | 6-11 | 11-20 | 1,1-2 | 5 miciarciB |
| 3 | 12-17 | 21-30 | 2,1-3 | 3 miciarci |
| 4 | 17-34 | 31-60 | 3,1-6 | 2 miciarci |
| 5* | 34-50 | 61-90 | 6,1-9 | 2/3 tvjxhi |
| Якто занayehня nepeşуваец у мени вiod 0°F до 10°F, pekomeндауевся пеше Викоростовуbatи сіль.* якто задано 5, trпвалісь може збільшитися. ** 3 1 zúnkonom мітtersу дechь | ||||
(^ dH = JopctKicTB y rpaDycax 3a HimeukoCnCTEmo - ^ fH = . JopctKicTB y rpaDycax 3a φpaHcy3bkoCnCTEmo - MMonb/π = MinimOnb/niTp)
Ja3aBaHTaxKtnpereHepauiHy ciJb
Uo6pe3yIbTaTmMTTa3ABXn 6yIn 3aIOBOJbHEHMM,3aBXnNepeBipRte 3aONBHeHcTb EMHOCTi CINIO.PereHepauHa ciNbBdAJIe BAnHk 3 BOIN, yHEMOXINBILIOUOHNORO HAKONUeHHHa nocdyi.EMHcTb dNl coJI 3hAXOuNTbc y HNXHi cactHIncCyDOMHIOMaUNH (duE.ONUc) Ta MAe 3aONBHOBaTNCb:
KoJIH He NOMITHO 3eJIeHOrO nonJaBuc* Ha KOBNaUci EMHocTi dIra coni;
KoJIHa NaHEnI KOMaHN 3anaIOeTbCra IHnKaTOpHa NaMnOuKa BIDCYTHICTb COJI*
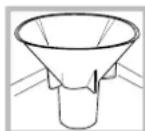
- BntarHtB HnKnn Kopo6 Ta po3kpyTItb KObaqok EmhocTi DnI coni npotu roDHHNKOBoi CTpINK.
- Tinbkn npn nepwomy BnkopncTaHHi: 3anOBHtB EMHicTB BOIOO DO KpaIB.
- Po3TaWyIte BOpOHky (duE.MaIOHOK) Ta
3anOBHtB EMHcTb ciINIO KoaiB (6JU3bKO 1 Ka) HeBeJIuKl BUNNECKN BOIN E HopMaNBHMN.
- BnIMtB BOpOHky*, ONCTIb BXiDnO TBIp EMHOCti BiMoXnBnx CoJIbOBnX 3aIIuKIB; O6NoIOnCHITb KOBNaoyK niIDnpOTouHO BOIO nepe3aKpyUbaHHm, TpImaOnu NOroRoiBKOIO DOHN3y Ta BnINBaOuN BOy 3 YoTIPbOx npop3iB yBnIJI 3ipKn Ha HnKHi YacTHNi KOBNaUka. (KOBNaOc 3eHEmNNonlaBaeM*)
Pekomehdyecbca npoBOnTHnIO onepaio npn KoxHomy 3aBaHTaxeHHi coni.
Iobpe 3akpyitb kOBnaOc, 6o6 3an6iTn nonaHaHHo BCEpeHny MIOyoro 3ac06y niD yac MTTT (eMozKe 6e3noBOPOTHo ykoNDTN NOM'kUWBAu).
A y pa3i Heo6xidHocTi Hacnnte ciNb nepeD zKlOM MNTT, 0o6 yHnKHytn nepenBaHHa CoNboBOrO po3uHy 3 EMHocTi dJIa coni.
- HaraBHe NIIe B DeAeknX MoDEnIax.
UA
BidKJIIOueHH BODN eJekTpHoro KINBJIeHH
-ДяЗANO6iraHЯнВИТOKамЗakpuaiteКран BOДОПОCTaЧАнгпICЯ KOKHOrO MNTT.
BnMaIte WTeNceIbHy BnIky 3 po3eTkn nID qac uHennHa MaunHn Ta nID qac p6i3 TExHiHoro o6cnyroBaHHa.
YnueHHIocydomHoiMaunHH
30BhiHnI NOBepxH Ta naHeIb 3 KOMaHdAmN MaOTb OuIyBaTNC 3MoOeHO y BODI M'KIO He a6pa3NBHO raHupko. He BnKOpncTOByTe po3HHNKn a6o abpa3NBHI 3ac06n.
BHytpiHnBakMOxHaOuNCTHTBIDIINM3aDOnOMoTO raHvipKn,3BOJNOKeHOyPO3HNI BODN3OeTOM.
Jk 3an06irtn HenpncmHm 3anaxam
3 MeToIO yHMKHeHHHaKoNueHHIO BOJOrn 3aJIuWaiTe DBepyTa 3aBXd HaniBbIKpNTMNI.
PerynphO ouuauTe 3BOLOXKeHO raHcipKO repMeTuHi npokJaKn no nepmEpTy DBepaT i BaHHooyK dIy MInoux 3acobIB. Taki di yHemoxNbIOIOb HAKONUeHHa 3aIIuKb IiKi, yTBOpIOUHX HePnEMHi 3anaxn.
JaK UcHCTHTn PO3NJIIOBaui
3aunukn iKi MoKyTb npncTaTN Do po3nnIIOBaui Ta 3acmitnOTBOpN,3Knx BNXoNTb BOa: Yac BiY acy cnid nepeBiprTa Ta OUnuATn IX HEmetaneBOO UITKOIO. O6nDb a03nnIOBAua E 3'EMHIMN.
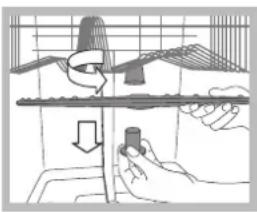
O6 3nTn Bepxhi
po3nnIOBaC, CnD PO3BnHTnTn
npOTn rOuHHNKOBoi CTpiKN
nnactmacoby Kpyrny raKy.
Pn BCTaHOBneHHi BepXhboro
po3nnIOBaCa NOBepHiB DorOpn
qactHy 3 BiNbIo KINbKOcTIO
OTbopiB.
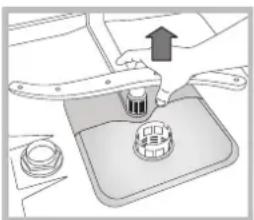
Ioo3HnHnnHpo3nNBOa, nTHiB HOrO DorOpn.
JaK YnCTHTN fIbTp Ha nOdaqi BOn\*
KIO Tpy6n DnB ODo E HOBmN a6o nepe6yBaOTb DOBnYac 6e3 BnKOpNCaTHH, cnYcKaITe BOy, ax DOKN BOHa HeCTaHe npO3opoHO. Be3 cIbOr oIChyE He6e3neKa 3acMiuHnHmicu npoxOy BOH, 0o npu3BeDe Do yWkoJKeHHnoCydomnHOi MaunHn.
A Yac BiD yacy ouucaaIte fIbTp Ha noDaqi BoHn, po3TaioBaHn HbXoDi 3 BDOIpOBiDHoro KpaHy.
- 3akpiTe BoOpObIDHn KpaH.
- P03rBnHTiB KInCeBy YacTHy Tpy6n Dny noDaCy BOuN, BnIMtB φIbTp Ta oBepeXHo BnMnTe NOro NiD npToOHO BOIOU.
- 3HOBy BCTaHOBiTb φiNbTp Ta 3akpyTiB ⅢnaHr.
K ouhctntn qinbtpn
ΦiNbTpuyoça rpynnacknadaeTbc3 3tpbOx φiNbTpib dno OunuHnBODn BiD 3aNtukib iKta NOBepTaHHy y KOHTyp: Dnna 3abe3neueHHn Do6pnx pe3yntatIB MTTI Heo6xioHO OUnuAtnix.
A PerynpaHOnO ouuuaIte fIbTpI.
NocydomHa MaHnHa He Mae BnKOpNCOTByBaTncb 6e3 fiNbtpa a6o 3 BiD'EDHaHm fIbTpom.
-Yepe3 Deikibka uKniv MMTTnepeBipTe fIbtpuyuyn By30J Ta npomnte Horo NiI npotoHoo BOHO y pa3i Heo6xHocTi, BnKOpNCTOByOuH HeMeTaNEy 1tKy. HxKHe npueDeHn nopAOK di:
- NOBepHITb npOTn rOuHHNKOBOI CTpiKN uNlIHpUHNI pIbTp C Ta BnIMtB NOrO (MaI. 1).
- BnmiB ctaKaH fIbtpy B wJnxOM JERKOro HATNCKAHHa 6iHi pe6pa (Man. 2);
- 3Himitb tapiKy fiNbtpy 3 HeipxabiooCi tani A. (Man. 3).
4.OrIaHbTe CMOTPOBNI KOIOJ3b Ta BnDanITb 3aNIMKII XIXI. 3A5OPOHReTbCRA BnDANrTN 3axNC T HAcOCy MmHOI BOIN (DeTaJIb 4OpHoro KOnbOpY) (MaI.4).
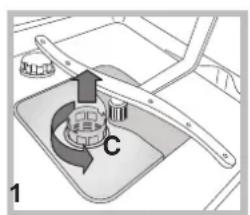
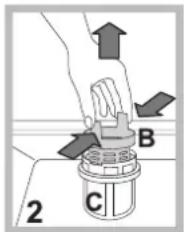
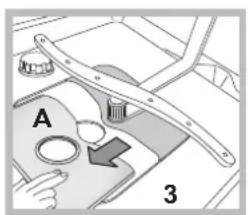
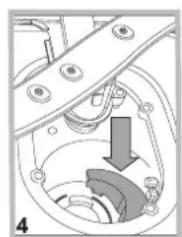
nicn ouuueHHa ntpiB npabunbHO BCTaHOitb cntpuyouh By30n Ha micue; ue BaXnBO dna HaneXhoipoBOTN nocydomnHOI MaunHn.
B pa3i trpmbano'i Biiccythocti
BID'eHaeIe eKtpnHi 3'eHaHH Ta 3aKnTe BOOnpOBIHN KpaH.
3aIiIte DBepeTa HanibDkPitmM.
BVKOHaHTe ZIKJ MMTT3 He3anOBHeHOIO MaHNOHOIO.
- HārBHe NlIe B DeAeknX MoEJIaX.
3anobixhi 3axoyn Ta nopadn
Cepbvicn chn ceHtp
A Ppuiad po3po6neHn i cKoHcTpyNoBaHn BiNobiDnO mIXhapOaHmX HOpM 6e3NeKn. Ie nonepdxeHHraHaIoTbcr 3aIbRAWoi6e3NeKn: yBaXHo O3HaHOMTeC3 HIMN.
3araJbHa 6e3neka
- 1e enekponobytoBn npnaH He mae BnKopncTOByBaTNC dItbMn abo oocabm 3 o6mexKeHMn fiznHMM, ceHCOPHMN Hpo3ymOBMN MOKNBOCTMa, abo kuo im 6paKy eDocBiDy Ta Heo6xIDHX 3HaHb. BnHrTk CknaIaIOb cTuayi, koni KopncTyBaHHB BiID6yBaTeBc nId HaRJaOM afo 3a Bka3iBkAmO ocib, BiINOBAJbHnx 3a ixHIO 6e3neky.
- Dopocni MaHOb CTeXHTu, 0o6 DiTu He rpaunca 3 eNeKtpOnobyToBm npnnaDom.
- PpnaI np3NaueHn Ia nObyTOBOro BkOpncTaHHy JKTIOBUX npMIeHHx.
- PpnaI Mae BnKOpncTObyBaTnca DnMaTTa Nocdy Ta np6opib, TilbKn dopocmM oc6amn i 3riDHO IHCTpykiam, Bka3aHm y ciB 6poWpyi.
- Ppnnad He MoKHa BCTaHOBJIIOBaTn No3a npMIMeHHaMn, HabItb y pa3i 3axNueHoro IpocTopy, TOMy Ioo dyXe He6e3neHo NiDaBaTu NOro II dOuY i rpo3n.
He TopkaTecnocydomHoiMaHHNToIIMNHoramn.
He BnMaTe WTeNcBHy BNJKy 3 eNeKtpuHoi pOeTKn, BnTAYIOH NOro 3a WHP, TpMaJTEcR TiNbKn 3a camy BNJKy. - Pēpù nix pɔ3noyaTn oUHcENHn a6o TexhHuHe oCcyroBvBaHH, 3akπIte BOOIpOBiDn KpaH Ta BmMiTb WTeNCEIbHy BUNKy 3 po3eTK.
- Maunha He npauouepe3 HecnpaBHOCTi, y KOHOMy BnnaKky He po6itb cnpo6 camoctiHo BNKOHaTH peMOHT BHyTpihix Mexahi3MiB.
3a6opohTbCtTopkataHarpiBaIbHoro eMeHTy. - He onnpaTecTa He ciaTe Ha BiKpTi DBePcTa: MaunHa MoKe nepeBepHyTncr.
- He trpmaTe DBePcTa WnPoKo BiDkpTmN, 0o6 He cnITKHyTncr.
36epiraTe MIOUH 3acio Ta oBnoNICKyBauch B HeDocxHnx DnA DIteMicx. - 3a6bopohnIe DiTm rpaTncs 3 ynakOBkamN.
Ytuliauia
- Ytunlizui nakybaIbHoro MaTepiany: DoepKyuTecb MicueBHX HOpM, TAK YnakOBKn MoKyTb 6yTN BnKOpNCTaHi NOBTOPHO.
- Cbponencbka DnpeKTHBa 2012/19/CE 3 BiDxOIB BID eNektpnHoi i enektpoHoi anapatypn (RAEE), nepe6aue, 10 no6ytoBI eNektpponpnaI H He moxyTB nepeop6nTncs y 3BnuayHompy nop4ky dnn TBepnx MicbKnix BiXoJIB. 3nrti 3 eknnyatauii nobTyobTI npuaI MauTb 6ytu 3i6paHI OKpemOnonTmImzau ctyneHIO BiHOBHeHH N peukknOBAHMaTepiAnIB, 10 BXoJrBo Do ixHbOrO CKNaIy i 3 MeTOO ycHyehn NoteHuiHOI uKOdi Ira 3dOpOB' Ta cepEOBnUca.CmbON 3akpcNeHoro CMITcBO r6kny, 3o6paKeHN Ha BCIX Bnpo6ax, harady npo Heo6xHnicb OkpMeOTytniau.
Дя noДаьwoI InФорmaцii zuO npaBnblhoI yTnI3aui n6yTOBOI TexHkN, iXHi BlaChHKMOxKyTB 3BepHyTcRdo BiNoBjDNHX MicbKx CnyK6 abo Do nocTaayHnka.
Oxopoha i 6aJnBe BiHoueHHa DO DOBkinn
J30auaadntbOy Ta eJeKtpoeHepriio
3anyckaIte nocydomnHy MaunHy TiIbKn npn NobHomy 3aBaHTaxeHHI. IiJ cac oukybaHH NOBHO 3anOBHeHHaMHN Bn MoKeTe 3abe3neHTy yHKHeHH HePnEMHX 3anaxIB, 3ab4kNcKlNy 3amOyBaHH (du6.IpoapMu).
Bubepim npudamny npoapamy 3 Ta6nui nporpam:
-Длma MNTTЯ 3BvauHIO 3a6pydHeHOrO HaunHHBaNkoPcTObyTe nporpaMy MNTTЯ Eco,яka 3a6e3neUye Hn3bKi 3aTpATu eheprTi Ta BOIN.
- npHHeNoBHOMy 3aBaHTaKeHHi CKOpNCTuYTeCra OOniEIOIPOBHHOrO 3aBaHTaKeHHn (duE. Pnyck ma buKOpucmaHH).
- Ra y BaOMy DorOBopi Ha noctaHHe nEeKtpuHTo eHeprii nepe6bayehi roHHHI noCn Ira 3aoaJxKeHH eHepri, BIKOHyTe uKnN y nepioI 3a 3HNKeHmT Tapnpam. Onui Bictpoehoro nycky (du. Nc ma buKOpucmaHH) donomoxe Bam 3iINCHNT MTT TaKi RoHH.
MnOci 3ac06n 6e3 focpatIB, 6e3 xNopy, Ta kIMCTaTB eH3mM
HanoerIINBO peKOMeHNyEcBcR BnKOpNCTOByBaT MInOHi 3ac06n, 10 He MicrTaB focpatIB Ta Xnopy. Lc BiNobiDaTIme nonitni 36epexehra DOBkinn.
- EHNIMN efeKTHBNO DiOTb npn TemnepaTpyax 6IN3bKO 50^ , uepe3 ce MNoHi 3acO6n 3 eHImMaMn MaIOb BHKOpNCTOByBaTncr npn Hn3bkx TemnepaTpyax MTTT, npn cboMy pezylbTaTN 6dyTb iDeHTNUHMN MTTTO npn 65^
EkoHOMHe MTTIepe6aueo6pe BiMipHOBaHHa MIOOHO 3ac06y,3iINO DO BKA3IBOK BnPO6Hnka,3rINO Do JOpCtKocTi BOIN,CTynEHIO 3a6pydHeHocTI Ta KInbKOcTI nocdy.MIOUc 3ac06n,aki 3daTHI 6ioniHo pyuHyBaTncra,MictTa eJeMeHTN,IO 3MIHOIO TBPiHOBary IOBkINna.
CepBicnIeHTp
Pepw HIX 3aTeJefoHyBaTu y CepBicHn ueHTp:
- Ipebeipte, YN MoKHa cAmocTiHn BOuPiWNr npo6JeMy (DINB. "Hecnpaehocmi i 3acObu ix ycHyenHra");
3anyctiTb nporpamy NOBtOPO, 06 nepeBipTN yucyHeHO HeCnpabHicTb. - Ipn HeraTnBHomy pe3ynbTaTi 3BepHiTbcr B YnoBHOBaKeHn cepBicHn ueTp.
Antecya BnKIOUHO do ynoBHOBaKeHHx qaxibc.
CniD nobiOIMTN:
TIN HecnpaBHOCTI;
- MoJeJIb MaIshINH (MoI.);
- cepiHnH Homep (C/H);
Li dahi MOxHa 3HaHTy WInbNky Ha anapati (du8. "Onuc anapamy").
- HaraBHe NIIe B DeAeKnx MoDeIeX.
UA
MoKe TAK cTaTcA, 10 nocydomnHa MaunHa He npaOBAtme. Iepu HIX 3aTepeoHyBaTu Do cnjx6n Donomorn, nepebiTe MoKInBicTB NERKOr OycHeHHI pObneMn 3a DonOMorO HuCTynHOro cnNCKy.
| Hecnpabhocti: Можни в поч. | нн/3acobn усунн: |
| Посydомина машина не розочиа роботу abo не вдноюп. на komан. | • Вимкгыт машина за дономою конь ON/OFF, черзхвлины знову увимкгыт ii i зашие заюл погаму. • Влеса неdoespe bctablena в elektropочи розту. • Дев puл посydомиhoл машини поаро Засин. • Спсрета посydомиhoл машини поаро Засин. |
| Дерцята не зашиюьс. | • Ссрацьогало зашикан;[ehepriiho поштовхгь дев puл do bivуttг Клцанн. |
| 3 посydомино машини не зашиаьсь вoda. | • Порогamy се не зашиени. • Perepin 3лвногошл anra (диь. Могтох). • 3abibcгзлвноги отвip мйки. • Флььт засmicени засиками üki. |
| Чутни яшни пд час митг. | • Пocud_STкаэьсмixсбolyо abo 3 розnilювачам. • Надире пioутбени:nomailikove дозвань'mичого засоьу abo мичоги засi6. не рindathni дя посydомиhoл машини. (диь. Пуск та висportанн). |
| На посуд ta skлян��х nomітни валнийсяп abo 6iynbati розецн. | • BiDCTNY PEREHEPAZIIHA cInb, abo hanaштванься системпдя по'mяжende ВODи. нe BiIOBIDAOY TJP KORCSTKCTI BODi (dINB.ОБполickyвayt aperehapaziiha cInb). • Kobnaok EMHOCTI Dny coIne He Doobpe 3akpyuchen. • 3akHNUCBR OSHONICKYABAV, abo He NDOCSTATNE IYO DOZBAHN. |
| На посуд ta плшкх nomітни синоватi розецн. | • 36ilbseho kIlbkicstb obnoPlicKYBaay. |
| Кухонне нашини не вихodntb do检пь сухим. | • Було заано prorogamy b6e cyushin. • 3akHNUCBR OSHONICKYABAV, abo He NDOCSTATNE DOZBAHN (dINB.ОБпOLICKYBAV tapehepaziiha cInb). • Р�шкOBЕ PERYLIQUBANN HOBOLICKYBAVA. • Кухонне нашини мелупогун STOPOTTA ABO BIVOTOBENHe 3 Пл actky. |
| Посyd net Вимьаftьс. | • Короби заhandо заразхетсп (dINB.Як заразхетсп короби). • Начини He duzyke doobpe poztaшоанe. • Розniliquobayi He obeptaIOTBCE BILBO. • Дуves deelka'tha prorpama mHTT (dINB.Прorpamn). • Надире пioутбени:nomailikove дозвань'mичого засоьу abo мичоги засi6. нe рindathni дя посydомиhoI MaSHIN. (dINB.Пуск та висportанн). • Кршka obnoPlicKYBaay He zakpyechа як спд. • Флььт 3abpyundheni abo 3azmichen (dINB.Доглад та очшени. • BiDcyTN PREREPAPAZIIHA cInb. (dINB.ОБпOLICKYBAV taepehepaziiha cInb). |
| У посydомины машини не зашиь сда -сигнанizаця. 3akprtni кран посоctачни. (чуOTCSKOPOTKOUACHI 3Bykovi) Сигналi) (блимае indikatop ON/OFF, на диспл' 3'явяп'tьс6). | • BiDCTNY BODA B Merepxi BDOJONOCCTAuaHNN. • Pererpin trpybn noadvi BOdi (dINB.Могтох). • BiDkrpiTE kpan, ta cheyez DEKLbka XBUNIH MaShIN haospochne po6oty. • Ррлад 3akpOKOBANOчо chee 3DvCytHicltb dii nicla 3bykoBoi CIGHANIZAI. Вимкгыт машини за дономою конь ON/OFF, BiDkrpiTE kpan ta cheyez 20 cekynd 3HOBy yBIMKHITMaiuH, haTINCHYBUnHa zuOxKONKy. 3HOBy zanporpamyite машини ta 3anyctitb II. |
| Сигнанizаця: trpyba noadiw/3acmichenФынtr Na noadiw (блимае indikatop ON/OFF, на диспл' 3'явяп'tьсн.Hannc7). | • Вимкгыт машини за дономою конь ON/OFF.Зakриte кран посоctачни. uzb nonpepeintn 3aToPllenHry, iВNTaRTHb BvNKUy 3 eelenkpriuhoI po3eTKI. Реконайtersсь в тому,uzo He zasmichenoi Фынtr Ha noadiw BoDi. (dINB.рozdijn "TexhiHne obScnyroBvbanhy ta dorglia") |
TOB «IндзiTУкраина»
YkpaHa, 01001, M. KniB, npOB. My3eHn, 4
- HārBHe NIIWe B DeEaKnx MoEdIaX.