M6801 Trendino - Aspirateur DIRT DEVIL - Free user manual and instructions
Find the device manual for free M6801 Trendino DIRT DEVIL in PDF.
Download the instructions for your Aspirateur in PDF format for free! Find your manual M6801 Trendino - DIRT DEVIL and take your electronic device back in hand. On this page are published all the documents necessary for the use of your device. M6801 Trendino by DIRT DEVIL.
USER MANUAL M6801 Trendino DIRT DEVIL
vacuum cleaner with electric
cleaning brush (switchable) &
hand vac (removable)
SERVICE-HOTLINE M680_Trendino_7lang_20110603.pdf 10 03.06.2011 13:46:3811
1 Safety instructions
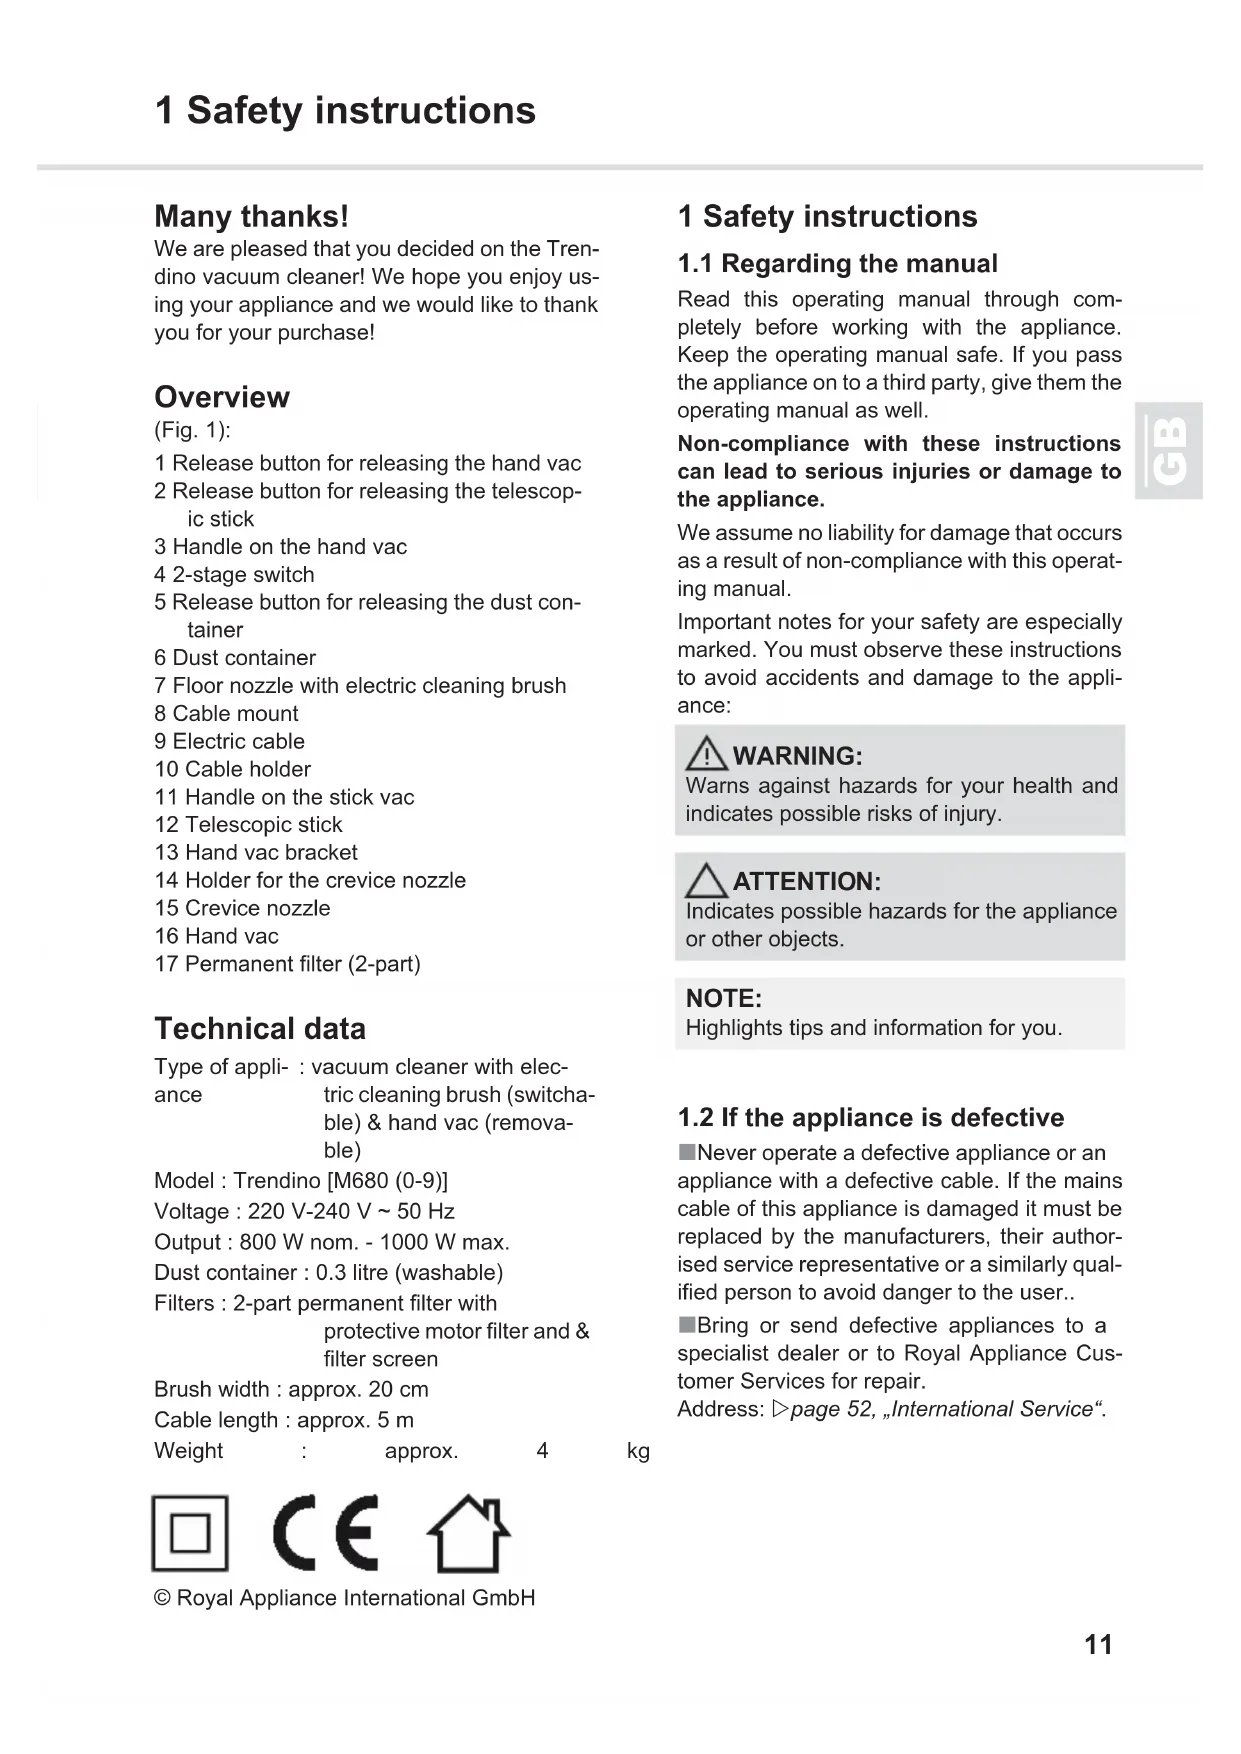
GB Many thanks! We are pleased that you decided on the Tren-dino vacuum cleaner! We hope you enjoy us-ing your appliance and we would like to thankyou for your purchase! Overview (Fig. 1):1 Release button for releasing the hand vac2 Release button for releasing the telescop-ic stick3 Handle on the hand vac4 2-stage switch5 Release button for releasing the dust con-tainer6 Dust container7 Floor nozzle with electric cleaning brush8 Cable mount9 Electric cable10 Cable holder11 Handle on the stick vac12 Telescopic stick13 Hand vac bracket14 Holder for the crevice nozzle15 Crevice nozzle16 Hand vac17 Permanent filter (2-part) Technical data © Royal Appliance International GmbH 1 Safety instructions
1.1 Regarding the manual Read this operating manual through com-pletely before working with the appliance.Keep the operating manual safe. If you passthe appliance on to a third party, give them theoperating manual as well. Non-compliance with these instructionscan lead to serious injuries or damage tothe appliance.We assume no liability for damage that occursas a result of non-compliance with this operat-ing manual.Important notes for your safety are especiallymarked. You must observe these instructionsto avoid accidents and damage to the appli-ance: 1.2 If the appliance is defective Never operate a defective appliance or anappliance with a defective cable. If the mainscable of this appliance is damaged it must bereplaced by the manufacturers, their author-ised service representative or a similarly qual-ified person to avoid danger to the user.. Bring or send defective appliances to aspecialist dealer or to Royal Appliance Cus-tomer Services for repair. Address: Zpage 52, „International Service“. Type of appli- ance : vacuum cleaner with elec-tric cleaning brush (switcha-ble) & hand vac (remova- ble) Model : Trendino [M680 (0-9)]Voltage : 220 V-240 V ~ 50 HzOutput : 800 W nom. - 1000 W max.Dust container : 0.3 litre (washable)Filters : 2-part permanent filter with protective motor filter and & filter screenBrush width : approx. 20 cmCable length : approx. 5 m Weight : approx. 4 kg WARNING: Warns against hazards for your health andindicates possible risks of injury.
Indicates possible hazards for the applianceor other objects. NOTE: Highlights tips and information for you. M680_Trendino_7lang_20110603.pdf 11 03.06.2011 13:46:3812
1 Safety instructions
1.3 Regarding children
This appliance can be used by children
aged from 8 years and above and persons
with reduced physical, sensory or mental ca-
pabilities or lack of experience and knowledge
if they have been given supervision or instruc-
tion concerning use of the appliance in a safe
way and understand the hazards involved.
Children shall not play with the appliance.
Cleaning and user maintenance shall not be
made by children without supervision. Chil-
dren must not be allowed to stand or sit on the
For reasons of safety we strongly recom-
mend that even children aged from 8 years
and above do not operate the device as they
definitely cannot understand all specific dan-
gers arising from it. Keep the appliance out of
reach of people of these groups.
Packing material must not be used to play
with. There is a danger of suffocation.
1.4 Regarding the power supply
The appliance is operated with electrical
power which means there is in principle a risk
of electric shock. Pay particular attention to
- Never touch the plug with wet hands.
- If you want to pull the electric cable out of
the socket, always pull directly on the
plug. Never pull on the electric cable as
this could damage it.
- Make sure that the power cable is not
bent, caught or run over, and that it does
not come into contact with heat sources.
- Never immerse the appliance in water or
other fluids and keep it away from rain
- Only operate the appliance if the electrical
voltage stated on the type plate matches
the voltage of your socket. Wrong voltage
can destroy the appliance.
1.5 Regarding intended use
Only use the vacuum cleaner for cleaning dry,
normally dirty floors, carpets, runners, etc.
Any other use is considered in appropriate us-
age and is prohibited.
The appliance may only be operated in
households. It is not suitable for industrial or
The following is prohibited in particular:
- hair, fingers and other body parts. They
could be pulled in and injured.
- pieces of clothing (scarves, etc.). They
could be pulled right in and cause injuries.
- water and other fluids, especially damp
carpet cleaning agents. Internal damp-
ness can lead to a short-circuit.
- toner (for laser printers, copy machines,
etc.). There is a risk of fire and explosion.
- hot ash, burning cigarettes or matches.
These can cause fire.
- pointed objects such as glass fragments,
nails, etc. Otherwise, the appliance might
- rubble, plaster, cement, fine drilling-dust,
makeup, etc. These might damage the
Do not use near explosive or easily flam-
mable substances. There is a risk of fire or ex-
Do not use in the open-air. There is a risk
of the appliance being destroyed by rain and
Do not push objects into the openings of
the appliance. It could overheat.
M680_Trendino_7lang_20110603.pdf 12 03.06.2011 13:46:3813
2 Preparation and Vacuuming
2 Preparation and Vacuum-
2.1 Unpacking 1. Unpack the appliance.2. Check that it is undamaged and complete. 2.2 Preparation 1. Unwind the electric cable from the cablemount until you have reached the neces-sary length.2. Decide on one of the three ways of usingof your Trendino:- as a stick vac for short-pile carpet, hardfloor, laminate flooring, tiles, etc. Zpage 13, „Use as a stick vac“ - as a brush vacuum cleaner by using the switchable electric cleaning brush fordeep cleaning of carpets, runners, etc.Brushing also straightens the carpet pile.Zpage 14, „Use as a brush vacuumcleaner“- as a hand vac for mobile use, in particu-lar in hard to reach places. With the crev-ice nozzle (Fig. 1/15) pushed on, the suc-tion effect is additionally concentratedand makes vacuuming cracks possible.Zpage 14, „Use as a hand vac“ 2.3 Use as a stick vac 1. Put the telescopic stick into working posi-tion by unlocking it (Fig. 2/A/1) and pullingit out (Fig. 2/B). It clicks audibly into place.2. Put the floor nozzle (Fig. 1/7) into vacuum-ing position by folding it down.3. Insert the plug into a plug socket.4. Switch the appliance on by putting the 2-stage switch (Fig. 1/4) into the centre.5. To vacuum, push the vacuum cleanerback and forth. When vacuuming, observethe corresponding recommendations ofthe flooring manufacturer. ATTENTION: Always transport/send the appliance in itsoriginal packaging so that it does notbecome damaged. Keep the packing mate-rial for this purpose.Dispose of any packing material that is nolonger required in accordance with the pro-visions applicable in your country. NOTE: If you should notice damage due to trans-port, then contact your dealer immediately. WARNING: Check the vacuum cleaner before each use.A damaged appliance must never be used.There is a risk of injury. ATTENTION: Only use the vacuum cleaner if the filter isintact and dry, and inserted correctly. Makesure that none of the openings are blocked.Otherwise, the vacuum cleaner can becomedamaged. ATTENTION: Only operate the appliance if the electricalvoltage stated on the type plate matches thevoltage of your socket. Wrong voltage candestroy the appliance.M680_Trendino_7lang_20110603.pdf 13 03.06.2011 13:46:3814
2.4 Use as a brush vacuum
1. Carry out steps 1-4 under Zpage 13, „Use as a stick vac“ .2. Switch the electric cleaning brush on byputting the 2-stage switch into "brush vac-uuming" position (Fig. 3). 3. To vacuum, push the vacuum cleanerback and forth. When vacuuming, observethe corresponding recommendations ofthe flooring manufacturer. 2.5 Use as a hand vac 1. Hold the hand vac firmly by its handle andpress the release button (Fig. 4/1) to un-lock the hand vac. 2. Pull the hand vac forwards out of its brack- et. 3. Insert the plug into a plug socket.4. Switch the appliance on by putting the 2-stage switch (Fig. 1/4) into the centre. The crevice nozzle (Fig. 1/15) is con- tained in the bracket as an accessory. Attachthe crevice nozzle as follows:1. Remove the crevice nozzle from its holderin the bracket (Fig. 5).2. Insert the crevice nozzle (Fig. 6/1) into thesuction end of the hand vac (Fig. 6/2). 3 After vacuuming
3.1 Switching off 1. Switch the vacuum cleaner off using the 2-stage switch (Fig. 1/4).2. Pull the plug out of the plug socket. 3.2 Transporting 1. If you have used it, stow away the crevicenozzle by pushing it forcefully back into itsmount. It will click into place audibly.2. If you have used it, stow away the handvac back in its bracket. It clicks audibly in-to place.3. If necessary, lower the telescopic stick(Fig. 2/B) until it clicks into place.4. Wind the electric cable around the cablemount (Fig. 1/8).5. Put the floor nozzle into transport positionby aligning the vacuum cleaner exactlyvertical to the floor. The floor nozzle clicksnoticeably into place.You can now transport the vacuum cleanerboth by using the handle (Fig. 1/11) and usingthe hand vac handle (Fig. 1/3). 3.3 Storage If you want to store the appliance for alonger period of time, empty the dust contain-er and clean it Zpage 15, „Emptying the dustcontainer“. Keep the appliance in a cool, dryroom.
When you operate the appliance in "brushvacuuming" mode (Fig. 3), the brushingroller rotates with a high speed. The brush-ing roller must not be touched while operat-ing as otherwise there is a risk of injury.
Only operate the appliance if the electricalvoltage stated on the type plate matches thevoltage of your socket. Wrong voltage candestroy the appliance.
When you leave the work area, switch theappliance off and pull the electric cable outof the plug socket by holding the plug. Oth-erwise, there is a risk of injury.
Never position the appliance directly againstheat sources (e. g. heating, oven). Avoiddirect sunlight. Heat can damage the appli-ance.M680_Trendino_7lang_20110603.pdf 14 03.06.2011 13:46:3815
4.1 Emptying the dust container Empty the dust container regularly, prefer-ably after each vacuuming session.1. Press the release button (Fig. 7/A/1) andremove the dust container forwards out ofthe appliance (Fig. 7/B).2. Hold the dust container low over a dustbinwith the permanent filter inserted.3. Only then should you remove the perma-nent filter from the dust container. Disposeof the contents of the dust container in adustbin (Fig. 8). 4. If the dust container is extremely dirty,clean it thoroughly by rinsing it with warmwater (max. 40 °C).5. Take this opportunity to clean the perma-nent filter as well Zpage 15, „Cleaning thepermanent filter“.6. Reinsert the dust container together withthe permanent filter (Fig. 7/B). It clicks au-dibly into place. 4.2 Cleaning the permanent filter The permanent filter can get dirty duringprolonged use. It is therefore important thatyou clean the permanent filter regularly. If you determine that a filter insert is dam-aged, replace it immediately1. Empty the dust container, open and re-move it ZChapter 4.1, "Emptying the dustcontainer", Points 1-3.2. Separate the protective motor filter fromthe filter screen over a dustbin.3. For a rough clean, knock both filter ele-ments lightly.4. For a thorough clean, rinse both filter ele-ments with warm water (max. 40 °C).Then leave the filter elements to dry. 5. Put the filter elements for the permanentfilter together again and correctly reinsertthe permanent filter into the dust container(Fig. 9). 4.3 Cleaning the appliance Only clean the housing with a slightlydamp cloth. ATTENTION: Switch off the appliance before emptyingthe dust container. Otherwise, the vacuumcleaner can become damaged. NOTE: You can dispose of the contents of the dustcontainer with the normal domestic wasteas long as it does not contain any elementsnot permitted for domestic waste. ATTENTION: The dust container is not suitable for thedishwasher. Never clean the container withany cleaning agent, scouring agent or alco-hol as these damage the dust container. ATTENTION: Switch off the appliance before cleaning/removing the permanent filter. Otherwise,the vacuum cleaner can become damaged. ATTENTION: The filter elements are not suitable for thedishwasher. Do not use either brushes orpointed or hard objects as cleaning imple-ments. Reinsert the filter into the vacuumcleaner only when it is completely dry. Oth-erwise the filter/appliance will be damaged. ATTENTION: Never clean the dust container or permanentfilter with any cleaning agent, scouring agentor alcohol as these damage the housing.M680_Trendino_7lang_20110603.pdf 15 03.06.2011 13:46:3816
5 Correcting malfunctions
5 Correcting malfunctions
5.1 Before you send in the appli-
ance Before sending the appliance to Royal Appli-ance Customer Services, use the following ta-ble to check whether you can correct the mal-functions yourself. 5.2 Spare parts
5.3 Supply sources Accessory parts and spare parts can be reor- dered Zpage 52, „International Service“.
5.4 Waste disposal Dispose of the appliance in com-pliance with the environmentalprotection laws of your country.Electrical waste may not be dis-posed of together with domesticwaste. Use local old-appliance collection points in-stead. The filters used are made from environ-ment-friendly materials. You may dispose ofthem in your household waste.
Switch off the appliance before trouble-shooting. Never use a defective appliance.Malfunction Possible causeSolutionAppliance does not workPlug not plugged in.Insert plug.Socket does not carry any current.Test the plug at another socket which you are sure carries current.Appliance does not suck up any dirt or is running unusually loud.Dust container is full/blocked.Empty/clean dust con-tainer ZChapter 4.1, "Emptying the dust con-tainer".Permanent filter is blocked.Clean permanent filter. ZChapter 4.2, "Cleaning the permanent filter".Suction passage is blocked.Remove the blockage.
If you cannot solve the problem followingthese instructions, contact our service hot-line or the Royal Customer Service Zpage52, „International Service“.Item no. Description0680001 1 Permanent filter (2-part, con-sisting of filter screen and mo-tor protection filter)M680_Trendino_7lang_20110603.pdf 16 03.06.2011 13:46:3817
We offer a warranty of 24 months from the
date of purchase for the appliances we sell.
Within this warranty period, we will remove all
defects free of charge that are due to material
or manufacturing faults, either by repair work
or replacing the appliance or accessories, at
our discretion (damage to accessory parts
does not automatically lead to the entire appli-
ance being replaced). The warranty does not
cover damage due to improper use (operating
with the wrong power type/voltage, connect-
ing to unsuitable power sources, breakage,
etc.), normal wear and defects that only insig-
nificantly affect the value or the ability of the
appliance to be used.
The warranty is made null and void if any work
is carried out by a site not authorized by us or
if spare parts other than Royal Appliance
spare parts are used. Wear parts are not in-
cluded in the warranty and are therefore at the
The warranty only comes into force if the pur-
chase date is confirmed by a stamp and sig-
nature of the dealer on the warranty card or if
a copy of the invoice is included with the ap-
pliance when it is sent in. Warranty work does
not extend the warranty time nor does it con-
stitute a claim for a new warranty!
Send the appliance with an emptied dust con-
tainer and a short description of the fault in
block capitals. Write the comment "Regarding
warranty" on the address label.
Send it together with the warranty card or a
copy of the invoice to the following address:
Zpage 52, „International Service“ M680_Trendino_7lang_20110603.pdf 17 03.06.2011 13:46:3818
der jeweiligen ausländischen Anbieter und der jeweils aktuellen Tarife.
* € 0.14 per minute from German landlines, maximum German mobile phone tariff € 0.42 per minute.
The cost of calls from abroad—outside Germany—depend upon the current prices of the respective foreign