
IPV38WE - Surveillance Camera EBODE - Free user manual and instructions
Find the device manual for free IPV38WE EBODE in PDF.
| Product type | Indoor wireless IP surveillance camera |
| Brand | ebode |
| Model | IPV38WE |
| Resolution | 300K pixels (1/4" CMOS sensor) |
| Pan rotation angle | 270° (Pan) |
| Tilt angle | 120° (Tilt) |
| Night vision | Infrared LEDs (10 LEDs) |
| Video compression | MJPEG |
| Frame rate | 30 fps in LAN/WAN |
| Network connectivity | Ethernet 10/100 Base-T, Wi-Fi 802.11b/g |
| Wireless security | WEP, WPA, WPA2 |
| Supported protocols | HTTP, TCP/IP, UDP, SMTP, DDNS, SNTP, DHCP, FTP |
| Special features | Motion detection, alert sending, image capture, two-way audio (built-in microphone and speaker) |
| Power supply | DC 5V power adapter (included) |
| Power consumption | Approximately 5 W (estimated) |
| Dimensions (approx.) | Height 12 cm, width 10 cm, depth 10 cm (estimated) |
| Weight (approx.) | 250 g (estimated) |
| Operating temperature | 0 °C to 40 °C |
| Maintenance and cleaning | Clean the exterior with a dry soft cloth. Do not use abrasive products. |
| Spare parts and repairability | Contact ebode support for any repairs. Parts not available at retail. |
| General information | Indoor use only. Complies with directive 1999/5/EC. |
Frequently Asked Questions - IPV38WE EBODE
User questions about IPV38WE EBODE
0 question about this device. Answer the ones you know or ask your own.
Ask a new question about this device
Download the instructions for your Surveillance Camera in PDF format for free! Find your manual IPV38WE - EBODE and take your electronic device back in hand. On this page are published all the documents necessary for the use of your device. IPV38WE by EBODE.
USER MANUAL IPV38WE EBODE
natural_image
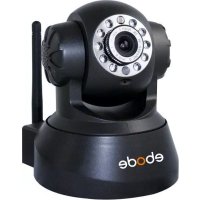
Black electronic device with circular camera and antenna, labeled 'ebode' at base (no other text or symbols visible)IPV38 & IPV38WE
User guide 2
1.4 PC System Requirements
1.5 Hardware Installation
1.6 Software Installation
1.7 IP Camera Tool
1.7.1 Six Options Available
1.7.2 Basic Properties
1.7.3 Network Configuration
1.7.4 Firmware Upgrade
1.7.5 Refresh Camera List
1.7.6 Flush Arp Buffer
1.7.7 About IP Camera Tool
1.8 Camera Login
1.8.1 For IE Browser
1.8.2 For Safari, Firefox, Google Browser
1.8.3 For Mobile Phone
1.9 Network Settings
1.9.1 Basic Network Settings
1.9.2 Wireless LAN Settings
1.9.3 ADSL Settings
1.9.4 UPnP Settings
1.9.5 DDNS Service Settings
1.9.6 To change the camera's port.
2.0 Set Port Forwarding in the router
2.1 Belgian Customers with Telenet Modem/Routers
3.0 System Settings
3.1 Device Info
3.2 Alias Settings
4.0 Sign in mobile phone
4.1 Compatible Apps for mobile devices
5.0 Obtaining Technical Support
1.0 Introduction
This is an integrated wireless IP Camera solution. It combines a high quality digital Video Camera with network connectivity and a powerful web server to bring clear pictures to your Desktop from anywhere on your local network or over the Internet.
The main function of the camera is to transmit remote video over IP network. The high quality video image can be transmitted with 30fps speed on the LAN/WAN by using MJPEG hardware compression technology.
It is based on the TCP/IP standard, build-in WEB server which supports Internet Explorer. Therefore the management and maintenance of your camera becomes simple by using the network to achieve the remote configuration, start-up and to upgrade firmware.
You can use your IP Camera to monitor your home or your office. Also, controlling and managing images are simple by visiting the web site.
1.1 Features
☆ Powerful high-speed video protocol processor
☆ High-sensitivity 1/4" CMOS sensor
☆ Picture total 300K pixels
☆ Supports Pan and Tilt (PT) control, Pan 270°, Tilt 120°
☆ Optimized MJPEG video compression for transmission
☆ Multi-level user management and passwords definition
☆ Embedded Web Server for users to visit by IE
☆ Supports wireless network (WI-FI/802.11/b/g)
☆ Supports Dynamic IP (DDNS) and UPNP LAN and Internet (ADSL, Cable Modem)
☆ Gives an alarm in case of motion detection
☆ Supports image snapshot
☆ Supports multiple protocols: HTTP/TCP/IP/UDP/SMTP/DDNS/SNTP/DHCP/FTP
☆ Supports WEP/WPA/WPA2 encryption
☆ Supports 3G phone, Smart phone control and surveillance
☆ Supports IE, Firefox, Safari, and Google chrome browsers
1.2 Packing List
Please check that the following items are included:
- IP Camera - 6.0mm Lens (IPV38) or 3.6mm Lens (IPV38WE)
- Power Supply
- Wi-Fi Antenna
- Network Cable
- Mounting bracket
- Quick Setup Guide
• CD with software and manual
1.3 Product Views
1.3.1 Front View

Figure 1.1
1 Light Sensitive Hole: For light sensitive photocell
2 Infrared LED: 10 LEDs
3 LENS: CMOS sensor with fixed focus lens. (IPV38 has 6.0mm Lens, and the IPV38WE has 3.6mm Lens)
4 Network Indicator LED: If there is network activity, the LED will blink
5 Microphone: Build-in microphone
6 Speaker: Build-in speaker
7 Wireless Antenna: Wi-Fi Antenna
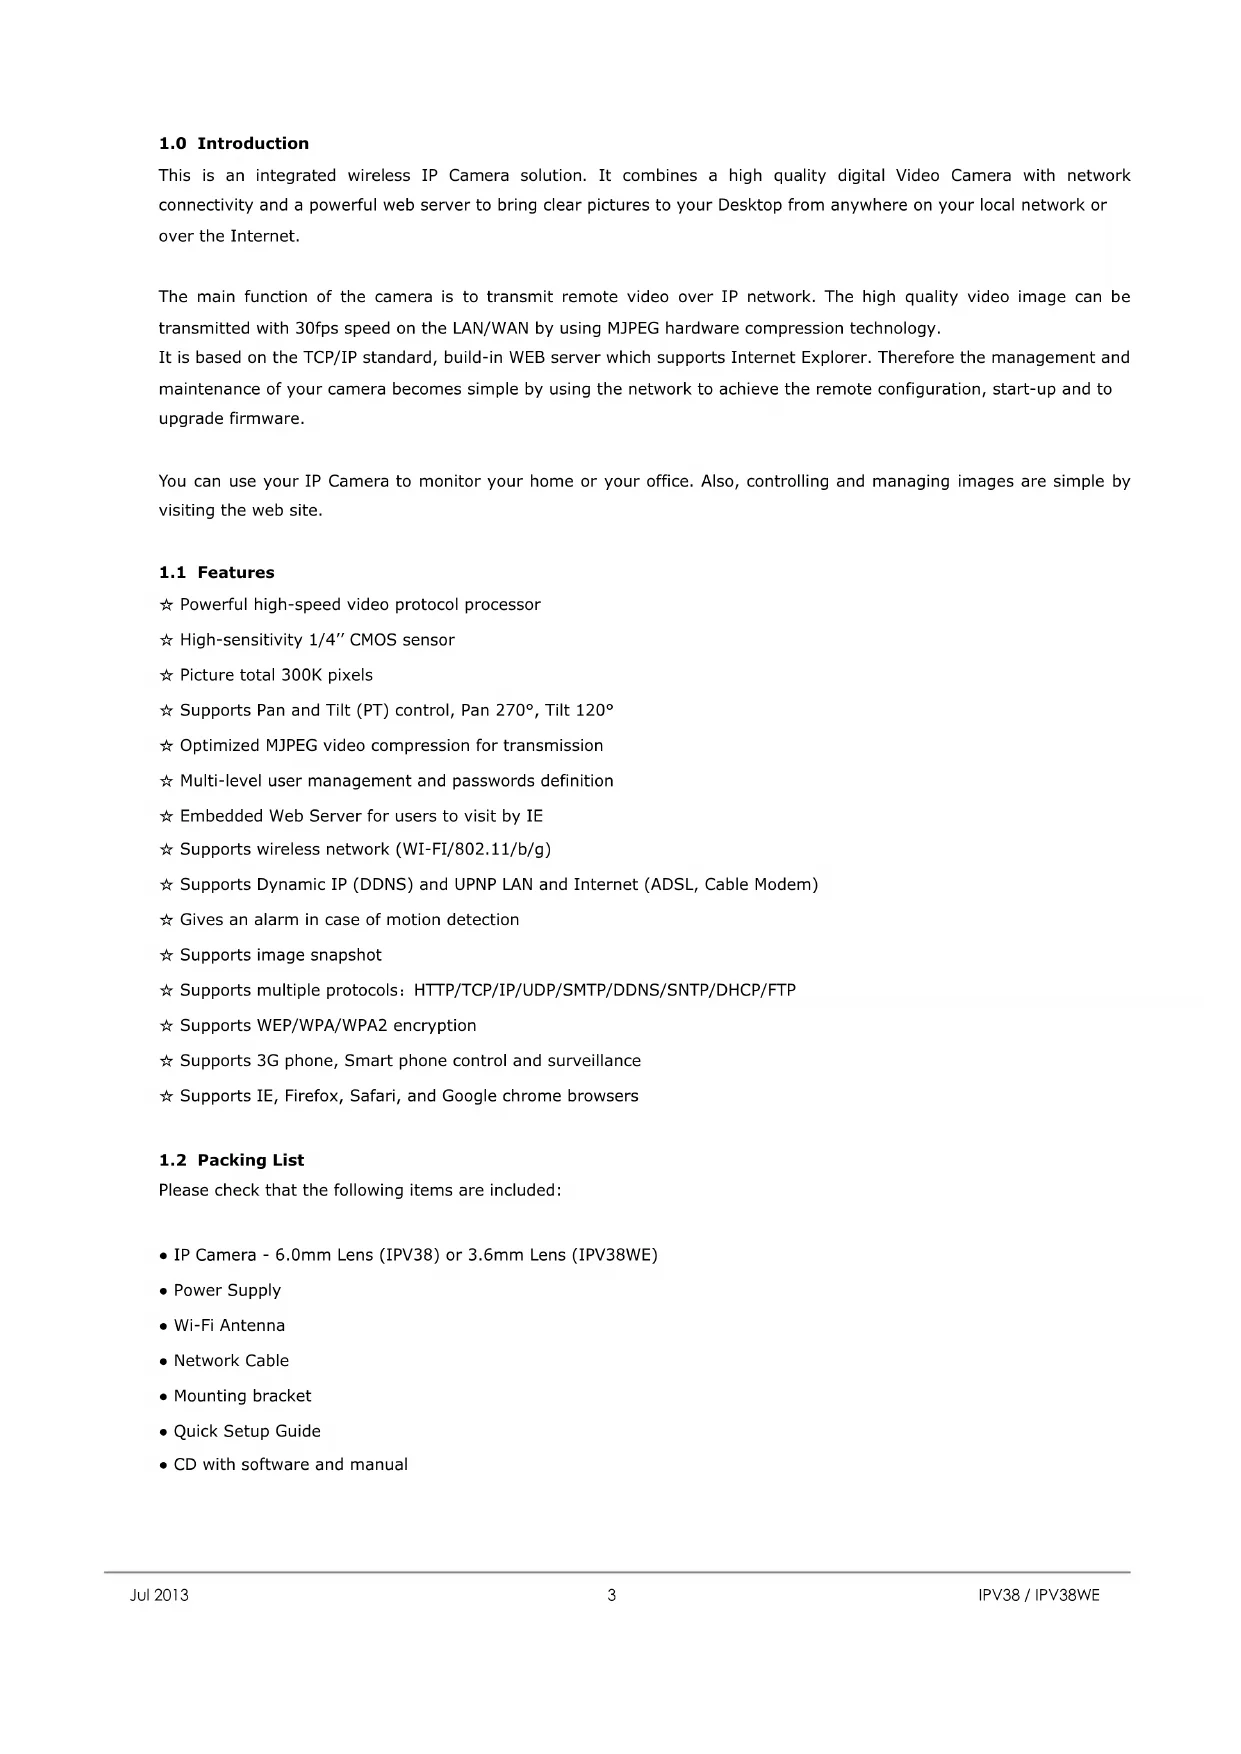
1.3.2 Rear Panel
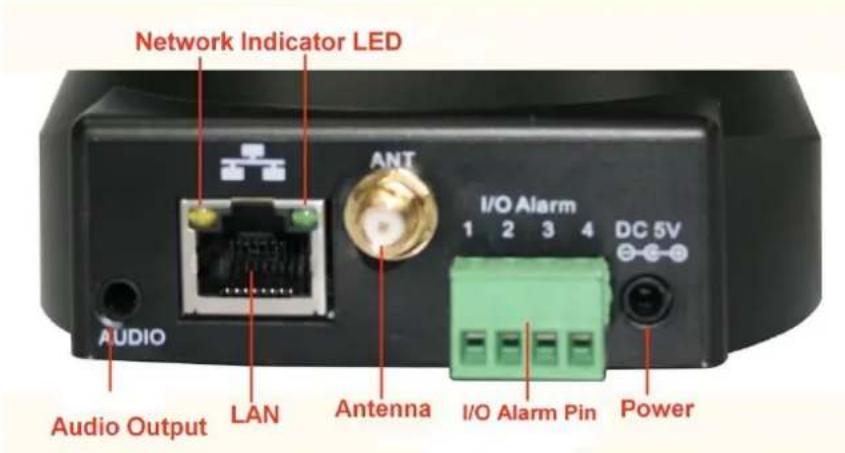
Figure 1.2
LAN: RJ-45/10-100 base T
Power: DC 5V/2A power supply
Network Light: The green LED is on when connected to the network, the yellow LED blinks when data is transferred.
Audio Output: The jack is used to connect an external speaker
I/O PINS: 1: Output A 2: Output B 3: Alarm input 4: Input (GND)
1.3.3 Bottom View

Figure 1.3
Please note the unique MAC and DDNS addresses on the bottom of the camera (different for every camera).
RESET BUTTON: Press and hold the RESET BUTTON for 15 Seconds to reset the camera back to the factory default settings. (Please keep the power on when doing a RESET)
1.4 PC System Requirements
System configuration requirements:
CPU: 2.06 GHZ or above.
Memory: 256M or above.
Network Card: 10M or above.
Display Card: 64M or above memory.
Recommended Operating system: Windows XP, Windows Vista, Windows 7.
1.5 Hardware Installation
You need to set up your camera using a network cable (wired) first, before you can use it wirelessly, so let's start with plugging in the network cable. Follow the steps below to set up your camera hardware.
- Plug one end of the network cable into the camera, and the other end into an empty port of your router/switch/modem.
natural_image
Two-panel image showing a plug inserted into a device and a close-up of internal cables with connectors (no visible text or symbols)-
Install the Wi-Fi antenna to the camera.
-
Plug the power adaptor into the camera and into an AC outlet. Please note that your power supply will fit both the AC outlet and the Audio Output, please make sure you put it in the AC outlet, or your IP camera will not be powered.
-
It takes approximately 30 seconds to boot up the camera.
-
When the power is on and the network cable is connected, the green LED on the rear panel next to the network cable will stay on, please make sure the Green light is on before we continue. The yellow LED will keep flashing, and the Indicator LED on the front of the camera will flash when the connection is established. (The behavior of the front indicator LED can be controlled by software).

Figure 1.4
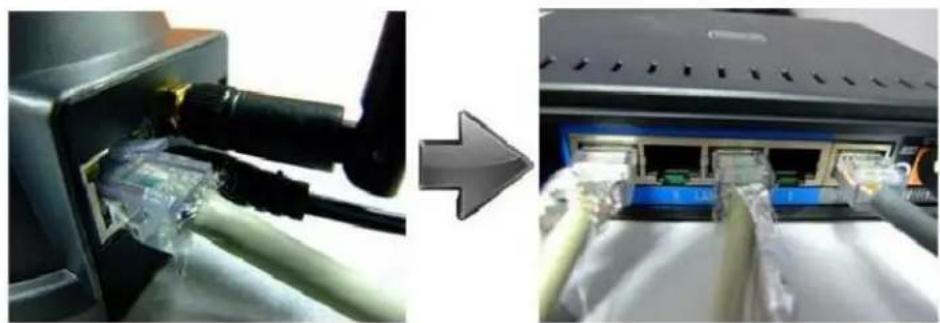
1.6 Software Installation
-
IP Camera Tool: Insert the CD, a popup menu might appear like shown in the picture below.
-
Select "Open Map" and click "OK"
- Open the "ebode IP Vision Software" folder and double click "IPCamSetup.exe" then click next to complete the software installation. (Please note that on some computer systems it might take a few seconds before the "IPCamSetup" icon will appear)

In order to run smooth we will need to install the "ActiveX App" on each system we would like to use to visit the camera. The "AppInstall" file is located in the same folder as the "IPCamSetup" file from the previous steps. Please take the following steps:
- ActiveX: Double click "Appinstall.exe"—"Next"—"Install"—"Finish".

flowchart
graph LR
    A["Laptop"] --> B["Add Device"]
    B --> C["Next"]
Figure 1.5

Figure 1.6
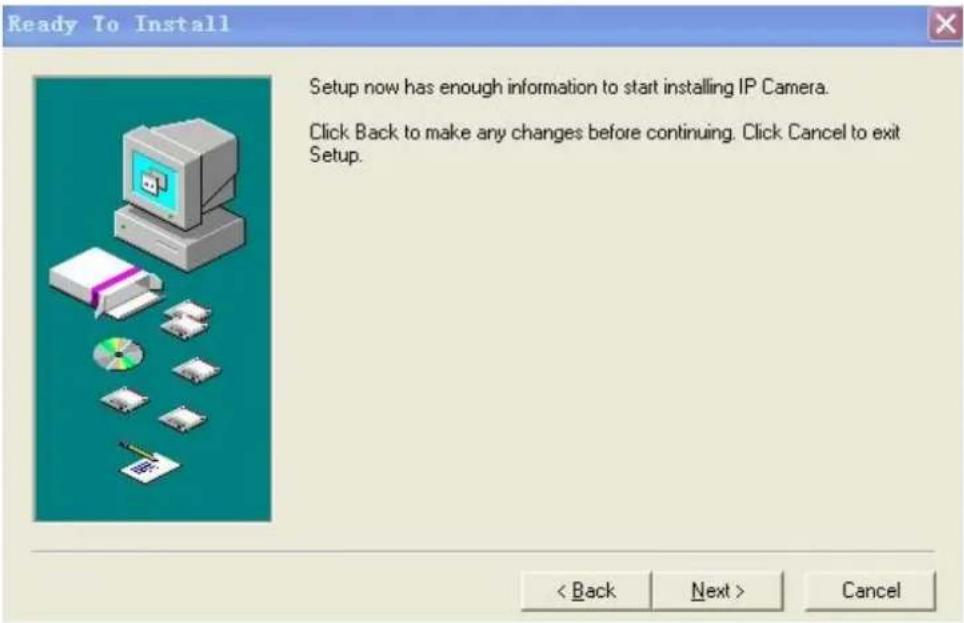
Figure 1.7
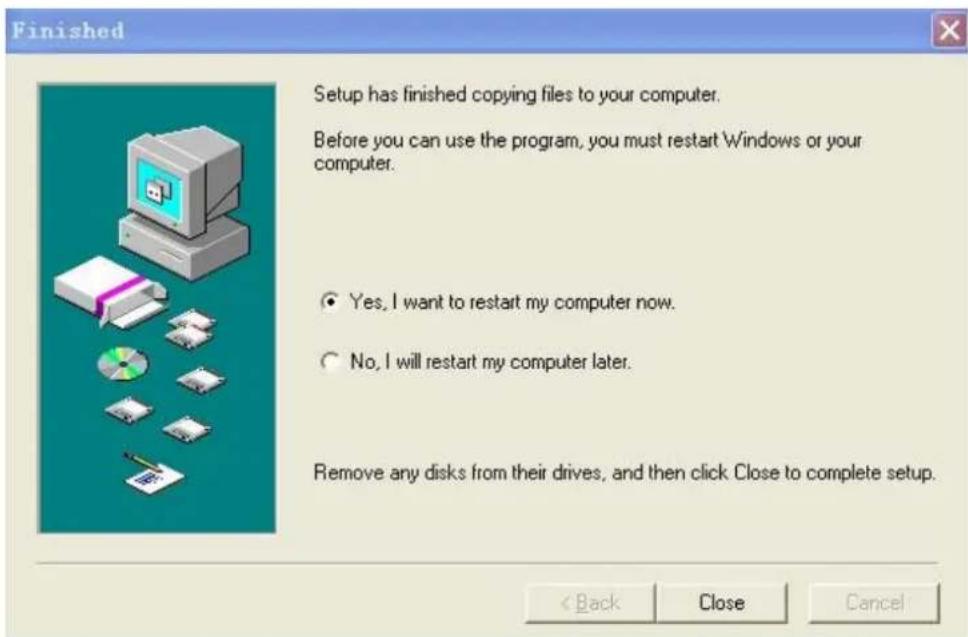
Figure 1.8

After the systems has been restarted, the icon "IP Camera Tool" IP Camera Tool will be displayed on your desktop.
Caution: Before installing and using the product, please read the following precautions carefully and make sure they are fully understood.
Use only the power adaptor included with the product. Use of an unauthorized power adapter may cause damage to your IP Camera and avoid warranty.
The IPV38 is designed as an Indoor Camera should be installed indoors only.
Do not touch the lens of the IP Camera. The optimum focus range has been set for you. If you turn the lens, it may cause incorrect focus and blurry images.
Do not turn the Pan/Tilt by force, it may cause damage to internal components of the Pan/Tilt mechanism. Only when the Pan / Tilt system is not working properly anymore you are allowed to carefully move the camera left or right until a loud click is heard.
For firmware upgrading or connection with an external device, refer to detailed instructions contained in the CD.
Caution: On the first run of the program "IP Camera Tool" you might get a Windows Security Alert Popup. It will ask you to choose a setting for the firewall. Please make sure you choose the 'UNBLOCK' option. Your IP camera will not work without unblocking the firewall settings.

1.7 IP Camera Tool
When the Device has been installed properly, you can double-click the Icon "IP Camera Tool"

and a dialog box shown in Figure 1.9 will pop up.

Figure 1.9
Note: The software searches IP Servers automatically over your LAN. It may take a few minutes before the IP address appears in the list. There are 3 cases:
- No IP Cameras found within LAN. After about 1 minute search, the Result Field will show "not found IP Server" and the program shut down automatically.
- IP Cameras have been installed within LAN. All the IP Cameras will be listed and the total number is displayed in the result field as shown in Figure 1.9.
- The IP Cameras installed within LAN do not share the same subnet with the monitoring PC. A prompt will be shown in result field (prompt: Subnet doesn't match, double click to change!). Click the left mouse button to choose the prompt and click the right mouse button, choose Network Configuration to set the static IP address of the Camera to the same subnet as your LAN. (Figure 2.3).
NOTE: If it shows" Subnet doesn't match, double click to change!" you can also choose "Obtain IP from DHCP Server" to get a dynamic IP. (Figure 2.2). If the camera still doesn't show in the IP Camera Tool please use the Reset button on the bottom of the camera and hold it for 15 seconds with the power on. (Figure 1.3)
Please be sure your computer is on the same network as the camera!
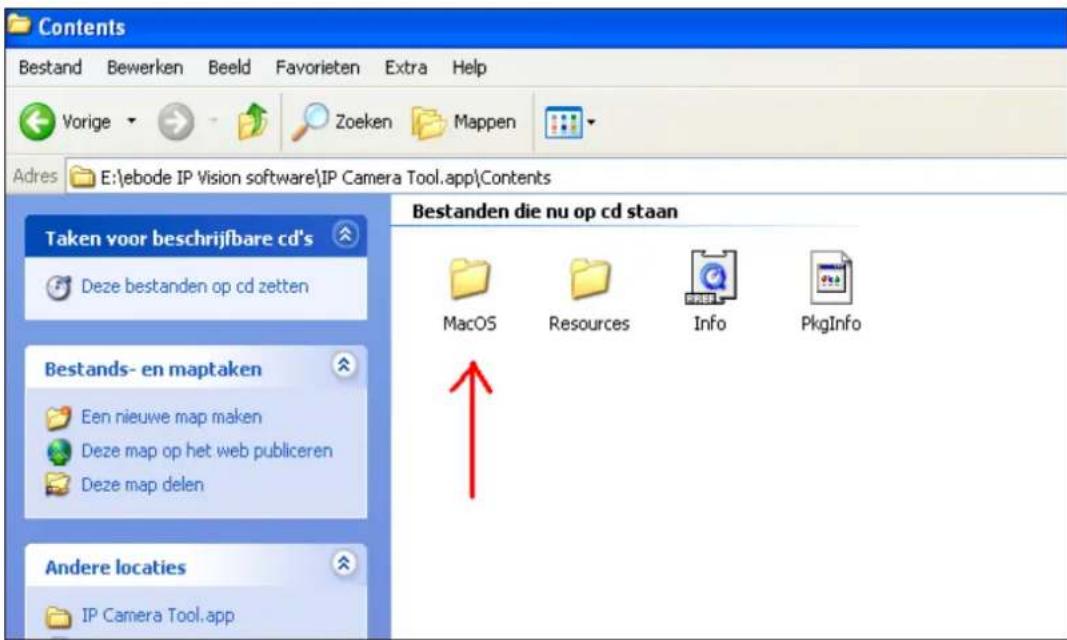
Mac Users:
Browse to the Mac folder x:\ebode IP Vision software\IP Camera Tool.app\Contents and install the IP Camera Tool.
Choose the IP Camera and Click the right mouse button on that camera, there are six options: (Figure 2.0). Basic Properties, Network Configuration, Upgrade Firmware, Refresh Camera List, Flush Arp Buffer, About IP Camera Tool.

Figure 2.0
1.7.2 Basic Properties
There is some device information in the Basic Properties, such as Device ID, System Firmware Version, and Web UI Version. (Figure 2.1).
The Device ID is the camera's MAC ID, which should be the same as shown on the sticker on the bottom of the camera. Every camera has a unique MAC ID. So if there are many IP addresses shown in the list, check the MAC ID on the bottom of the camera, so you can ensure which camera it is you are looking for.
Sometimes, if there is no IP address shown on the IP Camera tool, it could be blocked by a firewall, in this case you need to add the MAC ID to the router, and give it a fixed IP or add the MAC ID as a trusted site. There are two MAC Addresses, one is the Device MAC ID, the other is the WIFI MAC ID.
WIFI MAC ID, you can find it on the sticker on the bottom of the camera, you can also login to your WIFI router, check the host status, which will show all the WIFI devices connected to your router, you can also find the IPCAM's WIFI MAC ID there.

Figure 2.1
1.7.3 Network Configuration
Below shows how you can configure the Network parameters.
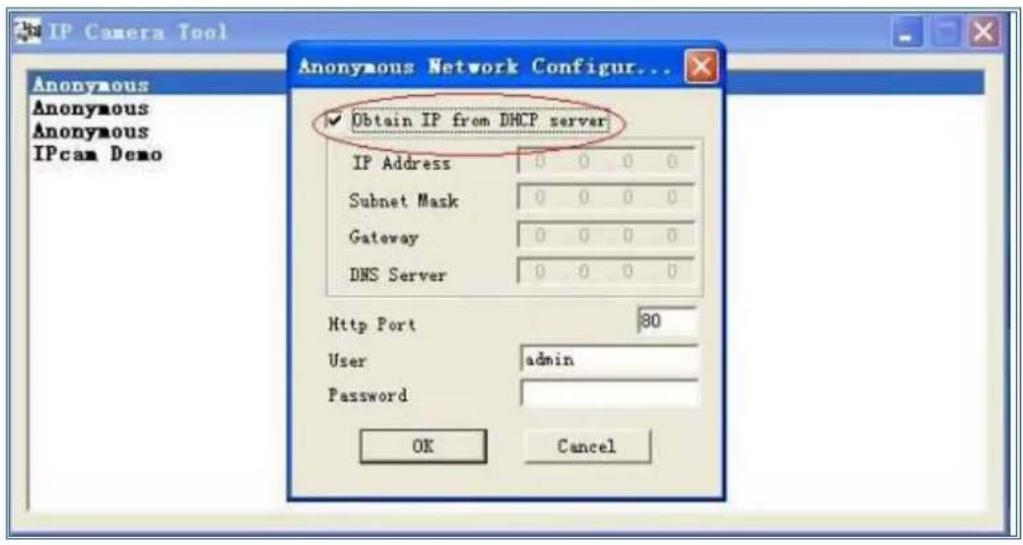
Figure 2.2
Obtain IP from DHCP server: If clicked, the device will obtain IP from DHCP server. In other words, the camera will have a dynamic IP. (Make sure the Router which the camera connects to has DHCP function and DHCP is enabled, by factory default all routers have DHCP enabled). (Figure 2.2).
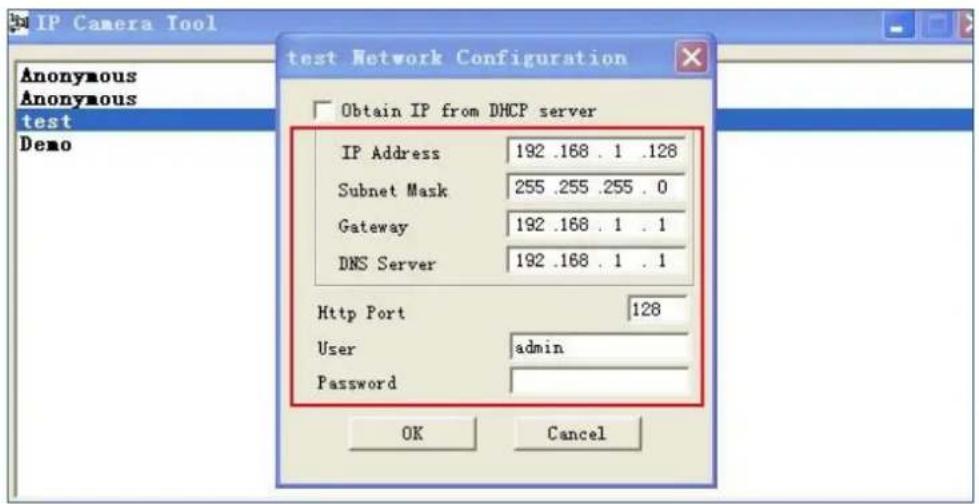
Figure 2.3
IP address: Fill in the IP address assigned and make sure it is in the same subnet as the Gateway, and the subnet should be the same as your computer or router. (I.e. the first three sections are the same).
Subnet Mask: The default subnet mask of the equipment is: 255.255.255.0.
Gateway: Make sure it is in the same subnet with PC's IP address. Here gateway is the LAN IP of your router.
DNS Server: IP address of IPS network provider. We suggest you use the same IP address as the Gateway.
NOTE: You can find the Subnet Mask, Gateway, DNS Server from your router, or check the local connection status of your computer, to get all the parameters. Normally two DNS servers are optional. Please go to step 3.7.3 (CMD) if you do not know how to find this information.
Http Port: LAN port assigned for the equipment, default is 80. We strongly recommend you to set another port number like 81, 82, 83 etc. for your camera since most internet providers will block port 80.
User: Default administrator username is: admin (please make sure all are lowercase letters).
Password: Default password is bank, i.e. no password.
NOTE: When the prompt "subnet doesn't match, double chick to change!" appears, please set the IP Address, Subnet Mask, Gateway, DNS Server once again, or enable Obtain IP from DHCP server.
For Network Settings please go to step 1.9
1.7.4 Firmware Upgrade
Enter the correct User and Password to upgrade system Firmware and Web UI. Please upgrade system firmware first and then upgrade Web UI or it may damage the camera. (Figure 2.4).
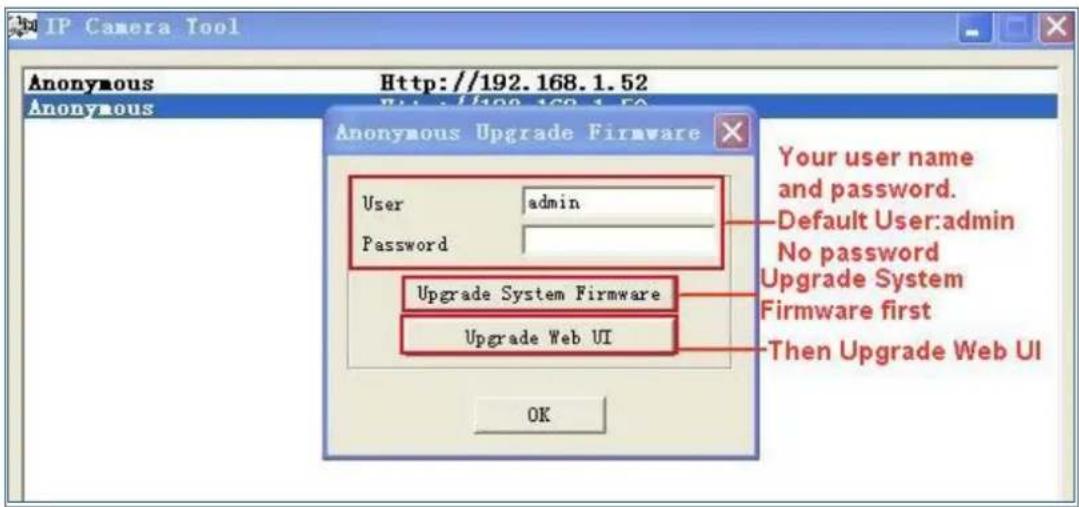
Figure 2.4
Please download the firmware package for the correct type of your camera before you upgrade.
Follow the upgrade document carefully to upgrade. Please see readme first before you upgrade.
Visit our website for new firmware releases in case of trouble www.ebodeelectronics.eu
CAUTION: You should not upgrade the firmware unnecessarily. It is possible to damage the camera if a mistake is made during the upgrade. If your camera works well with the current firmware, we strongly recommend that you don't upgrade it.
NOTE: When doing an upgrade, remember you must keep the power on, and it's best to use wired mode, connected via the network cable.
1.7.5 Refresh Camera List
Refresh camera list manually.
1.7.6 Flush Arp Buffer
When cable network and wireless network of the device are fixed IP address .There is a problem you may encounter is can search the camera IP but can't open the camera web page .you may try to use Flush Arp Buffer.
1.7.7 About IP Camera Tool
Check the IP Camera Tool Version and IP Camera ActiveX Control Version here.
1.8 Camera Login
You can access the camera through IP Camera Tool or Internet Explorer (IE), Firefox, Safari, Google Chrome or other standard browser directly.
Double click the IP address of the IP Camera listed (Figure 1.9). Select a language and the web browser you use. Note that IE Browser stands for "Internet Explorer" which is Microsoft Windows default browser.

flowchart
graph TD
    A["ActiveX Mode (For IE Browser)"] --> B["Sign in"]
    B --> C["ServerPush Mode (For Safari, FireFox, Google Browser)"]
    C --> D["Sign In"]
    D --> E["VLC mode (for IE, Safari, FireFox, Google, Opera browser)"]
    E --> F["Sign in"]
    F --> G["Sign in mobile phone"]
To access the camera by IE Browser directly, just type the camera's IP address, You will find the address of your camera with the Camera Tool (Figure 1.9). For example, if the camera's IP address is 192.168.1.123:
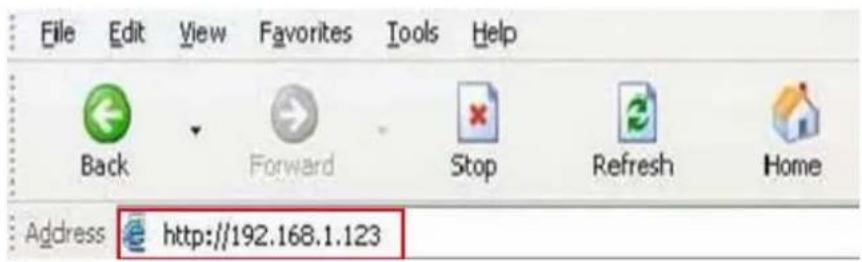
Figure 2.5
The following screen will pop up after pressing "Enter":
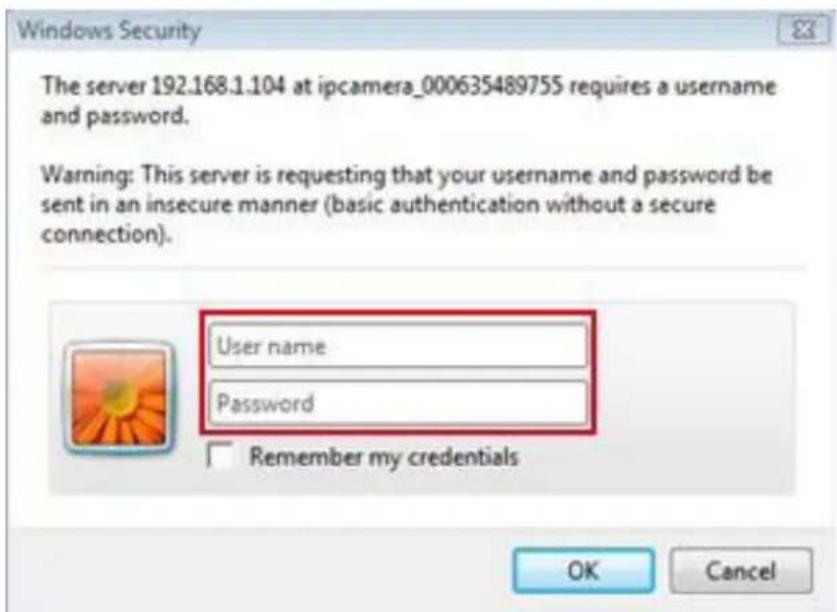
Figure 2.6
The default user name is admin, no password (please leave password blank)
Input the correct user name and password, the Sign In interface will pop-up.
There are three models to login (figure 2.7).
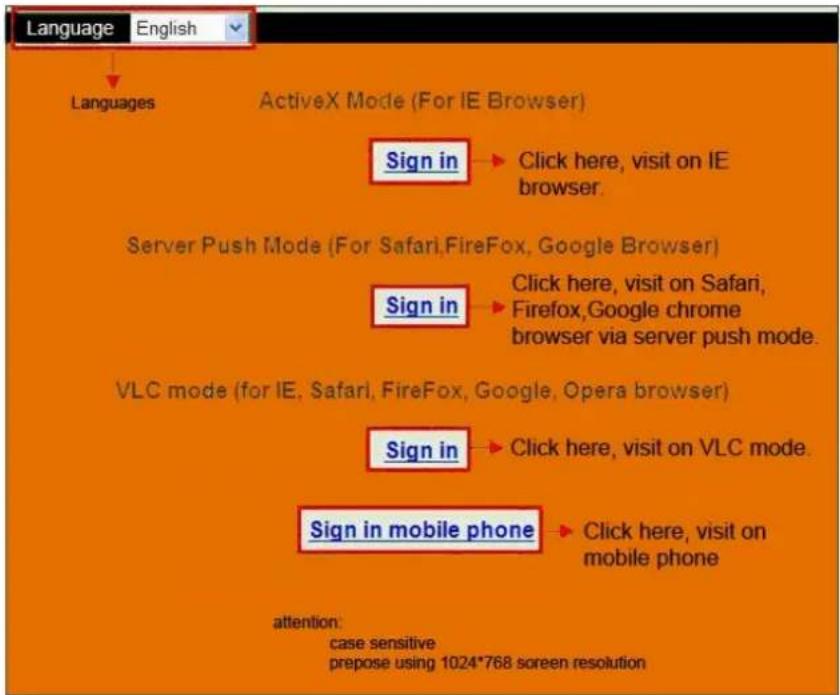
Figure 2.7
(1) "Active Mode" (For IE Browser): available in Internet Explorer 6.0 or above.
(2) "Server Push Mode": available in Firefox, Safari, and Google Chrome browser.
(3) "Sign in mobile phone": available in most recent Mobile Smart Phone's.
1.8.1 For IE Browser (Microsoft Windows default browser "Internet Explorer")
Choose Active Mode (For IE Browser), and sign in.
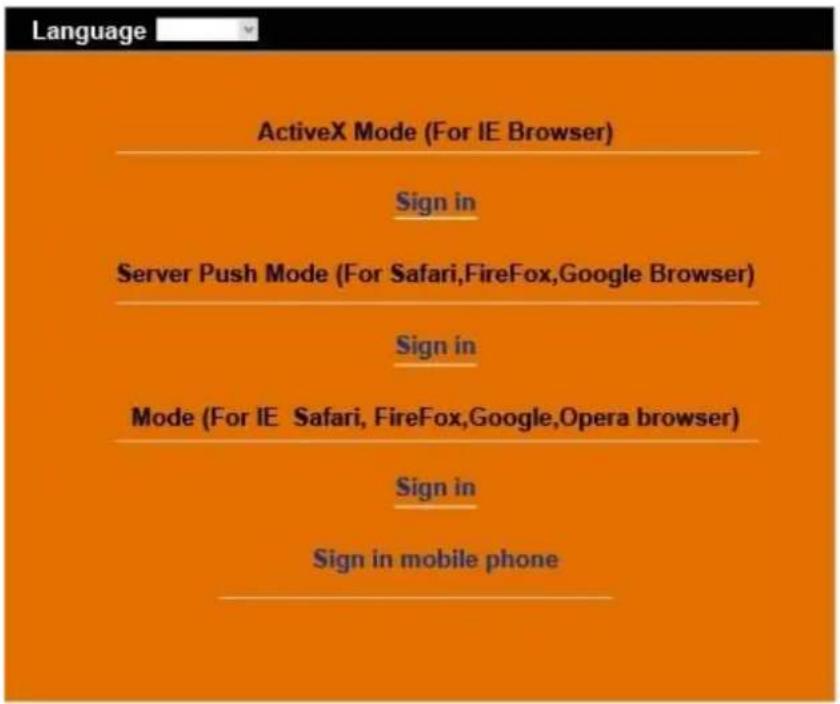
Figure 2.8
The first time you login to the camera, you might get an ActiveX prompt as in the picture above, please click the prompt and choose Run Add-on, refresh and login to the camera again, then will see live video, as below:
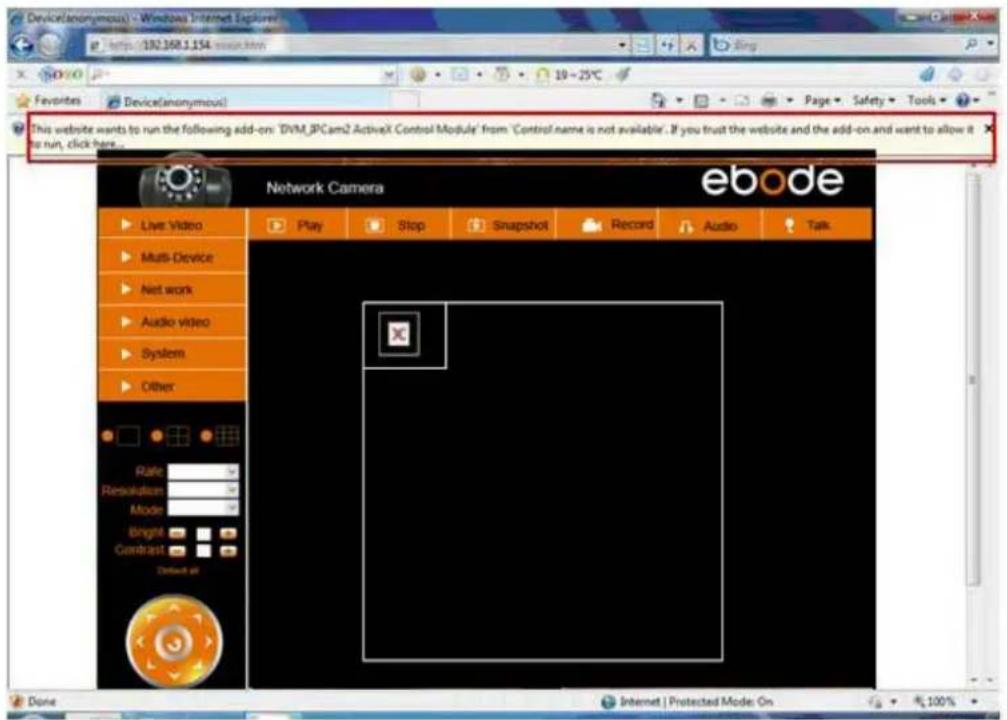
Figure 2.9

Figure 3.0

Note: If there is still no live video after you run ActiveX, and a red cross shows in the center of the screen, or even just a black screen, please try to enable the ActiveX options of IE security settings. Did you install the ActiveX App from step 4 in chapter 1.6, Figure 1.5?
Please take the following steps:
- Close the firewall software of your computer.
- Change the ActiveX settings, "IE" browser > "Tool" > "Internet Options" > "Security" > "Custom Level" > "ActiveX control and Plug-ins", all the ActiveX options set to be "Enable":
Especially:
Enable: Download unsigned ActiveX controls
Enable: Initialize and script ActiveX controls not marked as safe
Enable: Run ActiveX controls and plug-ins
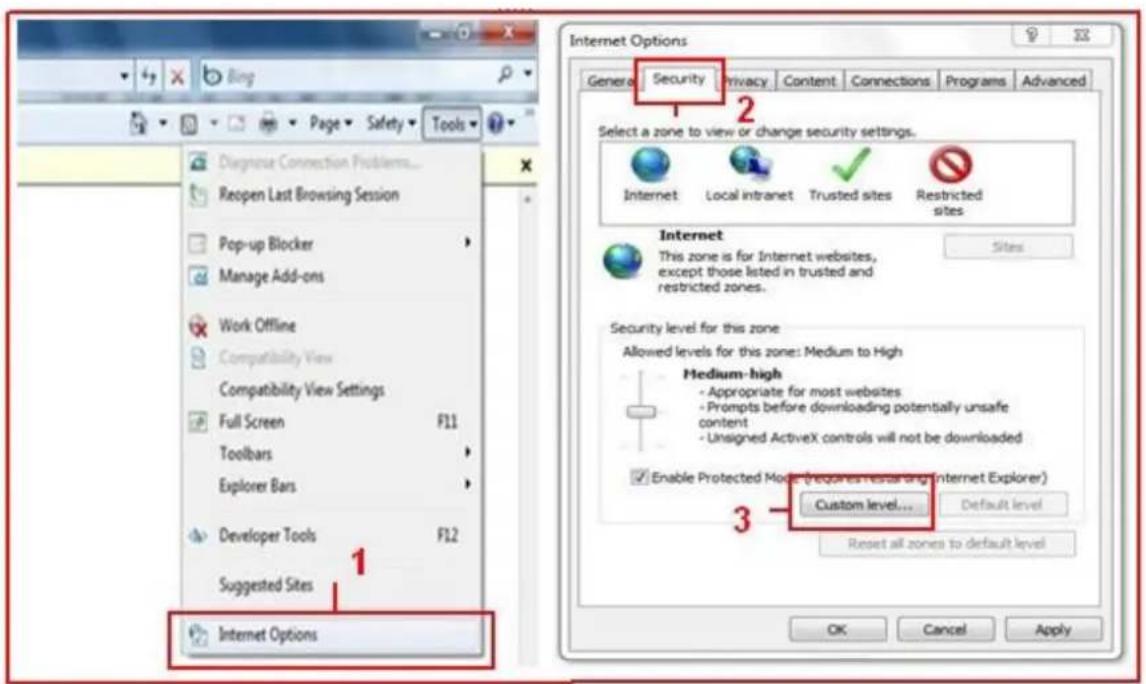
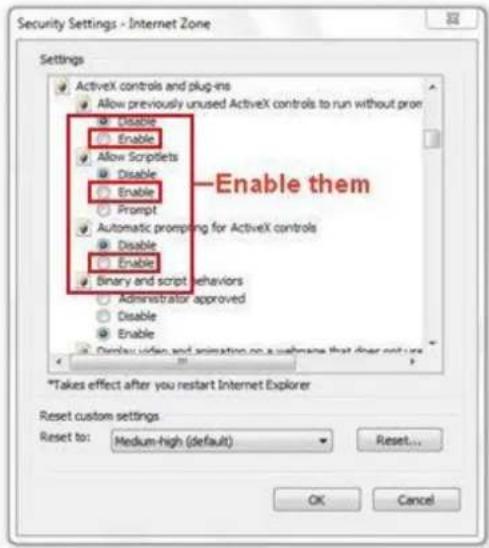
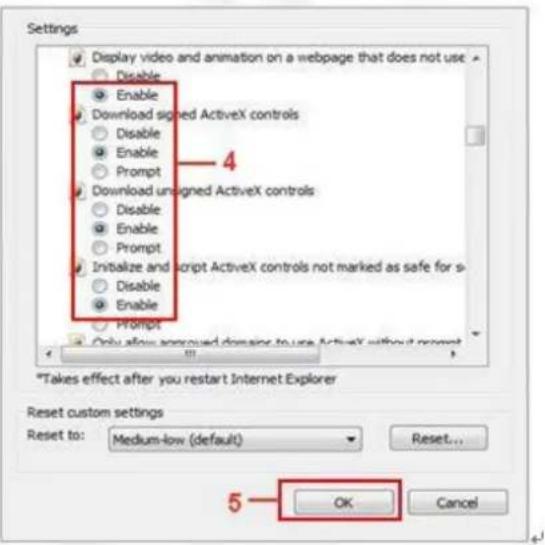
Figure 3.1
In addition: you can also click "Start" menu->"Internet Explorer", choose "Internet attributes" to enter, or via "Control Panel" ->"Internet Explorer", enter to Security setting. If you allowed the ActiveX to run, but still could not see live video, only a Red Cross in the center of the video, and the device status light changed to yellow color not green, please change to another port number. Don't use port 80, use another port such as 128, 1008 etc.
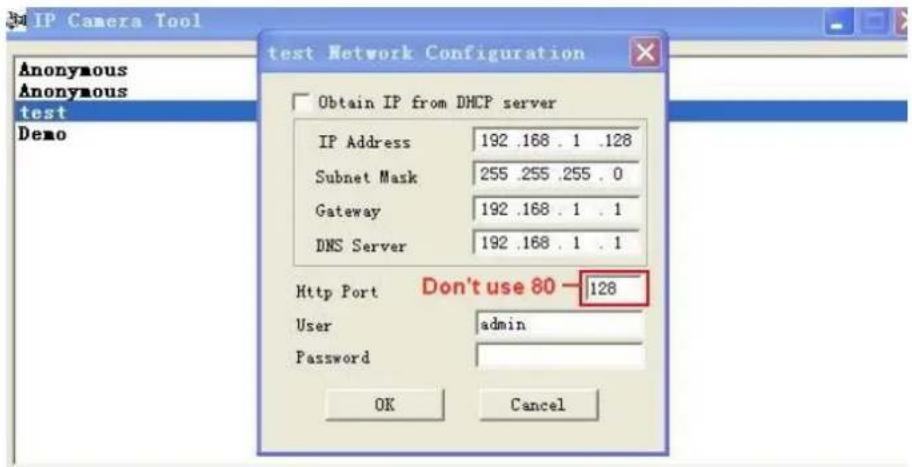
Figure 3.2
NOTE: Make sure that your firewall or anti-virus software doesn't block the software or ActiveX. If you couldn't see live video, please close your firewall or anti-virus software, and try again.
1.8.2 For Safari, Firefox, Google Browser
Choose Server Push Mode (For Safari, Firefox, Google Browser), and sign in. Server Push Mode doesn't support ActiveX, so some functions are not available, such as Play, Stop, Record, Audio, Talk etc. if you want to use these functions, please use IE browser.
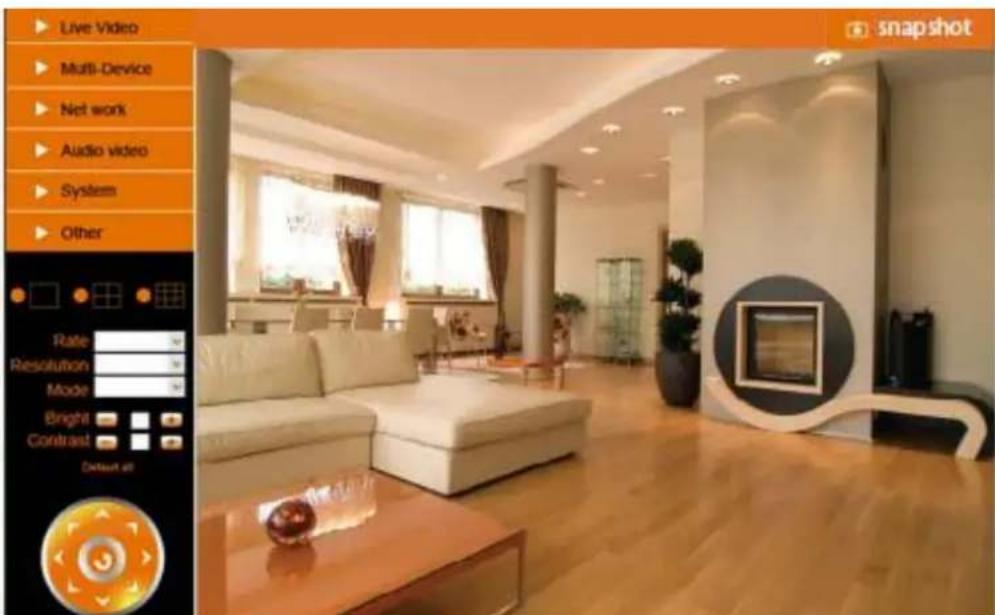
Figure 3.3
1.8.3 For Mobile Phone
Choose Sign in mobile phone, and sign in. Mobile phone doesn't support ActiveX, so only some basic functions are available in this mode. It supports iPhone®, Smart phone, 3G phone, etc. Normally, if the mobile phone supports network video, then it should work with your IP Camera. The ebode IP Vision app for iPhone® supports all features, see step 4.1
1.9 Network Settings
When logged in to the Camera with the IP Camera Tool click Network, this will pop-up the prompt as below:
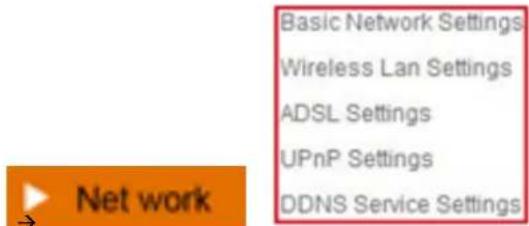
1.9.1 Basic Network Settings
Here you can fix the camera's IP address; i.e., set the static IP address of the camera manually. You can also do these settings from IP Camera Tool. (Figure 2.3). There are some good reasons to give the camera a static IP. The factory default setting is DHCP, this means that the network router will give the Camera an IP address itself for easy setup. The problem is that after a camera or network power loss the router may decide to give the camera a different IP address than the last time. If you want to login to the camera not using the IP Tool you don't know the camera's (new) IP address.
This will also result in a port forward to the wrong IP address and you will not be able to view your camera from remote locations or your smartphone. Belgium Telenet Users have some special rules for portforwarding and Static IP. Changes need to be made on the Telenet.be website. Most Telenet routers have a reserved static IP range starting at address 1 to 99. Please choose a static IP between 192.168.0.2 and 192.168.0.99 and make sure no other device has the same static IP to avoid conflicts.

Figure 5.7
If you don't know the Subnet Mask, Gateway, DNS Server. Please check the Local Area Connection Status of your computer; it contains all this information, steps as below or follow step 3.7.3 (CMD):
- Control Panel→Network Connections→Local Area Connections (Lan)→Support→Details
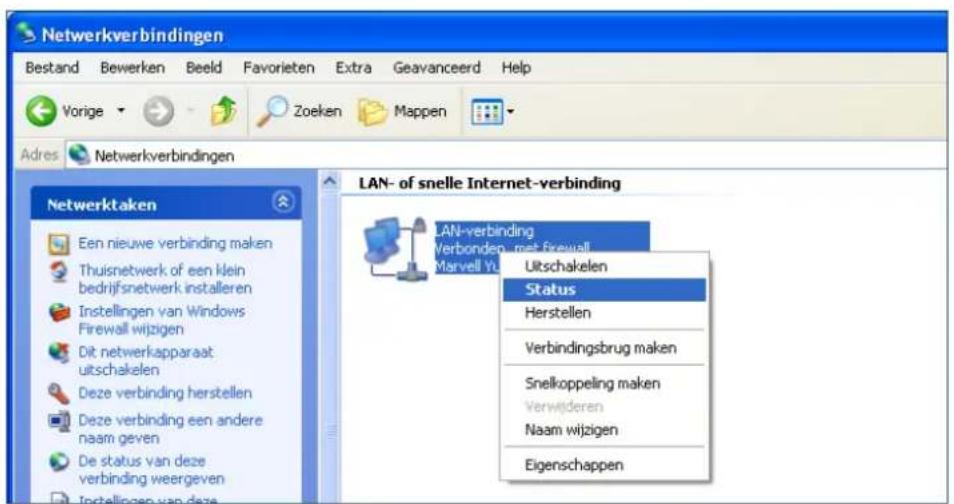
- Find the local connection icon 📁, because you might see more than one icon, left click it, choose Support → Details
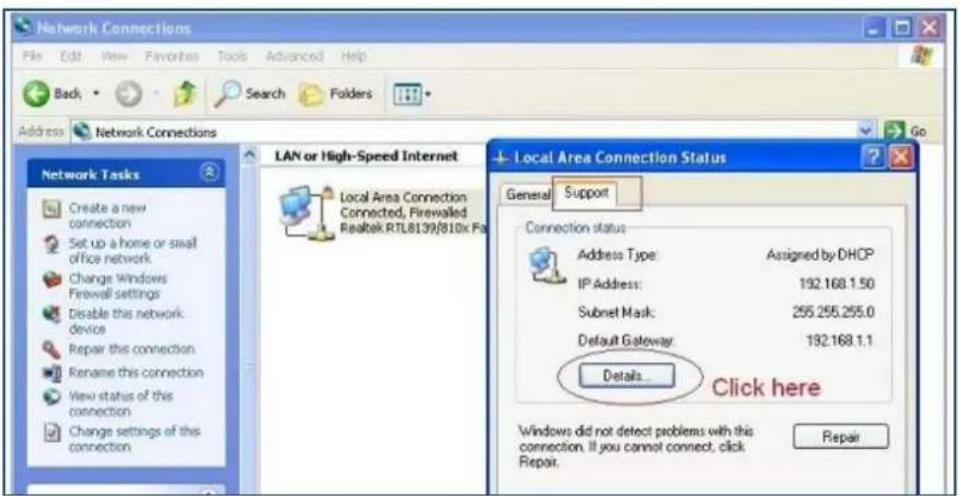
Figure 5.8
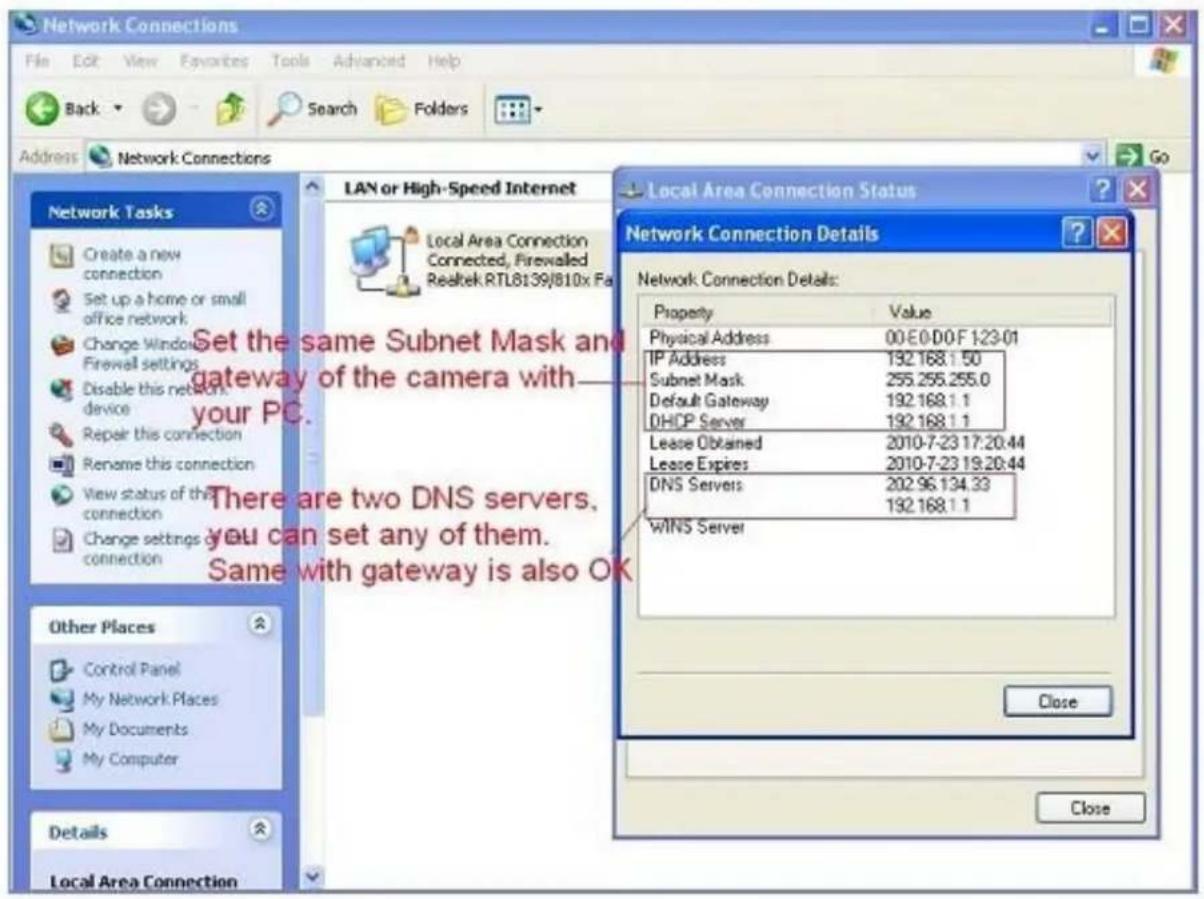
Figure 5.9
If you don't know the DNS Server, we suggest you to use the same IP address as the Gateway.
Most routers will supports DHCP function, you can choose "Obtain IP from DHCP Server" to get dynamic IP, however we strongly recommend you to use a Static IP for remote login to the camera (see step 3.3)!
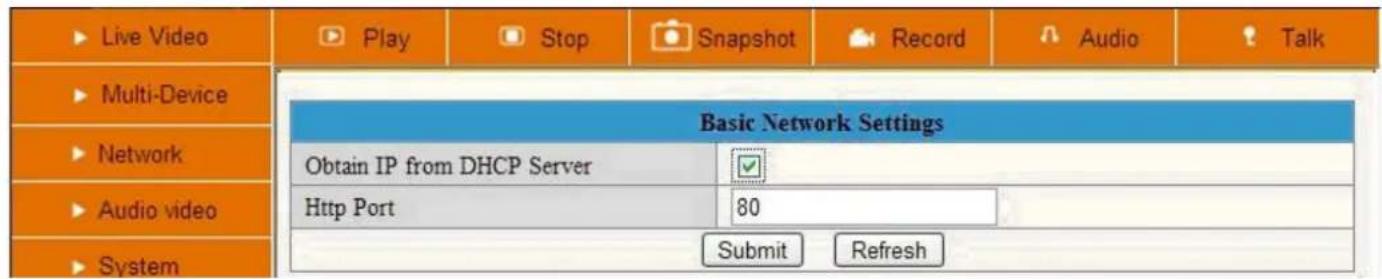
Figure 6.0
Http Port: In most cases your Internet Service Provider blocks this port (80), you may change it to another port number such as 81, 82, 83 etc. Make sure that if you have more than one camera to give each camera a unique port number to avoid login problems.
1.9.2 Wireless LAN Settings
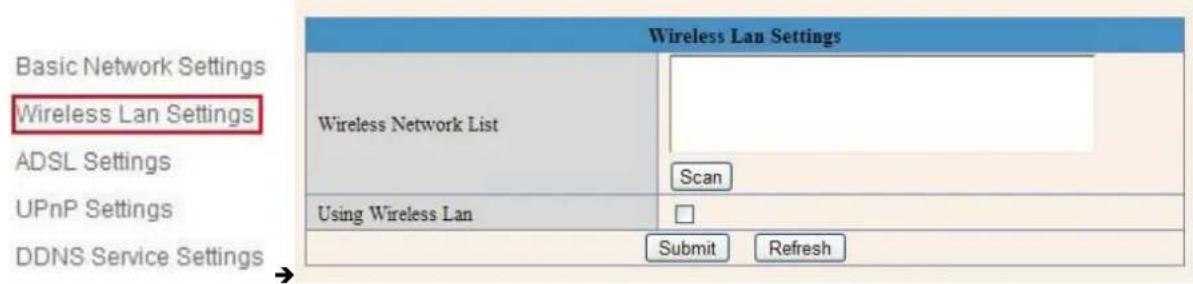
Figure 6.1
Let's setup a wireless connection for the camera with our wireless router by following these steps:
- Make sure your router is a wireless router.
- Make sure the Wi-Fi antenna is installed on your camera.
- Determine whether there is encryption (wireless password) on the WLAN of router, if there is encryption, note the key somewhere as we need it in the following steps.
Extra information:
Encryption is another word for password and type security of the wireless network, most routers will have encryption these days (and should be) so other people cannot brake in to your network. Some routers have a sticker on the bottom with the factory username and password, other ones don't have a password, and the password can also be set by the user or mechanic. There is a very handy website with allot of router brand information like default IP address, default username and password etc. Please note we only refer to this website, we do not maintain or support it. The website is: http://portforward.com/ Click "Router List" and find your brand and type to find more handy details about your router if you can't find them anywhere else.
In the next screenshots we you can see Portforward.com has all the information we need for our router.
Please note that Portforward.com is a website designed to tell you how to login, make changes, portforward etc. Information may vary from type to type of routers. Belgium users that have Telenet as Internet Provider are in most cases not able to login to their router. All changes have to be made on the Telenet.be website.

-
Login to the camera with the IPCamera Tool or manual with your Browser. (Figure 2.8)
-
Click "Network">"Wireless Lan Settings">"Scan", please press scan 2 times, then you will find the WLAN from the
list, choose the one you use (Figure 6.2).

Figure 6.1.1
![Device(Anonymous) - Windows Internet Explorer File Edit View Help Default Deviation Build Favorites Extra Help Favorites Zandamature Facebook Outlook PCAM Block PCCam Cootren ELM UPC University UPC UBC Registrable Device(Anonymous) Network Camera Live Video Play Stop Snapshot Record Audio Talk Multi Device Network Audio video System Other Wireless Las Settings Wireless Network List BMB_Office[1x00002954] infra WPA/WPA2-PSK BMB_Office[0x00002954] infra WPA/WPA2-PSK Scan Using Wireless Las SSID BMB_Office Network Type Infra Encryption WPA Personal (AES) Share Key Submit Refresh Rate Full-Space Resolution 320°140 Mode 50 Hz Encrypt Contract Default an](/content/2026/02/359225/images/5da5836c32b6876d631daa4b27a3e635485140b66f4d0d98f9c5943678ff8f15.jpg)
Figure 6.2
Please note that the (tree view) menu (Figure 6.1.1) can look different on different computer systems depending on the resolution of the screen used. Figure 6.1.1 shows that we had to scroll over with our mouse and click "Network" inside the tree view on the left and that the options unfold in the tree view itself. After clicking "Network" you will see something like Figure 6.1.1.

- Select your Wireless network in the list, please look careful and select the right one.
"Wireless Lan" can also be referred as "SSID" in some router manuals or on the bottom of the router.
- Behind the SSID you can also find your type of encryption, in this particular case the Camera discovered: Network type "infra" Encryption "WEP".
![Wireless Lan Settings 123[002586745b2c] infra WEP 1[00258637ee26] infra None zhonglian[0025862c0bee] infra WEP t[e005c52b6934] infra None Scan](/content/2026/02/359225/images/7839fb14b5b334b52521ab20ff528f34762a91de392ef5a0573fe24ad6676239.jpg)
- If there is no encryption, select "none" and click "Submit". (Figure 6.4).
- If there is encryption, please input the share key (password), then click "Submit". (Figure 6.5).
- Wait about 30 seconds, the camera will reboot, after full reboot unplug the network cable. You might have to login to the Camera again with the IP Camera Tool to continue with the next steps.
![Wireless Lan Settings 123[002586745b2c] infra WEP 1[00258637ee26] infra None zhonglian[0025862c0bee] infra WEP t[e005c52b6934] infra None Scan Wireless router SSID list Using Wireless Lan ✓ SSID 1 Network Type Infra Encryption None Submit Refresh](/content/2026/02/359225/images/f738242710cd9f7f09cebcc4af41d078fe17ad4a09b390d1d9b4ee32be8b0def.jpg)
Figure 6.3
![Wireless Lan Settings 123[002586745b2c] infra WEP 1[00258637ee26] infra None zhonglian[0025862c0bee] infra WEP t[e005c52b6934] infra None Scan Using Wireless Lan ✓ SSID 1 Network Type Infra No encryption Encryption None Submit Refresh](/content/2026/02/359225/images/caf671f52dd93917b6a3283e43d28e985856cf96695e06b27780fee8eff8ba12.jpg)
Figure 6.4
![Wireless Lan Settings 123[002586745b2c] infra WEP 1[00258637ee26] infra None zhonglian[0025862c0bee] infra WEP t[ø005c52b6934] infra None Scan Using Wireless Lan SSID 123 Network Type Infra Encryption WEP Authentication Open System Key Format Hexadecimal Number Default TX Key 1 Key 1 share key here 64 bits Key 2 64 bits Key 3 64 bits Key 4 64 bits Submit Refresh](/content/2026/02/359225/images/64003a855cb494cd0b12af138d3807c2166ce71f296b19c06dddfde319f08930.jpg)
Figure 6.5
1.9.3 ADSL Settings (please do not change or use these settings if you do not know what it is)
When connected to the Internet through ADSL directly, you can enter the ADSL username and password obtained from ISP.
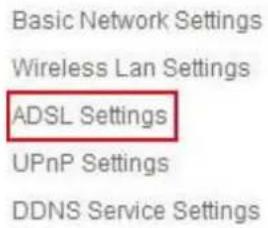
Figure 6.6
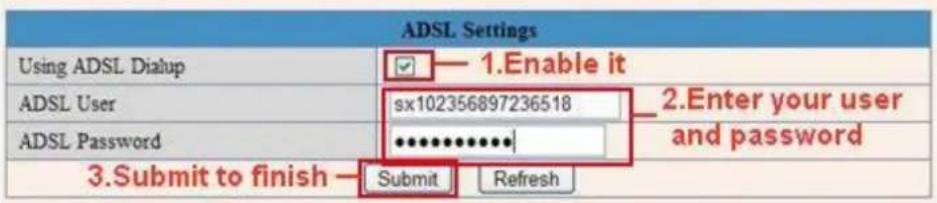
Figure 6.7
1.9.4 UPnP Settings (use always!)
If we want to be able to see our camera live video from a computer outside our network, for example when we are at work, we have to do some advanced settings in our router. For most people this will be a difficult step, but we will try to help you out. UPnP stands for Universal plug n Play device. UPnP will do the port forwarding in the router for us, so we don't need to do this manually. In order to use this function we need to have a router that is capable of using UPnP devices. Please make sure your router supports UPnP (please check the manual of your router to determine if it supports UPnP), if not please skip the next step and continue with step 3.7 DDNS Service Settings. By default UPnP is most likely disabled in your router. Please refer to the router manual to enable UPnP and enable UPnP.
Click Network > UPnP Settings to choose Using UPnP to Map Port:

Basic Network Settings
Wireless Lan Settings
ADSL Settings
UPnP Settings
DDNS Service Settings
Figure 6.8
Select UPnP and click Submit, then the camera will support UPnP port forwarding automatically. It is helpful for using DDNS (viewing live video from outside our network). As soon as you have enabled UPnP in you router, please proceed with the next steps.

Figure 6.9
NOTE: UPnP is only for port forwarding. It relates to the security settings of your router, make sure the UPnP function of your router is enabled, before you continue. If your router does not support UPnP, it may show error information, therefore we recommend you to do port forwarding manually in your router, as explained in step 3.7.3. If your router has UPnP and you cannot access your camera from outside your network please use manual portforwarding in step 3.7.3. always leave UPnP on!
1.9.5 DDNS Service Settings
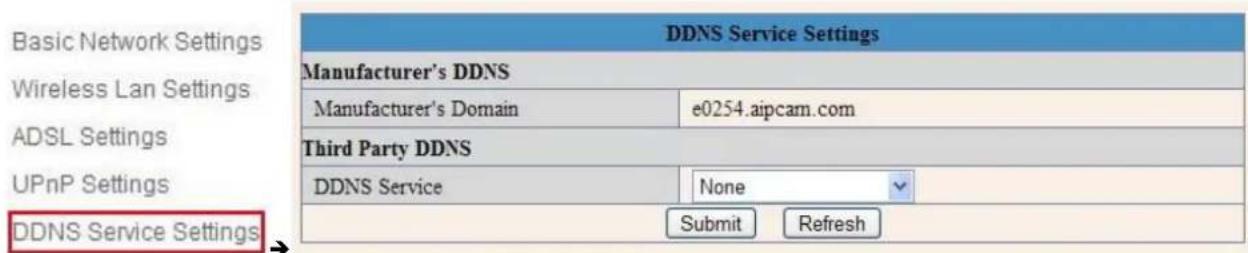
Select Network > DDNS Service Settings in the Tree View on the left (see picture above)
There are 2 options:
Manufacturer's DDNS: This domain is provided with the Camera (see the sticker on the bottom of the camera). We suggest you to use our provided DDNS server and set DDNS Service to "None" and choose 'submit'. In most cases you will need to login to the camera again. You can use the IPCamera tool for this or enter the Camera's IP address in your web browser. After you have done this, please skip the next step and continue with step 3.7.1
Third Party DDNS: You might have a DDNS server already, then it is useful to take the next steps.
This domain is provided by the third party, such as Dyndns, Oray, 3322 etc.

Figure 7.1
Third Party DDNS
If you use third party DDNS, please choose the server you use, such as "3322.org" or "dyndns.org" as below:

Figure 7.2

Figure 7.3
You have to register an account first, enter the user, password, and host.
NOTE: Only 1 DDNS can be chosen, for example, if you use the manufacturer's DDNS, the third party one won't work, if you use the third party DDNS, the manufacturer's one won't work.
1.9.6 To change the camera's port. (Always change your port!)
Open the IP Camera Tool from your Desktop select the ebode camera (it will turn blue) and right-mouse click and choose network configuration. The default port of camera is "80", please change "80" to any other one you like, such as 81, 82, 83 etc. Click "OK", the camera will reboot, wait about 30 seconds.

Figure 7.4
1.9.7 DDNS Status (Always check!)
After all these steps are done you should be able to access your camera from your mobile device or tablet using an app or your web browser.
Before you have remote access to the camera, you first need to check the DDNS status from the camera. Login to the camera and choose "System">"Device Info". Please check that 'DDNS Status' shows 'succeed' followed by the address. This is illustrated in the image below. It is important that you get the address link of DDNS to access the camera from anywhere in the world. You can also find this address on the bottom of your camera. Write this address somewhere or add is as your Favorite in your web browser to visit the camera from outside the network (from your mobile device for example at work, school, on the road etc.)

Figure 7.8
Congratulations! You've know successfully installed your IP camera. It is always a good idea to ask friends or family to login to the camera from their own place. Don't forget to change the password of the camera afterwards! Please save this manual for additional features. The following steps in this manual are only needed if the camera is not accessible from outside the network, or if you want to use additional features.
If it didn't succeed, it is most likely that UPnP is not supported by your router, please set the port forwarding manually (as explained in the next step). You can always leave UPnP on, whether it's working or not. If DDNS status still doesn't show 'succeed' please check the FAQ, Chapter 4, in the back of the full manual or at our website www.ebodeelectronics.eu.
2.0 Set Port Forwarding in the router (Manually)
ADVISORY: We highly recommend you to give the ebode camera a static IP address. This ensures you that the camera will always have the same IP address, and reduces the risk of not being able to access and control the camera by your mobile device. To give your camera a static IP address, please check step 3.3 in this manual.
This is the most important step. Please check the 'extra information' in step 3.4 for more information about routers and port forwarding.
In order to get the DDNS to work, you have to forward your cameras port in the router. You need:
- IP address of the camera
- Port number of the camera (should not be port 80!)
- Default gateway IP address of the router
- Username and password of the router (Belgium users visit the Telenet.be website for login)
The first two items can be found if you start up the IP Camera tool from your desktop. As an example the IP address from the below image is 192.168.1.16 and the port is 81.

REMEMBER: Your camera should not be on Port 80. If it is, please go to step 3.7.1 to change the port number.
How to discover the default gateway IP address in MS Windows Vista or Windows 7: Click 'Start', and type in 'cmd', press enter (see image below.) Belgium Telenet users should skip this step!
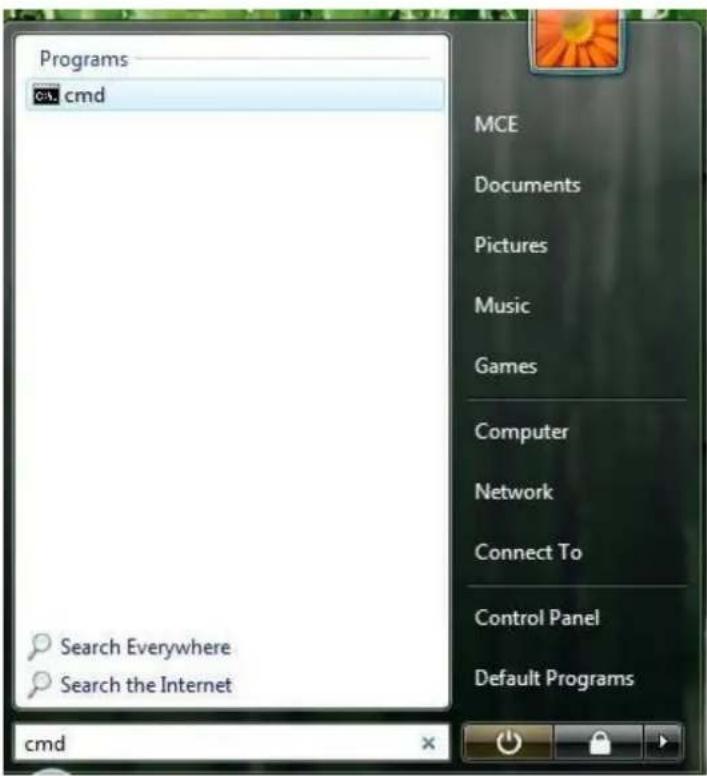
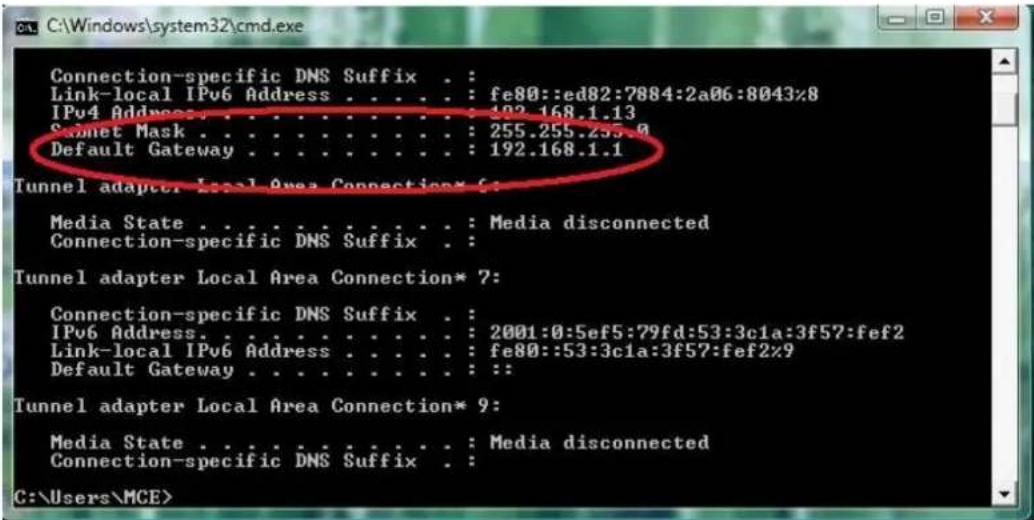
Next, type in 'ipconfig' and press enter. Please refer to below image.
![C:\Windows\system32\cmd.exe Microsoft Windows [Version 6.0.6002] Copyright (c) 200C Microsoft Corporation. All rights reserved. C:\Users\M&E>ipconfig_](/content/2026/02/359225/images/d351f514b33af40421cf459fa821effe9d7fdebbd5bb90cff46282eeca4615d5.jpg)
Finally, you can see the default router gateway address and Subnet Mask as shown in the image below.
Now we know the default router gateway address we only need to know the username and password of your router. Some routers have a sticker on the bottom with the factory default username and password, other ones don't have a password, and the password can also be set by the user or mechanic. There is a very handy website with allot of router brand information like default IP address, default username and password etc. Please note we only refer to this website, we do not maintain or support it. The website is: http://portforward.com/ Click "Router List" and find your brand and type to find more handy details about your router if you can't find them anywhere else. For more information on portforward.com, please go to step 3.4.
We know have all information to get the DDNS working, we will show you how to do this.
- Open your web browser and type in the default router gateway address and press enter.

- Enter the username and password from the router

- The next screen is the interface of a router. Please note that each brand of router has its own interface. This is just an example.
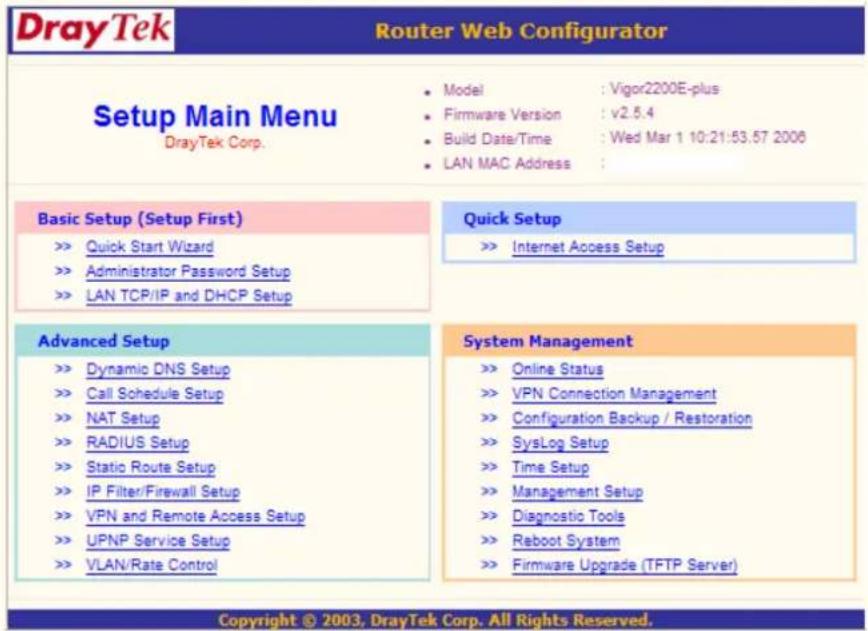
-
Select NAT Setup. Please note that for each brand this can have a different name for NAT setup. Portforward.com contains more information about most router brands.
-
Please choose 'Configure Port Redirection Table'

- Now we have to let the router know, on which port the camera is located.
Service name: give the camera a recognizable name, i.e. ebode IP Cam
Protocol: Select TCP
Public Port: You've checked this earlier on, please enter the right port for your camera (you can always use the IPCamera
Tool to look it up, as explained at the beginning of this chapter)
Private IP: Is the IP address of the camera. Again, you can use the IPCamera Tool to look it up
Private Port: This is the same as public port
Please tick the box for 'active'
Then press ok

Now go to the DDNS Status from step 1.9.7 and check if it says 'succeed'. You should now be able to login to the camera from remote access.
However, we showed you one example, there are many different kinds of routers, therefore it's difficult to show fixed steps for each router, but here are some other samples of different router's port forwarding settings. Remember, portforwarding.com is a very useful source of information.
TP-LINK:
- Login the router.

-
Choose "Forwarding", select "Virtual Servers"
-
Click the Add New button, pop-up below:
Add or Modify a Virtual Server Entry
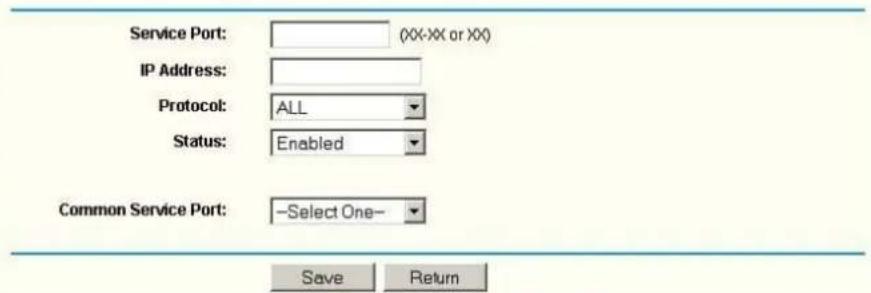
Figure 7.5
Fill the service port (except 80), IP address of the camera, then click Save NOTE: The port and IP address should be the same as the Camera.
BELKIN:
- Login to the router.
- Choose "Firewall", select "Virtual Servers"
- Input the port (do not use 80) and IP address, then click save.
NOTE: The port and IP address should be the same as the Camera.
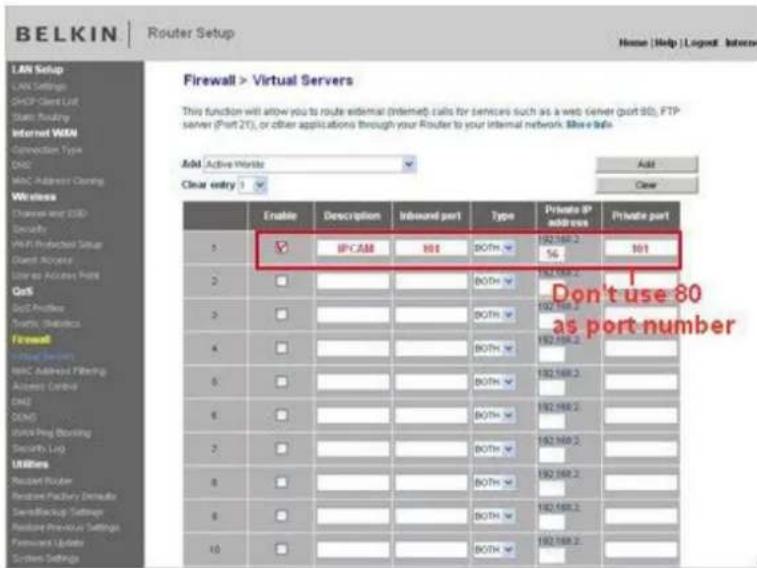
Figure 7.6
DLINK:
- Login the router.
- Choose "Advanced", select "Virtual Servers"
- Input the port, IP address, Protocol, then click save.
NOTE: The "public port" & "private port" should be the same as camera's port, choose the protocol to be "both".

Figure 7.7
Now you are finished setting up your camera. The next steps explain additional features of your camera and FAQ.
2.1 Belgian Customers with Telenet Modem/Routers
Our Belgian customers with Telenet Modem/Routers often do not have access to their Modem/Router because of Telenet policies. Please visit www.telenet.be and login with your personal username and password to change Wireless settings and do advanced options like portforwarding. Please contact Telenet if you need any help. Below you will find two pictures of a typical Telenet modem portforward (Please select "Geavanceerd"):


Mijn Telenet
Algemeen
Mijn aanrekeningen
Mijn internet
Fibernet
Verbruik
- Telemeter
- Mailbox aanmaken
- Mailbox beheren
• Geavanceerd
Website & Domein
• Website aanmaken
• Website beheren
• Webruimte beheren
• Domeinaanvraag
Abonnement
• Wijzigen
• Hotspottoegang
• Security Pack
Gebruikers
- Beheren
• Aanmaken
Draadloze instellingen
Instellingen
• Geavanceerd
- Reset
Figure 8.0
3.1 Device Info
You can find the information about Device ID, Firmware Version, Embedded Web UI Version, Alias, Alarm Status, DDNS Status, UPnP Status and MSN status.
| Device Status | |
| Device ID | 000DC5D008FA |
| Device Firmware Version | 0.22.2.20 |
| Device Embedded Web UI Version | 20.8.4.23 |
| Alias | Demo |
| Alarm Status | None |
| DDNS Status | aipcam.com Succeed http://e0254.aipcam.com:8901 |
| UPnP Status | No Action |
| Refresh | |
Figure 8.1
3.2 Alias Settings
Default device name is anonymous. You set any new name for your camera here, then click Submit.

Figure 8.2
4.0 Sign in mobile phone
If you are using a mobile phone, choose Sign in mobile phone, login to the camera, you will see the main user interface as below:
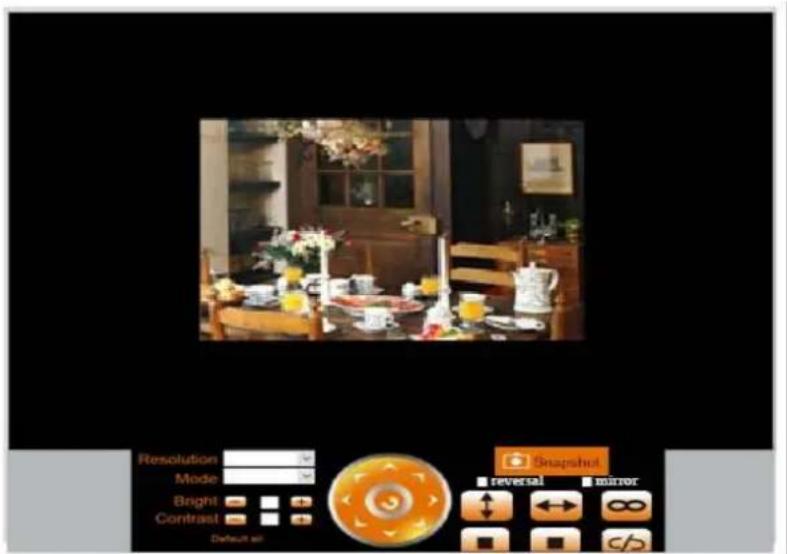
Figure 11.3
NOTE: Mobile phone Mode does not support ActiveX. In mobile phone mode, it only supports some simple functions, such as Resolution, Mode, Bright, Contrast, Pan/Tilt control, Snapshot, Reversal, Mirror, IO Linkage functions.
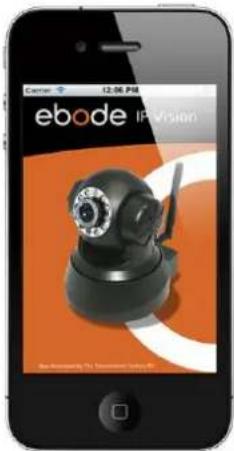
4.1 Compatible Apps for mobile devices
Recently we introduced our own ebode app for the IP camera. With this app you can remotely view and control your ebode IP camera from your iPad®, iPhone® or iPod Touch®, wherever you are*.
Go to the App Store to download the IPVision App (€4,49)
On the bottom of your camera you will find the address (DDNS e.g. http://a5151.gipcam.com) for remote access. Please note additional steps (static IP, Port change, Portforwarding etc.) are required!
FEATURES
- View the live video feed of your cameras
- Control the cameras in all 8 directions (if supported by the camera)
- Motion detection (only for cameras that support it): send mail on motion detection, set sensitivity, Quickly enable/disable the alarm
- Zoom in and out on the image by pinching (even when your camera doesn't support zoom)
- Full screen by rotating the device to a landscape position
- Full screen controls
- Swipe in full screen view to select another camera, this only works when not zoomed in (double tap to zoom to 100%)
- Take snapshots and save it to your camera roll
- Adjust brightness/contrast
- Mirror and flip is taken into account (so the controls will still work intuitively, even when the camera is mounted to a ceiling for example)
- Change camera resolution
- Adjust brightness and contrast
- Multiple camera support (up to 144 cameras)
- Mosaic view for showing 4 cameras (in landscape) and 6 cameras (in portrait) simultaneously
- Swipe in mosaic view to view more other cameras
- Possibility to lock PTZ controls and/or rotation
- iOS 4 tested and supported
- Taking full advantage of retina display on iPhone® 4
SUPPORTED CAMERAS FOR EBODE APP
Please note that this app is ONLY compatible with ebode MJPEG cameras, cameras of other brands are not supported.
*** NOTE THAT NOT ALL FEATURES WILL WORK WITH ALL CAMERA MODELS ***
*** NOTE THAT NOT ALL FEATURES WILL WORK WITH YOUR CAMERA IF YOU DO NOT USE THE IPHONE® APP OR MICROSOFT INTERNET EXPLORER SINCE THIS DEVICE DEPENDS ON ACTIVE-X***
*3G or wireless network connection required. For use outside your home network you'll need to setup port forwarding on your router, see the FAQ.
For this IP camera, you can use the following apps:


For Andriod: CamViewer App For iOS: ebode IP Vision (unofficial) App
5.0 Obtaining Technical Support
We hope your experience with your IP network camera is enjoyable, but if you experience any issues or have any questions that this User's Guide has not answered, please visit www.ebodeelectronics.eu or e-mail support@ebodeelectronics.eu.
This manual is based on the latest version of the camera at its release. Updates might become available overtime, so make sure you always make sure to run the latest firmware version for your camera in order to obtain support.
If your camera does not support some special functions shown in this manual, please contact our technical support team to obtain the latest Firmware and WEB UI file for upgrading.
1.0 Introduction
Alimentation: DC 5V/2A
Figure 1.3
natural_image
Two-panel image showing a device with attached cables and a close-up of network cables being inserted into a server (no visible text or symbols)Figure 1.6

Figure 1.7

Figure 1.8
1.7 IP Camera Tool
Figure 2.2
Figure 2.3
Figure 2.4
Figure 2.5
Figure 2.6
Figure 2.7
Figure 2.8
Figure 2.9
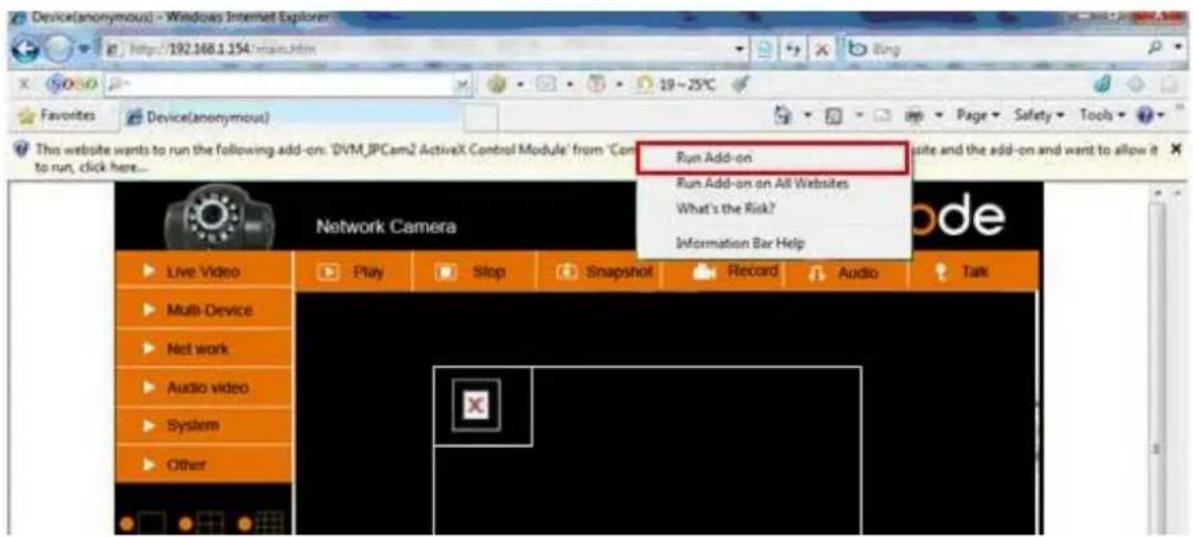
Figure 3.0

Activé: Download unsigned ActiveX controls
Activé: Initialize and script ActiveX controls not marked as safe
Activé: Run ActiveX controls and plug-ins
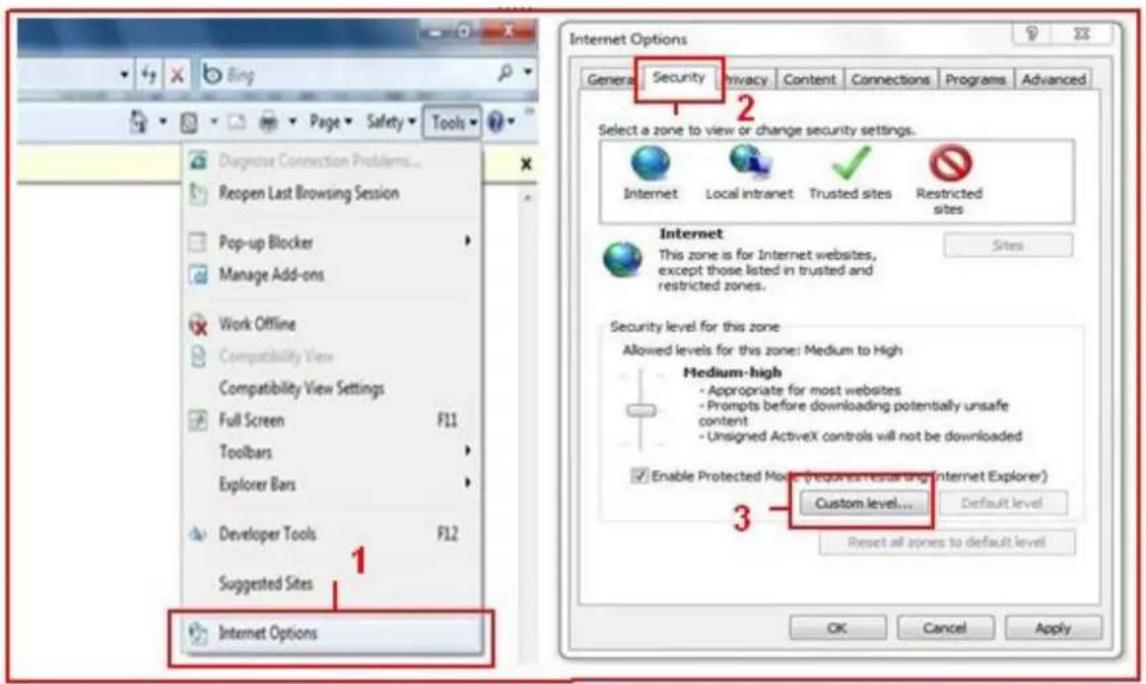

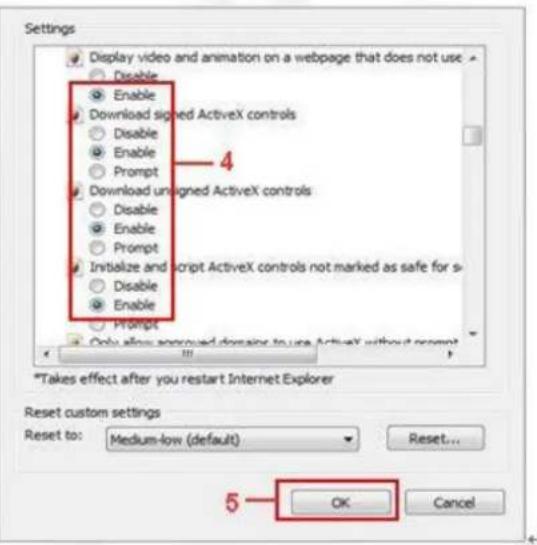
Figure 3.1
Figure 3.2
Figure 3.3
Figure 5.8

Figure 5.9
Figure 6.1
Figure 6.3
![Wireless Lan Settings 123[002586745b2c] infra WEP 1[00258637ee26] infra None zhonglian[0025862c0bee] infra WEP t[e005c52b6934] infra None Scan Using Wireless Lan SSID 1 Network Type Infra No encryption Encryption None Submit Refresh](/content/2026/02/359225/images/693dcb59223cd6eb4a4506c8f27581d23f80569bcd70899d03b92220a8531114.jpg)
Figure 6.4
![Wireless Lan Settings 123[002586745b2c] infra WEP 1[00258637ee26] infra None zhonglian[0025862c0bee] infra WEP t[ø005c52b6934] infra None Scan Using Wireless Lan SSID 123 Network Type Infra Encryption WEP Authentication Open System Key Format Hexadecimal Number Default TX Key 1 Key 1 share key here 64 bits Key 2 64 bits Key 3 64 bits Key 4 64 bits Submit Refrash](/content/2026/02/359225/images/cd5ced7392635072c32e42d9a460517af99813162223f5db00e96d93fefdabc9.jpg)
Figure 6.5
Figure 6.6
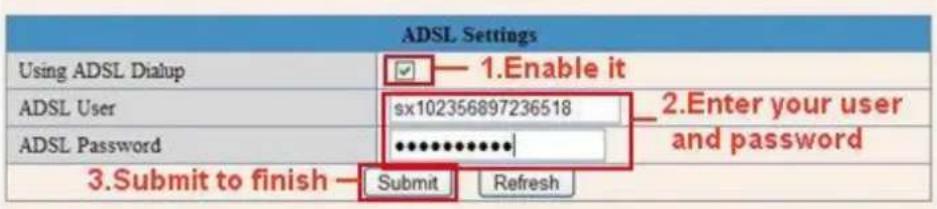
Figure 6.7

Figure 6.8
Figure 6.9
Figure 7.3
Figure 7.4
Figure 7.5
Figure 7.6
DLINK:
Figure 7.7
Figure 8.0
Figure 8.2
FONCTIONS
Pour Andriod: CamViewer App (officieux) App

Pour iOS: ebode IP Vision
5.0 Obtenir un support technique
DECLARATION OF CONFORMITY
Hereby, ebode electronics, declares that this ebode IPV38 or IPV38WE is in compliance with the essential requirements and other relevant provisions of the following Directives:
Directive 2004/108/EC of the European Parliament and of the Council of 15 December 2004 on the approximation of the laws of the Member States relating to electromagnetic compatibility
Directive 2006/95/EC of the European Parliament and of the Council of 12 December 2006 on the harmonization of the laws of Member States relating to electrical equipment designed for use within certain voltage limits
Directive 2002/95/EC of the European Parliament and of the Council of 27 January 2003 on the restriction of the use of certain hazardous substances in electrical and electronic equipment
Directive 2005/32/EC of the European Parliament and of the Council of 6 July 2005 establishing a framework for the setting of eco design requirements for energy-using
Technical data and copies of the original Declaration of Conformity are available and can be obtained from ebode electronics: PB 25, NL-4264ZG, the Netherlands.
CE
User Information for Consumer Products Covered by EU Directive 2002/96/EC on Waste Electric and Electronic Equipment (WEEE)
This document contains important information for users with regards to the proper disposal and recycling of ebode products. Consumers are required to comply with this notice for all electronic products bearing the following symbol:
Environmental Information for Customers in the European Union
European Directive 2002/96/EC requires that the equipment bearing this symbol on the product and/or its packaging must not be disposed of with unsorted municipal waste. The symbol indicates that this product should be disposed of separately from regular household waste streams.
It is your responsibility to dispose of this and other electric and electronic equipment via designated collection facilities appointed by the government or local authorities. Correct disposal and recycling will help prevent potential negative consequences to the environment and human health.
For more detailed information about the disposal of your old equipment, please contact your local authorities, waste disposal service, or the shop where you purchased the product.
DECLARATION OF CONFORMITY TO R&TTE DIRECTIVE 1999/5/EC
for the European Community, Switzerland, Norway, Iceland and Liechtenstein
Product category: general consumer (category 3).
English: This equipment is in compliance with the essential requirements and other relevant provisions of the European R&TTE Directive 1999/5/EC


- IPV38 & IPV38WE
- Introduction
- Features
- Packing List
- Product Views
- Front View
- Rear Panel
- Bottom View
- PC System Requirements
- Hardware Installation
- Software Installation
- IP Camera Tool
- Basic Properties
- Network Configuration
- Firmware Upgrade
- Refresh Camera List
- Flush Arp Buffer
- About IP Camera Tool
- Camera Login
- For IE Browser (Microsoft Windows default browser "Internet Explorer")
- For Safari, Firefox, Google Browser
- For Mobile Phone
- Network Settings
- Basic Network Settings
- Wireless LAN Settings
- Extra information:
- ADSL Settings (please do not change or use these settings if you do not know what it is)
- UPnP Settings (use always!)
- DDNS Service Settings
- To change the camera's port. (Always change your port!)
- DDNS Status (Always check!)
- Set Port Forwarding in the router (Manually)
- TP-LINK:
- BELKIN:
- DLINK:
- Belgian Customers with Telenet Modem/Routers
- Device Info
- Alias Settings
- Sign in mobile phone
- Compatible Apps for mobile devices
- FEATURES
- SUPPORTED CAMERAS FOR EBODE APP
- Obtaining Technical Support
- FONCTIONS
- Obtenir un support technique
- DECLARATION OF CONFORMITY
- CE
- User Information for Consumer Products Covered by EU Directive 2002/96/EC on Waste Electric and Electronic Equipment (WEEE)
- Environmental Information for Customers in the European Union
- DECLARATION OF CONFORMITY TO R&TTE DIRECTIVE 1999/5/EC
Brand : EBODE
Model : IPV38WE
Category : Surveillance Camera