
AquaAction FC8952 - Vacuum Cleaner PHILIPS - Free user manual and instructions
Find the device manual for free AquaAction FC8952 PHILIPS in PDF.
User questions about AquaAction FC8952 PHILIPS
0 question about this device. Answer the ones you know or ask your own.
Ask a new question about this device
Download the instructions for your Vacuum Cleaner in PDF format for free! Find your manual AquaAction FC8952 - PHILIPS and take your electronic device back in hand. On this page are published all the documents necessary for the use of your device. AquaAction FC8952 by PHILIPS.
USER MANUAL AquaAction FC8952 PHILIPS
Always here to help you
Register your product and get support at
www.philips.com/welcome
FC8952
FC8950


ENGLISH 6
FRANÇAIS 13
繁體中文20
31
37
Introduction
Congratulations on your purchase and welcome to Philips! To fully benefit from the support that Philips offers, register your product at www.philips.com/welcome.
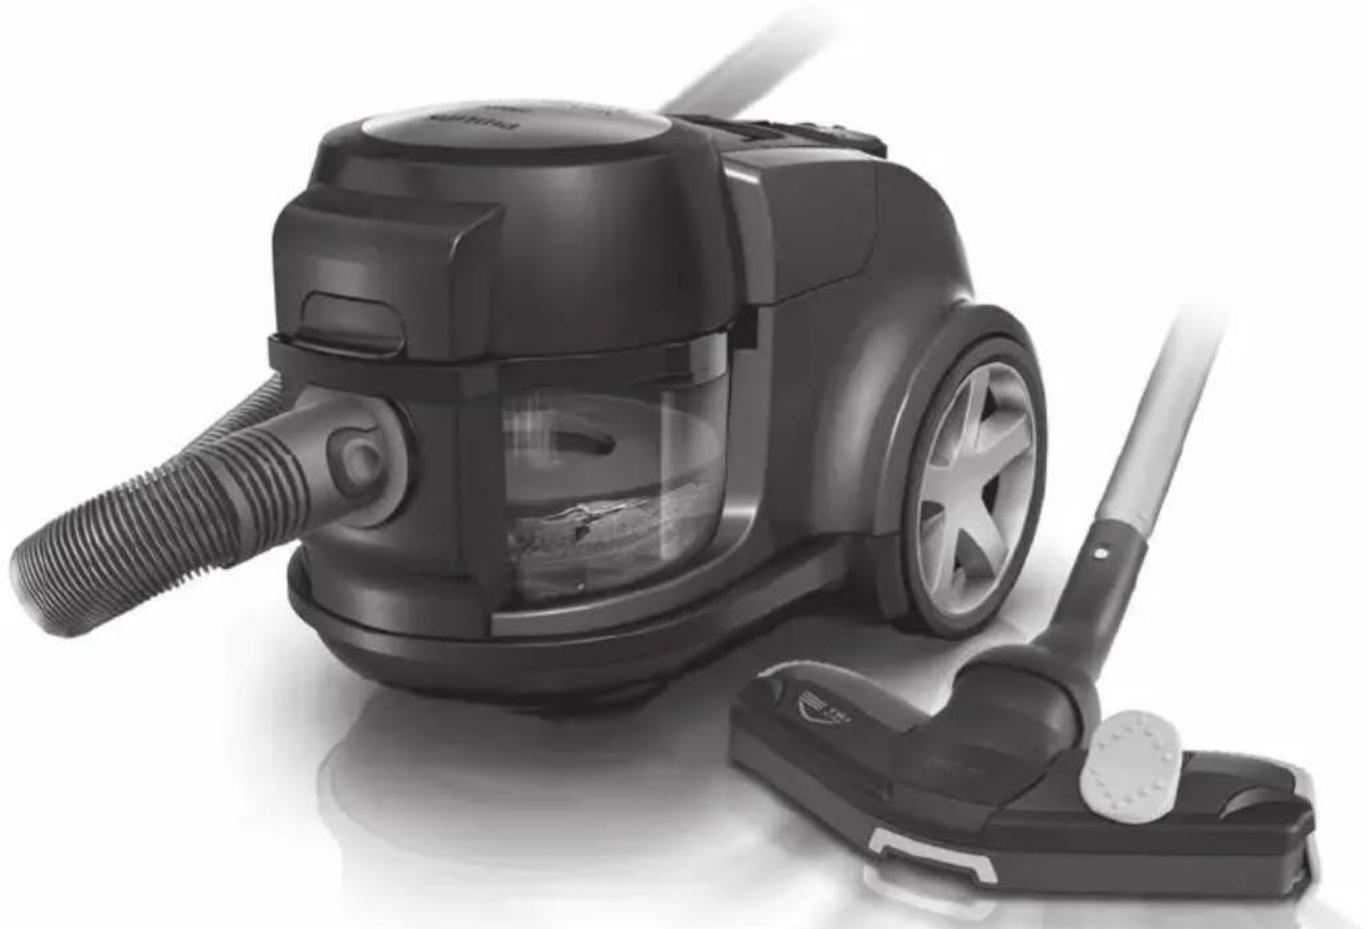
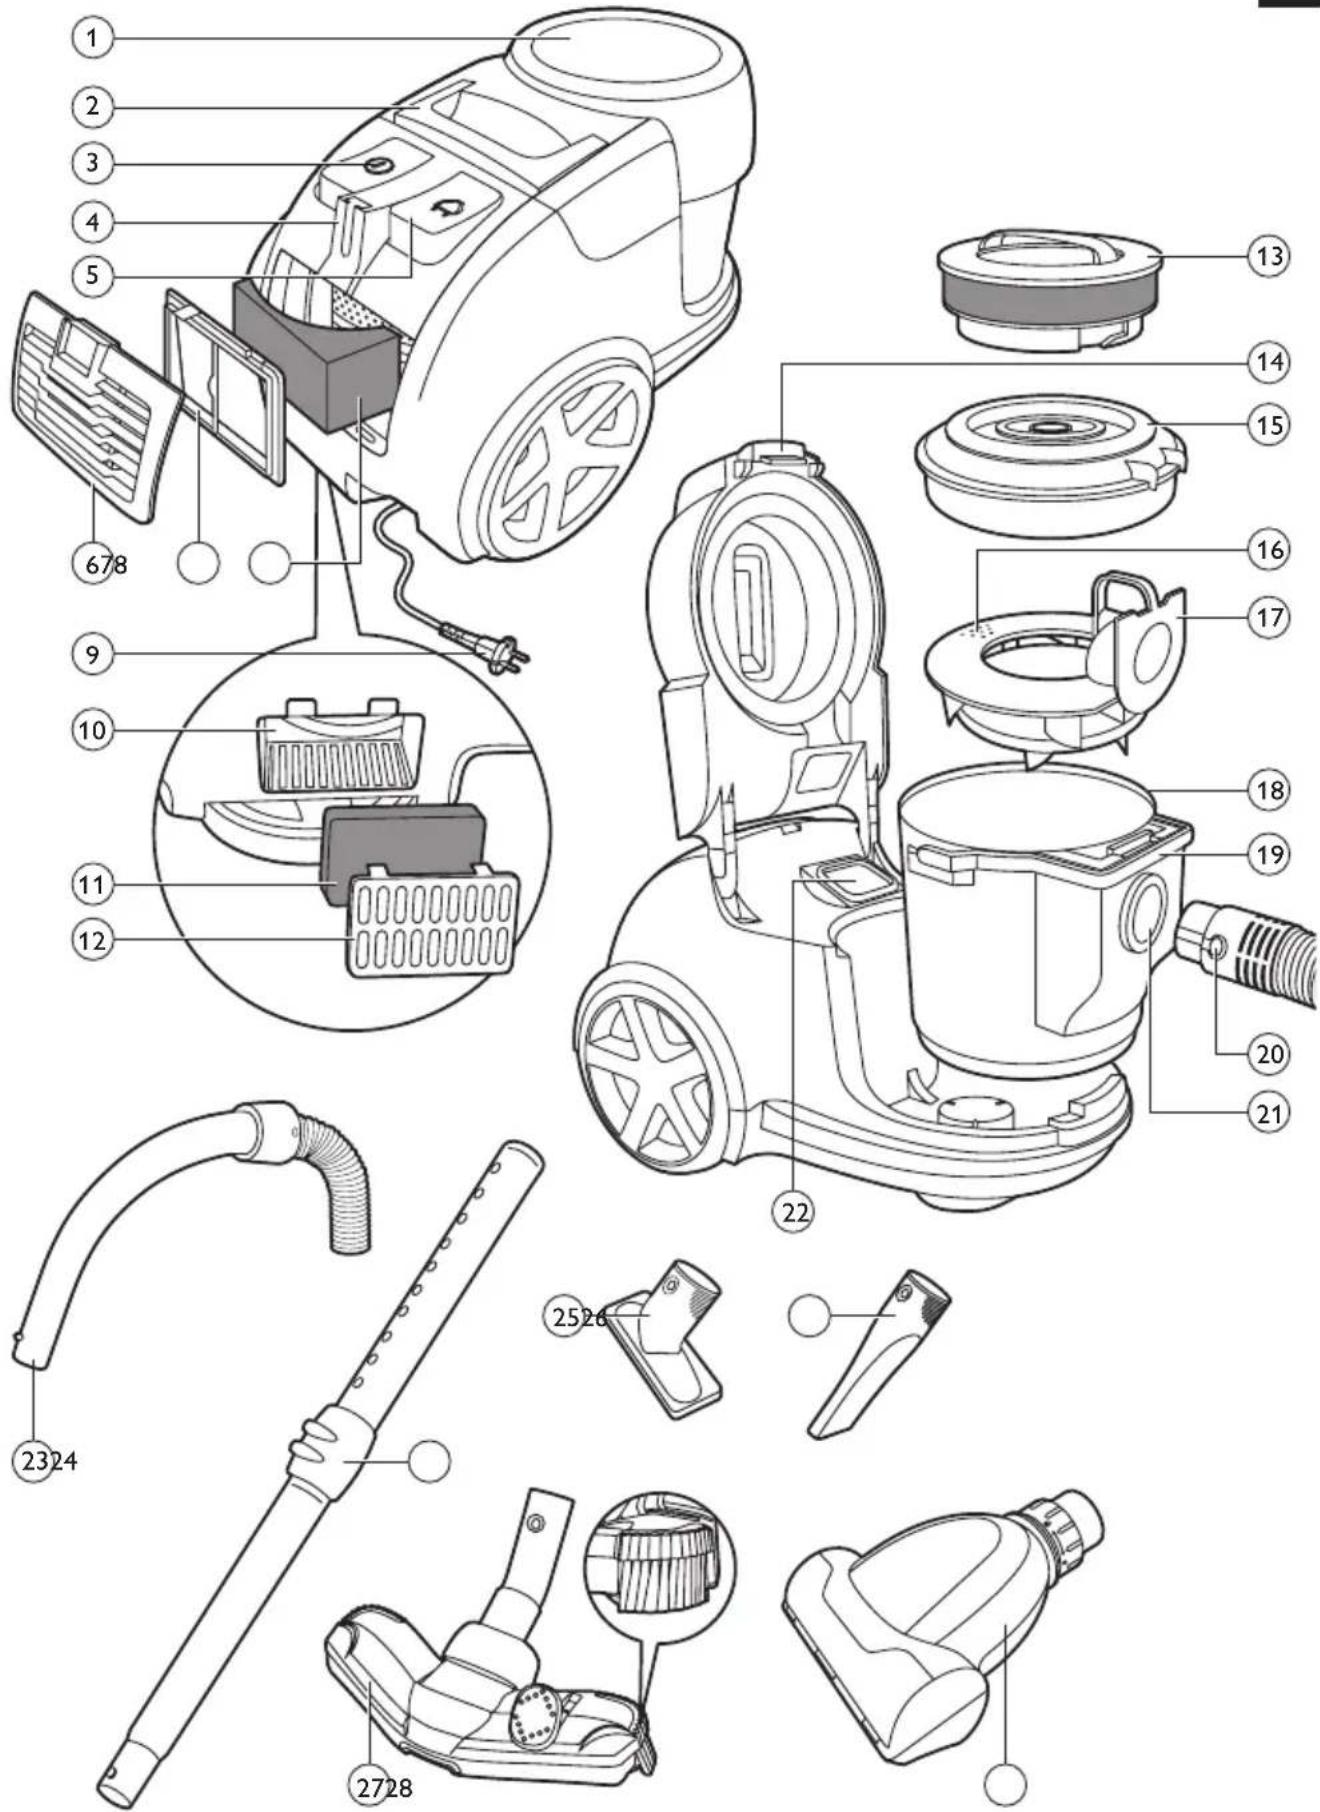
General description (Fig. 1)
1 Cover
2 Handle
3 On/off button
4 Parking slot
5 Cord rewind button
6 Filter grille
7 Washable Ultra Clean Air HEPA 13 exhaust filter
8 Silencer
9 Mains plug
10 Motor outlet
11 Motor outlet filter
12 Filter grille
13 Handle with air filter
14 Cover release button
15 Lid
16 Drainer
17 AquaWeb
18 Dust bucket
19 Handle of dust bucket
20 Hose release button
21 Hose connection opening
22 Motor inlet filter
23 Handgrip
24 Telescopic tube
25 Small nozzle
26 Crevice nozzle
27 TriActive nozzle
28 Mini turbo brush (FC8952 only)
Important
Read this user manual carefully before you use the appliance and save it for future reference.
Danger
- Never vacuum up water or any other liquid. Never vacuum up flammable substances and do not vacuum up ashes until they are cold.
Warning
- Check if the voltage indicated on the appliance corresponds to the local mains voltage before you connect the appliance.
- Do not use the appliance if the plug, the mains cord or the appliance itself is damaged.
- If the mains cord is damaged, you must have it replaced by Philips, a service centre authorised by Philips or similarly qualified persons in order to avoid a hazard.
- Only switch on the appliance if the water level in the dust bucket is between the MIN and MAX indication.
- Only lift or carry the appliance by its handle, to prevent water flowing inside the appliance.
-
Do not put the appliance in vertical position during use.
-
This appliance is not intended for use by persons (including children) with reduced physical, sensory or mental capabilities, or lack of experience and knowledge, unless they have been given supervision or instruction concerning use of the appliance by a person responsible for their safety.
- Keep the appliance and its cord out of the reach of children.
- Children are only allowed to replace the dustbag and clean or replace the filters under supervision.
- Do not point the hose, the tube or any other accessory at the eyes or ears nor put it in your mouth when it is connected to the vacuum cleaner and the vacuum cleaner is switched on.
- Do not use the appliance and the mini turbo brush on pets.
- Always unplug the appliance before cleaning or maintaining the appliance.
Caution
- Do not vacuum up large objects, as this may cause the air passage in the tube or hose to become obstructed.
-
If you add non-foaming soap or perfume to the water, make sure you clean the dust bucket properly after use to prevent foam from developing inside the dust bucket.
-
If foam develops inside the dust bucket, stop vacuuming. Empty the dust bucket and fill it with fresh water.
- After use, always empty the dust bucket and clean the dust bucket and AquaWeb.
- Always let the Super Clean Air HEPA 13 exhaust filter dry completely before you place them back into the appliance.
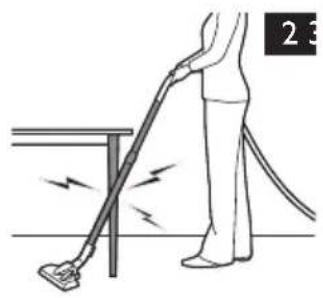
- During vacuum cleaning, especially in rooms with low air humidity, your vacuum cleaner builds up static electricity. As a result you can experience electric shocks when you touch the tube or other steel parts of your vacuum cleaner. These shocks are not harmful to you and do not damage the appliance. To reduce this inconvenience we advise you:
1 to discharge the appliance by frequently holding the tube against other metal objects in the room (for example legs of a table or chair, radiator etc.); (Fig. 2)
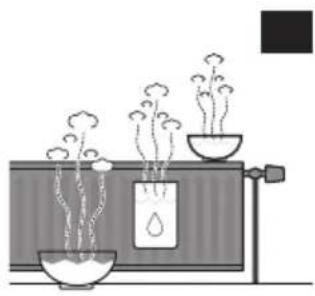
2 to raise the air humidity level in the room by placing water in the room. For example, you can hang containers filled with water from your radiators or place bowls filled with water on or near your radiators (Fig. 3).
- Noise level: Lc = 88 dB(A)
Electromagnetic fields (EMF)
This Philips appliance complies with all applicable standards and regulations regarding exposure to electromagnetic fields.
Preparing for use
Connecting the hose
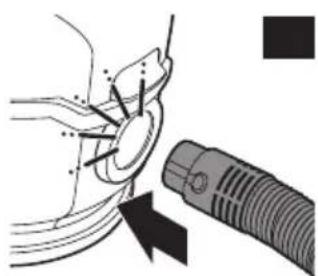
To connect the hose, push it firmly into the appliance ('click') (Fig. 4).
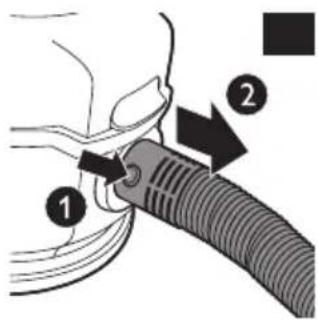
2 To disconnect the hose, press the release button (1) and pull the hose out of the appliance (2) (Fig. 5).
Connecting the telescopic tube
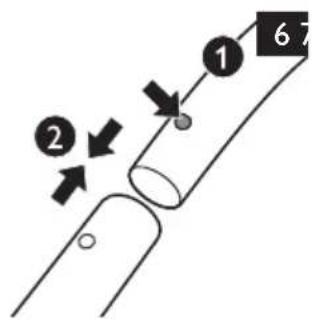
1 To connect the tube to the handgrip of the hose, press the spring-loaded lock button on the handgrip (1) and insert the handgrip into the tube (2). Fit the spring-loaded lock button into the opening in the tube ('click') (Fig. 6).
2 To disconnect the tube from the handgrip, press the spring-loaded lock button and pull the handgrip out of the tube.
ENGLISH8
Use the same method to connect and disconnect the nozzles.
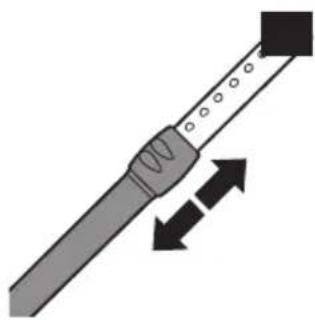
3 Adjust the tube to the length you find most comfortable during vacuum cleaning (Fig. 7).
Connecting the nozzle and accessories
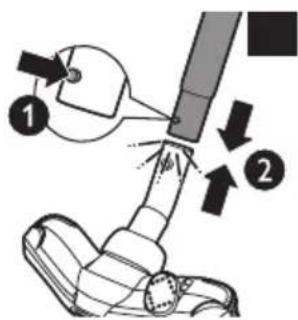
1 To connect the nozzle or an accessory to the tube, press the spring-loaded lock button (1) on the tube and insert the tube into the floor nozzle (2). Fit the spring-loaded lock button into the opening in the nozzle ('click') (Fig. 8).
Note: You can also connect the nozzle or accessories directly to the handgrip in the same way.
2 To disconnect the nozzle or an accessory from the tube, press the spring-loaded lock button and pull the nozzle out of the tube.
TriActive nozzle
The TriActive nozzle is a multi-purpose nozzle for carpets and hard floors.
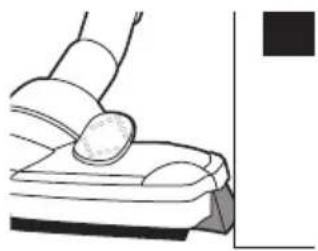
- The side brushes catch more dust and dirt at the sides of the nozzle and allow you to clean better along furniture and other obstacles (Fig. 9).
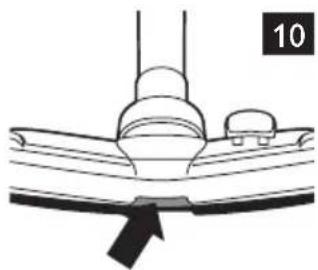
- The opening at the front of the nozzle allows you to vacuum up larger particles (Fig. 10).
1 To clean hard floors, push the rocker switch on top of the nozzle with your foot (Fig. 11).
The brush strip for cleaning hard floors comes out of the housing. At the same time, the wheel is lifted to prevent scratching and to increase manoeuvrability.
2 To clean carpets, push the rocker switch again (Fig. 12).
The brush strip disappears into the nozzle housing and the wheel is lowered automatically.
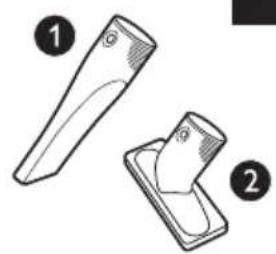
Crevice nozzle and small nozzle
1 Connect the crevice nozzle (1) or the small nozzle (2) directly to the handgrip or to the tube (Fig. 13).
Mini turbo brush (FC8952 only)
The mini turbo brush has been specially designed to effectively pick up animal hairs and fluff from furniture and mattresses. The unique brush inside the mini turbo brush loosens the hairs from the fabric so that they can be picked up by the vacuum cleaner. The mini turbo brush can be attached to the handgrip of the hose or to the telescopic tube.
1 Attach the mini turbo brush (see section 'Connecting the nozzle and accessories' in this chapter).
Using the appliance
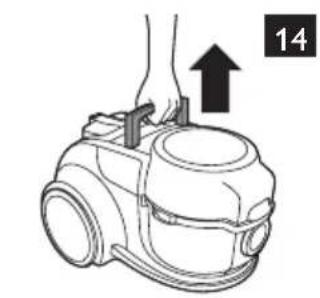
Note: You can carry the vacuum cleaner by the handle on top of the appliance (Fig. 14).
Press the release button (1) to remove the hose (2). (Fig. 5)
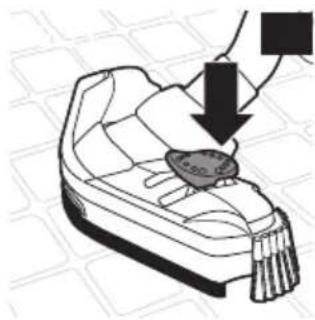
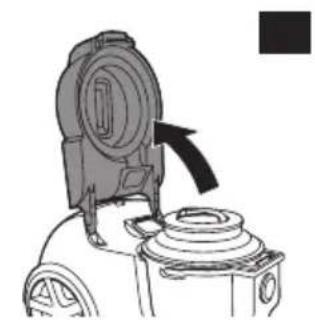
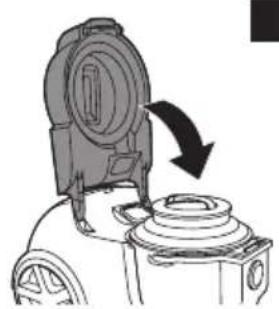
2 Open the cover (Fig. 15).
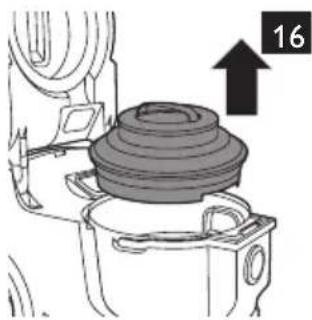
3 Grap the handle of the air filter and lift the lid off the dust bucket (Fig. 16).
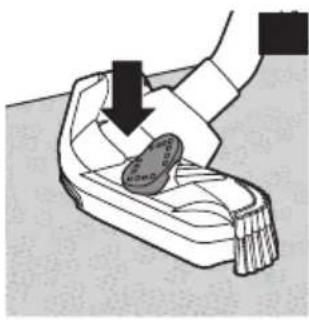
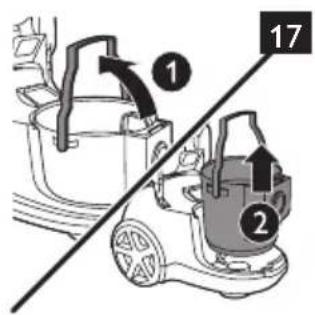
4 Lift the dust bucket out of the appliance by its handle. (Fig. 17)
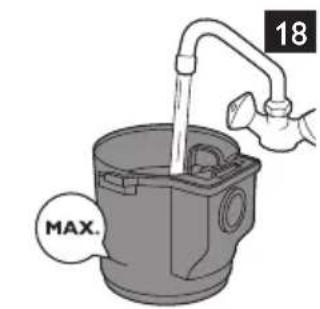
5 Fill the dust bucket with water up to the MAX indication. (Fig. 18)
Do not operate the appliance without water. Always make sure the dust bucket is filled to a level between the MIN and MAX indication.
If you add non-foaming soap or perfume to the water, make sure you clean the dust bucket and AquaWeb properly after use to prevent foam from developing inside the dust bucket.
Caution: If foam develops inside the dust bucket, stop vacuuming. Empty the dust bucket and fill it with fresh water.
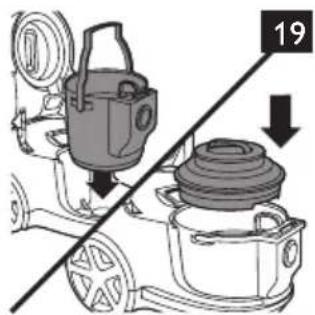
6 Put the dust bucket back into the appliance and put the air filter back onto the dust bucket. (Fig. 19)
7 Close the cover. (Fig. 20)
8 Connect the hose by pushing it firmly into the appliance. (Fig. 21)
Pull the cord out of the appliance and put the mains plug in the wall socket.
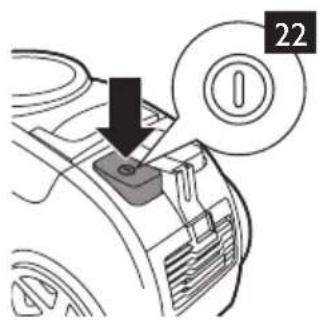
10 Press the on/off button on top of the appliance to switch on the appliance (Fig. 22).
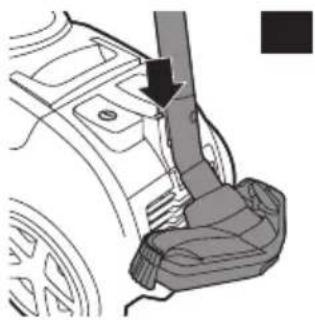
11 If you want to pause for a moment, insert the ridge on the nozzle into the parking slot to park the tube in a convenient position (Fig. 23).
Tip: To wind up the cord, you only have to press the cord winder once.
Cleaning and maintenance
Always unplug the appliance before you clean or replace the filters.
Dust bucket and AquaWeb
Clean the dust bucket and AquaWeb after every vacuuming session.
Switch off and unplug the appliance (Fig. 22).
Press the release button (1) to remove the hose (2) (Fig. 5).
3 Open the cover (Fig. 15).
4 Grab the handle of the air filter and lift the lid off the dust bucket. (Fig. 16)
5 Lift the dust bucket out of the appliance by its handle. (Fig. 17)
6 Empty the dust bucket into the sink. (Fig. 24)
Tip: You can use the AquaWeb as a drainer.
7 Remove the AquaWeb from the dust bucket and clean it under the tap. (Fig. 25)
Empty, clean and dry the dust bucket (Fig. 26).
9 Dry the AquaWeb with a clean cloth or let it dry on the air before you put it back into the dust bucket. (Fig. 27)
10 Place the dust bucket back in the appliance and put the air filter back (Fig. 19).
11 Close the cover. (Fig. 20)
Washable Ultra Clean Air HEPA 13 exhaust filter
Clean the washable Ultra Clean Air HEPA 13 filter every 6 months. The filter can be cleaned 4 times. After these 4 times, the filter has to be replaced. Replace the washable Ultra Clean Air HEPA 13 filter with a Philips filter of the correct type (see chapter 'Ordering accessories').
ENGLISH10
Switch off and unplug the appliance (Fig. 22.
2 Remove the HEPA exhaust filter grille and remove the washable Ultra Clean Air HEPA 13 exhaust filter from the appliance (Fig. 28).
Note: Do not remove the silencer behind the washable Ultra Clean Air HEPA 13 exhaust filter. You do not have to clean this part.
3 Rinse the filter under a warm tap (Fig. 29).
Never clean the washable Ultra Clean Air HEPA 13 filter with a brush.
Note: Cleaning does not restore the original colour of the filter, but does restore its filtration power.
4 Carefully shake the water from the surface of the filter.
5 Let the washable Ultra Clean Air HEPA 13 exhaust filter dry completely before you place it back into the appliance.
Place the dry washable Ultra Clean Air HEPA exhaust filter back into the appliance (Fig. 30).
7 To close the HEPA exhaust filter grille, first align the lugs at the bottom of the grille with the slots in the appliance (1). Then press the top of the grille towards the appliance until the grille locks into place (2) ('click') (Fig. 31).
Air filter
Clean the air filter every 6 months. You do not have to replace the filter.
1 Open the cover (Fig. 32).
2 Turn the handle with the air filter counter clockwise (1) and remove it from the lid (2). (Fig. 33)
3 Remove the air filter and clean it under the tap. (Fig. 34)
4 Let the air filter dry completely before you reattach it to the handle.
5 Reattach the air filter back onto the lid (1) and turn it clockwise (2). (Fig. 35)
6 Close the cover. (Fig. 36)
Cleaning the mini turbo brush (FC8952 only)
To clean the brush inside the mini turbo brush, follow the steps below:
1 Turn the mini turbo brush upside down.
2 To unlock the mini turbo brush, turn the ring anticlockwise (1) and pull it towards you (2) (Fig. 37).
3 Separate the two housing halves. (Fig. 38)
4 Remove the hairs and dirt entangled around the brush. (Fig. 39)
Do not detach the brush and the parts inside the mini turbo brush.
5 Slide the three ridges of the bottom part into the three slots of the top part (Fig. 40).
6 Lower the bottom part onto the top part to close the turbo brush (Fig. 41).
To lock the mini turbo brush, slide the ring towards the housing (1) and turn it clockwise to fix it (2) (Fig. 42).
Storage
1 Switch off the appliance and remove the mains plug from the wall socket (Fig. 22).
2 Press the cord rewind button to rewind the mains cord (Fig. 43).
Note: You can also pull the cord briefly to rewind it.
3 Insert the ridge on the nozzle into the parking slot to attach the nozzle to the appliance. Store the appliance in horizontal position, with all wheels touching the floor (Fig. 23).
Do not store the appliance in vertical position. (Fig. 44)
4 Always put the TriActive nozzle in the carpet setting when you store it. Also prevent the side brushes from becoming bent (Fig. 12).
Ordering accessories
To buy accessories or spare parts, visit www.shop.philips.com/service or go to your Philips dealer. You can also contact the Philips Consumer Care Centre in your country (see the worldwide guarantee leaflet for contact details).
- Washable Ultra Clean Air HEPA 13 exhaust filter.
Environment
- Do not throw away the appliance with the normal household waste at the end of its life, but hand it in at an official collection point for recycling. By doing this, you help to preserve the environment (Fig. 45).
Guarantee and service
If you need information or support, please visit www.philips.com/support or read the separate worldwide guarantee leaflet.
Troubleshooting
This chapter summarises the most common problems you could encounter with the appliance. If you are unable to solve the problem with the information below, visit www.philips.com/support for a list of frequently asked questions or contact the Consumer Care Centre in your country.
1 The suction power is insufficient.
- Perhaps the dust bucket is full.
If necessary, empty the dust bucket.
- Perhaps the dust bucket lid is not placed correctly.
Place the lid correctly.
- Perhaps the filters need to be cleaned or replaced.
If necessary, clean or replace the filters.
- Perhaps the nozzle, tube or hose is blocked up (Fig. 46).
To remove the obstruction, disconnect the blocked-up part (hose or tube) and connect it (as well as possible) the other way round. Switch on the vacuum cleaner to force the air through the blocked-up part in opposite direction.
The sound produced by the vacuum cleaner suddenly changes while I am vacuuming.
- Perhaps the vacuum cleaner picked up a foreign object that is tumbling around in the dust bucket. Empty the dust bucket.
3 The amount of water in the dust bucket is below the minimum level indication.
- The performance of the vacuum cleaner is not optimal. Fill the dust bucket with water. Make sure the water level is between the minimum and maximum level.
ENGLISH12
4 The amount of water in the dust bucket exceeds the maximum level indication.
- Empty the dust bucket until the water level is below the maximum level.
I used the vacuum cleaner to pick up water or other liquids.
- The appliance is not suitable for picking up water or liquids. Make sure the water level does not exceed the maximum level in the dust bucket (see point 4).
6 Water leaks out of the appliance.
- Perhaps you tilted the appliance too much. This can cause water leakage. Keep the vacuum cleaner flat on the ground.
Foam develops inside the dust bucket while using the vacuum cleaner.
-
If you add soap or perfume to the water, make sure that this is non-foaming soap or perfume.
-
If foam develops inside the dust bucket, stop vacuum cleaning. Empty the dust bucket and fill it with fresh water.
FC8952 only: hairs are entangled around the brush inside the mini turbo brush.
- Clean the mini turbo brush. See chapter 'Cleaning', section 'Cleaning the mini turbo brush'.
Introduction
Commanded accessoires
.(rrJ) 151g a g abo 1
.(rr J) 151g j yss 151g g go
. 151g j yss 151g abo g yss
.(roJ) 151g xL a bao 151g wj l gai 151g a L
.(rFJ) uogwgyguyuuyuuyuuyuuyuuyuuyuuyuuyuuyuuyuuyuuyuuyuuyuuyuuyuuyuuyuuyuuyuuyuuyuuyuuyuuyuuyuuyuuyuuyuuyuuyuuyuuyuuyuuyuuyuuyuuyuuyuuyuuyuuyuuyuuyuuy
$$ \left. \right.\left. \right.\left. \right.\left. \right.\left. \right.\left. \right.\left. \right.\left. \right.\left. \right.\left. \right.\left. \right.\left. \right.\left. \right.\left. \right.\left. \right.\left. \right.\left. \right.\left. \right.\left. \right.\left. \right.\left. \right.\left. \right.\left. \right.\left. \right.\left. \right.\left. \right.\left. \right.\left. \right.\left.\left.\left.\left.\left.\left. \text {J} ^ {\prime} = 1 0 0 0 0 0 0 0 0 0 0 0 0 0 0 0 0 0 0 0 0 0 0 0 0 0 0 0 0 0 0 0 0 0 0 0 0 0 0 0 0 0 0 0 0 0 0 0 0 0 0 1\right) ^ {\prime} = 1 0 0 0 0 0 0 0 0 0 0 0 0 0 0 0 0 0 0 0 0 0 0 0 0 0 0 0 0 ^ {\prime} = 1 0 0 0 0 0 0 0 0 0 0 0 0 ^ {\prime} = 1 0 0 0 0 0 0 0 0 0 ^ {\prime} = - \frac {1}{2} + \frac {1}{2} ^ {\prime} = - \frac {1}{2} + \frac {1}{2} ^ {\prime} = - \frac {1}{2} + \frac {1}{2}\right) ^ {\prime} = - \frac {1}{2} + \frac {1}{2}\right) ^ {\prime} = - \frac {1}{2} + \frac {1}{2}\right) ^ {\prime} = - \frac {1}{2} + \frac {1}{2}\right) ^ {\prime} = - \frac {1}{2} + \frac {1}{2}\right) ^ {\prime} $$
$$ . (r r \int S _ {i i}) \cup_ {i i} S _ {i i} \cup \left{1, 2, 3, 4, 5 \right} $$
$$ \cdot (1 4 \sqrt {2} \omega) \frac {\partial}{\partial t} \frac {\partial}{\partial x} \frac {\partial}{\partial y} \frac {\partial}{\partial z} \frac {\partial}{\partial t} \frac {\partial}{\partial y} \frac {\partial}{\partial z} \frac {\partial}{\partial t} \frac {\partial}{\partial z} \frac {\partial}{\partial t} \frac {\partial}{\partial z} \frac {\partial}{\partial t} \frac {\partial}{\partial z} \frac {\partial}{\partial t} \frac {\partial}{\partial z} \frac {\partial}{\partial t} \frac {\partial}{\partial z} \frac {\partial}{\partial t} \frac {\partial}{\partial z}. $$
$$ . (1 1 \sqrt {2}) \frac {1}{2} \sqrt {2} \sqrt {2} \sqrt {2} \sqrt {2} \sqrt {2} \sqrt {2} \sqrt {2} \sqrt {2} \sqrt {2} \sqrt {2} \sqrt {2} $$
$$ . \dots \text {i} \text {i} \text {i} \text {i} \text {i} \text {i} \text {i} \text {i} \text {i} \text {i} \text {i} \text {i} \text {i} \text {i} \text {i} \text {i} \text {i} \text {i} \text {i} \text {i} \text {i l} \text {l} \text {l} \text {l} \text {l} \text {l} \text {l} \text {l} \text {l} \text {l} \text {l} \text {l} \text {l} \text {l} \text {l} $$
$$ \therefore \omega \omega \omega \omega \omega \omega \omega \omega \omega \omega \omega \omega \omega \omega \omega \omega \omega \omega \omega \omega \omega \omega \omega \omega \omega \omega \omega \omega \omega \omega \omega \omega \omega \omega \omega \omega \omega \omega \omega \omega \omega \omega \omega \omega \omega \omega \omega \omega \omega \omega \Omega $$
$$ \therefore \sin \angle 1 = \frac {1}{2} \cos \angle 1 $$
$$ \Delta $$
$$ \therefore \sin \angle A C B = \frac {1}{2} $$
$$ \left. \right. \dot {g} _ {b} \left. \right\rvert\left. \right.\left. \right.\left. \right.\left. \right.\left. \right.\left. \right.\left. \right.\left. \right.\left. \right.\left. \right.\left. \right.\left. \right.\left. \right.\left. \right.\left. \right.\left. \right.\left. \right.\left. \right.\left. \right.\left. \right.\left. \right.\left. \right.\left. \right.\left. \right.\left. \right.\left. \right.\left. \right.\left. \right.\left. \right.\left. \right.\left. \right.\left. \right.\left. \right.\left. g _ {b} ^ {\prime} \right\right) ^ {\prime} \right\right) ^ {\prime} \right\right) ^ {\prime} \right\right) ^ {\prime} \right\right) ^ {\prime} \right\right) ^ {\prime} \right\right) ^ {\prime} \right\right) ^ {\prime} \right\right) ^ {\prime} \right\right) ^ {\prime} \right\right) ^ {\prime} \right\vert\left. \right\rvert\left. \right\rvert\left. \right\rvert\left. \right\rvert $$
$$ . (R V J S i t) (R) \text {a d} j l i g o l i w s $$
$$ (1) \quad \text {d i s t a t e} \quad S _ {i j} = \left{ \begin{array}{l l} \frac {1}{2} & \text {d i s t a t e} \ 0. 5 & \text {d i s t a t e} \end{array} \right. $$
$$ . (r \wedge J S) ^ {2} (\quad^ {2} S _ {1} ^ {2} S ^ {2}) (r) \quad \text {d i s t a n t i o n} \quad j g = \left{ \right.j \rightarrow j \rightarrow j \rightarrow j \rightarrow j \rightarrow j \rightarrow j \rightarrow j \rightarrow j \rightarrow j \rightarrow j \rightarrow j \rightarrow j \rightarrow j \rightarrow j \rightarrow j \rightarrow j \rightarrow j \rightarrow j \rightarrow j \rightarrow j \rightarrow j \rightarrow j \rightarrow j \rightarrow j \rightarrow j \rightarrow j \rightarrow j \rightarrow j \rightarrow j \rightarrow j \rightarrow j \rightarrow j \rightarrow j \rightarrow j $$
1goy
jai jai jai oogj jai jai dlo rdo
$$ . (1 r \sqrt {2} \sin) \frac {1}{2} \sin 3 0 ^ {\circ} = \frac {1}{2} \sin 3 0 ^ {\circ} $$
$$ . (r q \sqrt {2} \omega) (r) \quad u _ {1} \left|\right| _ {1} \left|\right| _ {1} \left|\right| _ {1} \left|\right| _ {1} \left|\right| _ {1} \left|\right| _ {1} \left|\right| _ {1} \left|\right| _ {1} \left|\right| _ {1} \left|\right| _ {1} \left|\right.\left. \right.\left(1\right) c l w g a r e c c s > c l s i o c g a r e j l g a r e j l g a r e j l g a r e j l g a r e j l g a r e j l g a r e j l g a r e j l g a r e j l g a r e j l g a r e j l g a r e j l g a r e j l g a r e j l g a r e j l g a r e j l g a r e j l g a r = 1 0 0 0 0 0 0 0 0 0 0 0 0 0 0 0 0 0 0 0 0 0 0 0 0 0 0 0 0 0 0 0 0 0 0 0 0 0 0 0 0 0 0 0 0 0 0 0 0 0 0 1 5 $$
$$ \cdot (r. \sqrt {2} \sin) \quad \text {i s i} \quad \text {i s i} \quad \text {i s i} \quad \text {i s i} \quad \text {i s i} \quad \text {i s i} \quad \text {i s i} \quad \text {i s i} \quad \text {i s i} \quad \text {i s i} \quad \text {i s i} \quad \text {i s i} $$
$$ \therefore \log_ {2} 1 = \frac {1}{2} $$
$$ \left. \right.\left. \right.\left. \right.\left. \right.\left. \right.\left. \right.\left. \right.\left.\left.\left.\left.\left.\left.\left.\left.\left.\left.\left.\left.\left.\left.\left.\left.\left.\left.\left.\left.\left.\left.\left.\left.\left.\left.\left.\right.\right.\right.\right.\right.\right.\right.\right.\right.\right.\right.\right.\right.\right.\right.\right.\right.\right.\right.\right.\right.\right.\right.\right.\right.\right.\right\rangle_ {1} ^ {1} 5 s g = 0, 0, 0, 0, 0, 0, 0, 0, 0, 0, 0, 0, 0, 0, 0, 0, 0, 0, 0, 0, 0, 0, 0, 0, 0, 0, 0, 0, 0, 0, 0, 0, 0, 0, $$
$$ (r) \vert \zeta (r) (r) \vert_ {2} = 1, \vert \zeta (r) \vert_ {2} = c l _ {\omega} $$
$$ . (1 1 \sqrt {5} +) \frac {1}{2} 5 j _ {1} l _ {1} d \sqrt {5} \omega_ {1}, $$
(FC8952 Joo b)
(ro Jui) gll jjly aolll clll jll lglll
()gillglglglglglglglglgl
(rV Jcull) lacull (r) acull bllac dlal g 1) cull al lalall y, dallg jill d
#
(19 J) blll sao no yuill isall wlae gjglg j
(1)
aJ 1
g 10000000000000000000000000000000000000000000
.(r.)a@jll auaolco 1
r_9( 5,4) .
.1J) aai jll aljall l 2w x .luiy syy paa loic ao jll slc! laI TriActive agg
JiaLall Jb
(17 Jull) cllll jgoo cui jilall abu

.1111 7 J5 Jlll lll Ultra Clean Air HEPA 13 jlll qii x
. 1
jlll bww joc no w yclll p

Jg 11111111111111111111
f jlll (1) 1bX ll Jull Ultra Clean Air HEPA pJall jil no aalll al
Gg aasll g 1aill g jll gaggall gall aljao xg pHEPA palell jil aagglgeo") (r) LlCo g aatt cttt pji jell aln agall gall bol p.(jqll qaggall .(rJssll) ("abab oog


jlll jlll llae 7 llgll jie
(1r Jull) 1
.(9J)(r)boll no dolslg(1)aclll blae alse c g aell jg
.(r.J)jai all aai bii pag algall jie
.
(1) 1.2.3.4.5.6.7.8.9.10
.1UJSSI) 1b2eI gI
(FC8952jIbll) 1
aillgbsll gai, aesall gjll alj jyagall alj jai
aec JcLj, aeeall grrll al

.(rr Jclll) (r) dolj lglg (1) aclll jlac oJ, sfc f aal, j, gall gill al

(rrJ)cuallj>laol

(15)

.aaall grrll alj jagall gall gaiy all da
(ba FC8952jll) yall gill
Jee Jy jy ggs no bwlalll yjg cllg ybalt laoa ayall ayai p aai pliy Igbail sas yiai yieill yjy jaeay all ayagall ayaaall ayall ayall ayall ayall ayall ayall ayall ayall ayall ayall ayall ayall ayall ayall ayall ayall ayall ayall ayall ayall ayall ayall ayall ayall ayall ayall ayall ayall ayall ayall ayall ayall ayall ayall ayall ayall ayall ayall ayall ayall ayall ayall ayall ayall ayall ayall ayall ayall ayall ayall
j4=11 plssi
(17 J5ill) 4io gall cjjll jgall gall aoll plssu wiywai coll Jao di:
.(rJSCill) (r) pgbjll gcll (1) jrrll jbc


