RCD102SP - Mp3 player LEXIBOOK - Free user manual and instructions
Find the device manual for free RCD102SP LEXIBOOK in PDF.

| Product type | CD/MP3 player with FM/AM radio |
| Brand | Lexibook |
| Model | RCD102SP |
| Audio power | 2 × 3 W (estimated) |
| Speakers | 2 speakers (stereo) |
| Display | LED display |
| Supported formats | Audio CD, MP3 (via AUX input) |
| Radio | FM, AM, FM stereo |
| Antenna | Telescopic FM antenna |
| Auxiliary input | Yes (3.5mm AUX IN jack) |
| Programming | Up to 20 tracks |
| Repeat | Single track or all tracks |
| Mains power | AC 230 V, 50 Hz |
| Battery power | 6 C (LR14) 1.5V batteries (not included) |
| Dimensions (approx.) | 280 × 180 × 140 mm |
| Weight (approx.) | 1.2 kg |
| Material | Plastic |
| Color | Black/Silver (typical) |
| Care | Clean with a soft dry cloth, avoid chemicals |
| Safety | Do not expose to water, disconnect before cleaning, laser precautions (CD) |
| Spare parts | Not available directly, contact Lexibook customer service |
| Warranty | 2 years (against manufacturing defects) |
| Manufacturing | Designed in Europe, Made in China |
Frequently Asked Questions - RCD102SP LEXIBOOK
User questions about RCD102SP LEXIBOOK
0 question about this device. Answer the ones you know or ask your own.
Ask a new question about this device
Download the instructions for your Mp3 player in PDF format for free! Find your manual RCD102SP - LEXIBOOK and take your electronic device back in hand. On this page are published all the documents necessary for the use of your device. RCD102SP by LEXIBOOK.
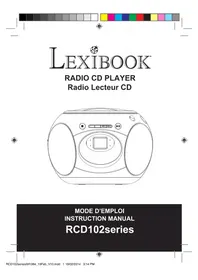
USER MANUAL RCD102SP LEXIBOOK
natural_image
Black-and-white photo of a LexiBook radio with a digital display and antenna (no visible text or symbols on the device body)MODE D'EMPLOI INSTRUCTION MANUAL RCD102series
MESURES DE SECURITE
natural_image
Black triangular warning symbol with a white lightning bolt inside, indicating electrical hazard (no text)MISE EN GARDE RISQUE D'ÉLECTROCUTION NE PAS OUVRIR

natural_image
Black triangular warning symbol with exclamation mark (no text or numbers)MISE EN GARDE : AFIN DE RÉDUIRE LES RISQUES D'ÉLECTROCUTION, NE PAS ENLEVER LE COUVERCLE (NI L'ARRIÈRE). NE CONTIENT AUCUNE PIÈCE POUVANT ÊTRE RÉPARÉE NI REMPLACÉE PAR L'UTILISATEUR. CONFIER TOUTE RÉPARATION À UN TECHNICIEN QUALIFIÉ.
CE PRODUIT LASER EST DE CLASSE 1. L'UTILISATION DE COMMANDES OU DE REGLAGES AINSI QUE L'EXECUTION DE PROCEDURES AUTRES QUE CELLES SPECIFIEES DANS CE DOCUMENT PEUVENT ENTRAINER UNE EXPOSITION A DES RADIATIONS DANGEREUSES.
natural_image
Diagram of four batteries arranged in a row with positive and negative charge indicators, no text or symbols present.natural_image
Simple line drawing of two hands holding a circular object with concentric rings (no text or symbols)natural_image
Hand holding a circular object with concentric rings and an arrow indicating direction (no text or symbols)

EMPLACEMENT DES TOUCHES
natural_image
Black triangular warning symbol with white lightning bolt symbol (no text)CAUTION RISK OF ELECTRIC SHOCK DO NOT OPEN

natural_image
Black triangular warning symbol with exclamation mark (no text or numbers)CAUTION: TO REDUCE THE RISK OF ELECTRIC SHOCK, DO NOT REMOVE COVER (OR BACK). NO USER SERVICEABLE PARTS INSIDE. REFER SERVICING TO QUALIFIED SERVICE PERSONNEL.
The graphic symbols on the back cover of the set mean the following:
The lightning flash with arrowhead symbol within an equilateral triangle is intended to alert the user to the presence of uninsulated “dangerous voltage” within the product’s enclosure that may be of sufficient magnitude to constitute a risk of electric shock to persons.
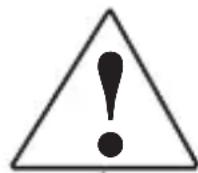
The exclamation point within an equilateral triangle is intended to alert the user to the presence of important operating and maintenance (servicing) instructions in the literature accompanying the appliance.
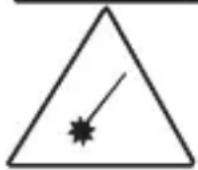
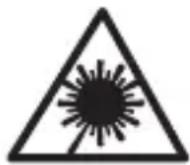
DANGER: Invisible and hazardous laser radiation when open and interlock failed or defeated. Avoid direct exposure to beam.
WARNING:
- To reduce the risk of fire or electric shock, do not expose this appliance to rain or moisture.
- The apparatus shall not be exposed to dripping or splashing and that no objects filled with liquids, such as vases, shall be placed on the apparatus.
- The mains plug is used as the disconnect device, the disconnect device shall remain readily operable.
- In order to disconnect the apparatus from the mains completely, the mains plug should be disconnected from the mains socket outlet completely.
DANGER
LASER SAFETY
This unit employs an optical laser beam system in the CD mechanism, designed with built in safeguards. Do not attempt to disassemble, refer to qualified service personnel. Exposure to this invisible laser light beam may be harmful to the human eye.
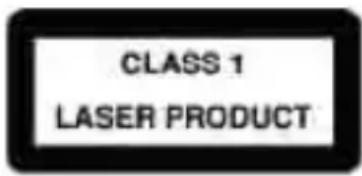
THIS IS A CLASS-1 LASER PRODUCT. USE OF CONTROLS, OR ADJUSTMENTS OR PROCEDURES OTHER THAN THOSE SPECIFIED HEREIN, MAY RESULT IN HAZARDOUS LASER LIGHT BEAM EXPOSURE.
Invisible laser radiation when open and interlock failed or defeated. Avoid direct exposure to laser beam.
SAFETY INSTRUCTIONS
- Read these instructions.
- Keep these instructions.
- Heed all warnings.
- Follow all instructions
- Do not use this product near water and moisture, for example: near a bathtub, washbowl, kitchen sink or laundry tub; in a wet basement; or near a swimming pool.
- Clean only with a dry cloth. Unplug this product from the wall outlet before cleaning. Do not use liquid cleaners or aerosol cleaners. It may damage the screen
- Do not block any ventilation openings. Install in accordance with manufacturer's instructions.
- Do not install near any heat sources such as radiators, heat registers, stoves, or other apparatus (including amplifiers) that produce heat.
- Do not defeat the safety purpose of the polarized or grounding type plug. A polarized plug has two blades with one wider than the other. A grounding type plug has two blades and a third grounding prong. The wide blade or the third prong is provided for your safety. If the provided plug does not fit into your outlet, consult an electrician for replacement of the obsolete outlet.
- Protect the power cord from being walked on or pinched particularly at plugs, convenience receptacles, and the point where they exit from the apparatus.
- Only use attachments/accessories specified by the manufacturer.
- Unplug this apparatus during lightning storms or when unused for long periods of time.
- Refer all servicing to qualified service personnel. Servicing is required when the apparatus has been damaged in any way, such as power-supply cord or plug is damaged, liquid has been spilled or objects have fallen into the apparatus, the apparatus has been exposed to rain or moisture does not operate normally, or has been dropped.
- Do not overload wall outlet. Use only power source as indicated.
- Use replacement parts as specified by the manufacturer.
-
Never push objects of any kind into this product through openings as they may touch dangerous voltage points or short out parts that could result in fire or electric shock. Never spill or spray any type of liquid on the product.
-
The product may be mounted to a wall only if recommended by the manufacturer.
- Upon completion of any service or repairs to this product, ask the service technician to perform safety checks.
UNPACKING THE DEVICE
When unpacking, ensure that the following elements are included:
1 x Boombox CD Player
1 x AC cable
1 x instruction manual
WARNING: All packaging materials, such as tape, plastic sheets, wire ties and tags are not part of this product and should be discarded.
POWER SOURCES
The Radio CD Player operates on AC 230V – 50Hz or with 6 x 1.5V ——/C size batteries (not included).
AC operation
- Check that the unit is switched off.
- Insert the small end of the AC cord into the AC socket at the back of the unit.
- Plug the other end of the AC cord into any convenient AC 230V – 50Hz mains power socket.
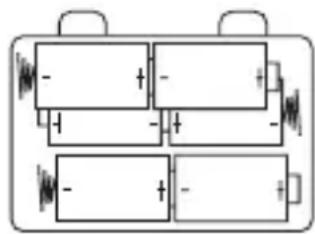
Battery installation
- To install the batteries, open the battery compartment located at the back of the unit by pressing in on the tabs, then lifting it off.
- Insert 6 x 1.5V —— /C size batteries (not included) observing the polarity indicated in the compartment, and as per the diagram shown opposite.
- Close the battery compartment.
natural_image
Diagram of a battery pack with four cells, each showing charge and polarity indicators (no text or labels)Note: The AC power cord must be disconnected from the AC socket on the rear of the unit in order for the product to operate on battery power.
Non-rechargeable batteries are not to be recharged. Rechargeable batteries are to be removed from the product before being charged. Rechargeable batteries are only to be charged under adult supervision. Different types of batteries or new and used batteries are not to be mixed. Only batteries of the same or equivalent type as recommended are to be used. Batteries are to be inserted with the correct polarity. Exhausted batteries are to be removed from the product. The supply terminals are not to be short circuited. Do not throw batteries into a fire. Remove the batteries if you are not going to use the game for a long period of time.
WARNING: Malfunction or loss of memory may be caused by strong frequency interference or electrostatic discharge. Should any abnormal function occur, remove the batteries and insert them again, or unplug the AC/DC adapter from the mains socket and plug it back in.
CARE AND MAINTENANCE
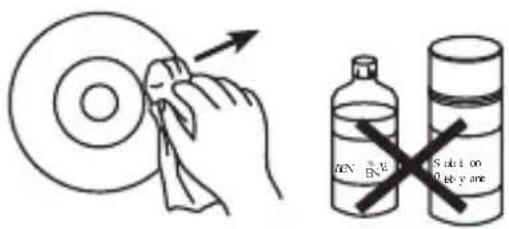
Caring for compact discs
- Treat the disc carefully. Handle the disc only by its edges. Never allow your fingers to come in contact with the shiny, unprinted side of the disc.
- Do not attach adhesive tape, stickers, etc. to the disc label.
- Clean the disc periodically with a soft, lint-free, dry cloth. Never use detergents or abrasive cleaners to clean the disc. If necessary, use a CD cleaning kit.

natural_image
Simple line drawing of two hands holding a circular object (no text or symbols)- If a disc skips or gets stuck on a section of the disc, it is probably dirty or damaged (scratched).
- When cleaning the disc, wipe in straight lines from the centre of the disc to the outer edge of the disc. Never wipe in circular motions.
- This unit is designed to play only compact discs bearing the identification logo as shown here. Other discs may not conform to the CD standard and may not play properly.
- Discs should be stored in their cases after each use to avoid damage.

- Do not expose discs to direct sunlight, high temperatures or dust, etc.
- Prolonged exposure or extreme temperatures can warp the disc.
- Do not stick or write anything on either side of the disc. Sharp writing instruments, or ink, may damage the surface.
Cleaning the unit
- To prevent fire or shock hazard, disconnect your unit from the AC power source when cleaning.
- The finish on your unit may be cleaned with a dust cloth and cared for as other furniture. Use caution when cleaning and wiping the plastic parts.
- Mild soap and a damp cloth may be used on the front panel.
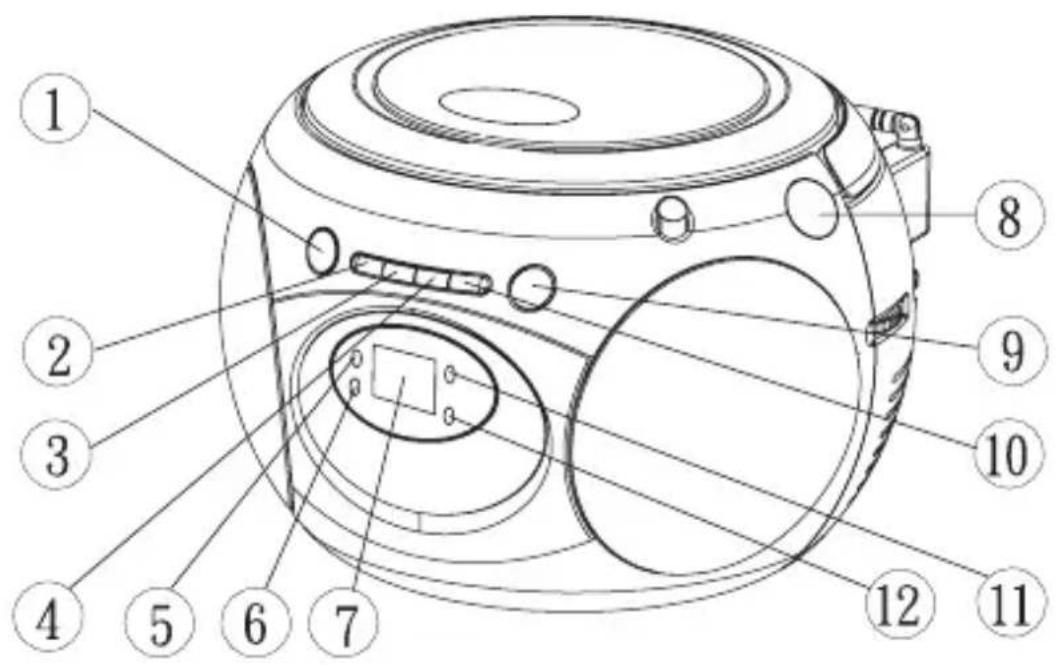
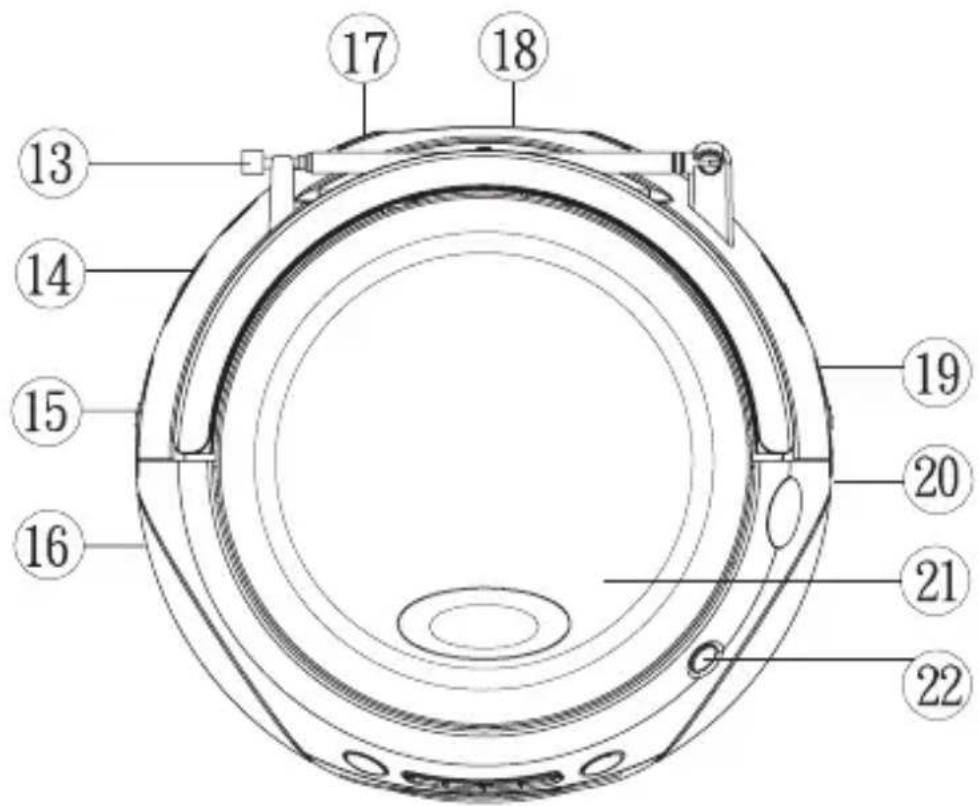
LOCATION OF CONTROLS
Refer to the image p.2
- STOP button
- PROG. (Program) button
- REPEAT button
- SKIP – (BACKWARDS) button
- Power indicator
- FM stereo indicator
- LED screen
- DIAL SCALE
- PLAY/PAUSE button
- SKIP + (FORWARDS) button
- PLAY/PAUSE/PROG indicator
- REPEAT indicator
- FM antenna
- FUNCTION selector (OFF/CD/RADIO)
- AC input jack
- VOLUME control
- AUX IN jack
- Battery compartment
- AM-FM-FM ST BAND selector
- RADIO TUNING knob
- CD door
- CD DOOR OPEN button
RADIO OPERATION
- Slide the FUNCTION selector to the RADIO position to turn the unit on.
- Slide the BAND selector to select AM, FM or FM ST (stereo) for the desired radio band.
- Use the RADIO TUNING knob to select the desired radio station.
- Adjust the VOLUME control.
- To switch off the radio, slide the FUNCTION selector to the OFF position.
Note: To ensure maximum FM tuner sensitivity, the FM antenna should be fully extended to obtain the best possible reception. Avoid close proximity to the speakers and other electrical appliances. For FM stereo reception, the FM stereo indicator will light steadily when a stereo program is being received. When tuning in AM reception, to ensure best AM sensitivity, try repositioning the unit until the best reception is obtained.
CD OPERATION
Play a CD
- Press the CD DOOR OPEN button and carefully place a disc on the centre spindle with the printed label side facing up.
- Close the CD DOOR OPEN button and slide the FUNCTION selector to the CD position to turn the unit on. The LED display will show the total number of tracks on the disc.
- Press PLAY/PAUSE and the PLAY indicator will light and the CD will start playing from the first track.
- Adjust the VOLUME control to set the sound level.
- To suspend playing, press PLAY/PAUSE again. The track number will flash and the PLAY indicator will go off. To resume playing, press PLAY/PAUSE once again.
- To stop playing, press STOP.
SKIP FORWARDS / SKIP BACKWARDS buttons
- When the CD is stopped, to play your favourite track directly, locate the desired track using SKIP FORWARDS or SKIP BACKWARDS and press PLAY/PAUSE.
- When listening to a CD, press SKIP FORWARDS to play the next track. Press SKIP BACKWARDS once to skip to the beginning of the track currently playing. Press the same button twice or more to play the previous tracks.
- To search forward or backward through the playing track, press and hold SKIP FORWARDS or SKIP BACKWARDS to locate a specific musical passage. The player will move forward or backward at high speed as long as the button is pressed. Stop pressing the button to return to normal playback.
Note:
- If a disc is installed incorrectly, dirty or damaged, it will not play.
- As each track is played, the track number is shown on the display.
- To prevent damage to the disc, never open the CD door while the disc is rotating. Wait for the disc to stop before opening the CD door. Never touch the lens when the CD door is open.
- Do not use the carrying handle when playing CD. The product should only be used on a steady surface.
Repeat
- To repeat continuously a single track, press REPEAT once while in play mode. The repeat indicator will flash.
- To repeat all the tracks, press REPEAT twice while in play mode. The repeat indicator will light steadily.
- To cancel the repeat function, repeatedly press the REPEAT until the repeat indicator goes off.
CD PROGRAMMED PLAY
Use the program function to preselect the order in which a sequence of tracks will be played. Up to 20 tracks can be programmed.
- Slide the FUNCTION selector to the CD position.
- Press PROG., "01" will blink on the display.
- Use SKIP FORWARDS or SKIP BACKWARDS to select the first track to include in the programmed sequence.
- Press PROG. to confirm and store the track.
- Repeat steps 3 and 4 to program the other desired tracks.
- Press PLAY to begin playback. The tracks will be played in the programmed order. The PLAY/PAUSE/PROG indicator flashes when the program function is in used.
Note:
- To cancel the program function, press the STOP button until the PLAY/PAUSE/PROG indicator goes off.
- During program setting, press STOP or open the CD door.
AUX IN OPERATION
You can play music through the speakers of this Radio CD Player by connecting its AUX IN jack to your MP3 or other digital audio player.
- Plug one end of an audio cable (not included) into the AUX IN jack located at the back of the unit, and the other end of the cable to the line out jack of the device you want to connect.
- Slide the FUNCTION selector to the CD or the RADIO position.
- Adjust the VOLUME control to your desired listening level.
- Use the function keys of your audio device to pause and resume the playback, adjust the volume and select the next or the previous track.
MAINTENANCE
To prevent fire or shock hazard, disconnect your unit from the AC power source when cleaning. The finish on your unit may be cleaned with a dust cloth and cared for as other furniture. Use a soft, clean cloth moistened with plain, lukewarm water to clean the exterior of the unit. Use caution when cleaning and wiping the plastic parts. Mild soap and a damp cloth may be used on the front panel.
WARRANTY
This product is covered by our 2-year warranty.
For any claim under the warranty or after sale service, please contact your distributor and present a valid proof of purchase. Our warranty covers any manufacturing material and workmanship defect, with the exception of any deterioration arising from the non-observance of the instruction manual or from any careless action implemented on this item (such as dismantling, exposition to heat and humidity, etc.). It is recommended to keep the packaging for any further reference.
In a bid to keep improving our services, we could implement modification on the colours and the details of the product shown on the packaging.
NOTE: Please keep this instruction manual, it contains important information.
Reference: RCD102series
Designed in Europe – Made in China
©2009 Lexibook®
LEXIBOOK UK Ltd,
Unit 10 Petersfield Industrial Estate,
Bedford Road, Petersfield, Hampshire,
GU32 3QA,
United Kingdom
Helpline: 0808 100 3015
http://www.lexibook.com
CE
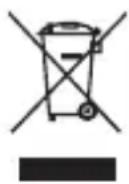
Environmental Protection
Unwanted electrical appliances can be recycled and should not be discarded along with regular household waste! Please actively support the conservation of resources and help protect the environment by returning this appliance to a collection centre (if available).
natural_image
Black triangular warning symbol with white lightning bolt symbol (no text)natural_image
Black triangular warning symbol with exclamation mark (no text or numbers)ESTE ES UN PRODUCTO LÁSER DE CLASE 1. EL USO DE CONTROLES, AJUSTES O PROCEDIMIENTOS DISTINTOS DE LOS QUE SE DESCRIBEN EN ESTE MANUAL, PUEDEN SER CAUSA DE EXPOSICIÓN PELIGROSA AL RAYO LÁSER.
natural_image
Diagram of four batteries arranged in a row with power and charge indicators (no text or labels)natural_image
Simple line drawing of two hands holding a circular object with concentric rings (no text or symbols)natural_image
Hand holding a circular object with an arrow pointing to it (no text or symbols)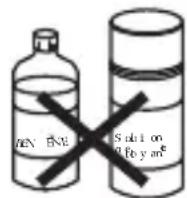

natural_image
Black triangular warning symbol with white lightning bolt symbol (no text)CUIDADO ISCO DE CHOQUE ELÉCTRICO NÃO ABRIR

natural_image
Black triangular warning symbol with exclamation mark (no text or numbers)CUIDADO: PARA REDUZIR O RISCO DE CHOQUE ELÉCTRICO, NÃO RETIRE A COBERTURA DIANTEIRA OU TRASEIRA. NÃO EXISTEM PEÇAS QUE POSSAM SER REPARADAS PELO UTILIZADOR NO INTERIOR. A REPARAÇÃO DEVERÁ SER FEITA POR PESSOAL QUALIFICADO.
ESTE É UM PRODUTO LASER DE CLASSE 1. A UTILIZAÇÃO DE CONTROLOS OU AJUSTES OU PROCÉDIMENTOS PARA ALÉM DOS AQUI ESPECIFICADOS PODE DAR ORIGEM A UMA EXPOSIÇÃO PERIGOSA AO RAIO LASER.
natural_image
Diagram of a battery pack with four batteries and two charging terminals (no text or symbols)natural_image
Simple line drawing of two hands holding a circular object with concentric rings (no text or symbols)
natural_image
Black triangular warning symbol with white lightning bolt symbol (no text)ATTENZIONE PERICOLO DI SCOSSA ELETTRICA NNON APPIRE

natural_image
Black triangular warning symbol with exclamation mark (no text or numbers)ATTENZIONE: PER RIDURRE IL RISCHIO DI SCOSSA ELETTRICA, NON RIMUOVERE IL COPERCHIO (O LA PARTE POSTERIORE). ALL'INTERNO NON SONO PRESENTI PARTI CHE RICHIEDONO MANUTENZIONE DA PARTE DELL'UTENTE. PER LA MANUTENZIONE, RIVOLGERSI UNICAMENTE A PERSONALE QUALIFICATO.
SI TRATTA DI UN PRODOTTO LASER DI CLASSE 1. L'UTILIZZO DI CONTROLLI O REGOLAZIONI O PROCEDURE DIVERSE DA QUELLE QUI SPECIFICATE PUÒ PROVOCARE ESPOSIZIONE PERICOLOSA AI RAGGI LASER.
natural_image
Diagram of four batteries arranged in a row with positive and negative charge indicators, no text or symbols present.natural_image
Simple line drawing of two hands holding a circular object (no text or symbols)natural_image
Hand cleaning a circular object with a cloth, no text or symbols visible

natural_image
Black triangular warning symbol with white lightning bolt symbol (no text)ACHTUNG GEFAHR VON
natural_image
Black triangular warning symbol with exclamation mark (no text or numbers)natural_image
Diagram of a battery pack with four cells, each showing charge and polarity indicators (no text or labels)natural_image
Simple line drawing of two hands holding a circular object (no text or symbols)natural_image
Black triangular warning symbol with white lightning bolt symbol (no text)LET OP GEVAAR VOOR ELECTRISCH SCHOK NIET OPENEN

natural_image
Black triangular warning symbol with exclamation mark (no text or numbers)LET OP: OM HET RISICO VAN EEN ELEKTRISCHE SCHOK TE VERMINDEREN, VERWIJDER DE BEHUIZING (ACHTERKANT) NIET. IN HET APPARAAT ZITTEN GEEN ONDERDELEN DIE DOOR DE GEBRUIKER GEREPAREERD ZOUDEN KUNNEN WORDEN. LAAT REPARATIES UITVOEREN DOOR GEKWALIFICEERD PERSONEEL.
DIT IS EEN KLASSE-1 LASERPRODUCT. ONJUIST GEBRUIK VAN DE KNOPPEN, WIJZIGINGEN OF NIET IN DEZE GEBRUIKSAANWIJZING BEPAALDE PROCEDURES KAN BLOOTSTELLING AAN GEVAARLIJKE LASERSTRALEN TEN GEVOLGE HEBBEN.
natural_image
Diagram of four batteries arranged in a row with positive and negative charge indicators (no text or symbols)natural_image
Simple line drawing of two hands holding a circular object (no text or symbols)natural_image
Hand holding a circular object with an arrow indicating direction (no text or symbols)

DIGITAL AUDIO
ONDERHOUD VAN HET TOESTEL
IM Code: RCD102seriesIM0219