
StudioPower FC9080 - Vacuum Cleaner PHILIPS - Free user manual and instructions
Find the device manual for free StudioPower FC9080 PHILIPS in PDF.

User questions about StudioPower FC9080 PHILIPS
0 question about this device. Answer the ones you know or ask your own.
Ask a new question about this device
Download the instructions for your Vacuum Cleaner in PDF format for free! Find your manual StudioPower FC9080 - PHILIPS and take your electronic device back in hand. On this page are published all the documents necessary for the use of your device. StudioPower FC9080 by PHILIPS.
USER MANUAL StudioPower FC9080 PHILIPS
Register your product and get support at
www.philips.com/welcome
StudioPower FC9080 SERIES

31
32
33
34
ENGLISH 6
FRANÇAIS 18
INDONESIA 31
韓国兒 44
BAHASAMELAYU 57
PORTUGUES 70
ESPANOL 84
nnu 97
TIÊNG VIÊT 109
繁體中文 121
简体中文 133
5
167
Introduction
Congratulations on your purchase and welcome to Philips! To fully benefit from the support that Philips offers, register your product at www.philips.com/welcome.
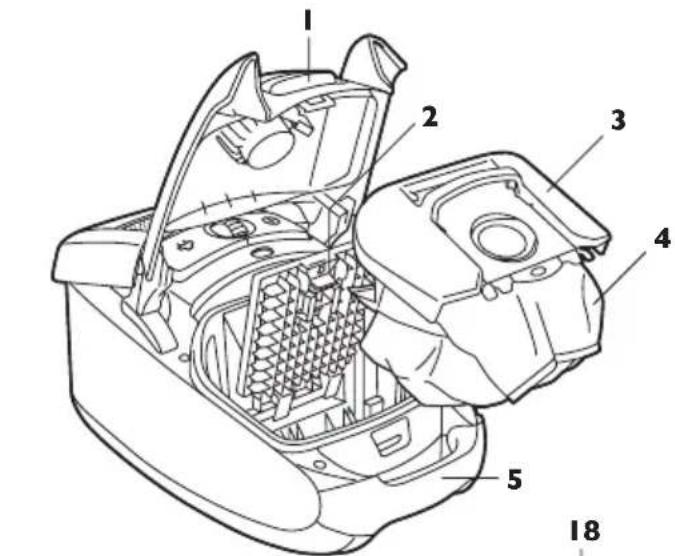
General description (Fig. 1)
1 Cover release tab
2 Filter grille release tab
3 Dustbag holder
4 Dustbag
5 Front handle
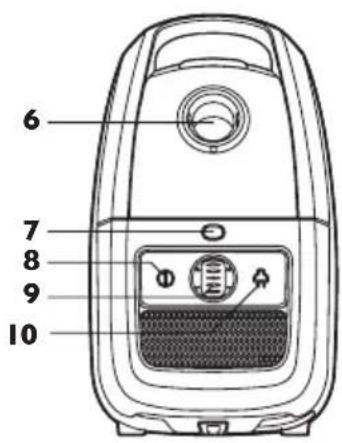
6 Hose connection opening
7 Dustbag-full indicator
8 On/off button
9 Suction power selection wheel
10 Cord rewind button
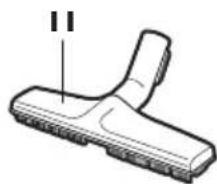
11 Hard floor nozzle (specific types only)
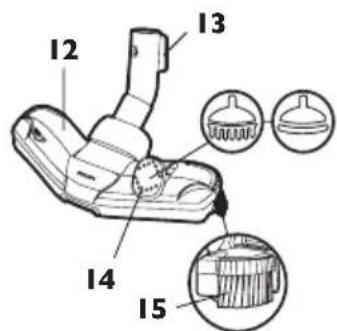
12 Tri-Active nozzle
13 Parking/storage ridge
14 Rocker switch for carpet/hard floor settings
15 Side brush
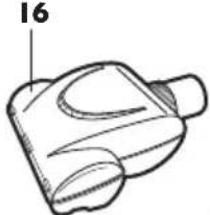
16 Mini turbo brush (specific types only)
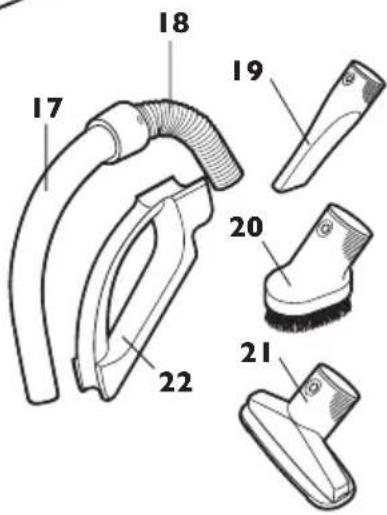
17 Standard handgrip
18 Hose
19 Crevice tool
20 Small brush (specific types only)
21 Small nozzle
22 Accessory holder (specific types only)
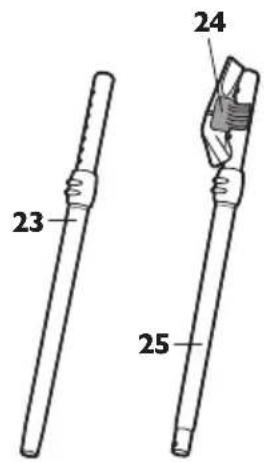
23 Telescopic tube with conical connection (specific types only)
24 Accessory clip (specific types only)
25 Telescopic tube with button connection (specific types only)
26 Exhaust grille
27 HEPA 13 washable filter
28 HEPA-filter lock grille
29 Parking slot
30 Mains plug
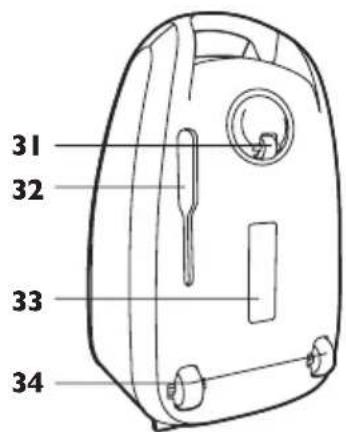
31 Swivel wheel
32 Storage slot
33 Type plate
34 Rear wheels
Important
Read this user manual carefully before you use the appliance and save it for future reference.
Danger
- Never suck up water or any other liquid. Never suck up flammable substances and do not suck up ashes until they are cold.
Warning
-
Check if the voltage indicated on the appliance corresponds to the local mains voltage before you connect the appliance.
-
Do not use the appliance if the plug, the mains cord or the appliance itself is damaged.
- If the mains cord is damaged, you must have it replaced by Philips, a service centre authorised by Philips or similarly qualified persons in order to avoid a hazard.
- This appliance is not intended for use by persons (including children) with reduced physical, sensory or mental capabilities, or lack of experience and knowledge, unless they have been given supervision or instruction concerning use of the appliance by a person responsible for their safety.
- Children should be supervised to ensure that they do not play with the appliance.
- Do not point the hose, the tube or any other accessory at the eyes or ears nor put it in your mouth when it is connected to the vacuum cleaner and the vacuum cleaner is switched on.
Caution
- When you use the vacuum cleaner to vacuum ashes, fine sand, lime, cement dust and similar substances, the pores of the dustbag become clogged. As a result, the dustbag-full indicator will indicate that the dustbag is full. Replace the disposable dustbag or empty the reusable dustbag, even if it is not full yet (see chapter 'Replacing/emptying the dustbag').
- Never use the appliance without the motor protection filter. This could damage the motor and shorten the life of the appliance.
- Only use Philips s-bag™ synthetic dustbags or the reusable dustbag provided (some countries only).
Electromagnetic fields (EMF)
This Philips appliance complies with all standards regarding electromagnetic fields (EMF). If handled properly and according to the instructions in this user manual, the appliance is safe to use based on scientific evidence available today.
Before first use
1 Take the appliance and its accessories out of the box.
2 Remove any sticker, protective foil or plastic from the appliance.
Preparing for use
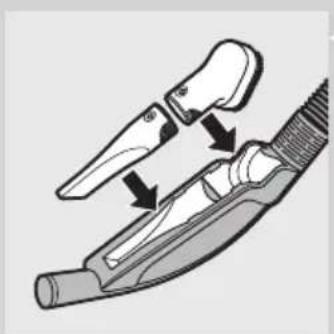
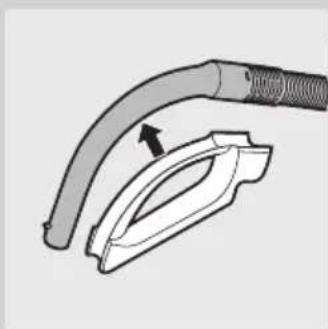
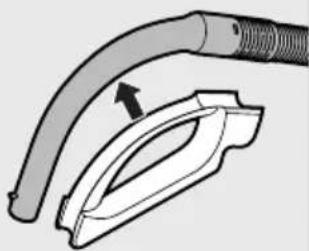
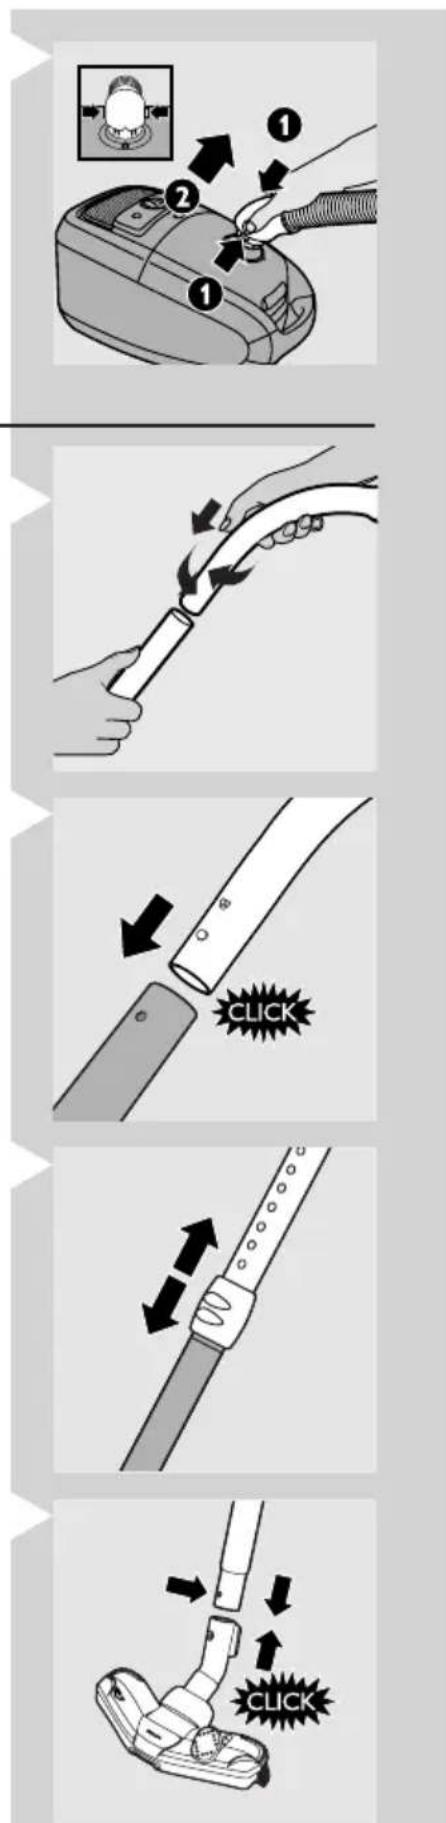
Connecting the hose
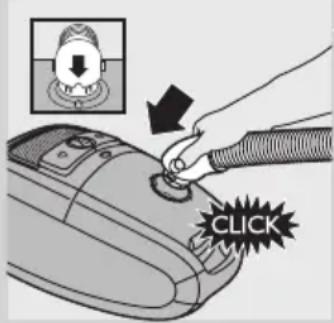
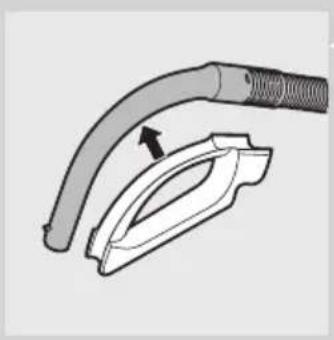
1 To connect the hose, push it firmly into the appliance ('click'). Make sure the recess in the hose connection fits exactly on the projection on housing of the appliance.
ENGLISH8
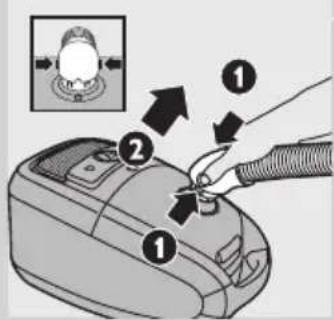
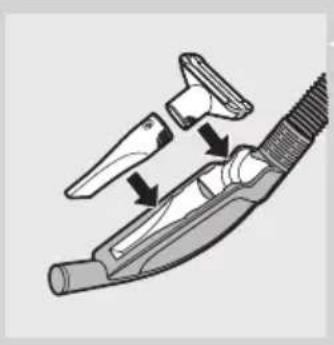
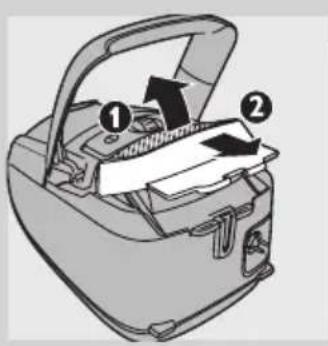
2 To disconnect the hose, push the buttons (1) and pull the hose out of the appliance (2).
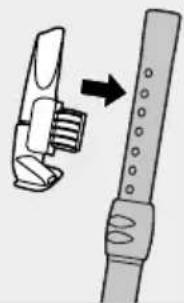
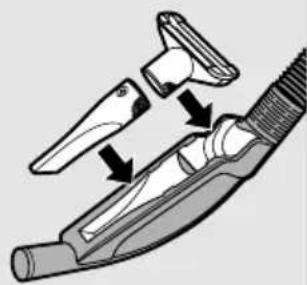
Connecting the telescopic tube

1 To connect the telescopic tube to the handgrip:
- Telescopic tube with conical connection (specific types only): Insert the handgrip into the telescopic tube and turn a little.
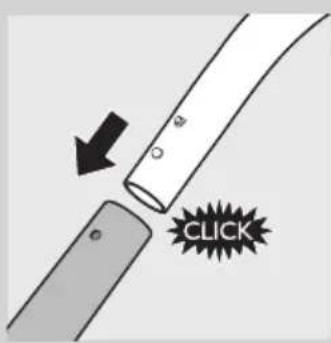
- Telescopic tube with button connection (specific types only): Press the spring-loaded lock button on the handgrip and insert the handgrip into the telescopic tube. Fit the spring-loaded lock button into the opening in the tube ('click').
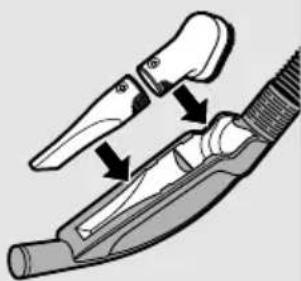
To disconnect the telescopic tube from the handgrip:
- Telescopic tube with conical connection (specific types only): Pull the handgrip out of the telescopic tube while turning it a little.
- Telescopic tube with button connection (specific types only): Press the spring-loaded lock button and pull the handgrip out of the tube.
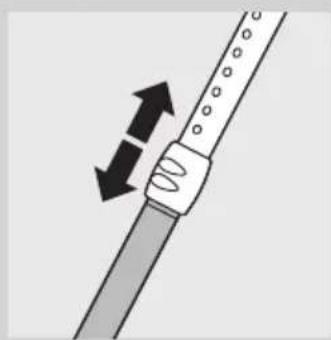
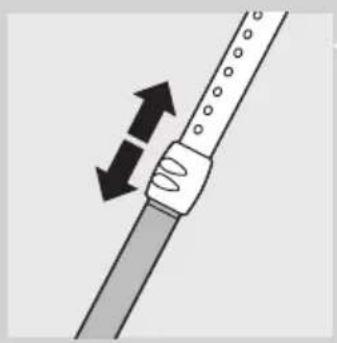
2 Adjust the telescopic tube to the length you find most comfortable during vacuuming.
Hold the collar with one hand and pull the tube part above the collar upwards or push it downwards with the other hand.

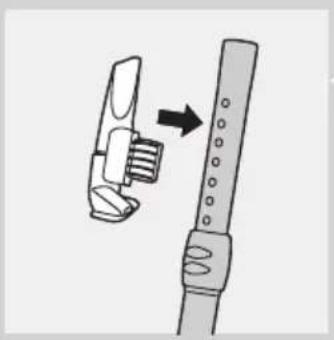
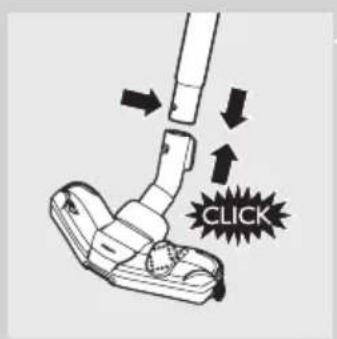
3 To connect the tube to a nozzle, press the spring-loaded lock button on the tube and insert the tube into the nozzle. Fit the spring-loaded lock button into the opening in the nozzle ('click').
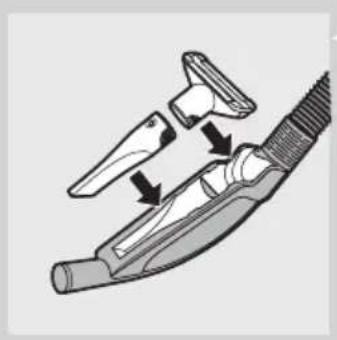
Accessory clip (specific types only)
1 Snap the crevice tool and the small nozzle into the clip.
2 Snap the accessory clip onto the tube.
3 Pull the accessory clip from the tube to remove it.
Accessory holder (specific types only)
1 Snap the accessory holder onto the handgrip.
2 Store accessories in the accessory holder by pushing them into the holder. To detach the accessories, pull them out of the holder.
You can store two accessories at a time in the accessory holder.
- Crevice tool and small nozzle.
Note: The small nozzle must be placed in the accessory holder as shown in the picture.
- Crevice tool and small brush.
Tri-Active nozzle
The Tri-Active nozzle is a multi-purpose nozzle for carpets and hard floors.
- The side brushes catch more dust and dirt at the sides of the nozzle and allow you to clean better along furniture and other obstacles.
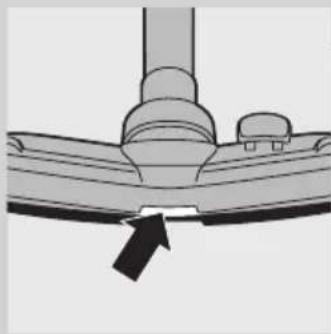
- The opening at the front of the nozzle allows you to suck up larger particles.
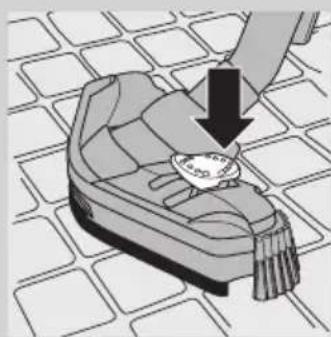
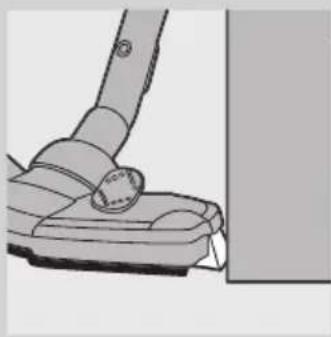
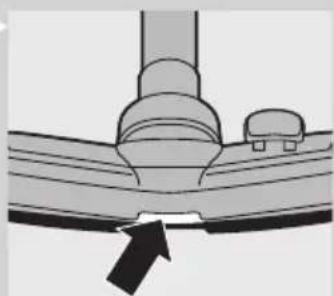
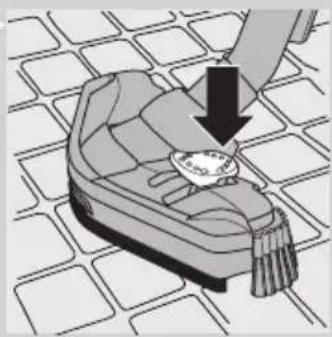
1 Use the hard floor setting to clean hard floors (for instance for tiled, parqueted, laminated and linoleumed flooring): push the rocker switch on top of the nozzle with your foot to make the brush strip come out of the housing. At the same time, the wheel is lifted to prevent scratching and to increase manoeuvrability.
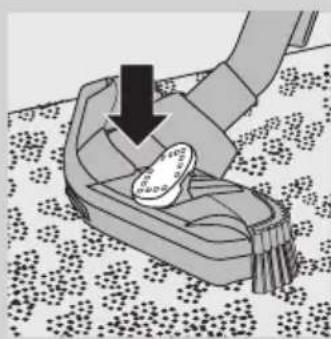
2 Use the carpet setting to clean carpets: push the rocker switch again to make the brush strip disappear into the nozzle housing. The wheel is lowered automatically.
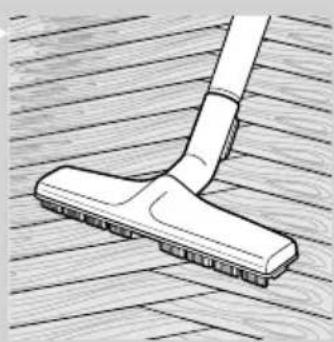
Hard-floor nozzle (specific types only)
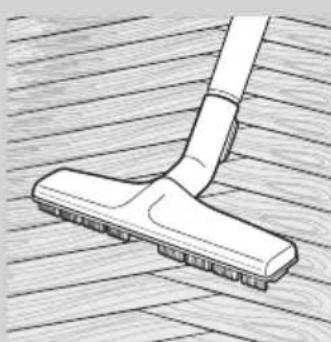
- The hard-floor nozzle is designed for gentle cleaning of hard floors.
Mini turbo brush (specific types only)
The mini turbo brush is specially designed for effectively picking up animal hairs and fluff from furniture and mattresses. The unique brush inside the mini turbo brush loosens the hair from the fabric. Then the hair is picked up by the vacuum cleaner.
The mini turbo brush can be attached to the handgrip of the hose or to the telescopic tube.
1 To attach the mini turbo brush, insert it into the handgrip or the telescopic tube and turn a little.
2 To detach the mini turbo brush, pull it out of the handgrip or the telescopic tube while turning it a little.
Using the appliance
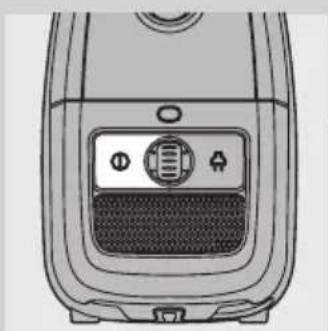
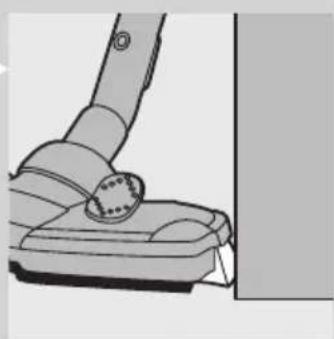
1 Pull the cord out of the appliance and put the mains plug in the wall socket.
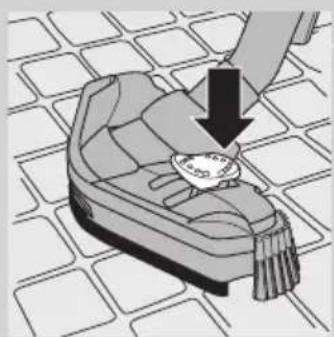
Press the on/off button on top of the appliance to switch on the appliance.
Tip: To avoid bending your back, press the on/off button with your foot.
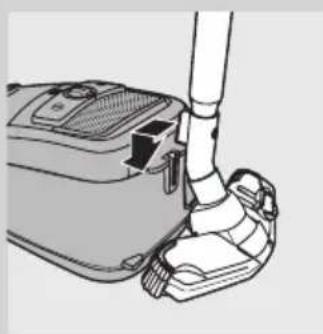
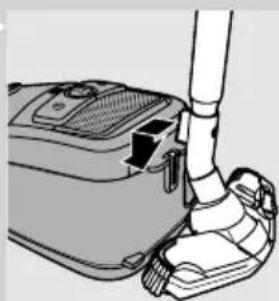
3 If you want to park the tube for a moment during vacuum cleaning, insert the ridge on the nozzle into the parking slot.
4 To ensure stable parking of the telescopic tube, adjust the tube to the shortest length.
5 To switch off the appliance, press the on/off button on top of the appliance or the on/off/standby button on the remote control.
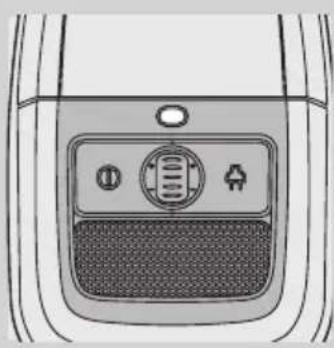
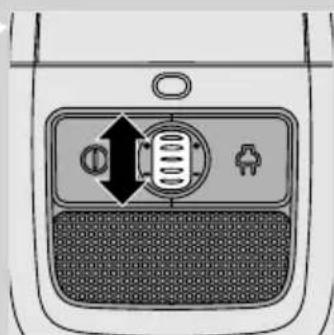
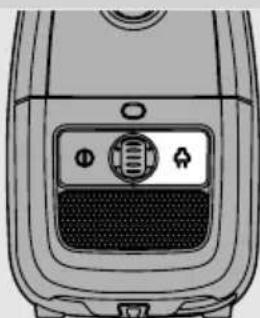
Adjusting suction power
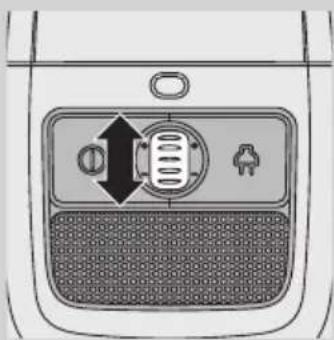
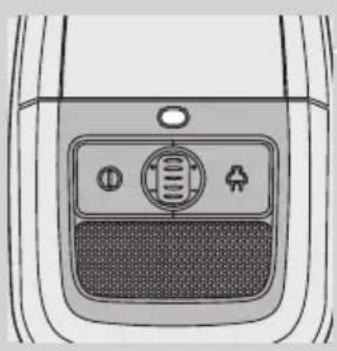
1 During vacuum cleaning, you can adjust the suction power with the selection wheel on top of the appliance.
- Use maximum suction power to vacuum very dirty carpets and hard floors.
- Use minimum suction power to vacuum curtains, tablecloths etc.
Storage
Switch off the appliance and remove the mains plug from the wall socket.

2 Press the cord rewind button to rewind the mains cord.
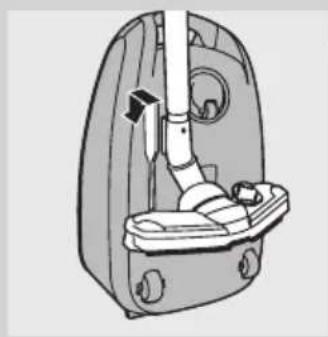
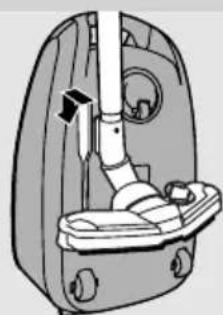
3 Put the appliance in upright position. To attach the nozzle to the appliance, insert the ridge on the nozzle into the storage slot.
- To ensure stable parking of the telescopic tube, adjust the tube to the shortest length.
4 Specific types only: Always put the Tri-Active nozzle in the carpet setting when you store it. Also prevent the side brushes from becoming bent.
Replacing/emptying the dustbag
Always unplug the appliance before you replace the disposable dustbag or empty the reusable dustbag.
Replacing the disposable dustbag
- Replace the dustbag as soon as the dustbag-full indicator has changed colour permanently, i.e. even when the nozzle is not placed on the floor.
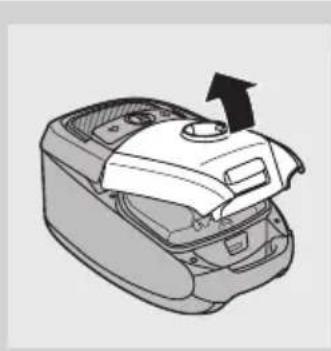
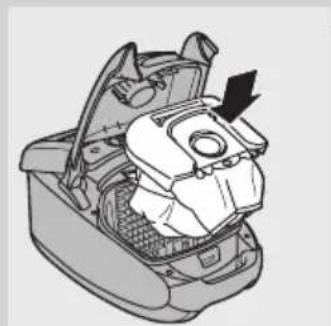
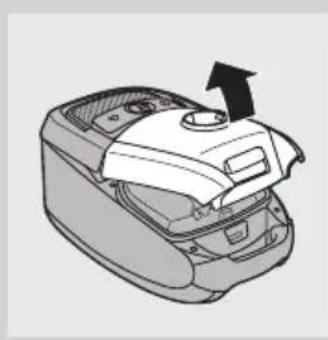
Pull the cover upwards to open it.
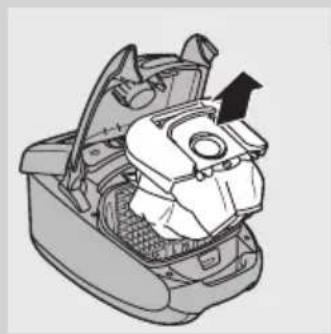
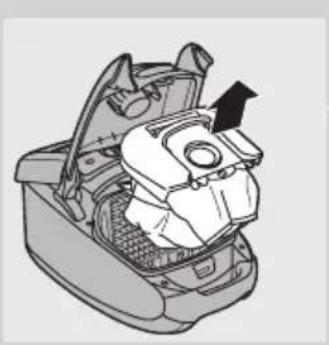
2 Lift the dustbag holder out of the appliance.
Make sure you hold the dustbag upright when you lift it out of the appliance.
3 Pull at the cardboard tag to remove the full dustbag from the holder. When you do this, the dustbag is sealed automatically.
4 Slide the cardboard front of the new dustbag into the two grooves of the dustbag holder as far as possible.
Put the dustbag holder back into the vacuum cleaner.
Note: If no dustbag has been inserted, you cannot close the cover.
Push the cover downwards to close it.
Emptying the reusable dustbag (some countries only)
In some countries, this vacuum cleaner also comes with a reusable dustbag that can be used and emptied repeatedly. You can use the reusable dustbag instead of disposable dustbags.
To remove and insert the reusable dustbag, simply follow the instructions in 'Replacing the disposable dustbag'.
To empty the reusable dustbag:
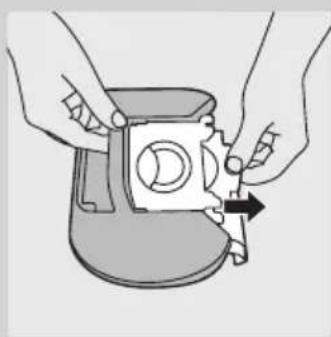
1 Slide the clip off the dustbag sideways.
2 Shake out the contents into a dustbin.
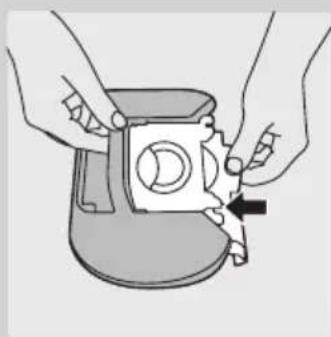
3 To close the dustbag, slide the clip back onto the bottom edge of the dustbag.
Cleaning and maintenance of filters
Always unplug the appliance before you clean or replace the filters.
Permanent motor protection filter
Clean the permanent motor protection filter every time you empty the reusable dustbag or replace the disposable dustbag.
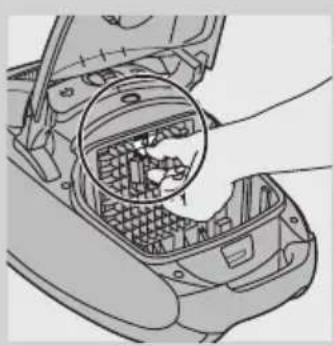
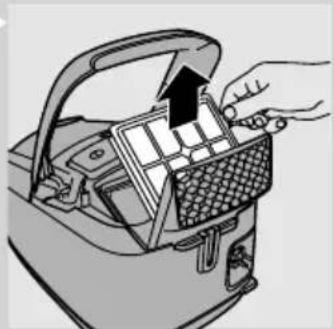
1 Remove the dustbag holder with the dustbag.
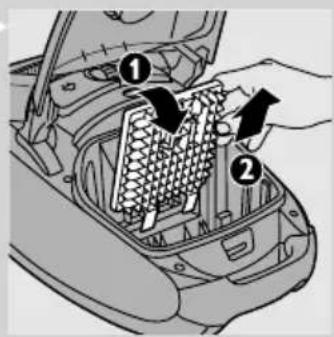
2 Press the tab at the top of the motor protection filter holder down to release it.
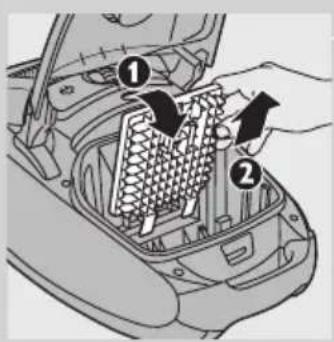
3 Pull the top of the motor protection filter holder towards you (1) and lift the filter holder out of the dustbag compartment (2).
4 Shake the filter over a dustbin to clean it.
5 Put the clean filter back into the filter holder.
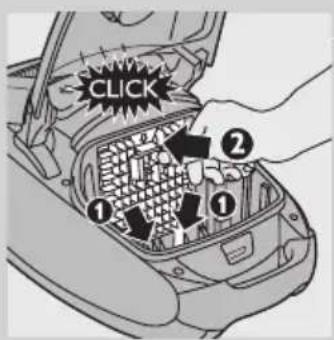
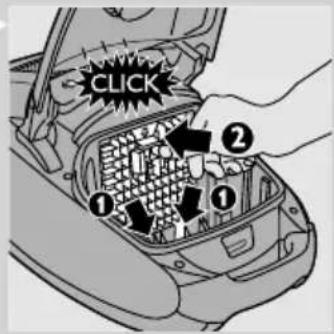
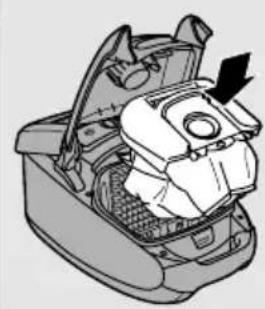
6 Fit the two lugs of the filter holder behind the ridge at the bottom to ensure that it fits properly at the top (1). Then press the filter holder home ('click') (2).
7 Place the dustbag holder with the dustbag back into the appliance and close the cover.
HEPA 13 washable filter
HEPA 13 washable filter is able to remove 99.95% of all particles down to 0.0003mm in size from the outlet air. This not only includes normal house dust, but also harmful microscopic vermin such as dust mites and their excrements, which are well-known causes of respiratory allergies.
Note: To guarantee optimal dust retention and performance of the vacuum cleaner, always replace the HEPA filter with an original Philips filter of the correct type (see chapter 'Ordering accessories').
Clean the washable HEPA 13 filter every 6 months. You can clean the washable HEPA 13 filter max. 4 times. Replace the filter after it has been cleaned 4 times.
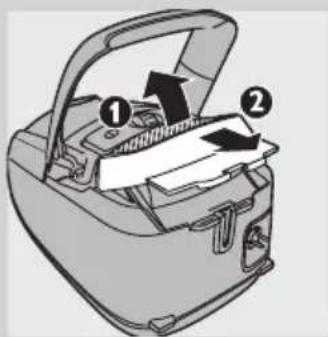
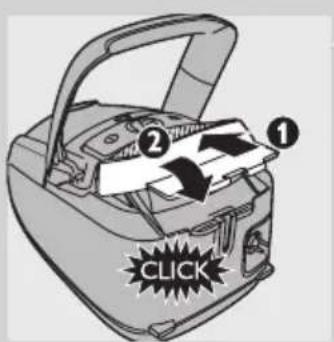
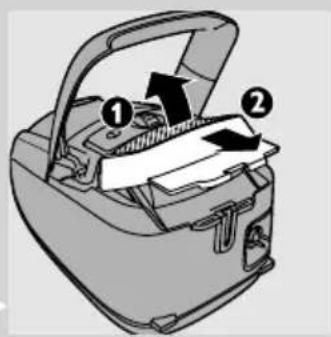
1 Open the exhaust grille (1) and pull it out of the appliance (2).
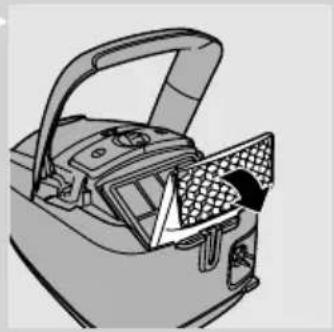
2 Pull the top of the HEPA-filter lock grille towards you and put it in upright position.
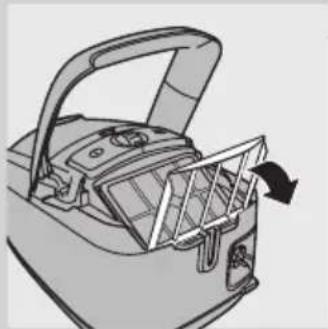
3 Take out the washable HEPA 13 filter.
4 Rinse the pleated side of the HEPA 13 filter under a hot slow-running tap.
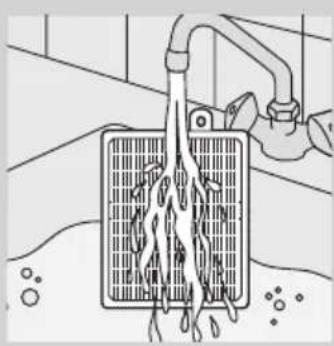
- Hold the filter in such a way that the pleated side points upwards and the water flows parallel to the pleats. Hold the filter at an angle so that the water washes away the dirt inside the pleats.
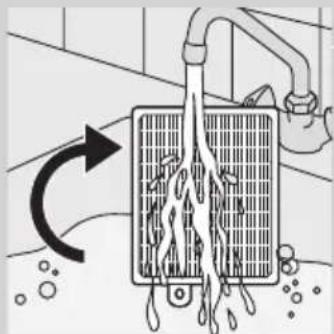
-
Turn the filter 180^ and let the water flow along the pleats in opposite direction.
-
Continue this process until the filter is clean.

Never clean the washable filter with a brush.
Note: Cleaning does not restore the original colour of the filter, but does restore its filtration power.
5 Carefully shake the water from the surface of the filter. Let the filter dry at least 2 hours before you put it back into the vacuum cleaner.
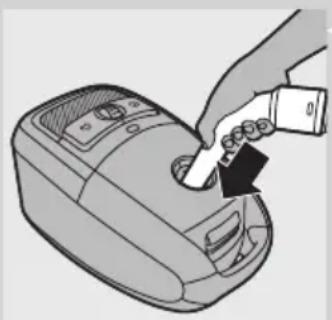
6 Put the filter back into the appliance. Lower the HEPA-filter lock grille onto the HEPA filter.
7 Insert the filter grille into the appliance (1) and push the other end of filter grille home ('click') (2).
Ordering accessories
For purchasing dustbags, filters or other accessories for this appliance, please visit www.philips.com, consult the worldwide guarantee leaflet or contact the Philips Consumer Care Centre in your country.
Ordering dustbags
- Philips Classic s-bag™ synthetic dustbags are available under type number FC8021.
- Philips Clinic s-bag™ high filtration synthetic dustbags are available under type number FC8022.
-
Philips Anti-odour s-bag™ synthetic dustbags are available under type number FC8023.
-
Reusable dustbags (some countries only) are available under code number 432200493290.
Note: Please visit www.s-bag.com for more information about the s-bag.
Ordering filters
- HEPA 13 washable filters are available under type number FC8038.
Environment
- Do not throw away the appliance with the normal household waste at the end of its life, but hand it in at an official collection point for recycling. By doing this, you help to preserve the environment.
Guarantee & service
If you need service or information or if you have a problem, please visit the Philips website at www.philips.com or contact the Philips Consumer Care Centre in your country (you find its phone number in the worldwide guarantee leaflet). If there is no Consumer Care Centre in your country, go to your local Philips dealer.
Troubleshooting
This chapter summarises the most common problems you could encounter with the appliance. If you are unable to solve the problem with the information below, contact the Consumer Care Centre in your country.
1 The suction power is insufficient.
A Check if the dustbag is full.
If necessary, replace the disposable dustbag or empty the reusable dustbag (some countries only).
B Check if the filters need to be cleaned or replaced.
If necessary, clean or replace the filters.
C Check if the suction power selection wheel is in maximum position.
D Check if the nozzle, tube or hose is blocked up.
- To remove the obstruction, disconnect the blocked-up item and connect it (as far as possible) the other way around. Switch on the vacuum cleaner to force the air through the blocked-up item in opposite direction.
Introduction
Commanded accessoires
1 田新不樂和歌形樂樂樂樂樂樂樂樂樂樂樂樂樂樂樂
2 页
3 3
默陆社
1 1
2 2
- 井藻土否及尚
Before the establishment of the Chinese Academy of Medical Sciences, the National Institutes of Health (NIAH) is a 10-year-old research center located in Shanghai, China. The main research focus is on human diseases and their relationship with human health. The research program includes: (1) to study the relationship between human disease and human health; (2) to develop and test new drugs and methods for treating human diseases; and (3) to develop and test new drugs and methods for treating human diseases.
注释:
iRnJ 1
1 音日
1
2 1
3 Naequiu
4
5
6 waiyienjepu
7 ngnynWwNnOeJyH
8 1
9 13000000000000000000
10 1
11 Wnwnnnnnnnnnnnnnnnnnnnnnnnnnnnnnnnnnnnnnnnnnnnnnnnnnnnnnnnnnnnnnnnnnnnnnnnnnnnnnnnnnnnnnnnnnnnnnnnnnnnnnnnnnnnnnnnnn
12 Tri-Active
13
14 1
15 u
16 uwnnunun (wnnnun)
17 1
18 W
19
20 1wunwn (wnwnn)
21
22 1nssnn (wnzwnwn)
23 WaeuunuunuuuauuauuuuuuuuuuuuuuuuuuuuuuuuuuuuuuuuuuuuuuuuuuuuuuuuuuuuuuuuuuuuuuuuuuuuuuuuuuuuuuuuuuuuuuuuuuuuuuuuuuuuuuuuuuuuuuuuuuuuuuuuuuuuuuuuuuuuuuuuuuuuuuuuuuuuuuuuuuuuuuuuuuuuuuuuuuuuuuuuuuuuuuuuuuuuuuuUU
24 1wuaumuau (wunuunu)
25 viogoejueyoussyovwovwovnuovvduovluu (wuvnuu
26 1
27 1nHepa 13 nnnnnnnnnnnnnnnnnnnnnnnnnnnnn
28 1000000000000000000000000000000000000000000000000000000
29 1
30
31 Keunennn
32 dea nn
33 1
34
20170 17
mnnnne nnnnnnnnnnnnnnnnnnnnnnnnnnnnnnnnnnnnnnnnnnnnnnnnnnnnnnnnnnnnnnnnnnnnnnnnnnnnnnnnnnnnnnnnnnnnnnnnnnnnnnnnnnnnnnnnn
#
-
n nn
lumraananaananaananaananaananaananaananaananaananaananaananaananaananaananaananaananaananaananaananaananaananaananaananaananaananaananaananaananaananaananaananaananaananaananaananaananaananaananaananaananaananaananaananaananaananaananaananaananaananaananaan
nanaananaananaananaananaananaananaananaananaananaananaananaananaananaananaananaananaananaananaananaananaananaananaananaananaananaananaananaananaananaananaananaananaananaananaananaananaananaananaananaananaananaananaananaananaananaananaananaananaananaanana
nannnnn nnnnnnnnnnnnnnnnnnnnnnnnnnnnnnnnnnnnnnnnnnnnnnnnnnnnnnnnnnnnnnnnnnnnnnnnnnnnnnnnnnnnnnnnnnnnnnnnnnnnnnnnnnnnnnnnnnnnnnnnnnn
2 1
i
3 lunranaanannnnaaennnnnnaaannnnnnaaannnnnnaaannnnnnaaannnnnnaaannnnnnaaannnnnnaaannnnnnaaannnnnnaaannnnnnaaannnnnnaaannnnnnaaannnnnnaaannnnnnaaannnnnnaaannnnnnaaannnnnnaaannnnnnaaannnnnnaaannnnnnaaannnnnnaaennnnnnaaannnnnnaaannnnnnaaannnnnnaaannnnnnaaannnnnnaaannnnnnaaannnnnnaaannnnnnaaannnnnnaaannnnnnaaannnnnnaaannnnnnaaannnnnnaaannnnnnaaannnnnnaaannnnnnaaannnnnnaaannnnnnaaann
UNNTHEPA 13 UUNNANNNN NNNNN
n HEPA 13 nnnn nn nannnnae aenennnnnnnnnnnnnne 0.0003 uu. hannnnn an 99.95% naanennnnnnnnnnnnnnnnnnnnnnnnnnnnnnnnnnnnnnnnnnnnnnnnnnnn
Hepa nnnnns Philip (nnn nn)
n nnnnnaeannnnnneennn nnnnnaeae HEPA 13 nnn 6 nnnn nn nnnn nnnn nnnn nnnn nnnn nnnn nnnn nnnn nnnn nnnn nnnn nnnn nnnn nnnn nnnn nnnn nnnn nnnn nnnn nnnn nnnn nnnn nnnn nnnn nnnn nnnn nnnn nnnn nnnn nnnn nnnn nnnn nnnn nnnn
Thay/lam sach tui chu bra bui
Luon rut phich cam cua thiet bi ra khoi dien truck hi thay tui chuabui sur dung mot lan hoac truck hki do sach bui trong tui chuaba co thei sur dung ra.
Thay tui chu a bui sur dung mot lan
Thay tui chu a bui ngay khi ch bao tui chu a bui day doi mau v nh vien, tuc la ke ca khi dai voi khong ddt xuong san.
jai jai yu yu 1, guiuui uui jla jilai jia
J 1 J 1 J 1 J 1 J 1 J 1 J 1 J 1 J 1 J 1 J 1
juaa jya paaii
45 123
aie paaai jyj yj aolsi yj
S 1
15
#
aies jj yj j aLg g oys gals 1ol
aegg g aag yaae 1
00 1
is Jog olSiu 4
-
1
y 1 y

J 1

(yolglaa)jao 5iLaa
100 1
()
1
J 1
1
y
1

()
1
y
()
1
y
a 1
i 1
j 100000000000000000000000000000000000000000000
00
1
oJL aW dIa
1
a
1
()
()
1
1 1
1 1
1 1
1 1
1 1
1 1
1 1
1
()
100000000000000000000000000000000000000000000000000000000000000000000000000000 1 1 1 1 1 1 1 1 1 1 1 1 1 1 1 1 1 1 1 1 1 1 1 1 1 1 1 1 1 1 1 1 1 1 1 1 1 1 1 1 1 1 1 1 1 1 1 1 1 1 2
EMF)
Philips ClassicsbagTM aallll lllllllllllllllllllllllll
Philips Joclinic s-bagTM 1
FC8022
Philips Anti- Odour s-bagTM 1
.FC8023j11
J 1
aaiiiaai
Jalal Jala 1
1
()“o”jaiai
y
HEPA13
140 99.90 1
LaiJaiu 1sIg. gall jiall jie le dll jiay y. qiall alglj .
aal aal aal aal aal aal aal aal aal aal aal aal
Ie Iaal aaiyssll aisll oag jiaai jaiin Jaaai aaii aaii (aie aie) Jiai jaii pial gilln Philips n jie HEPA 13 HePA 13 jie HEPAA 13 jie
a 8
(1)p(1)
HEPA jie jia jia jia jia jia jia jia jia jia jia jia jia jia jia jia jia jia jia jia jia jia jia jia jia jia jia jia jia jia jia jia jia jia jia jia jia jia jia jia jia jia
HEPA13
HEPA 13 jn
aaiiie aiee iieae eae eae eae eae eae eae eae eae eae eae eae eae eae eae eae eae eae eae eae eae eae eae eae eae eae eae eae eae eae eae eae eae eae eae eae eae eae eae eae eae
()
| Emf. (EMF) | |
| Philips no jlglll | |


