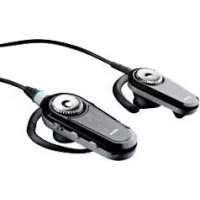
PRO 9450 - Earphones JABRA - Free user manual and instructions
Find the device manual for free PRO 9450 JABRA in PDF.
User questions about PRO 9450 JABRA
0 question about this device. Answer the ones you know or ask your own.
Ask a new question about this device
Download the instructions for your Earphones in PDF format for free! Find your manual PRO 9450 - JABRA and take your electronic device back in hand. On this page are published all the documents necessary for the use of your device. PRO 9450 by JABRA.
USER MANUAL PRO 9450 JABRA
© 2011 GN Netcom A/S. All rights reserved. Jabra ^a is a registered trademark of GN Netcom A/S. All other trademarks included herein are the property of their respective owners. The Bluetooth ^b word mark and logos are owned by the Bluetooth SIG, Inc. and any use of such marks by GN Netcom A/S is under license. (Design and specifications subject to change without notice).
MADE IN CHINA TYPE: 9400HS/BS


PATENTS AND DESIGN REGISTRATION PENDING INTERNATIONAL
REGISTER YOUR JABRA AT JABRA.COM/REGISTER - FOR NEWS, SUPPORT AND COMPETITIONS www.jabra.com
81-03178 D
Quick Start Guide
www.jabra.com
NEED MORE HELP?
EUROPE
Belgique/Belgium +49 (0)8031 2651 72
Czech Republic +420 800 522 722
E-mail Support: support.mea@gn.com
USA & CANADA
Canada 1-800-489-4199
USA 1-800-826-4656
ASIA
Australia 1-800-636-086 (local distributor)
China +86-21-5836 5067
Hong Kong 800-968-265 (Toll free)
India 000-800-852-1185 (Toll free)
Indonesia 001-803-852-7664
Japan +81-3-5297-7976
Malaysia 1800-812-160 (Toll free)
New Zealand 0800-447-982 (Toll free)
Philippines +63-2-2424806
Singapore 800-860-0019 (Toll free)
Taiwan 0080-186-3013 (Toll free)
For more languages please refer to the manuals on the CD.
EUROPE:
EN/FR/DE/IT/NL/ES/DA/SE/NO/FI/PT/RU/TR/CZ
USA & CANADA:
US/FR/ES/PT
ASIA:
EN/CHT
LANGUAGES
ENGLISH / US 2
FRANÇAIS / FR 10
DEUTSCH / GE 18
ESPAÑOL / ES 26
繁體中文 / CHT 34
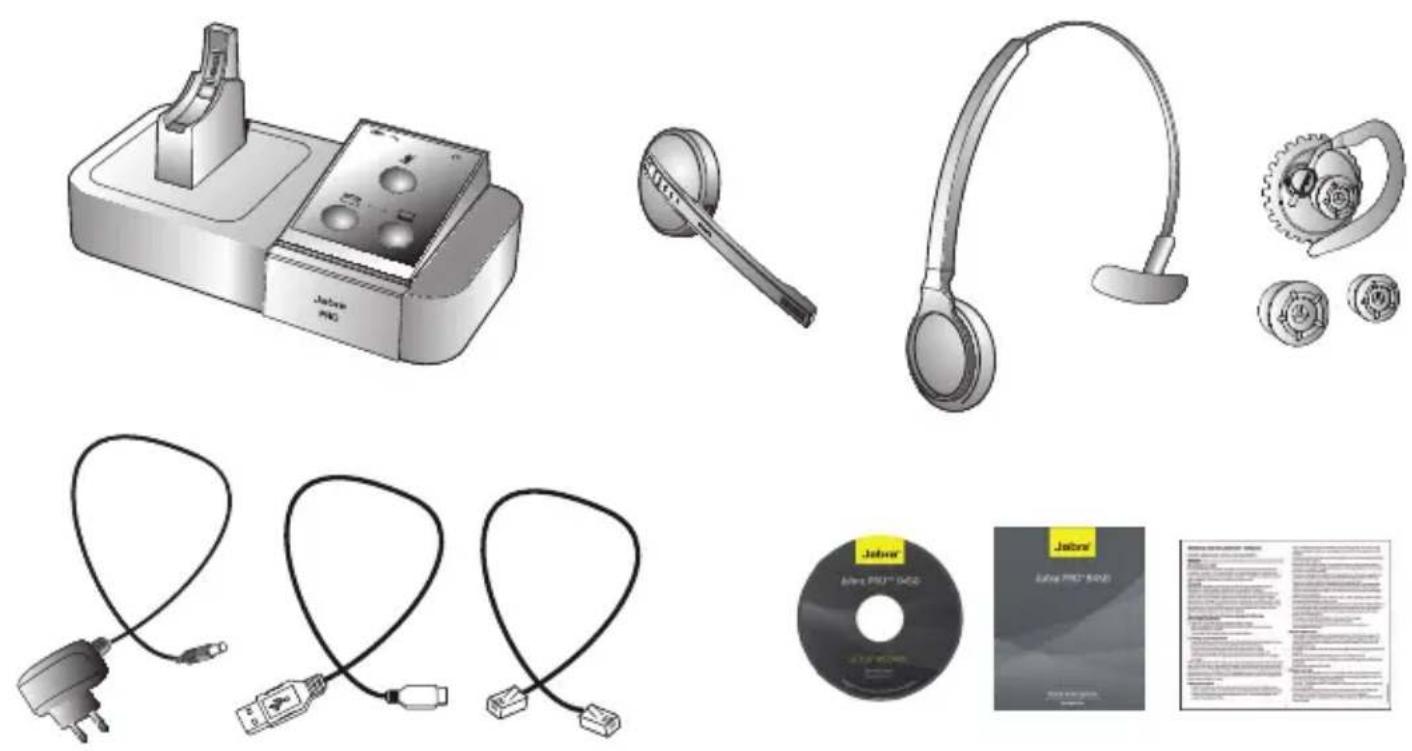
PACKAGE CONTENTS
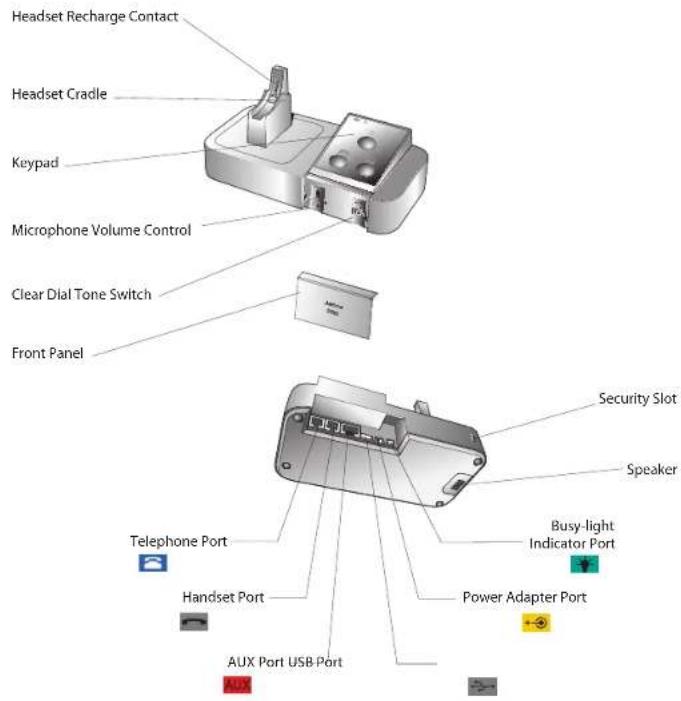
JABRA PRO 9450 HEADSET DIAGRAMS

2
JABRA PRO 9450 BASE DIAGRAMS
3
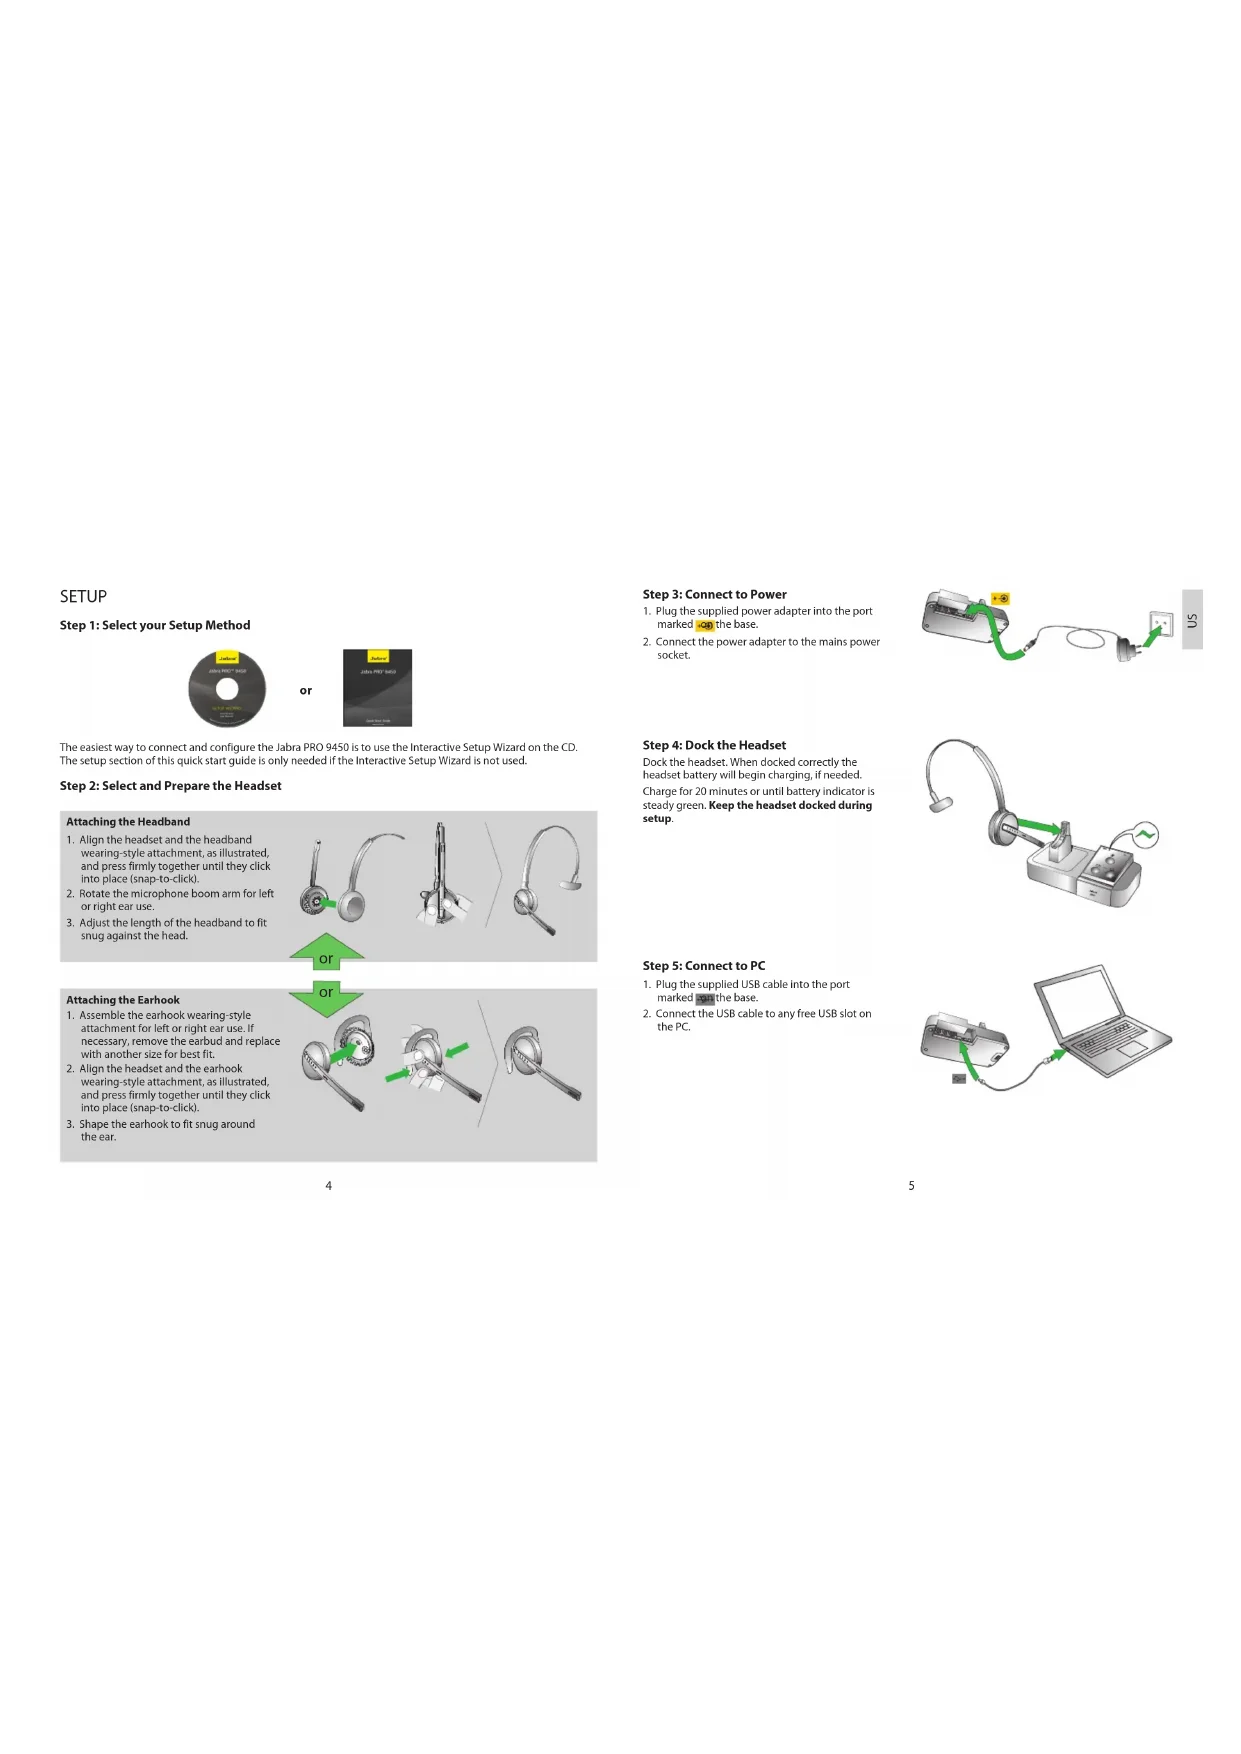
SETUP
Step 1: Select your Setup Method

or

The easiest way to connect and configure the Jabra PRO 9450 is to use the Interactive Setup Wizard on the CD. The setup section of this quick start guide is only needed if the Interactive Setup Wizard is not used.
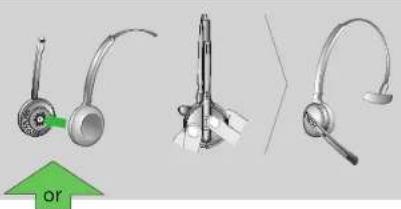
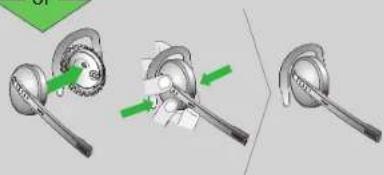
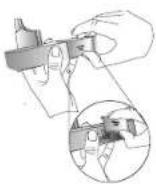
Step 2: Select and Prepare the Headset
Attaching the Headband
- Align the headset and the headband wearing-style attachment, as illustrated, and press firmly together until they click into place (snap-to-click).
- Rotate the microphone boom arm for left or right ear use.
- Adjust the length of the headband to fit snug against the head.
Attaching the Earhook
- Assemble the earhook wearing-style attachment for left or right ear use. If necessary, remove the earbud and replace with another size for best fit.
- Align the headset and the earhook wearing-style attachment, as illustrated, and press firmly together until they click into place (snap-to-click).
- Shape the earhook to fit snug around the ear.
natural_image
Three-panel illustration showing a medical or surgical device with a green arrow labeled 'or' pointing to it, no text or symbols present.or
natural_image
Three-step diagram showing a mechanical component with green arrows indicating motion or assembly (no text or symbols)4
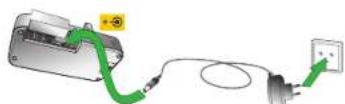
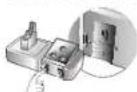
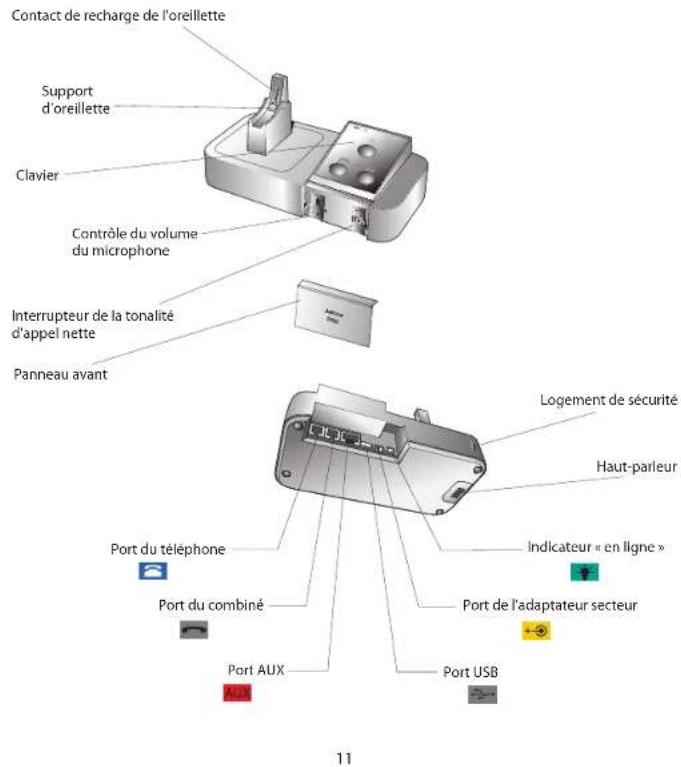
Step 3: Connect to Power
- Plug the supplied power adapter into the port marked -op the base.
- Connect the power adapter to the mains power socket.
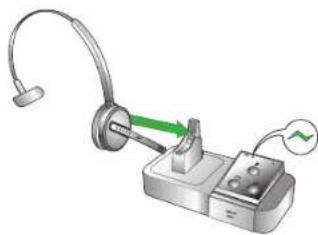
Step 4: Dock the Headset
Dock the headset. When docked correctly the headset battery will begin charging, if needed. Charge for 20 minutes or until battery indicator is steady green. Keep the headset docked during setup.
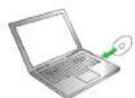
Step 5: Connect to PC
- Plug the supplied USB cable into the port marked on the base.
- Connect the USB cable to any free USB slot on the PC.
natural_image
Illustration of a headset connected to a device with a green arrow indicating direction (no text or symbols)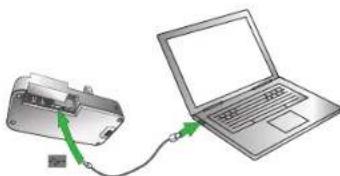
natural_image
Diagram showing a printer connected to a laptop via cable, with no visible text or symbols5
Step 6: Select and Connect to a Desk Phone
Connecting to a desk phone will vary depending on the type of desk phone used.
Connect to a Desk Phone with
Headset Port
This type of desk phone has a dedicated headset port (usually at the back of the phone). These phones typically have a button on the front panel for switching between handset and headset.
- Plug the supplied telephone cable into the port marked on the base.
- Connect the telephone cable to the headset port ☐ on the desk phone.
text_image
Diagram showing connection between a device with a telephone handset and a mobile phone, labeled in Chinese.
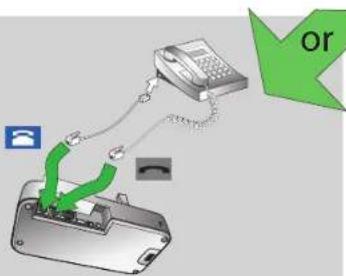
Connect to a Desk Phone without Headset Port
This desk phone does not have a dedicated headset port.
- On the desk phone, unplug the handset cable from the phone body.
- Connect the handset cable to the port marked on the base.
- Plug the supplied telephone cable into the port marked on the base.
- Connect the telephone cable into the handset port on the desk phone.
text_image
Diagram showing a person inserting a device into a device with a green arrow labeled 'or' pointing to the device.
text_image
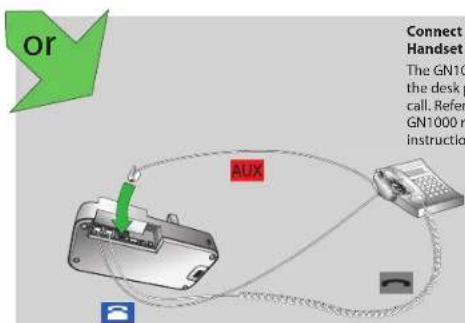
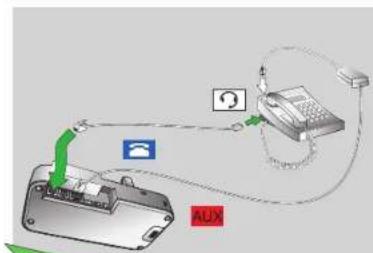
AU2 orConnect to a Desk Phone with Electronic Hookswitch
An electronic hookswitch enables an incoming call to be answered or ended by the headset's multi-function button.
Contact your local Jabra dealer to purchase an electronic hookswitch adapter.
- Plug the supplied telephone cable into the port marked 📄 on the base.
- Connect the telephone cable to the headset port ☐ on the desk phone.
- Plug the electronic hookswitch adapter into the port marked AUX on the base.
- Connect the electronic hookswitch adapter to the desk phone.
text_image
or Connect to Handset The GN10 the desk p call. Refer GN1000 r instruction AUXConnect to Desk Phone with GN1000 remote Handset Lifter
The GN1000 remote handset lifter manually lifts the desk phone handset to make or answer a call. Refer to documentation supplied with the GN1000 remote handset lifter for connection instructions.
Step 7: Make a Test Phone Call
Test Call from Desk Phone
1 Ensure the headset is docked, and then press and hold the desk phone button on the base keypad until the desk phone icon changes to 📄
2 Remove the front panel of the Jabra PRO 9450, as illustrated.
3 Put on the headset. The desk phone icon will change to all the icon does not change, tap the desk phone button on the base keypad.
4 Press the headset button on the desk phone, or lift the desk phone handset, to get a dial tone.
5 Make a test call. Dial a friend or colleagues phone number using the desk phone.
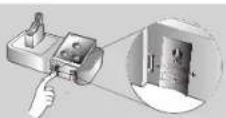
6 Check your speaking volume. If the listener says your speaking volume is too quiet or too loud, adjust the microphone volume control on the base, as illustrated. Ensure the listener does not adjust their own volume.
7 When finished, end the call and return the front panel of the Jabra PRO 9450
Troubleshooting
If you cannot hear anything, or the sound is distorted, during the desk phone call, try rotating the clear dial tone switch from A-G until the sound is optimal. For further details see section 3.1 Configuring for Desk Phones, in the user manual on the CD.
Test Call from PC (softphone)
1 using the installation CD.
2 Open your PC phone software (softphone) and set the Jabra PRO 9450 as speaker and microphone in the softphone's audio configuration settings.
3 Ensure the headset is docked, and then press and hold the softphone button on the base keypad until the softphone icon changes to ☐
4 Make a test call. Put on the headset, and dial a friend or colleague's phone number using the softphone software. The softphone icon will change to
5 When finished, end the call.
YOU HAVE NOW SUCCESSFULLY CONNECTED YOUR JABRA PRO 9450
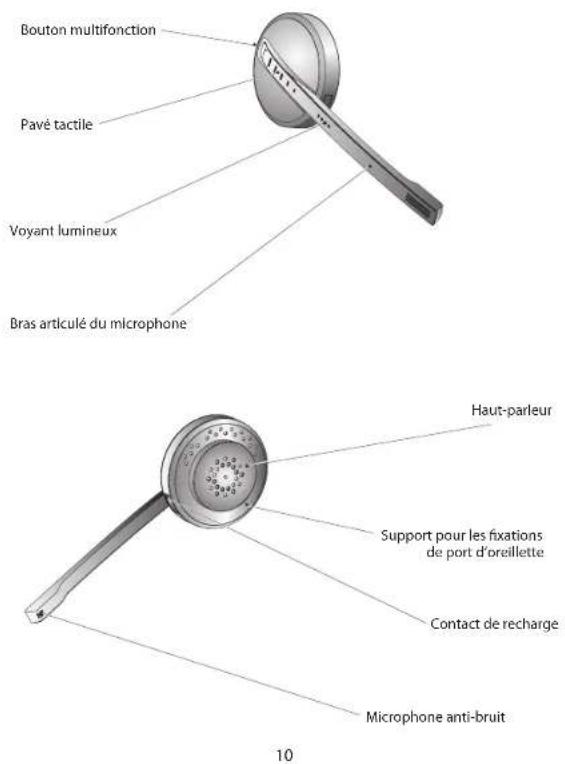
Headset Multi-function Button
The multi-function button is located on top of the headset, and manages calls on the target phone. You can answer calls, end calls, switch between held calls, and more, using a combination of taps, double-taps or presses.
Headset Volume Control
The volume control is a touch-sensitive panel located on the arm of the headset, and controls the headset speaker volume and microphone mute/un-mute.

text_image
Multi-function button Touch panel 2x Multi-axial volumeBase Keypad
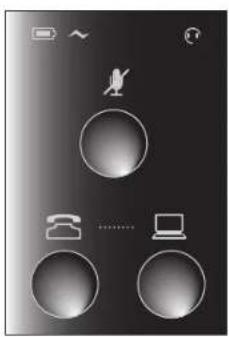
The Jabra PRO 9450 base keypad displays information about the headset and call status, and has controls for call handling. From here, you can change target phone, answer an incoming call, end the current call, or open an audio link to the current target phone.
natural_image
Black-and-white interface of a mobile phone with four circular buttons and icons (no text or symbols)
text_image
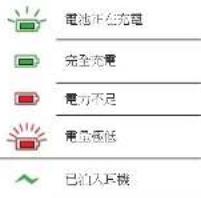
Battery charging Full battery Low battery Very low battery Headset docked Unknown headset docked Headset and base pairing Muted
text_image
Current target phone Phone ringing Phone on call Phone on hold Phone unplugged Group call Audio link between headset and base is active Unable to connect to headset
Dispose of the product according to local standards and regulations.
www.jabra.com/weee
SCHÉMAS DU MICRO-CASQUE JABRA PRO 9450
SCHÉMAS DU SOCLE DU JABRA PRO 9450
CONFIGURATION
natural_image
Three different types of hair accessories with curved arms and metal fittings, shown from different angles (no text or symbols visible)ou
natural_image
Three-step diagram showing mechanical assembly with green arrows indicating motion (no text or symbols)12
natural_image
Illustration of a headset connected to a device with a green arrow indicating motion (no text or symbols)natural_image
Diagram showing a device connected to a laptop via cable, with no visible text or symbols13
text_image
Diagram showing connection between a landline telephone and a device with a green signal icon, likely illustrating mobile phone or communication.
text_image
Diagram showing connection between a telephone and a printer with green arrows indicating signal transmission or data flow, labeled 'ou'.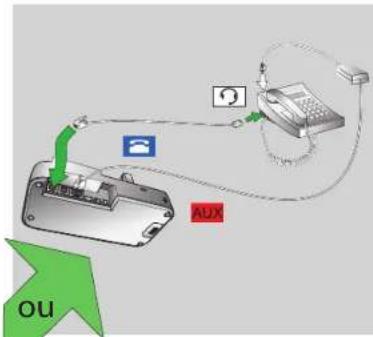
text_image
Diagram showing connection between a device with signal and control points, labeled 'OU' with arrows and icons1. Anfordered De installation PC Suite
natural_image
Black and white image of a mobile phone interface with four circular buttons and icons (no text or symbols)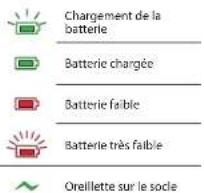
natural_image
Three medical or diagnostic illustrations of earbuds with different angles and structures (no text or symbols visible)oder
Ohrbügel befestigen
natural_image
Illustration of a handheld device with a green cable and connector, no text or symbols presentnatural_image
Illustration of a laptop connected to a device via cable, showing no text or symbolstext_image
Diagram showing connection between a telephone handset and a device with a green signal icon, likely illustrating mobile phone or contact setup.
natural_image
Black-and-white interface icon showing a bird, phone, laptop, and circular buttons (no text or symbols)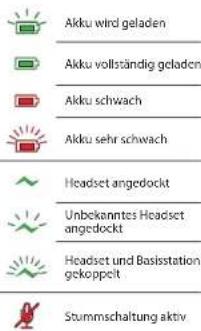
natural_image
Three technical illustrations of earbuds with a green arrow labeled 'p bien' pointing to the leftmost ear (no text or symbols on the products themselves)natural_image
Illustration of a handheld device with a green arrow pointing to a component, connected to a power strip (no text or symbols present)natural_image
Diagram showing a device connected to a laptop via cable, with no visible text or symbolstext_image
Diagram showing connection between a device with a telephone handset and a mobile phone, labeled in Chinese.
natural_image
Black-and-white interface of a mobile phone with four circular buttons and icons (no text or symbols)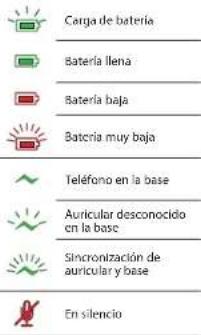
natural_image
Three technical illustrations of earbuds with adjustable arm and handle (no text or symbols)或
組合耳勾
natural_image
Three-step mechanical assembly diagram showing a knob, handle, and lever mechanism (no text or symbols)步驟3:連接電源
natural_image
Illustration of a handheld device with a green arrow pointing to a component, connected to a base (no text or symbols visible)步驟 5:連接電腦
natural_image
Illustration of a laptop connected to a device via cable, showing no text or symbols present.步驟 6:選擇並連接至座檯電話
text_image
Diagram showing connection between a landline telephone and a device, with a green signal icon indicating the connection point.或
連接至不帶耳機插孔的座檯電話
這類座標電話並沒有專用的耳機插孔。
text_image
Diagram showing connection between a landline telephone and a device with green wiring, including a logo and magnified view.或
flowchart
graph TD
    A["Device"] -->|Wireless Signal| B["Telephone"]
    B --> C["Satellite"]
    C --> D["Satellite"]
    D --> E["Phone"]
    style A fill:#f9f,stroke:#333
    style B fill:#ccf,stroke:#333
    style C fill:#cfc,stroke:#333
    style D fill:#fcc,stroke:#333
連接至帶電子收線開關的座標電話
text_image
Diagram showing connections between a device, telephone, and labeled component AUX with colored arrows indicating signal flow.步驟 7:撥打電話以作測試
從座檯電話測試通話
natural_image
Black-and-white interface of a mobile phone with four circular buttons and icons (no text or symbols)