C 809 - Loudspeaker JAMO - Free user manual and instructions
Find the device manual for free C 809 JAMO in PDF.

| Product type | 3-way bass-reflex floorstanding speaker |
| Brand | Jamo |
| Model | C 809 |
| Dimensions (H x W x D) | 1055 x 230 x 345 mm |
| Weight | 21.5 kg |
| Frequency response | 32 Hz - 40 kHz |
| Sensitivity | 90 dB |
| Nominal impedance | 6 ohms |
| Power handling (RMS) | 200 W |
| Peak power | 400 W |
| Main features | Bi-wiring possible; adjustable spikes; integrated subwoofer (C 80 SUB); phase, level, crossover adjustment; variable bass control (BGC) |
| Maintenance and cleaning | Use a dry or slightly damp cloth to clean the speakers. Do not use any cleaning product. |
| Safety | Do not expose to rain or moisture; install in a ventilated area; avoid heat sources; unplug if not used for a long time; repair by qualified personnel. |
| Spare parts and repairability | 60-month warranty for passive speakers, 24 months for electronics. Contact your supplier for repairs. Never send the product without prior agreement. |
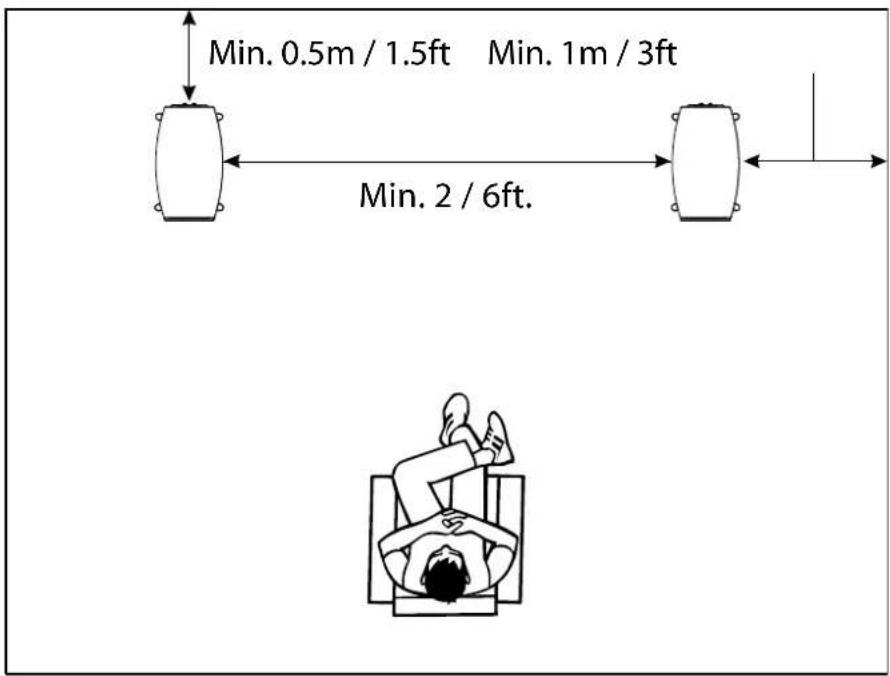
| General information | Designed for stereo or home theater use. A break-in period of a few days is recommended for optimal sound. Recommended placement: at least 2 m from each other, 0.5 m from the back wall, 1 m from side walls. |
Frequently Asked Questions - C 809 JAMO
User questions about C 809 JAMO
0 question about this device. Answer the ones you know or ask your own.
Ask a new question about this device
Download the instructions for your Loudspeaker in PDF format for free! Find your manual C 809 - JAMO and take your electronic device back in hand. On this page are published all the documents necessary for the use of your device. C 809 by JAMO.
USER MANUAL C 809 JAMO
General tips for setting up speakers. 6
Connecting 8
Spikes. 9
C803/C805/C807/C809 10
C 80 CEN 11
C 80 SUR. 12
C 80 SUB. 14
Connecting the subwoofer. 15
Speaker level input terminals 16
Subwoofer adjustment options. 17
Cleaning 19
Specifications 20
Jamo consumer warranty. 21
Introduction
Welcome to the exclusive circle of Jamo C 80 owners! This manual will give you a quick overview of how to set up your speakers in your room. For more in-depth information about the technologies used please refer to the C 80 technical description and www.Jamo.com.
First, a word of advice. After setting up your speakers for the first time, please allow at least a couple of days before you start fine-tuning the sound. This will serve two purposes. Firstly, you will get a sense of what these speakers sound like. Secondly, it will give time for the speakers to run in: the tonal quality of this design changes slightly after the first couple days of playing music.
Please remember the guidelines in this manual are only recommendations. There are no hard and fast rules about setting up a pair of speakers. When you get down to fine-tuning their performance in your room don't be afraid of experimenting: any speaker will sound different when moved a few inches. Feel free to change the speaker positions and move them around the room to determine your best listening position and sound.
Always rely on your own judgement to determine what sounds best. We do...
Enjoy!
General tips for setting up speakers
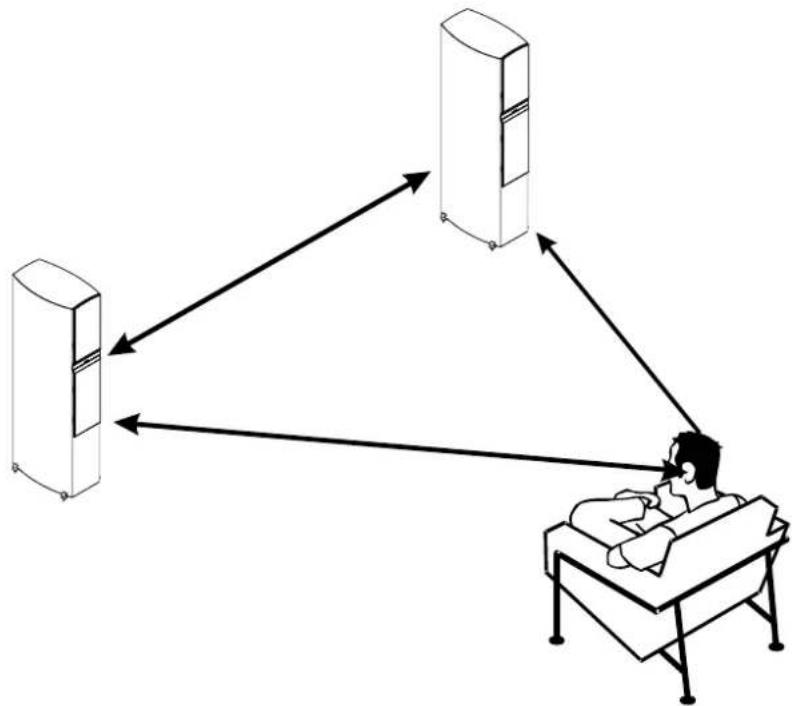
Stereo triangle
You can use the stereo triangle as a good rule of thumb when placing your speakers. This means the distance between the speakers should be the same as the distance from your listening position to both speakers; in other words an equilateral triangle.
Damping
If your room...
a) doesn't allow you to get the speakers the required distance from the back and side walls or...
b) has highly reflective surfaces (i.e. glass windows or bare plastered walls) or...
c) still doesn't sound quite right
...we strongly recommend that you 'damp' your room's critical surfaces. This can be done simply by adding curtains, furniture, bookshelves and so on. A damped surface is almost always preferable to a hard reflective surface.
Depending on the placement of the speakers, room size, sound reflecting surfaces, furniture, etc, it is entirely up to you how you fit ne-adjust the placement, angling and damping. Remember to take your time and use your ears.
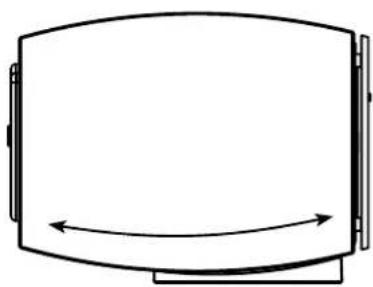
Toe-in
To achieve optimal sound, try experimenting with 'toeing in' the speakers towards the listening position. This achieves two things:
a) Fine-tuning of the tweeter level, which is more sensitive to reflections than mid-range and bass output, treble is more directive than midrange and bass frequencies.
b) Secondly you minimize side-wall reflections, thereby reducing colouration of the sound.
Some may not feel a need to toe in the speakers at all, while others may find the best solution is to point them directly at the listening position. See what suits you best...
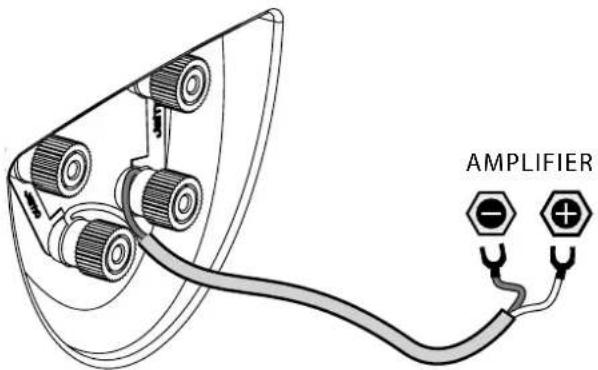
Connecting
The C 803, C 805, C 807 and C 809 speakers comes prepared for bi-wiring. Please note the following three possible setups.
Single-wiring
For single-wire connections, the terminal jumpers should be attached as shown in the illustration.
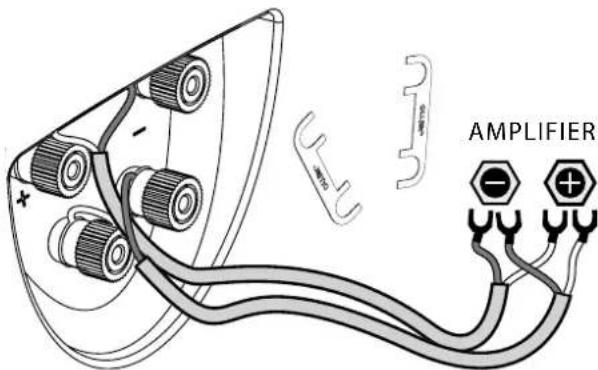
Bi-wiring
If you'd like to use a bi-wiring arrangement, make sure you remove both the terminal jumpers before you connect up your loudspeaker cables like so...
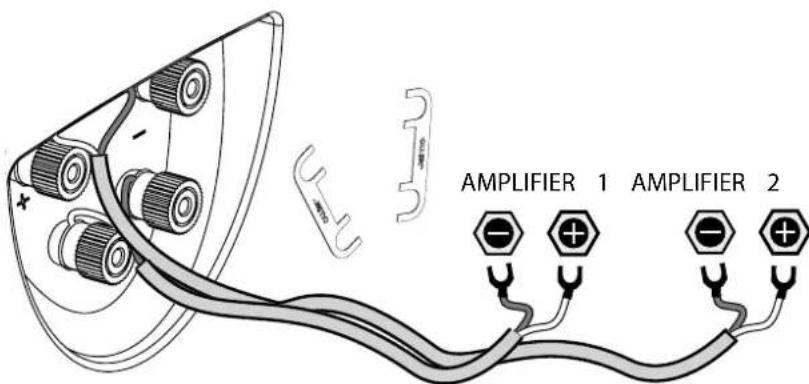
Bi-amping
In a bi-amped system, make sure you remove both the terminal jumpers before connecting up your cables as shown.
If you choose this option, we recommend you use identical amplifiers to drive both the bass and treble units.
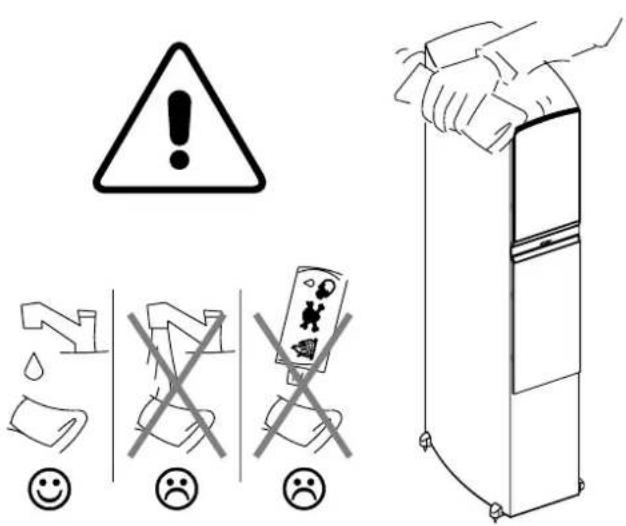
Spikes
After the initial placement of the C 80 floorstanders, you might consider using the supplied spikes instead of the built-in rubber feet. To fix them on, we recommend that you gently lay the speaker on one side and screw in all four spikes together. Before you do this, however, be sure to place a couple of thick towels or similar underneath the side of the speaker. This will prevent accidental scratching to the surface of the speaker.
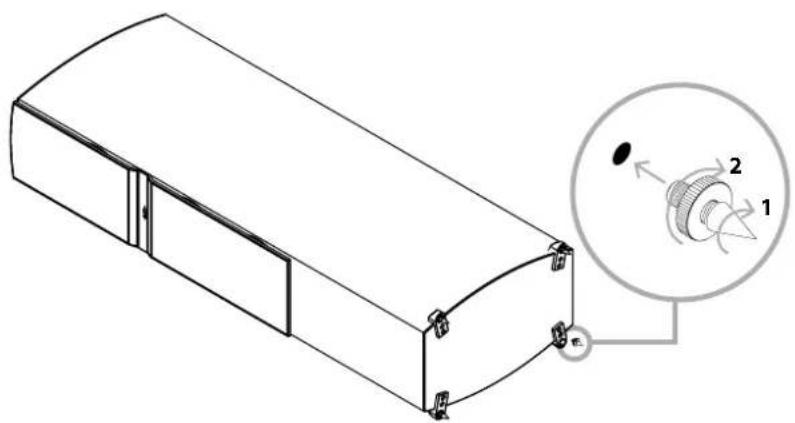
After screwing in the spikes, gently bring the speaker to its vertical position. Once upright simply adjust the spikes to give optimal support.
Using the spikes will give the very best support and sound quality. If you want to spare your floor surface from being punctured however, you can place the indented metal washers underneath the spike.
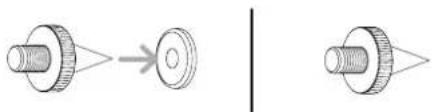
A warning: be careful when using the spikes with the indented metal washers - you don't want to get your finger trapped between the two!
Whichever option you choose, avoid "walking" the speakers if you need to move them to a different position... especially on hard wood floors!
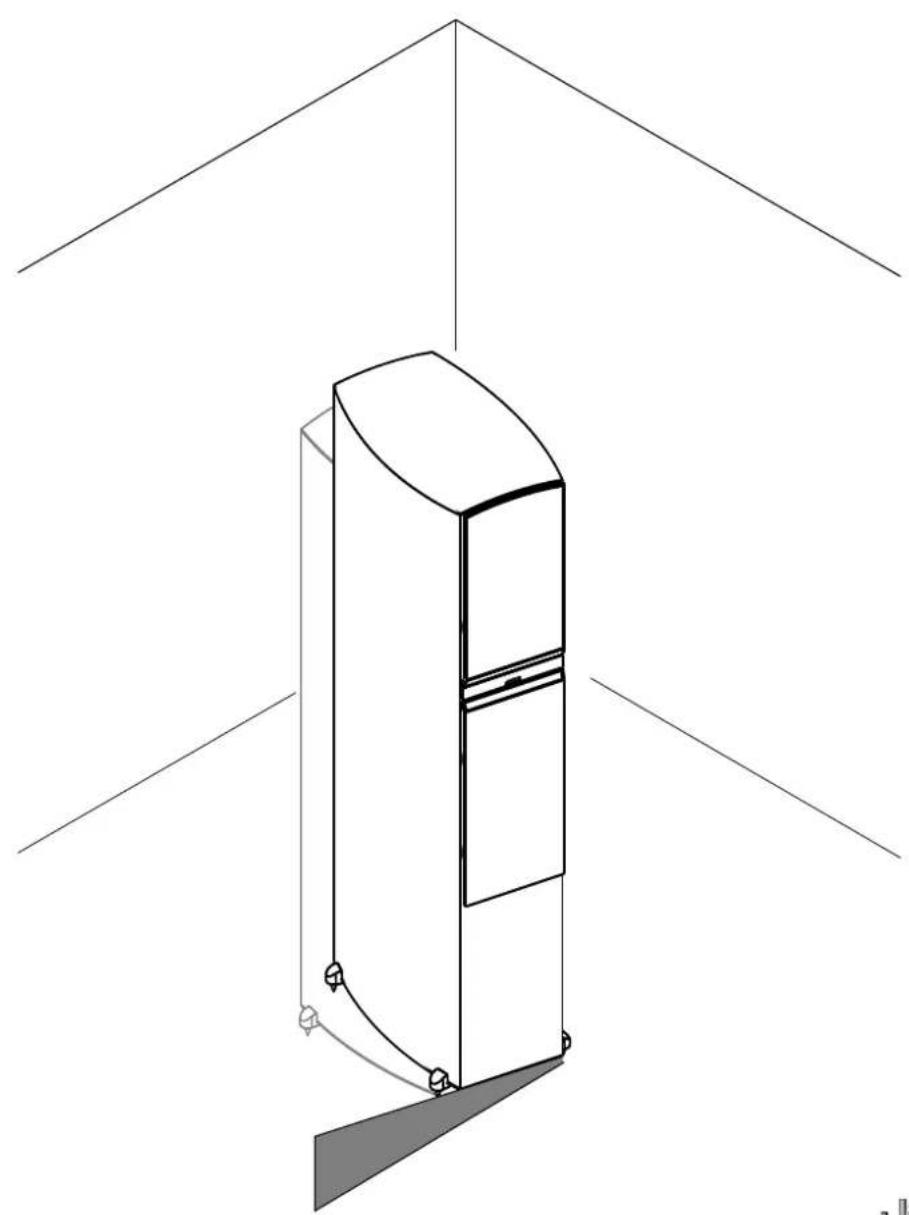
Placement
For an optimal listening experience, we recommend you place these speakers at a minimum of 2m / 6ft from each other, a minimum of 0.5m / 1.5ft from the back wall and at least 1m / 3ft from any side walls.
C80 CEN
Placement
For an optimal listening experience, we recommend you place the C 80 CEN close to your screen, either just above or just below it. The speaker is magnetically shielded so it can be placed close to a normal CRT-type TV.
Make sure the C 80 CEN stand/cradle is as stable as possible to ensure the optimal sound from the C 80 CEN.
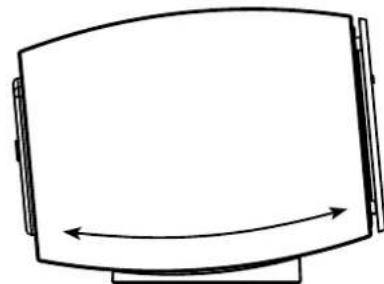
Angling
To achieve optimal sound, the included speaker cradle is constructed in such a way that you can angle the C 80 CEN directly towards your listening position. Try experimenting with different angles until you are fully satisfi ed.
Connecting
C 80 SUR
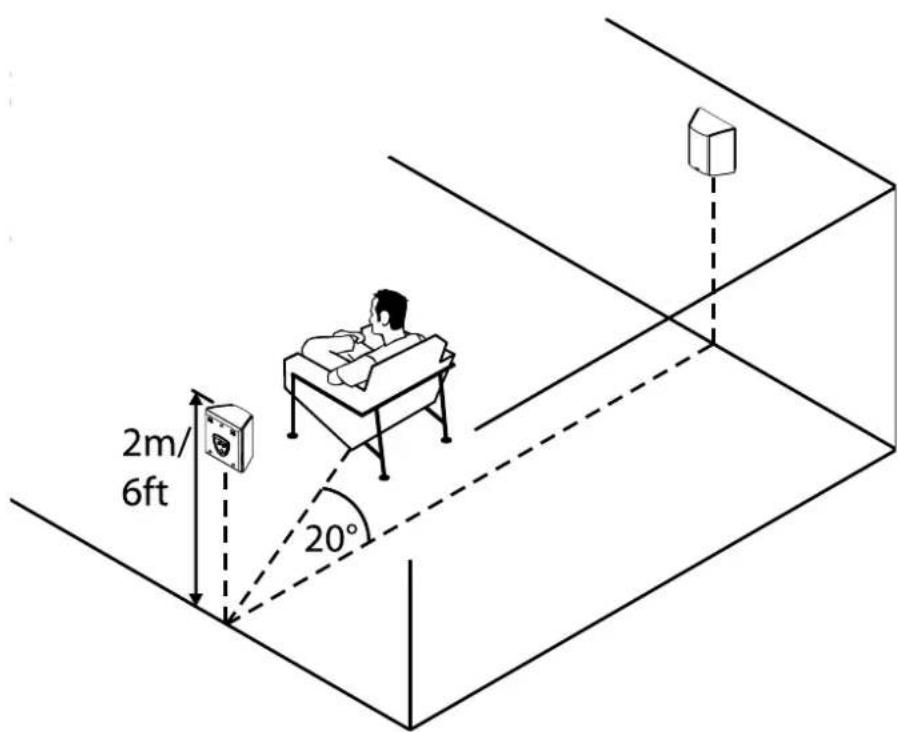
Placement
The C 80 SUR are best placed at a 20 degree angle from the listening position and at a height of approximately 2m / 6ft .
Connecting
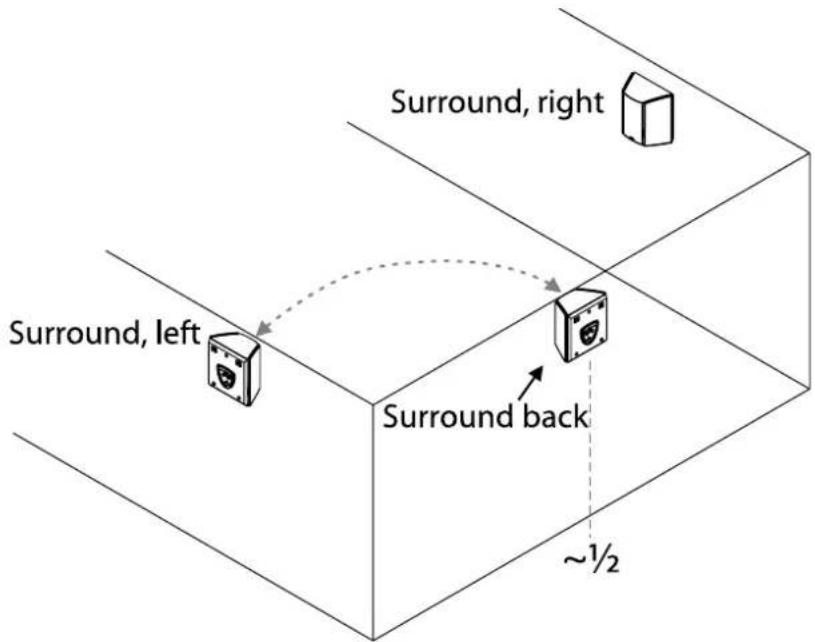
6.1 and 7.1 setup
If you want to have a 6.1 surround setup, we recommend using an additional C 80 SUR (left) speaker. Place it right between the two side walls just behind your listening area, to achieve optimal sound.
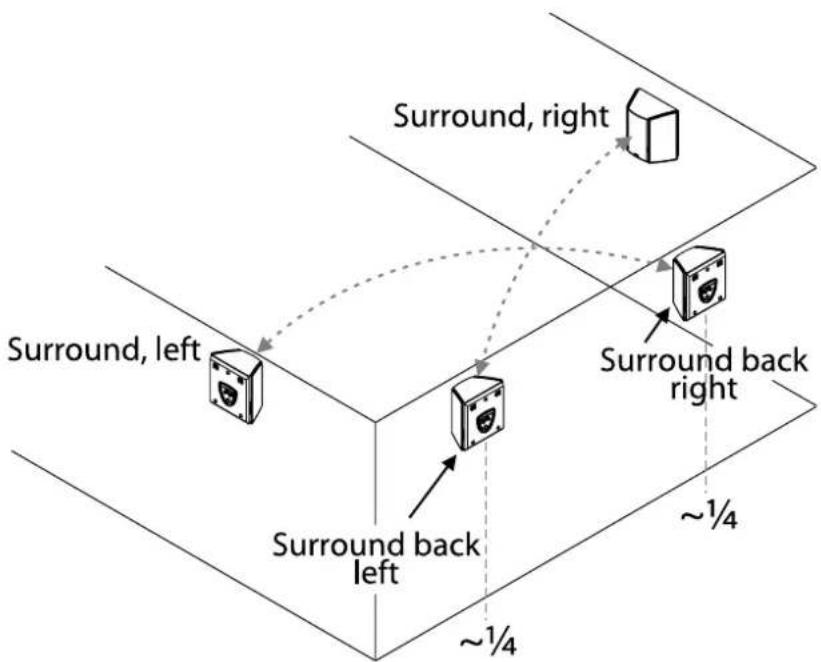
In a 7.1 setup, use a pair of C 80 SUR and place them 1/4 of the full room width from each sidewall.
Note: when placing the C 80 SUR as surround back speakers, you must place the C 80 SUR (left) on the right side of the room, and vice versa for the other speaker, in order to achieve correct dispersion from the dipole speakers.
C 80 SUB
If you go to www.Jamo.com or look at the CD-rom which came with the product, you can find a couple of useful subwoofer test signals. These will help you to set up your subwoofer so it delivers the maximum performance. Burn the test signals onto a CD and put them in your CD/DVD player.
Placement rules for subwoofoers
When placing a subwoofer in a room, you have more freedom than you would with an ordinary speaker because a sub generates less-directional low frequencies, which make it harder for the human ear to determine the direction they are coming from. We do still recommend, however, that you place the C 80 SUB mid-way between the two front speakers if possible. This is because:
A). The C 80 SUB will be easier to align, both level- and phase-wise, with the speakers.
B). Even though low frequencies are less-directional, higher frequencies can make the subwoofer easier to pinpoint sonically.
If it isn't possible to place the C 80 SUB between the two front speakers, the advanced electronics provided in the subwoofer still makes an easy and seamless integration possible.
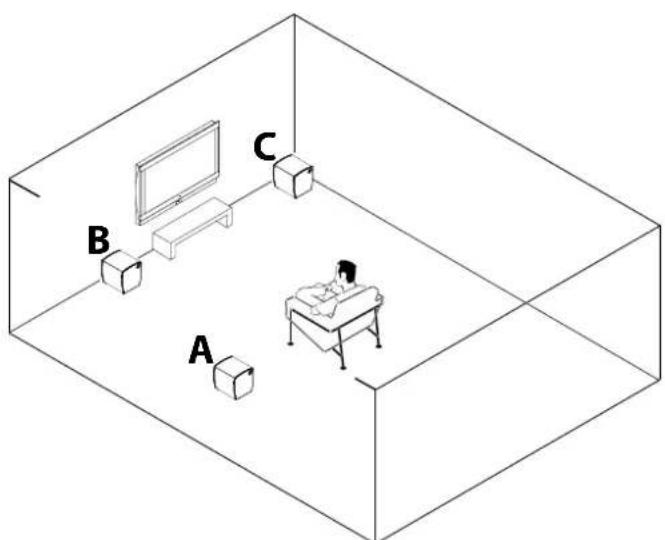
Three different placement positions
- sound reflections and amplification
There are basically three different ways to place a subwoofer, either of which will affect the overall sound level.
A). Placing it away from any wall will give the lowest sound level, but typically the most linear frequency response.
B). Placing it next to a wall will increase the low frequency level.
C). If it is positioned up against two walls, i.e. in a corner, the subwoofer will - because of wall reflections - accentuate the low frequencies even more.
Finding the right place for your subwoofer
Irrespective of the location you choose for the subwoofer, it is essential to have as linear a frequency response as possible. There should, in other words, be as few dips and peaks in the response as possible.
When evaluating the best location for the subwoofer, listen to some music or test tones from your favourite listening position, then try to move the subwoofer around the room to find the location that best suits your personal preference.
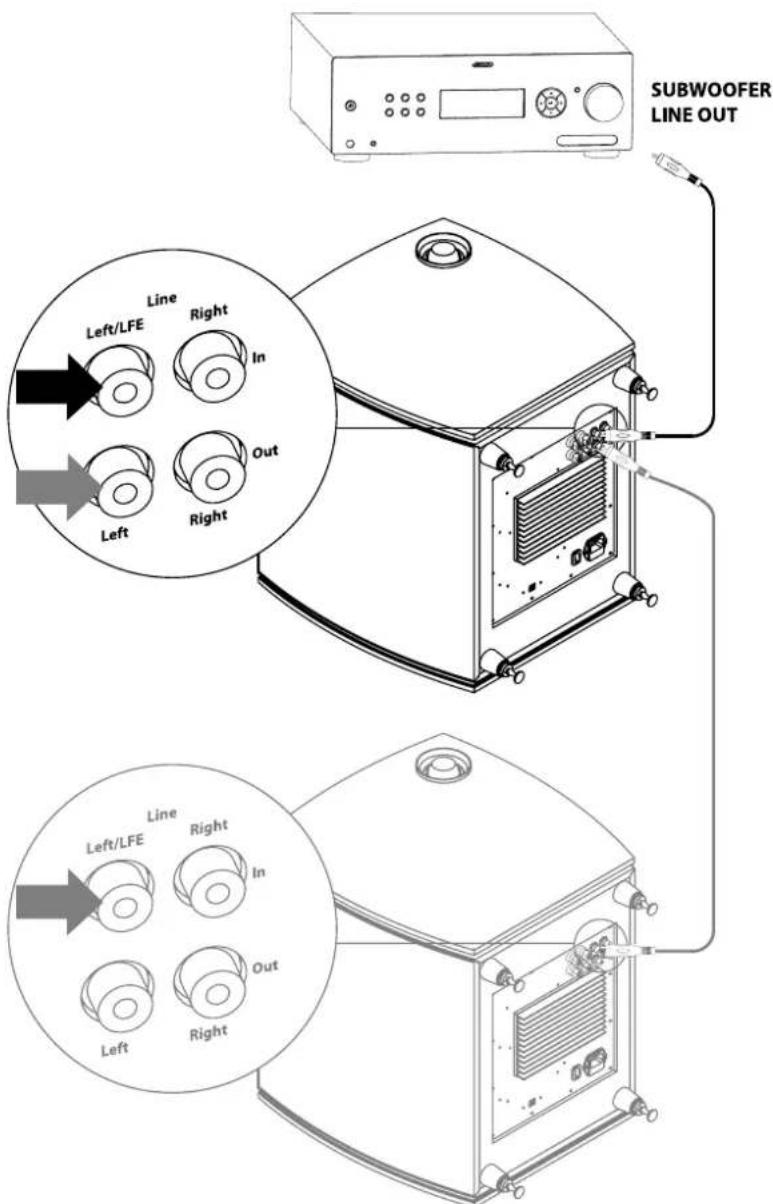
Connecting the subwoofer
Line/LFE input terminals
If your preamp/amplifier has a subwoofer out or subwoofer LFE out, please connect it to the LFE input terminal on the C 80 SUB.
If you have an additional subwoofer, it is possible to connect it via the C 80 SUB's LFE output terminal.
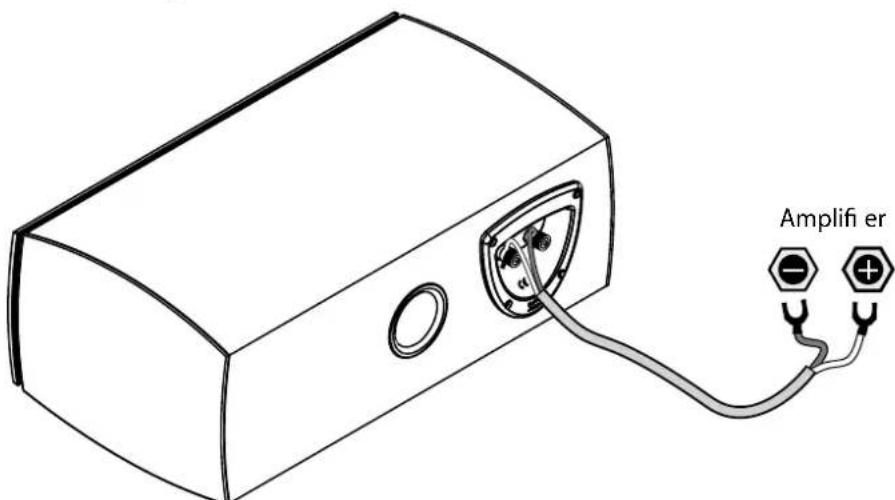
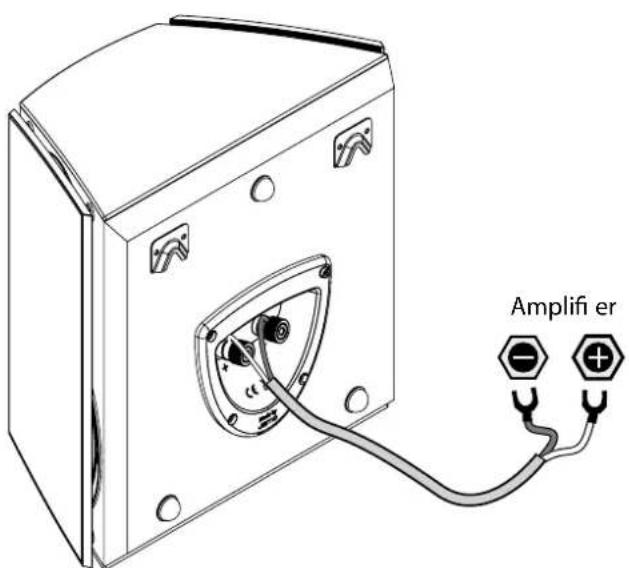
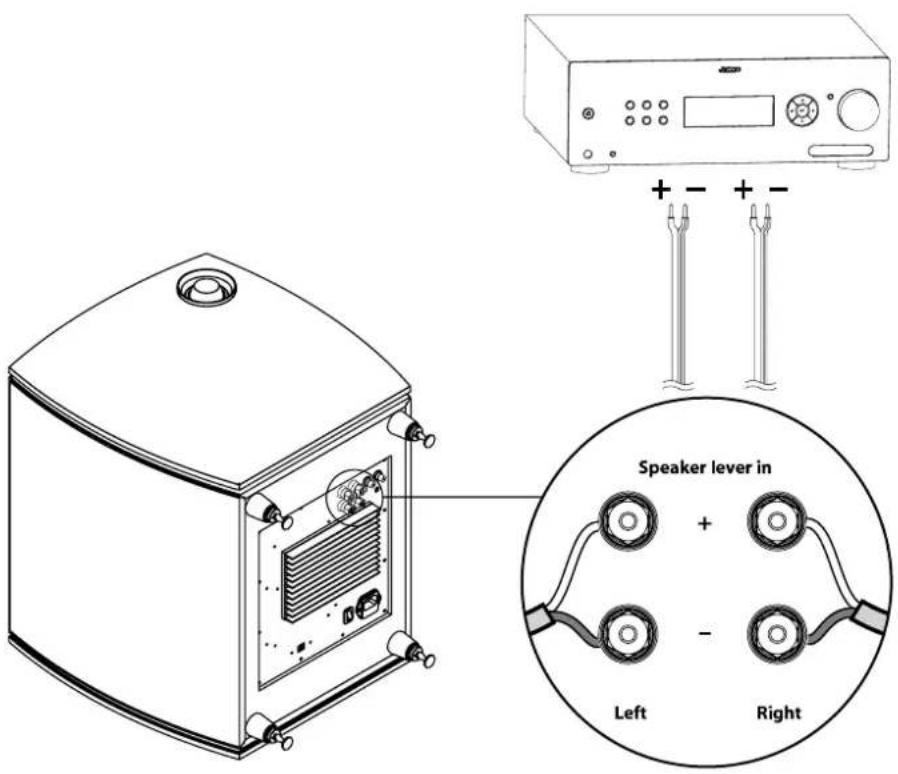
Speaker level input terminals
If you don't have a subwoofer out, you can connect the amplifier's speaker output directly to the speaker-level input terminals on the C 80 SUB.
Remember to connect both the left and right speaker outputs from the amplifier to the left and right input if you have just the one subwoofer connected. If only one channel is hooked up, the C 80 SUB will only reproduce the low frequencies contained in that channel.
Always remember to connect "+" and "-" from the amplifier to the corresponding "+" and "-" terminals on the subwoofer speaker level input.
Subwoofer adjustment options
Level
The level control on the C 80 SUB controls the volume.
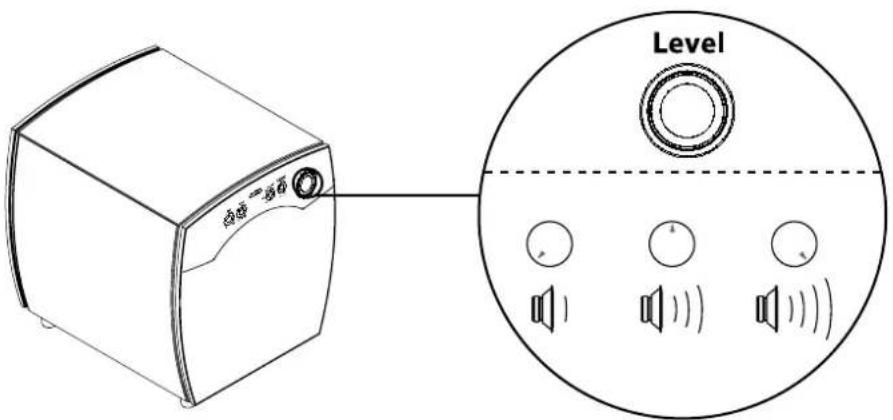
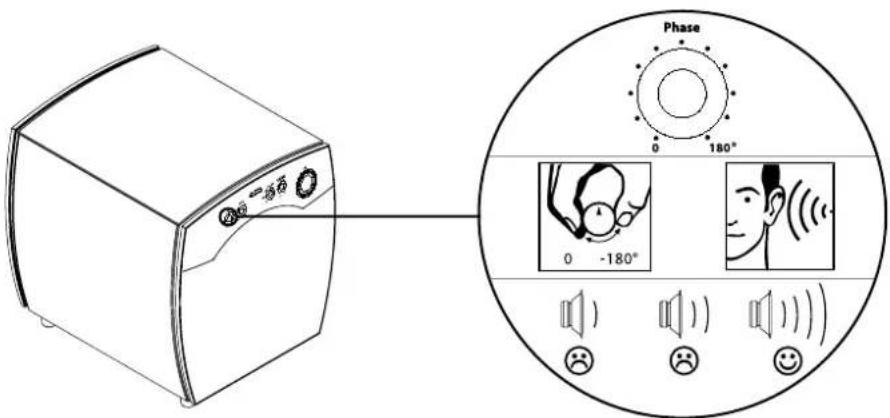
Phase
When all the speakers in your system and the subwoofer have been connected it is very important you have them connected in phase.
It is easier to adjust the phase on the subwoofer if you have someone helping you. Sit in the listening area and ask your helper to turn the phase control while you're playing back bass-heavy music or the test frequency files found at www.Jamo.com or on the CD-rom which came with the product. Turn the control back and forth to determine the position where the overall bass level sounds the loudest; that's when you'll know the subwoofer is in correct phase.
Note that it may help to turn the volume of the subwoofer up when correcting the phase. Regardless, you may also need to turn the subwoofer volume down after finding the correct phase position, as it increases the overall bass output from the subwoofer.
Cut-off frequency
If the C 80 SUB is connected via an Uni Itered output signal, such as a line pre-out or speaker output, it is necessary to adjust the cut-off frequency on the subwoofer to match the bass response of your speakers. If it is connected via a fi Itered output signal, such as a LFE or 'subwoofer out', the cut-off frequency should be turned all the way up, in order to stop the C 80 SUBs cut-off filter interfering with the filter built into your decoder/AV receiver.

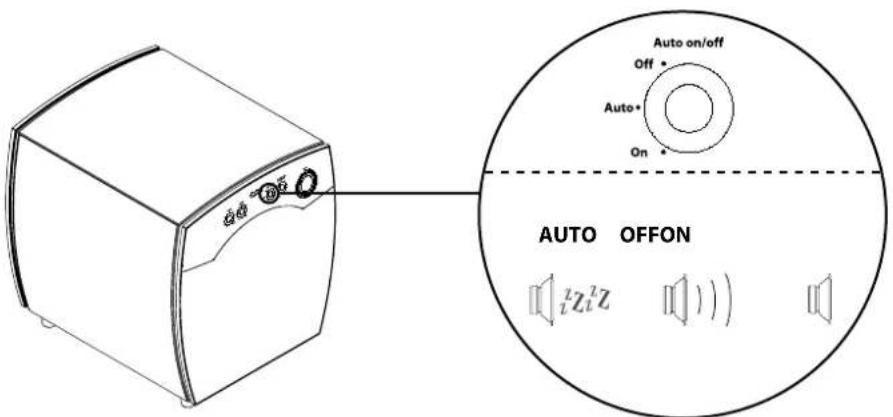
Auto/On/Off
The Auto/on/off switch offers three settings:
Auto: The Subwoofer will automatically switch on when it detects a signal from the source, and switch into stand-by mode again 20 minutes after the signal has terminated.
On: The subwoofer will stay on
Off: The subwoofer will stay in stand-by mode
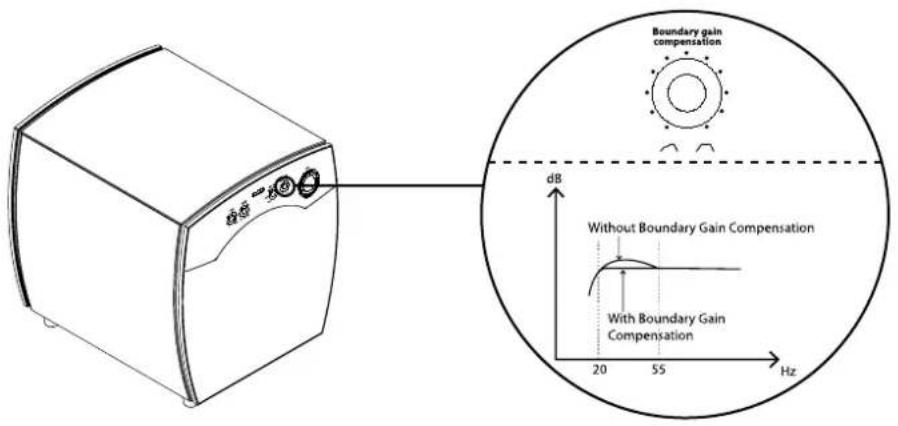
Variable Boundary Gain Compensation
Variable Boundary Gain Compensation is a fi iter which can compensate for bass peaking which typically starts around 60Hz and increases downwards. At fi rst, this effect sounds superfi cially impressive, but listen to music for any length of time and it becomes "boomy" and rather annoying. The effect commonly occurs in smaller rooms and when your listening position is near to a wall, hence the name Boundary Gain Compensation.
As with phase adjustment, we recommend you play music or the test frequency fi les from www.Jamo.com and have a friend turn the Variable Boundary Gain Compensation control, while you sit in the listening area. Then simply adjust it so that when the bass hits the lowest frequencies, there aren't any detectable bass peaks.
Cleaning
Please use a dust-free cloth to clean the speakers. It is also possible to use a slightly damp cloth for more stubborn marks.
Under no circumstances should you use any kind of cleaning agent on, or in close proximity to, these speakers.
Specifications
Name. C 809
System 3 way bassreflex
Woofer (In / mm) 2x7/180
Midrange (In / mm) 7/180
Tweeter (In / mm) 1/25
Long term power (W) 200
Short term power (W) 400
Sensitivity (dB/2,8V/1 m) 89
Frequency range (Hz) 30-24000
Impedance (Ohm) 6
Crossover frequency (Hz) 150/2000
Dimensions HxWxD
In 45.6 x 9.9 x 16.9
Mm 1157x252x428
Name C807
System. 21/2 way bassreflex
Woofer (In / mm) 7/180
Midrange (In / mm) 7/180
Tweeter (In / mm) 1/25
Long term power (W) 180
Short term power (W) 360
Sensitivity (dB/2,8V/1 m) 89
Frequency range (Hz) 35-24000
Impedance (Ohm) 6
Crossover frequency (Hz) 150/2000
Dimensions HxWxD
In 39.6x9.6x16.0
Mm 1007x242x406
Name C805
System. 2/2 way bassreflex
Woofer (In / mm) 6/155
Midrange (In / mm) 6/155
Tweeter (In / mm) 1/25
Long term power (W) 160
Short term power (W) 320
Sensitivity (dB/2,8V/1 m) 88
Frequency range (Hz) 40-24000
Impedance (Ohm) 6
Crossover frequency (Hz) 150/2000
Dimensions HxWxD
In 34.5x7.9x13.7
Mm .877 x 201 x 347
Name. C803
System 2 way bassreflex
Woofer (In / mm) 7/180
Midrange (In / mm)
Tweeter (In / mm) 1/25
Long term power (W) 125
Short term power (W) 250
Sensitivity (dB/2,8V/1 m) .87
Frequency range (Hz) 45-24000
Impedance (Ohm) 6
Crossover frequency (Hz) 2000
Dimensions HxWxD
In 15.0x8.9x13.4
Mm 380x225x341
Name C80 CEN
System 2 way bassreflex
Woofer (In / mm) 2x6/155
Midrange (In / mm)
Tweeter (In / mm) 1/25
Long term power (W) 160
Short term power (W) 320
Sensitivity (dB/2,8V/1 m) 88
Frequency range (Hz) 80-24000
Impedance (Ohm) 6
Crossover frequency (Hz) 2000
Dimensions HxWxD
In .8.3 x 8.9 x 13.4
Mm 212x501x281
Name C80 SUR
System 2 way dipole
Woofer (In / mm) 2x6/155
Midrange (In / mm)
Tweeter (In / mm) 2 x 1 / 25
Long term power (W) 160
Short term power (W) 320
Sensitivity (dB/2,8V/1 m) .87
Frequency range (Hz) 80-24000
Impedance (Ohm) 6
Crossover frequency (Hz) 2500
Dimensions HxWxD
In 11.5x11.3x7.1
Mm .293x 286 x 181
Name C80SUB
System............Closed box
Woofer (In / mm) 2x10/254
Amplifierated output (W) 1800
Frequency range (Hz) 20-200Hz
Cut off frequency (Hz) Variable
Impedance (Ohm) 22k
Phase.......Variable
Boundary Gain Comp. Variable
Limiter Yes
Auto/on/off switch Ye
12V trigger . Yes
Motional Feedback. Yes
Dimensions HxWxD
In 17.6 x 15.4 x 17.0
Mm 447 x 390 x 432
The lightning flash with arrowhead symbol within an equilateral triangle, is intended to alert the user to the presence of uninsulated "dangerous voltage" within the product's enclosure that may be of suffcient magnitude to constitute a risk of electric shock to persons.

The exclamation point within an equilateral triangle is intended to alert the user to the presence of important operating and maintenance (servicing) instructions in the literature ac-companying the product.
Important safety instructions
- Read these instructions.
- Keep these instructions.
- Heed all warnings.
- Follow all instructions.
- Do not use this apparatus near water.
- Clean only with dry cloth.
- Do not block any ventilation openings. Install in accordance with the manufacturer's instructions.
- Do not install near any heat sources such as radiators, heat registers, stoves, or other apparatus (including amplifiers) that produce heat.
- Do not defeat the safety purpose of the polarized or grounding-type plug. A polarized plug has two blades with one wider than the other. A grounding type plug has two blades and a third grounding prong. The wide blade or the third prong is provided for your safety. If the provided plug does not fit into your outlet, consult an electrician for replacement of the obsolete outlet.
- Protect the power cord from being walked on or pinched particularly at plugs, convenience receptacles, and the point where they exit from the apparatus.
- Only use attachments / accessories specified by the manufacturer
- Use only with the cart, stand, tripod, bracket, or table specified by the manufacturer, or sold with the apparatus. When a cart is used use caution when moving the cart / apparatus combination to avoid injury from tip-over.
- Unplug this apparatus during lightning storms or when unused for long periods of time.
- Refer all servicing to qualified service personnel. Servicing is required when the apparatus has been damaged in any way, such as power-supply cord or plug is damaged, liquid has been spilled or objects have fallen into the apparatus, the apparatus has been exposed to rain or moisture, does not operate normally, or has been dropped.
- WARNING: To reduce the risk of fire or electric shock, this apparatus should not be exposed to rain or moisture and objects fit with liquids, such as vases, should not be placed on this apparatus.
- To completely disconnect this equipment from the mains, disconnect the power supply cord plug from the receptacle.
- The mains plug of the power supply cord shall remain readily oper- able.
The scope of the warranty
Service. In case of warranty enquiries, please contact your dealer/ installer. In case of request for service under warranty, please enclose your original receipt and make sure that the serial number on the product is readable. Important: Never send the product to be repaired without the prior agreement of your dealer. If the product is STILL UNDER WARRANTY, Jamo will pay freight costs back and forth between the dealer and the Jamo authorised service centre. Any other freight must be paid for by the customer. The product must always be packed properly. If the product is NOT UNDER WARRANTY, all costs including without limit costs of repair and freight must be paid for by the customer.
Warranty certificate. Jamo provides a sixty (60) month warranty from the date of purchase against material and manufacturing defects on passive speakers and a twenty-four (24) month warranty on electronics; in the US only, Jamo provides a limited lifetime warranty on in-wall and in-ceiling speakers (each, a warranty period). For defects covered by the warranty, the product must be returned to the dealer/installer that sold the product.
Terms of Warranty
- Nothing in this warranty shall limit your statutory rights.
- The warranty is only valid on presentation of the original sales receipt or other valid proof of purchase, and provided that the serial number on the product is fully legible.
- Warranty repairs must be carried out by an authorised Jamo dealer, or an authorised service centre. No payment will be made for repairs performed by unauthorised persons. This warranty does not extend to products which have been repaired or otherwise altered by unauthorised persons, and any damage to the product caused by work by unauthorised persons is not covered by this warranty.
- This product will not be considered defective, either in materials or in manufacture, to the extent that faults are caused by adaptation to national, local, technical or safety related requirements in countries other than the specific country where the product was purchased.
- Jamo shall at its option during the relevant warranty period either repair or replace defective components. If the component repair or replacement cannot be performed, the product will be replaced.
- In no circumstances shall Jamo be liable in contract, tort (including negligence) or breach of statutory duty or otherwise for loss of profit ts, loss of revenue, loss of data, loss of business or loss of anticipated savings or for any consequential loss whatever.
- The warranty does not cover the following:
a) Periodic inspection, maintenance and repair or replacement of parts resulting from normal wear and tear.
b) Costs connected to delivery to the dealer, disassembly or re-installation of the product.
c) Misuse, including use for purposes other than was intended, or faulty installation.
d) Damage caused by lightning, water, fire, natural catastrophes, war, insurrection, incorrect line voltage, insuffient ventilation, transport or other causes outside of the control of Jamo. - This warranty applies to every legal owner of the product during the warranty period.

WARNING - DVD/CD PLAYERS/RECORDERS

THIS PRODUCT UTILizes A LASER. USE OF CONTROLS OR ADJUSTMENTS OR PER-FORMANCE OF PROCEDURES OTHER THAN THOSE SPECIFIED HEREIN MAY RESULT IN HAZARDOUS RADIATION EXPOSURE. DO NOT OPEN COVERS AND DO NOT REPAIR YOURSELF. REFER SERVICING TO QUALIFIED PERSONNEL.

Use only with the cart, stand, tripod, bracket, or table specified by the manufacturer, or sold with the apparatus. When a cart is used use caution when moving the cart/ apparatus combination to avoid injury from tip-over.
français
Sommaire
Introduction 5
C803/C805/C807/C809 10
C 80 CEN 11
C 80 SUR. 12
C 80 SUB. 14
Jamo consumer warranty. 21
Introduction
Woofer (In / mm) 2x7/180
Midrange (In / mm) 7/180
Tweeter (In / mm) 1/25
Long term power (W) 200
Short term power (W) 400
Sensitivity (dB/2,8V/1 m) 89
Frequency range (Hz) 30-24000
Impedance (Ohm) 6
Crossover frequency (Hz) 150/2000
Dimensions HxWxD
In 45.6 x 9.9 x 16.9
Mm 1157x252x428
Name C807
System. 21/2 way bassreflex
Woofer (In / mm) 7/180
Midrange (In / mm) 7/180
Tweeter (In / mm) 1/25
Long term power (W) 180
Short term power (W) 360
Sensitivity (dB/2,8V/1 m) 89
Frequency range (Hz) 35-24000
Impedance (Ohm) 6
Crossover frequency (Hz) 150/2000
Dimensions HxWxD
In 39.6 x 9.6 x 16.0
Mm 1007x242x406
Name C805
System 21/2 way bassreflex
Woofer (In / mm) 6/155
Midrange (In / mm) 6/155
Tweeter (In / mm) 1/25
Long term power (W) 160
Short term power (W) 320
Sensitivity (dB/2,8V/1 m) 88
Frequency range (Hz) 40-24000
Impedance (Ohm) 6
Crossover frequency (Hz) 150/2000
Dimensions HxWxD
In 34.5 x 7.9 x 13.7
Mm .877 x 201 x 347
Name. C803
System 2 way bassreflex
Woofer (In / mm) 7/180
Midrange (In / mm)
Tweeter (In / mm) 1/25
Long term power (W) 125
Short term power (W) 250
Sensitivity (dB/2,8V/1 m) .87
Frequency range (Hz) 45-24000
Impedance (Ohm) 6
Crossover frequency (Hz) 2000
Dimensions HxWxD
In 15.0x8.9x13.4
Mm 380x225x341
Name C80 CEN
System 2 way bassreflex
Woofer (In / mm) 2x6/155
Midrange (In / mm)
Tweeter (In / mm) 1/25
Long term power (W) 160
Short term power (W) 320
Sensitivity (dB / 2,8V / 1m) . 88
Frequency range (Hz) 80-24000
Impedance (Ohm) 6
Crossover frequency (Hz) 2000
Dimensions HxWxD
In .8.3 x 8.9 x 13.4
Mm 212x501x281
Name C80 SUR
System 2 way dipole
Woofer (In / mm) 2x6/155
Midrange (In / mm)
Tweeter (In / mm) 2 x 1 / 25
Long term power (W) 160
Short term power (W) 320
Sensitivity (dB/2,8V/1 m) .87
Frequency range (Hz) 80-24000
Impedance (Ohm) 6
Crossover frequency (Hz) 2500
Dimensions HxWxD
In 11.5x11.3x7.1
Mm 293x286x181
Name C80SUB
System............Closed box
Woofer (In / mm) 2 x 10 / 254
Amplifierated output (W) 1800
Frequency range (Hz) 20 - 200Hz
Cut off frequency (Hz) Variable
Impedance (Ohm) 22k
Phase.......Variable
Boundary Gain Comp. Variable
Limiter Yes
Auto/on/off switch Yes
12V trigger . Yes
Motional Feedback. Yes
Dimensions HxWxD
In 17.6 x 15.4 x 17.0
Mm 447x390x432

THIS PRODUCT UTILizes A LASER. USE OF CONTROLS OR ADJUSTMENTS OR PER-FORMANCE OF PROCEDURES OTHER THAN THOSE SPECIFIED HEREIN MAY RESULT IN HAZARDOUS RADIATION EXPOSURE. DO NOT OPEN COVERS AND DO NOT REPAIR YOURSELF. REFER SERVICING TO QUALIFIED PERSONNEL.


Use only with the cart, stand, tripod, bracket, or table specified by the manufacturer, or sold with the apparatus. When a cart is used use caution when moving the cart/ apparatus combination to avoid injury from tip-over.
deutsch
Inhalt
Einleitung 5
C803/C805/C807/C809 10
C 80 CEN 11
C 80 SUR. 12
C 80 SUB 14
Jamo consumer warranty. 21
Einleitung
Woofer (In / mm) 2x7/180
Midrange (In / mm) 7/180
Tweeter (In / mm) 1/25
Long term power (W) 200
Short term power (W) 400
Sensitivity (dB/2,8V/1 m) .89
Frequency range (Hz) 30-24000
Impedance (Ohm) 6
Crossover frequency (Hz) 150/2000
Dimensions HxWxD
In 45.6 x 9.9 x 16.9
Mm 1157x252x428
Name C807
System. 21/2 way bassreflex
Woofer (In / mm) 7/180
Midrange (In / mm) 7/180
Tweeter (In / mm) 1/25
Long term power (W) 180
Short term power (W) 360
Sensitivity (dB/2,8V/1 m) 89
Frequency range (Hz) 35-24000
Impedance (Ohm) 6
Crossover frequency (Hz) 150/2000
Dimensions HxWxD
In 39.6x9.6x16.0
Mm 1007x242x406
Name C805
System 21/2 way bassreflex
Woofer (In / mm) 6/155
Midrange (In / mm) 6/155
Tweeter (In / mm) 1/25
Long term power (W) 160
Short term power (W) 320
Sensitivity (dB/2,8V/1 m) 88
Frequency range (Hz) 40-24000
Impedance (Ohm) 6
Crossover frequency (Hz) 150/2000
Dimensions HxWxD
In 34.5x7.9x13.7
Mm .877 x 201 x 347
Name. C803
System. 2 way bassreflex
Woofer (In / mm) 7/180
Midrange (In / mm)
Tweeter (In / mm) 1/25
Long term power (W) 125
Short term power (W) 250
Sensitivity (dB/2,8V/1 m) .87
Frequency range (Hz) 45-24000
Impedance (Ohm) 6
Crossover frequency (Hz) 2000
Dimensions HxWxD
In 15.0x8.9x13.4
Mm 380x225x341
Name C80 CEN
System 2 way bassreflex
Woofer (In / mm) 2x6/15
Midrange (In / mm)
Tweeter (In / mm) 1/25
Long term power (W) 160
Short term power (W) 320
Sensitivity (dB/2,8V/1 m) .88
Frequency range (Hz) 80-24000
Impedance (Ohm) 6
Crossover frequency (Hz) 2000
Dimensions HxWxD
In .8.3 x 8.9 x 13.4
Mm 212x501x281
Name C80 SUR
System 2 way dipole
Woofer (In / mm) 2x6/155
Midrange (In / mm)
Tweeter (In / mm) 2 x 1 / 25
Long term power (W) 160
Short term power (W) 320
Sensitivity (dB/2,8V/1 m) .87
Frequency range (Hz) 80-24000
Impedance (Ohm) 6
Crossover frequency (Hz) 2500
Dimensions HxWxD
In 11.5x11.3x7.1
Mm 293x286x181
Name C80SUB
System............Closed box
Woofer (In / mm) 2 x 10 / 254
Amplifierated output (W) 1800
Frequency range (Hz) 20-200Hz
Cut off frequency (Hz) Variable
Impedance (Ohm) 22k
Phase.......Variable
Boundary Gain Comp. Variable
Limiter Yes
Auto/on/off switch Ye
12V trigger . Yes
Motional Feedback. Yes
Dimensions HxWxD
In 17.6 x 15.4 x 17.0
Mm 447 x 390 x 432

THIS PRODUCT UTILizes A LASER. USE OF CONTROLS OR ADJUSTMENTS OR PER-FORMANCE OF PROCEDURES OTHER THAN THOSE SPECIFIED HEREIN MAY RESULT IN HAZARDOUS RADIATION EXPOSURE. DO NOT OPEN COVERS AND DO NOT REPAIR YOURSELF. REFER SERVICING TO QUALIFIED PERSONNEL.

Use only with the cart, stand, tripod, bracket, or table specified by the manufacturer, or sold with the apparatus. When a cart is used use caution when moving the cart / a apparatus combination to avoid injury from tip-over.
dansk
Indhold
Indledning. 5
C803/C805/C807/C809 10
C 80 CEN 11
C 80 SUR. 12
C 80 SUB. 14
Jamo consumer warranty. 21
Indledning
Variable Boundary Gain Compensation
Woofer (In / mm) 2x7/180
Midrange (In / mm) 7/180
Tweeter (In / mm) 1/25
Long term power (W) 200
Short term power (W) 400
Sensitivity (dB/2,8V/1 m) 89
Frequency range (Hz) 30-24000
Impedance (Ohm) 6
Crossover frequency (Hz) 150/2000
Dimensions HxWxD
In 45.6 x 9.9 x 16.9
Mm 1157x252x428
Name C807
System. 2½ way bassreflex
Woofer (In / mm) 7/180
Midrange (In / mm) 7/180
Tweeter (In / mm) 1/25
Long term power (W) 180
Short term power (W) 360
Sensitivity (dB/2,8V/1 m) .89
Frequency range (Hz) 35-24000
Impedance (Ohm) 6
Crossover frequency (Hz) 150/2000
Dimensions HxWxD
In 39.6 x 9.6 x 16.0
Mm 1007 x 242 x 406
Name C805
System 2/way bassreflex
Woofer (In / mm) 6/155
Midrange (In / mm) 6/155
Tweeter (In / mm) 1/25
Long term power (W) 160
Short term power (W) 320
Sensitivity (dB/2,8V/1 m) 88
Frequency range (Hz) 40-24000
Impedance (Ohm) 6
Crossover frequency (Hz) 150/2000
Dimensions HxWxD
In 34.5 x 7.9 x 13.7
Mm .877 x 201 x 347
Name. C803
System 2 way bassreflex
Woofer (In / mm) 7/180
Midrange (In / mm)
Tweeter (In / mm) 1/25
Long term power (W) 125
Short term power (W) 250
Sensitivity (dB/2,8V/1 m) .87
Frequency range (Hz) 45-24000
Impedance (Ohm) 6
Crossover frequency (Hz) 2000
Dimensions HxWxD
In 15.0x8.9x13.4
Mm 380x225x341
Name C80 CEN
System 2 way bassreflex
Woofer (In / mm) 2x6/155
Midrange (In / mm)
Tweeter (In / mm) 1/25
Long term power (W) 160
Short term power (W) 320
Sensitivity (dB / 2,8V / 1m) . 88
Frequency range (Hz) 80-24000
Impedance (Ohm) 6
Crossover frequency (Hz) 2000
Dimensions HxWxD
In .8.3 x 8.9 x 13.4
Mm 212x501x281
Name C80 SUR
System 2 way dipole
Woofer (In / mm) 2x6/155
Midrange (In / mm)
Tweeter (In / mm) 2 x 1 / 25
Long term power (W) 160
Short term power (W) 320
Sensitivity (dB/2,8V/1 m) .87
Frequency range (Hz) 80-24000
Impedance (Ohm) 6
Crossover frequency (Hz) 2500
Dimensions HxWxD
In 11.5x11.3x7.1
Mm 293x286x181
Name C80SUB
System............Closed box
Woofer (In / mm) 2x10/254
Amplifierated output (W) 1800
Frequency range (Hz) 20 - 200Hz
Cut off frequency (Hz) Variable
Impedance (Ohm) 22k
Phase.......Variable
Boundary Gain Comp. Variable
Limiter Yes
Auto/on/off switch Yes
12V trigger . Yes
Motional Feedback. Yes
Dimensions HxWxD
In 17.6 x 15.4 x 17.0
Mm 447x390x432

THIS PRODUCT UTILizes A LASER. USE OF CONTROLS OR ADJUSTMENTS OR PER-FORMANCE OF PROCEDURES OTHER THAN THOSE SPECIFIED HEREIN MAY RESULT IN HAZARDOUS RADIATION EXPOSURE. DO NOT OPEN COVERS AND DO NOT REPAIR YOURSELF. REFER SERVICING TO QUALIFIED PERSONNEL.


Use only with the cart, stand, tripod, bracket, or table specified by the manufacturer, or sold with the apparatus. When a cart is used use caution when moving the cart/ apparatus combination to avoid injury from tip-over.
Innehäll
Inledning 5
C803/C805/C807/C809 10
C80 CEN 11
C 80 SUR. 12
C 80 SUB. 14
Ansluta subwoofern. 15
Jamo consumer warranty. 21
svenska
Inledning
VBGC (Variable Boundary Gain Compensation)
Woofer (In / mm) 2x7/180
Midrange (In / mm) 7/180
Tweeter (In / mm) 1/25
Long term power (W) 200
Short term power (W) 400
Sensitivity (dB/2,8V/1 m) 89
Frequency range (Hz) 30-24000
Impedance (Ohm) 6
Crossover frequency (Hz) 150/2000
Dimensions HxWxD
In 45.6 x 9.9 x 16.9
Mm 1157 x 252 x 428
Name C807
System. 21/2 way bassreflex
Woofer (In / mm) 7/180
Midrange (In / mm) 7/180
Tweeter (In / mm) 1/25
Long term power (W) 180
Short term power (W) 360
Sensitivity (dB/2,8V/1 m) 89
Frequency range (Hz) 35-24000
Impedance (Ohm) 6
Crossover frequency (Hz) 150/2000
Dimensions HxWxD
In 39.6 x 9.6 x 16.0
Mm 1007 x 242 x 406
Name C805
System 21/2 way bassreflex
Woofer (In / mm) 6/155
Midrange (In / mm) 6/155
Tweeter (In / mm) 1/25
Long term power (W) 160
Short term power (W) 320
Sensitivity (dB/2,8V/1 m) 88
Frequency range (Hz) 40-24000
Impedance (Ohm) 6
Crossover frequency (Hz) 150/2000
Dimensions HxWxD
In 34.5 x 7.9 x 13.7
Mm .877 x 201 x 347
Name. C803
System 2 way bassreflex
Woofer (In / mm) 7/180
Midrange (In / mm)
Tweeter (In / mm) 1/25
Long term power (W) 125
Short term power (W) 250
Sensitivity (dB/2,8V/1 m) .87
Frequency range (Hz) 45-24000
Impedance (Ohm) 6
Crossover frequency (Hz) 2000
Dimensions HxWxD
In 15.0x8.9x13.4
Mm 380x225x341
Name C80 CEN
System 2 way bassreflex
Woofer (In / mm) 2x6/155
Midrange (In / mm)
Tweeter (In / mm) 1/25
Long term power (W) 160
Short term power (W) 320
Sensitivity (dB / 2,8V / 1m) . 88
Frequency range (Hz) 80-24000
Impedance (Ohm) 6
Crossover frequency (Hz) 2000
Dimensions HxWxD
In .8.3 x 8.9 x 13.4
Mm 212x501x281
Name C80 SUR
System 2 way dipole
Woofer (In / mm) 2x6/155
Midrange (In / mm)
Tweeter (In / mm) 2 x 1 / 25
Long term power (W) 160
Short term power (W) 320
Sensitivity (dB / 2,8V / 1m) . 87
Frequency range (Hz) 80-24000
Impedance (Ohm) 6
Crossover frequency (Hz) 2500
Dimensions HxWxD
In 11.5x11.3x7.1
Mm 293x286x181
Name C80SUB
System............Closed box
Woofer (In / mm) 2x10/254
Amplifierated output (W) 1800
Frequency range (Hz) 20 - 200Hz
Cut off frequency (Hz) Variable
Impedance (Ohm) 22k
Phase.......Variable
Boundary Gain Comp. Variable
Limiter Yes
Auto/on/off switch Yes
12V trigger . Yes
Motional Feedback. Yes
Dimensions HxWxD
In 17.6 x 15.4 x 17.0
Mm 447x390x432

THIS PRODUCT UTILizes A LASER. USE OF CONTROLS OR ADJUSTMENTS OR PER-FORMANCE OF PROCEDURES OTHER THAN THOSE SPECIFIED HEREIN MAY RESULT IN HAZARDOUS RADIATION EXPOSURE. DO NOT OPEN COVERS AND DO NOT REPAIR YOURSELF. REFER SERVICING TO QUALIFIED PERSONNEL.

Use only with the cart, stand, tripod, bracket, or table specified by the manufacturer, or sold with the apparatus. When a cart is used use caution when moving the cart/ apparatus combination to avoid injury from tip-over.
Sisälto
Johdanto 5
Jamo consumer warranty. 21
suomi
Johdanto
Woofer (In / mm) 2x7/180
Midrange (In / mm) 7/180
Tweeter (In / mm) 1/25
Long term power (W) 200
Short term power (W) 400
Sensitivity (dB/2,8V/1 m) 89
Frequency range (Hz) 30-24000
Impedance (Ohm) 6
Crossover frequency (Hz) 150/2000
Dimensions HxWxD
In 45.6 x 9.9 x 16.9
Mm 1157x252x428
Name C807
System 2 way bassreflex
Woofer (In / mm) 7/180
Midrange (In / mm) 7/180
Tweeter (In / mm) 1/25
Long term power (W) 180
Short term power (W) 360
Sensitivity (dB/2,8V/1 m) 89
Frequency range (Hz) 35-24000
Impedance (Ohm) 6
Crossover frequency (Hz) 150/2000
Dimensions HxWxD
In 39.6 x 9.6 x 16.0
Mm 1007x242x406
Name C805
System. 2 way bassreflex
Woofer (In / mm) 6/155
Midrange (In / mm) 6/155
Tweeter (In / mm) 1/25
Long term power (W) 160
Short term power (W) 320
Sensitivity (dB/2,8V/1 m) 88
Frequency range (Hz) 40-24000
Impedance (Ohm) 6
Crossover frequency (Hz) 150/2000
Dimensions HxWxD
In 34.5x7.9x13.7
Mm .877 x 201 x 347
Name. C803
System 2 way bassreflex
Woofer (In / mm) 7/180
Midrange (In / mm)
Tweeter (In / mm) 1/25
Long term power (W) 125
Short term power (W) 250
Sensitivity (dB/2,8V/1 m) .87
Frequency range (Hz) 45-24000
Impedance (Ohm) 6
Crossover frequency (Hz) 2000
Dimensions HxWxD
In 15.0x8.9x13.4
Mm 380x225x341
Name C80 CEN
System 2 way bassreflex
Woofer (In / mm) 2x6/155
Midrange (In / mm)
Tweeter (In / mm) 1/25
Long term power (W) 160
Short term power (W) 320
Sensitivity (dB/2,8V/1 m) .88
Frequency range (Hz) 80-24000
Impedance (Ohm) 6
Crossover frequency (Hz) 2000
Dimensions HxWxD
In .8.3 x 8.9 x 13.4
Mm 212x501x281
Name C80 SUR
System 2 way dipole
Woofer (In / mm) 2x6/155
Midrange (In / mm)
Tweeter (In / mm) 2 x 1 / 25
Long term power (W) 160
Short term power (W) 320
Sensitivity (dB/2,8V/1 m) .87
Frequency range (Hz) 80-24000
Impedance (Ohm) 6
Crossover frequency (Hz) 2500
Dimensions HxWxD
In 11.5x11.3x7.1
Mm 293x286x181
Name C80SUB
System............Closed box
Woofer (In / mm) 2 x 10 / 254
Amplifierated output (W) 1800
Frequency range (Hz) 20 - 200Hz
Cut off frequency (Hz) Variable
Impedance (Ohm) 22k
Phase.......Variable
Boundary Gain Comp. Variable
Limiter Yes
Auto/on/off switch Yes
12V trigger. Yes
Motional Feedback. Yes
Dimensions HxWxD
In 17.6 x 15.4 x 17.0
Mm 447x390x432

THIS PRODUCT UTILizes A LASER. USE OF CONTROLS OR ADJUSTMENTS OR PER-FORMANCE OF PROCEDURES OTHER THAN THOSE SPECIFIED HEREIN MAY RESULT IN HAZARDOUS RADIATION EXPOSURE. DO NOT OPEN COVERS AND DO NOT REPAIR YOURSELF. REFER SERVICING TO QUALIFIED PERSONNEL.


Use only with the cart, stand, tripod, bracket, or table specified by the manufacturer, or sold with the apparatus. When a cart is used use caution when moving the cart/ apparatus combination to avoid injury from tip-over.
Contedio
Introduccion. 5
C803/C805/C807/C809 10
C 80 CEN 11
C 80 SUR. 12
C 80 SUB. 14
Jamo consumer warranty. 21
spanol
Introduccion
Woofer (In / mm) 2x7/180
Midrange (In / mm) 7/180
Tweeter (In / mm) 1/25
Long term power (W) 200
Short term power (W) 400
Sensitivity (dB/2,8V/1 m) 89
Frequency range (Hz) 30-24000
Impedance (Ohm) 6
Crossover frequency (Hz) 150/2000
Dimensions HxWxD
In 45.6 x 9.9 x 16.9
Mm 1157x252x428
Name C807
System. 21/2 way bassreflex
Woofer (In / mm) 7/180
Midrange (In / mm) 7/180
Tweeter (In / mm) 1/25
Long term power (W) 180
Short term power (W) 360
Sensitivity (dB/2,8V/1 m) 89
Frequency range (Hz) 35-24000
Impedance (Ohm) 6
Crossover frequency (Hz) 150/2000
Dimensions HxWxD
In 39.6 x 9.6 x 16.0
Mm 1007 x 242 x 406
Name C805
System 21/2 way bassreflex
Woofer (In / mm) 6/155
Midrange (In / mm) 6/155
Tweeter (In / mm) 1/25
Long term power (W) 160
Short term power (W) 320
Sensitivity (dB/2,8V/1 m) 88
Frequency range (Hz) 40-24000
Impedance (Ohm) 6
Crossover frequency (Hz) 150/2000
Dimensions HxWxD
In 34.5 x 7.9 x 13.7
Mm .877 x 201 x 347
Name. C803
System 2 way bassreflex
Woofer (In / mm) 7/180
Midrange (In / mm)
Tweeter (In / mm) 1/25
Long term power (W) 125
Short term power (W) 250
Sensitivity (dB/2,8V/1 m) .87
Frequency range (Hz) 45-24000
Impedance (Ohm) 6
Crossover frequency (Hz) 2000
Dimensions HxWxD
In 15.0 x 8.9 x 13.4
Mm 380x225x341
Name C80 CEN
System 2 way bassreflex
Woofer (In / mm) 2x6/155
Midrange (In / mm)
Tweeter (In / mm) 1/25
Long term power (W) 160
Short term power (W) 320
Sensitivity (dB/2,8V/1 m) .88
Frequency range (Hz) 80-24000
Impedance (Ohm) 6
Crossover frequency (Hz) 2000
Dimensions HxWxD
In .8.3 x 8.9 x 13.4
Mm 212x501x281
Name C80 SUR
System 2 way dipole
Woofer (In / mm) 2x6/155
Midrange (In / mm)
Tweeter (In / mm) 2 x 1 / 25
Long term power (W) 160
Short term power (W) 320
Sensitivity (dB/2,8V/1 m) .87
Frequency range (Hz) 80-24000
Impedance (Ohm) 6
Crossover frequency (Hz) 2500
Dimensions HxWxD
In 11.5x11.3x7.1
Mm 293x286x181
Name C80SUB
System............Closed box
Woofer (In / mm) 2x10/254
Amplifierated output (W) 1800
Frequency range (Hz) 20 - 200Hz
Cut off frequency (Hz) Variable
Impedance (Ohm) 22k
Phase.......Variable
Boundary Gain Comp. Variable
Limiter Yes
Auto/on/off switch Yes
12V trigger . Yes
Motional Feedback. Yes
Dimensions HxWxD
In 17.6 x 15.4 x 17.0
Mm 447x390x432

THIS PRODUCT UTILizes A LASER. USE OF CONTROLS OR ADJUSTMENTS OR PER-FORMANCE OF PROCEDURES OTHER THAN THOSE SPECIFIED HEREIN MAY RESULT IN HAZARDOUS RADIATION EXPOSURE. DO NOT OPEN COVERS AND DO NOT REPAIR YOURSELF. REFER SERVICING TO QUALIFIED PERSONNEL.

Use only with the cart, stand, tripod, bracket, or table specified by the manufacturer, or sold with the apparatus. When a cart is used use caution when moving the cart/ apparatus combination to avoid injury from tip-over.
Contenuti
Introduzione. 5
Jamo consumer warranty. 21
italiano
Introduzione
Woofer (In / mm) 2x7/180
Midrange (In / mm) 7/180
Tweeter (In / mm) 1/25
Long term power (W) 200
Short term power (W) 400
Sensitivity (dB/2,8V/1 m) 89
Frequency range (Hz) 30-24000
Impedance (Ohm) 6
Crossover frequency (Hz) 150/2000
Dimensions HxWxD
In 45.6 x 9.9 x 16.9
Mm 1157x252x428
Name C807
System. 21/2 way bassreflex
Woofer (In / mm) 7/180
Midrange (In / mm) 7/180
Tweeter (In / mm) 1/25
Long term power (W) 180
Short term power (W) 360
Sensitivity (dB/2,8V/1 m) .89
Frequency range (Hz) 35-24000
Impedance (Ohm) 6
Crossover frequency (Hz) 150/2000
Dimensions HxWxD
In 39.6 x 9.6 x 16.0
Mm 1007x242x406
Name C805
System. 21/ way bassreflex
Woofer (In / mm) 6/155
Midrange (In / mm) 6/155
Tweeter (In / mm) 1/25
Long term power (W) 160
Short term power (W) 320
Sensitivity (dB/2,8V/1 m) 88
Frequency range (Hz) 40-24000
Impedance (Ohm) 6
Crossover frequency (Hz) 150/2000
Dimensions HxWxD
In 34.5 x 7.9 x 13.7
Mm .877 x 201 x 347
Name. C803
System. 2 way bassreflex
Woofer (In / mm) 7/180
Midrange (In / mm)
Tweeter (In / mm) 1/25
Long term power (W) 125
Short term power (W) 250
Sensitivity (dB/2,8V/1 m) .87
Frequency range (Hz) 45-24000
Impedance (Ohm) 6
Crossover frequency (Hz) 2000
Dimensions HxWxD
In 15.0x8.9x13.4
Mm 380x225x341
Name C80 CEN
System 2 way bassreflex
Woofer (In / mm) 2x6/155
Midrange (In / mm)
Tweeter (In / mm) 1/25
Long term power (W) 160
Short term power (W) 320
Sensitivity (dB / 2,8V / 1m) . 88
Frequency range (Hz) 80-24000
Impedance (Ohm) 6
Crossover frequency (Hz) 2000
Dimensions HxWxD
In .8.3 x 8.9 x 13.4
Mm 212x501x281
Name C80 SUR
System 2 way dipole
Woofer (In / mm) 2x6/155
Midrange (In / mm)
Tweeter (In / mm) 2 x 1 / 25
Long term power (W) 160
Short term power (W) 320
Sensitivity (dB/2,8V/1 m) .87
Frequency range (Hz) 80-24000
Impedance (Ohm) 6
Crossover frequency (Hz) 2500
Dimensions HxWxD
In 11.5x11.3x7.1
Mm 293x286x181
Name C80SUB
System............Closed box
Woofer (In / mm) 2 x 10 / 254
Amplifierated output (W) 1800
Frequency range (Hz) 20 - 200Hz
Cut off frequency (Hz) Variable
Impedance (Ohm) 22k
Phase.......Variable
Boundary Gain Comp. Variable
Limiter Yes
Auto/on/off switch Yes
12V trigger. Yes
Motional Feedback. Yes
Dimensions HxWxD
In 17.6 x 15.4 x 17.0
Mm 447x390x432

THIS PRODUCT UTILizes A LASER. USE OF CONTROLS OR ADJUSTMENTS OR PER-FORMANCE OF PROCEDURES OTHER THAN THOSE SPECIFIED HEREIN MAY RESULT IN HAZARDOUS RADIATION EXPOSURE. DO NOT OPEN COVERS AND DO NOT REPAIR YOURSELF. REFER SERVICING TO QUALIFIED PERSONNEL.

Use only with the cart, stand, tripod, bracket, or table specified by the manufacturer, or sold with the apparatus. When a cart is used use caution when moving the cart/ apparatus combination to avoid injury from tip-over.
Inhoud
Inleiding. 5
C803/C805/C807/C809 10
C 80 CEN 11
C 80 SUR. 12
C 80 SUB. 14
Jamo consumer warranty. 21
Inleiding
Sperfrequentie (cut-off)
Variable Boundary Gain Compensation
THIS PRODUCT UTILizes A LASER. USE OF CONTROLS OR ADJUSTMENTS OR PER-FORMANCE OF PROCEDURES OTHER THAN THOSE SPECIFIED HEREIN MAY RESULT IN HAZARDOUS RADIATION EXPOSURE. DO NOT OPEN COVERS AND DO NOT REPAIR YOURSELF. REFER SERVICING TO QUALIFIED PERSONNEL.

Use only with the cart, stand, tripod, bracket, or table specified by the manufacturer, or sold with the apparatus. When a cart is used use caution when moving the cart / a apparatus combination to avoid injury from tip-over.
内容
简介 5
有关音箱安装的小贴士 6
连接 8
脚钉 9
C803/C805/C807/C809 10
C 80 CEN 11
C 80 SUR. 12
C 80 SUB. 14
超重低音音箱的连接 15
音箱电平输入端子 16
超重低音音箱上的调节选择 17
清洁. 19
技术参数 20
Jamo consumer warranty. 21
中文
简介
Woofer (In / mm) 2x7/180
Midrange (In / mm) 7/180
Tweeter (In / mm) 1/25
Long term power (W) 200
Short term power (W) 400
Sensitivity (dB/2,8V/1 m) 89
Frequency range (Hz) 30-24000
Impedance (Ohm) 6
Crossover frequency (Hz) 150/2000
Dimensions HxWxD
In 45.6 x 9.9 x 16.9
Mm 1157x252x428
Name C807
System. 2 way bassreflex
Woofer (In / mm) 7/180
Midrange (In / mm) 7/180
Tweeter (In / mm) 1/25
Long term power (W) 180
Short term power (W) 360
Sensitivity (dB/2,8V/1 m) 89
Frequency range (Hz) 35-24000
Impedance (Ohm) 6
Crossover frequency (Hz) 150/2000
Dimensions HxWxD
In 39.6 x 9.6 x 16.0
Mm 1007x242x406
Name C805
System. 2/2 way bassreflex
Woofer (In / mm) 6/155
Midrange (In / mm) 6/155
Tweeter (In / mm) 1/25
Long term power (W) 160
Short term power (W) 320
Sensitivity (dB/2,8V/1 m) 88
Frequency range (Hz) 40-24000
Impedance (Ohm) 6
Crossover frequency (Hz) 150/2000
Dimensions HxWxD
In 34.5 x 7.9 x 13.7
Mm .877 x 201 x 347
Name. C803
System 2 way bassreflex
Woofer (In / mm) 7/180
Midrange (In / mm)
Tweeter (In / mm) 1/25
Long term power (W) 125
Short term power (W) 250
Sensitivity (dB/2,8V/1 m) 87
Frequency range (Hz) 45-24000
Impedance (Ohm) 6
Crossover frequency (Hz) 2000
Dimensions HxWxD
In 15.0x8.9x13.4
Mm 380x225x341
Name C80 CEN
System 2 way bassreflex
Woofer (In / mm) 2x6/15
Midrange (In / mm)
Tweeter (In / mm) 1/25
Long term power (W) 160
Short term power (W) 320
Sensitivity (dB/2,8V/1 m) .88
Frequency range (Hz) 80-24000
Impedance (Ohm) 6
Crossover frequency (Hz) 2000
Dimensions HxWxD
In .8.3 x 8.9 x 13.4
Mm 212x501x281
Name C80 SUR
System 2 way dipole
Woofer (In / mm) 2x6/155
Midrange (In / mm)
Tweeter (In / mm) 2x1/25
Long term power (W) 160
Short term power (W) 320
Sensitivity (dB/2,8V/1 m) .87
Frequency range (Hz) 80-24000
Impedance (Ohm) 6
Crossover frequency (Hz) 2500
Dimensions HxWxD
In 11.5x11.3x7.1
Mm 293x286x181
Name C80SUB
System............Closed box
Woofer (In / mm) 2 x 10 / 254
Amplifierated output (W) 1800
Frequency range (Hz) 20-200Hz
Cut off frequency (Hz) Variable
Impedance (Ohm) 22k
Phase.......Variable
Boundary Gain Comp. Variable
Limiter Yes
Auto/on/off switch Ye
12V trigger Yes
Motional Feedback. Yes
Dimensions HxWxD
In 17.6x15.4x17.0
Mm 447 x 390 x 432

THIS PRODUCT UTILizes A LASER. USE OF CONTROLS OR ADJUSTMENTS OR PER-FORMANCE OF PROCEDURES OTHER THAN THOSE SPECIFIED HEREIN MAY RESULT IN HAZARDOUS RADIATION EXPOSURE. DO NOT OPEN COVERS AND DO NOT REPAIR YOURSELF. REFER SERVICING TO QUALIFIED PERSONNEL.

Use only with the cart, stand, tripod, bracket, or table specified by the manufacturer, or sold with the apparatus. When a cart is used use caution when moving the cart / apparatus combination to avoid Injury from tip-over.