
ERC 38810 WS - Wine cellar ELECTROLUX - Free user manual and instructions
Find the device manual for free ERC 38810 WS ELECTROLUX in PDF.

| Product type | Wine cellar |
| Brand | Electrolux |
| Model | ERC 38810 WS |
| Total capacity | 361 liters |
| Dimensions (H x W x D) | 1800 x 595 x 623 mm |
| Power supply | 230 V, 10 A |
| Climate class | SN (10-32°C), N (16-32°C), ST (18-38°C), T (18-43°C) |
| Adjustable temperature range | +6°C to +17°C |
| Temperature display | Digital, with +/- button adjustment |
| Interior lighting | Yes, automatic shutdown after 5 minutes |
| Defrosting | Automatic |
| Shelf type | Adjustable (flat or tilted) |
| Reversible door | Yes (can change direction of opening) |
| Handle | Included and movable |
| Open door alarm | Yes (triggers after 5 minutes) |
| Cooling system | Compressor |
| Refrigerant | CFC-free, environmentally friendly |
| Bulb type | E14, max 25 W |
| Cleaning | Soft cloth, warm water and dish soap |
| Repairability | Some issues can be resolved by the user (see troubleshooting) |
| Recyclable materials | Yes (packaging and appliance) |
Frequently Asked Questions - ERC 38810 WS ELECTROLUX
User questions about ERC 38810 WS ELECTROLUX
0 question about this device. Answer the ones you know or ask your own.
Ask a new question about this device
Download the instructions for your Wine cellar in PDF format for free! Find your manual ERC 38810 WS - ELECTROLUX and take your electronic device back in hand. On this page are published all the documents necessary for the use of your device. ERC 38810 WS by ELECTROLUX.
USER MANUAL ERC 38810 WS ELECTROLUX
ThankyouforchoosingafirstclassproductfromElectrolux,whichhopefullywill provideyouwithlotsofpleasureinthefuture.TheElectroluxambitionistooffer awidevarietyofqualityproductsthatmakeyourlifemorecomfortable.Youfind some examples on the cover in this manual. Please take a few minutes to study thismanualsothatyoucantakeadvantageofthebenefitsofyournewmachine. WepromisethatitwillprovideasuperiorUserExperienceddelivering Ease-of-Mind.Goodluck!
Safetyinstructions
YournewWinecoolermayhaveotherfunctionscomparedtoyourpreviousone.
This appliance is not intended for use by persons (including children) with reduced physical, sensory or mental capabilities, or lack of experience and knowledge, unless they have been given supervision or instruction concerning use of the appliance by person responsible for their safety.
Carefullyreadtheseinstructionstolearnhowtheapplianceworksandhow to careforit.Keeptheinstructionbooklet.Itwillcomeinhandyifyoulatersell the cabinetorgiveittosomebodyelse.
These warnings are provided in the interest of your safety. Ensure that you understand them all before installing or using the appliance. Yours safety is of paramount importance. If you are unsure about any of the meanings or warnings contact the Customer Care Department.
FortheUser
- Thecabinetisintendedforkeepingbeveragesinanormalhouseholdas explainedinthisinstructionbooklet.
- Donotkeepexplosivegasesorliquidsintherefrigerator. They may explode and cause injury and material damage.
- Donotletsharpobjectscomeintocontactwiththerefrigeratingsystemon thebackofandinsidethecabinet.Iftherefrigeratingsystemispunctured,the cabinetwillbedamagedandfoodstuffinsidemayspoil.
- Thecabinetisheavy. Theedgesandprojectingpartsofthecabinetmaybe sharp. Becarefulwhenmovingthecabinetandalwaysusegloves.
ChildSafety
- Payattentionsothatsmallchildrendonotgainaccesstotheoperating controlsortheinsideofthecabinet.

WARNING
Keepventilationopenings, in the appliance enclosure or in the built-in structure, clear of obstruction.

WARNING
Donotusemechanicaldevicesorothermeanstoacceleratethedefrosting process,otherthanthoserecommendedbythemanufacturer.

WARNING
Donotdamagetherefrigerantcircuit.

WARNING
Donotuseelectrical applianceinsidethefoodstoragecompartmentsofthe appliance, unless they are of the type recommended by the manufacturer.
Scrappingoldappliances
The symbol on the product or on its packaging indicates that this product may not be treated as household waste. Instead it should be taken to the appropriate collection point for the recycling of electrical and electronic equipment. By ensuring this product is disposed of correctly, you will help prevent potential negative consequences for the environment and human health, which could otherwise be caused by inappropriate waste handling of this product. Form more detailed information about recycling of this product, please contact your local council, your household wasted disposalservice or the shop where you purchase the product.
Thefollowingsymbolsareusedinthismanual:

Important information concerning your personalsafety and information on how to avoid damaging the appliance
Generalinformationandtips
Environmentalinformation
Contents
Safetyinstructions4.
Scrappingoldcabinets5. . . . . . . .
Contents6.
USE7....
ControlPanel7....
Tostartthewinecoolerandset thecorrecttemperature7.....
Temperature inside the wine cooler . 8
WinePlacement Storage tips .... 8
Measuring the temperature ..... 9
Switching off 9
Alarmsandotherfeatures ..... 9
Lighting 9
Cabinet interior 9
HINTandTIPS 9
Savingenergy 9.
FoodStorage 10.
Protect the environment ..... 10
MAINTENANCEandCLEANING .. 10
Removingtheventilationgrille .... 10
Cleaning 10.....
Tochangethelamp 11
Defrosting the wine cooler ..... 11
Whentheapplianceisnotinuse . . 11
SOMETHING NOT WORKING .... 12
TECHNICAL SPECIFICATION .... 13
INSTALLATION 14
Electricalcord 14.....
Unpacking 14
Remove the transport supports ... 14
Cleaning 14.....
Electricalconnection 14
Installing the cabinet 15
Door. Reversal.... 16
USE
Positionandcleanthecabinetas explainedinthesection"Installation". Checkthatthedrainhoseattherear ofthecabinetdischargesintothedrip tray.

natural_image
Illustration of a laboratory setup with a hand operating a test tube and a magnified view showing internal components (no text or symbols)
Beforeinsertingthepowerplugintotheoutletandswitchingonthecabinetfor thefirsttime,leaveitstandinguprightforabout2hours.Otherwisethe compressormaysustaindamage. Thistimewillallowtheoilsufficienttimeto returntothecompressor.
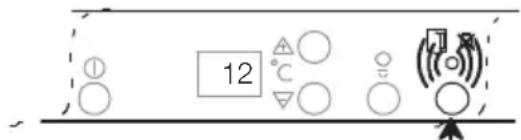
ControlPanel
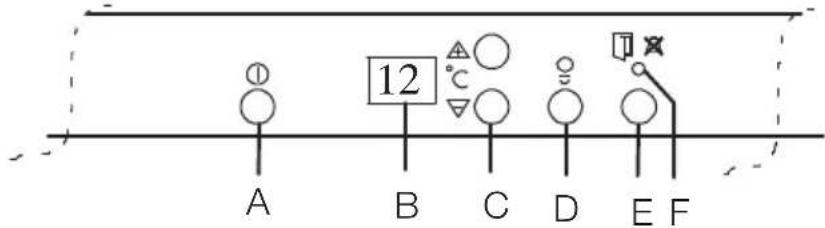
A. Winecoolerpowerswitch Switchesthewinecooleronandoff.
B. Temperature display Show the average temperature in the middle of the wine cooler.
C. Temperature adjustment buttons/thermostat Usedtosethetemperature.
D. Lighting
E. Alarmshut-offbutton Usedtoturntheaudiblealarmoff.
F.Redwarninglamp Flasheswhenthealarminthecabinet hasbeentriggered.
Tostartthewinecoolerandsetthecorrecttemperature
Switchingon: Switchonthewinecoolerbypassing thepowerswitch.
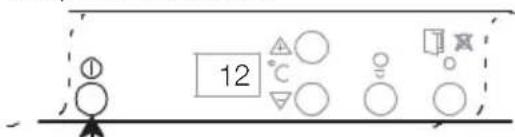
Settingthetemperature Pressthebuttonsuntilthedesired temperatureflashesinthetemperature display(Thetemperaturecanbeset
between+6°Cand+15°C.) "+"raisesthetemperature. "-"lowersthetemperature.
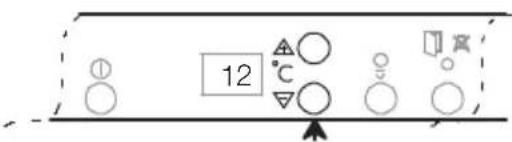
Onceset, the temperature display show the current temperature inside the cabinet.
NOTE: The controllable area is limited by a room temperature of 17^ Cor below.
Allowthecabinettorunforaperiodof 24hourswheneverthetemperature settingischanged. Thiswillallowthe temperaturetostabiliseinsidethe cabinet.
Itisnotnecessarytoresetthe temperaturewhenthecabinetis switchedonafterithasbeenoutof use. Thethermostatrecallsthe previouslysettemperature.
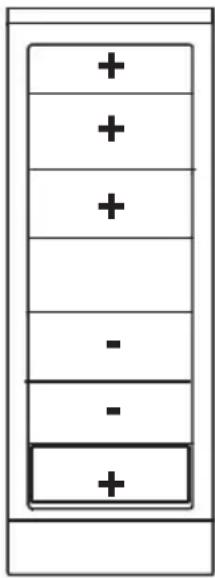
Temperatureinsidethewine cooler
NOTE: The pictures show the coldest and warmest places inside the fridge. (+warm, -cold)
WinePlacement Storagetips
The amountoftimetostorewine dependsonitsmaturity, typeofgrape, alcoholcontent, and dissolvedfructoseandtannins. When purchasing yourwine, findoutwhetheritismature orifitwillimproveovertime.
Inthelowerpartofthecooler.Coldair prolongsthetimetomaturity.Accordingly,storeoldandmaturewineaswell aswineyouwouldliketostorefora longtimeinthelowerportionofthe cooler.Thelowerpartshouldalsobe usedtostorewinethatistobese cold.
Intheupperpartofthecooler.Inthe upperpart,storewinethatyouw letfurthermature,winesthatare servedatawarmertemperature,and thosewinesyouintendtoconsume relativelysoon.
Storethebottleslyingdownsothat thecorksdonotdryout.
Storethewineinthedark. The cooler doorsaremadewithdouble-paned glasswithadarkcoating. This will protectthewineagainstlightdamage if the cooler is placed in a well-lit area.
Avoidturningonthelightinthecooler toooftenorfortoolong. Thewine shouldbestoredinthedark.
Handlethebottleswithcare,sothat thewineisnotagitated.
Heedanyadviceandrecommendationsgivenatthetimeofpurchaseorintheprofessionalliteratureconcerningthewine'squality,durabilityand optimalstoragetemperature.
Recommendedstoragetemperatures:
-for-whitewines+10to+12°C
-forroséwinesandlightredwines
+12to+16°C
-forchampagneandsparklingwines
+6to+8°C
If you stack several bottles on top of one another, makes sure they don't touch the cabinet's cooling plate.
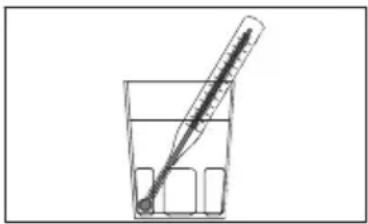
Measuring the temperature
If the temperature is measured using a standard, single thermometer, this should beputinaglassofwater centrally placed inside the cabinet. This will reflect the temperature inside the food products. Donot placethe thermometer hanging directly on the shelf.
natural_image
Simple line drawing of a thermometer inside a glass of water (no text or symbols)Switchingoff
Switchoffthecabinetbypassingthe powerswitch.
Keepthebuttonpressedforapprox.1 second.

Powertothecabinetiscompletely interruptedonlywhenthepowerplug isdisconnected.
Alarmsandotherfeatures
Dooropenalarm
If the fridgedoor remains open for more than 5 minutes, thered warning lamp starts flashing and a audible alarms sounds.
Toswitchoffthealarm:
Pressthe"alarmshut-offbutton".The redwarninglampgoesoutwhenthe doorisclosed.
Lighting
The coolerlightingmaybeturnedon withthedoorclosed. Thismakesit
easytosurveythecontentsofthe coolerwithoutopeningthedoor.The coolerlightingshouldnormallybeoff, sothatthewineisnotundulyexposed tolight.Thelightingturnsoff automaticallyafterabout5minutes.

Cabinetinterior
Theshelvesmaybeplacedflatorat anangle.
Angletheshelfbyplacingthefront pegsinalowersetoftracks.Youcan storealreadyopenedbottlesonthe shelfinthisposition.
HINTandTIPS
Savingenergy
- Paycarefulattentiontowherethe cabinetisplaced.Seethesection "Installation".Wheninstalledcorrectly, thecabinetwillconsumelessenergy.
- Trytoavoidkeepingthedooropen forlongperiods,oropeningthedoor toofrequentlyaswarmairwillenterthe cabinet,andcausethecompressorto switchonunnecessarilyoften.
- Ensure there are no obstructions preventing the door from closing properly.
- Itisadvisabletoperiodicallyclean therefrigerationsystematthebackof theappliancewithadusterorvacuum cleaner.
- Makesurethedoorgasketis completeandalwaysclean.
FoodStorage
• Toobtainthebestresultsfromyour appliance, neitherhotfoodsnorliquids whichmayevaporate, should be placedinthelardercompartment.
- Avoidbuyingfrozenfoodifyoucan notstoreitstraightaway. Theuseof aninsulatedcontainerisadvisable. Whenyouarrivehomeplacethe frozenfoodinthefreezerimmediately.
- Ensure that food placed in the freezer is dated and labelled and used in date order to ensure that food is consumed at its best. Removes suspect food from your refrigerator and clean, refertocleaning and maintenance.
Protecttheenvironment
- Handoverthecabinetpackaging anddiscardedfridgesandfreezerstoa recyclingstation.Contactyourlocal cityofficeoryourclosestdealerfor moreinformation.
- Whencleaningthecabinet,usea mildwashing-updetergent.
- Followtheadviceinthesection "Savingenergy"
- Thedoorgasketandcoolantusedin thiscabinetwillnotharmtheozone layer.
- Allpartsinthepackagingcanbe recycled.
- Thecabinethasbeendesignedfor easydismantlingandsubsequent recycling.
MAINTENANCE and CLEANING
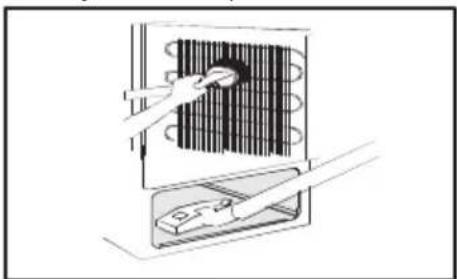
Removingtheventilationgrille
Theventilationgrillecanberemoved, e.g. towashthegrille.
Makesurethedoorisopenwhen removingtheventilationgrille.Unsnap theupperedgeofthegrillebypulling outward/downward.Thenpullthegrille straightouttocompletelyremoveit.
natural_image
Technical line drawing of a mechanical assembly or mounting bracket (no text or symbols)Cleaning
Cleanthecabinetatregularintervals. Disconnecttheappliancefrom electricitysupply.
Cleanoutthedripchannelinsidethe winecooleratregularintervalsand ensurethatthedripchannelisclearat alltimes.Ifblockedcarefullyclear usingapieceofflexiblecurtainwire insertedintothedrainoutlettoremove theblockage.

natural_image
Diagram showing a hand holding a tool near a vertical structure, with an inset magnified view of the detail (no text or symbols present)Cleantheinsideandaccessorieswith warmwaterandbicarbonateofsoda (5mlto0,5litrewater)Rinseanddry thoroughly.
Regularlycheckthedoorsealsand wipcleantoensuretheyareclean andfreefromdebris.
Cleanofftheinteriorwoodendetails withamoistragandmildkitchen soap.Donotsoakthewood.
natural_image
Technical line drawing of a mechanical assembly with no visible text or symbolsDrawer.
Pulloutdrawer.
Liftitoverthelocksinbackonthe slidingguides. Tipdrawerdownwards andpullitout.
Clean.
Assembleinreverseorder.

natural_image
Line drawing of a mechanical device with internal components and a handle (no text or symbols)Washtheoutercabinetwithwarm soapywater.Removetheventilation grille(seethesection"Removingthe ventilationgrille")andvacuum-clean underthecabinet.Onceortwicea yeardustthecondenser(blackgrille) andthecompressoratthebackofthe appliance,withabrushorvacuum cleaner,asanaccumulationofdust willaffecttheperformanceofthe applianceandcauseexcessive electricityconsumption.
natural_image
Diagram of a hand inserting a component into an appliance with a battery inside (no text or symbols)
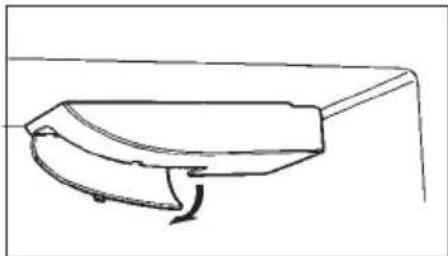
Whenmovingthecabinet, liftitbythe frontedgetoavoidscratchingthefloor.
Tochangethelamp
Beforereplacingthelightbulb, disconnectthepowerplugfromthe outlet.
Foldthegrillebackwardby unsnappingthefrontedge.
Useabulbofthesametype,E14 socket,maximumratingof25W.
natural_image
Simple line drawing of a curved mechanical component with an arrow indicating rotation (no text or symbols)Defrostingthewinecooler
Thewinecoolerisdefrosted automaticallyeverytimethe compressorstops.Frostformationcan bepreventedby:
·notputtingwarmfoodstuffinside thecabinet.
·avoidingfrequentlyopeningthe doororkeepingitopentoolong.
Whentheapplianceisnotinuse
Disconnect the appliance from electricity supply.
Ifthecabinetistobekepton, ask somebody to check it once in awhile to prevent the food inside from spoiling in case of a power failure.
Emptyallfoodsandcleanthe appliance,leavingthedoorsajarto preventunpleasantsmells.
SOMETHINGNOTWORKING
Before contacting your local Service Force Centre check the following point:
| ProblemPossiblecause/Remedy | |
| ”” isdisplayedinthe temperaturedisplay. | Aerrorhasoccurredinmeasuring the temperature.Callyourservicerepresentative. (Thecoolingsystemwillcontinuetokeep foodproductscold,buttemperature adjustmentwillnotbepossible.) |
| Itistoowarminsidethewine cooler. | Setalowertemperature.Makesurethatthedooriscompletelyclosed andthattheinsulatingstripiscompleteand clean. |
| Itistoowarminsidethewine cooler. | Setalowertemperature.Makesurethatthedooriscompletelyclosed andthattheinsulatingstripiscompleteand clean. |
| Itistoocoldinsidethewine cooler. | Setawarmertemperature. |
| Thereiswateronthecooling plateinsidethewinecooler. | Thisisnormal.Duringautomaticdefrosting, frostthawsonthecoolingplate. |
| Waterisrunninginsidethe winecooler. | Cleanthewaterdrainanddrainholeinside thewinecoolerusinge.g.cottonswabsora bottlecleanerbrush.Somefoodproductscouldhavebeenplaced neartherearoftheapplianceprevetungthe waterfromrunningintothedrain. |
| Water comes out on the floor. | Place the drain hose at the back of the cabinetabovethedrainbowl.Seethe chapter"Beforeusingthecabinetthefirst time". |
| Thecabinetdoesnotoperate atall.Coolingorinteriorlight doesnotoperate.Noindicator lampslight. | Thecabinetisnotswitchedon.Powerdoesnotreachthecabinet.(Try connectinganotherelectricaldevicetothe poweroutlet.)The fuse has blown.Thepowerplugisnotproperlyconnected. |
| Thecompressoroperates continuously. | Setawarmertemperature.Makesurethatthedooriscompletelyclosed andthattheinsulatingstripiscompleteand clean. |
| Soundlevelincabinetistoo high. | Therefrigeratingsystemwillalwaysproduce somesounds.Apulsingsoundisheardwhen coolantispumpedinsidethecoolingpipes.Atickingsoundfromthermostatcanbe heardwhenthecompressorswitchesonand off.Thesoundlevelvariesdependingonthe operationofthecabinet.Ifyoufeelthesoundlevelisincorrect:Makesurethepipesatthebackofthe cabinetdonottoucheachother.Carefully bendthemiftheydo.Ifthecushionspacers(betweenthecabinet wallandpipes)comeloose,putthembackin placeagain.Carefullyfollowtheinstructionsinthechapter "Installingthecabinet". |
TECHNICALSPECIFICATION
| ModelERC38810WS | |
| NetcapacityRefrigeratorl361 | |
| Dimensionmm | |
| Height1800 | |
| Width595 | |
| Depth | 623 |
INSTALLATION
Electricalcord
Donotremovethepowercordby pullingonitslead,particularywhenthe productisbeingpulledoutofitsniche.
- Damagetothecordmaycausea short-circuit, fireand/orelectricshock. - Intheeventofdamagetothe appliance'smaincable, onlyan authorisedservicecompany recommendedbythemanufactureror asimilarlyqualifiedpersonmayadjust itinordertoavoidshockhazardforthe user.
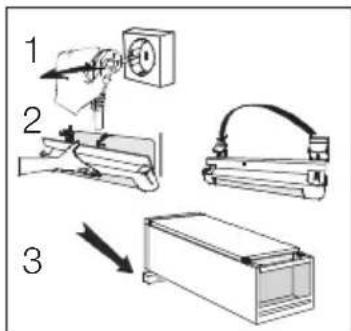
Unpacking
Unpackthecabinetandcheckthatit isingoodconditionandfreeofany transportdamage.Notifythedealer immediatelyofanydamage.Handthe packagingoverforrecycling.Formore information,contactyourlocalcouncil orthedealer.

Donotallowchildrentoplaywiththe packaging. Theplasticfilmcancause suffocation.
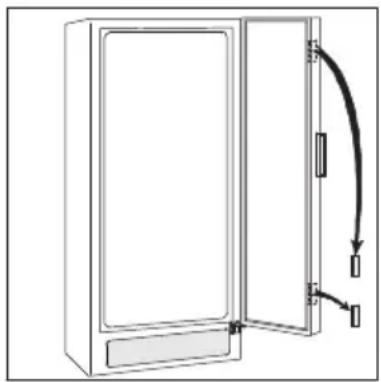
Removethetransportsupports
Removethetapeandthetran supportsfrom
·thedoorsides
Removethetransportsupportonthe glassshelfbypushingthesupport forwardalongtheedgeofthe
untilitstops.Takeholdoftherear edgeoftheglassshelfandpullthe shelfandtransportsupportforward
untiltheshelftiltsandthetransport supportcanberemoved.
natural_image
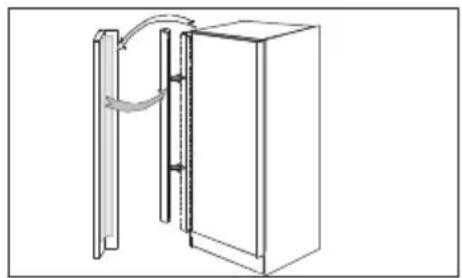
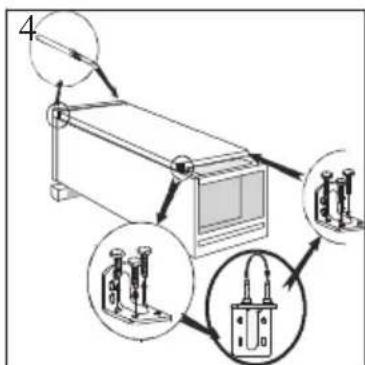
Diagram of a cabinet with open door and internal components, showing wiring connections (no text or symbols)Mountingthehandle
The handle is included in the packaging material of the cabinet. Secure the handle.
natural_image
Diagram of a door with a vertical panel and a curved arrow indicating motion or force (no text or symbols)Cleaning
Washtheinsideofthecabinetusing lukewarmwater,amildwashing-up detergentandasoftcloth.Cleanoff theinteriorwoodendetailswithamoist ragandmildkitchensoap.Donot sport soakthewood.
Electrical connection
Connectthecabinettoagrounded electricaloutlet.
Vschtaglef:230V.
Fuse:10A.
Refertotheratingplateontheleft insidethecabinet.
Installingthecabinet
Makesurethatthepowerplugisnot squashedordamagedbythebackof theproduct.
-Adamagedpowerplugmay overheatandcauseafire.
Donotplaceheavyarticlesorthe productitselfonthepowercord.
·thereisariskofashortcircuitand fire.
Ifthepowerplugsocketisloose, donot insertthepowerplug.
·thereisariskofelectricshockorfire.
Toobtainthebestperformancefromthe cabinet,ensure:
·thecabinetisplacedinadry,cool placeandisnotexposedtodirect sunlight.
·thecabinetisnotplacedclosetoa source of heat, e.g. a cooker or dishwasher.
·thecabinetislevel. Thecabinet should not lean against any wall. If necessary adjust the feet using the adjustments spanners supplied.
natural_image
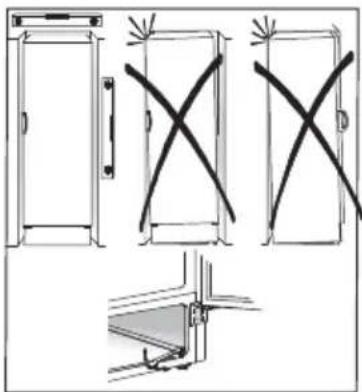
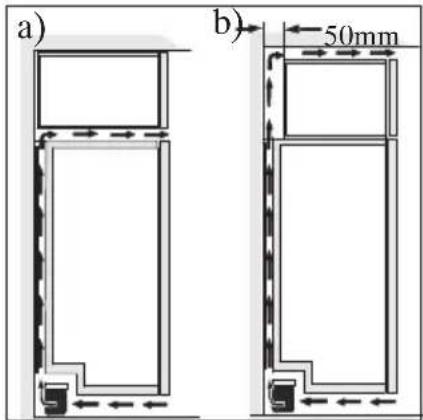
Technical line drawing of a door with X-shaped cutouts and a close-up detail showing a corner detail (no text or symbols)- thereisgoodaircirculationaround the cabinet and that the air channels belowandbehindthecabinetarenot blocked. The ventilation space above thecabinetmustbeatleast4cm.
Theventilationspacecaneitherbe a) directlyabovethecabinet,or
b) behindandabovethetopcupboard. Inthiscase,thespacebehindthe cupboardmustbeatleast50mmdeep.
Cabinetisplacedatalocationwhere theambienttemperaturecorresponds totheclimateclassification*,forwhich theapplianceisdesigned.
*Seeontheratingplateontheinside of the appliance.
The followingtableshowswhich ambienttemperatureiscorrectfor eachclimateclassification.
| Climate classification | foranambient temperatureof |
| SN | +10°Cto+32°C |
| N | +16°Cto+32°C |
| ST | +18°Cto+38°C |
| T | +18°Cto+43°C |
Check that the drain hose at therear of the cabinet discharges into the drip tray.
If thecabinetisplaced inacornerandthe side with the hinges facing thewall,thedistancebetween thewallandthecabinetmust beatleast 230mmto allowthedoortoopenenoughso that theshelvescanberemoved.
The power plug must be accessible after installation of the cabinet.
DoorReversal
-
Closethecabinetandremovethe plugfromtheelectricalsocket.
-
Removetheventilationgrille. There isapartonthegrillethatcanbe removed. Removeandrepositioniton theotherside.
-
Putthecabinetonawoodenboard whenitislaiddown. Later, when raisingthecabinet, itwillbeeasierto gripunderthecabinetthankstothe board.
- Ontheupperpartofthecabinet. Putthehingepinontheotherside. Onthelowerpartofthecabinet. Unscrewthehinge.Movethehinge pinandplasticcover.Securethehinge ontheotherside.
Remove any play in the door by adjusting the height of the lower hinge
withthesuppliedspanner.Securewith thelock-nut.
Raisethecabinetandreplacethe ventilationgrille.
5.Movethehandle. Unscrewthehandleandsecureitto theotherside.Pressthesupplied plasticplugsintotheholestowhich thehandlewaspreviouslyfitted.

natural_image
Simple diagram of a vertical rectangular object with an arrow indicating upward motion, no text or symbols present.Putthecabinetinposition.Checkthat theapplianceislevel.Seethesection "Positioningthecabinet".
natural_image
Illustration of a laboratory setup with a hand operating a test tube and a magnified view showing internal components (no text or symbols)
natural_image
Simple line drawing of a thermometer inside a glass of water (no text or symbols)Abschalten
natural_image
Line drawing of a door handle assembly with a hand inserting a component (no text or symbols)Reinigung
natural_image
Technical diagram showing a hand holding a tool near a structural component, with an inset close-up of the detail (no text or symbols present)natural_image
Technical line drawing showing a tool interacting with a mechanical component (no text or symbols present)Fach.
natural_image
Line drawing of a mechanical device with no visible text or symbolsnatural_image
Diagram of a refrigerator with cooling system and hand inserting a component (no text or symbols)
natural_image
Simple line drawing of a mechanical component with a curved handle and arrow indicating rotation (no text or symbols)Abtauen-Weinkühler
natural_image
Diagram of a cabinet with an open door and internal components, showing wiring connections (no text or symbols)BefestigungderGriffe
natural_image
Diagram of a cabinet with a vertical door and horizontal bars, showing a curved arrow indicating rotation or movement (no text or symbols present)Reinigung
natural_image
Technical line drawing showing door and window assembly with X marks, no text or symbols presentnatural_image
Simple line drawing of a vertical rectangular object with an arrow indicating upward motion (no text or symbols)natural_image
Illustration of a laboratory setup with a hand operating a test tube and a magnified view showing internal components (no text or symbols)
natural_image
Simple line drawing of a thermometer inside a glass of water (no text or symbols)Arrêt
natural_image
Line drawing of a mechanical assembly or mounting bracket with no visible text or symbolsNettoyage
natural_image
Diagram showing a hand holding a tool near a vertical line, with an inset close-up of the tool's tip (no text or symbols present)natural_image
Technical line drawing of a mechanical assembly with no visible text or symbolsTiroir
Retirezletiroir.
natural_image
Line drawing of a mechanical device with internal components and mounting brackets (no text or symbols)natural_image
Diagram of a refrigerator interior with hand inserting a cable into the air gap (no text or symbols)
Lorsdudéplacementducompartimen souleverparlebordavantafind'éviter derayerlesol.
Remplacementdel'ampoule
Replacezlagrilleentirantsurlebord avant.
natural_image
Simple line drawing of a curved mechanical component with an arrow indicating rotation (no text or symbols)natural_image
Diagram of a cabinet with open door and hanging wall-mounted sensors (no text or symbols)Montagelapoignée
natural_image
Diagram of a door with a curved arrow indicating rotation or movement, showing internal structure (no text or symbols)natural_image
Technical line drawing of a door and wall assembly with cross marks, showing structural details (no text or symbols)natural_image
Simple line drawing of a vertical rectangular object with an arrow indicating upward motion (no text or symbols)natural_image
Diagram of a laboratory setup with a hand operating a test tube and a magnified inset showing internal components (no text or labels)natural_image
Simple line drawing of a thermometer inside a glass of liquid (no text or symbols)Uitschakelen
natural_image
Simple line drawing of a mechanical assembly or mounting bracket (no text or symbols)Reinigen
natural_image
Diagram showing a hand holding a tool near a vertical structure, with an inset magnified view of the tool (no text or symbols present)natural_image
Technical line drawing of a mechanical device with two views (no text or symbols)Bak
natural_image
Line drawing of a mechanical device with no visible text or symbolsnatural_image
Diagram of a refrigerator interior with hand inserting a cable into the air gap (no text or symbols)