OMW 310W - Microwave Oven OK - Free user manual and instructions
Find the device manual for free OMW 310W OK in PDF.
| Product Type | Microwave Oven |
| Brand | OK |
| Model | OMW 310W |
| Dimensions (H x W x D) | 258 x 440 x 356 mm |
| Net Weight | Approximately 10 kg |
| Rated Voltage | 230 V ~ 50 Hz |
| Power Consumption | 1050 W |
| Output Power (Microwave) | 700 W |
| Operating Frequency | 2450 MHz |
| Oven Capacity | 20 L |
| Turntable Diameter | 255 mm |
| Power Levels | 5 levels: Low (17%), M.Low (33%), Med (55%), M.High (77%), High (100%) |
| Timer | 0 to 35 minutes, automatic shut-off |
| Main Functions | Cooking, defrosting, reheating |
| Control Panel | Rotary selectors for power and time |
| Safety | Door lock, mandatory grounding, automatic shut-off at end of cooking |
| Allowed Materials | Glass, microwave-safe plastic, paper, plastic wrap, porcelain without metal trim |
| Prohibited Materials | Metal, aluminum, wood, polystyrene, metal ties |
| Cleaning | Damp soft cloth; glass tray dishwasher safe; do not use steam cleaner |
| Included Accessories | Glass tray, turntable roller |
| Energy Consumption | 1050 W (consumed) |
Frequently Asked Questions - OMW 310W OK
User questions about OMW 310W OK
0 question about this device. Answer the ones you know or ask your own.
Ask a new question about this device
Download the instructions for your Microwave Oven in PDF format for free! Find your manual OMW 310W - OK and take your electronic device back in hand. On this page are published all the documents necessary for the use of your device. OMW 310W by OK.
USER MANUAL OMW 310W OK
natural_image
Front view of a microwave oven with control knobs and a timer (no visible text or symbols on the main body)De GeBRaUCHsanWeIsUnG
eL OΔΗΓΙΕΣ ΧΡΗΣΗΣ
en UseR ManUaL
es ManUaL De InsTRUCCIONes
FR MODE D'eMPLOI
HU FeLHasZnÁLÓI KÉZIKÖnYV
IT ManUaLe DeLL'UTenTe
natural_image
Exterior view of a microwave oven with open door and control panel (no text or symbols visible)1
2
natural_image
Close-up of a mechanical component with a crosshair overlay, no visible text or symbols3
natural_image
Close-up of a white electrical outlet plug with black cable (no text or symbols visible)4
1
natural_image
Exterior view of a microwave oven with open door and control panel (no text or symbols visible)1
natural_image
Close-up of a white electronic device with a black X-shaped mark and coiled wires, no visible text or symbols.3
natural_image
Close-up of a white electrical outlet plug with black cable (no text or symbols visible)4
1
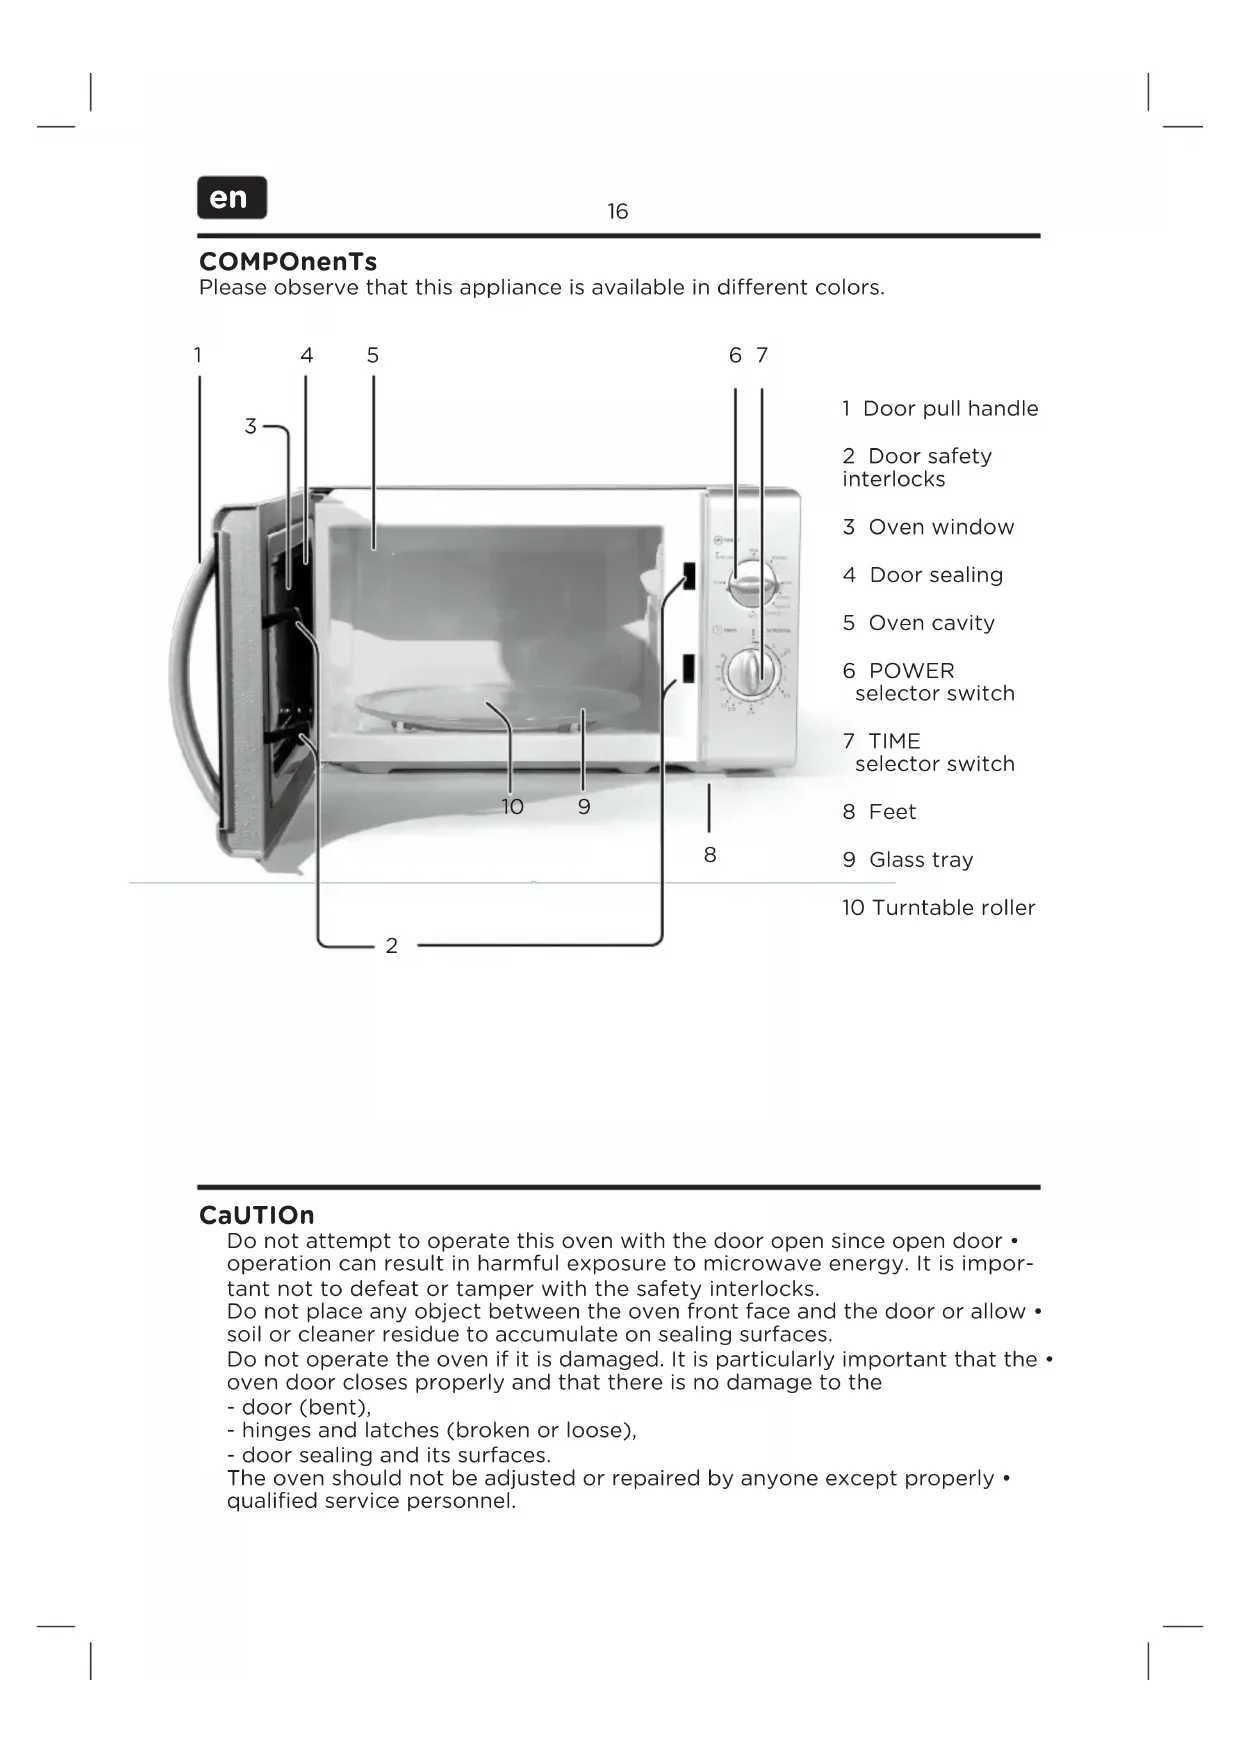
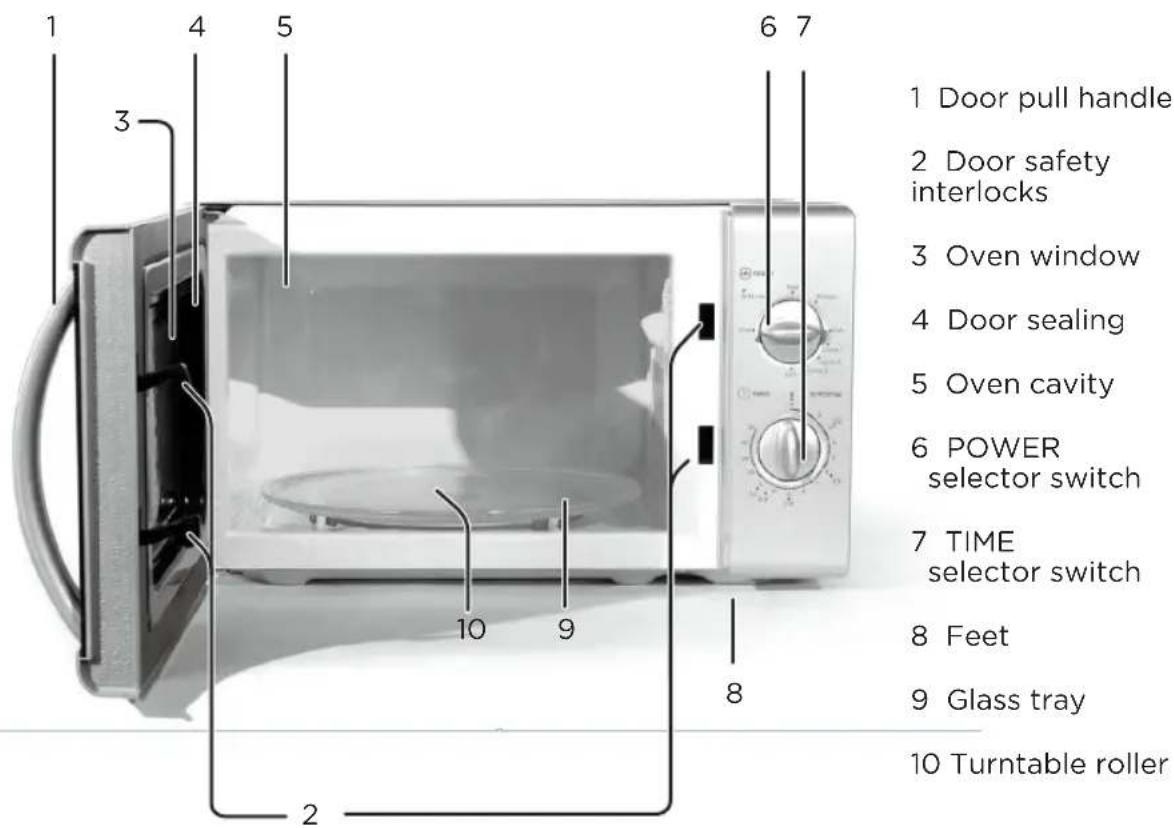
Please observe that this appliance is available in different colors.
CaUTION
Do not attempt to operate this oven with the door open since open door • operation can result in harmful exposure to microwave energy. It is important not to defeat or tamper with the safety interlocks.
Do not place any object between the oven front face and the door or allow soil or cleaner residue to accumulate on sealing surfaces.
Do not operate the oven if it is damaged. It is particularly important that the • oven door closes properly and that there is no damage to the
- door (bent),
- hinges and latches (broken or loose),
- door sealing and its surfaces.
The oven should not be adjusted or repaired by anyone except properly • qualified service personnel.
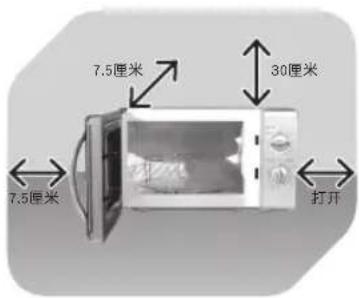
InsTaLLaTlOn
natural_image
Exterior view of a microwave oven with open door and control panel (no text or symbols visible)1
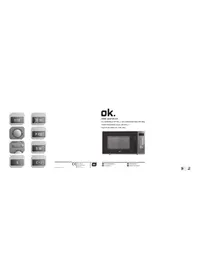
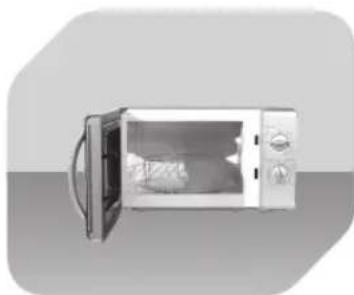
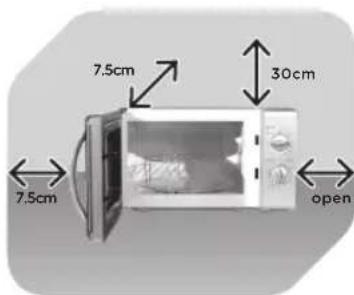
Place the microwave on a flat, stable surface.
2
Leave space for sufficient airflow: 30 cm above the oven, 7.5 cm at the back, 7.5 cm at one side and one side must be open.
natural_image
Close-up of a white electronic device with visible circuitry and a black X mark overlay (no text or symbols)3
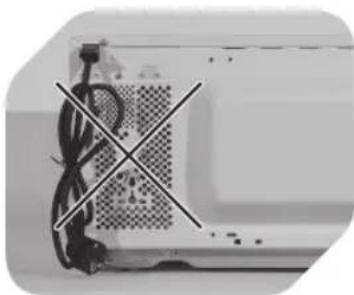
Do not cover or block any openings on the appliance. Do not remove feet.

natural_image
Close-up of a white electrical outlet plug with black cable (no text or symbols visible)4
Before use, plug in the unit. Unplug when not using for a long time.
nOTe
Make sure that all packaging materials including tape are removed from the door, cavity, switches and accessories.
Do not place the oven where heat, moisture or high humidity are generated, or near combustible materials.
Do not operate the oven without turntable roller • on the shaft and glass tray in proper positions.
Make sure that the supply cord is undamaged • and does not run under the oven or over any hot or sharp surface.
The mains plug must be readily accessible so that it can be easily disconnected in an emergency.
GROUnDInG InsTRUCTIONS
The supply cord of the oven is equipped with a plug with earth connection, which must be plugged into a properly installed and grounded wall outlet. It is recommended that a separate circuit serving only the oven be provided. High voltage is dangerous and may result in fire or other accidents, causing property damage or injuries.
Warning: Improper use of the grounding plug can result in a risk of electric • shock.
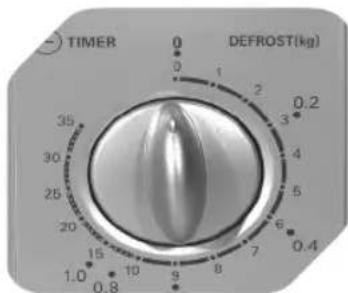
COnTROL Panel
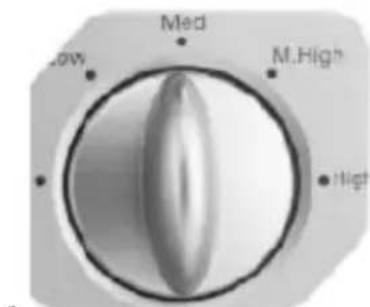
POWeR seLeCTOR SWITCH
Turn switch to select power level for cooking or defrosting. Please refer to chapter MICROWAVE COOKING.
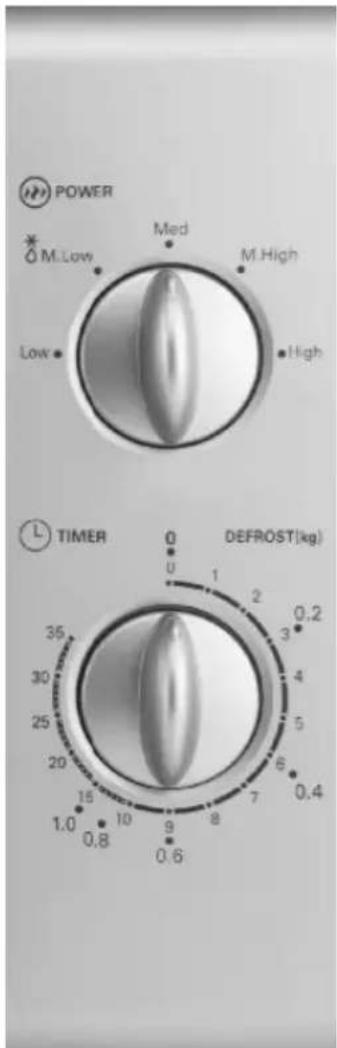
TIME seLeCTOR SWITCH
Use TIME selector switch to switch oven on or off (0). Turn clockwise to select cooking duration (minutes). To set short time periods, first turn switch to position 5, and then turn back to the desired lower setting. When cooking duration has elapsed (0), the oven will switch off automatically. You may terminate cooking process at any time by turning the switch manually back to position 0.
sPeCIFICaTIONs
Rated voltage: 230 V \~, 50 Hz / Rated power input: 1050 W (Micro) / Rated power output: 700 W / Operation frequency: 2450 MHz / Outside dimensions: 258 mm (H) x 440 mm (W) x 356 mm (D) / Turntable Diameter: ∅ 255 mm / Oven capacity: 20 L / Net weight: Approx. 10 kg
InTenDeD Use
This appliance is intended for defrosting, reheating and cooking food. Only use according to these instructions. Improper use is dangerous and will void any warranty claim. Important safety instructions can be found in the separate document.
MICROWaVe COOKInG
1
2
Use POWER selector switch to select power level.
Use TIME selector switch to set cooking duration.
Mode Power level
| Low 17 % |
| Medium-low (Defrost) 33 % |
| Medium 55 % |
| Medium-high 77 % |
| High 100 % |
DisPOsaL
The crossed-out wheeled bin logo requires the separate collection of waste electric and electronic equipment (WEEE). Electric and electronic equipment may contain dangerous and hazardous substances. Do not dispose of this appliance as unsorted municipal waste. Return it to a designated collection point for the recycling of WEEE. By doing so, you will help to conserve resources and protect the environment. Contact your retailer or local authorities for more information.
nOTe
A short supply cord is provided to reduce the risks resulting from becoming entangled in or tripping over a longer cord.
If an extension cord is used: •
1) The electrical rating should be at least as great as the electrical rating of the appliance.
2) The extension cord must be a grounding-type 3-wire cord.
3) The cord should be arranged so that it will not drape over counter tops or table tops, where it can be pulled on by children or tripped over unintentionally.
CLeanInG and CaRe
Cleaning the microwave oven is a significant part of the safe operation of the device and will prevent health hazards.
The device must be cleaned periodically, food residue must be removed. • If the device is not cleaned regularly, it can cause wear to the surface and severely reduce the service life. Furthermore, it could result in limited safety and functionality of the device.
If the door sealing no longer closes reliably due to accumulated food residue, microwave radiation may leak and damage your health.
Clean the device after use to prevent mould, vermin, as well as leaking microwave radiation.
Prior to each cleaning, switch off the microwave oven and disconnect the • mains plug.
Do not use steam cleaners to clean the device! The steam is pressurized and can condensate on the electrical components inside the device and cause short-circuits.
Do not use any abrasive cleaning agents or metal scrapers to clean the door • since they could scratch the surface and cause the glass to shatter.
Clean the casing with a slightly damp cloth. Please be sure that no water • enters the appliance.
Use a damp cloth to regularly and carefully clean the door sealing, cavity • and any adjacent components. Use a damp cloth to wipe off any food residue or splashes.
Make sure the control panel with selector switches does not get wet. Clean by using a soft, damp cloth. Leave the door open when cleaning the control panel in order to prevent accidental operation.
If steam condensates or forms drops inside the microwave or on the casing, use a soft cloth to wipe it off. Condensation can occur if moist air meets a cold surface. At very high temperatures, oil and grease can also evaporate and deposit as a grease film after cooling off.
The glass tray can be removed for cleaning. Clean the tray in warm, soapy • water or in the dishwasher.
The turntable roller and the cavity bottom should be cleaned regularly to prevent excessive noise. Simply use a mild household cleaner to wipe the surface; allow it to dry. If the turntable roller is removed for cleaning, make sure to re-insert it properly before next use. Regularly clean the door, window and sealing with a damp cloth to remove dirt.
Odours in the cavity can be neutralized by filling a microwave-suitable cup with water and lemon juice and boiling it in the microwave oven for 5 minutes. Wipe the cavity dry afterwards using a soft cloth.
In the event that the light bulb inside the cavity must be replaced, please • contact qualified service personnel.
MaTeRIaLs YOU Can Use In MICROWaVe OVen
Utensils Remarks
| Aluminum foil | Shielding only. Small smooth pieces can be used to cover thin parts of meat or poultry to prevent overcooking. Arcing can occur if foil is too close to oven walls. The foil should be at least 2.5 cm away from oven walls. |
| Browning dish | The bottom of browning dish must be at least 5 mm above the turntable. Incorrect usage may cause the turntable to break. |
| Dinnerware | Microwave-safe only. Do not use cracked or chipped dishes. |
| Glass jars | Always remove lid. Use only to heat food until just warm. Most glass jars are not heat resistant and may break. |
| Glassware | Heat-resistant oven glassware only. Make sure there is no metallic trim. Do not use cracked or chipped dishes. |
| Oven cooking bags | Do not close with metal tie. Make slits to allow steam to escape. |
| Paper plates and cups | Use for short-term cooking/warming only. Do not leave oven unattended while cooking. |
| Paper towels | Use to cover food for reheating and absorbing fat. Use with supervision for a short-term cooking only. |
| Parchment paper/Wax paper | Use as a cover to prevent splattering and retain moisture. |
| Plastic | Microwave-safe only. Should be labeled „Microwave Safe“. Some plastic containers soften, as the food inside gets hot. „Boiling bags“ and tightly closed plastic bags should be slit, pierced or vented as directed by packaged |
| Plastic wrap | Microwave-safe only (meat and candy thermometers). |
MaTeRIaLs TO Be aVOIDeD In MICROWaVe OVen
Utensils Remarks
| Aluminum tray/ Food carton with metal handle | May cause arcing. Transfer food into microwave-safe dish. |
| Metal or metal-trim-med utensils | Metal shields the food from microwave energy. Metal trim may cause arcing. |
| Metal twist ties May cause arcing and could cause a fire in the oven. | |
| Paper bags May cause a fire in the oven. | |
| Plastic foam | Plastic foam may melt or contaminate the liquid inside when exposed to high temperature. |
| Wood | Wood will dry out when used in the microwave oven and may split or crack. |
COMPOnenTes
natural_image
Exterior view of a microwave oven with open door and control panel (no text or symbols visible)1
natural_image
Exterior view of a modern office building (no signage)3
natural_image
Close-up of a white electrical outlet plug with black socket and cable (no text or symbols visible)4
1
natural_image
Exterior view of a microwave oven with open door and closed lid (no text or symbols visible)1
natural_image
Close-up of a mechanical component with visible wiring and a crosshair overlay (no text or symbols)3
natural_image
Close-up of a white electrical outlet plug with black cable (no text or symbols visible)4
1

2
natural_image
Exterior view of a microwave oven with open door and front-mounted control panel (no text or symbols visible)1
natural_image
Close-up of a device with a crosshair overlay, showing internal components and wiring (no text or symbols visible)3
natural_image
Close-up of a white electrical outlet plug with black cable (no text or symbols visible)4
natural_image
Exterior view of a microwave oven with open door and control panel (no text or symbols visible)1
natural_image
Close-up of a mechanical component with intersecting black lines indicating alignment or dislocation (no text or symbols visible)3
natural_image
Close-up of a black electrical outlet plug with a black cable (no text or symbols visible)4
natural_image
Exterior view of a microwave oven with open door and front-mounted control panel (no text or symbols visible)1
natural_image
Close-up of a computer monitor with visible circuitry and a crosshair overlay (no text or symbols)3
natural_image
Close-up of a black electrical outlet plug with a black cable (no text or symbols visible)4
natural_image
Exterior view of a microwave oven with open door and control panel (no text or symbols visible)1
natural_image
Close-up of a white electronic device with visible circuitry and a black X-shaped marking (no text or symbols)3
natural_image
Close-up of a white electrical outlet plug with black cable (no text or symbols visible)4
ReGULaTOR MOCY POWeR
natural_image
Exterior view of a microwave oven with open door and front-mounted control panel (no text or symbols visible)1
natural_image
Close-up of a white electronic device with visible circuitry and a black X mark overlay (no text or symbols)3
natural_image
Close-up of a white electrical outlet plug with black cable (no text or symbols visible)4
natural_image
Exterior view of a modern microwave oven with open door and front panel (no text or symbols visible)1
natural_image
Close-up of a computer monitor with visible circuitry and a diagonally crossed X mark (no text or symbols)3
natural_image
Close-up of a black electrical outlet plug with a black cable (no text or symbols visible)4
1
natural_image
Exterior view of a microwave oven with open door and control knobs (no text or symbols visible)1
natural_image
Close-up of a white electronic device with visible circuitry and wiring, no text or symbols present3
natural_image
Close-up of a black electrical outlet plug with a black cable (no text or symbols visible)4
VÄLJaROMKOPPLaRe FÖR eFFeKT
VÄLJaROMKOPPLaRe FÖR TID
1
2
natural_image
Exterior view of a microwave oven with open door and control panel (no text or symbols visible)1
natural_image
Close-up of a white electronic device with visible circuitry and a black X-shaped mark (no text or symbols)3
natural_image
Close-up of a black electrical outlet plug with a black cable (no text or symbols visible)4
natural_image
Exterior view of a microwave oven with open door and closed lid (no text or symbols visible)1
把微波炉放在平坦、稳定的表面上。
natural_image
Close-up of a computer monitor with visible circuitry and a diagonally crossed X mark (no text or symbols)3
natural_image
Close-up of a black electrical outlet plug with a black cable (no text or symbols visible)4
1