
Ecco V2 - Coffee machine BEEM - Free user manual and instructions
Find the device manual for free Ecco V2 BEEM in PDF.
| Product type | 3-in-1 breakfast center (toaster, kettle, coffee maker) |
| Brand | BEEM |
| Model | Ecco V2 (MF3450-A) |
| Power supply | 230 V ~ 50 Hz |
| Total power | 3000 / 1550 W |
| Toaster power | 750 W |
| Kettle power | 2200 W |
| Coffee maker power | 800 W |
| Protection class | I |
| Kettle capacity | 1.5 L max |
| Coffee maker capacity | Approx. 10 cups (marks on reservoir) |
| Number of toaster slots | 1 long slot |
| Toaster functions | Defrost, reheat, stop/eject |
| Toaster thermostat | 6 positions |
| Included accessories | Bun warmer, permanent filter, descaling filter, glass carafe |
| Materials | Stainless steel, plastic, glass (carafe) |
| Cleaning | Removable crumb tray, removable descaling filter, descaling recommended |
| Safety | Automatic shut-off, dry boil protection (kettle), anti-drip system (coffee maker) |
| Warranty | 24 months (household use) |
| After-sales service | BEEM GmbH, Germany (phone, email, website) |
| Dimensions (approx.) | Approx. 40 x 30 x 25 cm (estimate) |
Frequently Asked Questions - Ecco V2 BEEM
User questions about Ecco V2 BEEM
0 question about this device. Answer the ones you know or ask your own.
Ask a new question about this device
Download the instructions for your Coffee machine in PDF format for free! Find your manual Ecco V2 - BEEM and take your electronic device back in hand. On this page are published all the documents necessary for the use of your device. Ecco V2 by BEEM.
USER MANUAL Ecco V2 BEEM
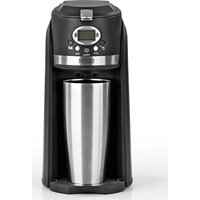
natural_image
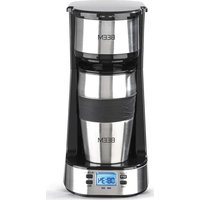
Exterior view of a modern coffee maker with two 3-wetters and a glass pitcher, no visible text or symbols on the main body.1 Introduction ......20
2 On these instructions ....20
3 Description of appliance and scope of delivery 21
4 Important safety information 22
5 Before initial operation 24
6 Use 25
6.1 Long slot toaster 25
6.2 Kettle....27
6.3 Coffee maker 28
7 Cleaning and storage 29
7.1 Descaling 30
7.2 Care of stainless steel parts 30
7.3 Storage 30
8 Malfunctions and troubleshooting ....31
9 Disposal 31
10 Technical data 32
11 Certification 32
12 Warranty, service, repairs 33
13 Wiring diagram 67
14 European Conformity Declaration....68

Sommaire
Zahlenschlüssel
natural_image
Cross-sectional view of a mechanical component with concentric rings and labeled parts (a and b), no readable text or symbols beyond labels.Your new breakfast centre Ecco 3 in 1 from BEEM combines three appliances in one: a long slot toaster, a kettle and a coffee maker. The Ecco 3 in 1 is compact and space-saving, making it ideal for a tidy kitchen. The combination of different appliances leaves nothing to be desired for easy preparation of your breakfast.
Enjoy your product!
2 On these instructions
The product is equipped with safety equipment. You should still read the safety instructions carefully and use the product only as described in these instructions, however, to avoid accidental injuries or damage.
Keep these instructions stored so you can consult them later. If the product is passed on to another user, these instructions must be handed over too.
Safety terms in these instructions:
The signal word DANGER warns of possible serious injuries and danger to life.
The signal word WARNING warns of injuries and serious damage to property.
The signal word CAUTION warns of slight injuries or damage.
3 Description of appliance and scope of delivery

Number scheme
A Long slot toaster C Electric base station
1 Crumb tray 13 Electric base station
2 Button for bun rack 14 Control panel
3 Toast slot 15 Water tank with
4 Bun rack water level indicator
5 Start button 16 Water tank lid 17 Coffee maker hot plate
B Kettle
6 Kettle lid
7 Button for opening lid
8 On/off switch
9 Handle
10 Water level indicator
11 Kettle
12 Lime scale filter
D Coffee maker
18 Glass pot
19 Glass pot lid
20 Permanent filter
21 Drip stop
22 Removable coffee filter holder
23 Instruction manual (not in diagram)
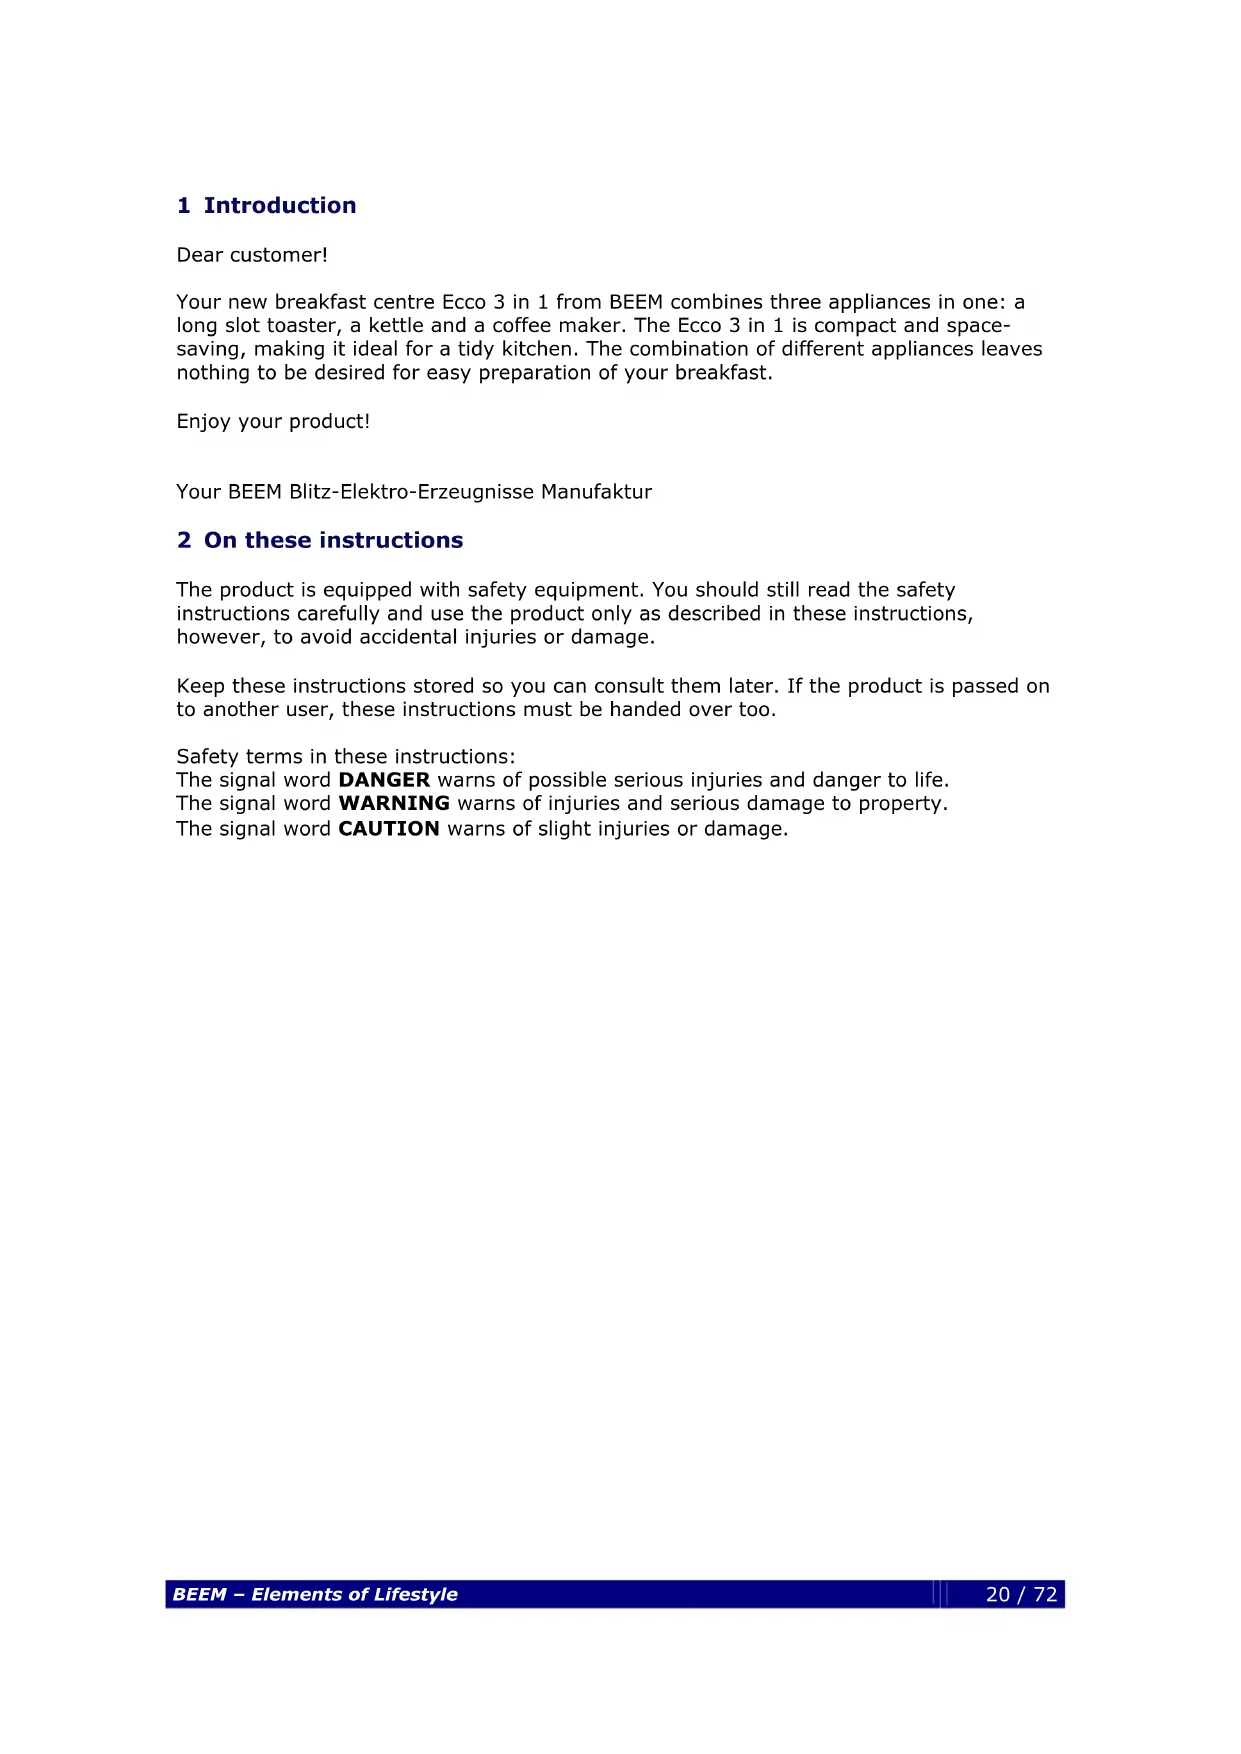
Control panel
24 On/off switch for coffee maker
25 Toaster browning control
26 Toaster control buttons:

Defrost

Reheat

Stop, eject toast
4 Important safety information
Intended use
-
This appliance is solely for use in the household, not for industrial use.
-
This appliance is intended only for the following use:
- Long slot toaster for toasting bread and, if the bun rack (4) is used, buns
• Kettle for boiling water (not milk etc.)
• Coffee maker for brewing ground coffee
Do not use the appliance for any other purposes.
- Read and observe the safety information. Keep it stored properly.
DANGER FOR CHILDREN
-
Particular caution is necessary when the appliance is operated near children. Do not leave the appliance unattended.
-
The appliance must not be operated by people with
-
impaired physical abilities,
- impaired sensory abilities,
- impaired mental abilities,
• a lack of experience and knowledge - or children
if they are not supervised or have not been instructed how to use the appliance by a person who is responsible for their safety.
-
Children should be supervised to ensure that they do not play with the appliance.
-
Keep the appliance out of the reach of children.
-
Keep children away from packaging material as there is the risk of suffocation among other things!
DANGER FROM ELECTRICITY
-
In order to prevent a fire hazard, electric shock or personal injury, do not operate the appliance outdoors and do not immerse it in water or other liquids.
-
Before you connect the appliance to your power supply, make sure that the voltage indicated on the specification plate corresponds with that of your power supply.
-
It is recommended to connect the appliance to a separate electric circuit.
- The appliance may be connected only to properly earthed power supplies.
- Never pull the appliance out of the power socket by tugging the power cord, instead always pull the mains plug.
- Do not let the power cord hang over sharp edges or hot surfaces.
-
Operate the appliance only with the supplied power cord.
-
Do not use any multi-outlet power strips or extension cables.
-
Do not try to repair the appliance yourself and do not ever use it with a defective plug or power cord or when it does not work flawlessly or is damaged in any other way. Send or deliver the appliance to an authorised dealer. Attempted repairs by unauthorised persons void all warranty claims.
-
Never open the appliance and do not remove any covers or housing parts.
-
The plug must be easy to reach so that you can pull out the mains plug immediately in case of emergency.
-
Pull the mains plug out of the power socket
-
when you are not using the appliance
-
if a fault occurs during operation
• before you clean the appliance -
To prevent electric shock, do not operate the appliance directly next to sinks or other moisture sources. Make sure that the power cord and the appliance are always completely dry.
- The electric station may be operated only when dry. If water has accidentally entered the station you should proceed as follows:
» Pull the mains plug out of the power socket
» Dry the electric station with absorbent dry kitchen towel
» Dry the place the station is put down on
» Insert the mains plug again
- Do not try to remove toast which is stuck in the toast slot (3) with a knife or other tool while the toaster is still in operation. Pull out the mains plug immediately and let the appliance cool down before you rectify the problem.
- Do not clean the appliance with a steel sponge. Small metallic parts may break off, touch the electric parts and cause a short circuit.
- Do not use this appliance together with an external timer or a separate remote control system.
WARNING about burns/fire
-
Never leave the appliance unattended while it is switched on. Toast may burn.
-
Pull out the plug and let the appliance cool down before you clean it.
-
Do not operate the appliance near hot gas or electric ovens, microwaves or other sources of heat and do not put it in the oven, microwave or similar appliances.
-
Do not operate the toaster under wall cupboards or curtains.
-
Use the toaster only with the crumb tray (1) in place.
-
Never force toasted products which are too thick or too long into the toast slot (3).
-
Do not insert any objects or metal foil into the toaster.
-
Never toast bread with butter or other spreads on it. Baked goods with a high sugar content or sugared crust are not suitable for toasting either.
-
Do not reach into the toast slot (3).
-
Do not try to remove food from the toaster by hand while it is in operation.
- The hot plate (17), coffee pot and filter cover and also the kettle (11) and the top side of the toaster become hot during operation. Touch only the handles and buttons.
- CAUTION: Hot steam escapes when water is boiling. Do not open the lid (6) of the kettle (11) when water is being boiled or immediately after it has boiled.
-
Do not fill the kettle (11) above the MAX level. Water may overflow and the heating element could become damaged. If the kettle (11) is overfilled there is the risk of boiling water spurting out.
-
Put the kettle (11) only on a flat surface so that it can not tip over.
-
Be particularly careful when the water in the kettle (11) is hot, e.g. when you open the lid (6) of the kettle (11) to top up with water. Pour the boiling water slowly and carefully.
-
Use only the supplied glass coffee pot without any damage. Use it carefully, it is very fragile, and do not cool the hot glass coffee pot down with cold water.
- Do not operate the appliance near explosive or inflammable fumes.
RISK OF INJURY
- Remove the bread carefully after toasting.
-
Transport the appliance only when it is cold and empty.
-
Use only the accessories supplied. Using other parts may lead to personal injury or damage to property.
WARNING about injuries with other causes
- Do not let the power cord hang over corners (trip-wire effect).
CAUTION - damage to property
-
Put the appliance on a flat, heat-resistant, stable surface at least 5 cm from the wall.
-
Do not put the appliance on top of other appliances.
-
Never cover the appliance because this will prevent the heat escaping.
-
Do not use the kettle (11) or the coffee maker without water.
-
If the glass pot (18) is not on the hot plate (17) or is empty, put the switch on the electric base station (13) to "0".
- The kettle (11) may be used only with the electric base station (13) belonging to it.
- Furniture today is coated with many types of paints and plastics and is treated with many different kinds of care products. It can therefore not be entirely excluded that some of these materials contain components which corrode and soften the rubber feet. If necessary, place a mat under the feet of the appliance.
WARNING: No liability can be assumed for any damage in the case of misuse or incorrect operation.
5 Before initial operation
- Make sure that all packaging material has been removed from the appliance (protective film etc.).
- Check that all parts are there (see chapter 3 Description of appliance and scope of delivery).
- Leave the specification plate and any warning notices on the appliance.
CAUTION: Make sure that the appliance is not damaged. If parts are damaged, do not operate the appliance. Instead, contact qualified service personnel.
- Put the appliance on a heat-resistant, dry and flat surface.
- Check to see if the crumb tray (1) is in place properly.
- Clean the kettle (11) before using it for the first time.
- Clean the glass pot (18) with washing-up liquid.
- Insert the mains plug in a power socket.
NOTE: When using the appliance for the first time there may be odours arising from production residues (e.g. fats), this is completely normal. Make sure that there is sufficient ventilation.
Proceed as follows to prepare the appliance for use:
Long slot toaster
- Operate the toaster twice on full power without bread.
- Then let it cool down.
Kettle
- Fill the cleaned kettle (11) up to the MAX fill level with fresh water.
- Switch on the kettle (11); wait until the water boils and then pour it away.
- Repeat this process once.
Coffee maker
- Fill the water tank (15) up to the MAX fill level with fresh water.
- Switch on the coffee maker; let the water run through and then pour it away.
- Repeat this process once again just with water and then a second time with some coffee.
- Clean the glass pot (18), the lid (19), the permanent filter (20) and the coffee filter holder (22) with hot water (see chapter 7 too).
6 Use
The breakfast centre combines three appliances in one:
- Long slot toaster
- Kettle and
- Coffee maker
The toaster and coffee maker and the kettle and coffee maker can be used at the same time.
NOTE: To avoid an overload at the power connection, the kettle switches off automatically when the toaster is switched on. As soon as the toaster is ready, the kettle switches back on again automatically.
6.1 Long slot toaster
Hints and tips:
- A different browning level should be chosen depending on the type of bread and your personal taste.
Light white bread, currant bread or waffles and thinner slices have to be toasted at a lower setting (1-3); darker and heavier types of bread or thicker slices require a higher setting (4-6).
• To begin with set the browning level to 3 until you become familiar with the appliance. - If you toast several pieces of bread after each other, the later slices will be toasted darker than the first ones.
- Use only toasted products which fit in the toast slot (3). If you force products into the slot which are too thick or too long, the ejection mechanism may not function properly.
- Never toast bread with butter or other spreads on it. Baked goods with a high sugar content or sugared crust are not suitable for toasting either.
- Remove all packaging (film) from products before toasting.
WARNING: Do not try to remove toast which is stuck in the toast slot (3) with a knife or other tool. Pull out the mains plug and let the appliance cool down before you rectify the problem.
- The toaster has the following control buttons:

Defrost
If necessary the toaster can even toast frozen bread to produce perfect-quality toast. Set the desired browning level on the control (25) and start the toasting process as usual. Then press the control button. The button will also light up.

Reheat
This function enables already toasted bread to be reheated. Start the toasting process as usual. Then press the control button. The button will also light up. The reheating process ends automatically after a preset time – irrespective of the setting on the control (25).

Stop, eject toast
By pressing this button you can stop the toasting process at any time. The toast is then ejected as normal.
NOTE: Make sure that the crumb tray (1) is inserted fully before you toast.
CAUTION: If the toaster starts to smoke, immediately stop the toasting process by pressing the button 🔒
Toasting
- Insert the desired number of pieces of bread in the toast slot (3). Do not force the bread into the slot.
- Set the desired browning level on the control (25). Level 1 toasts the least, level 6 toasts the darkest.
- Push the start button (5) down. The signal lamp on the button lights up and the toasting process begins.
NOTE: By pressing the button 📁 you can stop the toasting process at any time.
NOTE: The start button (5) remains pushed down only when the appliance is connected to the electricity.
- Watch the toasting process. If the bread has already reached the desired browning level before the end of the toasting process, press the button 🔒
- When the toasting process has finished, the toaster ejects the toast automatically. The start button (5) moves back up and the signal lamp on the button ☐ goes out.
- Remove the bread from the toast slot (3).
NOTE: If you find the toast too light, toast the bread again on a lower setting. Watch the toaster here to make sure that the bread does not burn.
WARNING: If the toasted product becomes stuck, unplug the mains plug and let the toaster cool down. Carefully remove the toasted product so you do not damage the toast slot (3) and the heating filaments.
- Clean the toaster regularly as described in chapter 7.
Using the bun rack (4)
The bun rack (4) is used for heating up uneven pieces of bread, buns, croissants, bagels etc.
- Push the button (2) down to lift the bun rack (4) up.
-
Select a browning level in the lower to medium range on the control (25).
-
Push the start button (5) down. The signal lamp on the button lights up and the toasting process begins.
- Stop the toasting process with the button 🔒 or wait until the end of the toasting process.
- If you no longer need to use the bun rack (4), push the button (2) up. The bun rack (4) folds back down.
6.2 Kettle
Hints and tips:
- The filter (12) in the spout of the kettle (11) prevents lime scale residue etc. being poured out with the water.
- If the water cools down without being used, simply switch on the appliance again and the boiling process will begin again.
- If the kettle (11) is removed from the base station (13) before or during the boiling process, the water boiling process stops and is continued again when the kettle is put back in place.
NOTE: If the kettle (11) is switched on by mistake while empty, the boil dry protection switches off the appliance automatically. Let it cool down before you fill it with cold water and switch it on again.
NOTE: To avoid overload at the power connection, the kettle (11) switches off automatically when the toaster is switched on. As soon as the toaster is ready, the kettle switches back on again automatically.
- Remove the kettle (11).
- Open the lid (6) by pressing the button (7) and fill the kettle (11) with the desired amount of water (at least 0.5 litres and a maximum of 1.5 litres).
NOTE: If there is too little water the appliance switches off before the water boils.
CAUTION: Do not fill the kettle (11) above the MAX level. Water may overflow and the heating element could become damaged. If the kettle (11) is overfilled there is the risk of boiling water spurting out.
- Make sure that the lid (6) is closed properly before you switch on the kettle (11).
natural_image
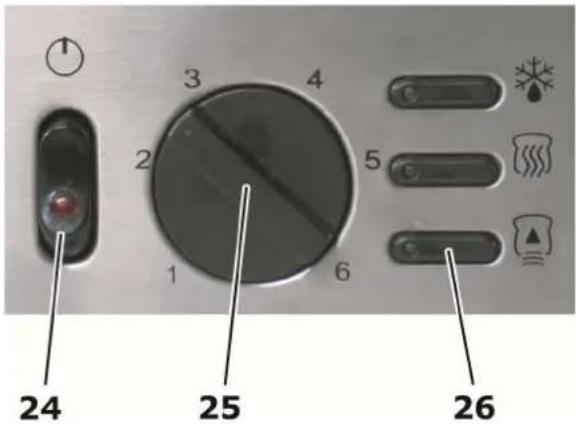
Cross-sectional diagram of a mechanical component with concentric rings and labeled parts (a and b), no readable text or symbols beyond labels.- Place the kettle (11) on the base station (13). Turn it so that the spout points towards the protrusion (a) and the kettle (11) locks in place in the catch (b).
- Push the on/off switch (8) down. The red signal lamps in the water level indicator (10) light up.
CAUTION: Hot steam escapes when water is boiling. Do not open the lid (6) of the kettle (11) when water is being boiled or immediately after it has boiled.
NOTE: You can stop the boiling process at any time by pushing the on/off switch (8) up.
- The water boils quickly, then the on/off switch automatically switches off and the signal lamps in the fill level indicator go out.
- Lift the kettle (11) from the base station (13) to pour the water.
NOTE: Make sure that the on/off switch can be moved without any problem and that the lid (6) is closed properly. Otherwise the appliance will not switch off automatically when the water boils.
Before you switch on the kettle (11) again, let it cool down for 15 to 20 seconds. To start the boiling process again, push the on/off switch (8) back down again.
6.3 Coffee maker
Hints and tips:
- To check the desired water quantity find the cup markings on the water tank (15) and on the glass pot (18). The markings correspond with the fresh water quantity. The amount of coffee produced later will be a little less because the coffee powder absorbs water and water evaporates.
- Always use non-fizzy, fresh, cold mineral or tap water. Never fill the water tank (15) with milk, ready coffee, tea, sugar etc.
- Never use hot water.
- Thanks to the practical permanent filter (20) you do not need to use paper filters with this appliance.
- You will achieve the best tasting coffee with a clean coffee maker. Clean it regularly as described in chapter 7.
- Store unused coffee powder in a cool, dry place to preserve the flavour. Seal up an open packet of coffee properly and put it in the refrigerator. This will keep the coffee fresh.
- Do not reuse already used coffee powder a second time as this will give the coffee greatly reduced flavour.
- It is not recommended to reheat cold coffee because its taste can not be compared with freshly made coffee.
-
Clean the coffee maker when you can see oil residue on the surfaces. This comes from the coffee powder. The more the coffee has been roasted, the more oil it contains.
-
Lift up the lid (16) of the water tank (15).
- Use the glass pot (18) to pour the desired amount of clear, cold tap water in the water tank (15) (do not fill above the MAX fill level).
- Pull out the removable filter holder (22) and put coffee powder in the permanent filter (20) – generally one tea spoon per cup.
- Put the filter holder back in again fully.
- Put the glass pot (18) with the lid (19) on the hot plate (17).
- Start the brewing process with the on/off switch (24). The red signal lamp in the switch lights up and the brewing process begins.
- Around one minute after the end of the brewing process you can remove the glass pot (18) and pour the coffee.
NOTE: You can stop the brewing process at any time by pressing the on/off switch (24).
NOTE: You can remove the glass pot (18) at any time and pour coffee, the drip stop (21) prevents dripping. A period of 30 seconds must not be exceeded, however, as otherwise the filter holder may overflow.
After the brewing process the hot plate (17) keeps the coffee hot in the glass pot (18) until you move the on/off switch (24) to off. Your coffee will taste best when it is freshly brewed, however.
Switch off the coffee maker when you no longer need it.
7 Cleaning and storage

WARNING
Risk of burning
Before cleaning always pull out the mains plug and let the appliance cool down.
DANGER
Danger to life from electric shock
Never immerse the appliance in water or other liquids.

CAUTION
Damage to property
Never use aggressive, abrasive or chemical cleaning products.
- Pull out the mains plug. Let the appliance cool down properly.
- Wipe the outside of the appliance with a wet cloth.
Long slot toaster
- Remove the crumb tray (1). Empty out the crumbs.
Wipe the tray with a wet cloth and then dry it with a soft cloth. - Insert the crumb tray (1) again.
WARNING! The crumb tray (1) has to be emptied regularly, otherwise there may be a fire.
Kettle
- The lime scale filter (12) can be removed for cleaning: the lime scale filter (12) is connected to the lid (6). By pressing from the side you can detach the pivot of the lid from the kettle and remove the lid. The pivot of the lime scale filter (12) is also removed from the lid (6) by pressing from the side.
- You can clean the lime scale filter (12) by hand or in a dishwasher.
- Clean the kettle (11) on the inside with a soft brush or something similar with a long handle and rinse it out. From the outside clean only with a wet cloth/sponge. Then dry with a soft cloth.
Coffee maker
Clean the glass pot (18) and the filter after every use.
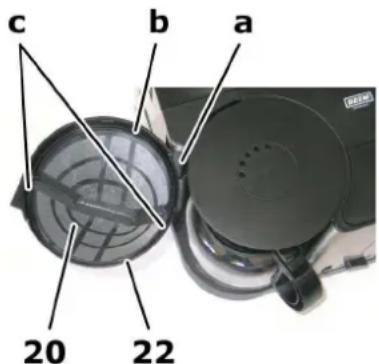
- Pull out the filter holder (22) fully and lift it up slightly (a). Now you can remove it for cleaning.
- Take the permanent filter (20) out of the filter holder by its handle (b).
- You can clean the permanent filter (20) by hand with hot water but NOT in the dishwasher.
- Condensation forms on the cover above the filter holder during use. Remove this with a clean dry cloth.
-
Clean the glass pot (18) with the lid (19) and the coffee filter holder (22) with washing up liquid and rinse with clear water.
-
Activate the drip stop (21) several times during rinsing.
- Carefully wipe the hot plate (17) with a wet cloth. Do not use any abrasive cleaning products.
- Put everything back together again. Make sure that the permanent filter (20) locks in place in the coffee filter holder (22) in both catches (c).
7.1 Descaling
Use descalers with citric acid or vinegar essence (approx. 5 % acid).
For descaling use only an environmentally friendly descaling agent and proceed only according to the information of the manufacturer.
Do not use formic acid-based descalers.
Kettle
The kettle (11) should be descaled after 20 - 40 uses, or possibly before if necessary. If lime scale covers the bottom of the kettle (11), this may lead to defects (heat accumulation). You can see that lime scale has formed when there is white discoloration on the inside of the kettle (11).
- Use the descaling agent according to the information of the manufacturer for the kettle (11).
- Empty the kettle (11) and remove the remnants with a wet cloth.
- After descaling fill the kettle (11) twice with fresh water and let it boil, then pour it away.
- Separate cleaning of the lime scale filter (12) is generally necessary only if the flow of water is inhibited when pouring. See chapter 7 for how to remove the lime scale filter (12). To reinstall the lime scale filter (12) proceed in the reverse order.
Coffee maker
For the coffee maker we recommend descaling every three months by way of precaution:
- Fill the water tank (15) up to the Max. level with a mixture of fresh water and descaling agent – according to the manufacturer's instructions.
- Push the filter holder (22) with the permanent filter (20) fully in without coffee powder.
- Place the glass pot (18) with the lid (19) on the hot plate (17).
- Then switch the appliance on.
- Wait until approx. one cup has run through and switch off the appliance.
- Let the descaling solution take effect for around 15 minutes and then switch the appliance back on again.
- Repeat steps 5 and 6 once, then leave the appliance switched on until the descaling solution has run through fully.
- Then repeat the running-through process three times with clear water.
- Rinse the glass pot (18), lid, coffee filter holder (22) and permanent filter (20) thoroughly under running water.
- Activate the drip stop (21) several times during rinsing.
7.2 Care of stainless steel parts
For regular care and also for removing stubborn stains on stainless steel parts we recommend the INOX-METAL-POLISH from BEEM. This polish restores the original sheen to appliances. INOX-METAL-POLISH is available in tubes and is suitable for all objects made of stainless steel, chrome, brass, copper, aluminium, silver and also hard plastics. INOX-METAL-POLISH is also used in factories for polishing stainless steel. You can order INOX-METAL-POLISH from your specialist dealer, by telephone from us or on our website www.beem.de.
Please note that the label and imprint on the stainless steel surfaces may come off if cleaned with metal polish or other chemicals.
7.3 Storage
- Let the appliance cool down fully.
■ Empty the kettle (11) and the water tank (15).
8 Malfunctions and troubleshooting
Pull out the mains plug in the event of malfunctions during operation.
| Fault | Possible cause | Remedy |
| Signal lamp does not light up | Mains plug not inserted | Connect appliance to the power supply |
| No mains voltage | Check main fuse/power socket | |
| Signal lamp defective | Inform customer service | |
| Main fuse pops out | Appliance defective | Inform customer service |
| Too many appliances connected | Reduce number of appliances in the electric circuit | |
| Kettle (11) does not start and signal lamps do not light up | Kettle (11) is not positioned properly on the base station (13) | Make sure the kettle (11) is in place properly (it has to lock in place) |
| Kettle (11) does not switch off automatically | On/off switch (8) blocked | Remove blockage |
| Lid (6) not closed properly | Close lid (6) | |
| Coffee filter holder (22) can not be moved properly into the brewing position | Permanent filter (20) is not in place properly in the coffee filter holder (22) | Make sure the permanent filter (20) is in place properly (it has to lock in place) |
| Coffee goes into the glass pot (18) too slowly | Drip stop (21) blocked | Clean drip stop (21) |
| Appliance contains lime scale | Descale appliance (see chapter 7.1) |
9 Disposal
The following regulations apply under some circumstances only for countries of the European Community.
Dispose of the packaging without mixing different types of packing material. If you want to get rid of the product, dispose of it in an environmentally friendly manner and in line with current regulations.
The following regulation applies for Germany and some EC countries:
This product must not be treated as normal household waste, but has to be handed over to a collection point for recycling electrical and electronic appliances according to the regulations which apply in your particular country. Information can be found out at your local collection point.
Some EC and non-EC countries have their own specific regulations for the disposal of old appliances. Information can be obtained from the responsible authorities.
10 Technical data
Model: Breakfast center Ecco 3 in 1
Model number: MF3450-A
Power supply: 230 V \~ 50 Hz.
Power consumption: 3000 / 1550 watts
2200 + 800 watts (Water kettle + Coffee maker)
750 + 800 watts (Long slot toaster + Coffee maker)
Protection class: I
Subject to alterations in design and technology. Subject to misprints.
11 Certification

This appliance has been checked and certified by TÜV SÜD.

This appliance complies with the European Electromagnetic Compatibility Directive (EMC) 2004/108/EC and the European Low Voltage Directive (LVD) 2006/95/EC.

This appliance complies with the European Restriction of Hazardous Substances Directive (RoHS) 2002/95/EC on the limitation of the use of certain hazardous substances in electrical and electronic equipment.
For Germany and some EC countries the following regulation applies:
This product must not be treated as normal household waste, but has to be handed over to a collection point for recycling electrical and electronic appliances according to the regulations which apply in your particular country. Information can be found out at your local collection point.
Some EC and non-EC countries have their own specific regulations for the disposal of old appliances. Information can be obtained from the responsible authorities.
This appliance complies with the European Waste Electrical and Electronics Equipment Directive (WEEE) 2002/96/EC which aims to increase the separate collection, reuse recovery and recycling of waste from electrical and electronic equipment.
12 Warranty, service, repairs
This high quality product from BEEM has been made in accordance with the latest manufacturing methods.
We guarantee that this high-quality product is in perfect condition. We will remedy all material or manufacturing defects free of charge within the warranty period.
The warranty period for this product is 24 months.
With industrial or similar use e.g. in hotels, guesthouses or communal facilities, or when the customer is not a consumer in terms of the German Civil Code, the manufacturer provides a warranty of 6 months. This does not affect the warranty exclusion.
Warranty exclusion: the warranty specifically excludes defects that have been caused by incorrect manipulation, disregard of the operating instructions and safety notes, use of force, alterations, attempts at self-repair or repair attempts undertaken by unqualified third parties. Also excluded are defects caused by normal wear & tear.
Insofar as we are legally obliged to provide a warranty, we will either repair or replace the defective item free of charge – with rights of replacement or reduction in price being excluded. If it is not possible to repair the product after a number of attempts have been made, or if the replacement is also defective for reasons which are our responsibility, then the customer is entitled to a reduction in price or, at his discretion, to withdraw from the contract. The warranty is not extended by availment thereof.
The dealer from whom you purchased the product is responsible in the first instance for swapping (exchange or replacement), return of the product (withdrawal from the sales contract) or reduction in the sale price. This is especially the case in the event of return or claims for reduction in price, since these must be settled with consideration for the sale price. Refund of the sale price in the event of return of goods, or issue of a credit note in the case of price reduction, can only be effected by the dealer from whom you bought the product.
If defects should transpire, contrary to expectations, please try first by telephone to clear up the problem. If the problem still remains please send the carefully-packed article to your dealer or to the customer service address given below. Include your full address, the product's type and model number and the serial number; these are to be found on the rating label. Describe as detailed as possible the defects or deficiencies. A machine-generated and dated sales receipt or invoice is to be enclosed with the product or spare parts order. Warranty services cannot be rendered without a machine-generated and dated sales receipt or invoice, either for repairs, spare parts or other claims.
Outside of Germany and especially in non-EC countries, send the article to your dealer or to your local distributor. You can obtain information from the customer service address below, preferably via email.
You can also arrange for repairs that are not covered by the warranty to be carried out by customer service - outside of Germany, via your dealer or distributor. These will be invoiced on their individual merits.
Consumable parts & materials can be ordered from your dealer or from the stated customer service address. Outside of Germany, please contact your dealer or distributor in the first instance.
Contact your dealer or the stated customer service department if you want product information or wish to order accessories or ask questions relating to service matters. Outside of Germany and especially in non-EC countries, please contact your dealer or distributor in the first instance.
Please also use the internet. On our website www.beem.de can be found accessories, replacement parts and instruction manuals in various languages. Also further product information.
Customer service address, Germany:
BEEM GmbH, Customer Service Department, Dieselstrasse 19 – 21, D-61191 Rosbach Service telephone number: +49 1805-233600 | Service fax number: +49 1805-233699 (Service number subject to a charge, may vary according to the country) | Service email address: kundenservice@beem.de | Internet: www.beem.de
1 1. Introduction
Chère cliente, cher client !
Numéros
natural_image
Close-up of a mechanical component with concentric rings and labeled parts (a and b), no readable text or symbols beyond labels.Cijfercode
natural_image
Close-up of a mechanical component with concentric rings and labeled parts (a and b), no readable text or symbols beyond labels.Model: Ontbijtcenter Ecco 3 in 1
Modelnummer: MF3450-A
flowchart
graph TD
    A["AC230V 50HZ"] --> B["PLUG"]
    B --> C["FUSE SF188E Tf192°C"]
    C --> D["SWITCH 250V/6A"]
    D --> E["Micro switch 250V/16A"]
    E --> F["connector P72c4"]
    F --> G["Thermostat Strix U1709"]
    G --> H["Steam switch Strix R4803"]
    H --> I["Kettle Heating Element 230V/2200W"]
    I --> J["Coffee maker Heating Element 230V/800W"]
    J --> K["THERMOSTAT KSD303 125°C"]
    K --> L["PLUG"]
    L --> M["SWITCH 250V/6A"]
    M --> N["connector P72c4"]
    N --> O["Thermostat Strix U1709"]
    O --> P["Steam switch Strix R4803"]
    P --> Q["Kettle Heating Element 230V/2200W"]
    Q --> R["Toaster Heating Element 230V/750W"]
    R --> S["Toaster PCB'A"]
    S --> T["Ambipolar switch"]
14 Europäische Konformitätsbescheinigung / European Conformity Declaration / Attestation Européenne de Conformità / Europese Conformiteitsverklarung
CE
EUROPÄISCHE KONFORMITÄTSBESCHEINIGUNG / EUROPEAN CONFORMITY DECLARATION / ATTESTATION EUROPÉENNE DE CONFORMITÉ / EUROPESE CONFORMITEITSVERKLARING
Frühstücks-Center
Breakfast Center
We herewith confirm that this appliance complies with the standards of the European Electromagnetic Compatibility Directive (EMC) 2004/108/EC (EN55014-1:2006, EN55014-2/A1:2001, EN61000-3-2:2006, EN61000-3-3/A2:2005), and with the European safety regulations according to the European Low Voltage Directive (LVD) 2006/95/EC (EN60335-2-15/A1:2005, EN60335-2-9/A2:2006, EN60335-1/A2:2006, EN50366/A1:2006).

- Sommaire
- Zahlenschlüssel
- On these instructions
- Description of appliance and scope of delivery
- Number scheme
- A Long slot toaster C Electric base station
- B Kettle
- D Coffee maker
- Control panel
- Important safety information
- Intended use
- DANGER FOR CHILDREN
- DANGER FROM ELECTRICITY
- WARNING about burns/fire
- RISK OF INJURY
- WARNING about injuries with other causes
- CAUTION - damage to property
- Before initial operation
- CAUTION: Make sure that the appliance is not damaged. If parts are damaged, do not operate the appliance. Instead, contact qualified service personnel.
- NOTE: When using the appliance for the first time there may be odours arising from production residues (e.g. fats), this is completely normal. Make sure that there is sufficient ventilation.
- Long slot toaster
- Kettle
- Coffee maker
- Use
- Long slot toaster
- Hints and tips:
- Defrost
- Reheat
- Stop, eject toast
- NOTE: Make sure that the crumb tray (1) is inserted fully before you toast.
- CAUTION: If the toaster starts to smoke, immediately stop the toasting process by pressing the button 🔒
- Toasting
- NOTE: By pressing the button 📁 you can stop the toasting process at any time.
- NOTE: The start button (5) remains pushed down only when the appliance is connected to the electricity.
- NOTE: If you find the toast too light, toast the bread again on a lower setting. Watch the toaster here to make sure that the bread does not burn.
- WARNING: If the toasted product becomes stuck, unplug the mains plug and let the toaster cool down. Carefully remove the toasted product so you do not damage the toast slot (3) and the heating filaments.
- Using the bun rack (4)
- Kettle
- NOTE: Make sure that the on/off switch can be moved without any problem and that the lid (6) is closed properly. Otherwise the appliance will not switch off automatically when the water boils.
- Coffee maker
- NOTE: You can stop the brewing process at any time by pressing the on/off switch (24).
- NOTE: You can remove the glass pot (18) at any time and pour coffee, the drip stop (21) prevents dripping. A period of 30 seconds must not be exceeded, however, as otherwise the filter holder may overflow.
- Cleaning and storage
- WARNING
- Risk of burning
- DANGER
- Danger to life from electric shock
- CAUTION
- Damage to property
- WARNING! The crumb tray (1) has to be emptied regularly, otherwise there may be a fire.
- Descaling
- Care of stainless steel parts
- Storage
- Malfunctions and troubleshooting
- Disposal
- The following regulation applies for Germany and some EC countries:
- Technical data
- Certification
- For Germany and some EC countries the following regulation applies:
- Warranty, service, repairs
- The warranty period for this product is 24 months.
- Customer service address, Germany:
- 1. Introduction
- Numéros
- Cijfercode
- Europäische Konformitätsbescheinigung / European Conformity Declaration / Attestation Européenne de Conformità / Europese Conformiteitsverklarung
- CE
- EUROPÄISCHE KONFORMITÄTSBESCHEINIGUNG / EUROPEAN CONFORMITY DECLARATION / ATTESTATION EUROPÉENNE DE CONFORMITÉ / EUROPESE CONFORMITEITSVERKLARING
Brand : BEEM
Model : Ecco V2
Category : Coffee machine