
Media Giant - Media player CONCEPTRONIC - Free user manual and instructions
Find the device manual for free Media Giant CONCEPTRONIC in PDF.
| Product type | Media player and recorder |
| Brand | Conceptronic |
| Model | Media Giant |
| Variants | CM3G (without tuner), CM3GP (with analog tuner), CM3GPP (with tuner and Powerline adapter) |
| Power supply | 100-240V AC via power cord |
| Maximum output resolution | 1080i |
| Supported video formats | MPEG1/2/4, AVI, DVD (VIDEO_TS, unprotected ISO) |
| Supported audio formats | MP3, WMA |
| Supported image formats | JPG |
| Video connectivity | HDMI 1.3, Composite, S-Video, Component (RGB), SCART (via adapter) |
| Audio connectivity | Analog RCA, SPDIF coaxial, SPDIF optical |
| Network connectivity | Ethernet RJ45, built-in Powerline (on CM3GPP) |
| Additional ports | USB host (front), Mini-USB (for PC), DV input (FireWire), AV input (Composite and Component), RF tuner input/output |
| Internal hard drive | Formattable via device interface (Timeshift partition, recording, media FAT32 and NTFS) |
| Recording functions | Instant recording, scheduled, timeshift, recording from DV and AV inputs |
| Playback functions | Media navigation, file playback, zoom, repeat, skip, subtitles, DVD angles |
| UPnP media server | Built-in Twonky Media Server (accessible via port 9000) |
| Remote control | Infrared with CR2025 battery (range ~5 meters) |
| Operating temperature | Avoid extreme humidity and liquids |
| Safety | Do not disassemble, do not expose to liquids, unplug if not in use, replace batteries correctly |
Frequently Asked Questions - Media Giant CONCEPTRONIC
User questions about Media Giant CONCEPTRONIC
0 question about this device. Answer the ones you know or ask your own.
Ask a new question about this device
Download the instructions for your Media player in PDF format for free! Find your manual Media Giant - CONCEPTRONIC and take your electronic device back in hand. On this page are published all the documents necessary for the use of your device. Media Giant by CONCEPTRONIC.
USER MANUAL Media Giant CONCEPTRONIC
Conceptronic Media Giant
Gebruiksaanwijzing
[Timeshift:activeren]
[Timeshift:actief]
Conceptronic Media Giant
User Manual
Congratulations on the purchase of your Conceptronic Media Recorder & Player.
This User Manual gives you a step-by-step explanation how to install and use the Conceptronic Media Recorder & Player.
When problems occur, we advise you to go to our support-site (go to www.conceptronic.net and click 'Support'. Here you will find the Frequently Asked Questions Database.
When you have other questions about your product and you cannot find it at our website, contact us by e-mail: support@conceptronic.net
For more information about Conceptronic products, please visit the Conceptronic Web Site: www.conceptronic.net
Tip : The Conceptronic Media Giant is firmware upgradable. To upgrade your unit with the latest firmware version, you can visit the Conceptronic Web Site, or use the firmware upgrade feature of the Media Giant.
Tip: Please check www.conceptronic.net for the latest codec list of supported files.
1. Package Contents
The following items should be present in the package of the Conceptronic Media Recorder & Player:
- Conceptronic Media Giant (described as 'unit' or 'Media Giant' in the manual). **
The device in the package is 1 of the 3 models listed below:
CM3G [C08-130]: Media Giant without tuner (AV-in only).
CM3GP [C08-131]: Media Giant with analog tuner.
- CM3GPP [C08-132]: Media Giant with analog tuner and Powerline Adapter.
Power cord.
Remote Control with battery. (Battery type: CR2025)
RF Antenna Cable.
- Composite Video Cable (Red, White, Yellow RCA Jacks).
S-Video Cable.
- Component Video Cable (Red, Green, Blue RCA Jacks).
Coaxial Digital Audio Cable (Black RCA Jacks).
- SCART Adapter for Composite Video Cable / S-Video Cable.
HDMI A/V cable (HDMI 1.3).
Network Cable.
USB Cable.
- This User Manual.
IMPORTANT:
In this manual, some features are explained which are only valid for the CM3GP (with analog tuner) and the CM3GPP (with analog tuner and Powerline Adapter).
These features are marked with **.
2. Product Features
Built-in Powerline network adapter. **
Built-in TV Tuner with TV channel auto-search. **
TV signal recording. **
AV signal recording from e.g. a VCR, DVD or Video Camera.
DV input for playback / recording from a DV Video Camera.
- Record to internal HDD.
- Up to 1080i output resolution.
- Up to 1080i playback resolution.
DVD quality of recorded files in MPEG2 format (can be played on PC or other media player).
Record Options: One-key instant record, Scheduled record, Time-shift.
- Playback of MPEG1/2/4, MP3, WMA, JPG files stored in internal HDD or USB Device.
- Files copy from USB Device or network location to internal HDD.
- Auto switch between USB-PC and Player Mode:
- When connected by USB to the PC, the unit acts as an USB Storage Device.
- When not connected by USB to the PC, the unit acts as a Media Recorder & Player.
3. Notes & Cautions

CAUTION
RISK OF ELECTRIC SHOCK DO NOT OPEN

- Do not attempt to disassemble the unit. This may cause high-voltage injuries.
- Keep the unit away from excessive moisture.
- Do not immerse or expose the unit to liquids.
- Disconnect the power cable if you do not intend to use the unit for an extended period of time.
Make sure the power socket where the Media Giant is connected to is easily accessible. - Avoid using the unit in a location near combustibles.
- Change the battery of the remote control with the same kind when it is weak or dead. Recycle old batteries where possible. To avoid corrosion, remove the battery when the remote will not be used for a long time.
Make sure the batteries are placed correctly in the remote control to prevent damage. - Keep the remote away from excessive moisture; do not drop it.
- Do not operate the remote under intense sunlight.
- NEVER drop, shake or bump the unit.
- To prevent overheating, do not cover the unit.
IMPORTANT:
Do NOT format the harddisk on your computer! This will cause the unit to loose all system data and will require a re-initialisation. When you want to format the harddisk of the unit, use the built-in format tool in the Setup menu of the unit.
4. Product Overview
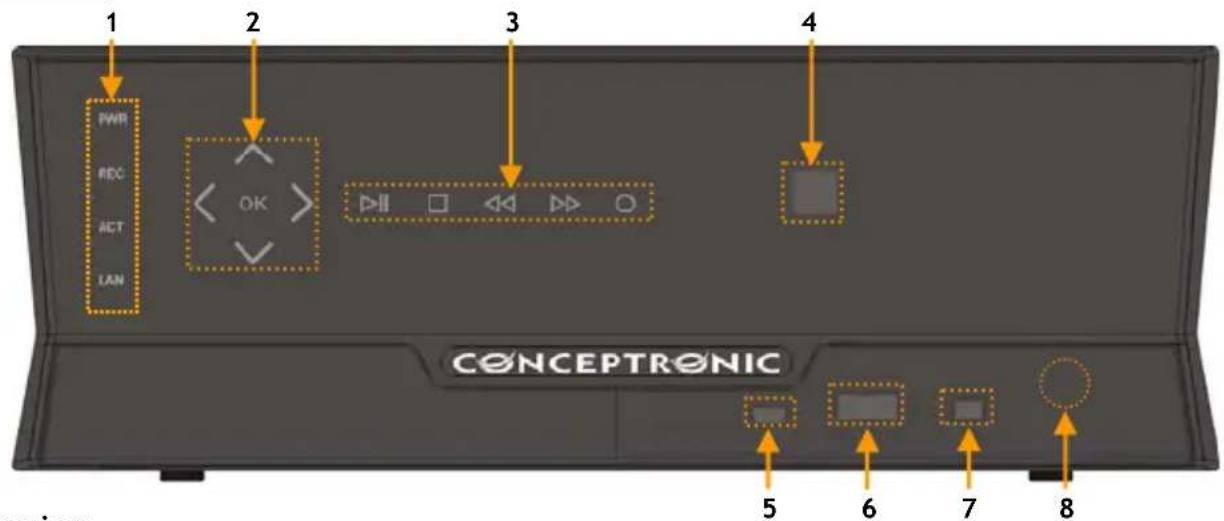
Front View
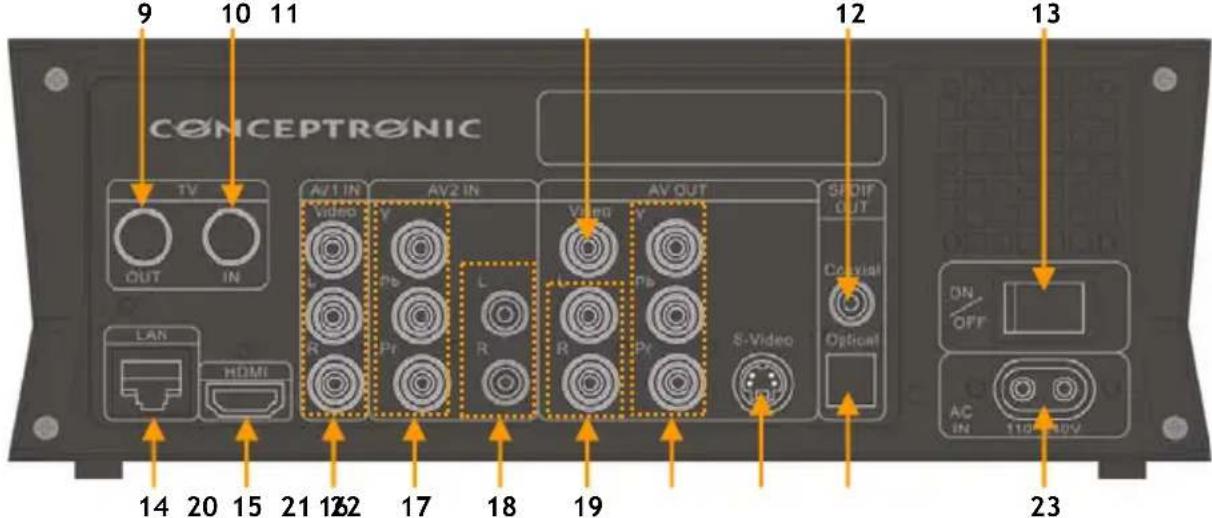
Rear view
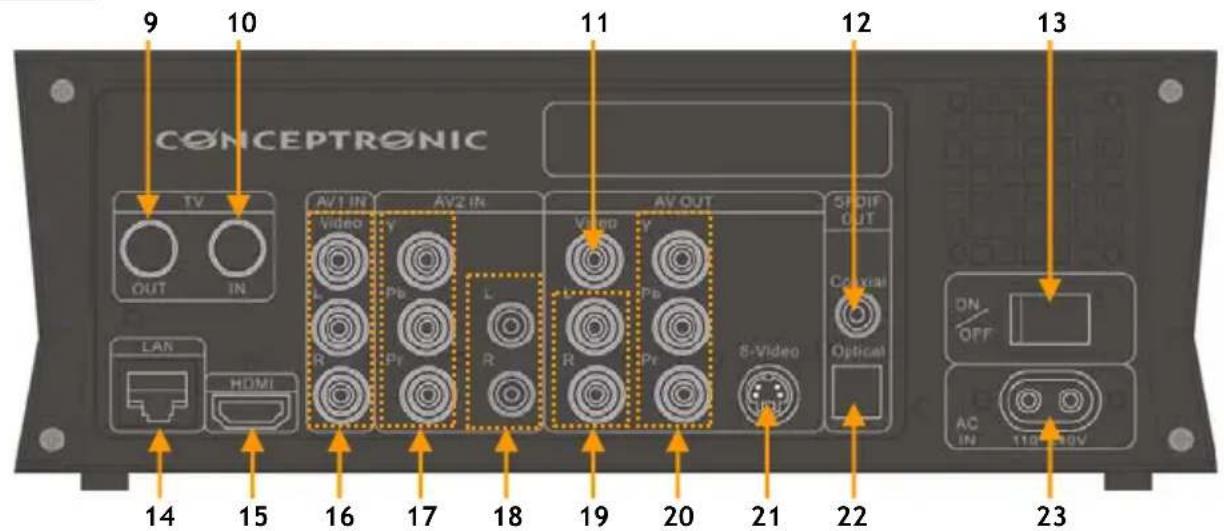
Description of the numbers:
- Status LED's (Power, REC, ACT, LAN)
- Navigation touch buttons
- Playback touch buttons
- Infrared receiver
- Mini-USB Jack (To PC)
- USB Host Port
- DV input
- Frontpanel 'Open' button
- TV-Tuner output **
- TV-Tuner input **
- AV Composite video output
-
SPDIF digital coaxial output
-
Main power switch
- LAN (RJ45) connection
15.HDMI output - AV1 input (Composite Video/Audio)
- AV2 Component video input
- AV2 audio input (L/R)
- AV audio output (L/R)
- AV Component video output (Y/Pb/Pr)
- S-Video output
- SPDIF digital optical output
- AC input (110 - 240v)
Note: The touch buttons have the same functions as the basic remote control functions.
5. Remote Control Explanation
The remote control is used to control the unit. On the inside cover of this manual you will find a picture of the remote control. The numbers of the buttons correspond with the table below, to explain each function of the remote control.
Nr Button Description
- POWER ( ) Turn the unit on or to standby mode
- SOURCE Switch between Tuner, AV & Playback
- MEDIA Direct button to the Media Browser
- AUDIO Change the DVD Audio track (when available on your DVD files)
- ZOOM Zoom in / zoom out
6.0-9 Numeric buttons - COPY Display the Copy menu
- REPEAT Set Repeat mode
- GOTO Goto a specific point in the playback
- FAST REWIND (F) Fast Rewind playback
- PREVIOUS ( ) Previous File / Track / Chapter / Picture
- VOLUME + Increase the Volume
- VOLUME - Decrease the Volume
- RETURN Return to the previous screen / channel
- Navigation Keys: Navigate through the menu's
- INS.REP. Jump back 10 seconds during timeshift or playback
- PAUSE Pause the (timeshift) playback
- PLAY StartPlayback
- RECR Start recording
- TV SYS Change the output resolution of the unit
- SETUP Direct button to the Setup menu
- TIMESHIFT Activate the timeshift feature
- STOP ( ) StopPlayback/StopRecording/DisableTimeshift
- SLOW Slowmotion playback
- CM.SKIP Jump forward 30 seconds during timeshift or playback
- ENTER Confirm selection
- INFO Display Channel information / File information
28.CHANNEL- Channel Down
29.CHANNEL ^+ Channel Up - MUTE Mute the sound
- NEXT (▶) Next File / Track / Chapter / Picture
- FAST FORWARD (▶) Fast Forward playback
- GUIDE Open the Scheduled Recording menu
- A-B Initialize A-B repeat loop
- DELETE Clear the input / Delete the selection
- ANGLE Change the DVD angle (when available on your DVD files)
- SUB-T Change the subtitle (when available on your video/DVD files)
- LIVE-TV Direct button to Live-TV
- DV Switch to DV Playback & Record mode
- MENU Display the Main menu
- LED Indicates the operation of the remote control
6. Connecting your Media Giant
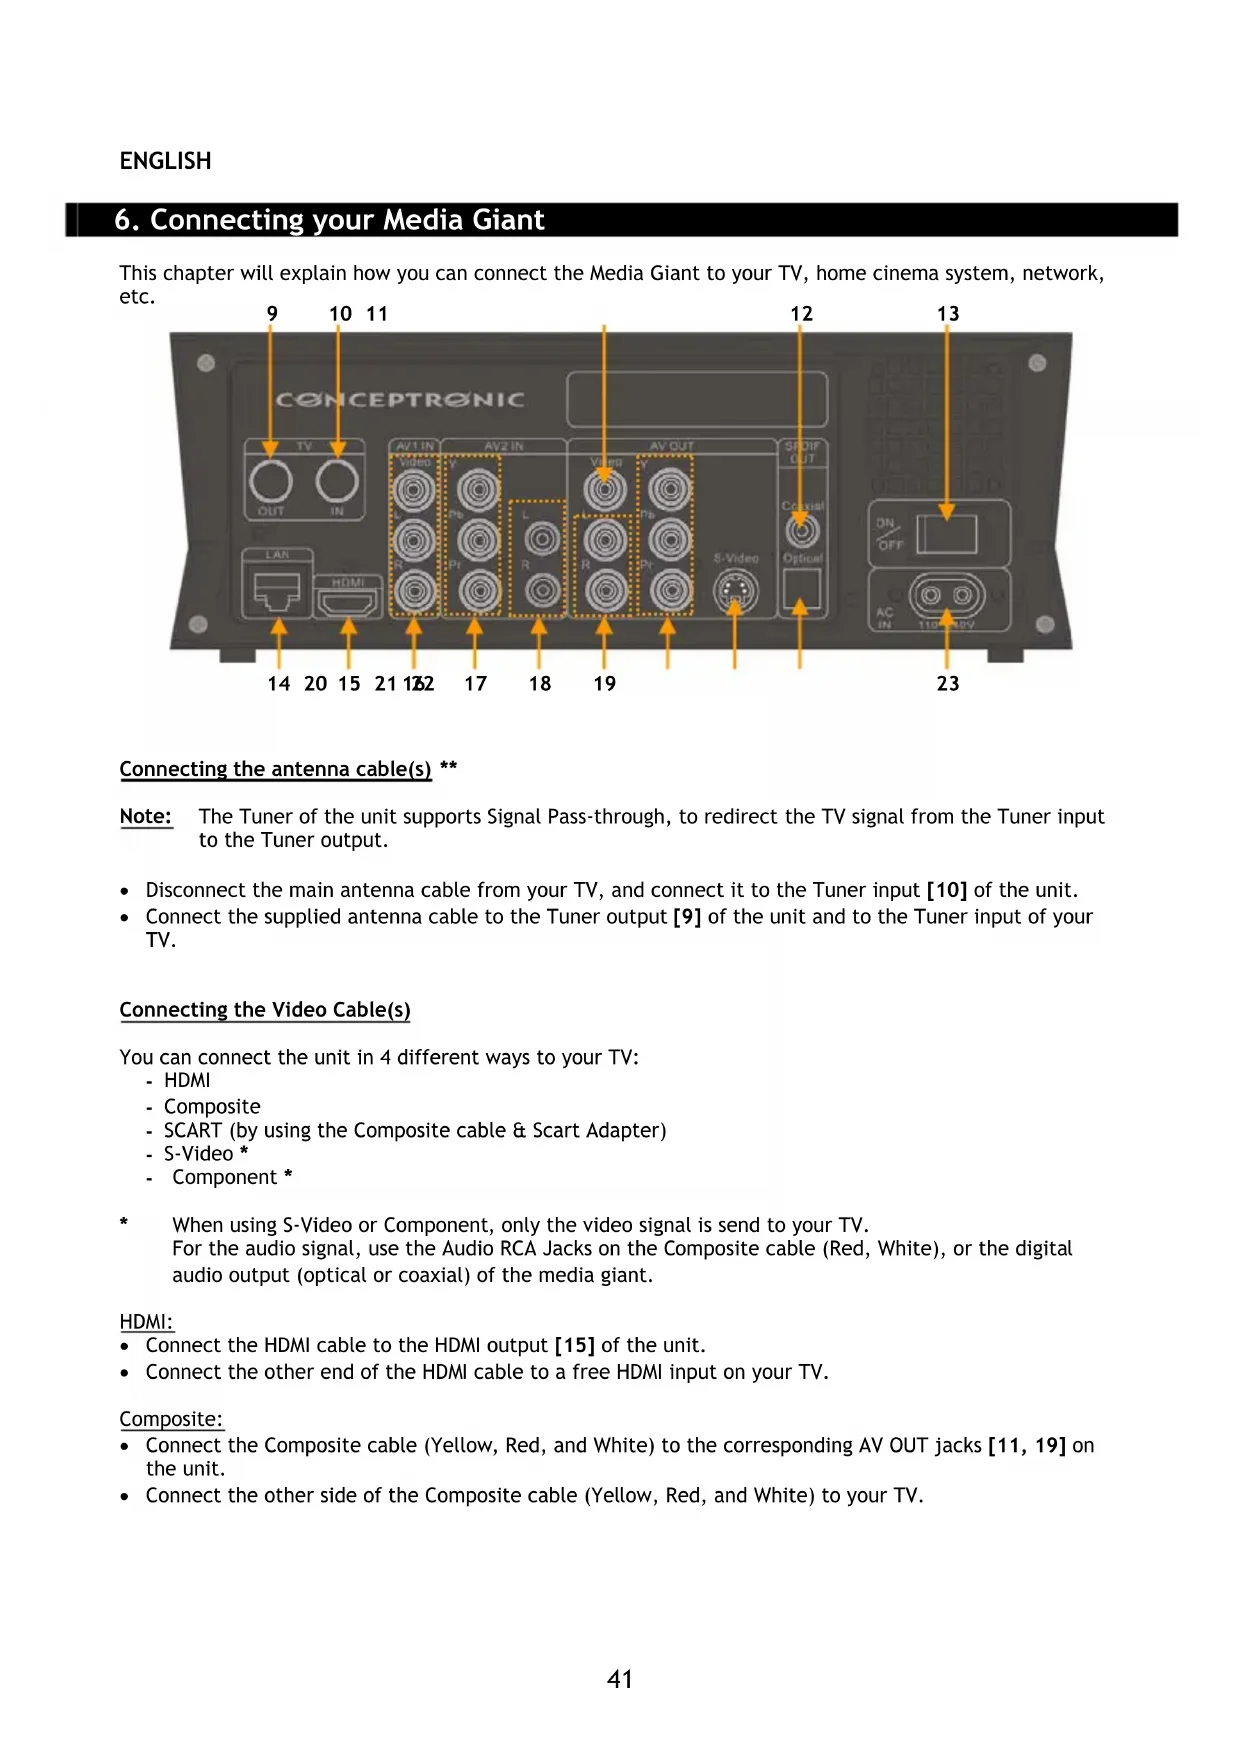
This chapter will explain how you can connect the Media Giant to your TV, home cinema system, network, etc.
Connecting the antenna cable(s) \*\*
Note: The Tuner of the unit supports Signal Pass-through, to redirect the TV signal from the Tuner input to the Tuner output.
- Disconnect the main antenna cable from your TV, and connect it to the Tuner input [10] of the unit.
- Connect the supplied antenna cable to the Tuner output [9] of the unit and to the Tuner input of your TV.
Connecting the Video Cable(s)
You can connect the unit in 4 different ways to your TV:
-HDMI
- Composite
- SCART (by using the Composite cable & Scart Adapter)
- S-Video *
- Component*
- When using S-Video or Component, only the video signal is send to your TV. For the audio signal, use the Audio RCA Jacks on the Composite cable (Red, White), or the digital audio output (optical or coaxial) of the media giant.
HDMI:
- Connect the HDMI cable to the HDMI output [15] of the unit.
- Connect the other end of the HDMI cable to a free HDMI input on your TV.
Composite:
- Connect the Composite cable (Yellow, Red, and White) to the corresponding AV OUT jacks [11, 19] on the unit.
- Connect the other side of the Composite cable (Yellow, Red, and White) to your TV.
ENGLISH
SCART:
- Connect the Composite cable (Yellow, Red, and White) to the corresponding AV OUT jacks [11, 19] on the unit.
- Connect the other side of the Composite cable (Yellow, Red, and White) to the jacks on the SCART Adapter.
- Connect the SCART Adapter to the SCART Input of your TV.
S-Video:
- Connect the S-Video cable to the S-Video output [21] of the unit.
- Connect the other end of the S-Video cable to the S-Video Input on your TV.
Component:
- Connect the Component Cable (Red, Green, and Blue) to the Component Jacks [20] on the unit.
- Connect the other end of the Component cable to the Component Jacks on your TV.
Connecting the Audio Cable(s)
You can connect the unit to your TV and/or your home cinema system in 3 different ways:
- Analog, through the RCA Audio Jacks of the A/V Output
- Digital, Through the Coaxial Digital SPDIF Output
- Digital, Through the Optical Digital SPDIF Output
Analog:
- Connect the Audio Jacks (Red, White) of the Composite cable to the RCA Audio Jacks [19] of the AV OUT.
- Connect the other end of the Composite cable to the RCA Audio Jacks of your TV or Receiver.
Digital Coaxial:
- Connect the Digital Coaxial cable to the Digital Coaxial output [12] of the unit.
- Connect the other end of the Digital Coaxial cable to the Digital Coaxial Input of your Receiver.
Digital Optical:
- Connect the Digital optical cable to the Digital optical output [22] of the unit.
- Connect the other end of the Digital Optical cable to the Digital Optical Input of your Receiver.
Connecting other Audio/Video Equipment
You can connect an Audio/Video source, like a VCR, DVD Player or Set-Top Box to the unit so you can record from the Audio/Video source.
The Media Giant supports devices with Composite or Component output.
Composite:
- Connect the Audio/Video cable delivered with your Audio/Video device to the corresponding AV Output jacks on the Audio/Video device.
- Connect the other side of the Composite cable (Yellow, Red, and White) to the AV1 IN jacks [16] of the unit.
Component:
- Connect the Component Video cable delivered with your Audio/Video device to the corresponding Component output on the Audio/Video device.
- Connect the other side of the Component Video cable (Red, Green, and Blue) to the AV2 IN jacks [17] of the unit.
ENGLISH
Note: The Component video cables only transfer video, no sound. To transfer sound, you also need to connect audio cables from the Audio/Video device to the AV2 IN audio jacks [18] of the unit.
Connecting the Power Cable
When the unit is connected to your Audio/Video equipment, you can connect the power supply to the unit.
- Connect the included power cable to the unit [23] and to a free wall socket.
- Set the main power switch [12] on the back of the unit to 'I' to power the unit.
The unit will now turn on.
Preparing the Remote Control
- Remove the battery cap from the back of the remote control
- Insert the included AAA batteries in the remote control.
- Replace the battery cap on the back of the remote control.
Notes: - The best operational range of the remote control is about 5 meters.
- Point the remote control to the IR receiver which is embedded in the front panel of the unit.
- The receiving angle of the IR receiver is ± 30 degrees.
- Change the batteries when they are weak or empty.
7. First-Time Configuration
The unit needs to be configured when you turn it on the first time.
- Select the correct input channel on your TV where the unit is connected to. (HDMI, Composite, SCART, S-Video or Component).
Note: From this point, the manual is based on the fact that your TV is set to the input channel of the unit. All steps described are related to the operation of the unit.
- Check if the main power switch on the back of the unit is set to '1' (On).
- Turn on the unit with the power button on the front of the unit, or with the 'Power' button (1) on the remote control.
- Check the Power LED on the front of the Media Giant. When the LED is Orange, the device is in 'Standby' mode. When the LED is Blue, the device is operational.
Note: The unit needs to be initialized when it is turned on. This can take a little while. During initializing, the Media Giant startup screen is shown.
[Startup Screen]
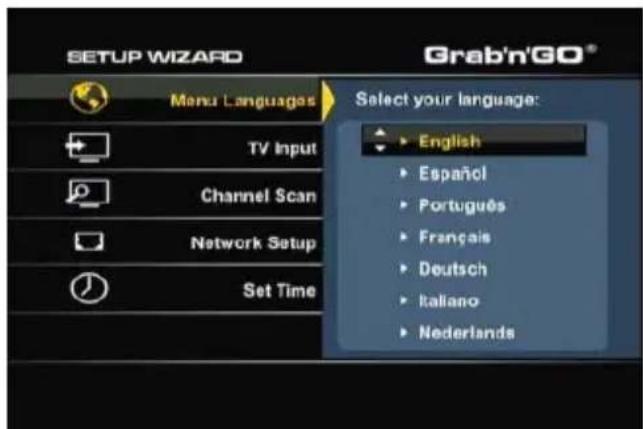
[ Setup Wizard ]
When the Media Giant is initialized, it needs to be configured for first time usage. To assist you with the first time configuration, the Media Giant will display the 'Setup Wizard' on your screen with the required configuration steps for first time usage.
The Setup Wizard will display the following configuration steps:
- Menu Language
- TV Signal **
- Channel Scan **
- Network Setup
- Set Time
Use the navigation keys and the 'Enter' button (26) on the remote control to setup your Media Giant. If you made a setting and you want to revise it, press the 'Return' button (14) on the remote control.
Menu Language
Select the language you want to use when operating the Media Giant.
TV Input**
Select your country from the country-list. If your country is not listed, select 'Don't Care' from the list.
ENGLISH
Channel Scan **
- Select 'OK' to start the automatic channel scan of analog channels through the analog tuner of the Media Giant. The automatic channel scan of the Media Giant can take a while, but will search & store automatically all found channels in the memory of your Media Giant.
- When the Channel Scan is finished, select 'OK' to continue with the Setup Wizard.
If you want to skip the Channel Scan (for example when you are using a set-top box and do not have an analog TV signal), you can select 'Cancel' to skip the Channel Scan and continue with the Setup Wizard.
Network Setup
The Network Setup is to set your IP Address for the Media Giant. In most situations, the Media Giant is connected to a network which has a DHCP server (mostly a router).
- When you have a DHCP server in your network, select the option 'DHCP IP'.
-
The Setup Wizard will ask you to confirm the selection. Select 'OK' to continue.
-
When you want to use a static IP address, select 'FIX IP'.
- The Setup Wizard will show you the fields to enter a static IP address. Use the navigation buttons (15) and the numeric buttons 0-9 (6) to enter the IP address, Subnet mask, Default gateway and DNS server.
- When the entered values are correct, press the 'Enter' button (26) on the remote control.
- The Setup Wizard will ask you to confirm the selection. Select 'OK' to continue.
If your Media Giant is not connected to a network, select 'Cancel' to skip this step and continue with the Setup Wizard.
Set Time
The Set Time' option allows you to set the correct time and date in the configuration of the Media Giant.
- To setup the time and date manually, select 'Manual'.
- Use the navigation buttons (15) and the numeric buttons 0-9 (6) to enter the Year, Month, Day, Hour, Minutes and Seconds. When you are finished, press the 'Enter' button (26) on the remote control.
-
The Setup Wizard will ask you to confirm the selection. Select 'OK' to continue.
-
When you have an active internet connection, and the Media Giant is connected to your network, you can select 'Auto (Via Network)'.
- The Setup Wizard will show you the fields to configure the Automatic time configuration. You can keep the default NTP server, but it you want to use another NTP server, press the 'Enter' button (26) on the NTP server field to adjust the value.
- Change the Time Zone to the correcttimezone of your country.
- Set the 'Daylight Savings Correction' to 'Disable' or 'Enable', depending if your country uses daylight saving time. When the entered values are correct, press the 'Enter' (26) button on the remote control
- The Setup Wizard will ask you to confirm the selection. Select 'OK' to continue.
The Setup Wizard is now complete and the basic configuration of the Media Giant is finished.
Note: For more configuration settings, use the 'Setup' option in the Main menu. The Setup menu is explained in chapter 13.
Note: If you want to run the Setup Wizard again after it is completed, select 'Setup' in the Main menu and select the option 'Restore Default'. The Media Giant will reset the made settings and run the Setup Wizard again.
Note: If you bought a Media Giant without a preformatted harddisk, the Media Giant will show the 'Format Wizard' after the 'Setup Wizard' is completed. This 'Format Wizard' is explained in chapter 15 of this manual.
8. Main menu
The Main menu allows you to select several functions of the Media Giant.
Note: When the Main menu is not displayed, you can press the 'Menu' button (40) on the remote control to show the Main menu on your screen.
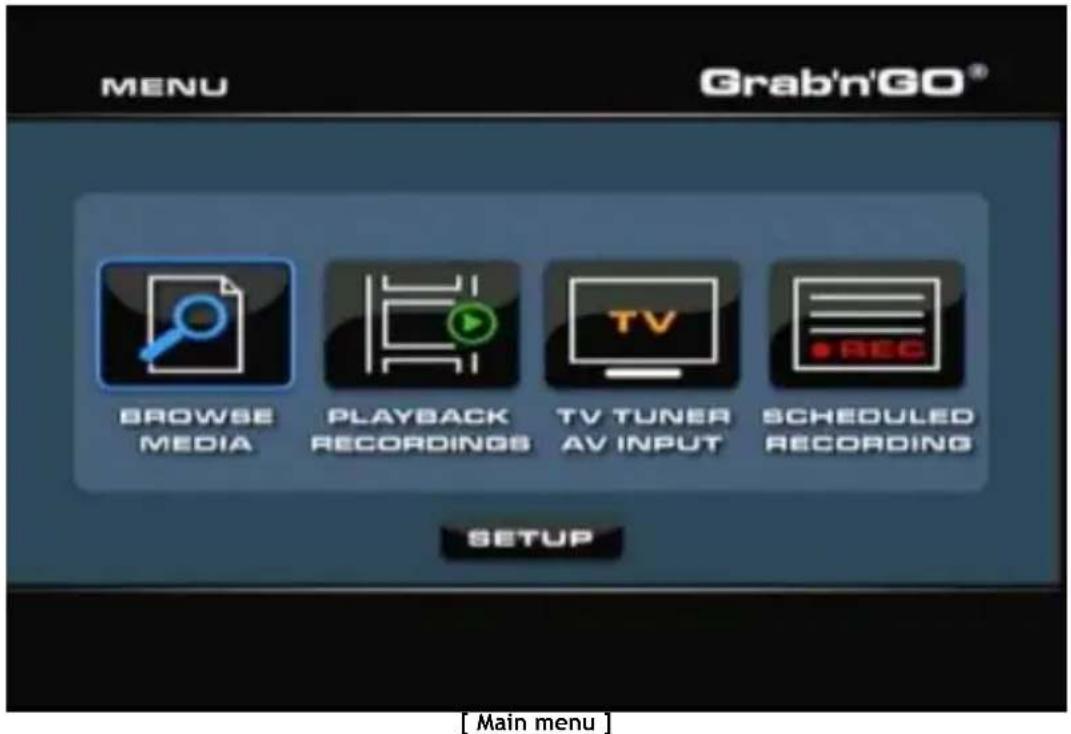
The following options are available in the Main menu:
Browse Media Playback of stored media files.
Playback Recordings playback & edit of your recordings.
TV Tuner/AV Input View Live-TV & Live-AV.
Scheduled Recording Configure scheduled records.
Setup Configuration of the Media Giant.
The above options are described in the following chapters of this manual.
9. Browse Media
When you have selected the 'Browse Media' option in the Main menu, the Media Giant will display the Media browser on your screen:
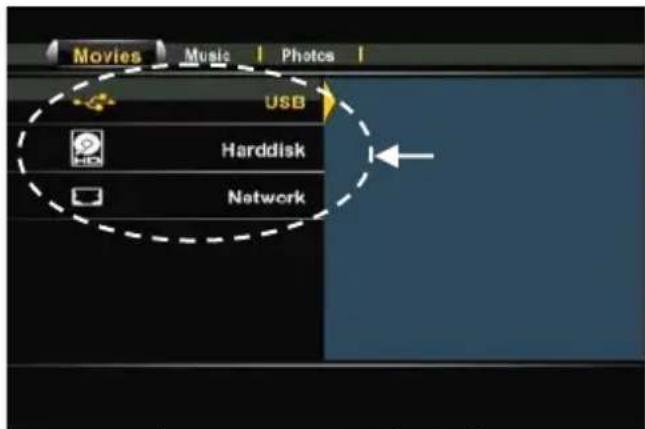
[Storage Location Selection]
[Mode Selection: Movies, Music, Photos]
The Media browser allows you to select the storage device where you want to play your media files from:
USB Play Media from a connected USB device (through the USB Host Port).
Hardisk Play Media from the internal harddisk of the Media Giant.
Network Play Media from Samba / Network shares in your network environment.
To browse through your USB device or the internal harddisk, select the 'USB' or 'Harddisk' from the storage location list.
To browse through your network to play media from network shares, select the 'Network' option from the storage location list.
Note: To browse through your network shares, make sure that you have setup your network shares correctly. For more information about making network shares and browsing through network shares, see chapter 17.
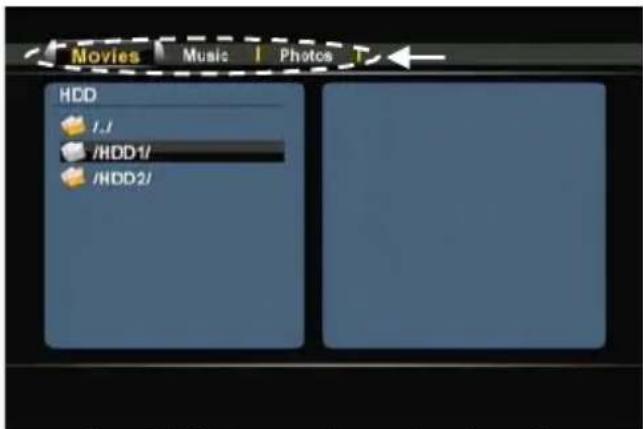
When a storage location is selected, you can switch between 'Movies', 'Music' and 'Photos' mode with the left and right navigation buttons on the remote control.
When selecting 1 of the 3 options, the Media Giant will automatically filter the content on the storage location so only corresponding files are shown.
For example: If you select 'Movies', only movie files will be shown on your screen.
In the Media browser menu, you can use the following browser options on the remote control:
- Navigation keys (15) Navigate through the files & folders or change playback mode.
- Enter (26) Play the selected file or open the selected folder.
- Return (14) Go to the previous folder.
- Copy (7) Open the Copy menu. (explained in a subchapter of this chapter)
-Play (18) Play the selected file. - Next (31) Go to the next page with files.
- Previous (11) Go to the previous page with files.
- Menu (40) Return to the Main menu.
You can return from the Media Browser menu to the Main menu by pressing the 'Menu' button (40) on the remote control.
ENGLISH
Playback of your movies
You can play movies, stored on the HDD of the unit, a USB storage device or a network location, on your TV through the 'Movies' filter of the Media Giant.
When the 'Movies' filter is selected, the Media Giant will display only movie files on your screen. All other files will not be visible.
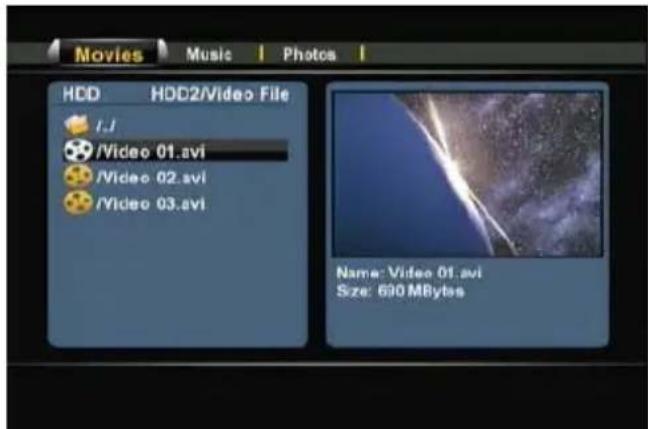
[ Movie Mode ]
- Select the file you would like to play with the navigation buttons (15) on the remote control.
If you have selected a movie file, the Media browser will display a preview with the filename and filesize in the right part of the screen. - Press the 'Enter' button (26) or the 'Play' button (18) on the remote control to start the playback of the selected file.
During playback, you can use the following playback options on the remote control: - Pause (17) Pause or resume the playback.
- Slow (24) Slowmotion playback.
- Stop (23) Stop the playback.
- Rewind (10) Rewind the playback.
- Fast Forward (32) Fast Forward the playback.
- Ins. Rep. (16) Jump back 10 seconds in the playback.
CM. Skip (25) Jump forward 30 seconds in the playback. - Goto (9) Go to a specific point (time) in the movie.
- Repeat (8) Change the Repeat option of the current playback.
- Info (27) Display the playback details.
- Zoom (5) Zoom in / zoom out
- Sub-t (37) Change the subtitle (if available for your playback).
Audio (4) Change the audio track (if available for your playback).
Volume (12), (13) Adjust the volume level. - Mute (30) Mute the sound.
You can return from the Media browser menu to the Main menu by pressing the 'Menu' button (40) on the remote control.
ENGLISH
DVDPlaybackfunctionality
The Media Giant plays DVD's from the hard disk as if they are a normal DVD. You can navigate through the DVD menu, choose subtitles or change audio languages.
Note: The Media Giant supports the playback of unprotected DVD copies only. CSS protection is not supported.
- Connect the Media Giant to your computer (See chapter 13).
- Create a folder on the Media Giant hard disk with the name of your DVD movie (for example: 'Movie1').
- Copy the files from the 'VIDEO_TS' folder to the created folder (for example: 'Movie1') on the Media Giant.
After copying, the folder structure should look like below:
-
[HDD of Media Giant]
-
Movie1 (with all the DVD files inside)
-
Disconnect the Media Giant from your computer and connect it to your TV.
- Select the 'Browse Media' icon in the Main menu with the 'Navigation' buttons (15) on the remote control, and press the 'Enter' button (26) on the remote control to open the Media browser.
- Use the 'Navigation' buttons (15) and the 'Enter' button (26) on the remote control to navigate to the folder on the internal hard disk where your DVD is stored.
- Open the DVD folder which you have created on the harddisk.
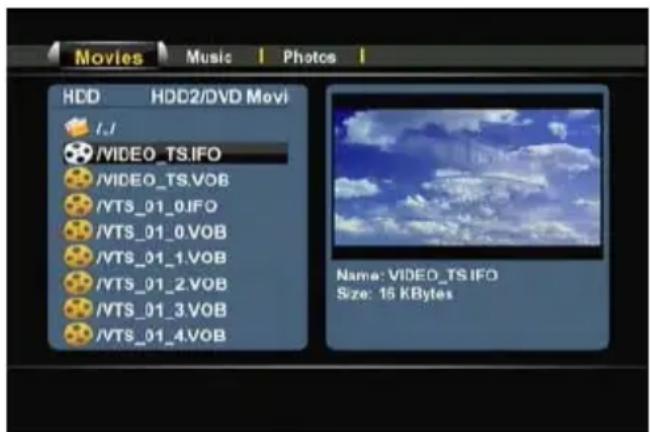
[ Movie Mode ]
- Select the 'VIDEO_TS.IFO' file and press the 'Play' button (18) on the remote control to start the playback of the selected DVD.
Note: It is also possible to play ISO files directly on the Media Giant, when they are stored on the NTFS media partition. When playing an ISO file of a DVD, the same playback features will apply as when playing the IFO file of a DVD.
ENGLISH
During DVD playback, you can use the following playback options on the remote control:
| - | Pause | (17) | Pause or resume the playback. |
| - | Slow | (24) | Slowmotion playback. |
| - | Stop | (23) | Stop the playback. |
| - | Navigation keys | (15) | Navigate through the DVD menu. |
| - | Enter | (26) | Confirm DVD menu selection(s). |
| - | Rewind | (10) | Fast Rewind. |
| - | Fast Forward | (32) | Fast Forward. |
| - | Previous | (11) | Previous Chapter. |
| - | Next | (31) | Next Chapter. |
| - | Ins. Rep. | (16) | Jump back 10 seconds in the playback. |
| - | CM. Skip | (25) | Jump forward 30 seconds in the playback. |
| - | Goto | (7) | Go to a specific point (time) in the movie. |
| - | Repeat | (8) | Change the Repeat option of the current playback. |
| - | Info | (27) | Display the playback details. |
| - | Zoom | (5) | Zoom in / zoom out |
| - | Angle | (36) | Change the DVD angle (when the DVD contains multiple angles). |
| - | Volume | (12), (13) | Adjust the volume level. |
| - | Mute | (30) | Mute the sound. |
| - | Sub-t | (37) | Change or turn off the subtitle of the DVD. |
| - | Audio | (4) | Change the audio track of the DVD (when the DVD contains multiple audio tracks). |
You can return from the Media Browser menu to the Main menu by pressing the 'Menu' button (40) on the remote control.
Playback of subtitles
The Media Giant can play subtitle files when playing AVI videosheets.
To play AVI files with subtitles, you need to assign the same name to the subtitle file as the AVI file, for example:
| Movie name: | My_Movie_With_Sub.AVI |
| Subtitle name: | My_Movie_With_Sub.SRT |
- Select the file you would like to play with the navigation buttons on the remote control.
- Press the 'Enter' button (26) or the 'Play' button (18) on the remote control to start the playback of the selected file.
The AVI file will start playing with the corresponding subtitle file loaded.
To disable/enable subtitles during playback, press the 'Sub-t' button (37) on the remote control.
You can return from the Media Browser menu to the Main menu by pressing the 'Menu' button (40) on the remote control.
ENGLISH
Playback of your Music
You can play music files, which can be stored on the HDD of the unit, a USB storage device or a network location, on your TV through the 'Music' filter of the Media Giant.
When the 'Music' filter is selected, the Media Giant will display only music files on your screen. All other files will not be visible.
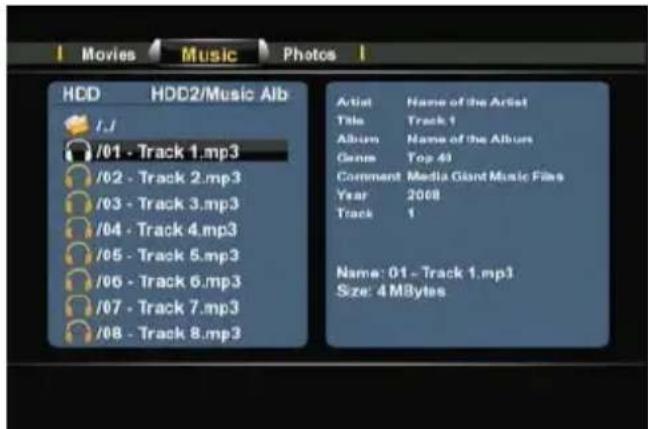
[ Music Mode ]
- Select the file you would like to play with the navigation buttons (15) on the remote control.
If you have selected a music file, the Media browser will display the ID3 tag information (when available) with the filename and filesize in the right part of the screen.
- Press the 'Enter' button (26) or the 'Play' button (18) on the remote control to start the playback of the selected file.
During playback, you can use the following playback options on the remote control:
- Pause
(17)
Pause or resume the playback.
- Stop
(23)
Stop the playback.
- Rewind
(10)
Rewind the playback.
- Fast Forward
(32)
Fast Forward the playback.
- Repeat
(8)
Change the Repeat option of the current file/folder.
- Info
(27)
Display the playback details.
Volume
(12), (13)
Adjust the volume level.
- Mute
(30)
Mute the sound.
You can return from the Media Browser menu to the Main menu by pressing the 'Menu' button (40) on the remote control.
ENGLISH
Playback of your Photos & Pictures
You can view your photos and pictures, which can be stored on the HDD of the unit, a USB storage device or a network location, on your TV through the 'Photos' filter of the Media Giant.
When the 'Photos' filter is selected, the Media Giant will display only photo and picture files on your screen. All other files will not be visible.
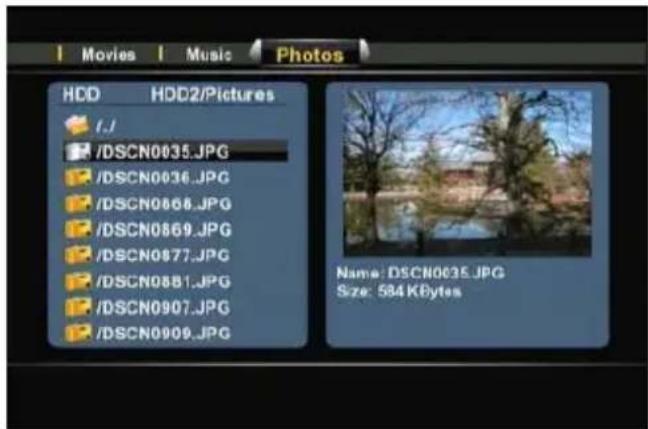
[Photos Mode]
- Select the file you would like to play with the navigation buttons (15) on the remote control.
If you have selected a photo file, the Media Browser will display a small preview with the filename and filesize in the right part of the screen.
- Press the 'Enter' button (26) or the 'Play' button (18) on the remote control to start the playback of the selected file.
During playback, you can use the following playback options on the remote control:
- Pause (17) Pause or resume the slideshow.
- Stop (23) Stop the slideshow.
- Navigation keys (15) Rotate the shown photo.
Previous (11) Play the previous file in the current folder. - Next (31) Play the next file in the current folder.
- Repeat (8) Change the Repeat option of the current file/folder.
- Info (27) Display the slideshow details.
- Zoom (5) Zoom in / zoom out
You can return from the Media Browser menu to the Main menu by pressing the 'Menu' button (40) on the remote control.
ENGLISH
Copy mode
If you want to copy data from 1 location to another location (for example: from a USB device to the internal harddisk), you can use the Copy mode of the Media Giant.
To access the Copy mode, press the 'Copy' button (Z) on your remote control when you are in the media browser. The Copy menu will be shown on your screen:
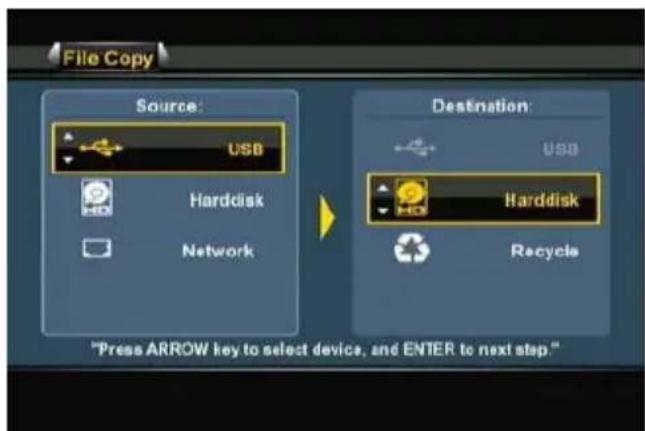
[Copy menu]
[Copy menu - Copy Wizard]
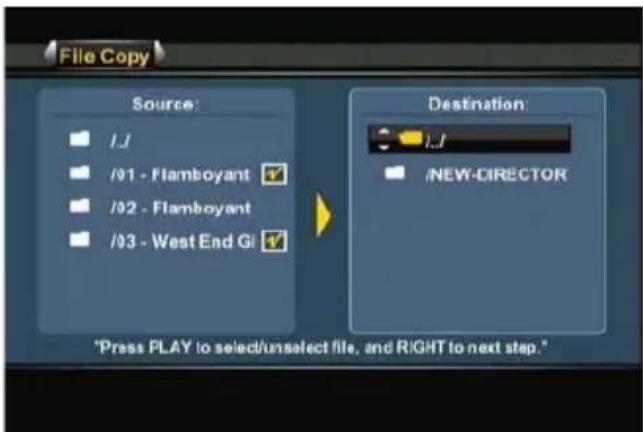
You can select between 'USB', 'Harddisk' or 'Network' as source for your copy. The available desinations are 'USB', 'Harddisk' and 'Recycle' (delete files).
First select the source by pressing the up and down navigation buttons (15) on the remote control. When the correct source is selected, press the right navigation button (15) and use the up and down navigation buttons (15) to select the destination.
Note: You can see by the highlighted border if the Source or Destination section of the Copy menu is active.
Note: It is not possible to copy from 'USB' to 'USB', or from 'Harddisk' to 'Hardisk'.
- When the source and destination location are correct, press the 'Enter' button (26) on the remote control to proceed with the Copy Wizard.
- Navigate through your source until you have found the files or folders you want to copy. You can navigate through the folders with the navigation buttons (15) and the 'Enter' button (26) on the remote control.
- Mark the files or folders you want to copy with the 'Play' button (18) on the remote control. The marked files or folders will show a marked icon behind the name.
- When the source files or folders are marked, press the right navigation button (15) on the remote control to switch to the destination section.
Note: It is not possible to select the NTFS media partition of the Media Giant as destination, since it is not possible to write on the NTFS media partition.
- Navigate through your destination until you have found the correct copy location. You can navigate through the folders with the navigation buttons (15) and the 'Enter' button (26) on the remote control.
- When the correct location is found, press the the right navigation button (15) on the remote control to start the copy process.
ENGLISH
- The copy wizard will ask your confirmation for the copy process. Select 'OK' to proceed with the copy process.

[Copy Confirmation]
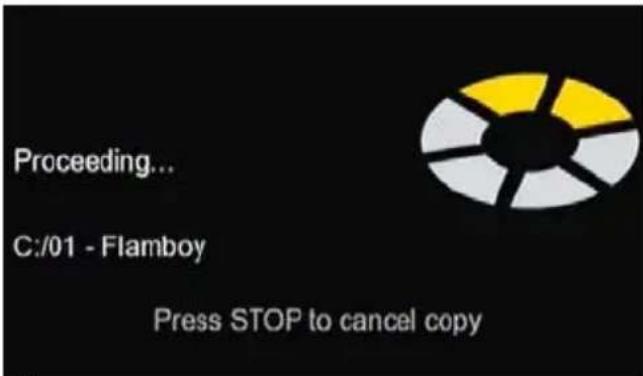
[Copy in progress]
When the copy process is complete, you will be notified with a message on your screen.
It is also possible to delete files through the Copy menu.
When you want to delete files, select 'Recycle' as your destination.
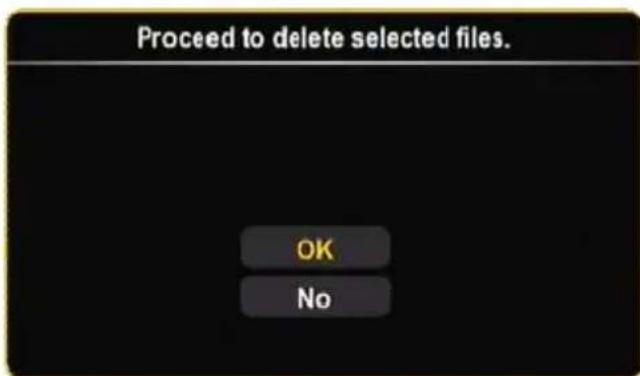
Mark the files or folders which you want to delete and press the right navigation button (15) on the remote control, you will see a confirmation window for deleting the selected files or folders.
Select 'OK' to delete the selected files or folders.
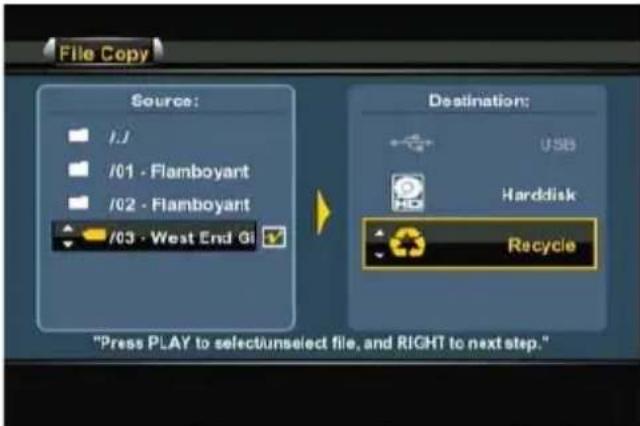
[Copy menu-Delete Wizard] [Delete Confirmation]
10. Playback Recordings
When you have selected the 'Playback Recordings' option in the Main menu, the Media Giant will display the recordings-list on your screen with all your recordings:
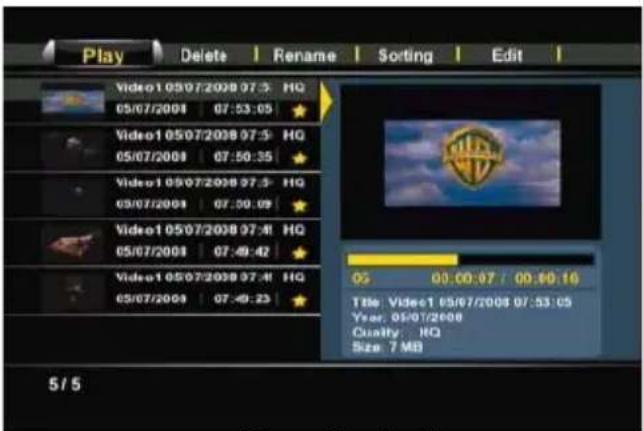
[ Recordings-list ]
The recordings-list will show all your recordings which are made by manual record or scheduled recording. Each video is indicated with a thumbnail image (first frame of the recording), name, time and date and recording quality.
A yellow star behind your recording means that the recording is new and not been watched yet. When you have watched the recording, the yellow star will disappear.
You can navigate through your recordings with the up and down navigation buttons (15) on the remote control and play the recordings by pressing the 'Enter' button (26) or the 'Play' button (18) on the remote control when a recording is selected.
During playback, you can use the following playback options on the remote control:
- Pause (17) Pause or resume the playback.
- Slow (24) Slowmotion playback.
- Stop (23) Stop the playback.
- Rewind (10) Rewind the playback.
- Fast Forward (32) Fast Forward the playback.
- Ins. Rep. (16) Jump back 10 seconds in the playback.
- CM. Skip (25) Jump forward 30 seconds in the playback.
- Previous (11) Play the previous chapter or the previous recording.
- Next (31) Play the next chapter or the next recording.
- Repeat (8) Change the Repeat option of the current playback.
- Info (27) Display the playback details.
- Goto (9) Go to a specific point (time) in the movie.
- Zoom (5) Zoom in / zoom out
- Audio (4) Change the audio track (if available for your playback).
Volume (12), (13) Adjust the volume level. - Mute (30) Mute the sound.
With the left and right navigation buttons (15) on the remote control, you can navigate through the options on the top menu of the recordings-list, to select several features:
Play Play your recordings.
Delete Delete your recordings.
Rename Rename your recordings.
Sorting Change the sorting of your recordings.
Edit Edit your recordings (explained in the next sub-chapter).
ENGLISH
The 'Edit' menu explained
The 'Edit' menu has multiple options to modify your recordings, which are explained below:
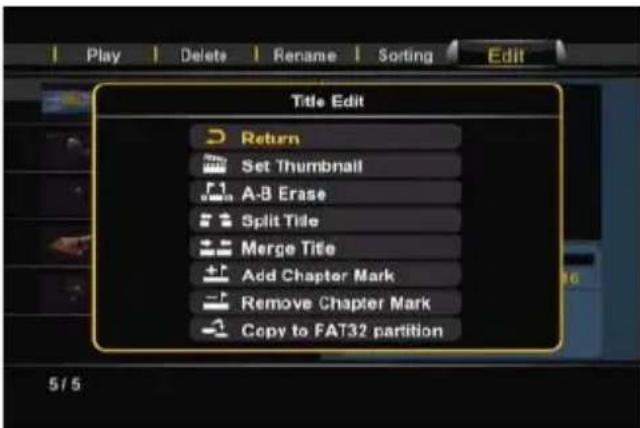
[ Recordings - Edit menu]
- Set Thumbnail With the 'Set Thumbnail' option, you can play your movie and select your favourite frame as thumbnail for your recording.
- A-B Erase With the 'A-B Erase' option, you can mark a part of your movie (for example: a commercial) and delete it from your recording.
- Split Title With the 'Split Title' option, you can split a recording in 2 pieces (for example: when you recorded 2 programs in 1 scheduled recording).
- Merge Title With the 'Merge Title' option, you can merge 2 recordings into 1 recording.
- Add Chapter Mark With the 'Add Chapter Mark' option, you can add chapter marks to your recording. This will allow you to easily jump to a specific part in the recording.
Note: You can also enable the 'Auto Chapter' option in the Setup menu to automatically add chapter marks on your recording.
- Remove Chapter Mark With the 'Remove Chapter Mark' option, you can remove chapter marks from your recording. This option can be usefull when you configured the Media Giant to automatically make chapter marks, but you want to remove them from the recording.
- Copy to FAT32 partition With the 'Copy to FAT32 Partition' option, you can copy your recording from the recording partition to the 'REC' folder on the media partition of the Media Giant.
When the recording is copied to the FAT32 partition, you are able to play, copy or edit it on your computer when the Media Giant is connected through USB, or you can stream it to a UPnP A/V client (like the Conceptronic C54WMP or the Conceptronic CFULLHDMA) through the network.
Note: For more information about the UPnP A/V Server feature of the Media Giant, see chapter 16.
11. TV Tuner / AV Input
Through the 'TV Tuner / AV Input' option in the main menu, you can view and record from the TV tuner or the AV Input sources of the Media Giant.
Tip: You can easily access the Live-TV screen from any menu in the Media Giant by pressing the 'Live-TV' button (38) on your remote control.
When you select the option 'TV Tuner / AV Input', the Media Giant will show the Live-TV image from the TV tuner. While watching live TV, you can change the channels by pressing the 'Channel +' (29) or 'Channel -' (28) button on the remote control.
With the 'Source' button (2) on the remote control, you can switch between the TV-Tuner, Composite input and Component input. The source will be shown shortly in the upper right corner of the screen.
Timeshifting
The Media Giant supports timeshifting. The timeshift feature 'pauses' Live TV or Live Audio/Video by recording the current channel/input when timeshift is activated.
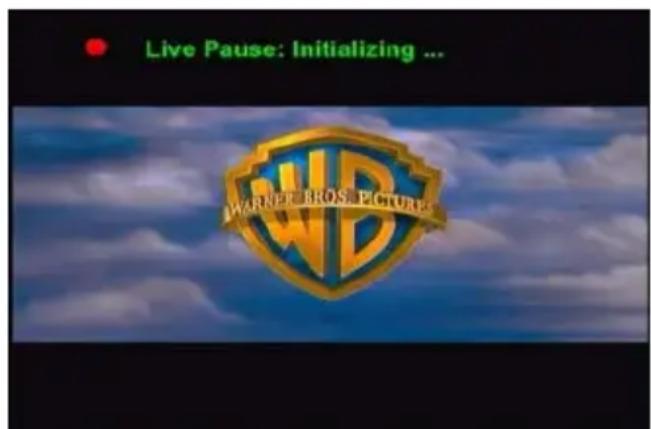
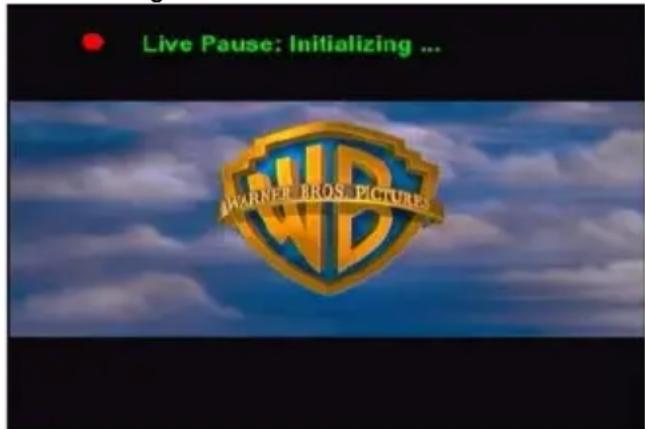
Press the 'Timeshift' button (22) on the remote control to initialize the timeshift feature. When the timeshift feature is initialized, the Live TV or Live A/V will be 'paused' and the unit will record the channel on the background.
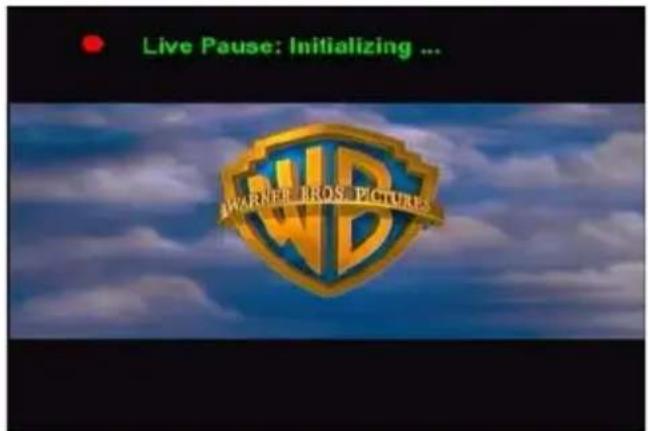
[Timeshift:Initializing]
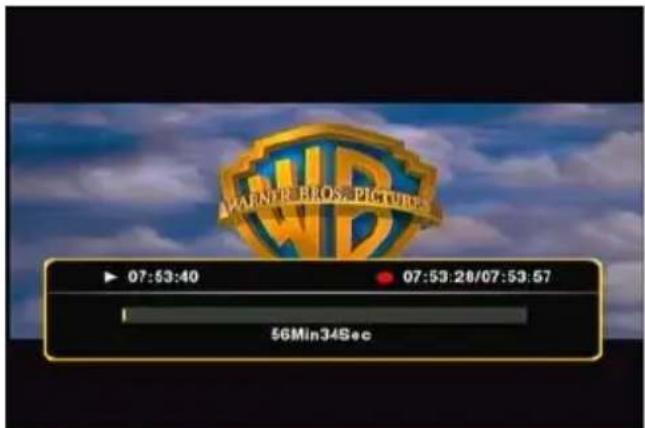
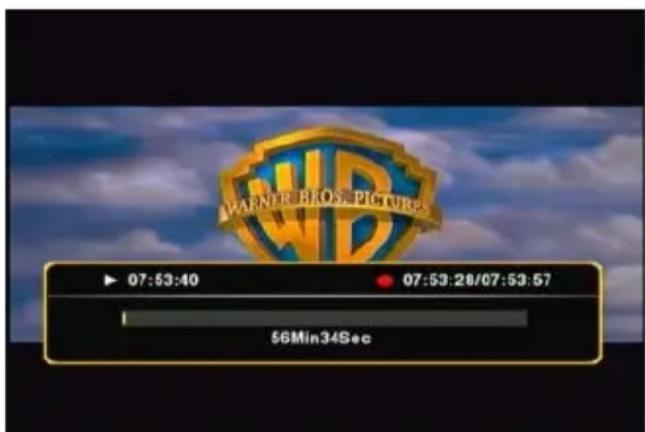
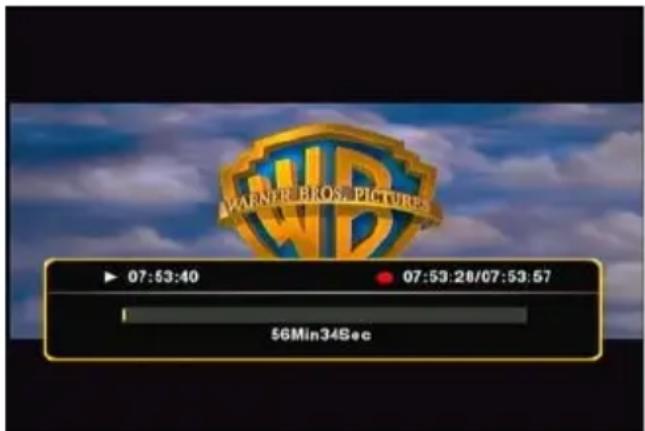
[Timeshift:Active]
Note: When the timeshift feature is activated, the onscreen progress bar shows the maximum timeshift buffer time. If you want to adjust this buffer (smaller or larger), you need to re-format the harddisk of the Media Giant in order to adjust the size of the timeshift buffer partition. More information about formatting can be found in chapter 15.
During the timeshift, you can use the following buttons on the remote control:
-Play
(18)
Play the timeshift buffer.
- Pause
(17)
Pause or resume the playback.
- Slow
(24)
Slowmotion playback.
- Stop
(23)
Stop the playback.
- Rewind
(10)
Rewind the playback.
- Fast Forward
(32)
Fast Forward the playback.
- Ins. Rep.
(16)
Jump back 10 seconds in the playback.
- CM. Skip
(25)
Jump forward 30 seconds in the playback.
- Info
(27)
Show or hide the timeshift buffer information.
Volume
(12), (13)
Adjust the volume level.
- Mute
(30)
Mute the sound.
ENGLISH
Permanent Timeshifting
In the Setup menu of the Media Giant, you can enable 'Permanent Timeshifting'. When this feature is enabled, the timeshift feature will be active at all times and allows you to instantly pause the playback or use the above buttons on the remote control to 'jump' in your timeshift buffer.
Recording
While watching Live TV or Live A/V through the unit, you can start a record of the current channel by pressing the 'Rec' button (19) on the remote control. The unit starts recording, until you press the 'Stop' button (23) on the remote control.
During recording, the 'REC' LED on the frontpanel will light up.
Note: The unit detects copy protection on the connected source, for example MacroVision protection on DVD discs. When a connected source is copy-protected, the unit will prevent recording and shows a warning message when the record button is pressed.
Note: The Media Giant records in HQ (High Quality) by default. You can change the recording quality in the Setup menu.
Note: During recording, you cannot change the current channel.
When you press the 'Rec' button (19) during a record, the record time will be set to 30 minutes, starting at the time you pressed the 'Record' Button.
The message 'OTR: 30 min.' will be shown on your screen.

[Normal Record] [Record Timer activated]

Press the 'Rec' button (19) again to increase the time with another 30 minutes, up to a maximum of 240 minutes. The unit keeps recording until the record time is elapsed, or until you press the 'Stop' button (23) on the remote control.
ENGLISH
DV Control
The mini FireWire connection behind the frontpanel of the Media Giant allows you to connect your DV camera directly to the Media Giant and view or record your home videos on the internal harddisk.
- Connect your DV camera to the mini Firewire connection [7] on the front of the Media Giant.
- Turn on your DV camera and set it to 'Playback' mode.
- Press the 'DV' button (39) on your remote control to initialize the 'DV Control' mode.
The Media Giant will display the DV Controls on your screen:
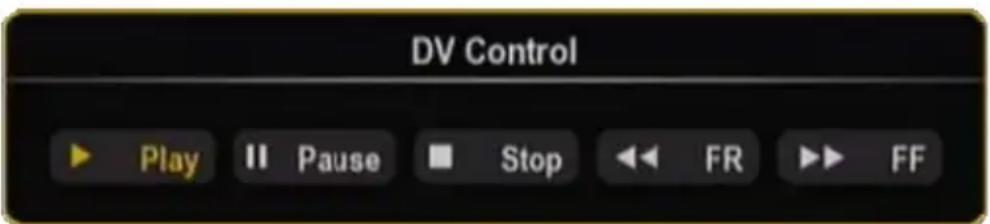
[ DV Control Panel ]
You can select the buttons of the DV Control panel with the navigation buttons (15) on the remote control. You can confirm your selection with the 'Enter' button (26) on the remote control.
When you have selected 'Play' in the DV Control window and your movie is playing, you can press the 'Rec' (19) button on the remote control to start recording your DV movie to the harddisk.
Tip: When you are recording, you can hide the DV Control panel by pressing the 'DV' button (39) on your remote control. The panel will be shown again after pressing the 'DV' button a second time.
You can stop this recording by pressing the 'Stop' button (23) on the remote control. The recorded movies will be listed in the recordings-list, as described in chapter 10.
To exit the DV Control mode, press the 'Return' button (14) on the remote control.
12. Scheduled Recording
You can program the unit to record channels on specific times. You can program up to 8 scheduled recordings in the unit.
- Select the option 'Scheduled Recording' in the Main menu.
The Scheduled Recording screen will be shown on your TV.
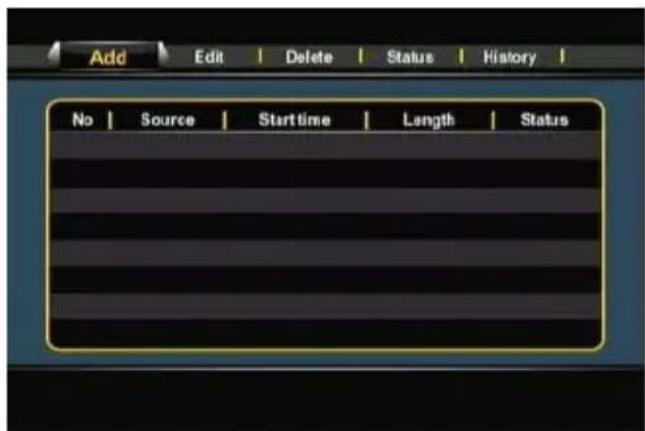
[Scheduled Recording menu]
[Add a scheduled recording]
The Scheduled Recording menu shows 5 options, which can be selected with the left and right navigation buttons (15) of the remote control:
Add Add a new scheduled recording
Edit Edit an existing scheduled recording
Delete Delete a scheduled recording
Status Change the status of the scheduled recording list
History Display the scheduled recording history list
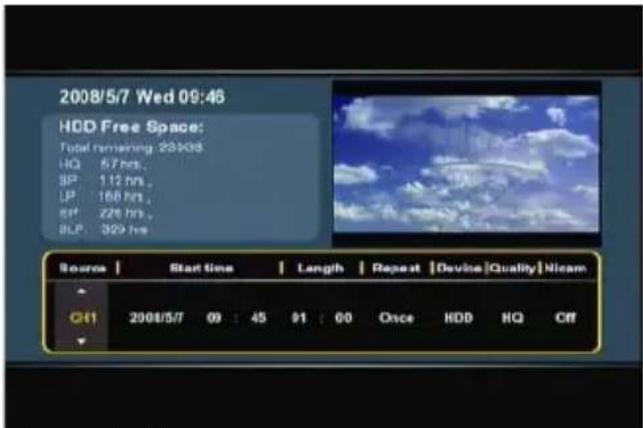
Add or Edit a schedule
When you select the 'Add' or 'Edit' option in the menu and you press the 'Enter' button (26) on the remote control, you can add a new schedule or edit an existing schedule.
By default, the 'Source' field is selected.
All options can be changed with the up and down navigation buttons (15), and you can select another field with the left and right navigation buttons (15).
-
Select the correct source for your recording. This can be TV channel, the Composite video input or the Component video input.
-
Set the correct date for your recording.
- Set the correct start time for your recording.
- Set the length of your recording.
- Set the repeat option for your recording. You can select the following options: 'Once', 'Everyday', 'Mon-Fri', 'Mon-Sat', 'Sun', 'Mon', 'Tue', 'Wed', 'Thu', 'Fri' or 'Sat'.
You can Skip the 'Device' field, since you can only record on the internal harddisk.
ENGLISH
- Set the recording quality. You can choose between 'HQ', 'SP', 'LP', 'EP' and 'SLP'.
Note: Changing the 'Quality' field influences the quality of your record and the amount of space needed for the record. The available recording time for each quality setting is shown in the upper left part of the scheduling window.
- Set the 'Nicam' option to 'on' or 'off'.
The Nicam option should be set to 'on' if the source you want to record a broadcast with 2 different audio languages (for example: Eurosport). - When all the options are set for your recording, press the 'Enter' button (26) on the remote control to save the schedule.
- A confirmation popup will be shown on your screen. Select 'Confirm' and press the 'Enter' button (26) on the remote control to save the schedule.
The recording is now programmed as a scheduled recording and the unit will start recording on the programmed time and channel, even when the device is set to 'Standby'.
Note: During recording, you cannot change the current channel.
13. Setup
When you select the 'Setup' option in the Main menu, the Setup menu will be shown on your screen. The explanation below shows all available settings with the including description.
You can switch between the various options of the Setup menu with the navigation buttons of the remote control.
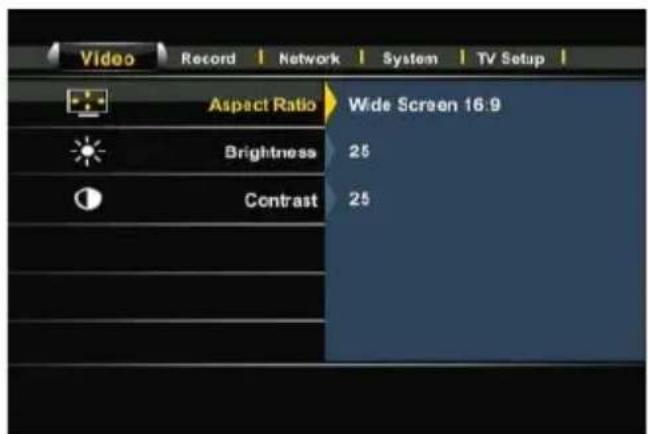
[Setup menu - Video]
[Setup menu - Record]
Video:
Aspect Ratio Change the aspect ratio of the Media Giant outputsignal.
('Letterbox 4:3',
'Pan-Scan 4:3', 'Wide'
Brightness Change the brightness of the Media Giant output signal.
Contrast Change the contrast of the Media Giant output signal.
Audio Setup Change the audio setup of the Media Giant.
Night Mode Enable or disable Night Mode audio. (Off, On, Comfort).
Digital Output Set the digital audio output. (HDMI-LPCM, HDMI-RAW, SPDIF-LPCM, SPDIF-RAW)
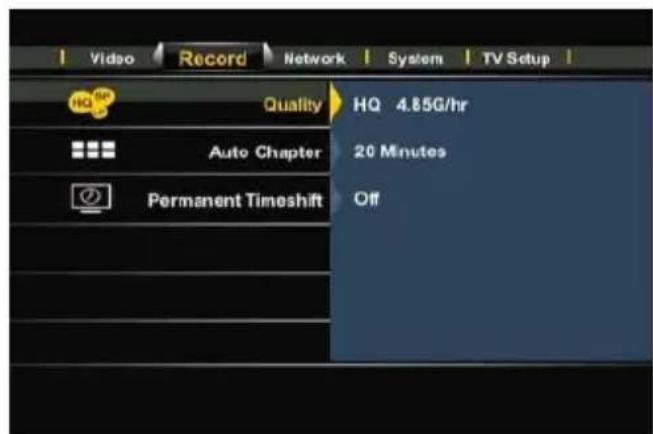
Record:
Quality Change the default record quality. (HQ, 'SP, 'LP, 'EP, 'SLP)
Note: Changing the 'Quality' field influences the quality of your record and the amount of space needed for the record. The different quality settings will require the following space for 1 hour of video:
Change the Auto Chapter setting. The Auto Chapter function will automatically add chapter marks to your recording, to easier jump trough your recordings during playback.
Permanent Timeshift
Enable or disable the permanent timeshift feature. When this feature is enabled, the timeshift feature will be active at all times and allows you to instantly pause the playback or the buttons on the remote control to 'jump' in your timeshift buffer.
ENGLISH
[ Setup menu - Network ]
[ Setup menu - System ]
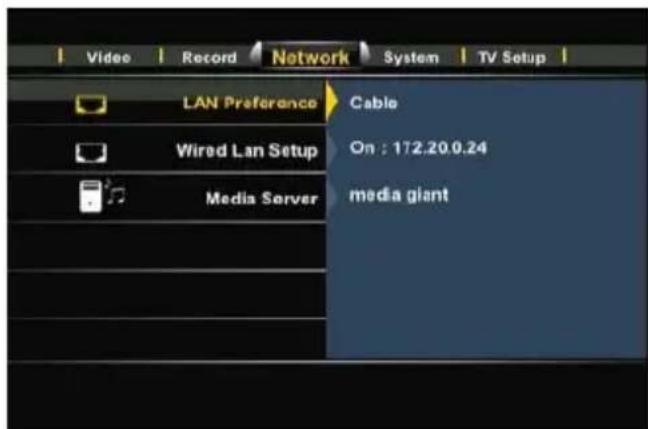
Network:
LAN Preference **
Change the preferred LAN connection: Cable or Auto (Via Powerline)
When 'Cable' is chosen, the Media Giant will always use the LAN port as network connection.
When 'Auto (Via Powerline)' is chosen, the Media Giant will use the Powerline feature if a Powerline network is available. If there is no Powerline network available, the LAN port will be used.
Note: When the Media Giant is connected to both Powerline and LAN Cable, the default network will be the Powerline network. When the performance of the Powerline network will decrease to below 1Mbps, the Media Giant automatically switches to Cable mode. During Cable mode, the Media Giant will keep checking the Powerline network performance. When the performance increases to above 1Mbps, the Media Giant will switch from Cable mode to Powerline mode.
Wired Lan Setup
In the 'Wired Lan Setup', you can configure the IP address of the Media Giant. When selected, you can choose between 'Cancel', 'DHCP IP (Auto)' or 'Fix IP (Manual)'.
When you have a DHCP server in your network, select the option 'DHCP IP'. When you want to use a static IP address, select 'FIX IP'.
The Setup Wizard will show you the fields to enter a static IP address. Use the navigation buttons (15) and the numeric buttons 0-9 (6) to enter the IP address, Subnet mask, Default gateway and DNS server.
When the entered values are correct, press the 'Enter' button (26) on the remote control.
Media Server
Change the Media Server name. This name is the name of the Media Giant UPnP A/V Server, which allows UPnP A/V clients (like the Conceptronic C54WMP or the Conceptronic CFULLHDMA) to stream media files through the network from the Media Giant harddisk.
Note: More information about the UPnP A/V Server functionality of the Media Giant can be found in chapter 16.
ENGLISH
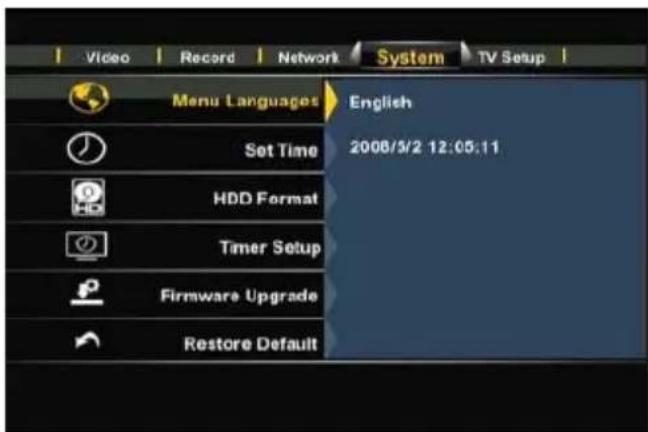
System:
menu Language Select the language you want to use when operating the Media Giant..
Set Time Change the time and date.
HDD Format Format the internal harddisk.
Timer Setup Slideshow Timer: Change the slideshow interval during a picture slideshow. Screen Save change the inactivity time to activate the screenshot.
Firmware Upgrade Upgrade the firmware of the Media Giant.
A firmware upgrade can be done through the internet or through a USB storage device. The firmware Upgrade option can be set to 'Auto' or to 'Manual'.
When 'Auto' is selected (default), the Media Giant will check on random times for new firmware online and upgrades the firmware automatically when no recording / playback is running on the Media Giant.
When 'Manual' is selected, you can manually check for new firmware.
Note: To check your current firmware version, press the 'Info' button (27) on the remote control when you are in the Main menu. The firmware version will be shown on your screen.
Restore Default
Restore the Media Giant to the default settings and initialize the Setup Wizard to reconfigure the unit.
[ Setup menu - TV Setup ] [ Programme Edit ]
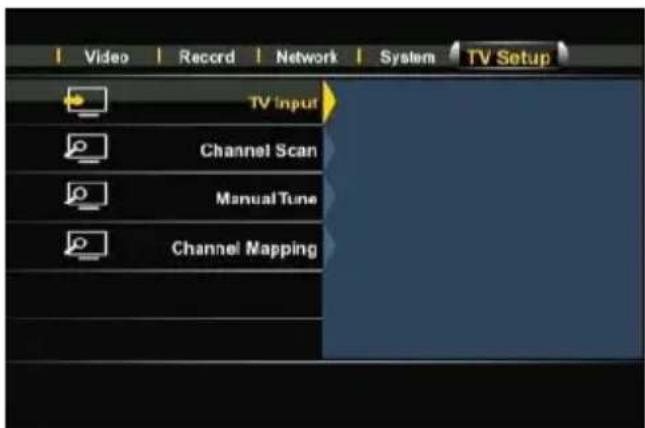
TV Setup: **
TV Input
Select your country from the country-list. If your country is not listed, select 'Don't Care' from the list.
Channel Scan
Start an automatic channel scan. The automatic channel scan of the Media Giant can take a while, but will search and store automatically all found channels in the memory of your Media Giant.
Manual Tune
With the Manual Tune feature, you can add new channels to your existing channel list (with the 'Add' option), remove channels from your channel list (with the 'Remove' option), or assign names to the found channels (with the 'Edit' option).
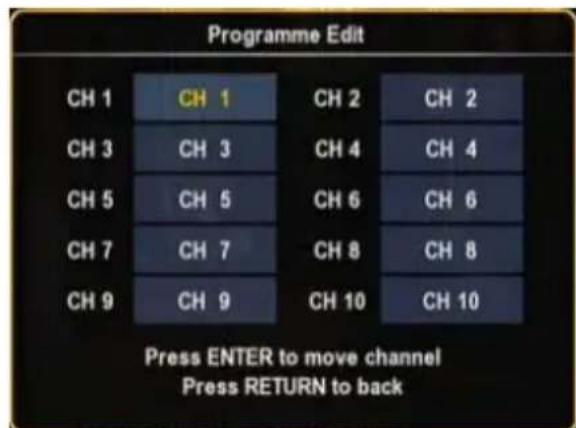
Channel Mapping
With the Channel Mapping feature, you can change the order of the channels.
To move a channel to another location, select the channel with the navigation buttons on the remote control and press the 'Enter' button.
The channel block will become yellow. Select the new location for the channel with the navigation buttons on the remote control and press the 'Enter' button.
The 2 channels are now swapped from location.
14. Computer USB Connectivity
The unit can be connected to your computer to copy data (movies, music, pictures, records, etc.) from and to the internal HDD.
Note: In our example below, we are using a computer running Windows XP, but the unit can be used on computers with USB support and the capability of reading & writing FAT32 & NTFS file systems.
Connect the unit to your computer
- Connect the delivered USB to Mini-USB cable to the Mini-USB port on the frontside of the unit and to a free USB port on your computer.
- Turn the unit on with the main power switch on the backside of the unit. The unit will be recognized and installed automatically and will be shown as extra drives on your computer.
Note: When the harddisk is partitioned with 1 media partition (FAT32 only), there will be only 1 drive letter visible. When the harddisk is partitioned with 2 media partitions (FAT32 and NTFS), the Media Giant will show 2 drive letters.
Recording playback on your computer
To play your recordings on your computer, you first need to copy the recordings from the record partition to the media partition. You can do this with the 'Copy to FAT32 Partition' command, which can be found in the 'Playback Recordings' menu, explained in chapter 10.
When your recordings are copied to the FAT32 partition, you can play the recorded programs on your computer, when the unit is connected to the computer.
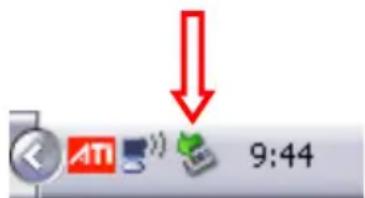
Disconnect the unit from your computer
- Single-click the "Safe Removal" icon on the system tray.
- Select "Stop USB Mass Storage Device" when prompted.
- Wait for the message "Safe to remove Hardware".
- Disconnect the USB cable.
15. Partition Information & Format Wizard
The Media Giant will be delivered with a preformatted harddisk in most situations. The harddisk is formatted with the default configuration of the Media Giant, and will partition the harddisk as following:
Timeshift buffer partition: - 4.85 GB
Recording partition: 50% of the harddisk space.
FAT32 media partition: 25% of the harddisk space.
NTFS media partition: 25% of the harddisk space.
| Example | with: | 500GB | 750 | GB |
| Timeshift buffer partition: ~ 4.85 GB ~ 4.85 GB ~ 4.85 GB | ||||
| Recording artition: ~ 250 GB ~ 375 GB ~ 500 GB | ||||
| FAT32 media partition: ~ 125 GB ~ 187 GB ~ 250 GB | ||||
| NTFS media partition: ~ 125 GB ~ 187 GB ~ 250 GB | ||||
You can change the default harddisk configuration by reformatting the harddisk of the Media Giant.
Note: If you reformat the harddisk of the Media Giant, all stored and recorded content on the harddisk will be deleted!
To format the harddisk of the Media Giant, go to the Setup menu and select the option 'HDD Format' on the 'System' page. Select again 'HDD format' as confirmation.
The HDD Format Wizard will now be shown on your screen, starting with a warning message:
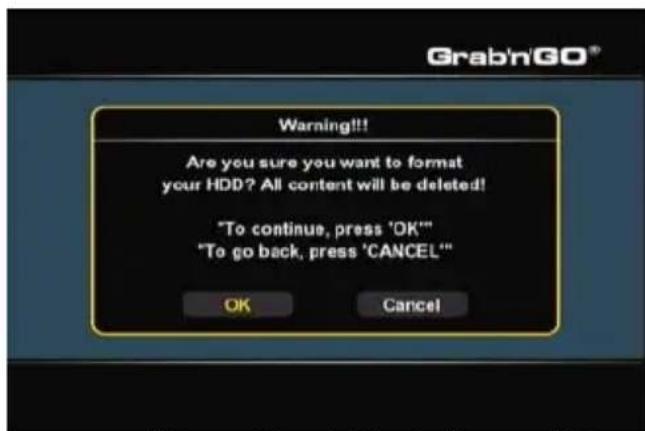
[Format Wizard - Warning]
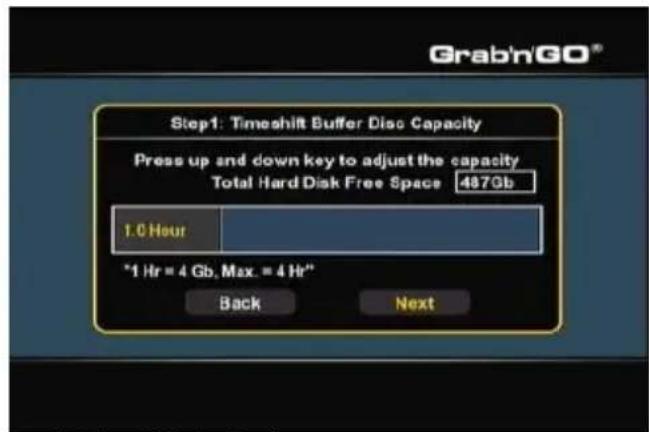
[Format Wizard -Timeshift Buffer]
- Select 'OK' to continue to the next step.
Change the Timeshift Buffer size with the up and down navigation buttons (15) on the remote control. You can set the Timeshift Buffer to 1, 2, 3 or 4 hours.
- Select 'Next' to continue to the next step.
ENGLISH
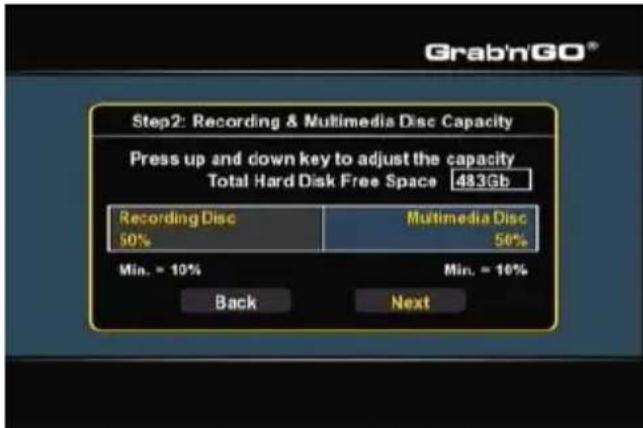
[Format Wizard - Recording Partition]
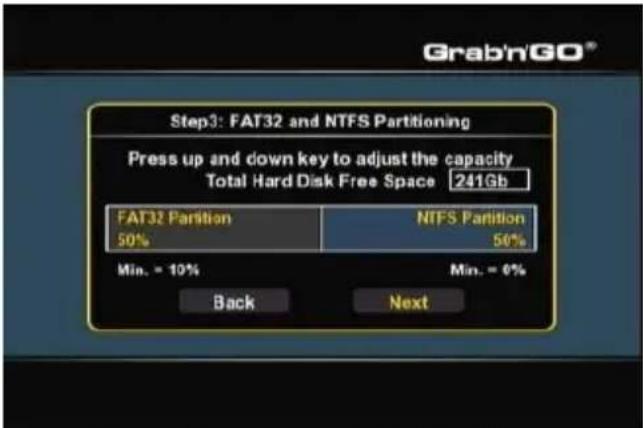
[Format Wizard - FAT32 / NTFS Partition]
- Change the Recording Partition size with the up and down navigation buttons (15) on the remote control.
The remaining space will be used for the media partition(s) of the Media Giant. - Select 'Next' to continue to the next step.
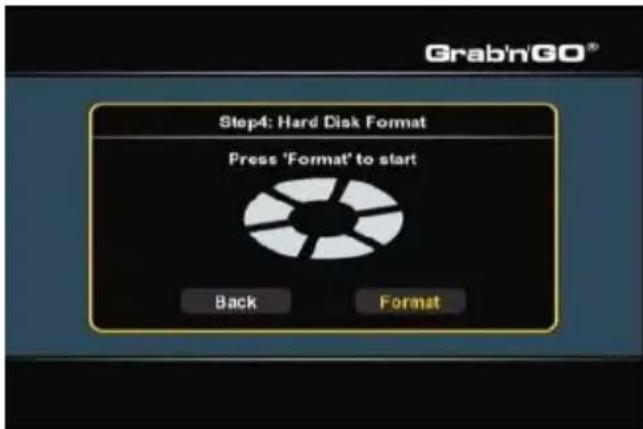
[Format Wizard-Start Format] [Format Wizard- Formatting]
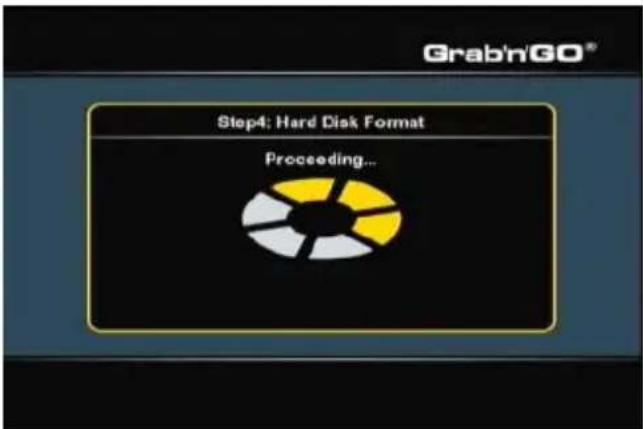
- Select 'Format' to start with formatting the harddisk of the Media Giant. During format, the Format Wizard will show 'Proceeding'.
Note: The format procedure can take a while (~ 5 minutes). Please wait until the format procedure is finished.

[Format Wizard - Completed]
- When the Format process is finished, select 'OK' to close the Format Wizard. The Media Giant will reboot automatically.
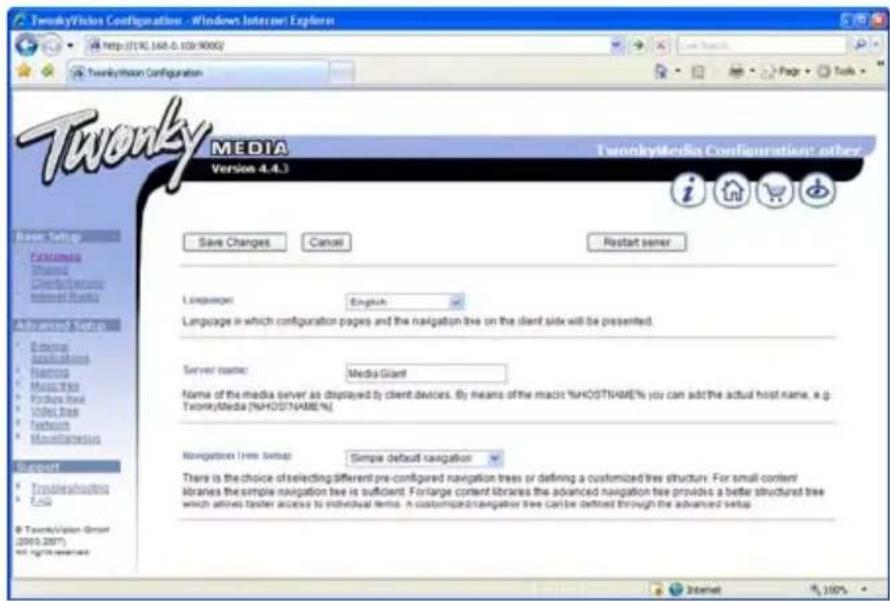
16. UPnP A/V Server (Twonky Mediaserver)
One of the features of the Media Giant is the UPnP A/V Server.
This makes the Media Giant and all its media content available for UPnP A/V clients in your network (for example: the Conceptronic CFULLHDMA or the Conceptronic C54WMP).
The used UPnP A/V Server in the Media Giant is 'Twonky Mediaserver'.
The Twonky Mediaserver automatically indexes all the media on the FAT32 and NTFS media partition. When new data is added to one of these partitions, it will become automatically available for UPnP A/V clients in your network.
The name of your UPnP A/V Server can be set in the Setup menu of the Media Giant, at the 'Network' section.
Note: The default name of the UPnP A/V Server is 'media giant'.
If you are familiar with the Twonky Mediaserver software, you can change the advanced Twonky Mediaserver settings through your computer.
To access the configuration pages of the Twonky Mediaserver software, enter the IP address of the Media Giant in your browser window, followed by the portnumber 9000.
For example: HTTP://192.168.0.100:9000/ (assuming that 192.168.0.100 is the IP address of your Media Giant).
The Twonky Media Server has a built-in 'Troubleshooting' guide, which can be found in the left navigation bar of the Twonky Media Server configuration window. This guide will help you with the configuration of the Twonky Media Server.
For more information of the Twonky Media Server, visit the Twonky website at:
http://www.twonkymedia.com/
17. Browsing Network Shares
The Media Giant can browse your network shares and play media files directly from a network share. In order to use this feature, you need to share your media folders in your network, so the Media Giant can find and access them.
This chapter will explain how you can enable file sharing in Windows XP and Windows Vista.
Note: This manual only describes file and folder sharing in Windows XP and Windows Vista.
Please check the manual of your operating system or network storage device how you can share a folder with media files.
File sharing in Windows XP
- Open 'My Computer' with the shortcut in the start menu and navigate to the folder with media files you want to share.
- Single click on the folder with media files and select the option 'Share this folder' in the left menu bar.
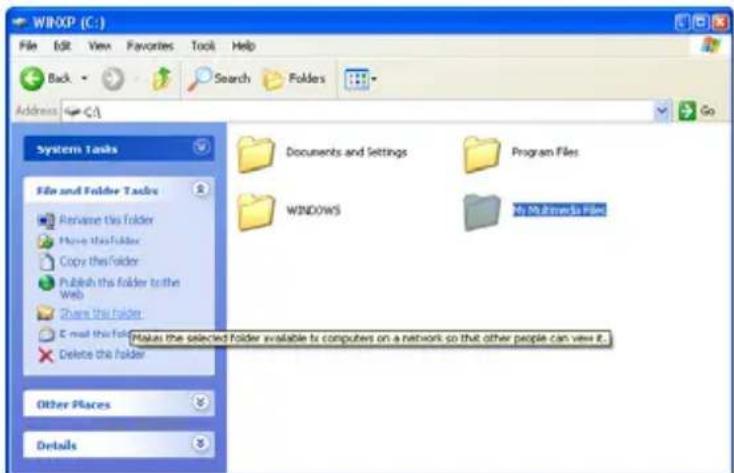
[My Computer-ShareFolder]
The properties of the folder are shown, with the 'Sharing' page displayed.
The section 'Network sharing and security' can be used to share the folder.
If you did not share any folders previously, you need to run the Network Setup Wizard by clicking the 'Network Setup Wizard' line in the window.
ENGLISH
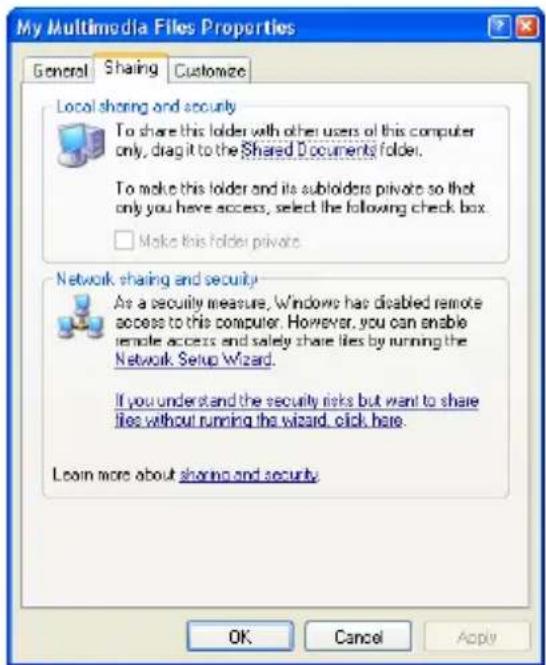
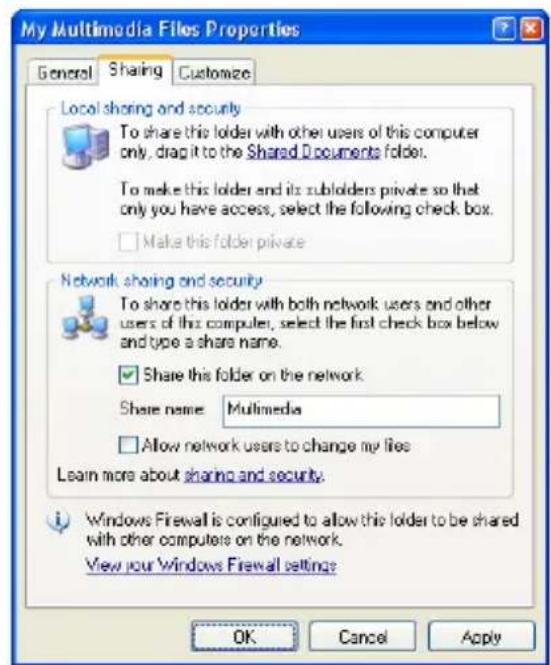
[Properties-SharingPage][Properties-SharingPage]
- When the Network Setup Wizard is already finished previously, you can share your folder by clicking 'Share this folder on the network'.
- Enter a name for the share in the textbox and click 'Apply'.
- Click 'OK' to close the window.
The folder is now listed with a hand beneath the folder icon, indicating that the folder is shared on your computer.
[SharedFolder]
ENGLISH
File sharing in Windows Vista
- Open 'Computer' with the shortcut in the Start menu and navigate to the folder with media files you want to share.
- Single click on the folder with media files and select the option 'Share' in the top menu bar of the window.
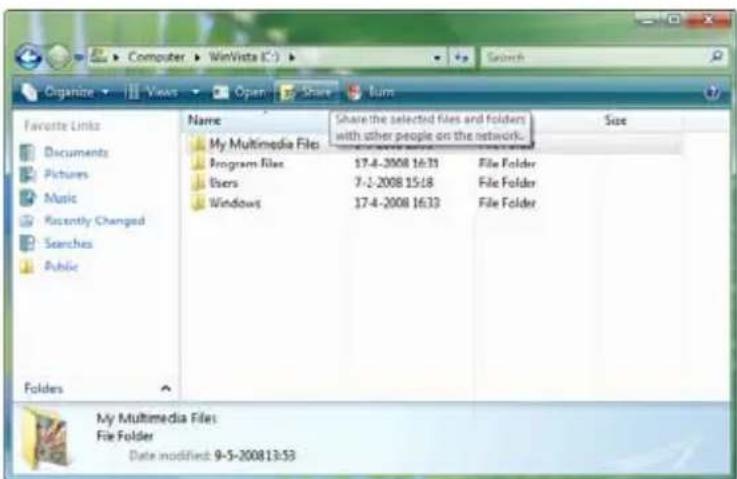
[Computer-ShareFolder]
By default, your own user is in the share list as owner of the folder.

[Sharing Properties]
- You can add more users to the sharing list by selecting them from the drop-down list and press the 'Add' button.
- When the list with users is complete, click the 'Share' button to share the folder.
The folder is now listed with a small icon displaying 2 people, indicating that the folder is shared on your computer.

ENGLISH
Browse shared folders on the Media Giant
When your media files are shared, you can use the 'Browse Media' option in the Main menu to browse your network locations.

[Storage Location Selection]
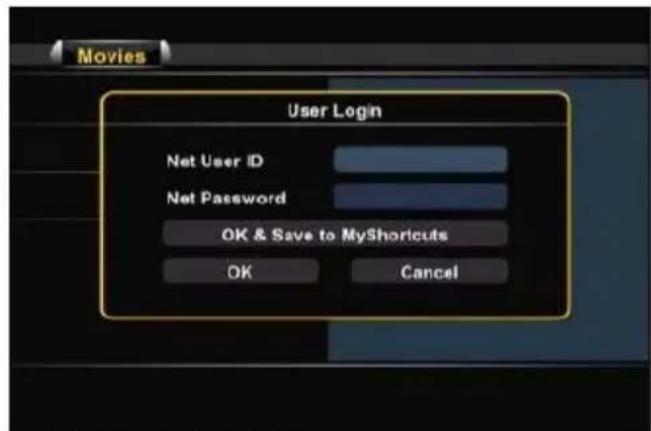
[Network Share -User Login]
Use the navigation buttons (15) on the remote control to select the option 'Network' in the storage location list, and navigate through the network to your computer or network storage device with the shared folders.
When a shared folder is protected with a username and password (for example: default sharing in Windows XP and Windows Vista), the Media Giant will show a 'User Login' popup, to enter the username and password.
Note: You can use your normal user account for Windows XP or Windows Vista to login to your shared folder.
Use the navigation buttons (15) on the remote control to select the User ID or the Password field and press the 'Enter' button (26) to show the onscreen keyboard for entering the value.
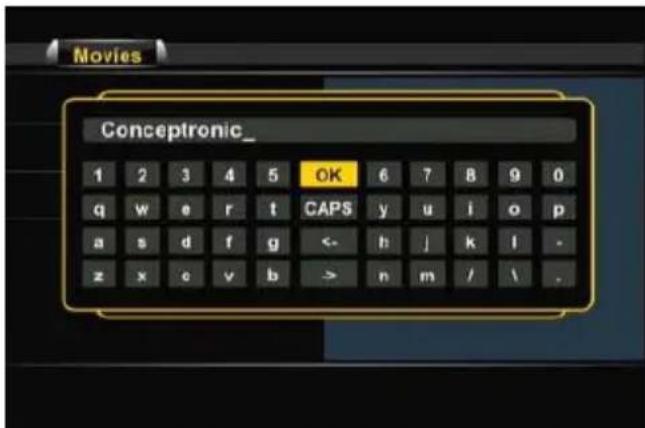
[Onscreen Keyboard]
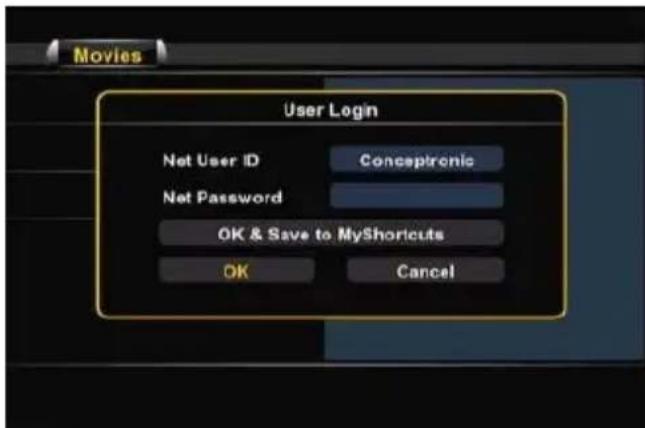
[Network Share -User Login]
When the username and password are correctly entered, select the 'OK' or the 'OK & Save to MyShortcuts' button to enter the network share.
You are now able to navigate through the shared folder like described in chapter 9.
Media Giant de Conceptronic
Manual del usuario
My_Movie_With_Sub.AVI
Conceptronic Media Giant
Benutzerhandbuch
Brightness [Helligkeit]
Contrast [Kontrast]
Audio Setup [Audio-Einstellungen]
Channel Scan [Kanalsuche]
Play (Lecture) Lire vos enregistrements.
- Remove Chapter Mark
- Copy to FAT32 partition
[Timeshift:Initialisation]
[Timeshift:Actif]
Remarque:
Brightness (Luminosite)
Contrast (Contraste)
Configuration audio
Conceptronic Media Giant
Manuale d'uso
- Pause (17)
- Slow (24)
- Stop (23)
- Rewind (10)
- Fast Forward (32)
- Ins. Rep. (16)
- CM. Skip (25)
- Previous (11)
- Next (31)
- Repeat (8)
- Info (27)
- Goto (9)
- Zoom (5)
- Audio (4)
Volume (12), (13) - Mute (30)
Condivisione file in Windows XP
Condivisione file in Windows Vista
Conceptronic Media Giant
Manual do utiliser
Delete Eliminar as susas gravacoes.
Delete Eliminaruma gravacao programada
Nota: No/DDo. 0 1 0 0 0 0 0 0 0 0 0 0 0 0 0 0 0 0 0 0 0 0 0 0 0 0 0 0 0 0 0 0 0 0 0 0 0 0 0 0 0 0 0 0 0 0 0 0 0 0 0 0 1
Conceptronic Media Giant
-HDD of Media Giant] 1 - > Movie1
My_Movie_With_Sub.AVI
Feliratnev:
My_Movie_With_Sub.SRT
- Copy to FAT32 partition
Conceptronic Media Giant
Kullanıçı Kılıvuzu
Conceptronic Media Recorder & Player Satin Aldiginiz Icin Tebrikler.
Film adi: My_Movie_With_Sub.AVI
Altyaz1 adi: My_Movie_With_Sub.SRT
- Copy to FAT32 partition
| Buildings | 20-30 years |
| Furniture | 10-20 years |
| Buildings | 20-30 years |
| Leasehold improvements | 15-20 years |
| Fixtures and equipment | 10-20 years |
This Conceptronic product (Media Giant) includes copyrighted third-party software licensed under the terms of the GNU General Public
License. Please see The GNU General Public License for the exact terms and conditions of this license.
Specially, the following parts of this product are subject to the GNU GPL:
Boot code
Bootup Early-stage bootstrap loader GPL
Bootcode Bootstrap loader GPL
Kernel
vmlinux
Linux
Kernel
GPL
Usb USB device driver GPL
Library
GPL
uclibc
Standard
C
busybox Provide basic rootfs and shell GPL
Application
Freetype Font Rendering Engine FTL(freetype license)
Mp3info id3tag parser GPL
libini Ini File Manipulate GPL
xine VCD, DVD access GPL
dvdauthor Sub Picture Encoder GPL
NTP Network time protocol demand GPL
ebase timer record LGPL
All listed software packages are copyright by their respective authors. Please see the source code for detailed information.
Availability of source code
Conceptronic. has eposed the full source code of the GPL licensed software, including any scripts to control compilation and installation of the object code. All future firmware updates will also be accompanied with their respective source code. For more information on how you can obtain our open source code, please visit our web site.
LICENSING INFORMATION
GNU GENERAL PUBLIC LICENSE
Version 2, June 1991
Copyright (C) 1989, 1991 Free Software Foundation, Inc.
Temple Place, Suite 330, Boston, MA 02111-1307 USA
Everyone is permitted to copy and distribute verbatim copies
of this license document, but changing it is not allowed.
Preamble
The licenses for most software are designed to take away your freedom to share and change it. By contrast, the GNU General Public License is intended to guarantee your freedom to share and change free software--to make sure the software is free for all its users. This General Public License applies to most of the Free Software Foundation's software and to any other program whose authors commit to using it. (Some other Free Software Foundation software is covered by the GNU Library General Public License instead.) You can apply it to your programs, too.
When we speak of free software, we are referring to freedom, not price. Our General Public Licenses are designed to make sure that you have the freedom to distribute copies of free software (and charge for this service if you wish), that you receive source code or can get it if you want it, that you can change the software or use pieces of it in new free programs; and that you know you can do these things.
To protect your rights, we need to make restrictions that forbid anyone to deny you these rights or to ask you to surrender the rights. These restrictions translate to certain responsibilities for you if you distribute copies of the software, or if you modify it.
For example, if you distribute copies of such a program, whether gratis or for a fee, you must give the recipients all the rights that you have. You must make sure that they, too, receive or can get the source code. And you must show them these terms so they know their rights.
We protect your rights with two steps: (1) copyright the software, and (2) offer you this license which gives you legal permission to copy, distribute and/or modify the software.
Also, for each author's protection and ours, we want to make certain that everyone understands that there is no warranty for this free software. If the software is modified by someone else and passed on, we want its recipients to know that what they have is not the original, so that any problems introduced by others will not reflect on the original authors' reputations.
Finally, any free program is threatened constantly by software patents. We wish to avoid the danger that redistributors of a free program will individually obtain patent licenses, in effect making the program proprietary. To prevent this, we have made it clear that any patent must be licensed for everyone's free use or not licensed at all.
The precise terms and conditions for copying, distribution and modification follow.
GNU GENERAL PUBLIC LICENSE
TERMS AND CONDITIONS FOR COPYING, DISTRIBUTION AND MODIFICATION
- This License applies to any program or other work which contains a notice placed by the copyright holder saying it may be distributed under the terms of this General Public License. The "Program", below, refers to any such program or work, and a "work based on the Program" means either the Program or any derivative work under copyright law: that is to say, a work containing the Program or a portion of it, either verbatim or with modifications and/or translated into another language. (Hereinafter, translation is included without limitation in the term "modification".) Each licensee is addressed as "you".
Activities other than copying, distribution and modification are not covered by this License; they are outside its scope. The act of running the Program is not restricted, and the output from the Program is covered only if its contents constitute a work based on the Program (independent of having been made by running the Program). Whether that is true depends on what the Program does.
- You may copy and distribute verbatim copies of the Program's source code as you receive it, in any medium, provided that you conspicuously and appropriately publish on each copy an appropriate copyright notice and disclaimer of warranty; keep intact all the notices that refer to this License and to the absence of any warranty; and give any other recipients of the Program a copy of this License along with the Program.
You may charge a fee for the physical act of transferring a copy, and you may at your option offer warranty protection in exchange for a fee.
LICENSE INFORMATION
- You may modify your copy or copies of the Program or any portion of it, thus forming a work based on the Program, and copy and distribute such modifications or work under the terms of Section 1 above, provided that you also meet all of these conditions:
a) You must cause the modified files to carry prominent notices stating that you changed the files and the date of any change.
b) You must cause any work that you distribute or publish, that in whole or in part contains or is derived from the Program or any part thereof, to be licensed as a whole at no charge to all third parties under the terms of this License.
c) If the modified program normally reads commands interactively when run, you must cause it, when started running for such interactive use in the most ordinary way, to print or display an announcement including an appropriate copyright notice and a notice that there is no warranty (or else, saying that you provide a warranty) and that users may redistribute the program under these conditions, and telling the user how to view a copy of this License. (Exception: if the Program itself is interactive but does not normally print such an announcement, your work based on the Program is not required to print an announcement.)
These requirements apply to the modified work as a whole. If identifiable sections of that work are not derived from the Program, and can be reasonably considered independent and separate works in themselves, then this License, and its terms, do not apply to those sections when you distribute them as separate works. But when you distribute the same sections as part of a whole which is a work based on the Program, the distribution of the whole must be on the terms of this License, whose permissions for other licensees extend to the entire whole, and thus to each and every part regardless of who wrote it.
Thus, it is not the intent of this section to claim rights or contest your rights to work written entirely by you; rather, the intent is to exercise the right to control the distribution of derivative or collective works based on the Program.
In addition, mere aggregation of another work not based on the Program with the Program (or with a work based on the Program) on a volume of a storage or distribution medium does not bring the other work under the scope of this License.
- You may copy and distribute the Program (or a work based on it, under Section 2) in object code or executable form under the terms of Sections 1 and 2 above provided that you also do one of the following:
a) Accompany it with the complete corresponding machine-readable source code, which must be distributed under the terms of Sections 1 and 2 above on a medium customarily used for software interchange; or,
b) Accompany it with a written offer, valid for at least three years, to give any third party, for a charge no more than your cost of physically performing source distribution, a complete machine-readable copy of the corresponding source code, to be distributed under the terms of Sections 1 and 2 above on a medium customarily used for software interchange; or,
c) Accompany it with the information you received as to the offer to distribute corresponding source code. (This alternative is allowed only for noncommercial distribution and only if you received the program in object code or executable form with such an offer, in accord with Subsection b above.)
The source code for a work means the preferred form of the work for making modifications to it. For an executable work, complete source code means all the source code for all modules it contains, plus any associated interface definition files, plus the scripts used to control compilation and installation of the executable. However, as a special exception, the source code distributed need not include anything that is normally distributed (in either source or binary form) with the major components (compiler, kernel, and so on) of the operating system on which the executable runs, unless that component itself accompanies the executable.
If distribution of executable or object code is made by offering access to copy from a designated place, then offering equivalent access to copy the source code from the same place counts as distribution of the source code, even though third parties are not compelled to copy the source along with the object code.
LICENSING INFORMATION
- You may not copy, modify, sublicense, or distribute the Program except as expressly provided under this License. Any attempt otherwise to copy, modify, sublicense or distribute the Program is void, and will automatically terminate your rights under this License. However, parties who have received copies, or rights, from you under this License will not have their licenses terminated so long as such parties remain in full compliance.
- You are not required to accept this License, since you have not signed it. However, nothing else grants you permission to modify or distribute the Program or its derivative works. These actions are prohibited by law if you do not accept this License. Therefore, by modifying or distributing the Program (or any work based on the Program), you indicate your acceptance of this License to do so, and all its terms and conditions for copying, distributing or modifying the Program or works based on it.
- Each time you redistribute the Program (or any work based on the Program), the recipient automatically receives a license from the original licensor to copy, distribute or modify the Program subject to these terms and conditions. You may not impose any further restrictions on the recipients' exercise of the rights granted herein. You are not responsible for enforcing compliance by third parties to this License.
- If, as a consequence of a court judgment or allegation of patent infringement or for any other reason (not limited to patent issues), conditions are imposed on you (whether by court order, agreement or otherwise) that contradict the conditions of this License, they do not excuse you from the conditions of this License. If you cannot distribute so as to satisfy simultaneously your obligations under this License and any other pertinent obligations, then as a consequence you may not distribute the Program at all. For example, if a patent license would not permit royalty-free redistribution of the Program by all those who receive copies directly or indirectly through you, then the only way you could satisfy both it and this License would be to refrain entirely from distribution of the Program.
If any portion of this section is held invalid or unenforceable under any particular circumstance, the balance of the section is intended to apply and the section as a whole is intended to apply in other circumstances. It is not the purpose of this section to induce you to infringe any patents or other property right claims or to contest validity of any such claims; this section has the sole purpose of protecting the integrity of the free software distribution system, which is implemented by public license practices. Many people have made generous contributions to the wide range of software distributed through that system in reliance on consistent application of that system; it is up to the author/donor to decide if he or she is willing to distribute software through any other system and a licensee cannot impose that choice.
This section is intended to make thoroughly clear what is believed to be a consequence of the rest of this License.
- If the distribution and/or use of the Program is restricted in certain countries either by patents or by copyrighted interfaces, the original copyright holder who places the Program under this License may add an explicit geographical distribution limitation excluding those countries, so that distribution is permitted only in or among countries not thus excluded. In such case, this License incorporates the limitation as if written in the body of this License.
- The Free Software Foundation may publish revised and/or new versions of the General Public License from time to time. Such new versions will be similar in spirit to the present version, but may differ in detail to address new problems or concerns.
Each version is given a distinguishing version number. If the Program specifies a version number of this License which applies to it and "any later version", you have the option of following the terms and conditions either of that version or of any later version published by the Free Software Foundation. If the Program does not specify a version number of this License, you may choose any version ever published by the Free Software Foundation.
- If you wish to incorporate parts of the Program into other free programs whose distribution conditions are different, write to the author to ask for permission. For software which is copyrighted by the Free Software Foundation, write to the Free Software Foundation; we sometimes make exceptions for this. Our decision will be guided by the two goals of preserving the free status of all derivatives of our free software and of promoting the sharing and reuse of software generally.
LICENSING INFORMATION
NO WARRANTY
- BECAUSE THE PROGRAM IS LICENSED FREE OF CHARGE, THERE IS NO WARRANTY FOR THE PROGRAM, TO THE EXTENT PERMITTED BY APPLICABLE LAW. EXCEPT WHEN OTHERWISE STATED IN WRITING THE COPYRIGHT HOLDERS AND/OR OTHER PARTIES PROVIDE THE PROGRAM "AS IS" WITHOUT WARRANTY OF ANY KIND, EITHER EXPRESSED OR IMPLIED, INCLUDING, BUT NOT LIMITED TO, THE IMPLIED WARRANTYES OF MERCHANTABILITY AND FITNESS FOR A PARTICULAR PURPOSE. THE ENTIRE RISK AS TO THE QUALITY AND PERFORMANCE OF THE PROGRAM IS WITH YOU. SHOULD THE PROGRAM PROVE DEFECTIVE, YOU ASSUME THE COST OF ALL NECESSARY SERVICING, REPAIR OR CORRECTION.
- IN NO EVENT UNLESS REQUIRED BY APPLICABLE LAW OR AGREED TO IN WRITING WILL ANY COPYRIGHT HOLDER, OR ANY OTHER PARTY WHO MAY MODIFY AND/OR REDISTRIBUTE THE PROGRAM AS PERMITTED ABOVE, BE LIABLE TO YOU FOR DAMAGES, INCLUDING ANY GENERAL, SPECIAL, INCIDENTAL OR CONSEQUENTIAL DAMAGES ARISING OUT OF THE USE OR INABILITY TO USE THE PROGRAM (INCLUDING BUT NOT LIMITED TO LOSS OF DATA OR DATA BEING RENDERED INACCURATE OR LOSSES SUSTAINED BY YOU OR THIRD PARTIES OR A FAILURE OF THE PROGRAM TO OPERATE WITH ANY OTHER PROGRAMS), EVEN IF SUCH HOLDER OR OTHER PARTY HAS BEEN ADVISED OF THE POSSIBILITY OF SUCH DAMAGES.
END OF TERMS AND CONDITIONS
How to Apply These Terms to Your New Programs
If you develop a new program, and you want it to be of the greatest possible use to the public, the best way to achieve this is to make it free software which everyone can redistribute and change under these terms.
To do so, attach the following notices to the program. It is safest to attach them to the start of each source file to most effectively convey the exclusion of warranty; and each file should have at least the "copyright" line and a pointer to where the full notice is found.
1 April 1989
Ty Coon, President of Vice
This General Public License does not permit incorporating your program into proprietary programs. If your program is a subroutine library, you may consider it more useful to permit linking proprietary applications with the lib
LICENSING INFORMATION
GNU LESSER GENERAL PUBLIC LICENSE
Version 2.1, February 1999
Copyright (C) 1991, 1999 Free Software Foundation, Inc. 51 Franklin Street, Fifth Floor, Boston, MA 02110-1301 USA Everyone is permitted to copy and distribute verbatim copies of this license document, but changing it is not allowed.
[This is the first released version of the Lesser GPL. It also counts as the successor of the GNU Library Public License, version 2, hence the version number 2.1.]
Preamble
The licenses for most software are designed to take away your freedom to share and change it. By contrast, the GNU General Public Licenses are intended to guarantee your freedom to share and change free software--to make sure the software is free for all its users.
This license, the Lesser General Public License, applies to some specially designated software packages--typically libraries-- of the Free Software Foundation and other authors who decide to use it. You can use it too, but we suggest you first think carefully about whether this license or the ordinary General Public License is the better strategy to use in any particular case, based on the explanations below.
When we speak of free software, we are referring to freedom of use, not price. Our General Public Licenses are designed to make sure that you have the freedom to distribute copies of free software (and charge for this service if you wish); that you receive source code or can get it if you want it; that you can change the software and use pieces of it in new free programs; and that you are informed that you can do these things.
To protect your rights, we need to make restrictions that forbid distributors to deny you these rights or to ask you to surrender these rights. These restrictions translate to certain responsibilities for you if you distribute copies of the library or if you modify it.
For example, if you distribute copies of the library, whether gratis or for a fee, you must give the recipients all the rights that we gave you. You must make sure that they, too, receive or can get the source code. If you link other code with the library, you must provide complete object files to the recipients, so that they can relink them with the library after making changes to the library and recompiling it. And you must show them these terms so they know their rights.
We protect your rights with a two-step method: (1) we copyright the library, and (2) we offer you this license, which gives you legal permission to copy, distribute and/or modify the library.
To protect each distributor, we want to make it very clear that there is no warranty for the free library. Also, if the library is modified by someone else and passed on, the recipients should know that what they have is not the original version, so that the original author's reputation will not be affected by problems that might be introduced by others.
Finally, software patents pose a constant threat to the existence of any free program. We wish to make sure that a company cannot effectively restrict the users of a free program by obtaining a restrictive license from a patent holder. Therefore, we insist that any patent license obtained for a version of the library must be consistent with the full freedom of use specified in this license.
Most GNU software, including some libraries, is covered by the ordinary GNU General Public License. This license, the GNU Lesser General Public License, applies to certain designated libraries, and is quite different from the ordinary General Public License. We use this license for certain libraries in order to permit linking those libraries into non-free programs.
When a program is linked with a library, whether statically or using a shared library, the combination of the two is legally speaking a combined work, a derivative of the original library. The ordinary General Public License therefore permits such linking only if the entire combination fits its criteria of freedom. The Lesser General Public License permits more lax criteria for linking other code with the library.
We call this license the "Lesser" General Public License because it does Less to protect the user's freedom than the ordinary General Public License. It also provides other free software developers Less of an advantage over competing non-free programs. These disadvantages are the reason we use the ordinary General Public License for many libraries. However, the Lesser license provides advantages in certain special circumstances.
For example, on rare occasions, there may be a special need to encourage the widest possible use of a certain library, so that it becomes a de-facto standard. To achieve this, non-free programs must be allowed to use the library. A more frequent case is that a free library does the same job as widely used non-free libraries. In this case, there is little to gain by limiting the free library to free software only, so we use the Lesser General Public License.
LICENSE INFORMATION
In other cases, permission to use a particular library in non-free programs enables a greater number of people to use a large body of free software. For example, permission to use the GNU C Library in non-free programs enables many more people to use the whole GNU operating system, as well as its variant, the GNU/Linux operating system.
Although the Lesser General Public License is Less protective of the users' freedom, it does ensure that the user of a program that is linked with the Library has the freedom and the wherewithal to run that program using a modified version of the Library.
The precise terms and conditions for copying, distribution and modification follow. Pay close attention to the difference between a "work based on the library" and a "work that uses the library". The former contains code derived from the library, whereas the latter must be combined with the library in order to run.
GNU LESSER GENERAL PUBLIC LICENSE TERMS AND CONDITIONS FOR COPYING, DISTRIBUTION AND MODIFICATION
- This License Agreement applies to any software library or other program which contains a notice placed by the copyright holder or other authorized party saying it may be distributed under the terms of this Lesser General Public License (also called "this License"). Each licensee is addressed as "you".
A "library" means a collection of software functions and/or data prepared so as to be conveniently linked with application programs (which use some of those functions and data) to form executables.
The "Library", below, refers to any such software library or work which has been distributed under these terms. A "work based on the Library" means either the Library or any derivative work under copyright law: that is to say, a work containing the Library or a portion of it, either verbatim or with modifications and/or translated straightforwardly into another language. (Hereinafter, translation is included without limitation in the term "modification".)
"Source code" for a work means the preferred form of the work for making modifications to it. For a library, complete source code means all the source code for all modules it contains, plus any associated interface definition files, plus the scripts used to control compilation and installation of the library.
Activities other than copying, distribution and modification are not covered by this License; they are outside its scope. The act of running a program using the Library is not restricted, and output from such a program is covered only if its contents constitute a work based on the Library (independent of the use of the Library in a tool for writing it). Whether that is true depends on what the Library does and what the program that uses the Library does.
- You may copy and distribute verbatim copies of the Library's complete source code as you receive it, in any medium, provided that you conspicuously and appropriately publish on each copy an appropriate copyright notice and disclaimer of warranty; keep intact all the notices that refer to this License and to the absence of any warranty; and distribute a copy of this License along with the Library.
You may charge a fee for the physical act of transferring a copy, and you may at your option offer warranty protection in exchange for a fee.
- You may modify your copy or copies of the Library or any portion of it, thus forming a work based on the Library, and copy and distribute such modifications or work under the terms of Section 1 above, provided that you also meet all of these conditions:
a) The modified work must itself be a software library.
b) You must cause the files modified to carry prominent notices stating that you changed the files and the date of any change.
c) You must cause the whole of the work to be licensed at no charge to all third parties under the terms of this License.
d) If a facility in the modified Library refers to a function or a table of data to be supplied by an application program that uses the facility, other than as an argument passed when the facility is invoked, then you must make a good faith effort to ensure that, in the event an application does not supply such function or table, the facility still operates, and performs whatever part of its purpose remains meaningful.
(For example, a function in a library to compute square roots has a purpose that is entirely well-defined independent of the application. Therefore, Subsection 2d requires that any application-supplied function or table used by this function must be optional: if the application does not supply it, the square root function must still compute square roots.)
LICENSING INFORMATION
These requirements apply to the modified work as a whole. If identifiable sections of that work are not derived from the Library, and can be reasonably considered independent and separate works in themselves, then this License, and its terms, do not apply to those sections when you distribute them as separate works. But when you distribute the same sections as part of a whole which is a work based on the Library, the distribution of the whole must be on the terms of this License, whose permissions for other licensees extend to the entire whole, and thus to each and every part regardless of who wrote it.
Thus, it is not the intent of this section to claim rights or contest your rights to work written entirely by you; rather, the intent is to exercise the right to control the distribution of derivative or collective works based on the Library.
In addition, mere aggregation of another work not based on the Library with the Library (or with a work based on the Library) on a volume of a storage or distribution medium does not bring the other work under the scope of this License.
- You may opt to apply the terms of the ordinary GNU General Public License instead of this License to a given copy of the Library. To do this, you must alter all the notices that refer to this License, so that they refer to the ordinary GNU General Public License, version 2, instead of to this License. (If a newer version than version 2 of the ordinary GNU General Public License has appeared, then you can specify that version instead if you wish.) Do not make any other change in these notices.
Once this change is made in a given copy, it is irreversible for that copy, so the ordinary GNU General Public License applies to all subsequent copies and derivative works made from that copy.
This option is useful when you wish to copy part of the code of the Library into a program that is not a library.
- You may copy and distribute the Library (or a portion or derivative of it, under Section 2) in object code or executable form under the terms of Sections 1 and 2 above provided that you accompany it with the complete corresponding machine-readable source code, which must be distributed under the terms of Sections 1 and 2 above on a medium customarily used for software interchange.
If distribution of object code is made by offering access to copy from a designated place, then offering equivalent access to copy the source code from the same place satisfies the requirement to distribute the source code, even though third parties are not compelled to copy the source along with the object code.
- A program that contains no derivative of any portion of the Library, but is designed to work with the Library by being compiled or linked with it, is called a "work that uses the Library". Such a work, in isolation, is not a derivative work of the Library, and therefore falls outside the scope of this License.
However, linking a "work that uses the Library" with the Library creates an executable that is a derivative of the Library (because it contains portions of the Library), rather than a "work that uses the library". The executable is therefore covered by this License. Section 6 states terms for distribution of such executables.
When a "work that uses the Library" uses material from a header file that is part of the Library, the object code for the work may be a derivative work of the Library even though the source code is not. Whether this is true is especially significant if the work can be linked without the Library, or if the work is itself a library. The threshold for this to be true is not precisely defined by law.
If such an object file uses only numerical parameters, data structure layouts and accessors, and small macros and small inline functions (ten lines or less in length), then the use of the object file is unrestricted, regardless of whether it is legally a derivative work. (Executables containing this object code plus portions of the Library will still fall under Section 6.)
Otherwise, if the work is a derivative of the Library, you may distribute the object code for the work under the terms of Section 6. Any executables containing that work also fall under Section 6, whether or not they are linked directly with the Library itself.
- As an exception to the Sections above, you may also combine or link a "work that uses the Library" with the Library to produce a work containing portions of the Library, and distribute that work under terms of your choice, provided that the terms permit modification of the work for the customer's own use and reverse engineering for debugging such modifications.
LICENSE INFORMATION
You must give prominent notice with each copy of the work that the Library is used in it and that the Library and its use are covered by this License. You must supply a copy of this License. If the work during execution displays copyright notices, you must include the copyright notice for the Library among them, as well as a reference directing the user to the copy of this License. Also, you must do one of these things:
a) Accompany the work with the complete corresponding machine-readable source code for the Library including whatever changes were used in the work (which must be distributed under Sections 1 and 2 above); and, if the work is an executable linked with the Library, with the complete machine-readable "work that uses the Library", as object code and/or source code, so that the user can modify the Library and then relink to produce a modified executable containing the modified Library. (It is understood that the user who changes the contents of definitions files in the Library will not necessarily be able to recompile the application to use the modified definitions.)
b) Use a suitable shared library mechanism for linking with the Library. A suitable mechanism is one that (1) uses at run time a copy of the library already present on the user's computer system, rather than copying library functions into the executable, and (2) will operate properly with a modified version of the library, if the user installs one, as long as the modified version is interface-compatible with the version that the work was made with.
c) Accompany the work with a written offer, valid for at least three years, to give the same user the materials specified in Subsection 6a, above, for a charge no more than the cost of performing this distribution.
d) If distribution of the work is made by offering access to copy from a designated place, offer equivalent access to copy the above specified materials from the same place.
e) Verify that the user has already received a copy of these materials or that you have already sent this user a copy.
For an executable, the required form of the "work that uses the Library" must include any data and utility programs needed for reproducing the executable from it. However, as a special exception, the materials to be distributed need not include anything that is normally distributed (in either source or binary form) with the major components (compiler, kernel, and so on) of the operating system on which the executable runs, unless that component itself accompanies the executable.
It may happen that this requirement contradicts the license restrictions of other proprietary libraries that do not normally accompany the operating system. Such a contradiction means you cannot use both them and the Library together in an executable that you distribute.
- You may place library facilities that are a work based on the Library side-by-side in a single library together with other library facilities not covered by this License, and distribute such a combined library, provided that the separate distribution of the work based on the Library and of the other library facilities is otherwise permitted, and provided that you do these two things:
a) Accompany the combined library with a copy of the same work based on the Library, uncombined with any other library facilities. This must be distributed under the terms of the Sections above.
b) Give prominent notice with the combined library of the fact that part of it is a work based on the Library, and explaining where to find the accompanying uncombined form of the same work.
8. You may not copy, modify, sublicense, link with, or distribute the Library except as expressly provided under this License. Any attempt otherwise to copy, modify, sublicense, link with, or distribute the Library is void, and will automatically terminate your rights under this License. However, parties who have received copies, or rights, from you under this License will not have their licenses terminated so long as such parties remain in full compliance.
9. You are not required to accept this License, since you have not signed it. However, nothing else grants you permission to modify or distribute the Library or its derivative works. These actions are prohibited by law if you do not accept this License. Therefore, by modifying or distributing the Library (or any work based on the Library), you indicate your acceptance of this License to do so, and all its terms and conditions for copying, distributing or modifying the Library or works based on it.
10. Each time you redistribute the Library (or any work based on the Library), the recipient automatically receives a license from the original licensor to copy, distribute, link with or modify the Library subject to these terms and conditions. You may not impose any further restrictions on the recipients' exercise of the rights granted herein. You are not responsible for enforcing compliance by third parties with this License.
LICENSE INFORMATION
- If, as a consequence of a court judgment or allegation of patent infringement or for any other reason (not limited to patent issues), conditions are imposed on you (whether by court order, agreement or otherwise) that contradict the conditions of this License, they do not excuse you from the conditions of this License. If you cannot distribute so as to satisfy simultaneously your obligations under this License and any other pertinent obligations, then as a consequence you may not distribute the Library at all. For example, if a patent license would not permit royalty-free redistribution of the Library by all those who receive copies directly or indirectly through you, then the only way you could satisfy both it and this License would be to refrain entirely from distribution of the Library.
If any portion of this section is held invalid or unenforceable under any particular circumstance, the balance of the section is intended to apply, and the section as a whole is intended to apply in other circumstances.
It is not the purpose of this section to induce you to infringe any patents or other property right claims or to contest validity of any such claims; this section has the sole purpose of protecting the integrity of the free software distribution system which is implemented by public license practices. Many people have made generous contributions to the wide range of software distributed through that system in reliance on consistent application of that system; it is up to the author/donor to decide if he or she is willing to distribute software through any other system and a licensee cannot impose that choice.
This section is intended to make thoroughly clear what is believed to be a consequence of the rest of this License.
- If the distribution and/or use of the Library is restricted in certain countries either by patents or by copyrighted interfaces, the original copyright holder who places the Library under this License may add an explicit geographical distribution limitation excluding those countries, so that distribution is permitted only in or among countries not thus excluded. In such case, this License incorporates the limitation as if written in the body of this License.
- The Free Software Foundation may publish revised and/or new versions of the Lesser General Public License from time to time. Such new versions will be similar in spirit to the present version, but may differ in detail to address new problems or concerns.
Each version is given a distinguishing version number. If the Library specifies a version number of this License which applies to it and "any later version", you have the option of following the terms and conditions either of that version or of any later version published by the Free Software Foundation. If the Library does not specify a license version number, you may choose any version ever published by the Free Software Foundation.
- If you wish to incorporate parts of the Library into other free programs whose distribution conditions are incompatible with these, write to the author to ask for permission. For software which is copyrighted by the Free Software Foundation, write to the Free Software Foundation; we sometimes make exceptions for this. Our decision will be guided by the two goals of preserving the free status of all derivatives of our free software and of promoting the sharing and reuse of software generally.
NO WARRANTY
- BECAUSE THE LIBRARY IS LICENSED FREE OF CHARGE, THERE IS NO WARRANTY FOR THE LIBRARY, TO THE EXTENT PERMITTED BY APPLICABLE LAW. EXCEPT WHEN OTHERWISE STATED IN WRITING THE COPYRIGHT HOLDERS AND/OR OTHER PARTIES PROVIDE THE LIBRARY "AS IS" WITHOUT WARRANTY OF ANY KIND, EITHER EXPRESSED OR IMPLIED, INCLUDING, BUT NOT LIMITED TO, THE IMPLIED WARRANTY OF MERCHANTABILITY AND FITNESS FOR A PARTICULAR PURPOSE. THE ENTIRE RISK AS TO THE QUALITY AND PERFORMANCE OF THE LIBRARY IS WITH YOU. SHOULD THE LIBRARY PROVE DEFECTIVE, YOU ASSUME THE COST OF ALL NECESSARY SERVICING, REPAIR OR CORRECTION.
- IN NO EVENT UNLESS REQUIRED BY APPLICABLE LAW OR AGREED TO IN WRITING WILL ANY COPYRIGHT HOLDER, OR ANY OTHER PARTY WHO MAY MODIFY AND/OR REDISTRIBUTE THE LIBRARY AS PERMITTED ABOVE, BE LIABLE TO YOU FOR DAMAGES, INCLUDING ANY GENERAL, SPECIAL, INCIDENTAL OR CONSEQUENTIAL DAMAGES ARISING OUT OF THE USE OR INABILITY TO USE THE LIBRARY (INCLUDING BUT NOT LIMITED TO LOSS OF DATA OR DATA BEING RENDERED INACCURATE OR LOSSES SUSTAINED BY YOU OR THIRD PARTIES OR A FAILURE OF THE LIBRARY TO OPERATE WITH ANY OTHER SOFTWARE), EVEN IF SUCH HOLDER OR OTHER PARTY HAS BEEN ADVISED OF THE POSSIBILITY OF SUCH DAMAGES.
END OF TERMS AND CONDITIONS
LICENSING INFORMATION
The FreeType Project LICENSE
2006-Jan-27
Copyright 1996-2002, 2006 by David Turner, Robert Wilhelm, and Werner Lemberg
INTRODUCTION
The FreeType Project is distributed in several archive packages; some of them may contain, in addition to the FreeType font engine, various tools and contributions which rely on, or relate to, the FreeType Project.
This license applies to all files found in such packages, and which do not fall under their own explicit license. The license affects thus the FreeType font engine, the test programs, documentation and makefiles, at the very least.
This license was inspired by the BSD, Artistic, and IJG (Independent JPEG Group) licenses, which all encourage inclusion and use of free software in commercial and freeware products alike. As a consequence, its main points are that:
o We don't promise that this software works. However, we will be interested in any kind of bug reports. (^ as is' distribution)
o You can use this software for whatever you want, in parts or full form, without having to pay us. ('royalty-free' usage)
o You may not pretend that you wrote this software. If you use it, or only parts of it, in a program, you must acknowledge somewhere in your documentation that you have used the FreeType code. ('credits')
We specifically permit and encourage the inclusion of this software, with or without modifications, in commercial products. We disclaim all warranties covering The FreeType Project and assume no liability related to The FreeType Project.
Finally, many people asked us for a preferred form for a credit/disclaimer to use in compliance with this license. We thus encourage you to use the following text:
··
Portions of this software are copyright ©
Please replace
LEGAL TERMS
0. Definitions
Throughout this license, the terms package',FreeType Project', and FreeType archive' refer to the set of files originally distributed by the authors (David Turner, Robert Wilhelm, and Werner Lemberg) as theFreeType Project', be they named as alpha, beta or final release.
You' refers to the licensee, or person using the project, whereusing' is a generic term including compiling the project's source code as well as linking it to form a program' orexecutable'. This program is referred to as `a program using the FreeType engine'.
This license applies to all files distributed in the original FreeType Project, including all source code, binaries and documentation, unless otherwise stated in the file in its original, unmodified form as distributed in the original archive. If you are unsure whether or not a particular file is covered by this license, you must contact us to verify this.
The FreeType Project is copyright (C) 1996-2000 by David Turner, Robert Wilhelm, and Werner Lemberg. All rights reserved except as specified below.
LICENSING INFORMATION
1. No Warranty
THE FREETYPE PROJECT IS PROVIDED 'AS IS' WITHOUT WARRANTY OF ANY KIND, EITHER EXPRESS OR IMPLIED, INCLUDING, BUT NOT LIMITED TO, WARRANTY OF MERCHANTABILITY AND FITNESS FOR A PARTICULAR PURPOSE. IN NO EVENT WILL ANY OF THE AUTHORS OR COPYRIGHT HOLDERS BE LIABLE FOR ANY DAMAGES CAUSED BY THE USE OR THE INABILITY TO USE, OF THE FREETYPE PROJECT.
2. Redistribution
This license grants a worldwide, royalty-free, perpetual and irrevocable right and license to use, execute, perform, compile, display, copy, create derivative works of, distribute and sublicense the FreeType Project (in both source and object code forms) and derivative works thereof for any purpose; and to authorize others to exercise some or all of the rights granted herein, subject to the following conditions:
o Redistribution of source code must retain this license file ('FTL.TXT') unaltered; any additions, deletions or changes to the original files must be clearly indicated in accompanying documentation. The copyright notices of the unaltered, original files must be preserved in all copies of source files.
o Redistribution in binary form must provide a disclaimer that states that the software is based in part of the work of the FreeType Team, in the distribution documentation. We also encourage you to put an URL to the FreeType web page in your documentation, though this isn't mandatory.
These conditions apply to any software derived from or based on the FreeType Project, not just the unmodified files. If you use our work, you must acknowledge us. However, no fee need be paid to us.
3. Advertising
Neither the FreeType authors and contributors nor you shall use the name of the other for commercial, advertising, or promotional purposes without specific prior written permission.
We suggest, but do not require, that you use one or more of the following phrases to refer to this software in your documentation or advertising materials: FreeType Project',FreeType Engine', FreeType library', orFreeType Distribution'.
As you have not signed this license, you are not required to accept it. However, as the FreeType Project is copyrighted material, only this license, or another one contracted with the authors, grants you the right to use, distribute, and modify it. Therefore, by using, distributing, or modifying the FreeType Project, you indicate that you understand and accept all the terms of this license.
4. Contacts
There are two mailing lists related to FreeType:
o freetype @ nongnu.org
Discusses general use and applications of FreeType, as well as future and wanted additions to the library and distribution. If you are looking for support, start in this list if you haven't found anything to help you in the documentation.
o freetype-devel@nongnu.org
Discusses bugs, as well as engine internals, design issues, specific licenses, porting, etc.
Our home page can be found at http://www.freetype.org