
CL1489 - Radio AudioSonic - Free user manual and instructions
Find the device manual for free CL1489 AudioSonic in PDF.
| Product type | Clock radio |
| Brand | AudioSonic |
| Model | CL1489 |
| Main power supply | AC/DC power adapter (included) |
| Backup battery | Lithium CR2032 (not included) |
| Display | LED, adjustable brightness |
| Alarms | 2 independent alarms |
| Wake-up source | Radio or buzzer |
| Preset FM stations | 10 stations |
| Radio reception | FM |
| Antenna | FM wire antenna |
| Nap timer (NAP) | 5, 15, 30, 45, 60, 75 or 90 minutes |
| Sleep timer | 5, 15, 30, 45, 60, 75 or 90 minutes |
| Weather function | Forecast based on built-in humidity sensor |
| Alarm snooze | Adjustable delay from 5 to 60 minutes |
| Brightness dimmer | Yes, multiple levels |
| Cleaning | Damp cloth with warm soapy water |
| Precautions | Do not mix old and new batteries; remove batteries if unused for more than a month |
Frequently Asked Questions - CL1489 AudioSonic
User questions about CL1489 AudioSonic
0 question about this device. Answer the ones you know or ask your own.
Ask a new question about this device
Download the instructions for your Radio in PDF format for free! Find your manual CL1489 - AudioSonic and take your electronic device back in hand. On this page are published all the documents necessary for the use of your device. CL1489 by AudioSonic.
USER MANUAL CL1489 AudioSonic
Clock radio
Weather indication - hi-lo-dimmer
CL-1489

AudioSonic
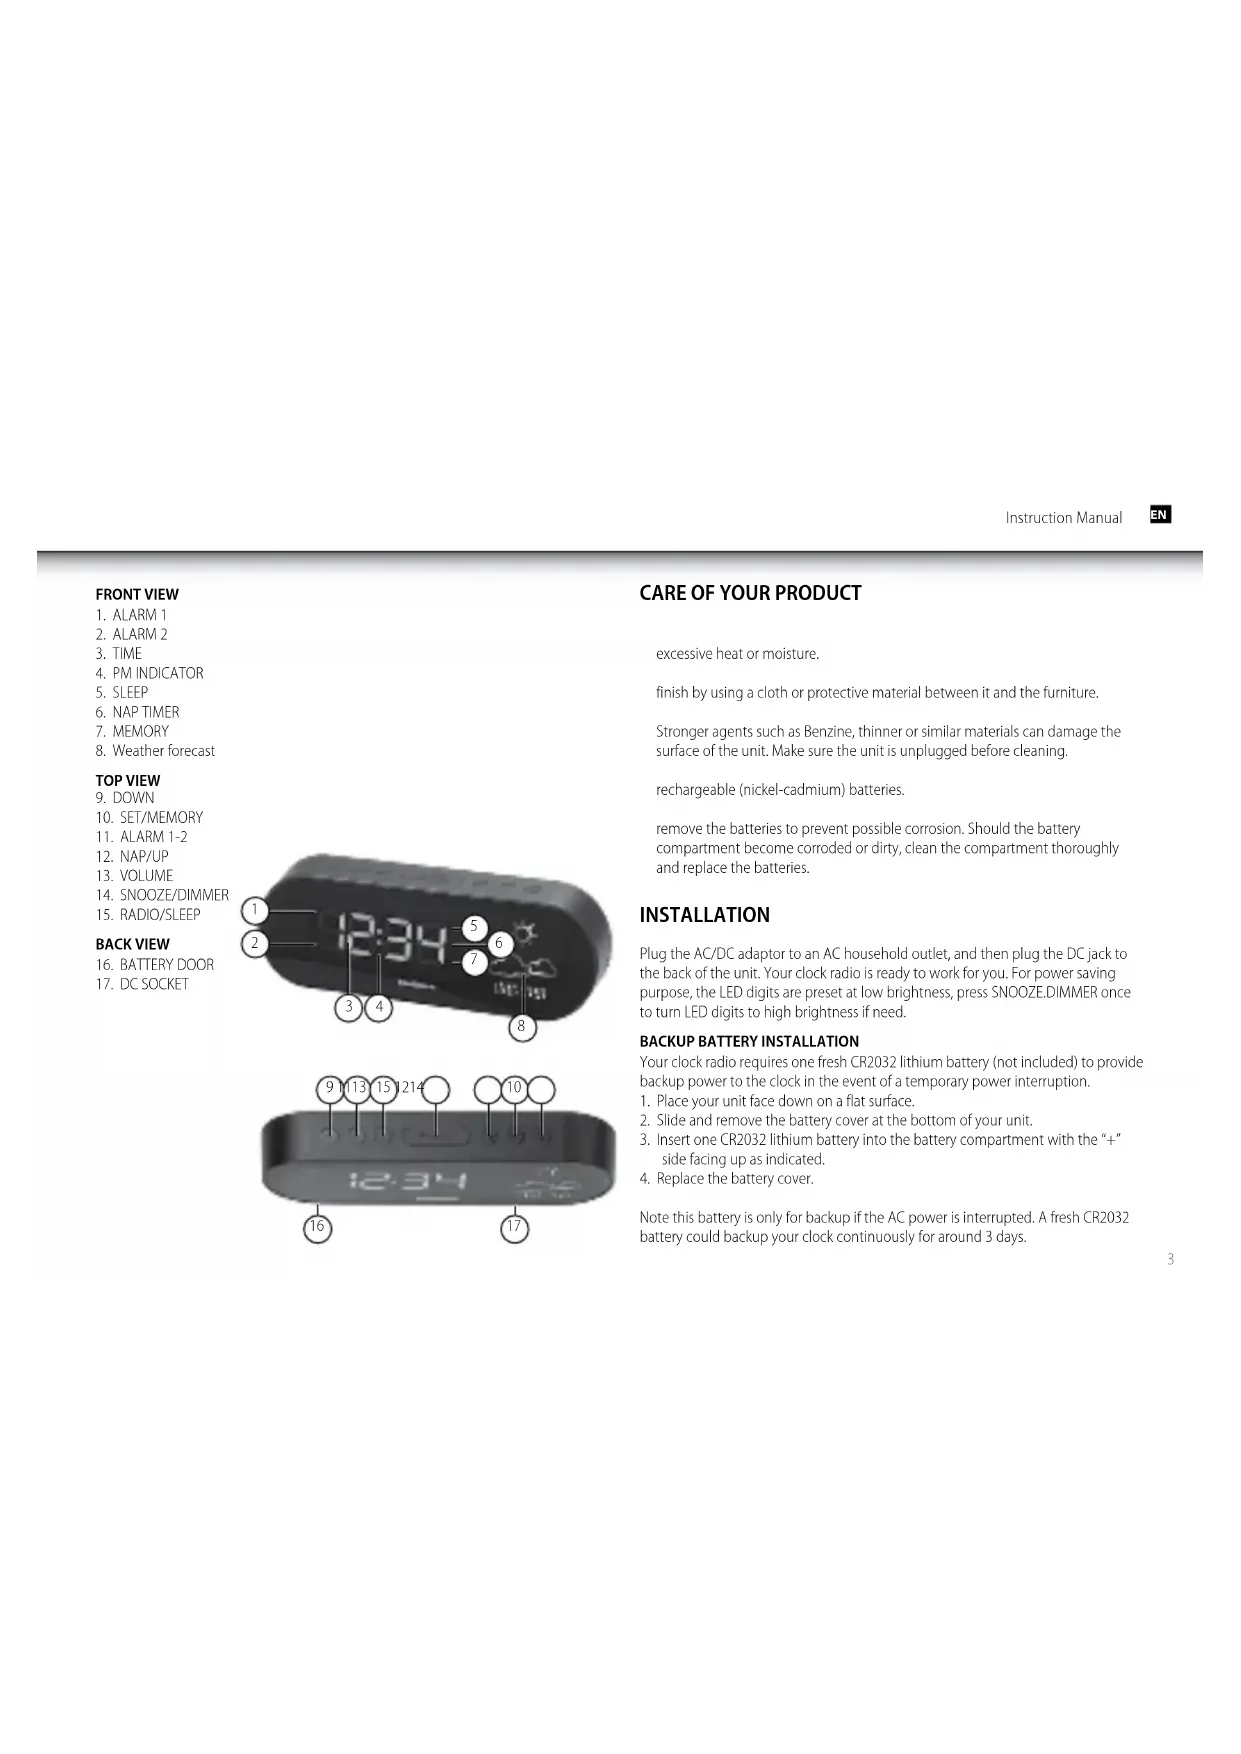
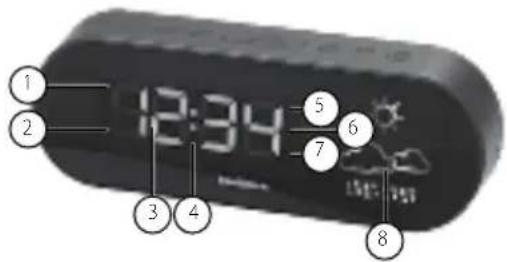
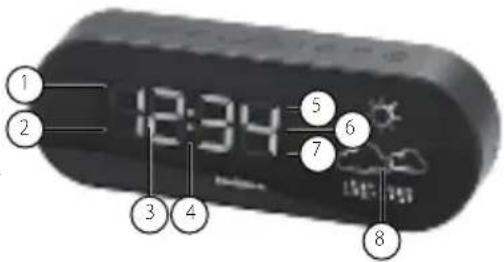
FRONT VIEW
- ALARM 1
- ALARM 2
- TIME
- PM INDICATOR
- SLEEP
- NAP TIMER
- MEMORY
- Weather forecast
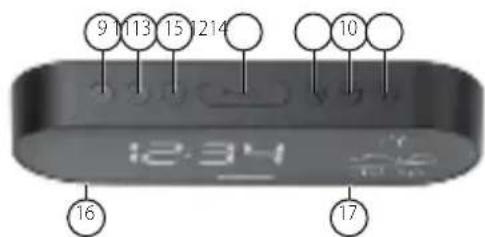
TOP VIEW
- DOWN
- SET/MEMORY
- ALARM 1-2
- NAP/UP
- VOLUME
- SNOOZE/DIMMER
- RADIO/SLEEP
BACK VIEW
- BATTERY DOOR
- DC SOCKET

CARE OF YOUR PRODUCT
excessive heat or moisture.
finish by using a cloth or protective material between it and the furniture.
Stronger agents such as Benzine, thinner or similar materials can damage the surface of the unit. Make sure the unit is unplugged before cleaning.
rechargeable (nickel-cadmium) batteries.
remove the batteries to prevent possible corrosion. Should the battery compartment become corroded or dirty, clean the compartment thoroughly and replace the batteries.
INSTALLATION
Plug the AC/DC adaptor to an AC household outlet, and then plug the DC jack to the back of the unit. Your clock radio is ready to work for you. For power saving purpose, the LED digits are preset at low brightness, press SNOOZE.DIMMER once to turn LED digits to high brightness if need.
BACKUP BATTERY INSTALLATION
Your clock radio requires one fresh CR2032 lithium battery (not included) to provide backup power to the clock in the event of a temporary power interruption.
- Place your unit face down on a flat surface.
- Slide and remove the battery cover at the bottom of your unit.
- Insert one CR2032 lithium battery into the battery compartment with the "+" side facing up as indicated.
- Replace the battery cover.
Note this battery is only for backup if the AC power is interrupted. A fresh CR2032 battery could backup your clock continuously for around 3 days.

AudioSonic
Instruction Manual
SETTING TIME, 12/24HR TIME AND THE SNOOZE DURATION
- Press SFT once, the hour digits flash. Press ▲ or ▼ set the current hour (hold to advance rapidly).
- Press SET again, the minute digits flash. Press ▲ or ▼ set minutes.
- Press SET again, the display shows "24Hr" and flashes, Press ▲ or ▼ select "12Hr" or "24Hr" time format.
- Press SET again, the display shows "05" and flashes. Press ▲ or ▼ select your snooze time from 5 to 60 minutes.
- Press SET again or if no key pressed for approx. 10 seconds to exit the setting mode.
Note: when 12-hour time format is selected, the P (PM) icon will appear on the lower middle time display to indicate the afternoon time; there is no AM indicator.
SETTING THE ALARMS
- Press AL 1.2 once, the A1 icon and the hour digits flash. Press ▲ or ▼ set the alarm 1 hour.
- Press AL 1.2 again to adjust minutes. Press ▲ or ▼ set the alarm 1 minutes.
- Press AL 1.2 again, LED displays "OFF" (alarm off). To select wake to sound sources, press ▲ or ▼ to select :-
rd = wake-by-radio
bu = wake-by-buzzer
OFF = alarm off
- Press AL 1.2 again, the A2 icon and the hour digits flash. Press ▲ or ▼ set the alarm 2 hour. Repeat step 2) and 3) to set alarm 2.
-
Press AL1.2 again or no button around 10 seconds to exit alarm setting mode. When wake-to-radio or wake-to-buzzer is selected, the related alarm is turned on, indicated by appearance of the A1 and / or the A2 icon on the left side of the display.
-
Press AL1.2 again or if no key pressed for approx. 10 seconds to exit the alarm setting mode.
STOPPING AND RESETTING THE ALARM TO COME ON THE NEXT DAY
When alarm 1 or 2 is sounding, the related A1 or A2 icon flashes. Press the AL 1.2 once to stop the alarm and reset it to come on the following day. After that A1 or A2 icon keep lighting up on the display.
Note: When alarm is sounding, press thes ▲/ NAP or RADIO / SLEEP will activate the nap timer or the radio and stop the alarm for the day.
SNOOZE OPERATION (default snooze duration is 5 minutes)
When alarm is sounding, presses once, the alarm will be silenced and come on again after the set snooze duration.
Note: if your second alarm activates while the first alarm is sounding or it is in the snooze mode, the second alarm overrides the first alarm (the first alarm is reset to come on the next day).
USING THE HI-LO DIMMER
Press Zn•10 to adjust the brightness of the LED time display. This can only be done when the radio is off or the unit is not sounding.
USING THE NAP TIMER
The NAP Timer allows you to rest and automatically wake up in 5, 15, 30, 45, 60, 75 or 90 minutes.
- Press ▲/NAP once, the display shows the nap icon and the default naptime "05" (5 minutes).
- Press ▲/NAP again to select your desired naptime. It will exit to time display if no button pressed for around 5 seconds.
- The nap icon lights up when the nap timer is counting. When the nap timer reaches 0, the alarm will sound and the nap icon will flash. Press ▲/NAP once to stop the nap alarm, the nap icon will go off.
Note: if the nap time is set up then your alarm is sounding, your nap time will be cancelled automatically.
SETTING UP THE FM ANTENNA
Extend the FM wire antenna fully and vary the direction for best FM reception. Do not strip, alter or attach to other antennas.
LISTENING TO THE FM RADIO
- To turn on the radio, press SLEEP/RADIO once, the display shows "ON" and then the radio frequency "87.5" readings in Mhz.
- Press ▲ / ▼ tune the radio to a desired station. Press and hold / ▲ ▼ scan for the next clear station.
- To adjust the volume, press VOL once, the display shows "L07", press adjust volume from L01 (minimum) to L15 (maximum)
- Press to turn off the radio.
Remark: keep your radio away from fluorescent lamps or other electronic devices, which may cause interference to the radio.
USING THE PRESET MEMORY
This clock radio features a total of 10 preset memories of FM stations. These allow you to preset your favorite stations and access them quickly.
- Turn on the radio and select a radio station you like to memorize.
-
Press and hold the SET until "ME" appears and "01" flashes. Press SET once to store Memory 1.
-
Press ▲ or ▼ select another station you like to memorize. Then press and hold SET until "ME" appears and "01" flashes. Press ▲ or ▼ice, "02" appears. Press SET once to store Memory 02.
-
Repeat Step 2 to 3 to preset memories 3 through 10.
-
To access a preset station at any time, press the SET one at a time while the radio is on.
-
To edit a preset station, select another station and then repeat Step 2 to 4. This overrides the original settings.
TO USE THE SLEEP TIMER
- Press the RADIO/SLEEP twice to enter the sleep mode. The sleep icon "SL" and the sleep time "05" (5 minutes) and will flash on the display.
- Press the RADIO/SLEEP again as needed to adjust the sleep timer from 5, 15, 30, 45, 60, 75 or 90 minutes..
- When the display changes back to show the time, press the RADIO/SLEEP once to show the sleep time remaining.
- The radio will play for the programmed sleep time and then shut off.
- To turn off the radio before the sleep time has elapsed, press once.
TO USE THE WEATHER FORECASTER
There is a built-in humidity sensor in your unit to make the weather forecast. There are four types of weather display in your weather station (please note that the weather graphics may look a little different to those on your unit):
| SUNNY | |
 | SUNNY AND CLOUDY |

AudioSonic
Instruction Manual
 | CLOUDY |
 | RAINY |
Remarks: for better use of your weather station, place your unit at a location with open air circulation e.g. close by an open window. Placing it at an air-conditioned environment will affect its accuracy. After your weather station is powered up, it will take around one hour to get stable. The weather icons on the display give a reference to the next 3-4 hours weather conditions. It may not match with the current weather condition outside.
TROUBLE SHOOTING
If your clock displays irrelevant time or does not function properly, which maybe caused by electro-static discharge or other interference, unplug the DC jack to disconnect the AC power (and remove the backup battery). The clock radio will be reset to default settings and you need to set it again.
VOORAANZICHT
- ALARM 1
- ALARM 2
- TUD
- PM-INDICATOR
- SLAAP
- NAP-TIMER
- GEHEUGEN
- Weersverwachting
BOVENAANZICHT
- OMLAAG
- SET/GEHEUGEN
- ALARM 1-2
- NAP/OMHOOG
- VOLUME
- SNOOZE/DIMMER
- RADIO/SLAAP
ACHTERAANZICHT
- BATTERIJKLEP
- DC AANSLUITPUNT
18.
ZORG VOOR UW PRODUCT
hittebronnen, direct zonlicht of vocht.
natural_image
Simple line drawing of two clouds with raindrops below (no text or symbols)REGENACHTIG
PFLEGE IHRES PRODUKTS
ANVÄNDA DET FÖRINSTÄLLDA MINNET
natural_image
Black portable electronic device with a digital screen displaying a turquoise beach and sky (no visible text or symbols)DV-1821

natural_image
Red portable electronic device with two silver speakers and a digital display (no visible text or symbols)CD-570LE-247802

www.tristar.eu


- Clock radio
- AudioSonic
- FRONT VIEW
- TOP VIEW
- BACK VIEW
- CARE OF YOUR PRODUCT
- INSTALLATION
- BACKUP BATTERY INSTALLATION
- SETTING TIME, 12/24HR TIME AND THE SNOOZE DURATION
- SETTING THE ALARMS
- STOPPING AND RESETTING THE ALARM TO COME ON THE NEXT DAY
- SNOOZE OPERATION (default snooze duration is 5 minutes)
- USING THE HI-LO DIMMER
- USING THE NAP TIMER
- SETTING UP THE FM ANTENNA
- LISTENING TO THE FM RADIO
- USING THE PRESET MEMORY
- TO USE THE SLEEP TIMER
- TO USE THE WEATHER FORECASTER
- TROUBLE SHOOTING
- VOORAANZICHT
- BOVENAANZICHT
- ACHTERAANZICHT
- ZORG VOOR UW PRODUCT
- REGENACHTIG
- PFLEGE IHRES PRODUKTS
- ANVÄNDA DET FÖRINSTÄLLDA MINNET
Brand : AudioSonic
Model : CL1489
Category : Radio