CR612 - Radio SALORA - Free user manual and instructions
Find the device manual for free CR612 SALORA in PDF.

| Product Type | Digital alarm clock radio |
| Brand | Salora |
| Model | CR612 |
| Category | Radio |
| Mains power | 230 V~, 50 Hz |
| Backup batteries | 2 AAA/LR03 batteries (not included) |
| Frequency ranges | AM 522-1620 kHz, FM 87.5-108 MHz |
| Number of presets | 10 AM and 10 FM |
| Alarm functions | Dual alarm with radio or buzzer selection |
| Snooze function | Yes (9 minutes) |
| Sleep timer | Yes (up to 90 minutes) |
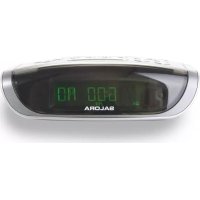
| Display | Digital with time, frequency, alarm indicators |
| FM reception | Deployable wire antenna |
| AM reception | Internal ferrite antenna (rotate the unit) |
| Maintenance | Clean with a soft slightly damp cloth |
| Safety | Do not disassemble, ventilation required, do not expose to moisture |
Frequently Asked Questions - CR612 SALORA
User questions about CR612 SALORA
0 question about this device. Answer the ones you know or ask your own.
Ask a new question about this device
Download the instructions for your Radio in PDF format for free! Find your manual CR612 - SALORA and take your electronic device back in hand. On this page are published all the documents necessary for the use of your device. CR612 by SALORA.
USER MANUAL CR612 SALORA
natural_image
Line drawing of a vintage saloRa air conditioner with control panel and buttons (no text or symbols)AM: 522-1620 kHz
FM: 87.5-108 MHz
GEBRUIKSAANWIJZING
Toestel
- AAN/UIT
- LED digitale klok
- VOLUME ▲ / AL1
- VOLUME ▼ /AL2
- FM ANTENNE
- TUNING ▲ /HR
- TUNING ▼ / MIN
- SLEEP
- INSTELLINGEN (SET)
- SNOOZE
- BAND
- MEM (geheugen)
- Batterijencompartiment
LED Display
flowchart
graph TD
    A["Genetic analysis (p. crm1 to allgeschekc e)"] --> B["AL1 marker Indicano (15)"]
    C["AL1 multi-indikable (19)"] --> D["AL1 multi-indikable (19)"]
natural_image
Line drawing of a vintage home air conditioner unit with control panel and buttons (no text or symbols)AM: 522-1620 kHz
FM: 87.5-108 MHz
MANUEL D'UTILISATION
Appareil
- PUISSANCE
- Ecran montre LED
- VOLUME /AL1
- VOLUME / XL2
- ANTENNE FM
- TUNING / AR
-
TUNING / MIN
-
SLEEP
- REGLAGE
- SNOOZE
- BANDE RADIO
- MEM (mémoire)
- Compartiment à piles

Ecran LED
natural_image
Line drawing of a vintage saloer device with control panel and buttons (no text or symbols)AM: 522-1620 kHz
FM: 87.5-108 MHz
INSTRUCTION MANUAL
Please read these instructions before use and retain for future reference
EN
1 Location of Controls
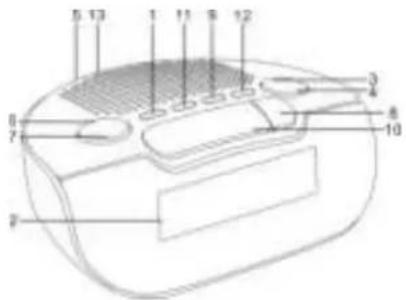
Unit
- POWER
- SLEEP
- LED Digital Clock Display
- SET
- VOLUME /AL1
- SNOOZE
- VOLUME / XL2
- BAND
- FM ANTENNA
- MEM (Memory)
- TUNING / AR
- Battery Door
- TUNING / MIN

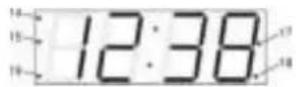
LED Display
- PM indicator (for 12 hour time display version)
- AL2 buzzer indicator
-
AL2 radio indicator
-
AL1 buzzer indicator
-
AL1 radio indicator
2 Back-up Mode (Memory Backup for Time Settings and Preset Stations)
It is advisable to fit back-up batteries (not supplied) to the unit to prevent loss of the clock time (keep operating), alarm time and preset stations settings during a power failure.
1 Slide off the Battery Door (13) from the underside of the unit.
2 Insert 2 x AAA size/LR03 (or equivalent) batteries with correct polarity
+/-
Refit the Battery Door (13).
3 Basic Operation
Standby Mode
After connecting the power supply, the unit is in standby mode and the display will blink 0:00 (clock time) for 24 hour time display version or 12:00 (AM) for 12 hour time display version. Please refer to "Clock and Alarm Time Setting" to set the time. Press POWER (1) button to turn on the unit to power on / radio mode or press it again to go back to the standby mode.
Power On / Radio Mode
Press POWER (1) button to switch on the unit, the current radio frequency appears on the display for 5 seconds, after which the current time indication returns to the display.
4 Clock and Alarm Time Setting
Clock Time Setting
In standby mode, press and hold SET (9) button for 2 seconds until the hour and minute digits blink,
- Press HR (6) button to set the hours.
- Press MIN (7) button to set the minutes.

EN
- Press SET (9) button again to confirm the clock time setting (hour and minute digits will become solid when finished)
Alarm 1 Time Setting
-
In standby mode, press and hold AL1 (3) button for 2 seconds until the hour and minute digits blink.
-
Press HR (6) button to set the hours.
-
Press MIN (7) button to set the minutes.
-
Press AL1 (3) button again to confirm the alarm 1 time setting (current time indication returns to the display when finished).
Alarm 2 Time Setting
-
In standby mode, press and hold AL2 (4) button for 2 seconds until the hour and minute digits blink.
-
Press HR (6) button to set the hours.
-
Press MIN (7) button to set the minutes.
-
Press AL2 (4) button again to confirm the alarm 2 time setting (current time indication returns to the display when finished).
PLEASE NOTE: When operating from batteries only (during back-up mode), the display will be off and clock will only remain accurate for a short period of time. The clock accuracy will decrease due to the voltage drop of the back-up batteries. It is important that the mains supply is restored as soon as possible. If no backup battery is installed or the power failure is prolonged, you will need to set the clock again.
5 Alarm Operation
You can set the radio or buzzer alarms at both preset alarm times in standby mode :
Wake up by Buzzer or Radio
-
To set or adjust the alarm time, follow the steps in "Clock and Alarm Time Setting".
-
To set alarm mode (radio or buzzer) or disable the alarm function for ALARM 1, Press AL1 (3) repeatedly until the desired alarm mode appears on the display. Each time you press AL1 (3), the alarm indication changes as follows:
EN

- To set alarm mode (radio or buzzer) or disable the alarm function for ALARM 2. Press AL2 (4) repeatedly until the desired alarm mode appears on the display. Each time you press AL2 (4), the alarm indication changes as follows:

- When the alarm time is reached, the radio or buzzer will sound unless the alarm function is disabled.
Note:
While volume of buzzer alarm is fixed and cannot be adjusted, the volume, band and frequency of radio alarm are preset as last tuned. When the radio alarm sounds, you can also adjust the listening level by VOLUME △(3) /▽ (4) buttons. To select the station, refer to "Radio Operation".
Review the Alarm Time
In standby mode, press and hold AL1 (3) button for ALARM 1 or AL2 (4) button for ALARM 2 for 2 seconds, then the alarm time setting will blink in the display. Press AL1 (3) (for ALARM 1) or AL2 (4) (for ALARM 2) again to return to the clock time display.
Snooze Function
When the alarm is sounding, press SNOOZE (10) button to stop the alarm temporarily. The "AL1/AL2 buzzer indicator (15)/(17) or AL1/AL2 radio indicator (16)/(18)" will keep blinking while the snooze function is in operation, and the alarm will sound again after 9 minutes. To stop the alarm, press POWER (1) button once. The alarm indicator will become solid and the alarm will function at the same time the next day.
6 Radio Operation
Listen to the Radio
- Press POWER (1) button to turn on the radio. The current radio frequency appears on the display.
The radio is default to FM mode at frequency 87.5 (MHz), and at 522 kHz for AM mode, or the frequency of last station listened will be displayed.

- Press BAND (11) button to select the band.
- Automatic tuning - Press and hold TUNING △ (6) button or TUNING ▽ (7) button for 2 seconds until the frequency displayed move up or down. Release the button. The tuner will scan and stop for the first strong station. Repeat until the desired station is reached.
- Manual fine-tuning - Press TUNING △ (6) button or TUNING ▽ (7) button repeatedly to adjust the frequency by each step.
Volume Control
Press the VOLUME △ (3) or VOLUME ▽ (4) button to adjust the volume level.
Achieve Optimum Reception
FM : Extend the FM wire antenna fully to increase reception sensitivity.
AM : Rotate the unit horizontally to the position in which reception is clearest.
Program Preset Radio Stations
You can store up to 10 preset stations each for FM and AM band.
- Tune in the station you want to preset.
- Press and hold SET (9) button for 2 seconds until program number blink. Press the SET (9) button again to store the station.
- Repeat these steps to store additional stations.

Recall Preset Radio Station
In radio mode, press the MEM (12) button repeatedly to the program number of which the desired station is stored.
7 Sleep Timer
You can use the sleep timer function to turn off the radio automatically after a preset duration (up to 90 minutes).
- Press SLEEP (8) button, and "90" is displayed.

- Press SLEEP (8) button repeatedly to select the duration: 90, 80.... Each time the button is pressed, the duration is reduced by 10 minutes, until "OFF" is displayed.
- The radio will turn off automatically after the selected preset duration has elapsed.
- To check the remaining playing time, press SLEEP (8) button once.
- To cancel the sleep function and turn off the radio, press POWER (1) button.
8 Care and Maintenance
Clean the cabinet with a soft cloth moistened with water or mild detergent. Do not use solvents such as alcohol, benzene or thinner, as they may damage the cabinet finish. Make sure to disconnect the mains lead from the supply before cleaning.
9 Caution
- Do not attempt to disassemble or alter any part of the equipment that is not expressly described in this guide. Disassembly or alteration may result in high-voltage electrical shock. Internal inspections, alterations and repairs should be conducted by qualified service personnel only.
- Ensure minimum distances of 5cm around the apparatus for sufficient ventilation. Do not place the product in closed bookcases or racks without proper ventilation. Ensure that the ventilation is not impeded by covering the ventilation openings with items, such as newspapers, table-cloths, curtains, etc.
- No naked flame sources, such as lighted candles, should be placed on the apparatus.
- It shall not be exposed to dripping or splashing and that no objects filled with liquids, such as vases, shall be placed on the apparatus.
EN
- Use of power sources, or batteries not expressly recommended for this equipment may lead to overheating, malfunction of the equipment, fire, electrical shock or other hazards. Use only the recommended power source.
- Do not use or store the equipment in humid or dusty area. Attention should be drawn to the use of apparatus in tropical and/or moderate climates.
- Danger of explosion if battery is incorrectly replaced. Replace only with the same or equivalent type. Batteries shall not be exposed to excessive heat such as sunshine, fire or the like. Never throw batteries in fire! Attention should be drawn to the environmental aspects of battery disposal.
- Where the mains plug or an appliance coupler is used as the disconnect device, the disconnect device shall remain readily operable.
- Marking plate is located at bottom enclosure of the apparatus.
10 Power Supply and Frequency Range
Power Source AC230V\~50 Hz
Back-up Batteries 2 x 1.5V "AAA" size / LR03 batteries or
equivalent (not supplied)
Frequency Range AM 522 - 1620 kHz
FM 87.5 – 108 MHz
Due to continuous product development, design and specifications are subject to change without notice.